|
Why make an ordinary
table when
you can make this elegant
one instead? The difference
is in the details.
That’s the genius behind
the furniture of Charles
and Henry Greene, California
architects and furniture
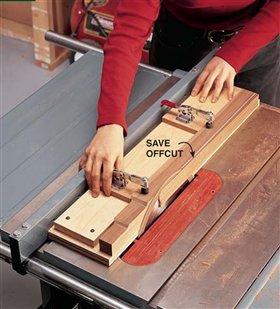
designers active during
the first quarter of the
20th century. Through
thoughtfully designed
details, they combined the
flowing, organic curves
found in traditional Chinese
furniture with the
hard-edged lines and pronounced
joints of the popular
Arts and Crafts style.
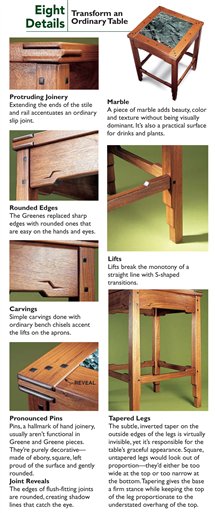
8 Details: Transform an ordinary table

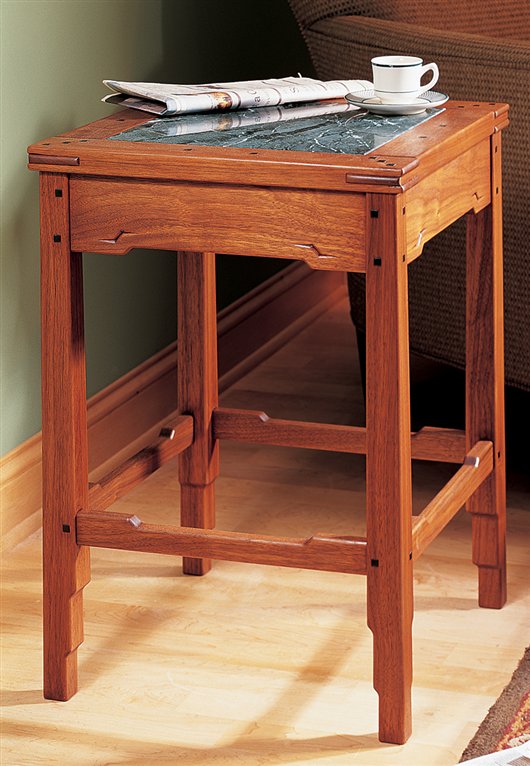
Although this table isn’t a replica of a specific Greene
and Greene piece, it incorporates many of the details
they used—accentuated joinery, decorative pins, lifts
and rounded edges. It’s made from walnut, one of several
woods they favored. You’ll need at least 10 lineal feet of 2-in.
square stock for the legs. It’s easiest to use 5/4
stock for all the other pieces—10 bd. ft.will be plenty.As on original Greene and Greene pieces,
the pins are ebony. (see Sources, below).
The marble inset in the top is a 12-in.-square floor
tile. Marble tiles are available at flooring stores. Have the marble in hand before
you cut any of your lumber. Tiles can vary as much as
1/4-in. from the specified dimensions. You’ll have to
change the lengths of the stiles and rails for the top and
the aprons and stretchers for the bottom if your tile is
not exactly 12 in. by 12 in.
Make the top
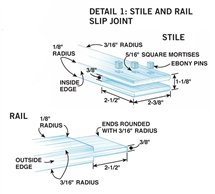
It’s easy to make the protruding ends that accentuate the
top’s joinery. Just make the tenons longer and the slots
deeper than the widths of the stiles and rails (see Photos
1 and 2, and Fig. B, Detail 1). Assemble the top
pieces and mark the inside edges (they receive a smaller
roundover). Then test the fit of the marble. The plan
measurements allow 1/16-in. clearance for it. If you
want a tighter fit, remove a bit more from the tenon
shoulders and make the slots a bit deeper.
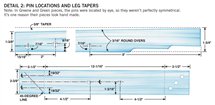
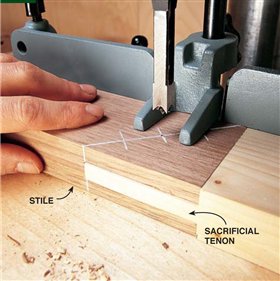
Mortise holes for the ebony pins in the top stiles
and rails.You’ll need only two fence settings to cut all of
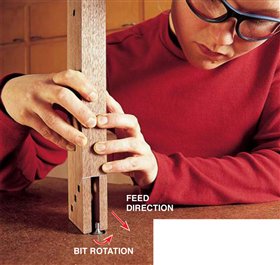
these holes (Photo 3 and Fig.B,Detail 2).Next, round
over the ends of the rail tenons and the stile legs with a
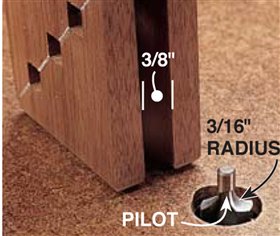
3/16-in. radius bit (Photo 4).Use the same bit to round
the outside edges of the stiles and rails, top and bottom
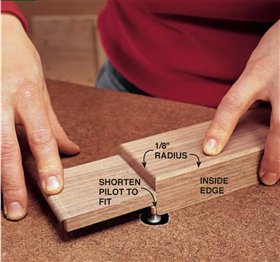
(Fig.B, Detail 1). Create joint reveals between the stiles
and rails by routing the rail shoulders and all top and
bottom inside edges with a shortened 1/8-in. radius
round-over bit (Photo 5).Then glue the top together.
Make ebony pin blanks (Photo 6). Seat them with a
hammer and a bit of glue, saw them off (Photo 7) and
round their tops (Photo 8).
Make the legs
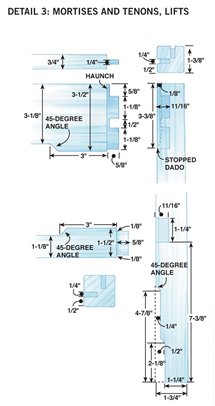
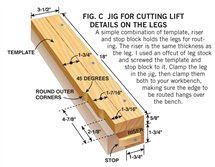
Rout lifts at the bottom of adjacent inner sides of the leg
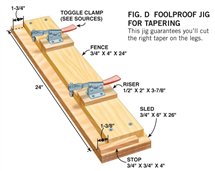
blanks (Photo 9 and Fig.B,Detail 3).Then taper the two
outer sides (Photo 10 and Fig.B, Detail 2).
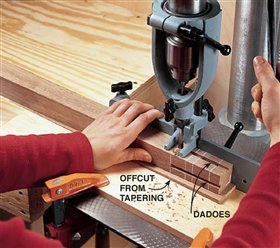
Cut mortises for the haunched apron tenons on the
two inner sides of each leg (the sides with lifts). First,
using the tablesaw, cut stopped dadoes. They provide
room for the haunch of the tenon and guide the bit
when cutting the mortises (Photo 11).
These dadoes are parallel to the tapered side of
the leg so the apron has a consistent reveal. The
mortises for the stretchers are also parallel to the outside
tapers, and have the same reveal as the aprons.
Mortise holes for the ebony pins (Fig.B, Detail 2).
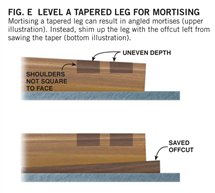
This time, position the legs with their straight inner
sides against the fence.Level the faces using a tapered
offcut, and protect the mortise cheeks with sacrificial
plugs before cutting.Round the edges of the legs with
the 3/16-in. radius bit. You’ll have to round the inside
edges,where the lifts meet, by hand.
Make the aprons
and stretchers
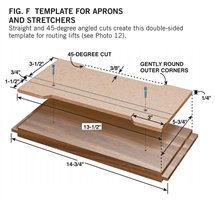
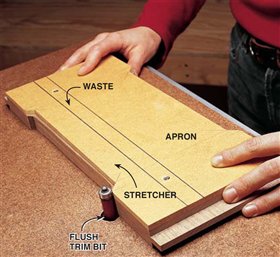
Prepare four blanks with tenons on both ends.Rout
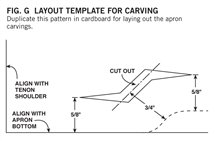
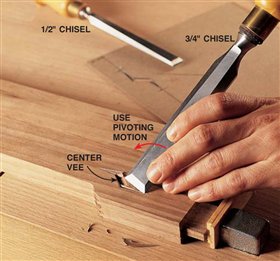
the lifts using a template (Photo 12).Add the carvings
to the aprons (Photo 13 and Fig. G).Round the
bottom edges of the aprons and the top and bottom
edges of the stretchers.
Assembly
Glue together two sides, each with two legs, an
apron and a stretcher and install the ebony pins.
Complete the glue-up, adding the remaining two
aprons and stretchers. Then install the rest of the
pins.Glue blocks on the insides of the aprons for the
screws that hold the top.
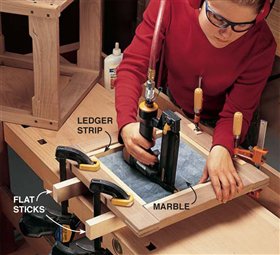
Install the ledger strips for the marble, working
from the underside of the top (Photo 14). Set the
marble in place after the finish has cured (Photo 15).
I used a glaze of burnt sienna and burnt umber
over a seal coat of shellac, topcoated with varnish.
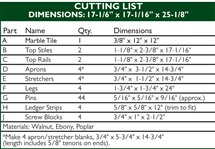
Cutting List

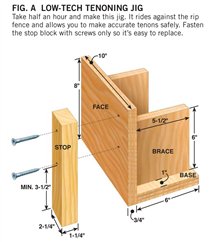
Fig. A: Low-Tech Tenoning Jig

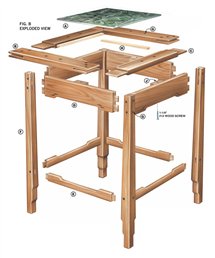
Fig. B: Exploded View

Detail 1: Stile and Rail Slip Joint

Detail 2: Pin Locations and Leg Tapers

Detail 3: Mortises and Tenons, Lifts

Fig. C: Jig for Cutting Lift Details On the Legs

Fig. D: Foolproof Jig for Tapering

Fig. E: Level a Tapered Leg for Mortising

Fig. F: Template for Aprons and Stretchers

Fig. G: Layout Template for Carving

Sources
(Note: Product availability and costs are subject to change since original publication date.)
All RIghteous Woods, righteouswoods.net, 877-843-
9265, Ebony
4/4 Madagascar ebony. You’ll need less than 1 bd. ft.
Seven Corners Hardware, 7corners.com, 800-328-0457,
3/16" radius HSS router bit w/
pilot, Bosch.
Eagle America, eagle-america.com, 800-872-2511, 2-1/2"-long straight bit,
1/2" shank, #102-0975;
1/8-in. radius bit with pilot, 1/4"
shank, #159-0202.
Woodcraft, woodcraft.com, 800-225-1153, 5/8" O.D. brass template guide
bushing, #147934; Brass lock nut for bushing, #1
MCLS, mlcswoodworking.com, 800-533-9298, Toggle clamps, #9058.
This story originally appeared in American Woodworker August 2000, issue #81.

|
|
Click any image to view a larger version.

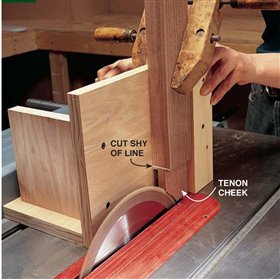
1. Saw tenon cheeks on the rails using a shop-made
tenoning jig (Fig. A). Remove the waste with bandsaw cuts first.
Then you can raise the tablesaw blade and clean the tenon
cheek in one pass. Cut the slot mortises in the stiles with the
same jig. CAUTION: This operation is difficult to do with the guard in
place. Use extra care.

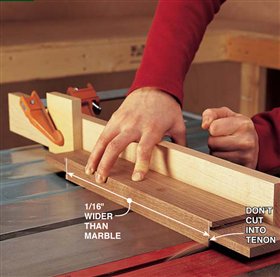
2. Square the tenon shoulders using a miter gauge with a
stop block.The critical dimension on the rails is end-to-end
between the shoulders. On the stiles it’s the distance between
the slots.These dimensions must be slightly longer than the
marble so it fits in place after the top is assembled. CAUTION:This
operation is difficult to do with the guard in place. Use extra care.

3. Cut square holes for the pins with a 5/16-in. mortising
chisel and bit. Space the pins evenly on a diagonal that starts at
the end of the slot mortise. Mortise through the upper leg of
the stile. Stop in the sacrificial tenon. It keeps the chisel and bit
from blowing out the inside surface of the joint.

4. Hold the styles and rails upright to round the
ends.To reduce the risk of
blowout, always cut into the
rotation of the bit. Clamp a
piece of hardboard with a 1-in.
hole on top of your router
table to support these short
pieces while routing.

4 (continued). To fit inside the slot between
the legs of the stile you’ll
need a bit with a 1/4-in. pilot
(see Sources, below).

5. Round the rail shoulders with a 1/8-in. radius bit.
Shorten the bit slightly, by grinding the tip of the pilot, so it fits
under the tenon.The inside edges of the stiles and rails also
receive an 1/8-in. rounding.
When the top is assembled, these rounded edges create
reveals at the joint between the stiles and rails and between
the wood and the marble.

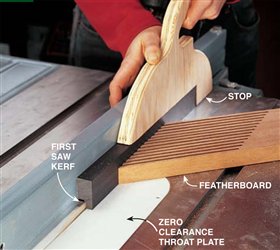
6. Saw square stock for the ebony pins from a single
saw set-up. First, cut a kerf in the face side of the board.Then,
with the board on its edge and the kerfed face against the
fence, make a second pass. A featherboard and push stick are
mandatory when cutting small parts.This shop-made push stick
includes a stop that prevents the newly cut square blank from
kicking back. CAUTION:This operation is difficult to do with the
guard in place. Use extra care.

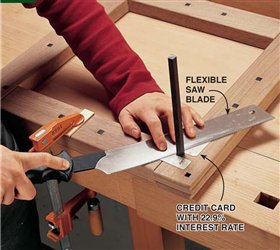
7. Saw the pins proud of the surface, after seating them
in the glued-up top. Use a notched credit card as a spacer so all
the pins are a consistent height.

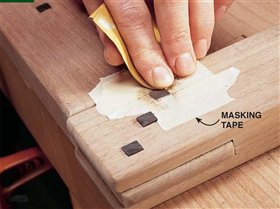
8. Sand the pins by hand, leaving them rounded and slightly
proud of the surface. Bear down with your fingertip on each
side of the pin to cut down the edges and create the rounded
shape.Tape protects the walnut from scratches.

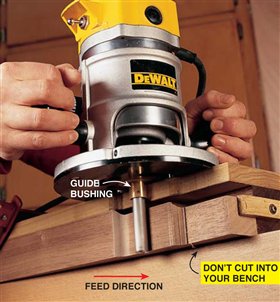
9. Rout the leg lifts using a jig (Fig. C) with a template
and a router (outfitted with a 5/8-in.O.D. guide bushing and
a 2-1/2-in. long, 1/2-in. dia. straight bit).To make routing
easier, saw away most of the waste first.When you use this
guide bushing and bit, the finished edge of the leg will be
1/16-in. away from the edge of the template, so be careful
not to saw away too much.

10. Cut leg tapers with this shop-made jig (Fig. D). It holds
the legs securely and keeps your fingers away from the
blade. Save the tapered offcut. It’ll be used for mortising.
CAUTION:This operation is difficult to do with the guard in
place. Use extra care.

11. Cut mortises in the straight, untapered sides of the legs,
using stopped dadoes to set and guide the bit. Make sure the
leg’s two tapered sides are against the base and the fence.You’ll
have to level the leg so the mortise is perpendicular (Fig. E).
Use the scrap left from sawing the tapers for leveling, making
sure it completely supports the leg. Cut the mortises for the
stretchers the same way.

12. Rout two lifts at once using a template (Fig. F) and a
blank wide enough to contain both an apron and a stretcher.
Saw away most of the wood to be removed on the bandsaw
before routing. After routing, saw the blank into a separate
apron and stretcher.

13. Carve the apron detail by making vee-cuts with two
chisels. Cut the center vee first, about 1/4-in. deep, with a
1/2-in. chisel.Then use a 3/4-in. chisel for the tail vees. Use a
pivoting motion from the outer end of each vee so they start
at nothing and deepen towards the center. After the vees are
carved, soften their sharp shoulders with the chisel.Then
smooth everything gently with fine sandpaper.

14. Fasten the ledger strips that hold the marble. It’s easy if
you flip the top upside-down. For the marble and top to be
flush, clamp the top to two flat sticks and lay the marble in
place on top of them. Put a bead of glue on one edge of the
ledger strips and nail away.

15. Set the marble top in place with a bead of silicone caulk
on the ledger strips.
|


