We may receive a commission when you use our affiliate links. However, this does not impact our recommendations.

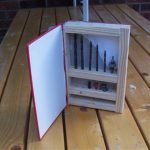
Using a tried-and-true design, gravity feeders can hold a large amount of chow. The wide opening at the bottom accommodates a seed mix containing everything from large sunflower seeds down to tiny millet seed. With its clear sides, it’s easy to see when it’s time to refill. (Of course, all of your birds suddenly disappearing is another good clue the feeder’s empty.) The version here features a hinged roof, making refilling a quick task. We’ll use 3/4″ cedar for this project, with 1/8″ acrylic for the windows.
 Begin by laying out the end pattern on your workpiece, as in Fig. 1. Note that the end pattern has straight sides, with a curved line inside the outer edges. (We’ll cut that curve out later, but the straight edges are necessary for first cutting slots to accommodate the windows.)
 I used the band saw to cut the end patterns, but you can also use a jigsaw or handsaw. Choose the orientation you want for the end pieces and use a pencil to mark the inside faces.
 Cut the slots for the windows on the table saw. Set the fence at 1″, and raise the blade to cut a 1/4″-deep slot in a single pass, as in Fig. 3.
 Once the slots are cut, there’s no need for that straight edge any longer, so layout and cut the waste from the curved edges. A spindle sander works great to smooth the inside curve. (Fig. 4)
 Put a bit of glue on each end of the bottom and nail the ends in place. (Fig. 5) Attach the window spacers at the inside corners with glue and a pair of brads. This spacer will set the height of the side windows, creating a gap at the bottom of each to allow seeds to flow into the feeding tray. These spacers can be made of any weather-resistant wood, and I happened to have some 1/2″ × 1/2″ oak scrap, so I used that.
 With the spacers in place, attach the tray sides with glue and nails, as in Fig. 6.
 Cut the windows to size and test-fit them in the slots as in Fig. 7. Note that I’ve left the protective film in place on the acrylic. When working with acrylic or other plastic sheets, leave this film in place as long as possible to prevent scratching the plastic while you work.
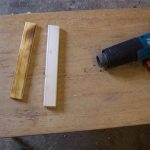
 The roof is made in identical halves, joined in the middle with a continuous hinge (sometimes called a piano hinge). I’ve found that it’s easiest to make and hinge the roof before attaching it to the main part of the feeder. Cut the roof halves to size, and cut a 60° bevel along one edge of each half.
The hinge you get will undoubtedly be too long, so you’ll need to cut it to length. You can use a hacksaw for this, or a rotary tool with a cutting disk if you have one. It’s not necessary, by the way, for the hinge to run the entire length of the roof. In fact, depending on the hinge you get, it may be difficult to cut it to the exact roof length since the hinges are already drilled — the exact roof length may place screw holes too close to the ends, inviting split-out when driving the screws. The hinge I used here is cut about 1/4″ short of the roof length on each end to center the holes in the hinge.
Center the hinge on one beveled edge to mark for the screw holes. I used an awl to create some small pilot holes as shown in Fig. 8., but you can also drill them. Cedar is very soft and easily takes screws, but pilot holes eliminate the chance of splitting the wood. Butt the other roof half up against the hinge of the first half, and attach it the same way.
 Lay the completed roof on top of the main portion of the feeder to check for fit, and mark one side in pencil, as shown in Fig. 9, to help you accurately place the nails. (I’ve made my pencil lines very dark for photo purposes, but make your marks as light as possible for easier removal.) Put a bit of glue on the top edges of one side of the feeder, and nail the roof in place on that side. Be sure you have the window in place on that side before nailing. Give the feeder a good sanding to remove any pencil marks and to ease any sharp edges.
Simply flip open one side of the roof to fill. The best seed to use for a gravity feeder of this type is a mixed seed, which will attract the greatest variety of birds. Several mixes are available that are designed to attract specific species, so the choice is yours.
Click here to download the PDF for this article.
Here are some supplies and tools we find essential in our everyday work around the shop. We may receive a commission from sales referred by our links; however, we have carefully selected these products for their usefulness and quality.