We may receive a commission when you use our affiliate links. However, this does not impact our recommendations.
 This classic Stickley ottoman oozes Craftsman style, but don’t let its simple form fool you—it packs in some great woodworking.
 This classic Stickley ottoman oozes Craftsman style, but don’t let its simple form fool you—it packs in some great woodworking.
Project #2221 • Skill Level: Intermediate • Time: 4 Days • Cost: $150
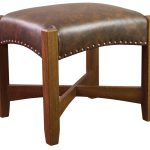
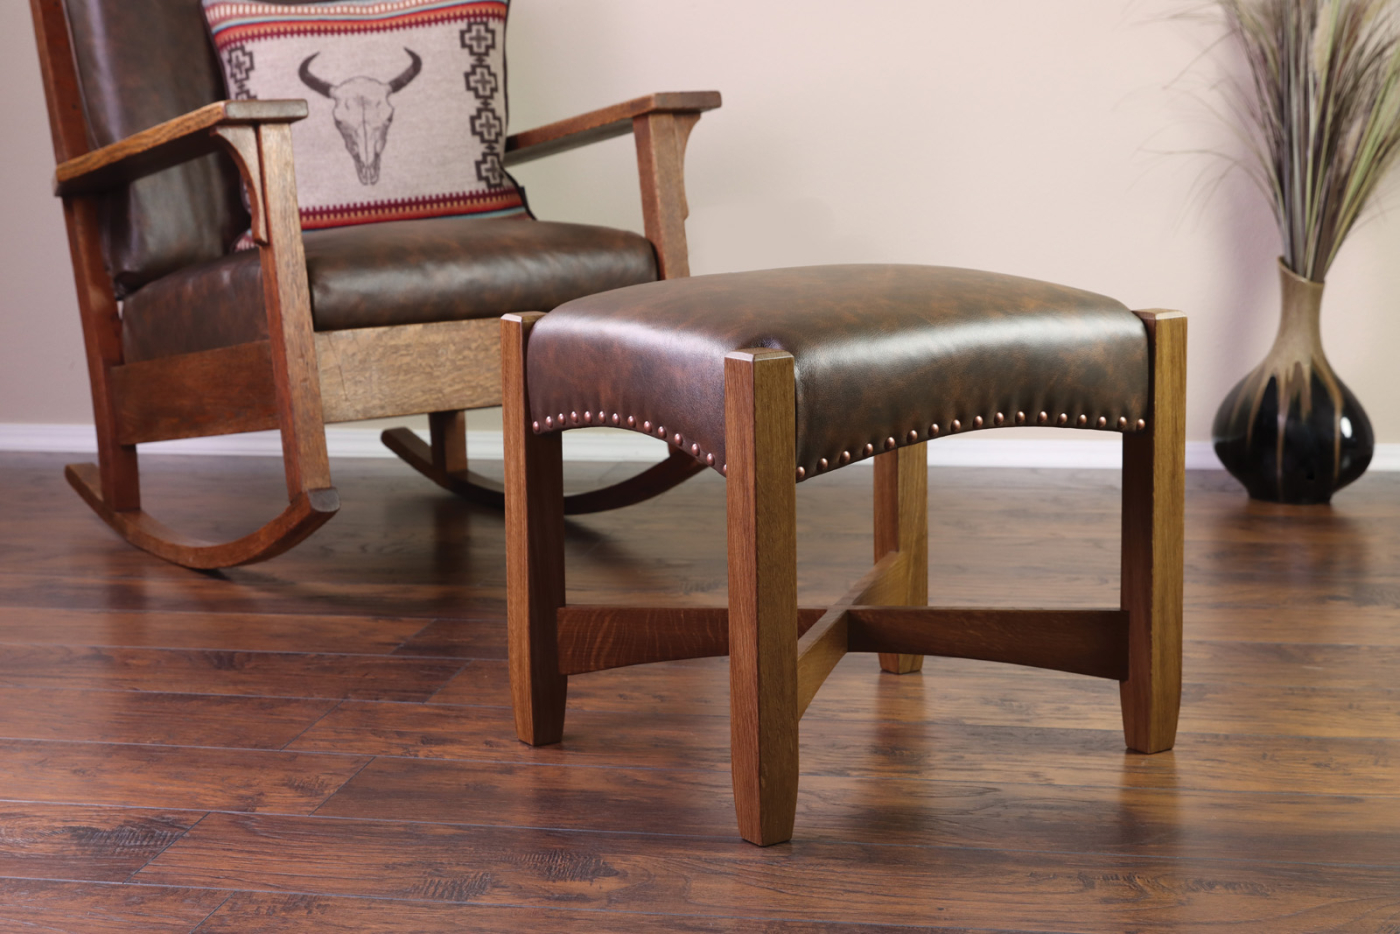
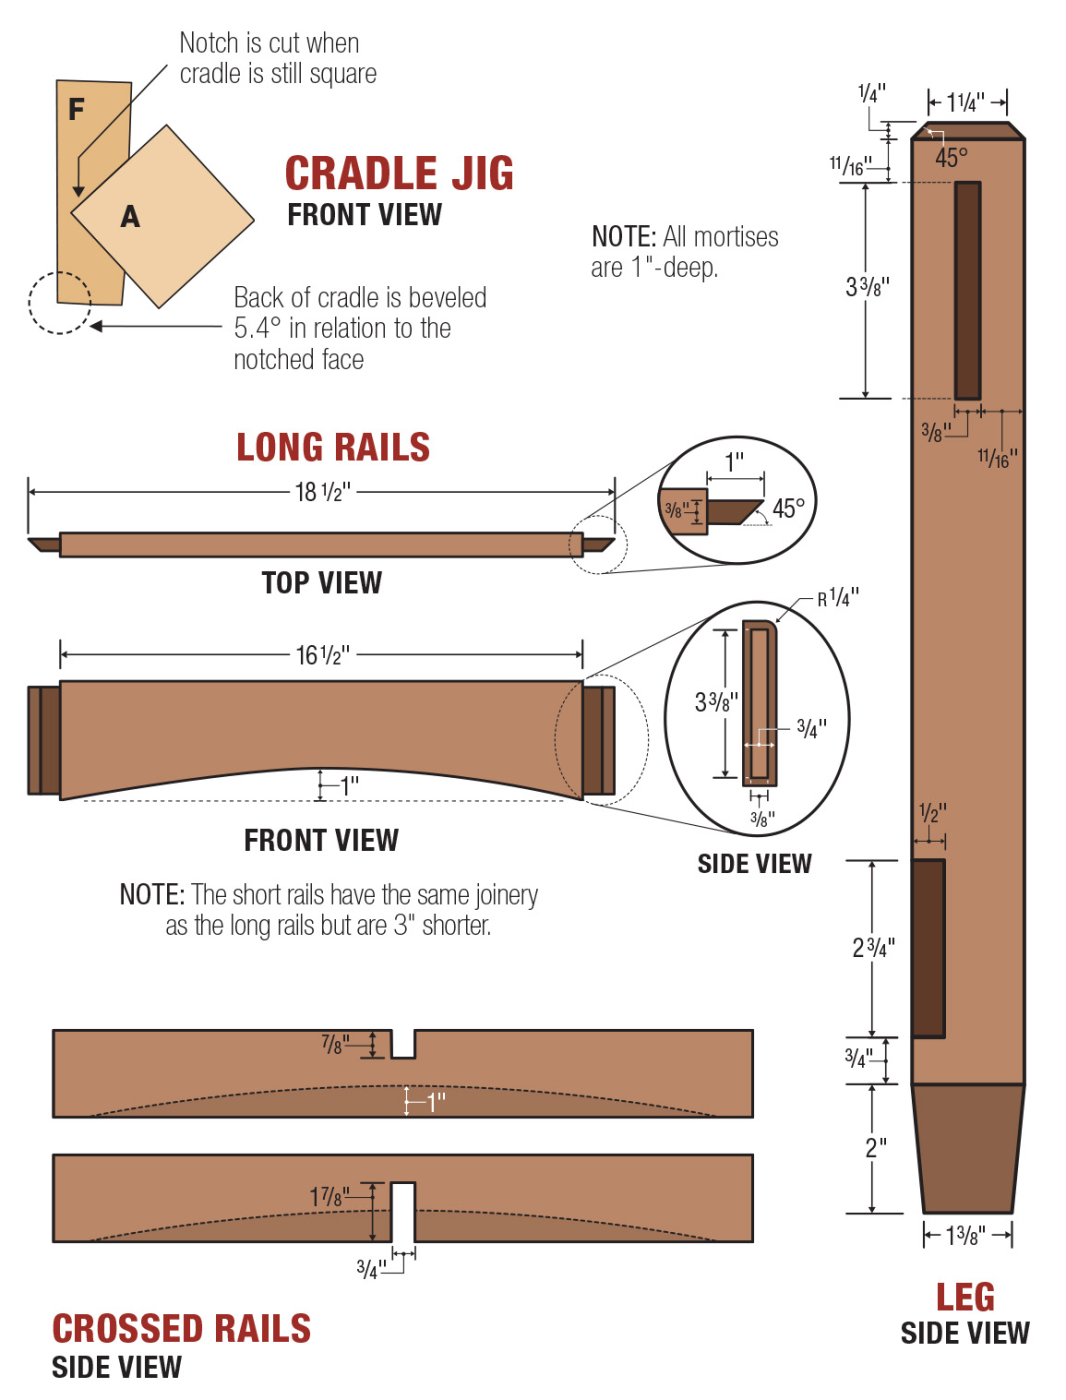
Named for a neighborhood in Syracuse, New York, this Gustav Stickley footstool design was an instant favorite. Originally sold with a massive Eastwood Chair, this ottoman pairs equally well with any larger rocker or Morris chair. This large ottoman was a 17“ x 20“ footprint, stood 17“ tall, and is notably larger than other antique or reproduction ottomans in my collection. It’s modeled after the original version, which appeared in the 1901 Stickley catalog, and featured tapered legs. By contrast, a modern Stickley piece is a full 24“ wide and devoid of tapers.
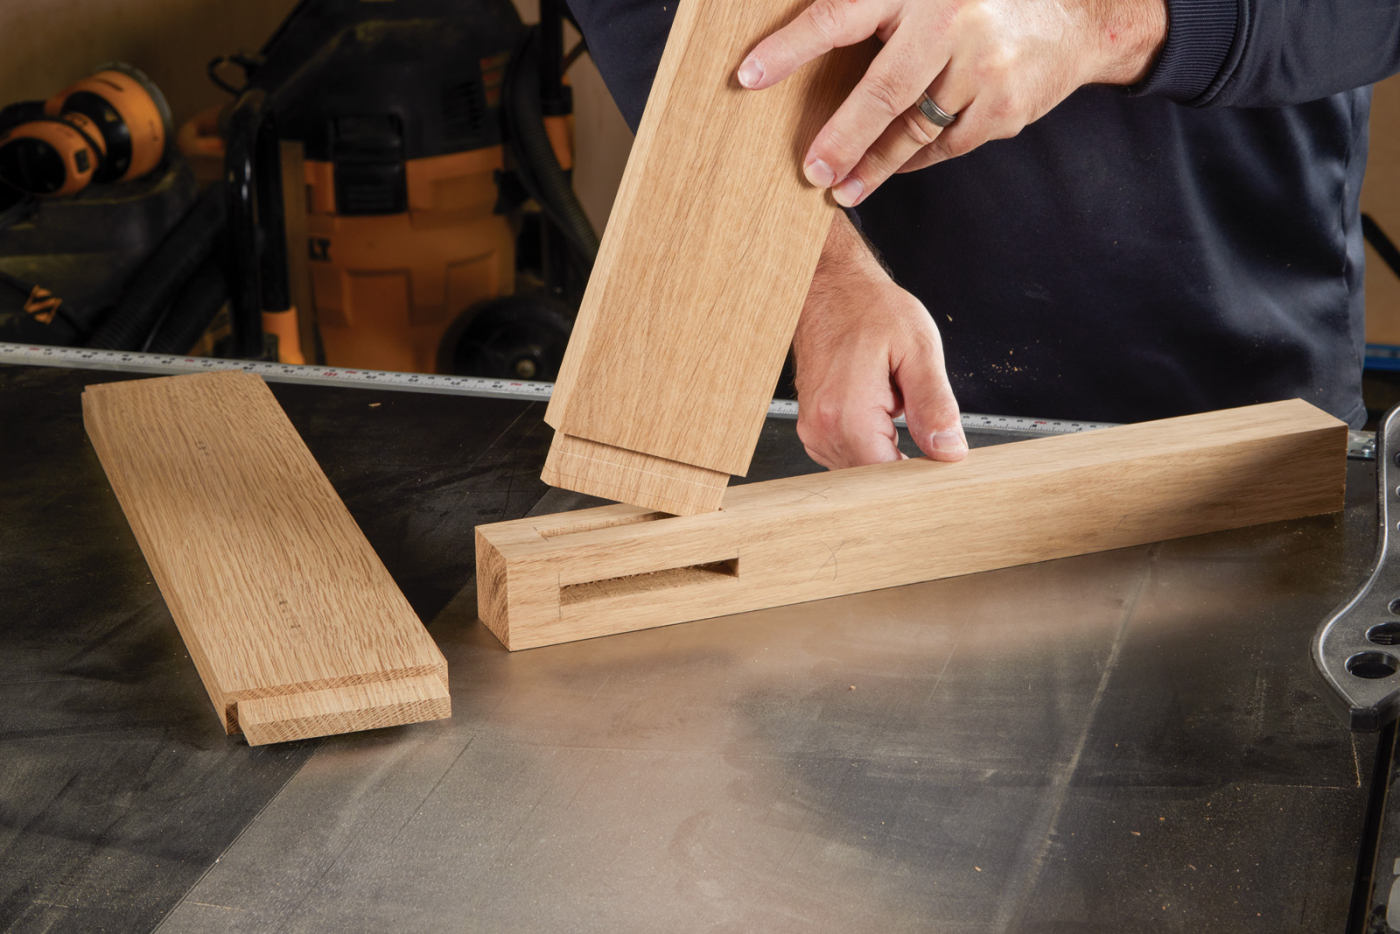
There are several challenges to overcome with this project, however, the angled joinery makes it a worthy project to tackle, even for a seasoned woodworker. The main conundrum stems from the odd angle formed by the intersecting lower rails. To join the lower rails to the legs, you have two main options really. I suppose they could be notched to fit around the inside corner of the leg, like a bird-mouth rafter notch, but that seemed like a difficult task. Instead, I chose to create a flat registration surface on each leg with a dado blade. By accounting for the odd angle joinery with the dado notches and a clever table saw cradle, we’ll pave the way for simple square ends on the lower rails. With this method of angled joinery, the cuts are reliable and repeatable, and any guesswork has been removed from the equation.
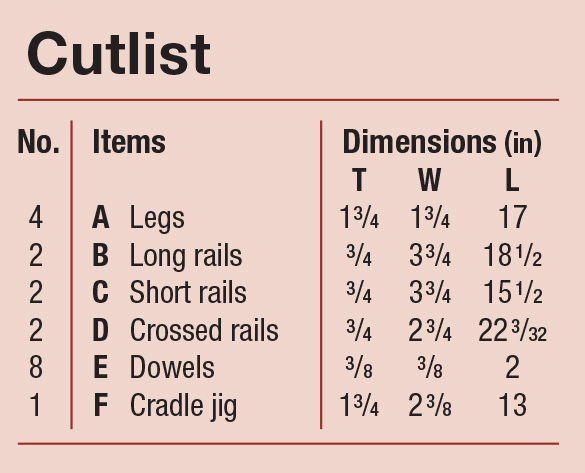
Cutlist and Exploded View
 A Stable Base
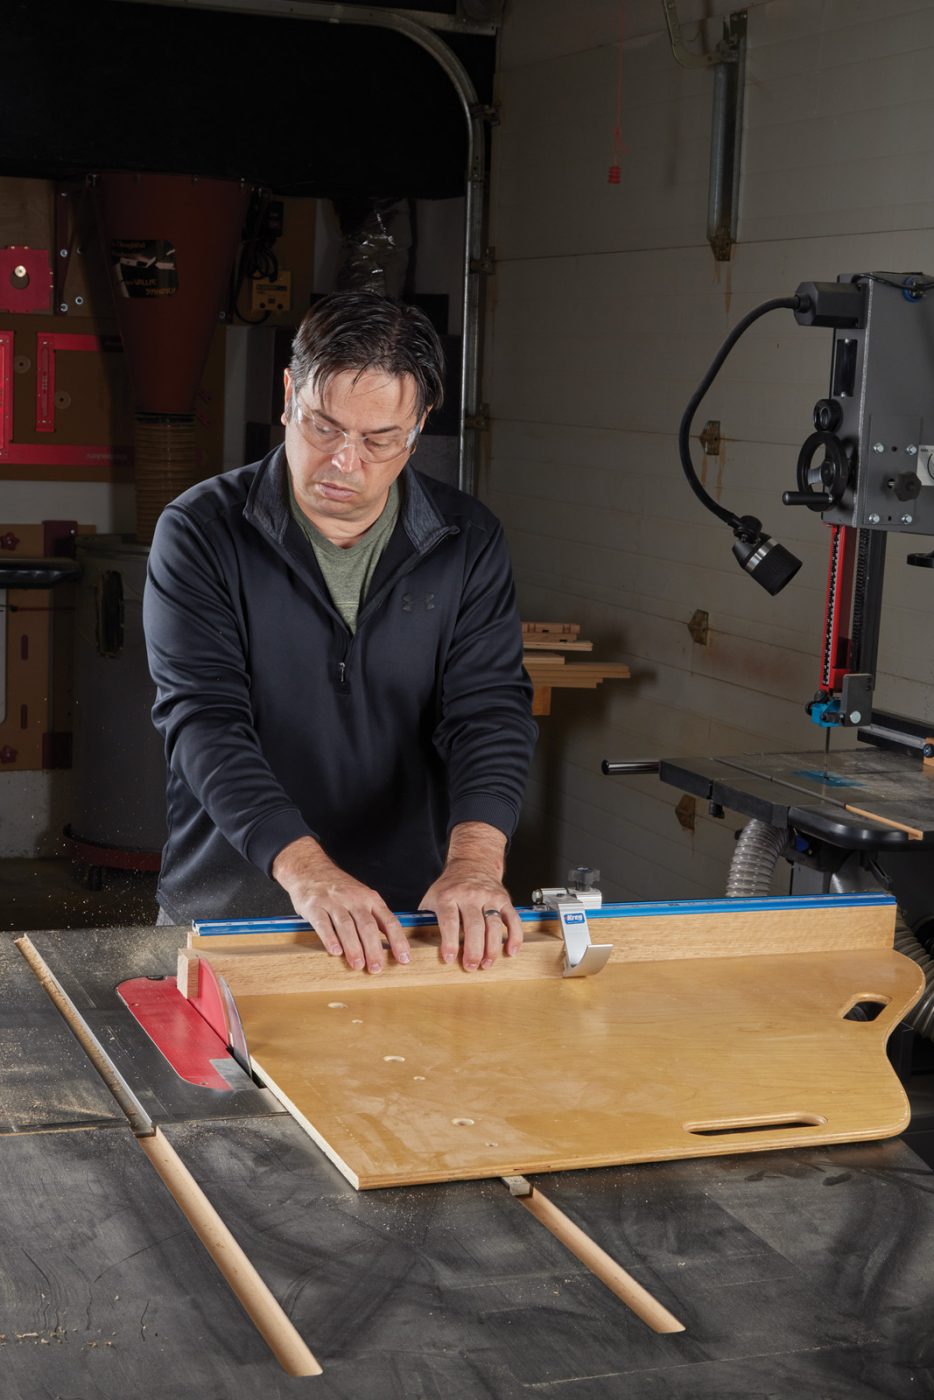
1 Trim the legs to length. Any project will benefit from identical leg parts, but due to the angled joinery with this footstool, it’s critical. So, start your project right with four square leg blanks, accurately trimmed to length.
Start with the thick legs as you embark on this interesting project. Mill a piece of 8/4 stock to finished dimensions of 13/4“ and rip four legs from the board. Rift-sawn stock is ideal for legs and posts because the grain pattern will be uniform on all faces. Leave the legs extra-wide initially to give yourself the opportunity to re-joint an edge as needed. Ultimately, you need four straight leg blanks sized 13/4“ square x 17“ long.

2 Cut two mortises in each leg for the upper rail. If you choose to use a hollow chisel mortiser, set the depth of the cut a little shallower than the required 1″ for now.
Square Joinery First
Now set out to make the mortise and tenon joints that connect the upper rails to the legs. These are simple blind mortises and could be cut with a variety of techniques. Choose your preferred method to mill 3/8“ x 33/8“ mortises, centered on the thickness of the legs. For this project, I used a hollow chisel mortiser to form the joints. When using a mortiser to create intersecting tenons, set the drill bit a little short of the 1“ final mortise depth. That way, you can clean up the inside corner with a hand chisel and preserve the crisp mortise wall.
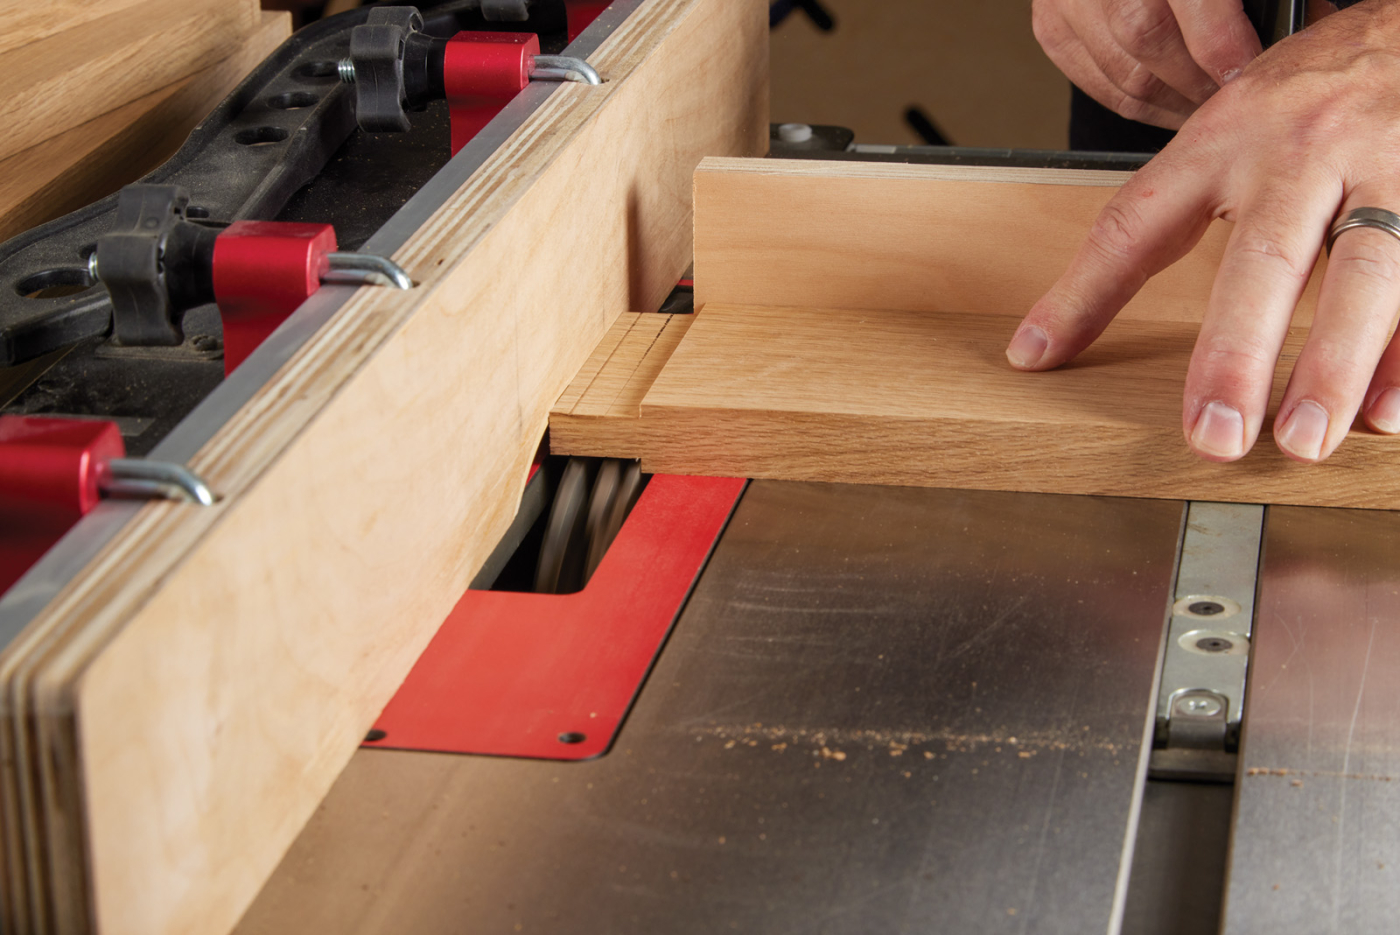
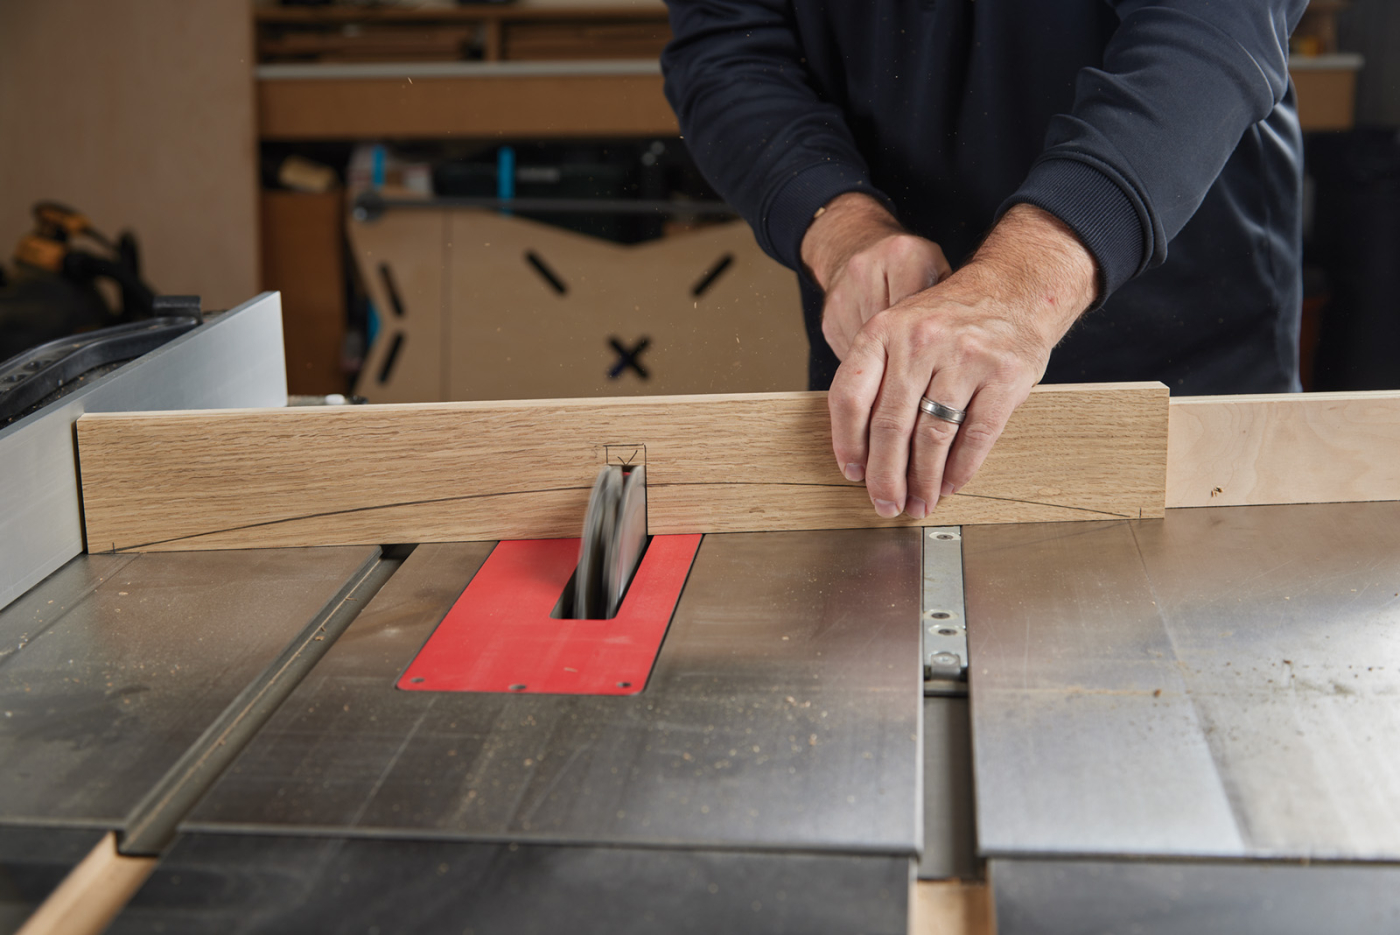
3 With a dado blade loaded in the saw, and an auxiliary fence attached to the rip fence, use the miter gauge to guide your workpiece and cut the tenons to fit the mortises. Dado blade height is approximately 3/16″.
4 With the blade height unchanged, flip the workpiece on edge. Cut the shoulders of the upper rails. All tenons are identical.
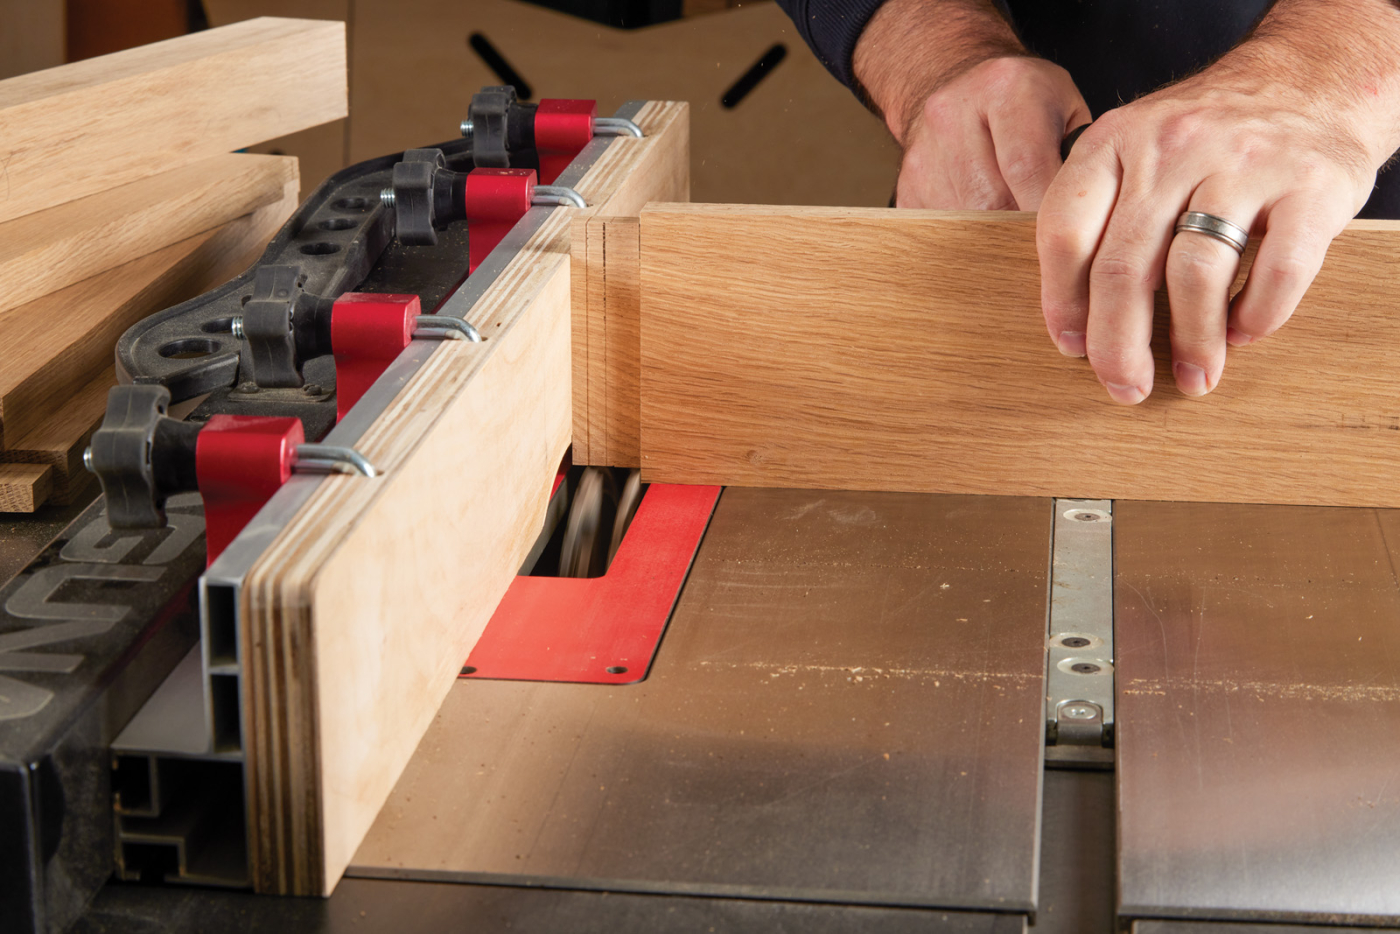
5 Once the tenon noses into the mortise, head over to the bench for any final adjustments with a chisel and a shoulder plane.
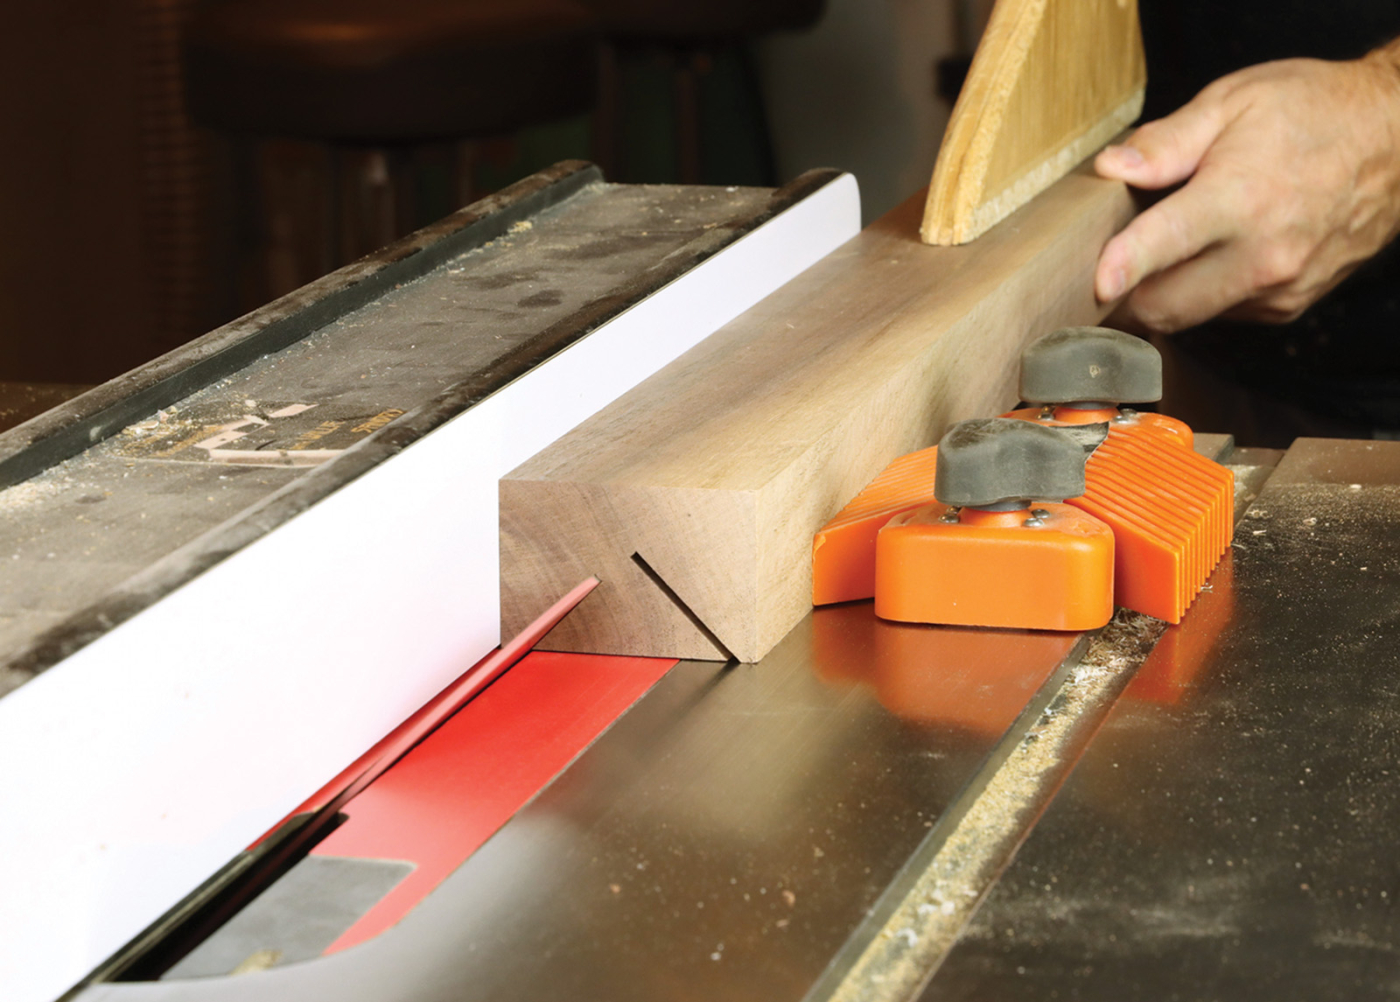
The tenons are made with a full 3/4“ dado stack and miter gauge outfitted with a sacrificial fence. Set the blade height to slightly less than 3/16“ and raise the blade incrementally until a corner of the tenon fits snugly into the mortises you made earlier. Luckily the blade height for cutting the tenon shoulders is 3/16“ as well, so turn the rails on the ends and complete the tenons with the same setup. The tenons will need to be mitered to fit into the legs, but not a sharp edge. Remove just enough material for the framework of the footstool to come together. I made this light trimming cut with the rails on edge at the miter saw station. If you have a flip-stop on your miter saw, register it against the shoulder of the tenon, rather than the end of the rail for consistent results.
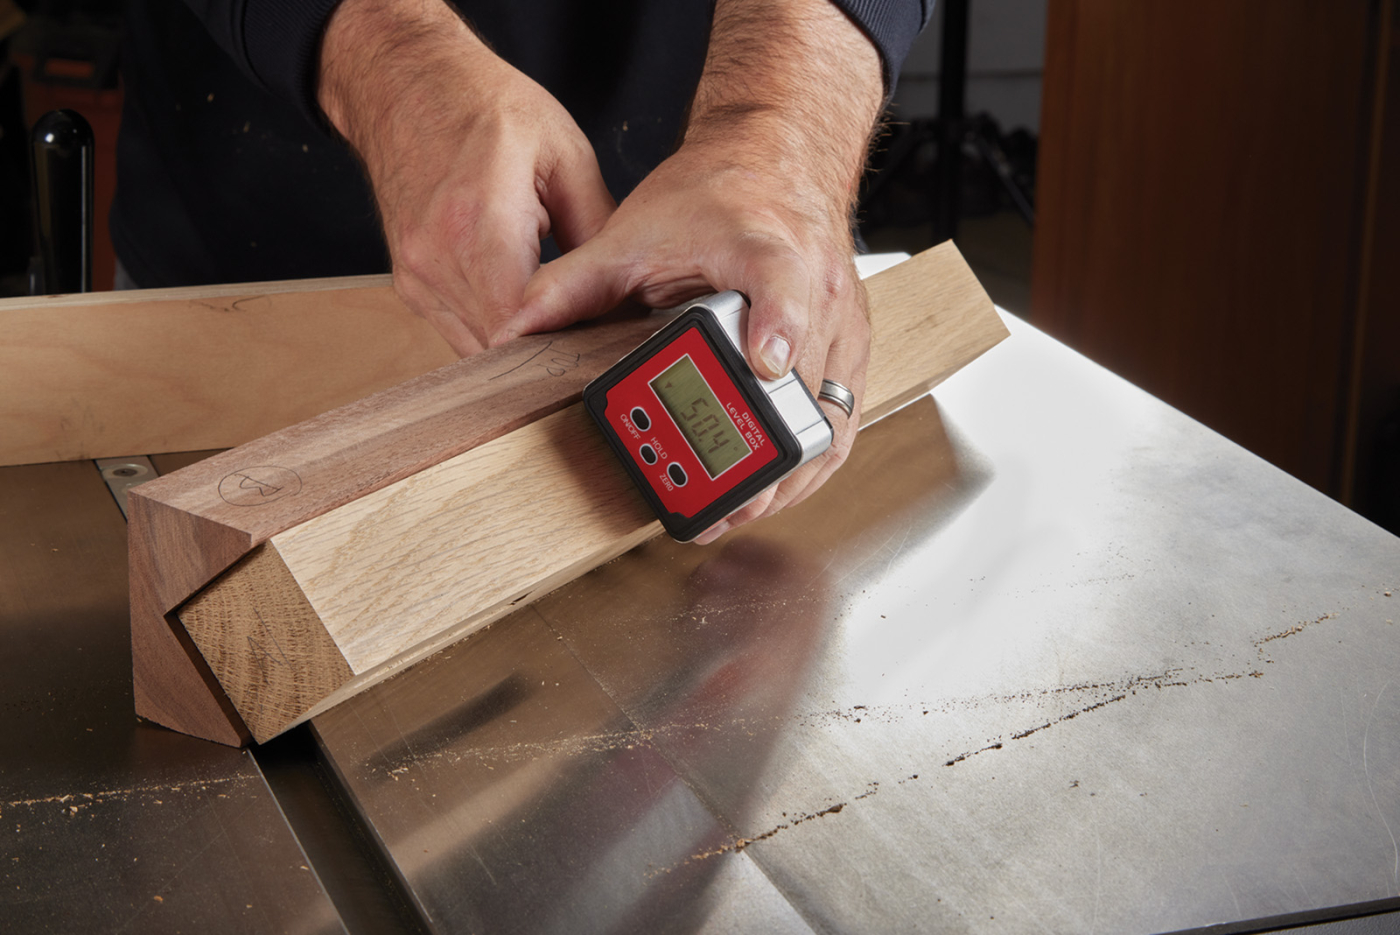
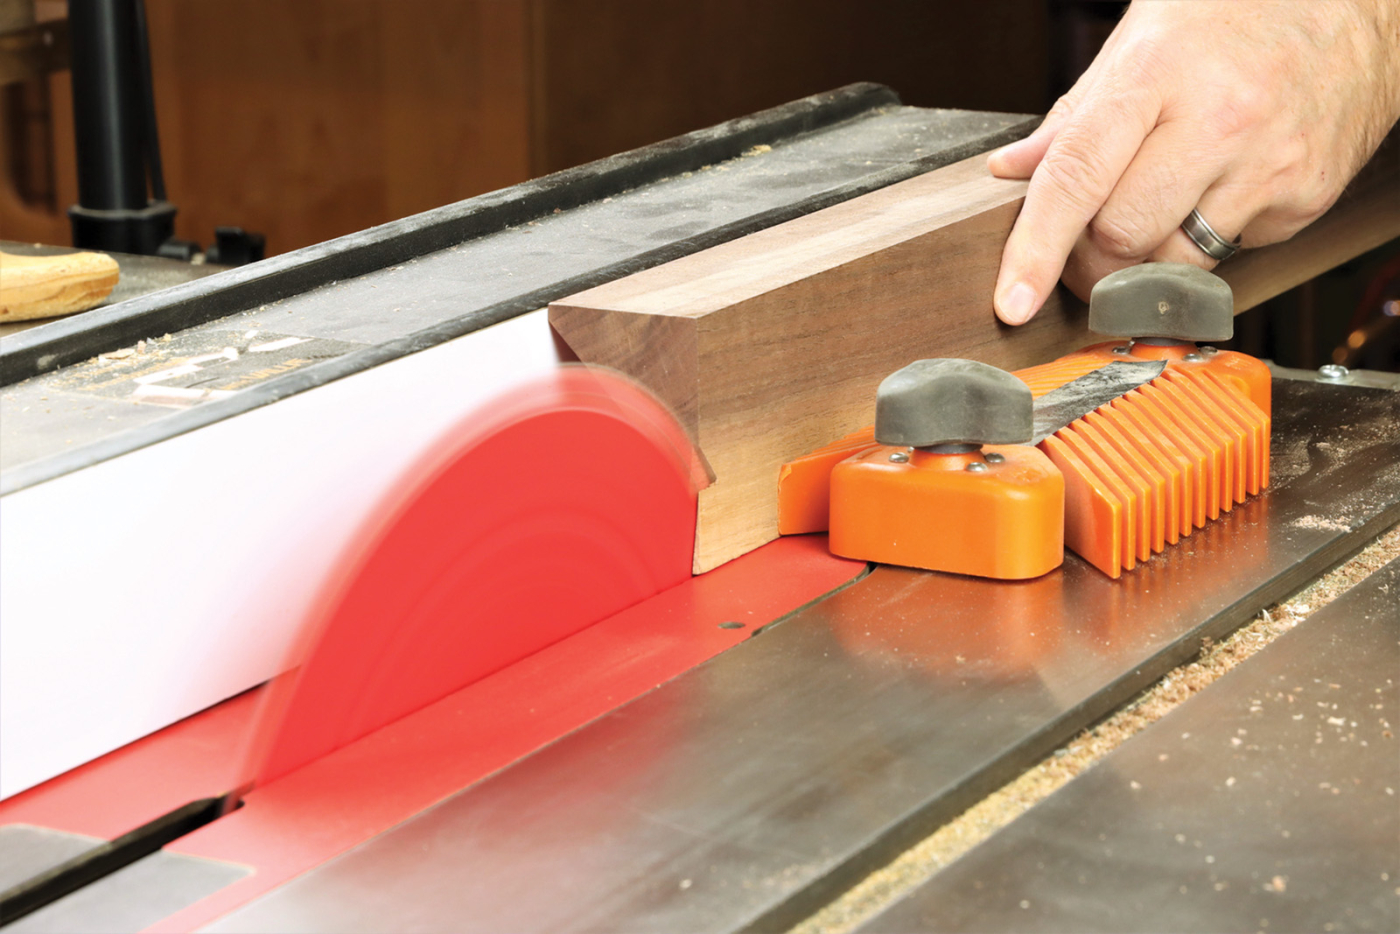
6 Confirm the cradle holds the leg in the correct position by zeroing the gauge on the table saw and taking a reading on the leg itself. The angle should be 50.4°. If it’s not, adjust the cradle with paper shims. Note that the corner of the leg component is in contact with the table saw surface.
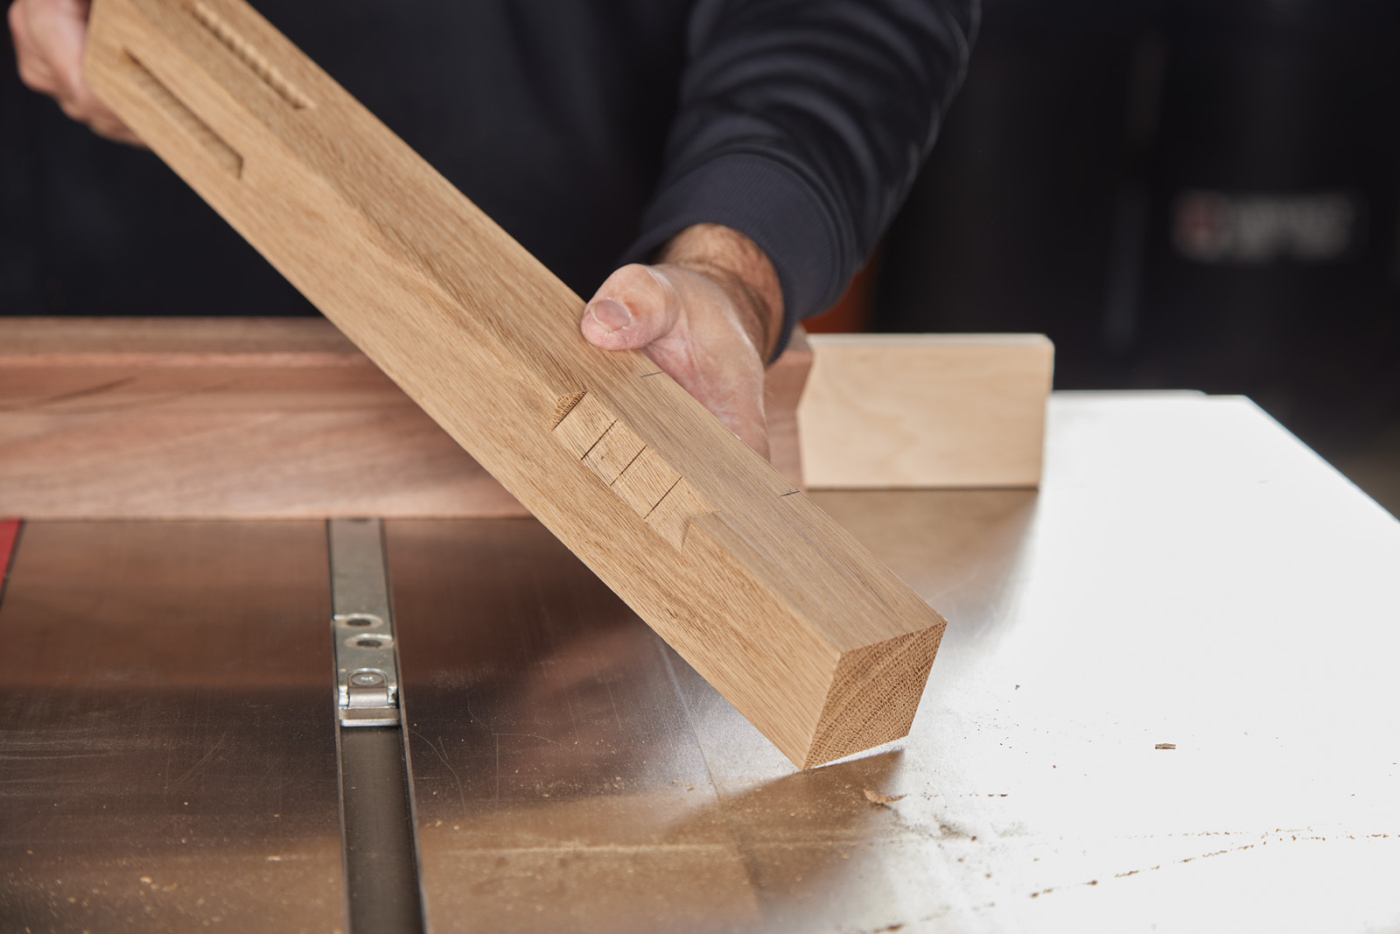
Notch the Legs
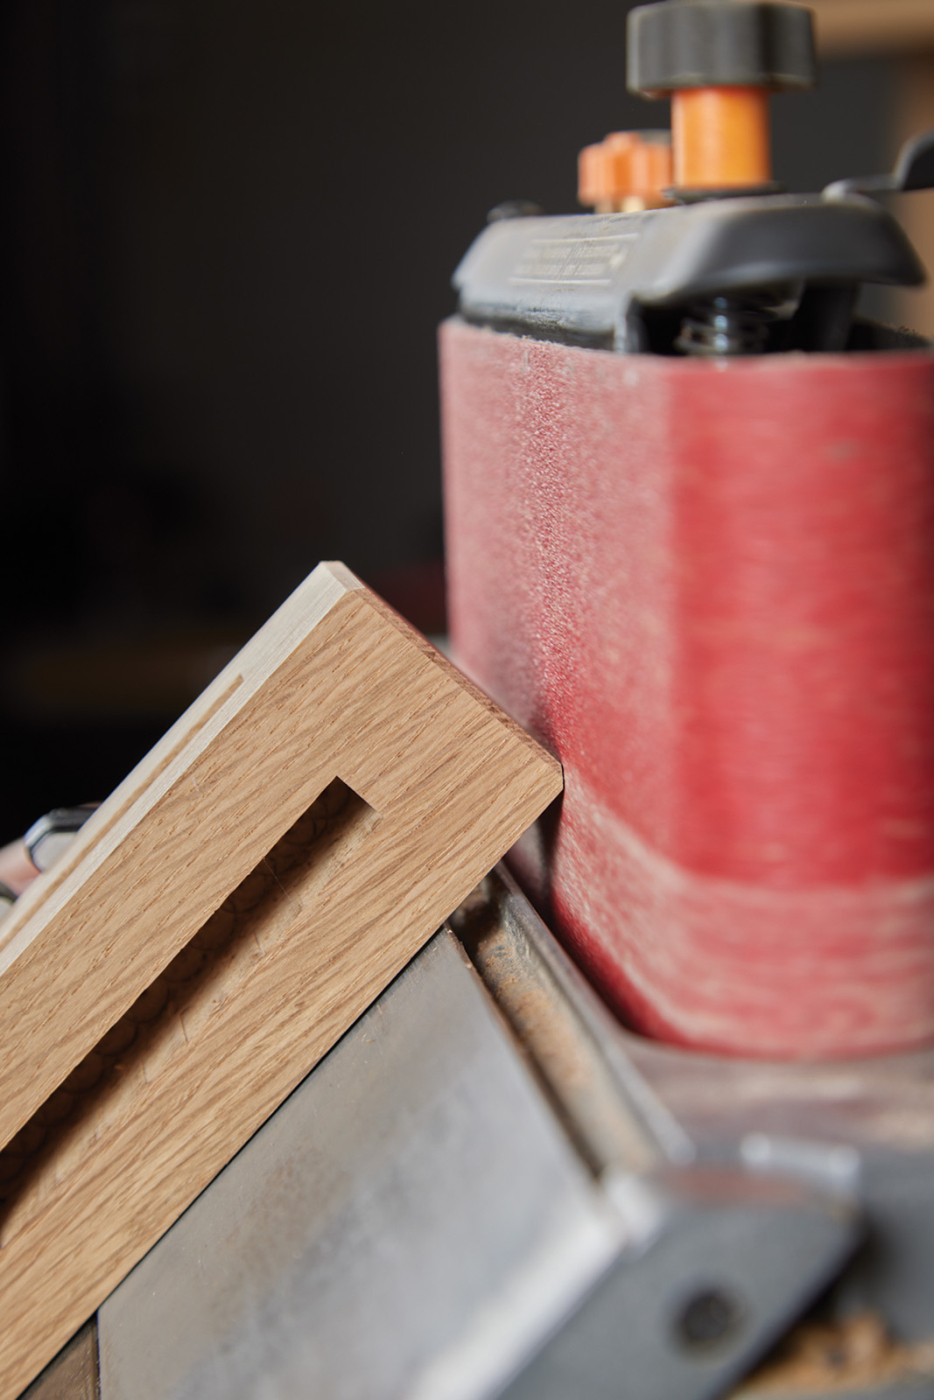
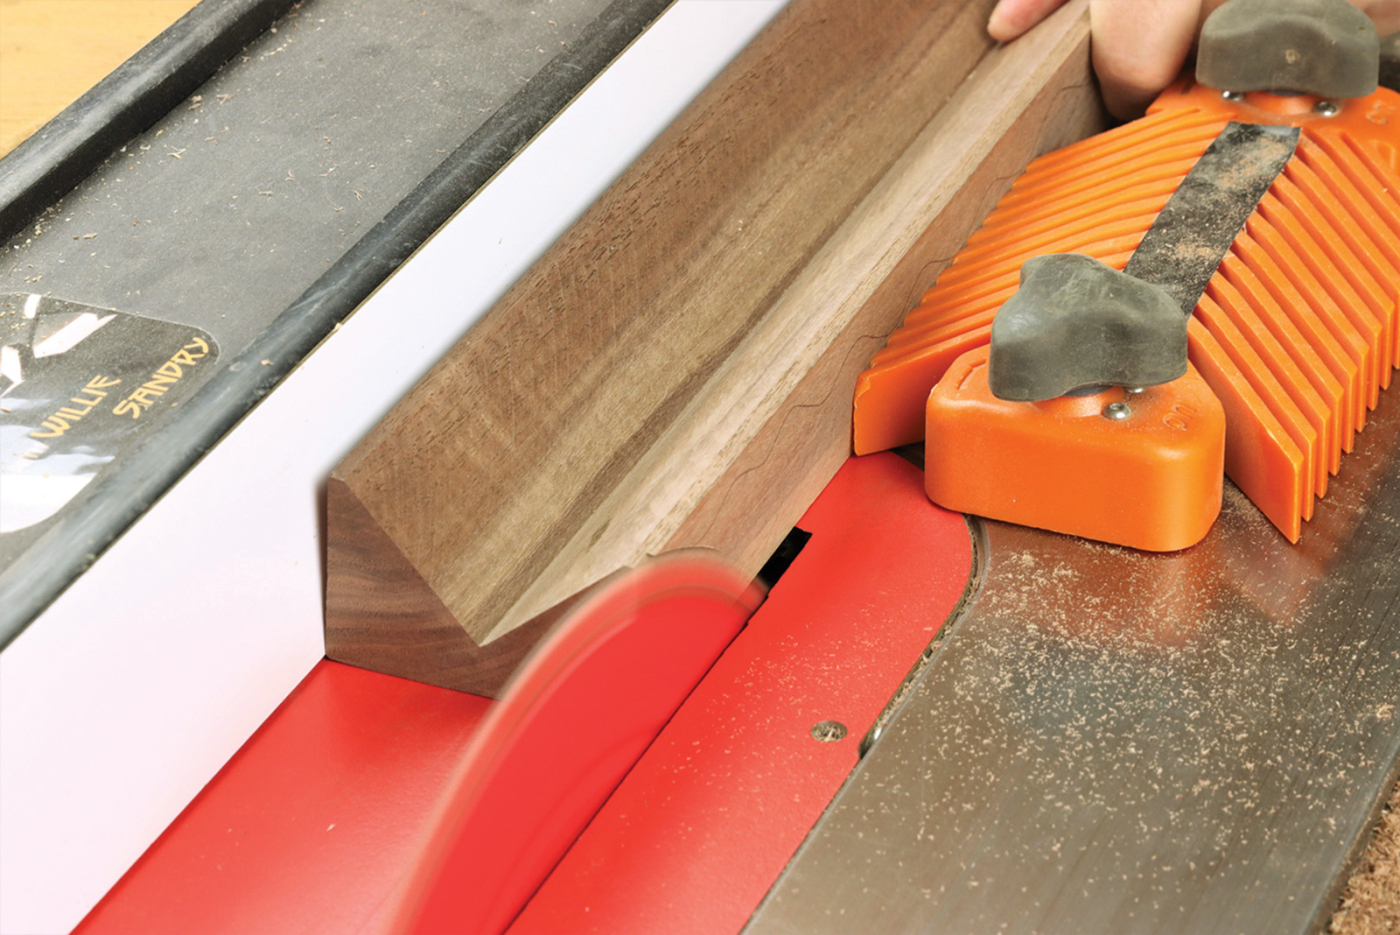
Attach a cradle jig (instructions for the jig are at the bottom of this article) to a miter gauge with a sacrificial fence using four screws. Layout the extent of the notch on the leg and adjust the rip fence to serve as a position stop. An off cut from the legs proves useful to set the dado height. Raise the blade to make a test cut. Repeat this process until you have a 3/4“ wide flat spot.
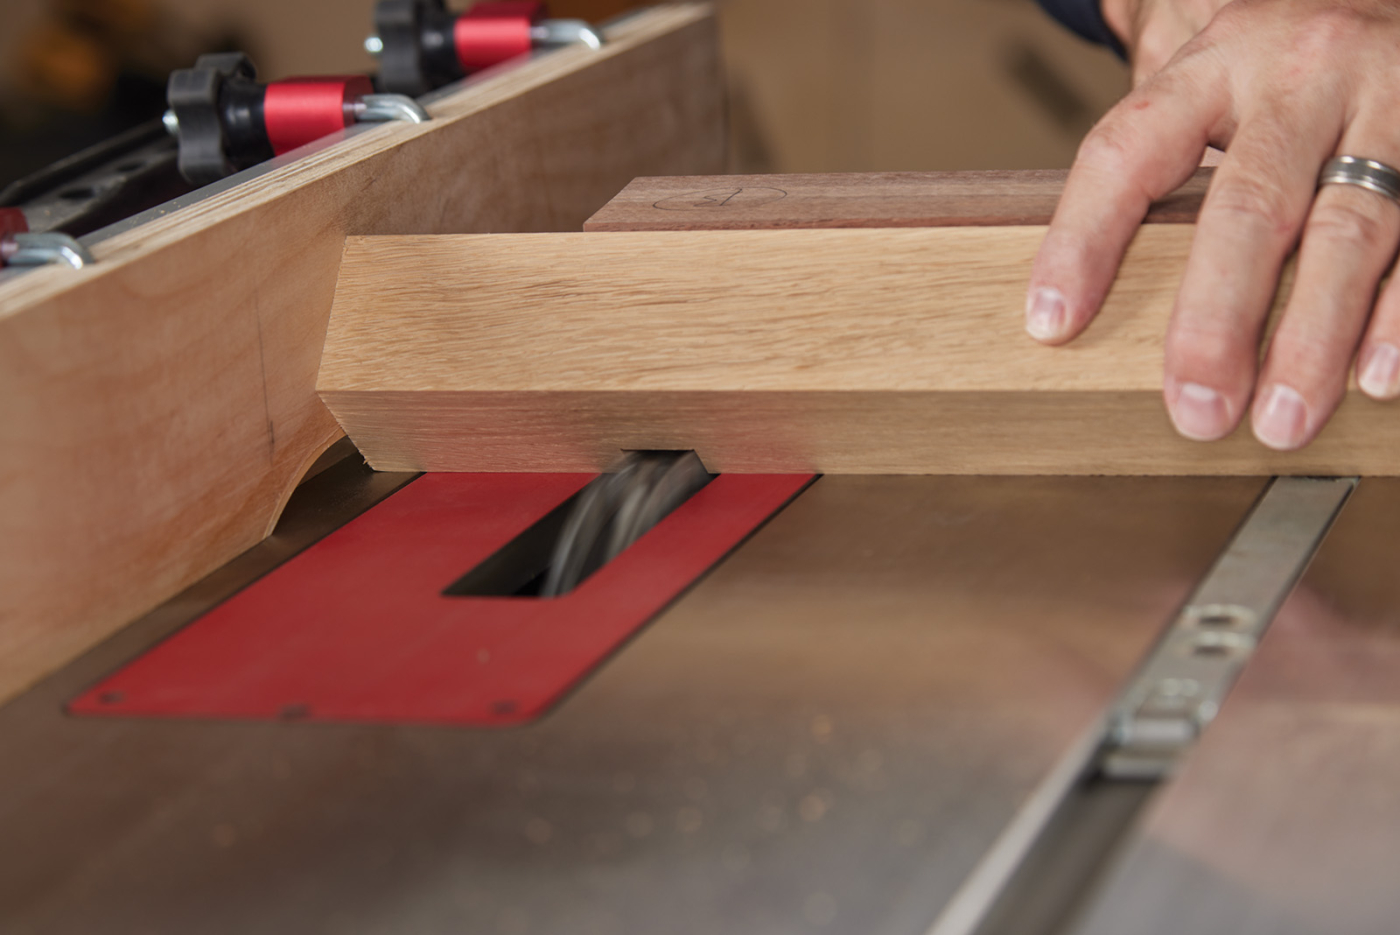
7 Use the rip fence as a positive stop while cutting the lower edge of the angled notch. Cut a total of two legs this way.
8 Slide the leg over in the cradle jig to make repeated passes. Then, use the rip fence again to set the top edge of the notch.
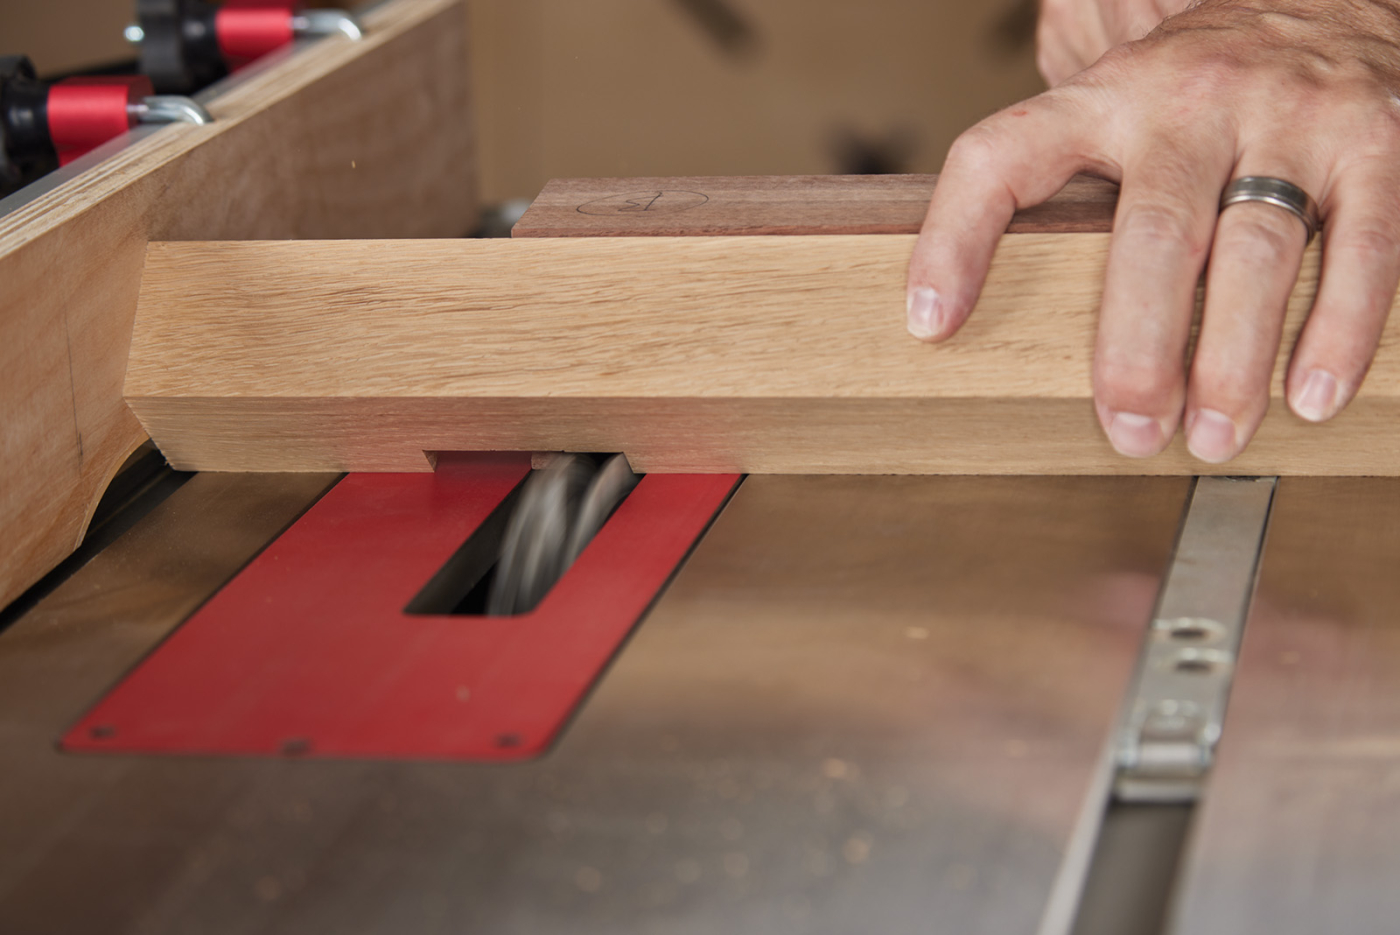
Mark two of the legs “A” and the other two legs “B.” Mark the left end of the cradle jig “A” and the right end “B.” With the miter gauge in the left table saw slot, insert a “B” leg into the cradle and slowly pass it over the dado blade. Cut only the two “B” legs in this manner. Clean out the rest of the waste with additional passes on these two legs. Reset the rip fence for the other end of the notch and make a final pass.
9 Move the miter gauge (with the cradle still attached) to the other miter slot and notch the other two legs.
Now move the miter gauge to the right table slot and notch both “A” legs in a similar fashion. The key point is that two legs are notched with the mortises facing left, and two legs are notched with the mortises facing right. To see the technique demonstrated, check out my video below.
Test Fit with Scraps
You’ll be anxious to test fit the parts to confirm that the angled notches are correct, but wait! There’s a trick to help locate the half-lap joints in the lower rails. Make a pair of scrap boards that are 13/8“ wide, 3/4“ thick, and 223/32“ long. Use them to test fit the lower rails, independent of the half-lap joint. If your angled notches seem about 10˚off—don’t panic. Just re-assemble the legs. Remember that an “A” leg needs to be diagonal across from another “A” leg for the angles to meet properly.
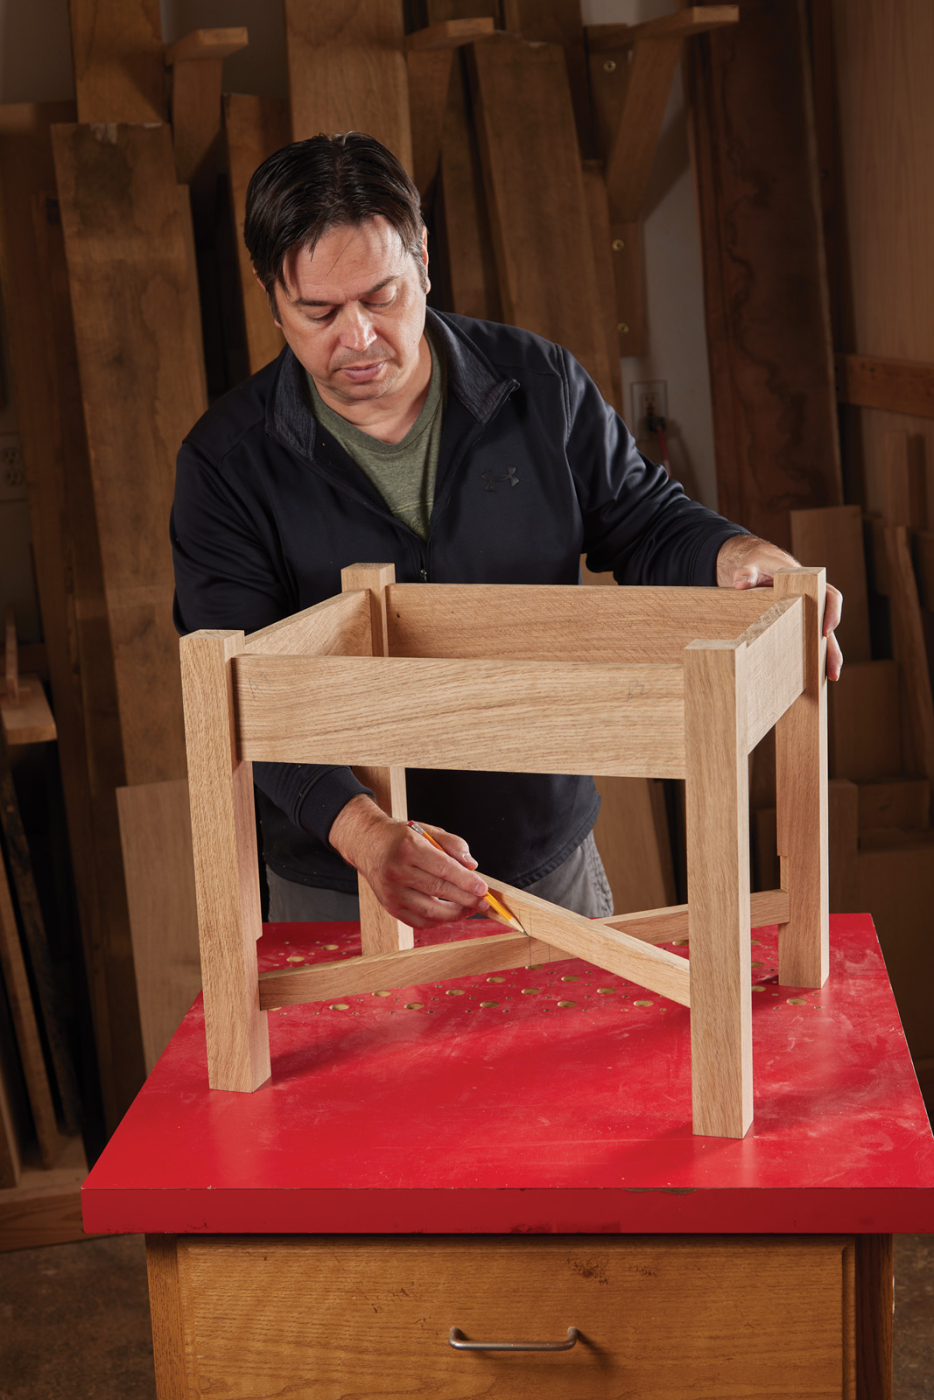
10 Use a pair of scrap boards to mark the point where the lower rails will meet.
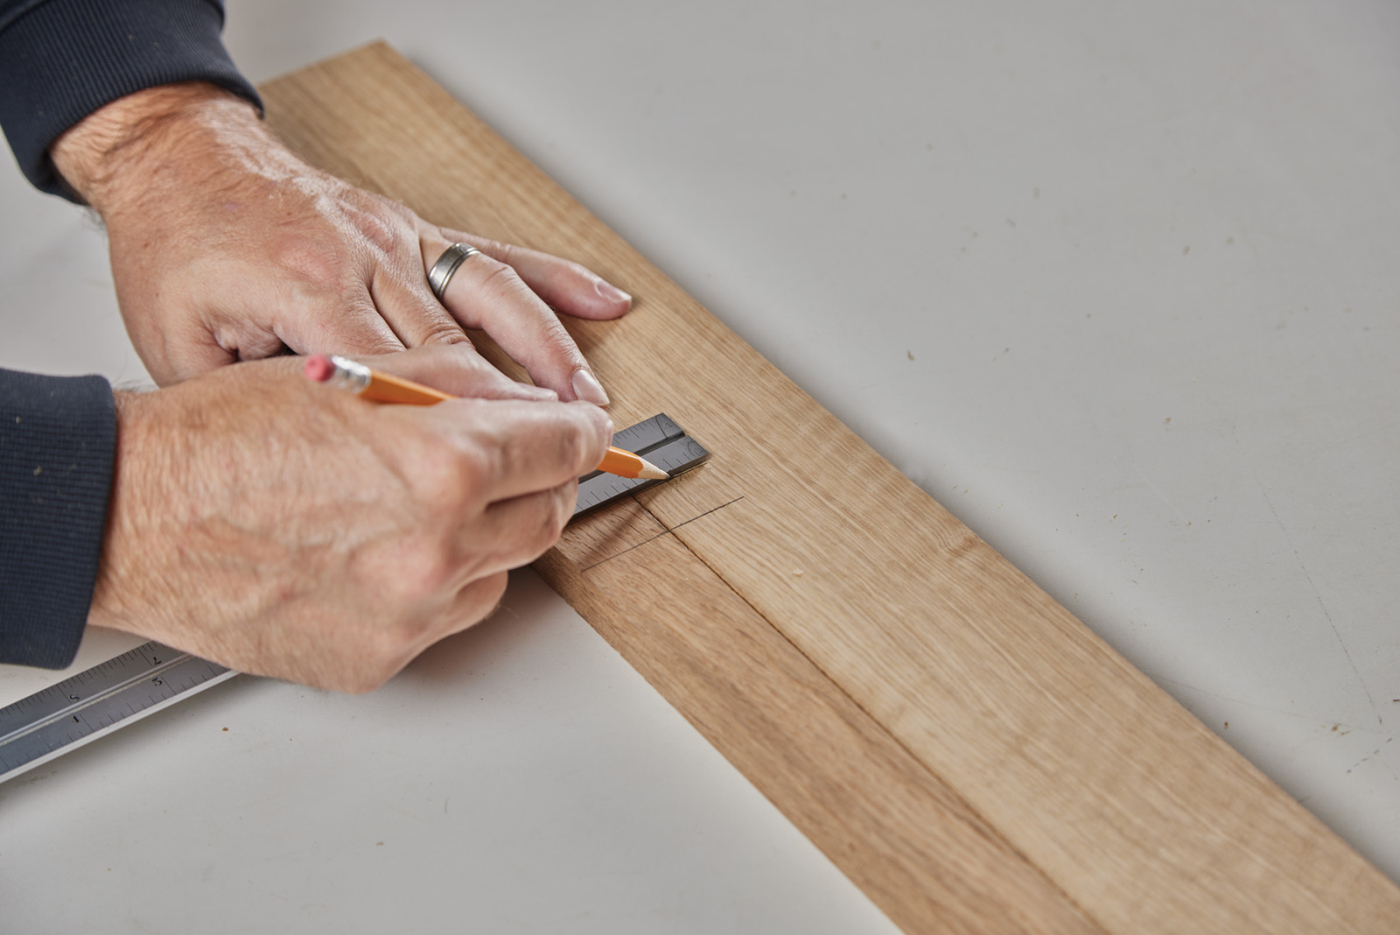
11 Transfer the notch location from the scrap boards to the actual lower rail workpieces. Pay particular attention to the curve orientation and notch depth.
With a renewed sense of confidence, you can proceed with layout marks for the half-lap joints. Mark lines where the two scrap boards intersect to form an “X” shape. Be sure to draw pencil lines on both scrap boards to clearly indicate where the half-lap notches should be cut. Label one scrap board “top” and one “bottom.” Now cut your actual lower rail workpieces to length and lay out the curved shape along their bottom edge. These curved lines will prove quite useful when thinking through the odd-angle half-lap cuts. Use a combination square to transfer the notch location from the scrap boards to the lower rails. Understand that these aren’t truly half-lap joints until after the curve is cut. In practical terms, this means the notch for the “bottom” lower rail will be 7/8“ deep, but the notch for the “top” lower rail need to be 1-7/8“ deep to account for the arched shape.
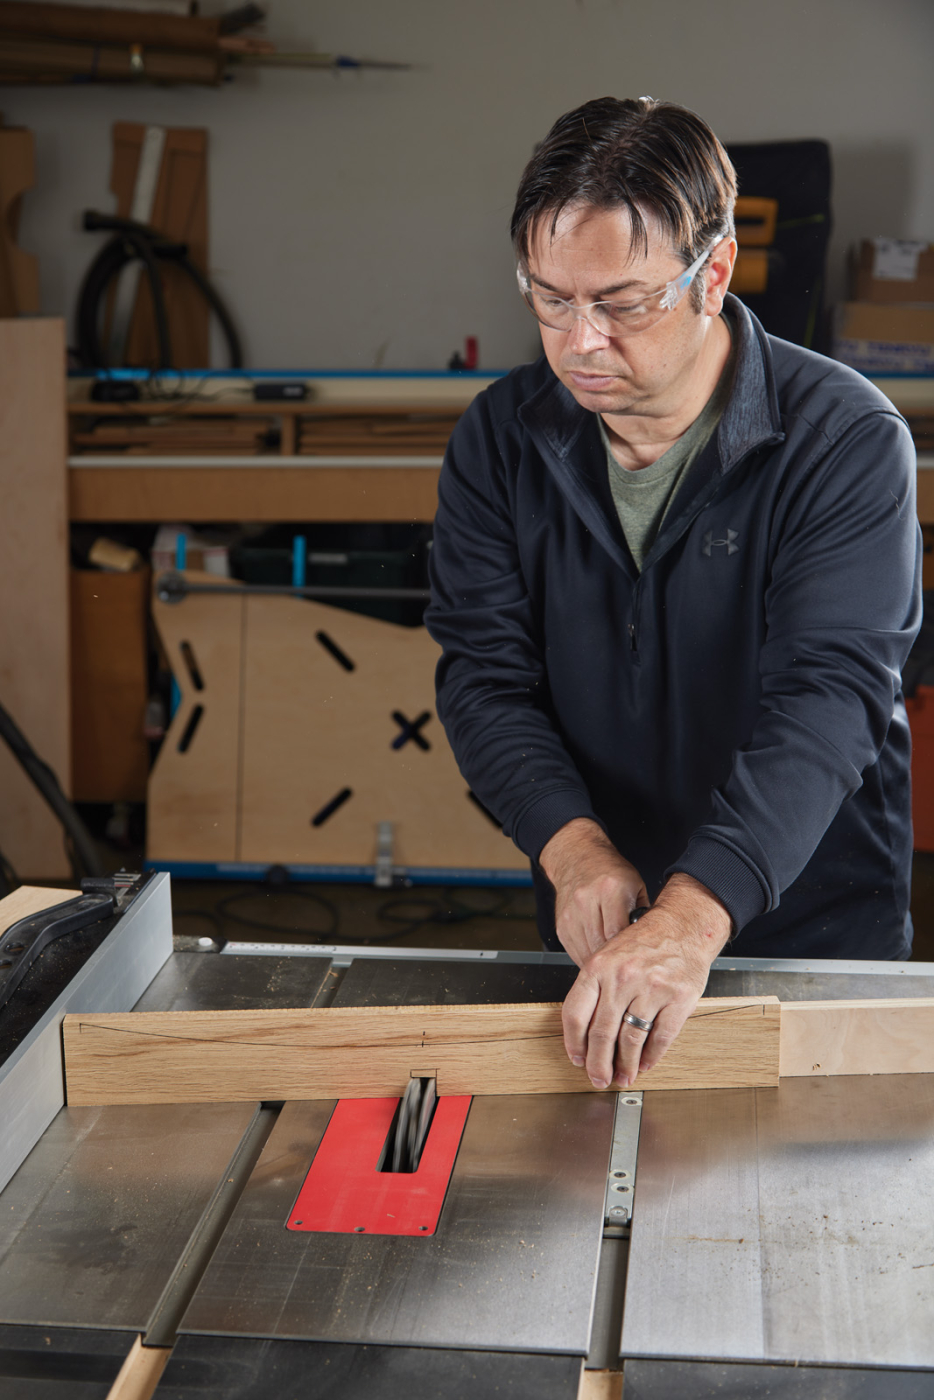
12 With a miter gauge and sacrificial fence, notch the “bottom” lower rail on your layout marks. The dado blade height is 7/8″ for this cut.
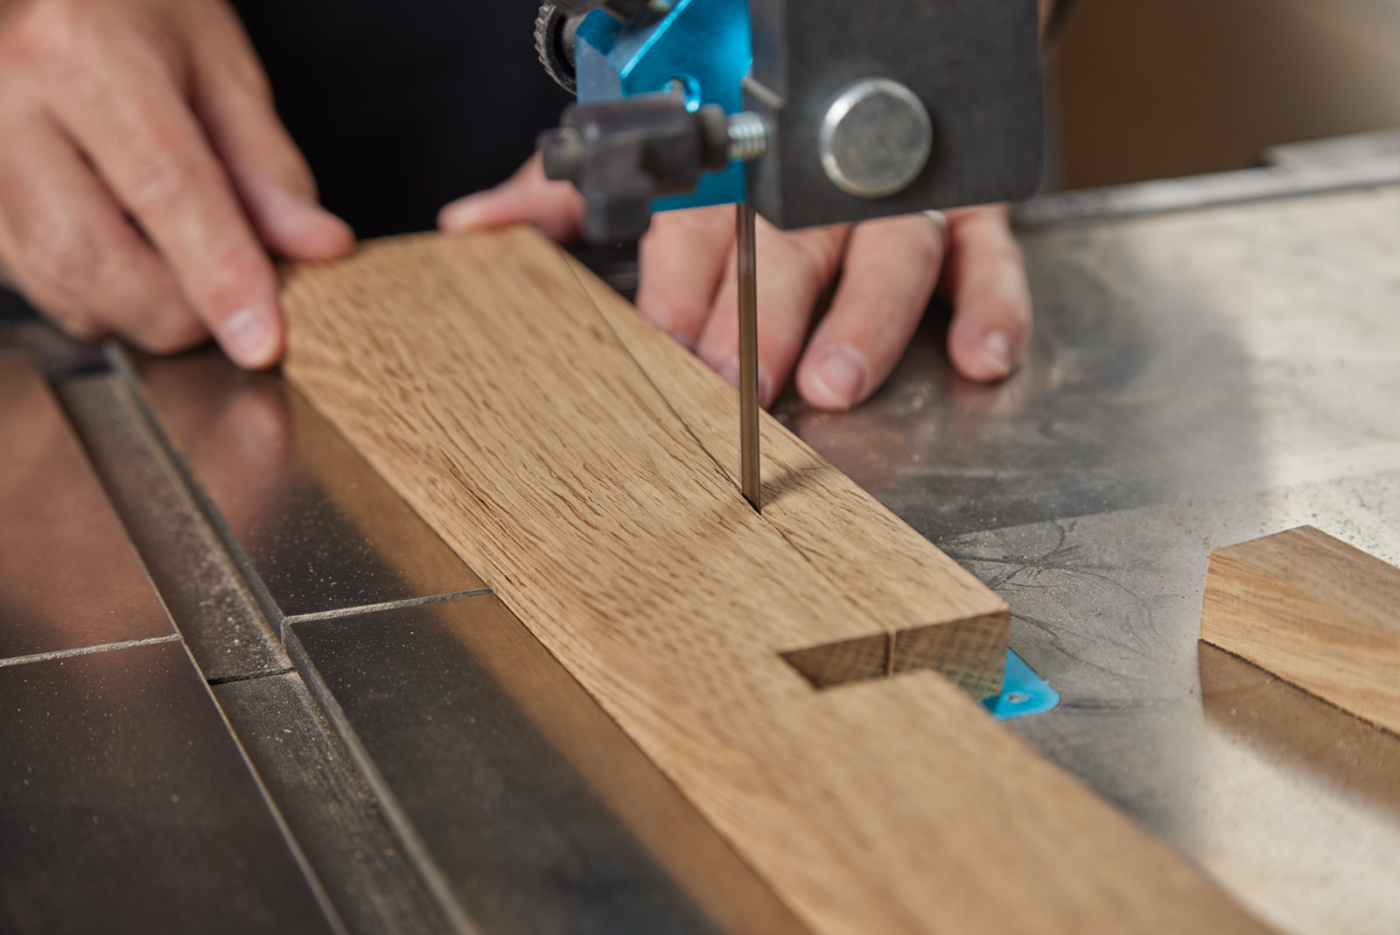
Odd-Angle Half-Lap Joint
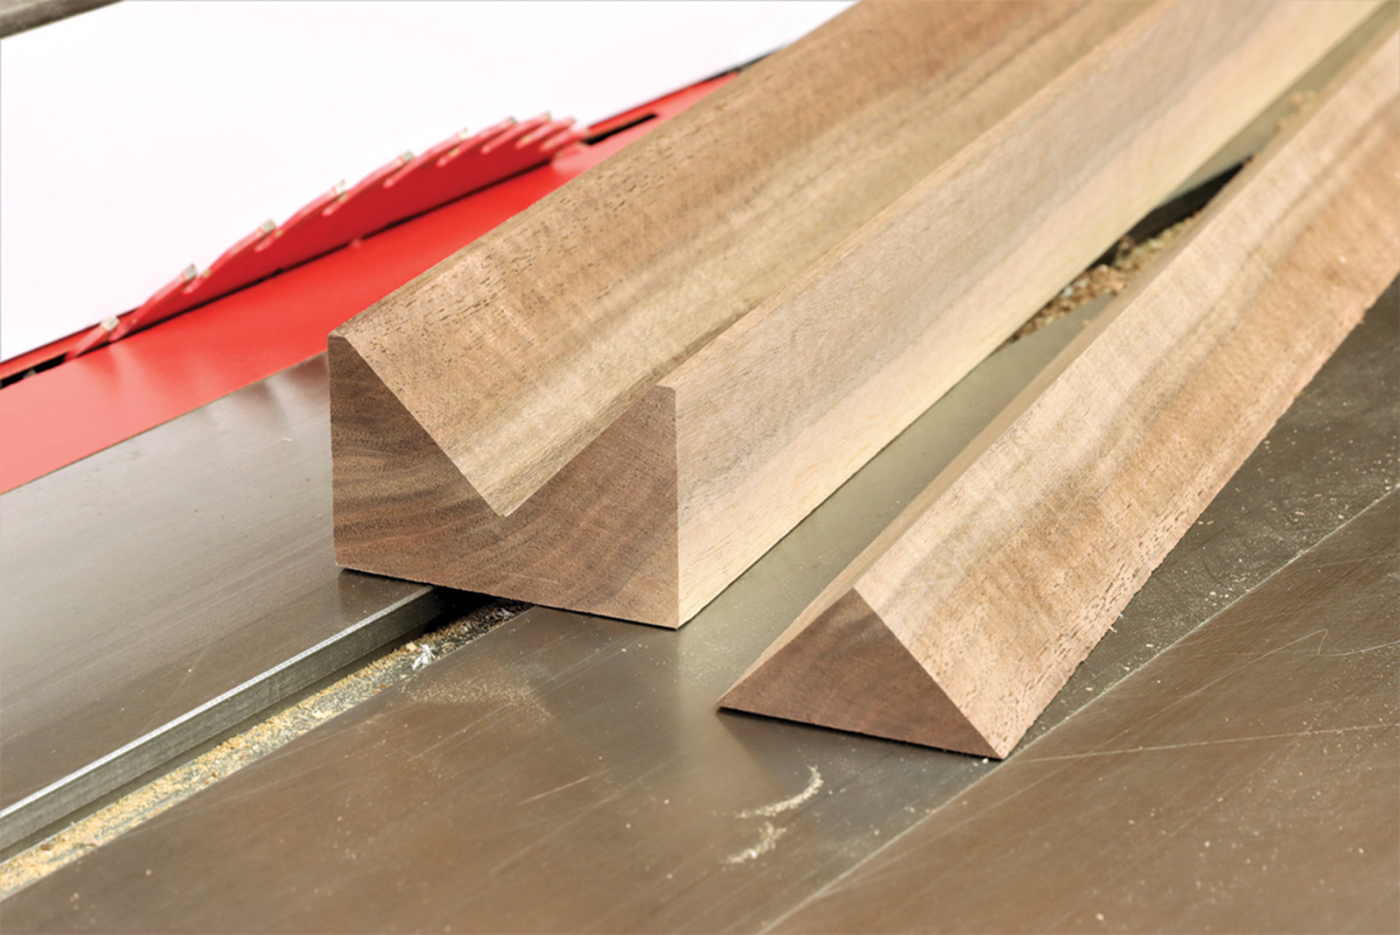
The prep work you did with the scrap boards makes the half-lap joinery a slam dunk on an 8‘ rim. What looks like it could be the most difficult part of this project suddenly becomes simple. The lower rails intersect at a 79.3° angle. With a 3/4“ dado stack on the table saw, set your miter gauge to 10.7°. Not all miter gauges will read in graduation that fine, but if you have a Vernier scale that allows at least 1/2° readings, you can come very close.
13 Raise the dado blade to 1-7/8″. Make the deep notch cut on the “top” lower rail.
Make a test notch in a scrap board to confirm your 3/4“ dado blade fits the thickness of your workpiece. Often, I’ll plane workpieces to fit the notch rather than use dado shims to exactly match the stock thickness. Align the dado blade with your pencil lines and use the rip fence as a stop. Start with the “bottom” lower rail and make a 7/8“ deep notch. Then raise the blade to 1-7/8“ to notch the “top” lower rail. Make sure the sacrificial fence attached to your miter gauge is tall enough that it’s not cut in half during this notching operation. For reference, both of these cuts were made with the rip fence cursor set near the 1-1/4“ mark, and the miter gauge setting was unchanged between cuts. Ultimately, you’ll trust your layout marks for the actual location of these notches.
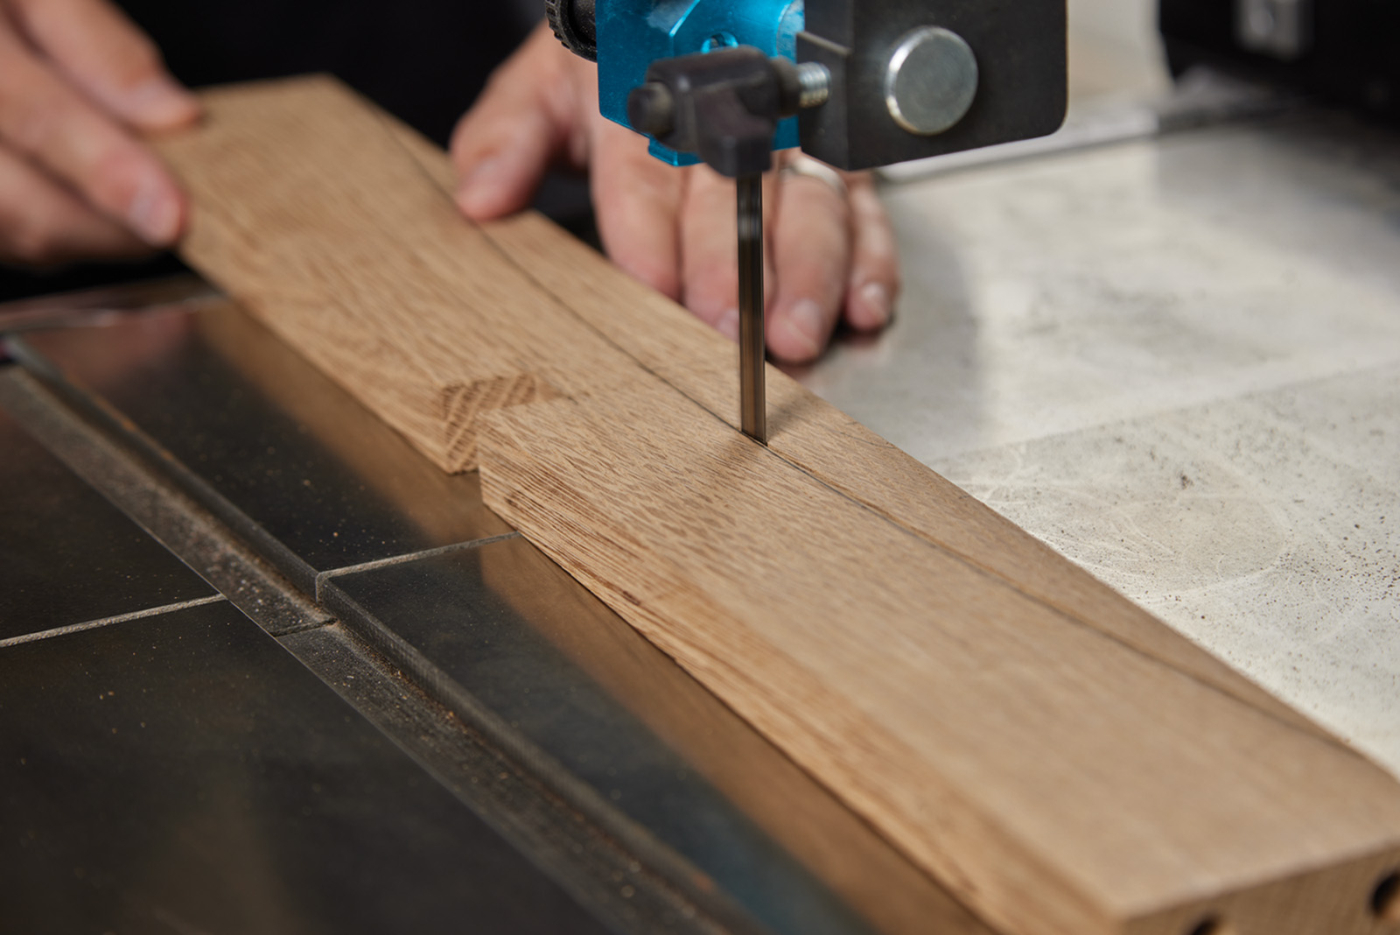
14 Check that the lower rails slide together without any drama and test the overall fit in the ottoman.
Do You Dowel?
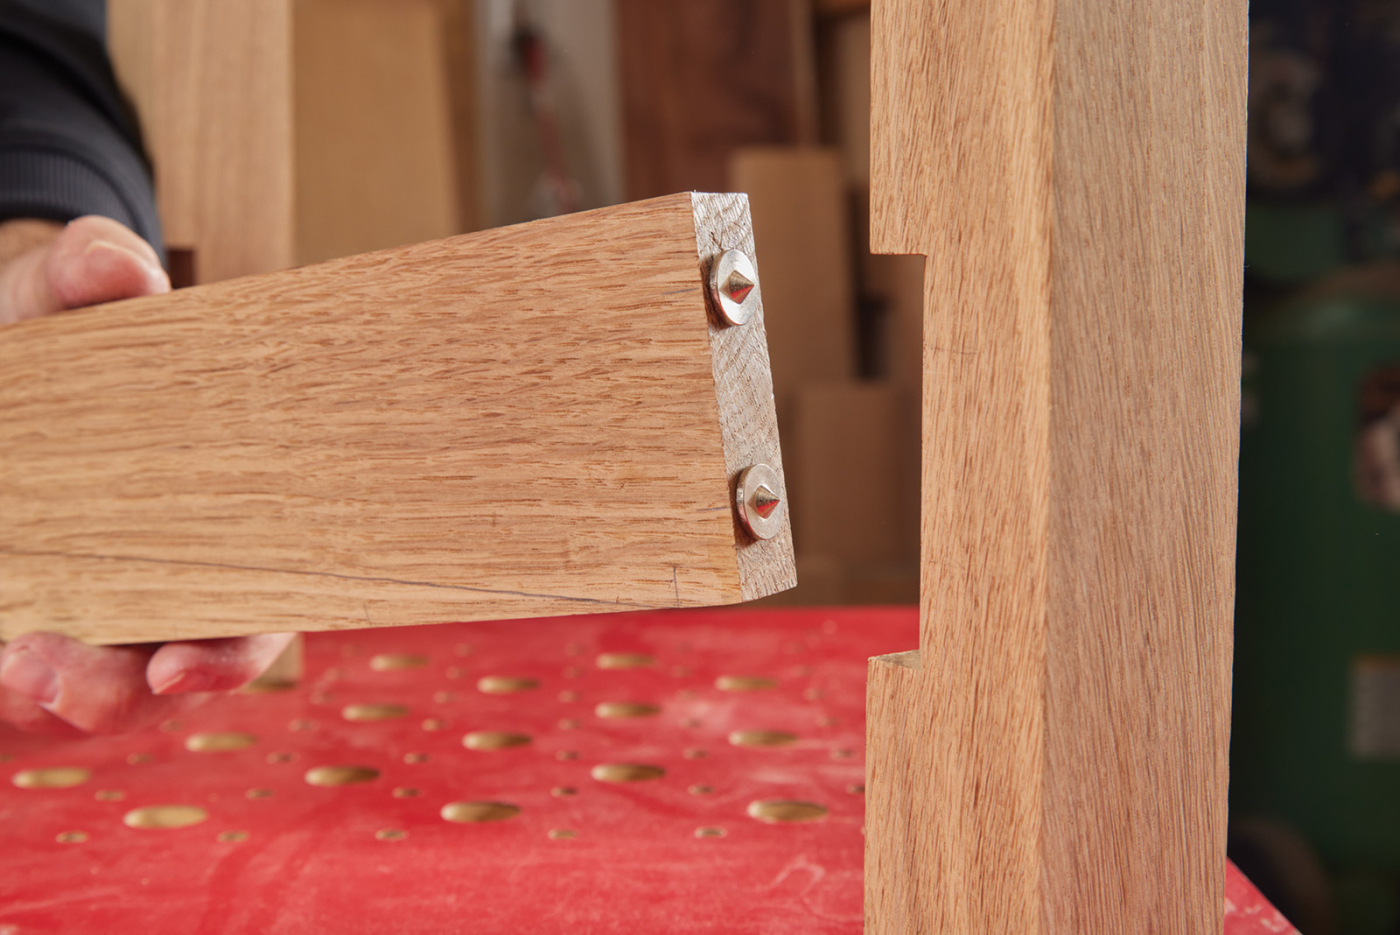
Believe it or not, deciding on the type of joinery between the lower rails and leg posts was the most difficult decision to make. Early examples of this antique ottoman didn’t reveal their secrets, and I couldn’t find anyone who’d let me dismantle their footstool (early Eastwood Ottomans have sold for thousands of dollars). This modern version is assembled with pocket hole screws, but for me it boiled down to mortise and tenons vs. dowel joints. I figured dowels would be easier to execute for this project and might allow the required wiggle room during final assembly. After all, the genuine antique Gustav Stickley U-back rocker pictured with the ottoman was built almost entirely with dowels!
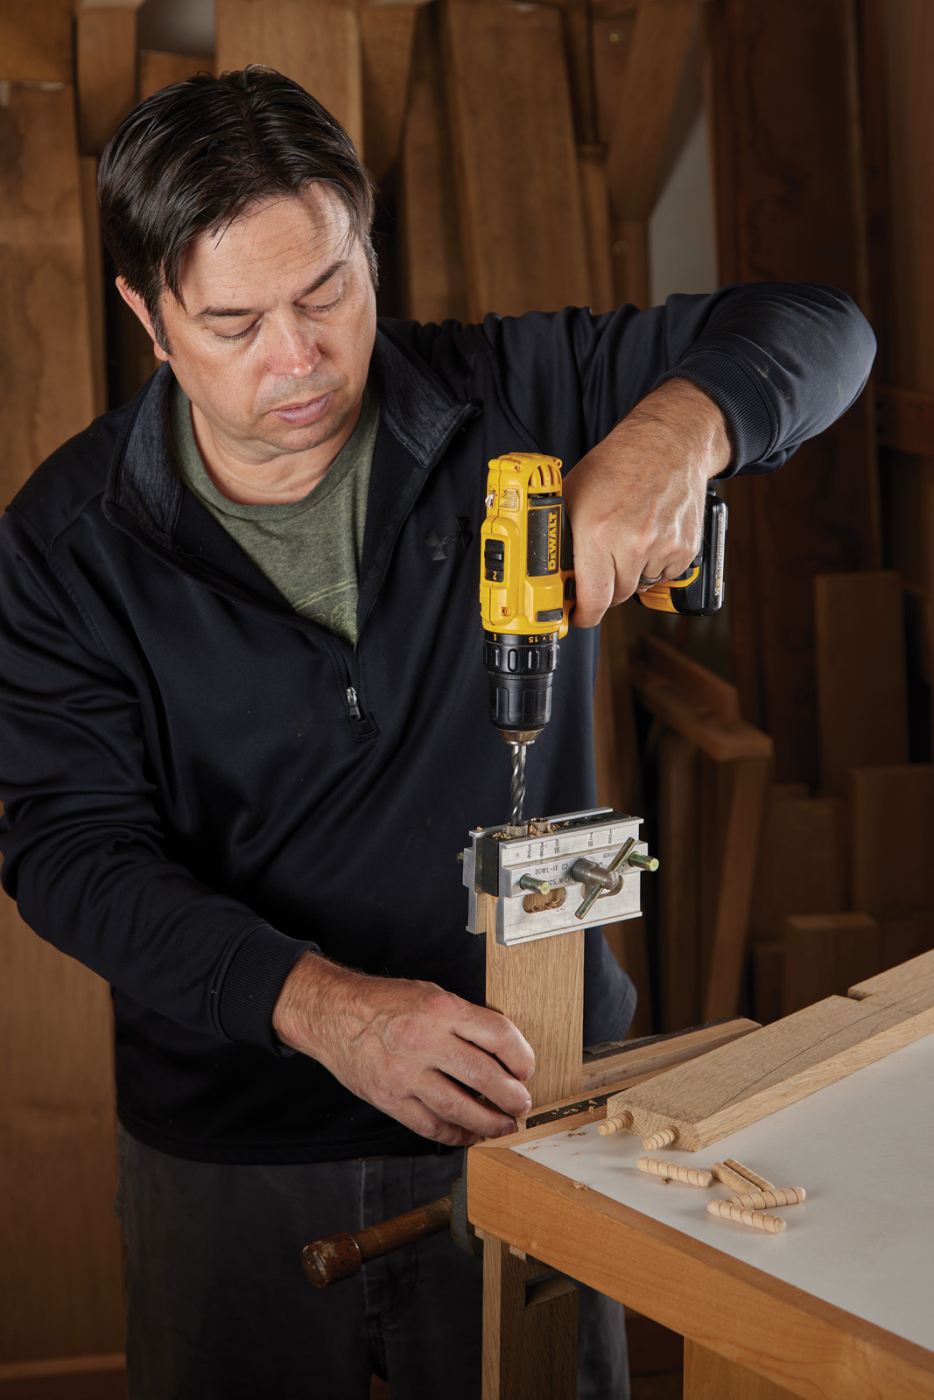
15 Use a self-centering doweling jig to drill a pair of 3/8″ holes in the ends of the lower rails.
16 Install dowel centering points and carefully clamp the assembly together to mark the location of the dowel holes in the legs.
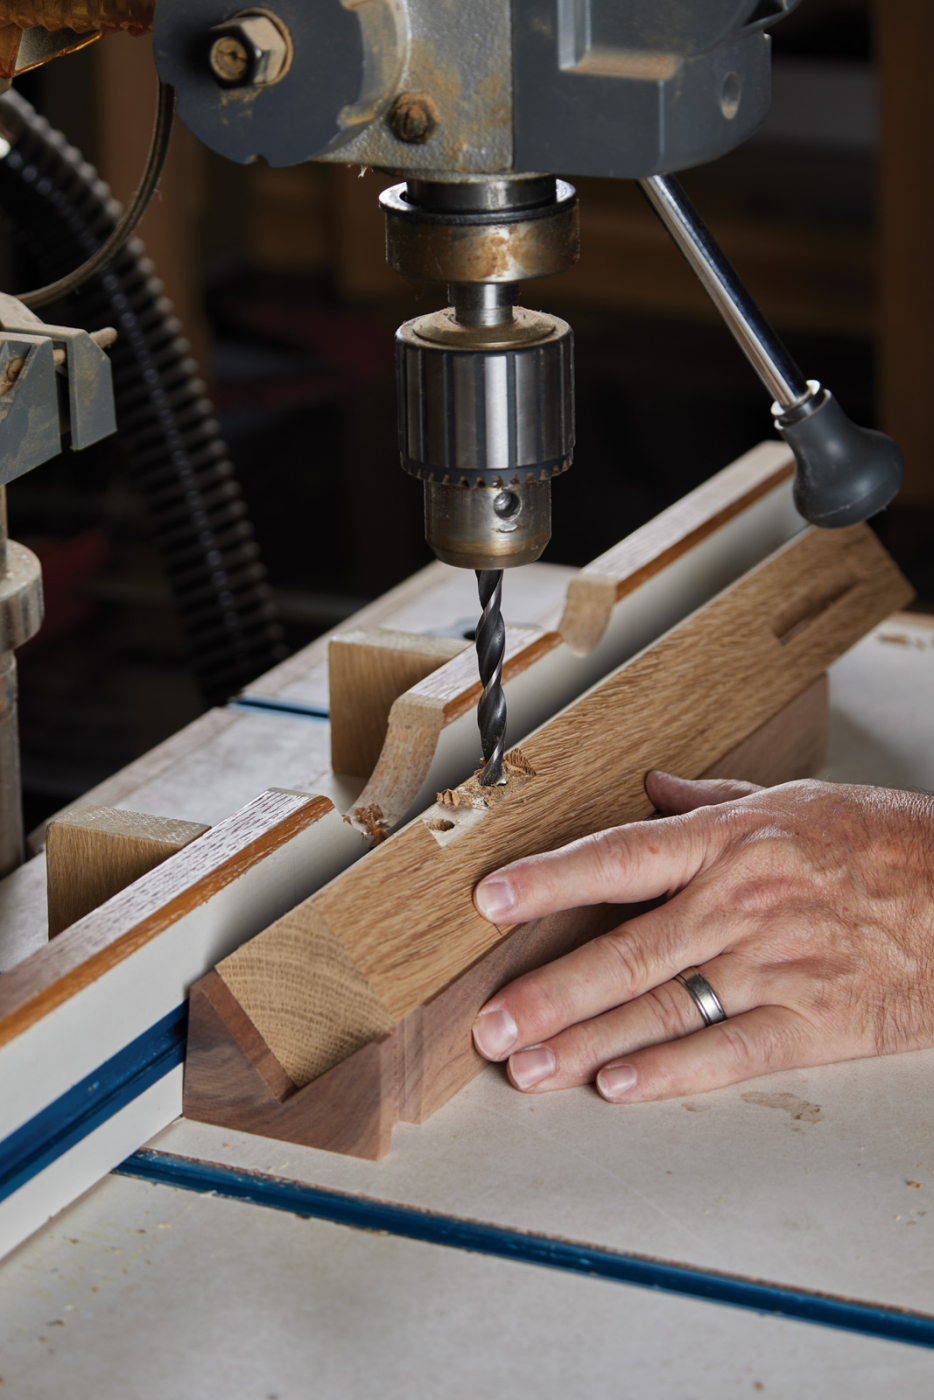
17 Use the cradle jig again to position the leg on the drill press. Be aware that the leg must be installed in the jig correctly to drill straight holes.
Use a doweling jig to drill a pair of 3/8“ x 1“ deep holes in the ends of the lower rails. Locate the holes 5/8“ in from each edge of the workpiece. Then use dowel centering points to locate the mating holes in the legs. Carefully center the rails in their respective notches to create the dimples. I found it was easiest to use only four centering points at a time. Finally, set the leg in the cradle jig you used earlier to help drill dowel holes in the legs. Remember that the back of the cradle jig is beveled at an angle, so there’s a correct orientation of the leg in the jig. I used a “Snap Check” micrometer to confirm the notch surface was parallel with the drill press table.
Curves and Tapers
Another test fitting will confirm the alignment of the dowels is correct, and you’ll proceed with cutting the curves and tapers that give this project its classic style. It may seem like you’re nearly done at this point, but every component in this project still has at least one curve or taper to cut. Band saw curves in all the rails and sand the sawn edges smooth. While you’re at it, sand all the parts through your normal grits and ease the edges as appropriate.
18-19 After scribing the shape on the rails, cut the curve at the band saw.
Two notes on creating round-overs for this project in particular:
1. Create a hefty round-over along the top edge of the upper rails to prevent any sharp edges from damaging the upholstery. I used a partially exposed 1/2“ radius round-over bit to create a thumbnail profile.
2. Stay clear of the ends of the lower rails, as well as the “X” shaped intersection when easing edges with a 1/8“ roundover bit. Instead, ease those areas with sandpaper after final assembly.
20 Taper the lower 2″ of each leg. All four faces of each leg receive a taper.
Taper the bottom 2“ of the legs so that 3/16“ thickness is removed from all four sides. Generally, a special jig is required for four-sided tapers, but since the tapers are so short, just about any tapering jig or sled should work. Also, chamfer the top of the legs down to a pencil mark 1/8“ from the top. I use an oscillating belt sander with a tilting table and a miter gauge for this operation, but a block plane would work as well.
21 Chamfer the tops of legs. You can do this at the router table or with a block plane, but I found an oscillating belt sander works well here.
Final Assembly and Finishing
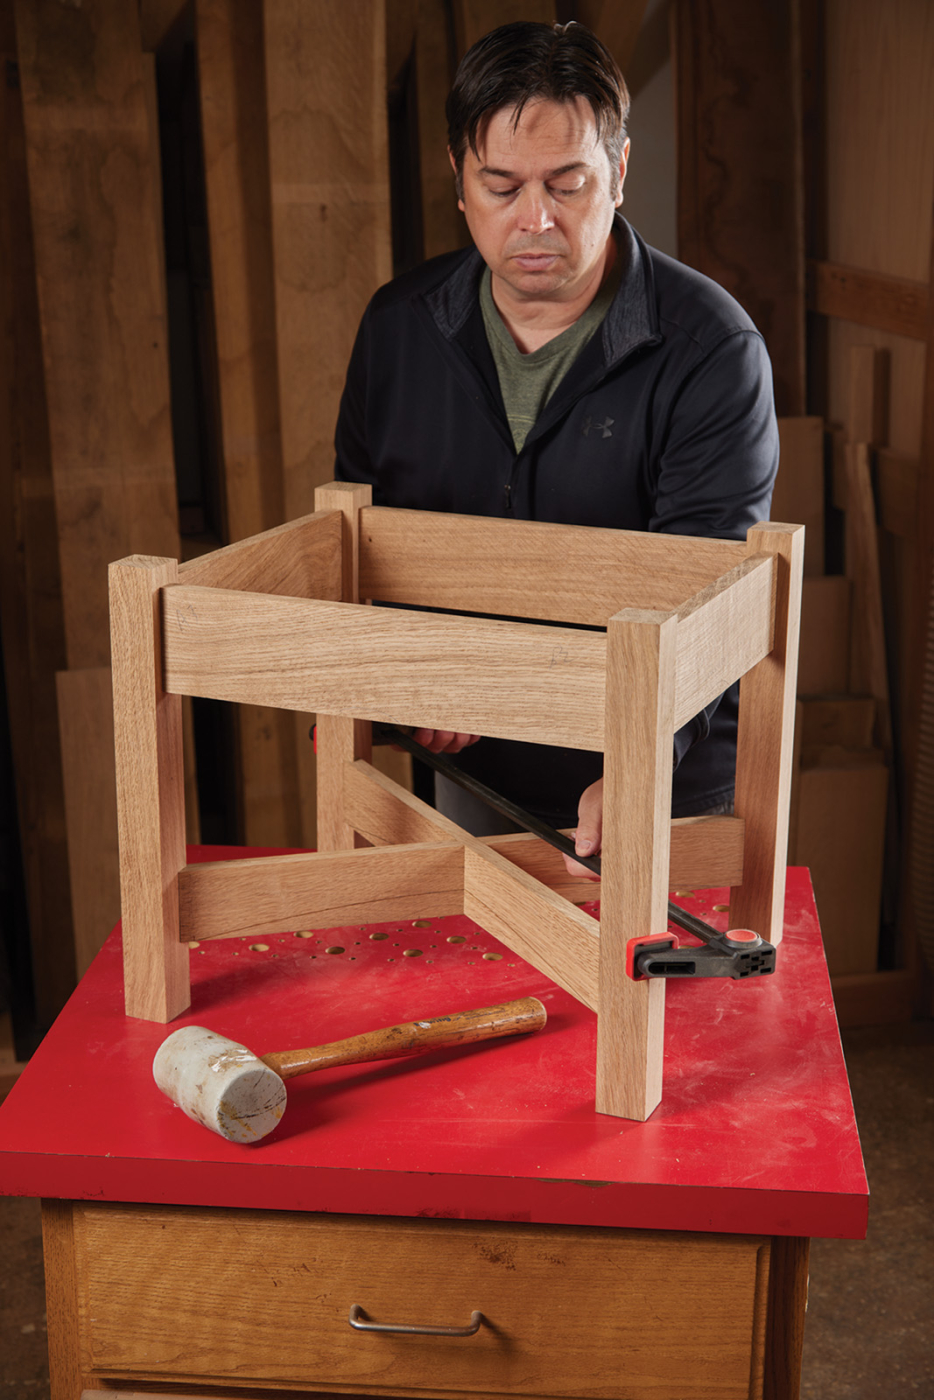
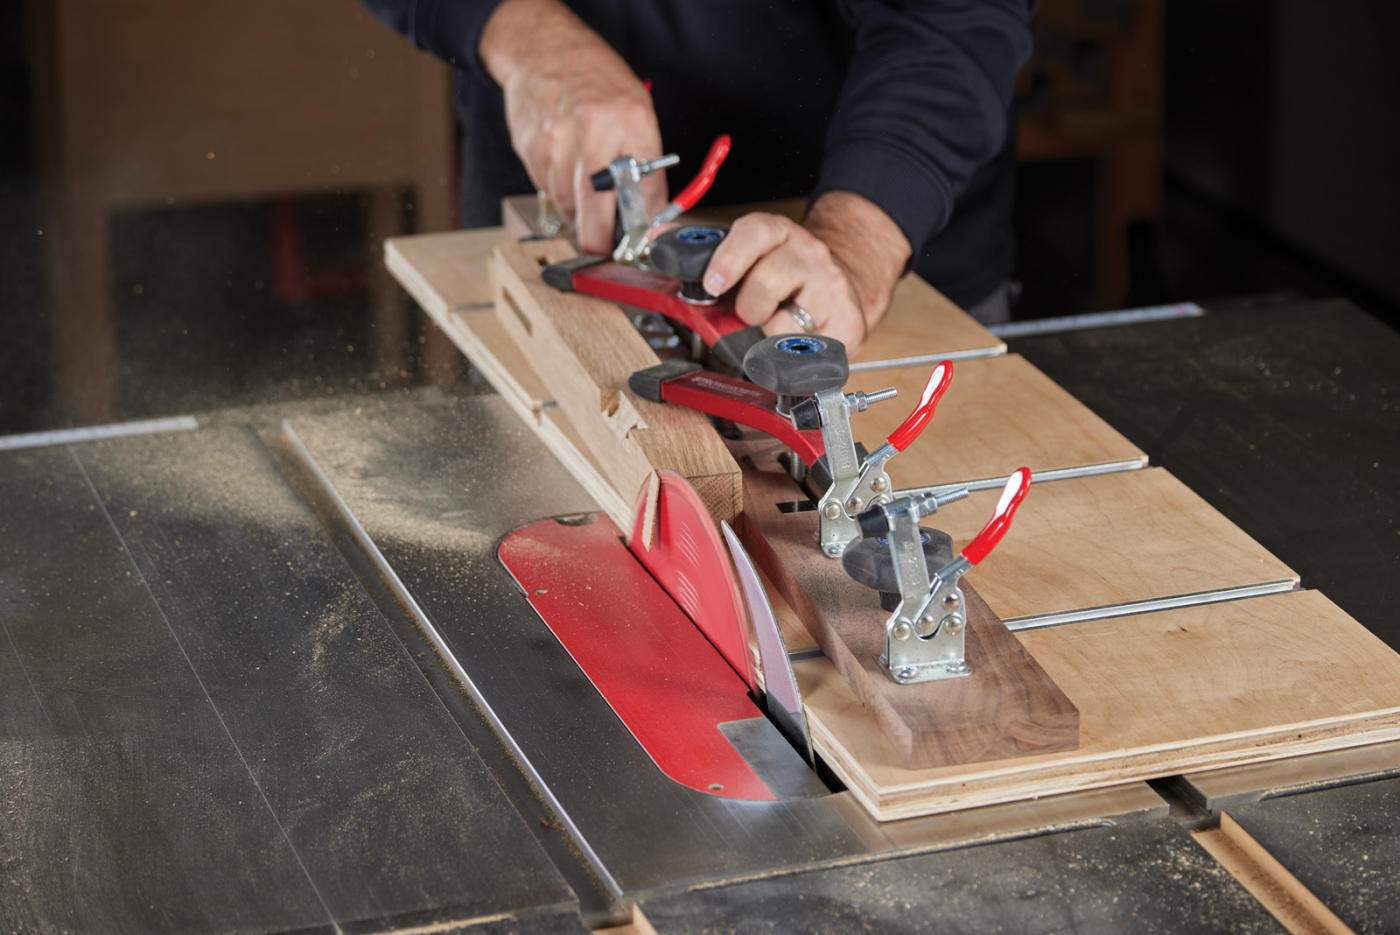
Since the ottoman has been dry-assembled a few times now, you ought to be confident with the fit. Label all the parts clearly, even if that means using blue painter’s tape. Glue the parts together and ensure the lower rails seat fully in their pockets.
The finish I use is one of the easiest I’ve found to apply. The ottoman is simply fumed for four hours in a tent with 28% ammonium and wiped with Watch Danish Oil in a medium walnut color. The topcoat is two coats of lacquer in a satin sheen, which was sprayed on. For all the details on this easy-to-apply finish, see the Traditional Fumed Finish for White Oak article in the June 2022 issue of Popular Woodworking.
All that is left to do is the upholstery cushion, and you will have an ottoman you’ll be thrilled to prop your feet up on after a hard day of work! If you would like to take a crack at the upholstery yourself, check out this article, where I’ll walk you through how you can make your own upholstery that complements all the beautiful chairs you’re bound to build in the future.
Extra: Making a Cradle Jig
To make accurate angled notches in the legs, I whipped up a cradle jig that attaches to a miter gauge. The cradle needs to present the leg to the surface of the table saw at a 50.4° angle. In other words, the notch isn’t a perfect 45°, it’s actually 5.4° more.
Start with a block of wood that is 1-3/4” thick by 2-3/8” wide and at least 13″ long. I am using a dark wood for clarity.
1 With the blade tiled to 45°, form an angled notch in the cradle jig.
2 Note the small flat spots on either side of the notch, which will be helpful in the next step. Discard the triangular waste pieces.
Cut a 45° notch lengthwise down one face to frame the cradle. Your table saw blade must be set at a true 45° angle for this operation. Make passes from both sides for a centered notch. Be sure to raise the blade as needed. Once complete, clean out any ridges in the inside corner.
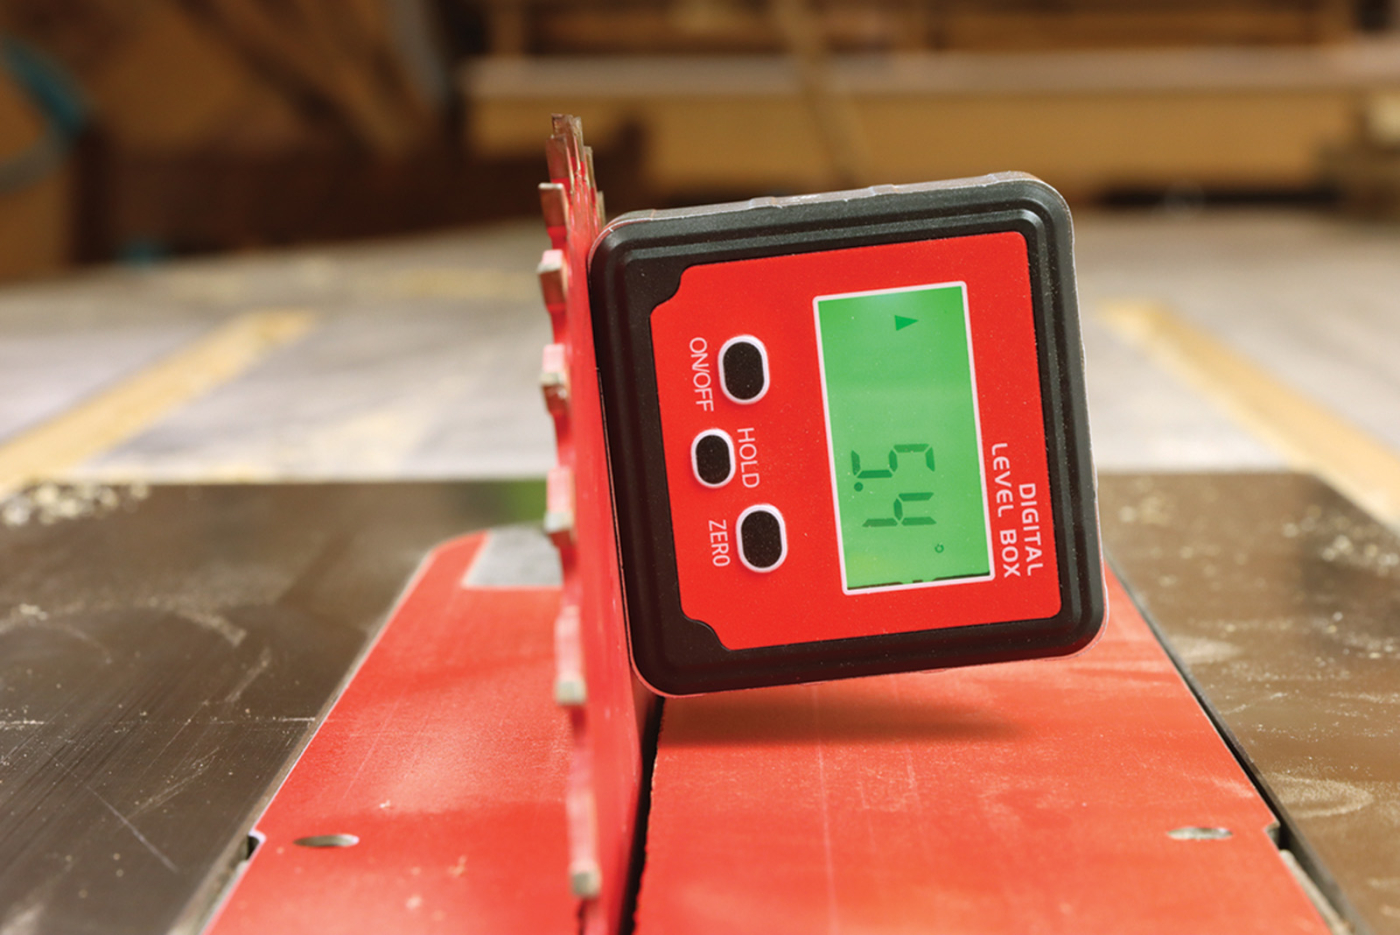
3 Use a digital inclinometer to tilt the blade to a 5.4°.
4 Bevel the back of the cradle jig to 5.4.°. Use a feather board and push stick to control the cut (shown on a left-tilting saw).
5 Return the blade to 90°. Create a partial flat spot on the bottom of the jig.
There are two additional cuts to make the cradle jig work for this project. Tilt the blade to a 5.4° angle and bevel the back side of the cradle board. Return the table saw blade to 90° and trim the bottom of the cradle board slightly. All you really need here is a flat spot that will sit on the table saw, so you can notch the legs of the ottoman. Make several light trimming passes on the bottom of the cradle board, until a leg piece installed in the cradle barely touches the cast iron table saw surface.
Here are some supplies and tools we find essential in our everyday work around the shop. We may receive a commission from sales referred by our links; however, we have carefully selected these products for their usefulness and quality.