We may receive a commission when you use our affiliate links. However, this does not impact our recommendations.

Display Cabinet
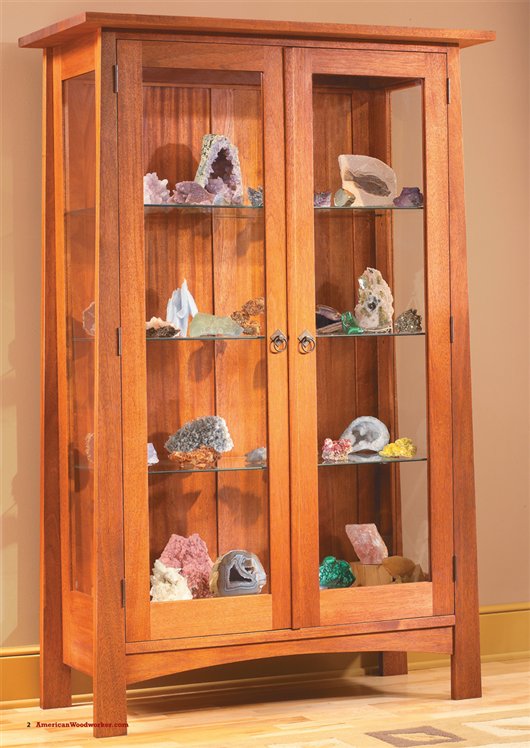
Open sides and built-in lights showcase your treasures.
By Randy Johnson
|
Some cabinets are all about displaying the beauty of
wood. This cabinet, with its glass doors, shelves and
sides and built-in lighting, is all about displaying
what’s inside. Whether it’s your collection of antique tools
or fine porcelain, whatever you put inside is sure to shine.
|
|

You may also like…
Show Case
Sliding Door Bookcase
Modern Mission Cabinet
|
|
Rough cut the stiles for the sides, back, doors and legs. Make a
couple extra pieces of each part in case a couple end up warping badly.
|
|
Click any image to view a larger version.

|
|
Let your roughsawn
lumber rest
for at least 48 hours.
Spread out the parts
so air can freely
circulate around them.
Most wood has a
tendency to warp or
twist a little after it is
rough sawn. Letting
your rough parts rest
allows them to
stabilize before you do
the final dimensioning.
|
|

|
|
Joint and plane the parts. Let these parts rest for a few days as
well. Then use a straightedge to check for flatness. Pick the straightest
and flattest boards for the doors.
|
|

|
|
Use a tongue-and-groove joint for the
side and back frames. The groove is quick to
make on your router table, and the tongue can
be cut with a dado head on your tablesaw.
|
|

|
|
Assemble the side panels on a flat bench. Check for twist by sighting
down a pair of winding sticks, which are simply a matching pair of straight
boards. Adjust the frame in the clamps until the sticks are parallel.
|
|

|
|
Glue the tapered legs to the assembled side frames. The legs should
be flush with the inside of the side frames. Sand the panel side of the legs
and the outside of the side frames before gluing these parts together. If
you get any glue squeeze out at these inside corners make sure to clean
it up with a damp rag before it dries.
|
|

|
|
Rout a rabbet around the inside of the side panels for the glass. The
router leaves rounded corners, so cut them square with a chisel.
|
|

|
|
The tongue-and-groove
joints at
the corners of the
box frames provide
positive alignment
for clamping.
|
|

|
|
Glue and clamp the box frames. Make sure they are perfectly square
and flat, because they determine how square and straight the cabinet
ends up.
|
|

|
|
Dry fit the box frames to the side frames. Once you’re sure the parts fit square and true, add
glue and leave everything clamped until completely dry.
|
|

|
|
Assemble the frame-and-panel back. First clamp the center
stile and top and bottom rails. Then add the panels and the side stiles.
Take a dry run at this assembly before actually gluing it.
|
|

|
|
Screw the back to the top and bottom box
frames. Add a mending plate along the side to
hold the back to the side leg.
|
|

|
|
Slide the bottom in place. The bottom is screwed at the front
through the front support board and held at the rear by a dado in the
back panel. The dado is 1/8" extra deep to allow the bottom to freely
shrink and expand.
|
|

|
|
Drill the holes for shelf pins. Using a shopmade
template and a self-centering drill bit
makes this simple and accurate. Align the
template with the inside edge of the side stiles.
|
|

|
|
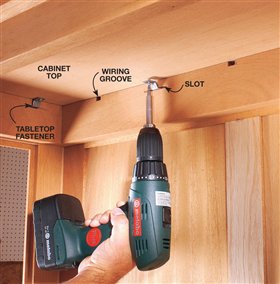
Attach the solid-wood top with tabletop fasteners. This allows the
top to expand and contract without cracking. The slots can easily be cut
with a plate joiner. Note that wiring grooves have already been routed in
the top of the box frame and back.
|
|

|
|
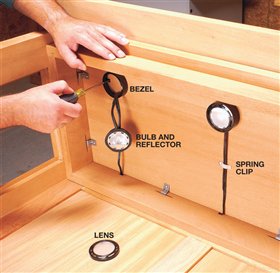
Install the low-voltage lights. This style of light is typically made
up of a bezel, a bulb and reflector, and the lens. The transformer and
switch are then attached to the back of the cabinet.
|
|

|
|
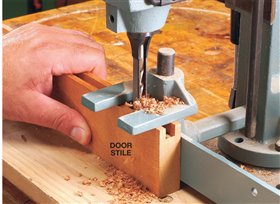
Drill mortises in the door stiles. Center the mortise bit right in the
middle of the groove.
|
|

|
|
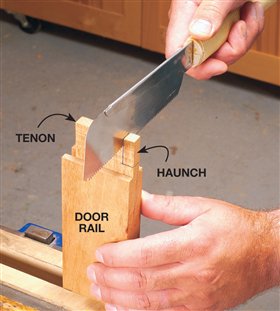
Saw the haunch on the door rail tenons.
The haunch will fit into the groove in the door
stile and stiffens the mortise-and-tenon joint.
|
|

|
|
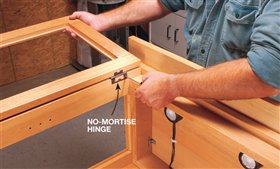
Attach the doors with no-mortise hinges. Put the door in its closed
position and mark for the location of the hinges. The doors will likely fit
snug at the top and bottom, and that’s okay for now. Open the door and
install the no-mortise hinges. Because you don’t have to fuss with making
mortises, their nickname is “the frustration-free hinge.”
|
|

|
|
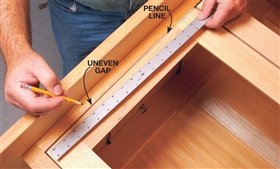
Check the clearance gap along the top and bottom of the doors.
Use a ruler as a guide and draw a pencil line for an even gap. Then
remove the doors and belt sand to the pencil line.
|
|

|
|
Install the glass and retainer strips after you have stained and
finished all of the cabinet parts. Predrill small holes in the retainer strip
and then use a brad pusher to install the small brads. The brad pusher is
a lot safer than a hammer around glass.
|
|

|
Product Recommendations
Here are some supplies and tools we find essential in our everyday work around the shop. We may receive a commission from sales referred by our links; however, we have carefully selected these products for their usefulness and quality.


