We may receive a commission when you use our affiliate links. However, this does not impact our recommendations.
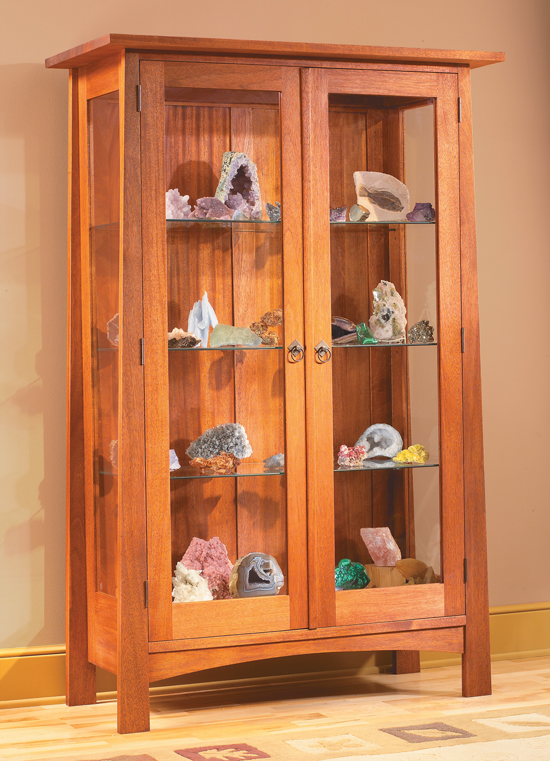
Craftsman-Style Display Cabinet
Lots of glass and built-in lights
By Randy Johnson
|
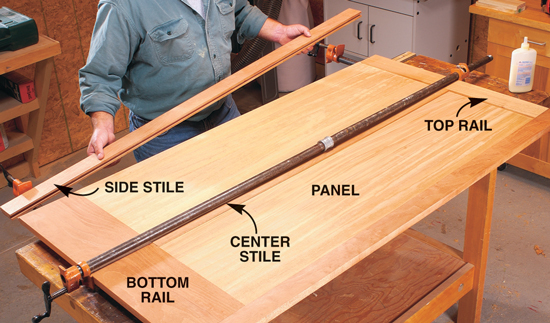
Some cabinets are all about displaying the beauty of wood. This Box frames make it strong
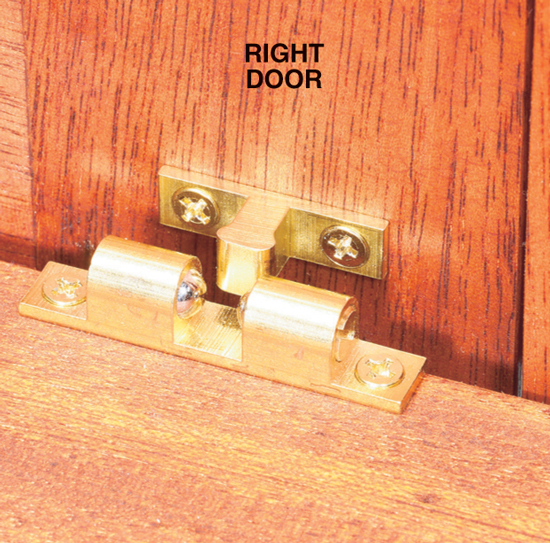
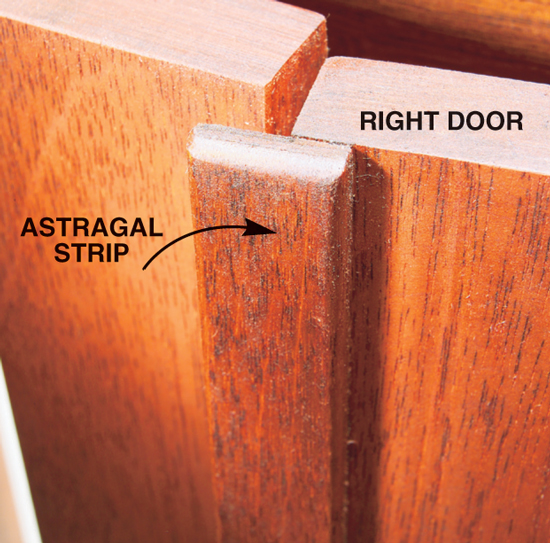
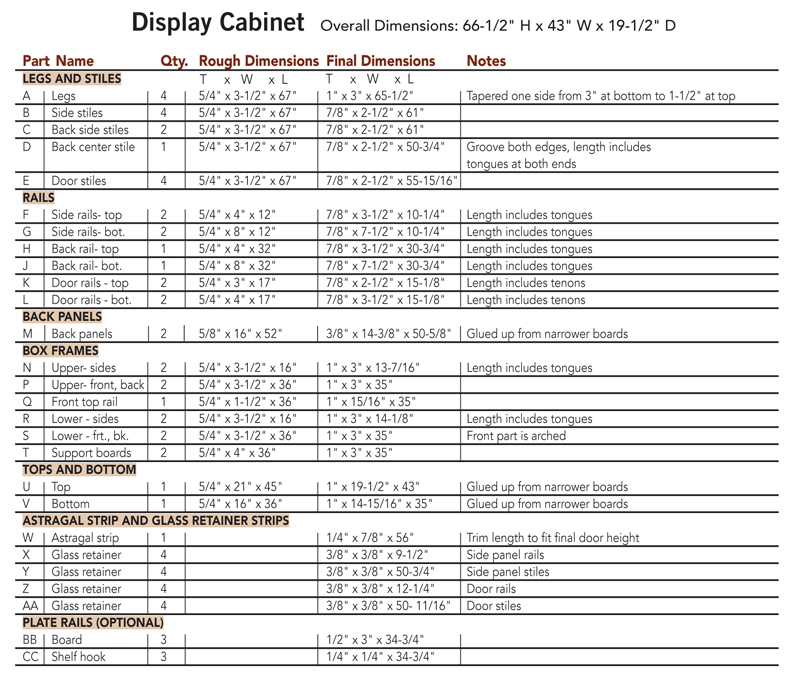
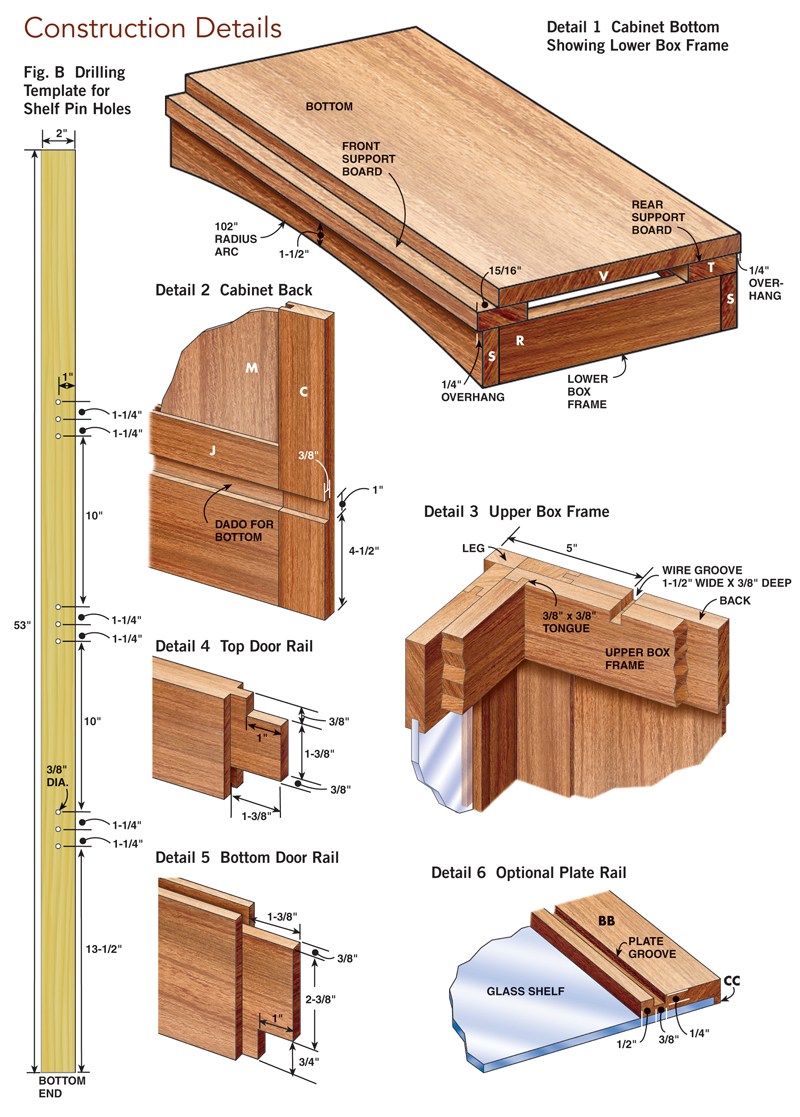
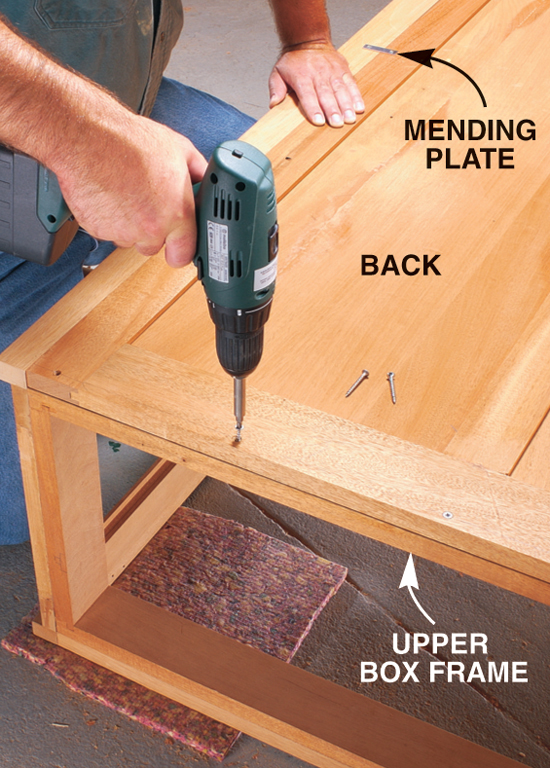
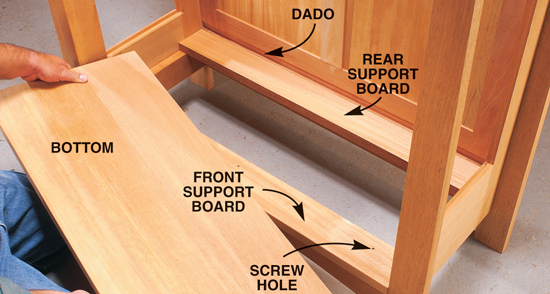
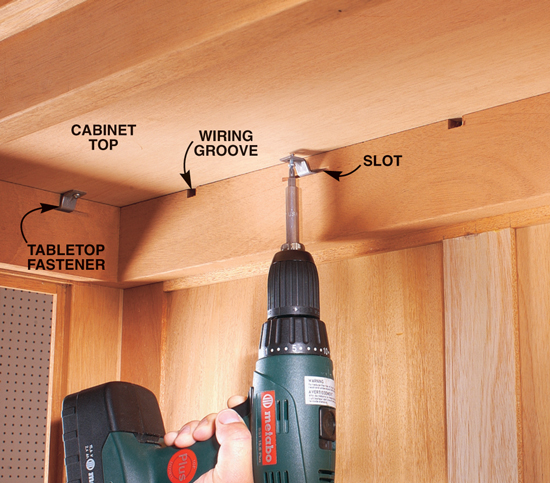
The upper and lower box frames are the secret behind this cabinet’s Tools and materialsThe power tools you need to build this display cabinet include a tablesaw, jointer, planer, bandsaw (or jigsaw), and a router table and router. A mortising machine is helpful but you can also use a drill and chisel to make the mortises. Other necessary tools include an electric drill, a plate joiner, a dado blade and a variety of router and drill bits. Plan on using about 80 bd. ft. of 5/4 (1-1/4-in. thick) lumber for this project. If you use mahogany, the lumber will cost you about $400. Other hardwoods like rift-sawn oak, walnut, or ash would also work. Wood with straight grain works the best. Wavy-grained woods are more likely to bow or twist after construction which could cause problems with the tall doors and panels. The glass and lighting add another $400 to the cost (see Sources, below). That adds up to a big chunk of time and money, but this cabinet is built to last and will be proudly passed on to your children’s children. Mill rough lumber in stagesStart by rough sawing your lumber into parts (Photo 1). See the Cutting List on page 89 for the rough cutting dimensions. Most lumber will twist or warp a bit after it’s rough cut, so let the rough-sawn parts rest for at least a couple of days before jointing and planing them (Photo 2). It’s also a good idea to make a couple extra stiles and legs (A through E) just in case some twist badly. Joint and plane all of the stiles oversize, and let them rest again before final jointing and planing. Then, double-check for flatness before using them (Photo 3). This jointing, planing, resting and checking phase is important and will pay off later when you assemble the cabinet and hang the doors. When you’re done jointing and planing the parts to thickness and width, you can proceed with cutting the grooves in all the rails and stiles (B through L) (Photo 4). Use a 3/8 in. by 3/8-in. slot cutter in your router table to make the grooves (see Sources, page below). You could use your dado blade for this, but I prefer the slot cutter in a router table because it produces more reliable results. After all, the 3/8-in. depth and width are already set for you by the design of the bit. Next, cut the rails and stiles to final length. Then cut the tongues on the side rails (F and G), the back panel rails (H and J) and the back center stile (D). I used a dado blade in the tablesaw for this cut because it’s quick and produces a better cut than a straight bit in the router table. Use your miter gauge to push the rails. Cut one side of the tongue, turn it over and cut the other side. Clamp a board to your rip fence as a stop to control the length of the tongue. This scrap board will also protect your rip fence from being damaged by the dado blade. Assemble the side framesMake sure the frames are flat when you glue them up. I assembled the frames on a flat surface and used a pair of winding sticks to check for flatness (Photo 5). If you discover some twist in the frame, loosen the clamp at that corner and raise or lower the corner until the tops of the winding sticks are perfectly parallel. When the glue on the side frames is dry, add the tapered legs (Parts A, Photo 6). Now sand the inside edge of the legs flush with the side frames and rout a 3/8-in.-wide by 5/8-in.-deep rabbet (see Sources, below) for the glass on the inside of those frames as well (Photo 7). Make the box framesStart making the box frames by machining the tongue-and-groove joints on parts N, P, R and S (Photo 8). A dado blade works well for making this joint. Next cut the arc on the front rail (U) for the lower box frame and glue and clamp the frames together (Photo 9). When the upper box frame is dry, glue the 1-in. side of the top frame rail (Q) to the front (Fig. A). Dry clamp the completed box frames to the cabinet sides. Set the lower box frame flush with the bottom of the bottom side rails (Photo 10) and the upper box frame flush with the top of the top side rails (F, Fig. A). The front arched rail (S) should be set back 1/4 in. from the front of the legs, but the top frame rail (Q) is set flush with the front of the legs (Photo 10). You may need to make a few small adjustments to the clamps or the position of the parts to get it square, but if your box frames and side panels were accurately made, the cabinet should just about square itself. When everything looks good and square, take it apart. Take some time to sand the inside corner areas between the box frames and cabinet sides and legs. It’s easier to do this now, before final gluing. Finally, reclamp and glue the sides to the box frames (Photo 10). Assemble the backGlue up lumber to make the back panels (M). We simply resawed a couple of 5/4 boards, planed them down and glued them together. The final thickness of the panels is 3/8 in., but leave the material about 1/64-in. to 1/32-in. thicker. This gives you a little extra material to sand after the panel parts are glued together. Sand these panels before installing them into the back frame. Glue up the back in stages. Start with the center stile (D) and the top and bottom rails (H and J). Make sure these parts are square to each other. Then slide the panels (M) into place and add the side stiles (C, Photo 11). Check that the back is square and let the glue dry thoroughly. Next, rout the groove for the cabinet bottom (V) in the back (Detail 2, below). Fasten the back to the rest of the cabinet with screws at the top and bottom. Also use a 2-in.-long mending plate (see Sources, below) at each side to keep the back and sides flush (Photo 12). Add the bottom and topBefore installing the bottom (V), glue the support boards (T) to the top of the lower box frame (Detail 1, below). The bottom is then slid in on top of these support boards. It is held in place with three 1-5/8-in. screws through the front support board and in a dado at the back (Photo 13). The bottom extends 1/4-in. into the dado. Because the dado is 3/8-in. deep, the solid wood bottom is free to shrink and expand without pushing the back or creating a gap. The top (U) is held in place with tabletop fasteners (Photo 15, see Sources, below). They allow seasonal movement of the solid top. Notice that we have pre-routed the grooves for the light-fixture wires. Install the lightsLow-voltage halogen accent lights are a good choice for this cabinet (see Sources, below). They are easy to install (Photo 16) and relatively inexpensive; $60 for the three lights, transformer, dimmer switch and power block. Simple plastic spring clips (see Sources, below) hold the wires against the inside of the top. Always install hardware, including lighting, before final finishing. That way you’re sure everything fits correctly. Now is also a good time to drill the holes for the shelf pins (Photo 14) using a drilling template (Fig. B) and a self-centering bit (see Sources, below). Building and installing the doorsWood-frame doors with glass need strong joinery to handle the extra weight of the glass. That’s why I chose a traditional haunched mortise-and-tenon joint (Photos 17 and 18, Details 4 and 5, below). Use winding sticks when gluing and clamping these doors, just like you did with the side panels (Photo 5). Mount the doors into the cabinet using no-mortise hinges (Fig. A, Photo 19, see Sources, below). These hinges greatly simplify door installation. If you’ve closely followed the sizes in the Cutting List, your doors should fit snug at the top and bottom. This is intentional; the snug fit allows you to trim the top and bottom of each door to produce nice, even gaps (Photo 20). The gap at the top and bottom should match the gap on the sides. With the no-mortise hinges, that gap is a little over 1/16 in. Complete the door installation by gluing the astragal strip (W, see photo, lower right) on the right-hand door. Next add the brass ball door catches (see photo, below left) and door pulls (see Sources, below). Cut the glass retainer strips (X, Y, Z and AA) at this time and if you want to display plates, make the optional plate rails (BB and CC, Detail 6, below). Finishing and final assemblyDisassemble your cabinet. Remove the doors, lights, top, bottom and back. Do a final sanding on all the parts and apply the stain and topcoat. We used a red oak stain and wipe-on tung oil finish (see Sources, below). When you’ re done finishing, reassemble the cabinet and install the glass in the doors and sides (Photo 21).Use a brad pusher (see Sources, below) for this step—it’s safer than a hammer. Choosing the right glassWe used 3/16-in. tempered glass in the doors for strength and safety. Tempered glass is tough and resistant to breakage. When it does break, it shatters into small pieces averaging only about 1/4 in. in size. These small pieces are far less hazardous than the large shards that regular glass breaks into. For the shelves, we used 1/4-in.-thick regular non-tempered glass with polished edges. Most glass merchants recommend using regular non-tempered glass for shelves. That’s because tempered glass is very susceptible to shattering when it gets bumped or nicked on an edge. Regular glass may chip at the edge, but is less likely to shatter suddenly. The 1/4-in. shelf thickness is fine for holding lighter items, but 3/8 in. or even 1/2 in. would be better if you plan to display heavy objects. Consult your glass supplier for a final recommendation. Taking the twist out of tall doorsWhen building frame-style doors, it’s always important to mill your lumber carefully and assemble the doors so they turn out as flat as possible. But inevitably, some doors twist and don’t hang flat after installation. This is especially true of tall doors. Anticipating this, we added a couple of details to our doors to overcome any potential twist. The astragal strip and the strong catches work together to hold both doors securely closed and flat…
Use a strong catch on the right-hand door. This brass ball catch can even hold a moderately twisted door flat and keeps the doors securely closed.
Use an astragal strip to hold the left-hand door shut. It also covers up the center gap between the doors. Sources(Note: Product availability and costs are subject to change since original publication date.) Rockler, rockler.com, 800-279-4441, Lee Valley, leevalley.com, 800-871-8158, Grizzly, grizzly.com, 800-523-4777, Glass Fabricators Inc., 800-532-1506, CableOrganizer.com, 877-547-4580, Minwax, minwax.com, 800-523-9299, Woodcraft, woodcraft.com, 800-225-1153, Woodworker’s Hardware, wwhardware.com, 800-383-0130, Accent lights, #WKAL20LB; Home Center or Hardware Store, Shopping ListDimensions
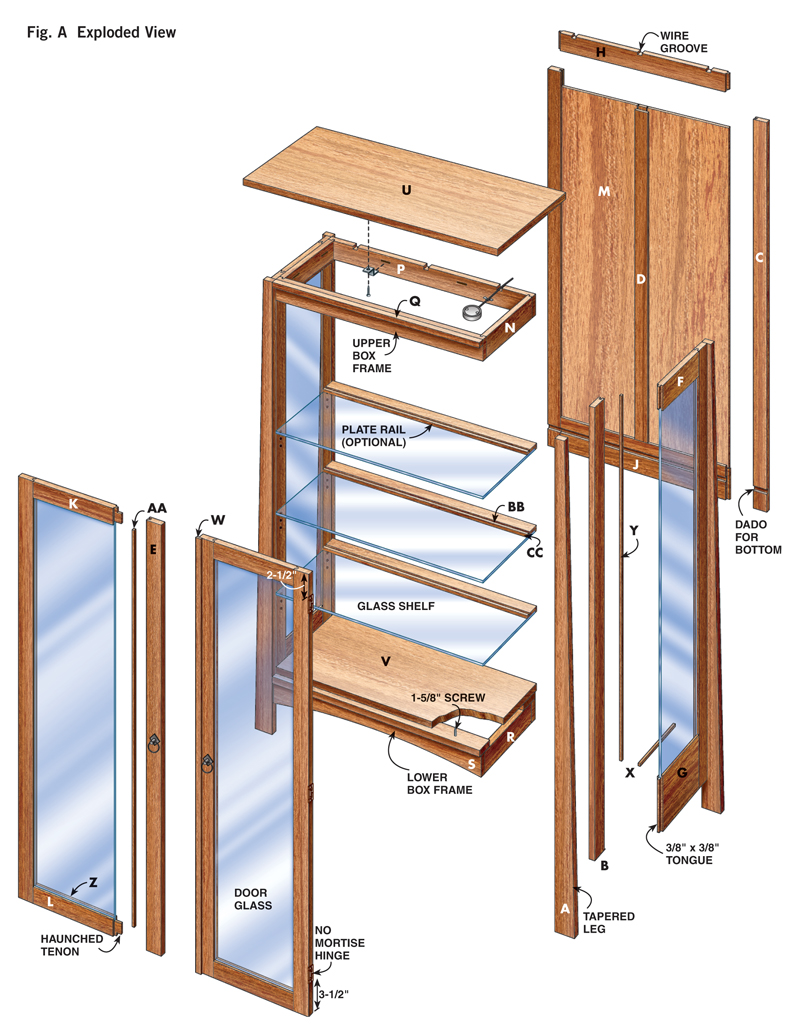
Fig. A: Exploded View
Fig. B: Drilling Template for Shelf Pin Holes
This story originally appeared in American Woodworker January 2003, issue #98.
|
Click any image to view a larger version.
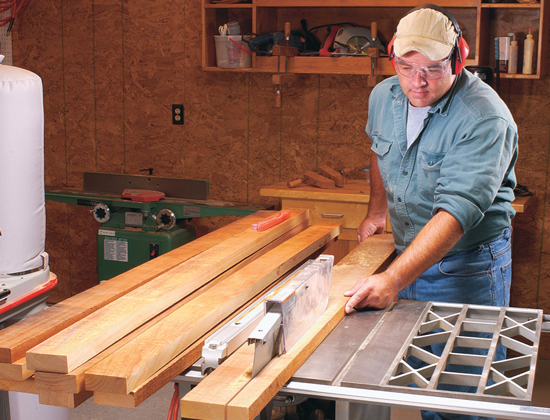
1. Rough cut the stiles for the sides, back, doors and legs. Make a couple extra pieces of each part in case a couple end up warping badly.
2. Let your rough-sawn lumber rest for at least 48 hours. Spread out the parts so air can freely circulate around them. Most wood has a tendency to warp or twist a little after it is rough sawn. Letting your rough parts rest allows them to stabilize before you do the final dimensioning.
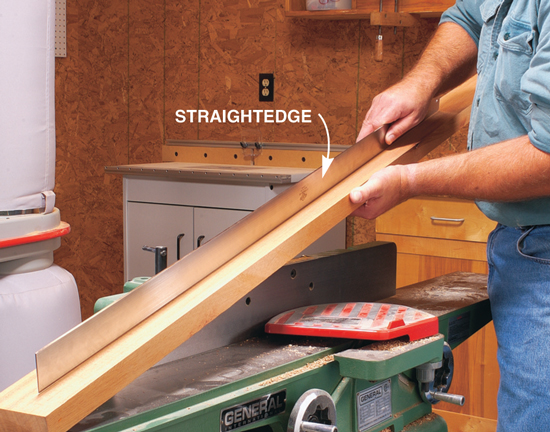
3. Joint and plane the parts. Let these parts rest for a few days as well. Then use a straightedge to check for flatness. Pick the straightest and flattest boards for the doors.
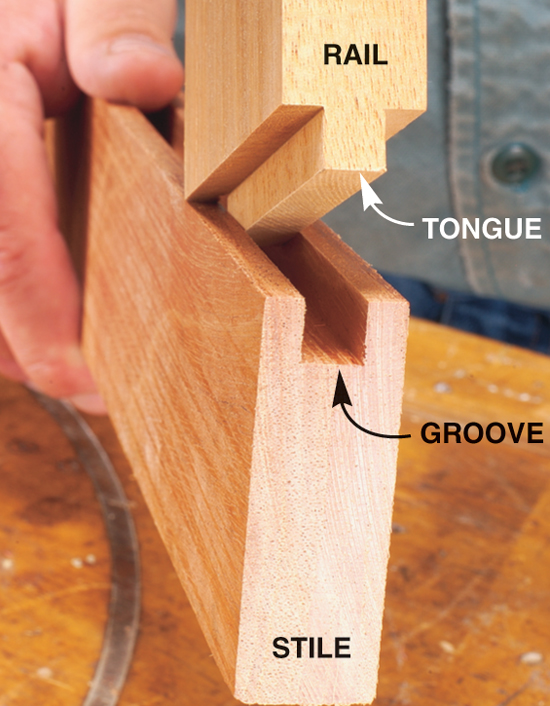
4. Use a tongue-and-groove joint for the side and back frames. The groove is quick to make on your router table, and the tongue can be cut with a dado head on your tablesaw.
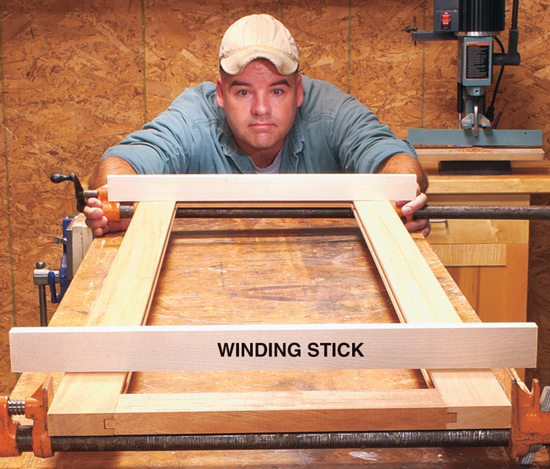
5. Assemble the side panels on a flat bench. Check for twist by sighting down a pair of winding sticks, which are simply a matching pair of straight boards. Adjust the frame in the clamps until the sticks are parallel.
6. Glue the tapered legs to the assembled side frames. The legs should be flush with the inside of the side frames. Sand the panel side of the legs and the outside of the side frames before gluing these parts together. If you get any glue squeeze out at these inside corners make sure to clean it up with a damp rag before it dries.
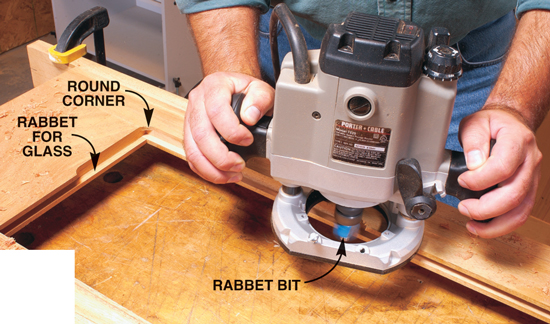
7. Rout a rabbet around the inside of the side panels for the glass. The router leaves rounded corners, so cut them square with a chisel.
8. The tongue-and-groove joints at the corners of the box frames provide positive alignment for clamping.
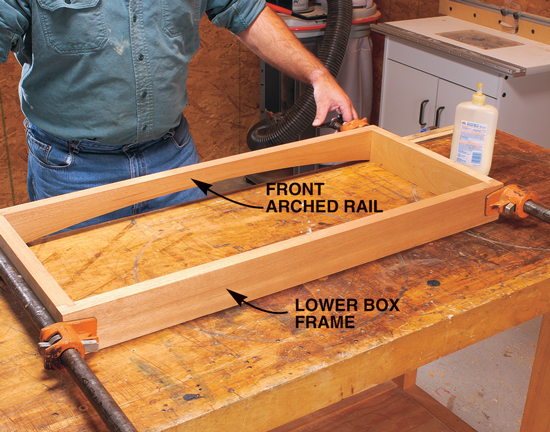
9. Glue and clamp the box frames. Make sure they are perfectly square and flat, because they determine how square and straight the cabinet ends up.
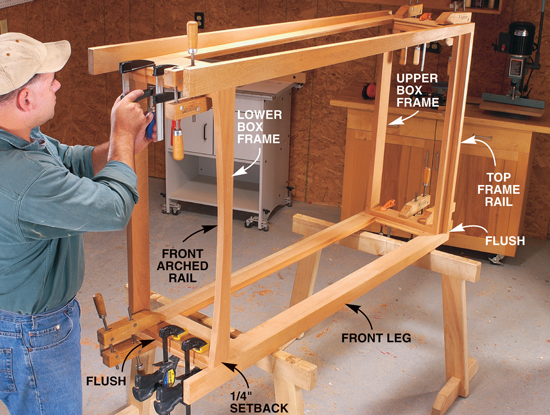
10. Practice clamping the box frames to the side frames. The box frames add an amazing about of strength and rigidity to the cabinet. Once you’re sure the parts fit square and true, add glue and leave everything clamped until completely dry.
11. Assemble the frame-and-panel back. First clamp the center stile and top and bottom rails. Then add the panels and the side stiles. Take a dry run at this assembly before actually gluing it.
12. Screw the back to the top and bottom box frames. Add a mending plate along the side to hold the back to the side leg.
13. Slide the bottom in place. The bottom is screwed at the front through the front support board and held at the rear by a dado in the back panel. The dado is 1/8-in.-extra deep to allow the bottom to freely shrink and expand.
14. Drill the holes for shelf pins. Using a shop-made template and a self-centering drill bit makes this simple and accurate. Align the template with the inside edge of the side stiles.
15. Attach the solid-wood top with tabletop fasteners. This allows the top to expand and contract without cracking. The slots can easily be cut with a plate joiner. Note that wiring grooves have already been routed in the top of the box frame and back.
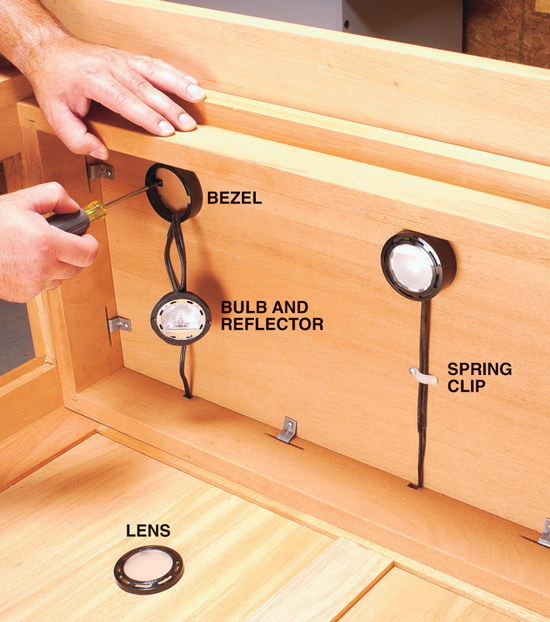
16. Install the low-voltage lights. This style of light is typically made up of a bezel, a bulb and reflector, and the lens. The transformer and switch are then attached to the back of the cabinet.
17. Drill mortises in the door stiles. Center the mortise bit right in the middle of the groove.
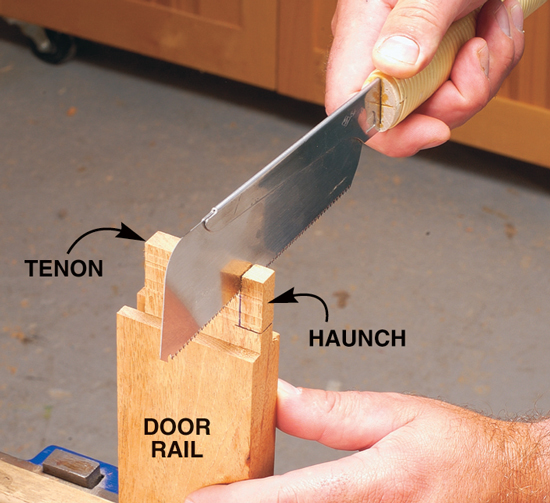
18. Saw the haunch on the door rail tenons. The haunch will fit into the groove in the door stile and stiffens the mortise-and-tenon joint.
19. Attach the doors with no-mortise hinges. Put the door in its closed position and mark for the location of the hinges. The doors will likely fit snug at the top and bottom, and that’s okay for now. Open the door and install the no-mortise hinges. Because you don’t have to fuss with making mortises, their nickname is “the frustration-free hinge.”
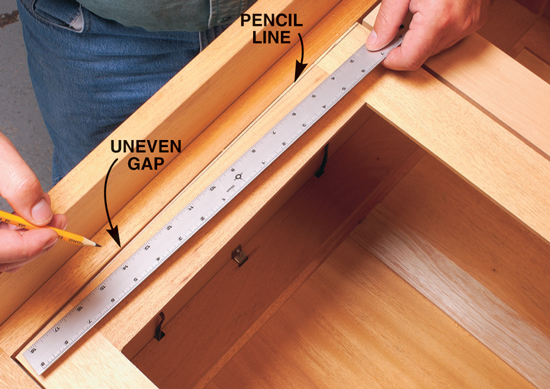
20. Check the clearance gap along the top and bottom of the doors. Use a ruler as a guide and draw a pencil line for an even gap. Then remove the doors and belt sand to the pencil line.
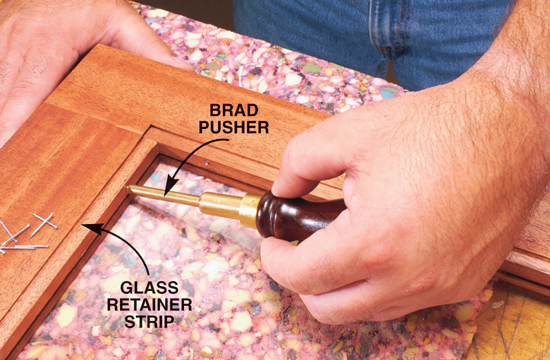
21. Install the glass and retainer strips after you have stained and finished all of the cabinet parts. Predrill small holes in the retainer strip and then use a brad pusher to install the small brads. The brad pusher is a lot safer than a hammer around glass. Oops!
One of the legs of our cabinet wasn’t touching the floor. Either the floor has a low spot or our cabinet was a little out of square. Not to worry. There’s an easy fix, and it works on almost any piece of furniture that has a similar problem. Just drill a hole in the bottom of the leg and add a piece of dowel long enough to keep the cabinet from rocking.
|


Here are some supplies and tools we find essential in our everyday work around the shop. We may receive a commission from sales referred by our links; however, we have carefully selected these products for their usefulness and quality.