In Projects, Shop Blog, Techniques

We may receive a commission when you use our affiliate links. However, this does not impact our recommendations.

Coved Doors on the Tablesaw

Make beautiful raised panels without a router table and expensive bits.

By George Vondriska

The tool of choice for most small-shop woodworkers who want to make raised panels is the router: A large one, generally 3 hp,hung in a router table, plus a set of specialized bits. 

But what if you just want to make one or two raised-panel doors, say for a bathroom vanity, a small cabinet, or a jewelry box? With our technique you can make raised panels with the traditional scooped-out profile using just your tablesaw. This process is based on the traditional method for cutting coved moldings on the tablesaw, but we’ve adapted it for making raised panels.You clamp an auxiliary fence at an angle to your blade, and feed the panel over the blade repeatedly, taking off only a little at a time until you get the profile you want.Cutting coves on the tablesaw can require a fair amount of trial and error,but we’ve eliminated that by developing a simple recipe that steers you through the process and gives you perfect results, even the first time. 

For large doors, cutting coved panels on the tablesaw is actually a better technique than using a router.The tablesaw allows you to cut a very wide profile; wider than you could cut with a router bit. On large raised panels, like those found on entertainment centers and armoires, the narrow profile produced by router bits can look out of scale. The best way to cut these wider raised panels is with a shaper,but again, if you’re only making a couple panels, this tablesaw method will give you excellent results. 

For many doors, you may still need a router and a railand- stile router bit set to make the door frames. But these are smaller, less-expensive bits, and don’t require a 3-hp router.

The bad news

One downside of this tablesaw technique is that the panel requires a
fair amount of sanding. We’ve developed a solution to simplify the
sanding and make it go faster, but if you had to sand more than three or
four doors at a time, it’ll get old. However, for one or two doors, the
sanding is not a big deal. 

The other drawback to this technique, although it’s minor, is that
the panel edge is not automatically cut to the right thickness. Because
this is the part that fits into the groove in the frame, it has to fit
precisely. It’s important to make accurate measurements as you go (Photo
7).


What you need

Any tablesaw, from benchtop to cabinet saw, can handle this work, as
long as you have a sharp, carbide- tipped blade to make the cuts.A blade
with a high tooth count (60 or more) will produce a smoother cut than a
blade with fewer teeth.And a smoother cut means less time spent
sanding.

You’ll need to build a simple auxiliary fence for your tablesaw and a
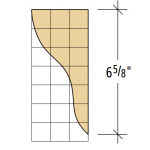
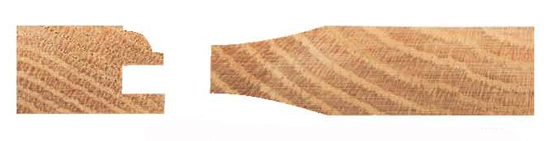
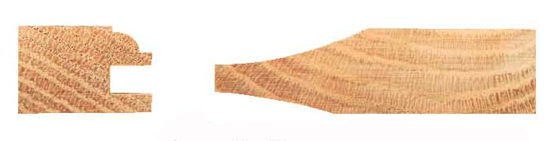
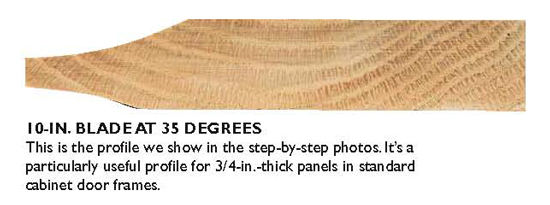
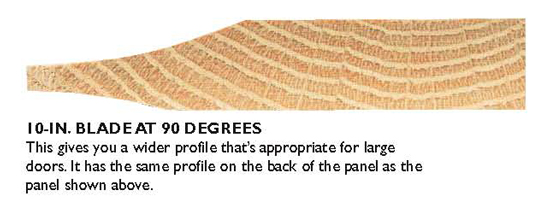
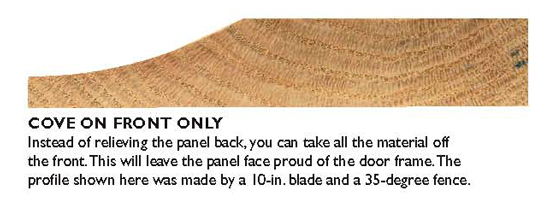
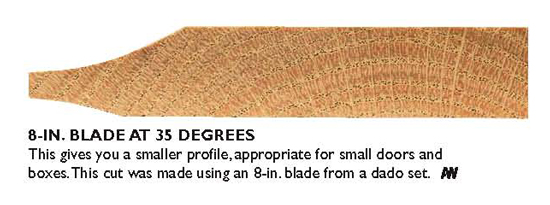
fresh zero-clearance throat plate (see page 50 for how to make one). An
inexpensive dial caliper is handy but not essential for measuring the
thickness of your panel edges.


Planning your doors

With this method, the panels are cut to fit the frame, so it’s
essential to make the frame parts first.You can use a spare rail or
stile to test the thickness of the panel edge when it’s near completion.

Glue up your panels, if required,and plane them all to the same
thickness. This is important for cutting the tongue of each panel to the
correct thickness.

By varying the angle of the fence and the size of the blade you use,
you can get an infinite variety of profiles.We suggest starting off
with a profile that has a small cove on the back of the panel and a
larger one on the front. For most door frames, this will make the
outside surface of the panel slightly below or flush with the
frame,which will make sanding the doors much easier.

For our doors,we planed the panels to 13/16-in. thick, and cut a
profile that had a 1/4-in. tongue, a 1/8-in. cove on the back and a
7/16-in. cove on the front.Our maximum depth of cut was 7/16 in.


First, set up your saw

The actual cutting of the panels is fairly straightforward; you clamp a fence at an
angle to the saw blade and pass the panels over the blade,
taking shallow cuts. But to get perfect results, you need to set up the
fence accurately. We’ve developed a guaranteed system:

1. First,build the auxiliary fence (Photo 3) and make the centering
and height boards (opposite page) that you’ll use to set the location of
the fence.

2. Find top-dead-center of the blade using the centering board and
height board (Photo 1). It’s important that the fence be located over
top dead-center so the tongue of the panel is properly shaped to fit the
groove in your frames (see Oops!, below). This is difficult on many
tablesaws because the blade actually swings forward as it is raised. You
need to find top-dead-center at the maximum height to which you will be
raising the blade, because that height will give you the profile you
want.

3. Transfer the location of top-dead-center to your zero-clearance
insert (Photo 2).Raise your blade through the zero-clearance insert if
you haven’t already.

4. Position the fence on the tablesaw so it covers the front half of the blade,where the teeth point
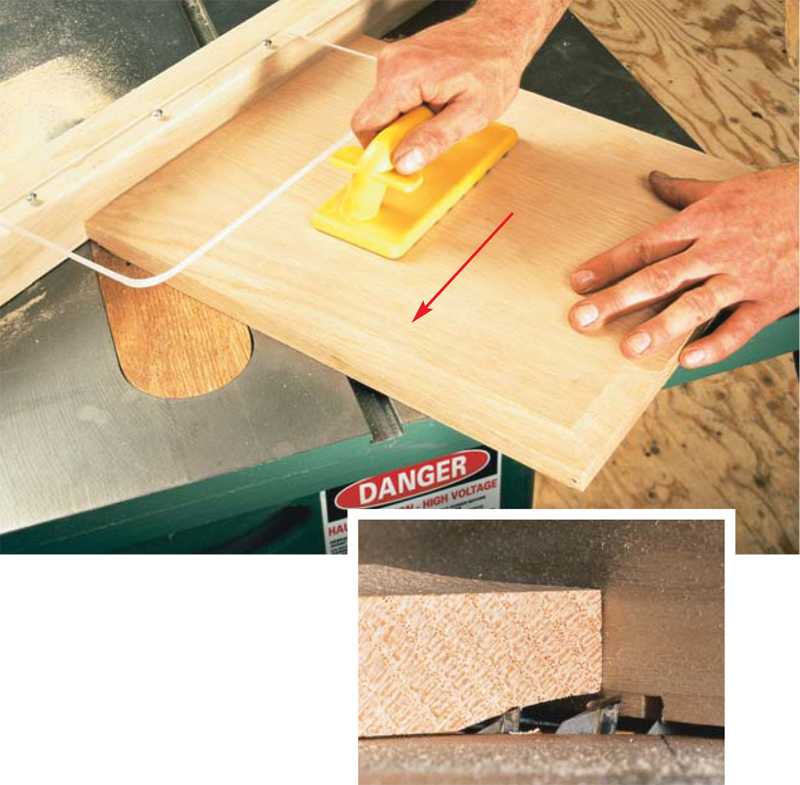
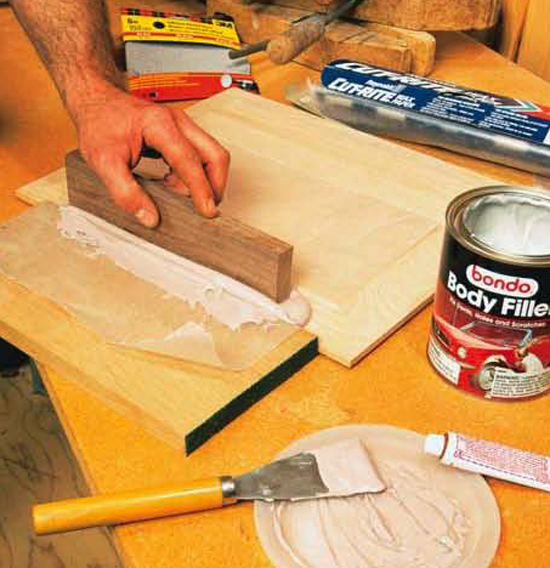
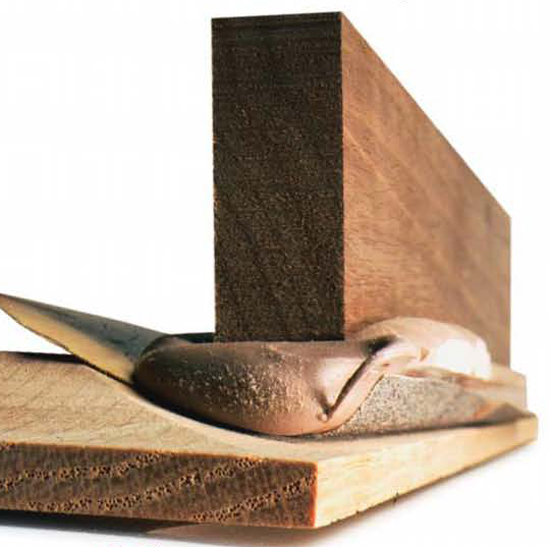
down toward the table (Photo 3). The blade must be down.Use your miter
gauge to set the fence at 35 degrees. The edge of the fence must be
directly over the intersection of the blade kerf and the top-dead-center
line on the insert (below).Clamp the fence securely to the saw, and
you’re ready to make a panel.


Cut the coved profile

Now that your fence is set, it’s time to actually cut the panels. Here’s the process:

1. Raise the blade 1/16-in. above the surface of the tablesaw and cut
the end-grain of the panel (Photo 4). Note that the panel is being
pushed “uphill” against the fence. Cut the long grain and repeat the
process on the other side of the panel.

2. Increase the height of the blade 1/16 in. and make another pass on
all four edges of both faces, end grain first. Now the back of the
panel is complete (Photo 5).

3. Finish the front of the panel by continuing to raise the blade
1/16 in. per pass. Use test cuts on the scrap piece to monitor your
progress. It will take about six passes to complete the profile on the
front.

4. Measure the thickness of the panel tongue (Photo 7). Leave it
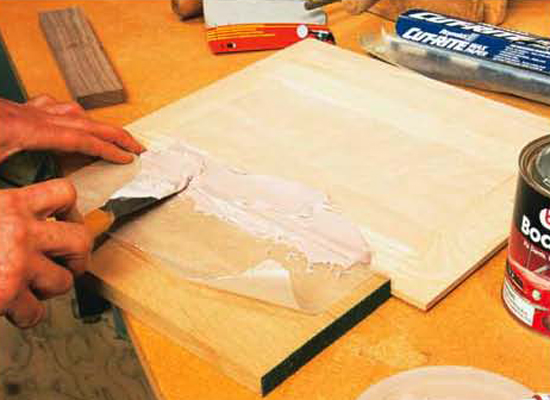
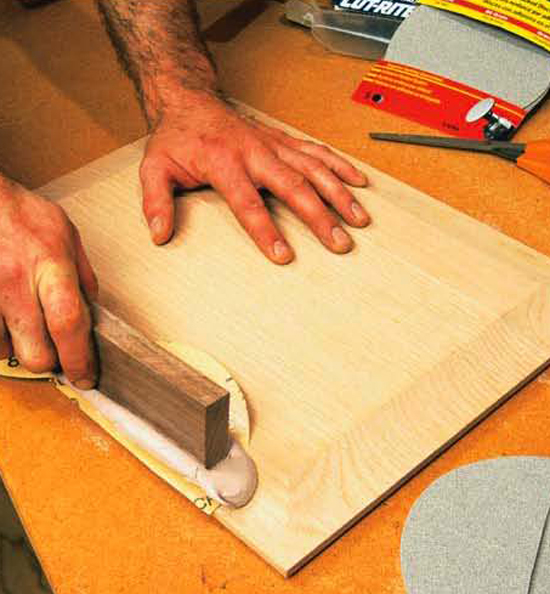
1/32-in. thicker than the groove in the frame to allow for sanding. Dial
calipers are an accurate and convenient way to take this measurement.


Sand the profile

To sand the saw scratches out of the profile without spoiling its
shape and crisp edges, you need a sanding block that’s made to fit the
profile.An easy way to do this is with Bondotype auto-body filler (Photo
8).

When you sand the profile, start with 80-grit sandpaper and move up
to 220 grit.When the panel is fully sanded, it should easily slip into
the door frame without rattling around inside it.


Tips for great coved panels

Raise the blade in small increments; 1/16 in. at a time. Light passes
make these cuts easier on your saw and provide the smoothest surface.

Have on hand an extra panel, of the same dimensions and thickness
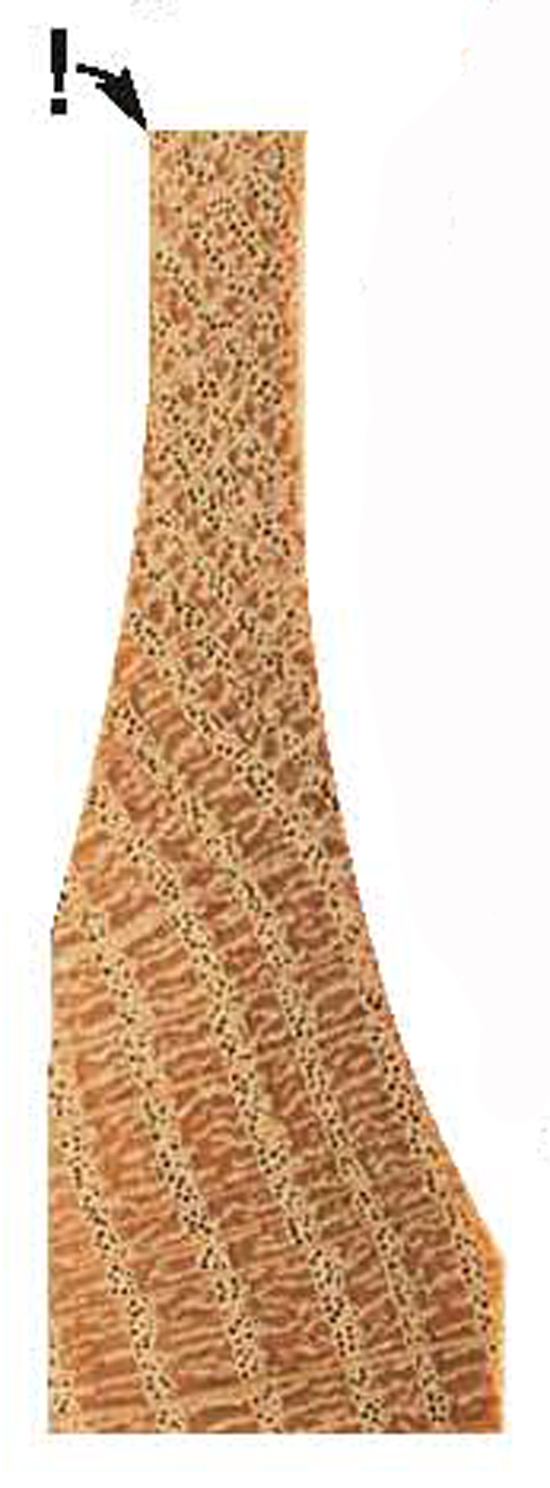
as your good ones. Use this for test cuts as you machine the panel.


Oops!

We learned the hard way that setting up the fence carefully is essential. If the auxiliary fence is located behind the center of the blade, you’ll get a profile that gets thicker right at the edge. This won’t fit into the groove worth a darn. Use the setup procedure we show, and you’ll be sure you’ve set the fence at the top-dead-center of the blade.
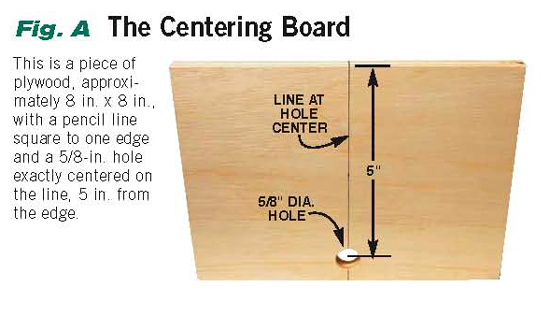
Sources

(Note: Product availability and costs are subject to change since original publication date.)

Auto parts stores, Auto body filler.

Highland Hardware, 800-241-6748, Fractional dial caliper,
Part #06.50.08.

Home centers, Self-adhesive sandpaper, 6" discs.

Woodworker’s Supply, 800-645-9292, Push Block.

Fig. A: The Centering Board

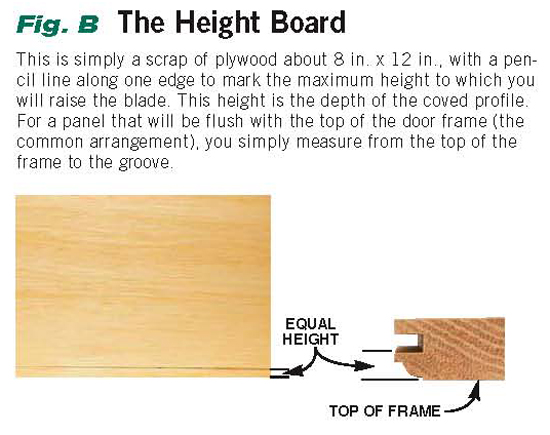
Fig. B: The Height Board

This story originally appeared in American Woodworker September 2002, issue #95.

September 2002, issue #95

Purchase this back issue.

Click any image to view a larger version.

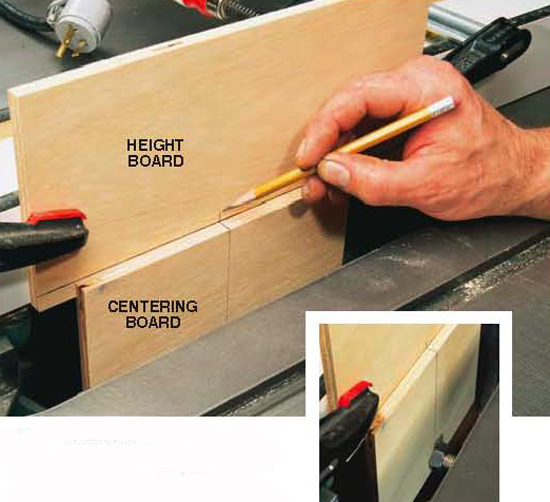
1. Locate the center of your saw arbor. Mount the centering board on the arbor as if it was the saw blade, and clamp the height board to the rip fence, with the bottom edge at the level of the saw table. Raise the arbor of your saw until the top of the centering board is at the line on the height board. Mark where the arbor line meets the height line.

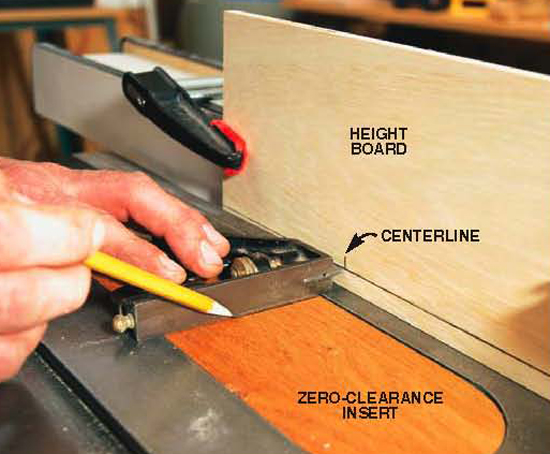
2. Transfer the centerline from the height board to the zero-clearance throat plate.Then raise the blade to the maximum height you will be using, while the zero-clearance throat plate is clamped down.

3. Clamp a shop-made fence to your saw using
the miter gauge to set its angle to 35 degrees. The fence edge should
be directly over the intersection of the centerline
on the insert and the blade kerf.

4. Always machine the
end grain first, using a
push block to hold the
panel.The blade should
only protrude 1/16-in.
above the table. Cut all
four edges of both sides
of the panel twice,
taking off no more than
1/16 in. at a time.

5. This is how the edge should look after two passes front and back.At this point the coved profile on the back of the panel is complete, so mark which sides of the panels you want to be the front and back.

6. It will take approximately six passes in all on the front of the panel to achieve the final shape. Stop cutting when the edge of the panel (the tongue) is the correct thickness (Photo 7).

7. Measure the edge of the panel carefully. To allow for sanding, it should be 1/32-in. thicker than the groove in the frame.

8. Make a sanding block that’s the exact shape of your coved profile. Mix auto-body filler and pack it into the cove, with a layer of wax paper over the wood to prevent it from sticking. A piece of scrap creates a dam to hold the filler in place.

9. Add a handle to the sanding block while the filler is wet.This makes it a lot easier to hold the block when you’re sanding.When dry, the filler creates a sanding block perfectly formed to the cove.

10. Attach sandpaper to the sanding block. Self-adhesive sheets are the easiest, but you can also use self-adhesive discs, cut in half.

11. Sand the cove, starting with 80-grit sandpaper and moving up to 220 grit. Every so often, check the fit of the panel, to be sure you’re not making the tongue too thin.

Imagine the possibilities

Now that you understand the technique, the possibilities are limitless. The look of the cove changes with every change of blade diameter and fence angle.


Product Recommendations

Here are some supplies and tools we find essential in our everyday work around the shop. We may receive a commission from sales referred by our links; however, we have carefully selected these products for their usefulness and quality.

Recommended Posts

Start typing and press Enter to search