We may receive a commission when you use our affiliate links. However, this does not impact our recommendations.
 Although this project uses 40 feet of moulding, it’s quite simple to make.
 Although this project uses 40 feet of moulding, it’s quite simple to make.
My wife and I recently attended our niece’s wedding in Ft. Wayne, Ind. We realized after checking into the hotel that we had several hours to kill before the event, so we got directions to the nearest antique mall and spent two hours there, searching through 20,000 square feet of moderately valuable old stuff. As usual, I was looking for moulding planes while my wife hunted for anything that struck her fancy.
Included in the junk was a stack of woodworking magazines from the ’40s and ’50s. In several of these magazines, I found handsome measured drawings of Colonial-era furniture all rendered by a man named Lester Margon, and one of those Margon-drawn colonial-era pieces was this plate rack.
The circa 1765 original that Margon drew hung in a recreated tavern in Old Sturbridge Village in Massachusetts. It was made of pine, unfinished, and was assembled – like my reproduction – with brads.
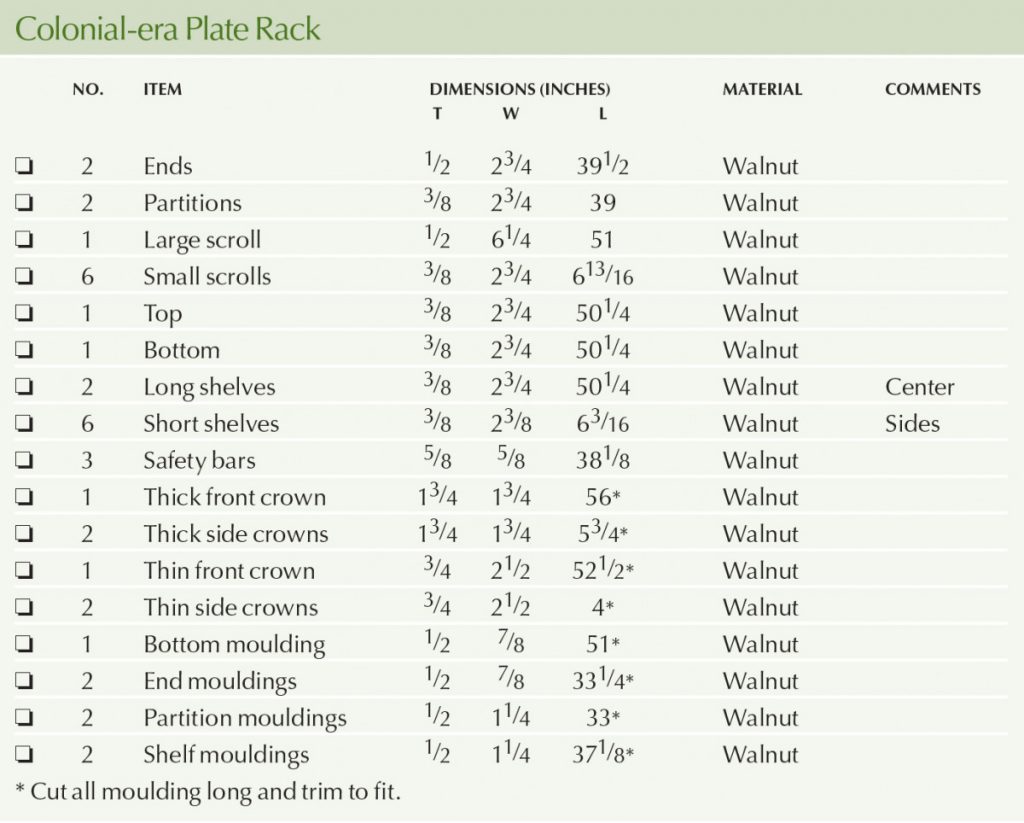
Colonial-era Plate Rack Cut List
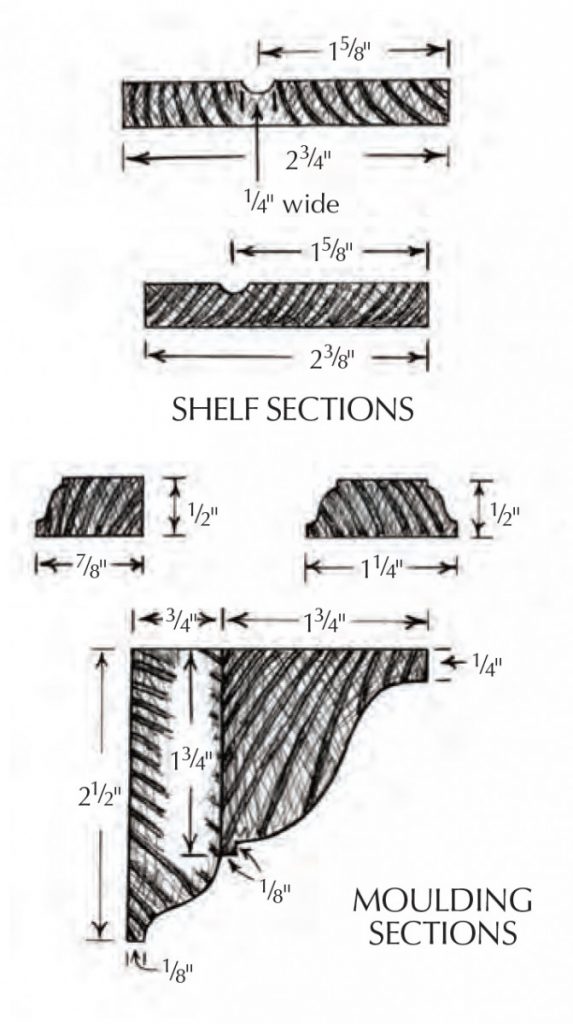
Scrolls and Mouldings
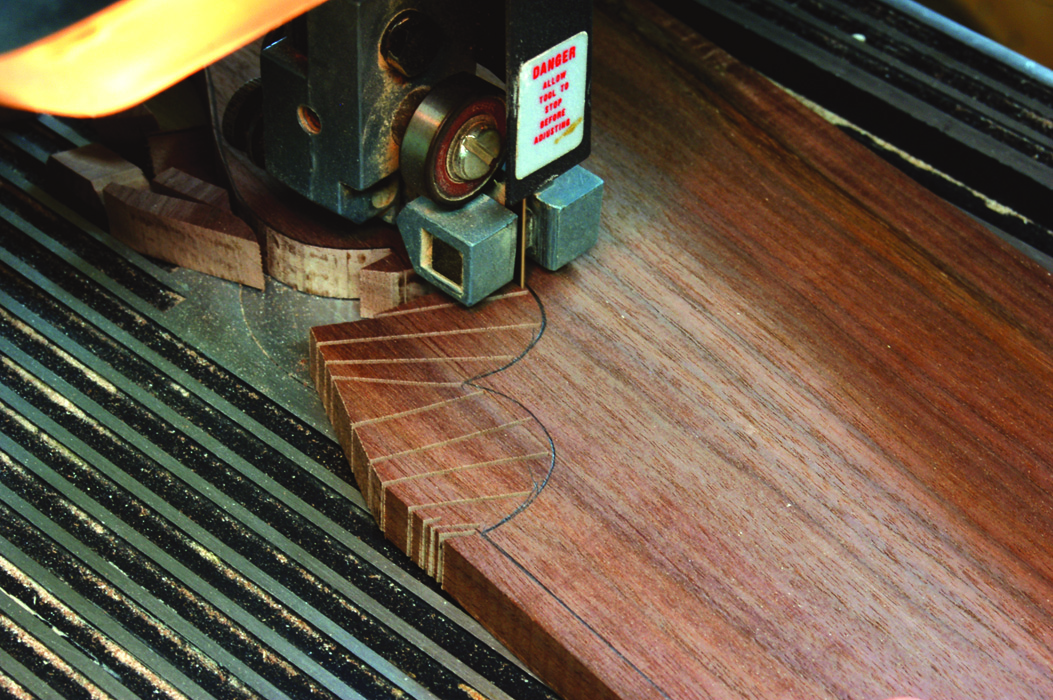
Relief for a wide blade. The use of a 1⁄4″ band saw blade requires a number of relief cuts so that the back edge of the blade can negotiate these tight circles.
I sawed out my parts from two walnut 3x 12s I’d been air drying for the last four years. Because this piece is assembled from thin stock, which sometimes exhibits a tendency to bow and twist after it’s cut from thicker stock, I cut everything heavy, then I gave each piece a preliminary straightening on my jointer before stickering the material in my shop for two weeks in order to stabilize the stresses in the material. I then gave each piece a final straightening on my jointer and planed it to the final thickness.
I chose to begin by cutting out the plate rack’s seven scrolls using a 1⁄4” band saw blade, though this blade required relief cuts in order to negotiate some of the tighter circles. I chose this blade because it is more stable on the long sweeping forms of the main scroll than an 1⁄8” blade would be. In fact, by exerting slight lateral pressure on the work with my right hand (which forces the work against the side of the blade), it’s possible to make those long cuts with little wandering of the blade in the cut. This combination of a stabilizing lateral pressure and relief cuts makes the 1⁄4” blade a good compromise when cutting a scroll like this, which features a mixture of tight and long curves.
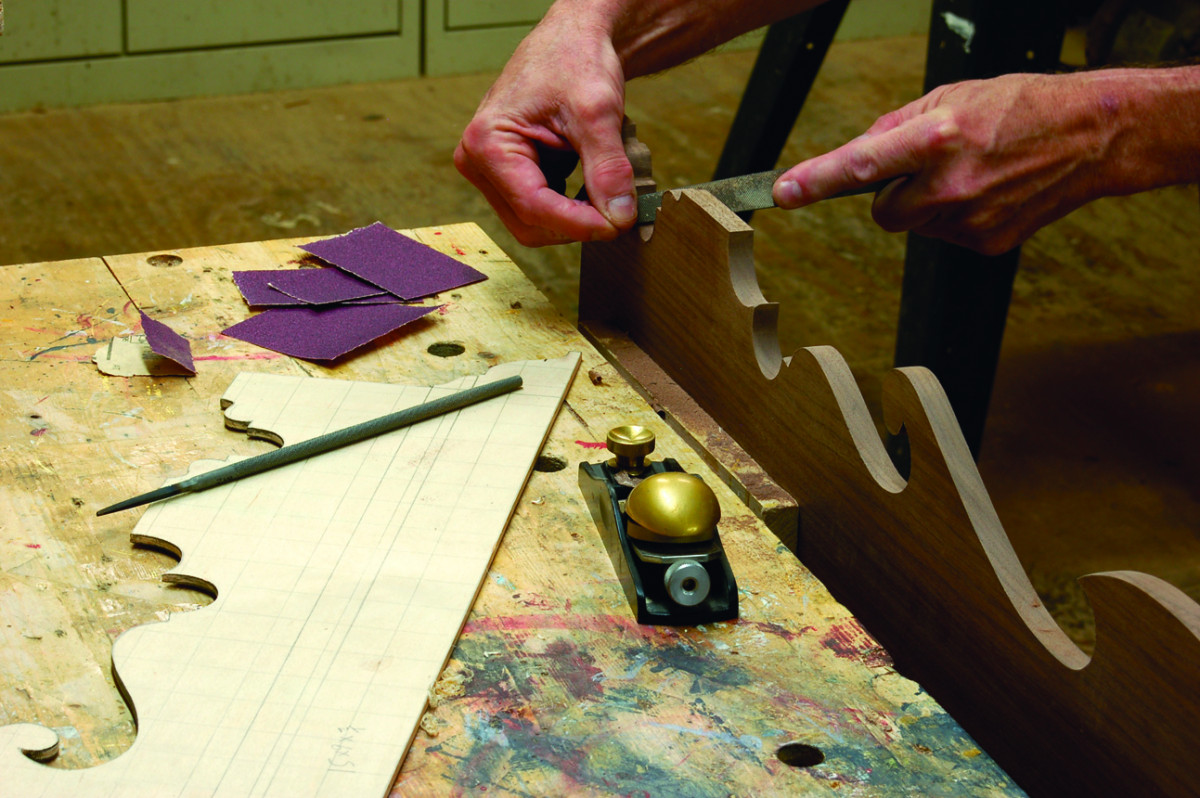
Cleaning curves. I used a block plane to clean up band saw marks on some of the long downhill curves, then cleaned up the tighter circles with rasps and sandpaper.
This plate rack has more than 40 feet of moulded edges. Fortunately, most of those can be cut with a 5⁄32” Roman ogee router bit, which is a near-perfect match for the profile on the mouldings applied to the front edges of the ends, partitions and shelves. The partition and shelf mouldings are made from 1⁄2” x 11⁄4” stock profiled on both edges, while the bottom and end mouldings are made from 1⁄2” x 7⁄8” stock profiled on one edge only.

Kerf out the waste. I cleared most of the waste from the outer component of the crown moulding with repeated passes over the table saw. I left one 1⁄4″-wide section intact to support the blank as I fed it over the blade for the other passes. I then carefully cut away this section with a final pass over the saw, keeping the stock pressed tightly against the fence for stability.
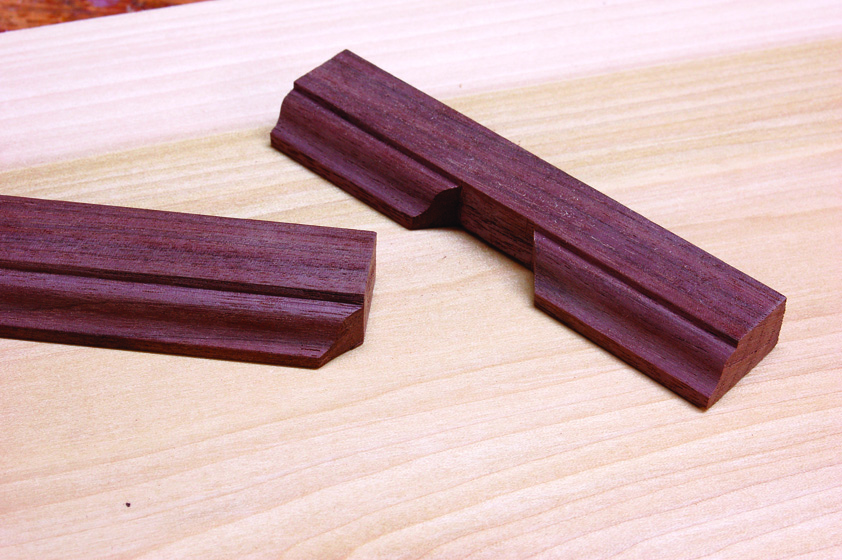
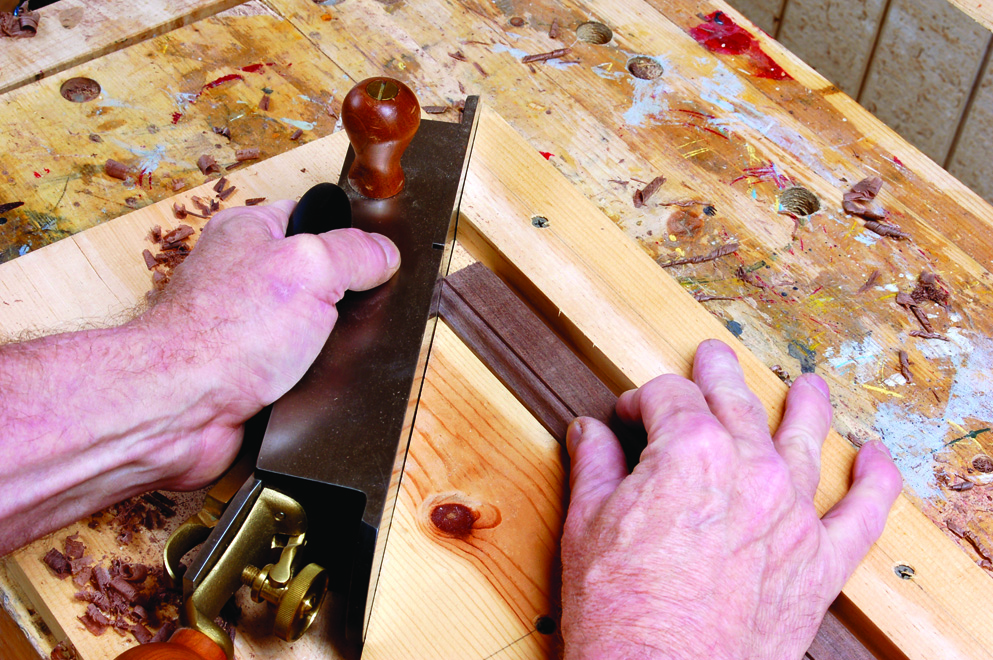
The two elements of the crown moulding were more difficult to fabricate. A shop equipped with a powerful router or a shaper might have cutters that could be used for these forms, but I have neither tool, and none of my moulding planes are a decent approximation for these shapes, so I roughed them in on my table saw, then faired the profiles with a variety of handplanes, followed by hand sanding.
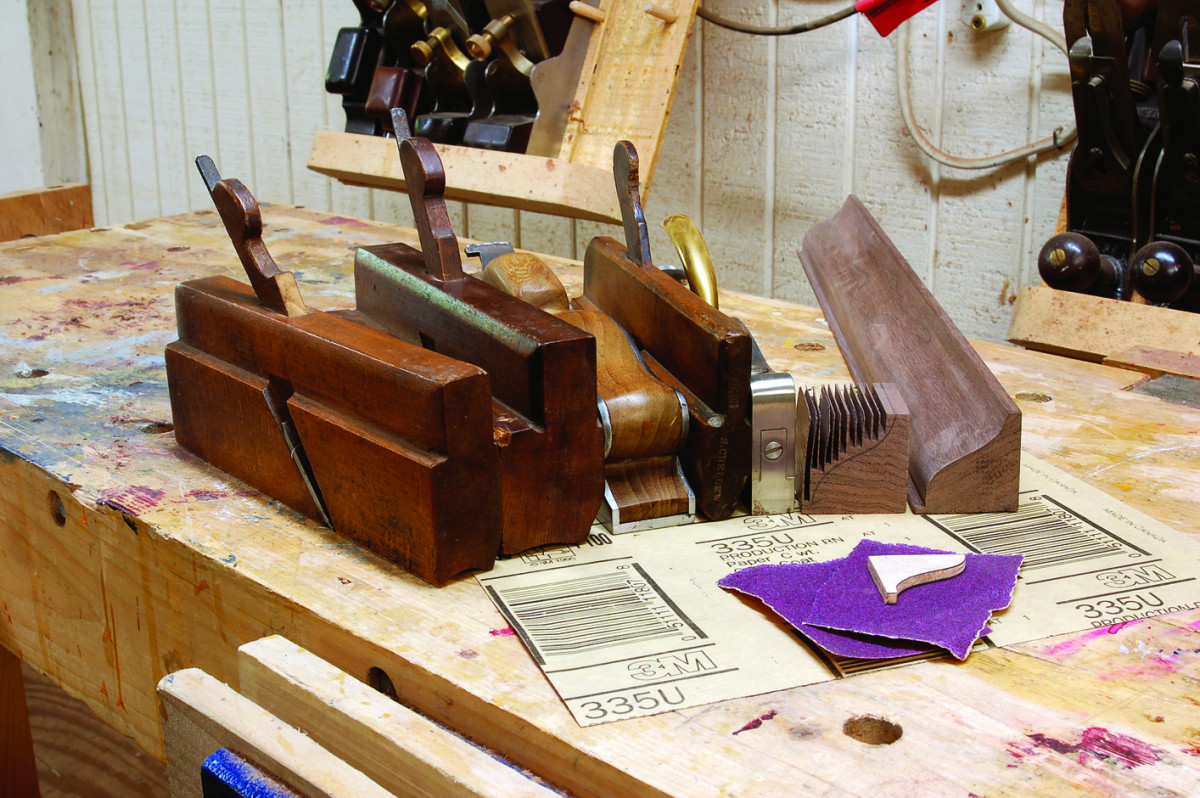
The planes for the attack. I used this selection of planes to fair the moulding. Notice the second plane from the right. This plane – sometimes called a full round – looks like a conventional round, but it isn’t because it cuts a half circle, unlike traditional rounds that cut only 1⁄6 of a circle. This was the most important plane in this group because it was the only one that could reach into the concave area of both components of the crown moulding.
The Frame
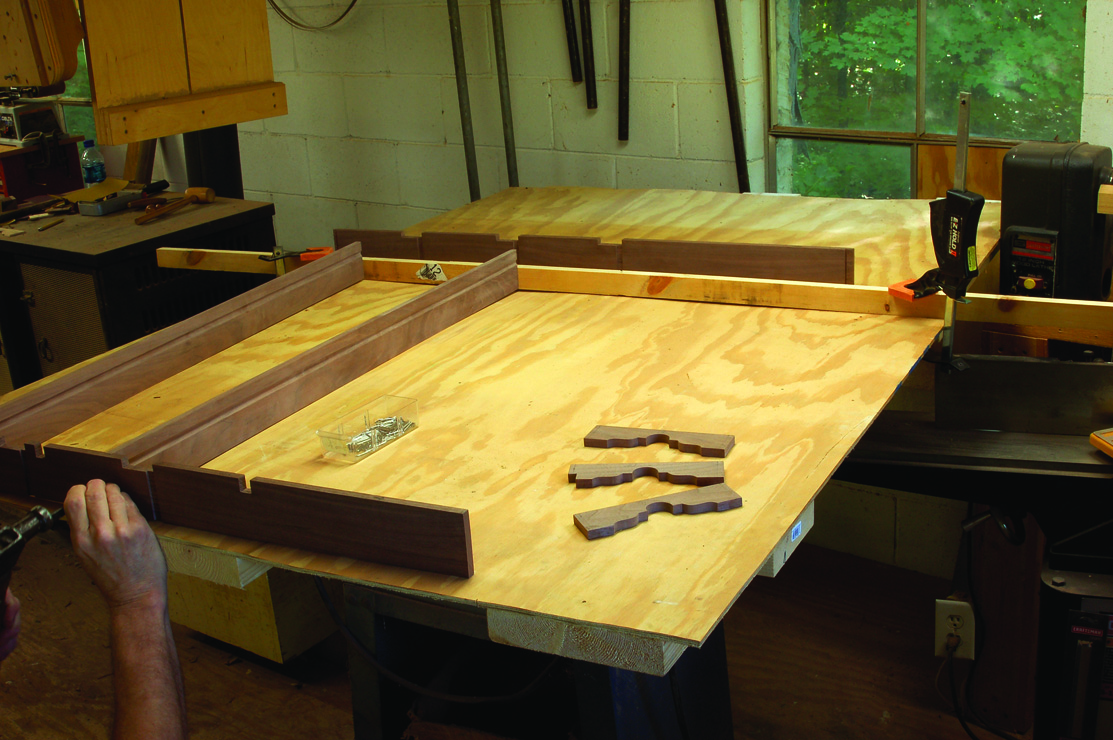
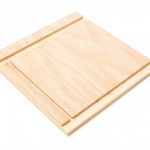
A flat place to work. I built a large plywood deck before I started assembly. I began with the middle shelves because if I had begun with the ladders on each end, there would have been no way to nail into the ends of the long shelves. (Notice the backing board clamped to the deck. This backs up the opposite ends of the shelves, giving me a stable nailing surface.)
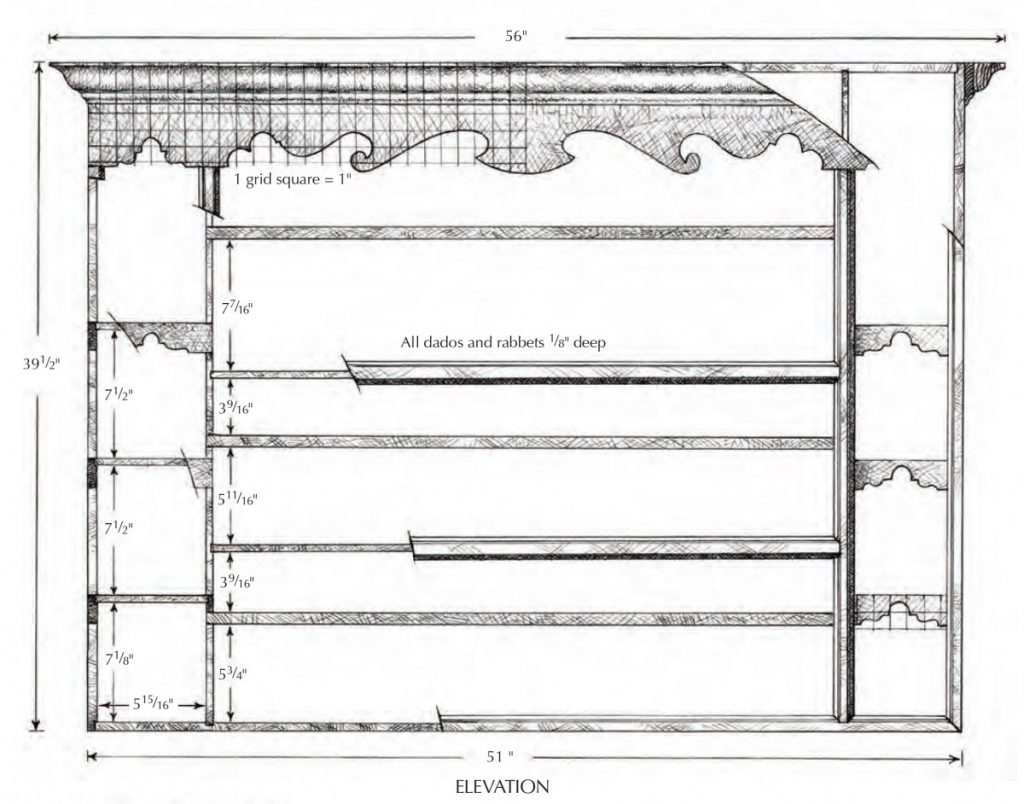
Like the original, the frame on my rack is assembled with notches (cut on the band saw), nailed rabbets (with pre-drilled holes) and 1⁄8“-deep dados (which I left unglued because of the weakness of end-grain gluing). I relied on set brads, plus a large number of interlocking parts to hold the frame together. In this regard, the frame of this plate rack is a little like the nailed frame of a house. When you nail those first few studs to their plates, the joinery seems flimsy, but as you add more nailed parts to the frame, strength accumulates until – when it is complete – those first few studs have become sturdy parts of a powerful whole.
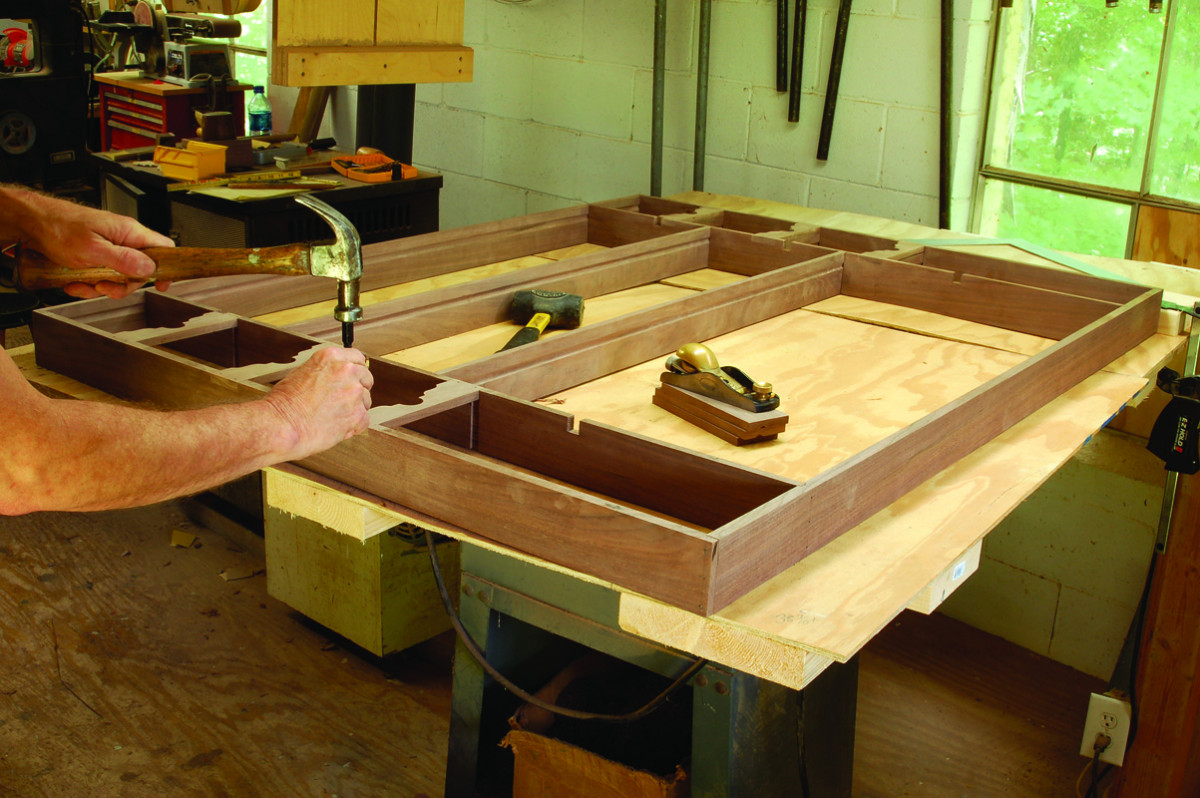
Add the small scrolls. I nailed the ends into the top and bottom before I nailed the small scrolls into their notches in the ends and the partitions. I then turned the rack over, slid the small shelves into place and nailed them through the dados.
I began by nailing the long middle shelves into place. I next added the frame’s top and bottom and both ends, followed by the small scrolls, which were glued and nailed into their notches. I then turned the rack over and slid the short shelves into their dados and nailed them through those dados.
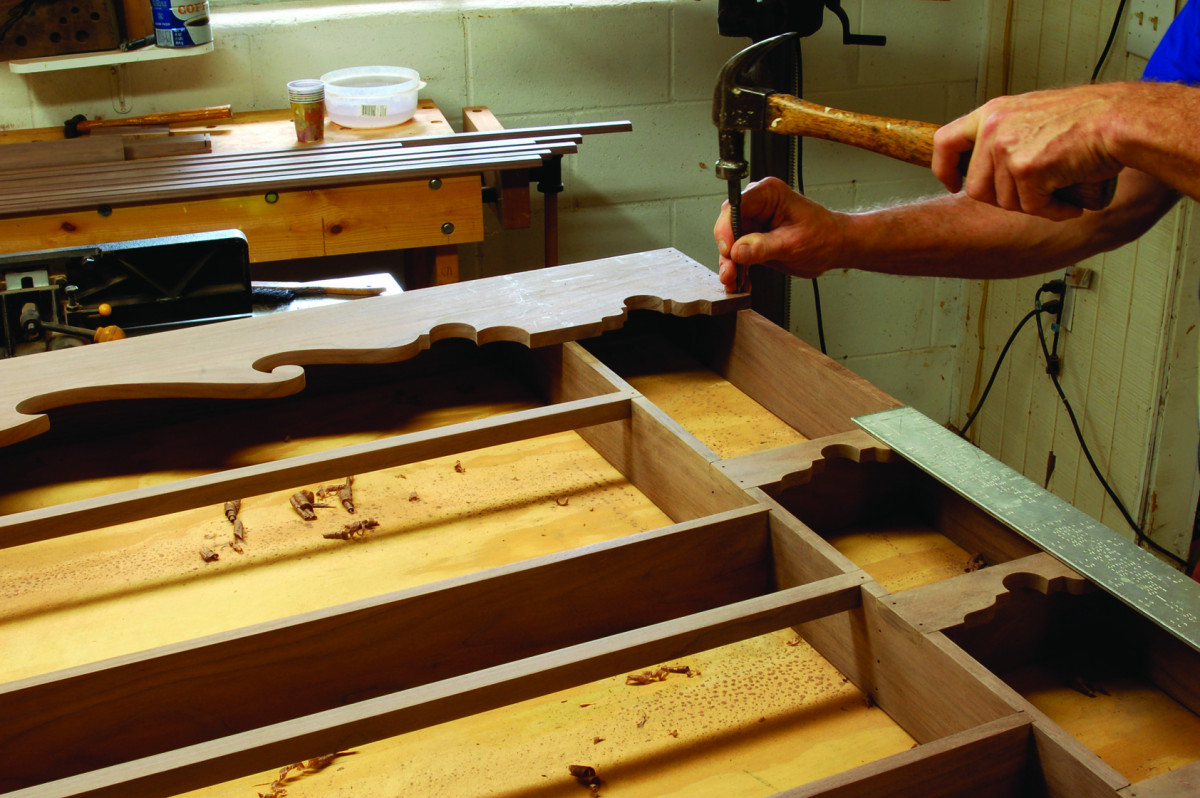
The scroll holds it square. Before I nailed the big scroll to the rack, I checked the squareness of the frame by measuring the diagonals. There was an error so I pressed the opposite end of the longer diagonal into this V-block and nailed the scroll into place. The scroll gave me a wide enough nailing surface to keep the rack square.
I knew that the only chance I would have to square up the frame would be when I nailed the wide top scroll into place because it was the only piece with a wide enough bite to correct an error. After I had tacked that scroll into place with a brad in either top corner, I checked the frame for square by measuring the diagonals, and found that one diagonal was 3⁄8” longer than the other. I pushed the long diagonal against a V-block clamped to the deck on one end of that diagonal. Then, while pressing against that V-block until the lengths of the diagonals matched (making the frame square), I nailed the wide scroll into place.
Where glue helps. Glue adds little strength to a dado joint so I assembled them unglued, but whenever I had a chance to glue side grain to side grain, I used glue as I’m doing here with this moulding.
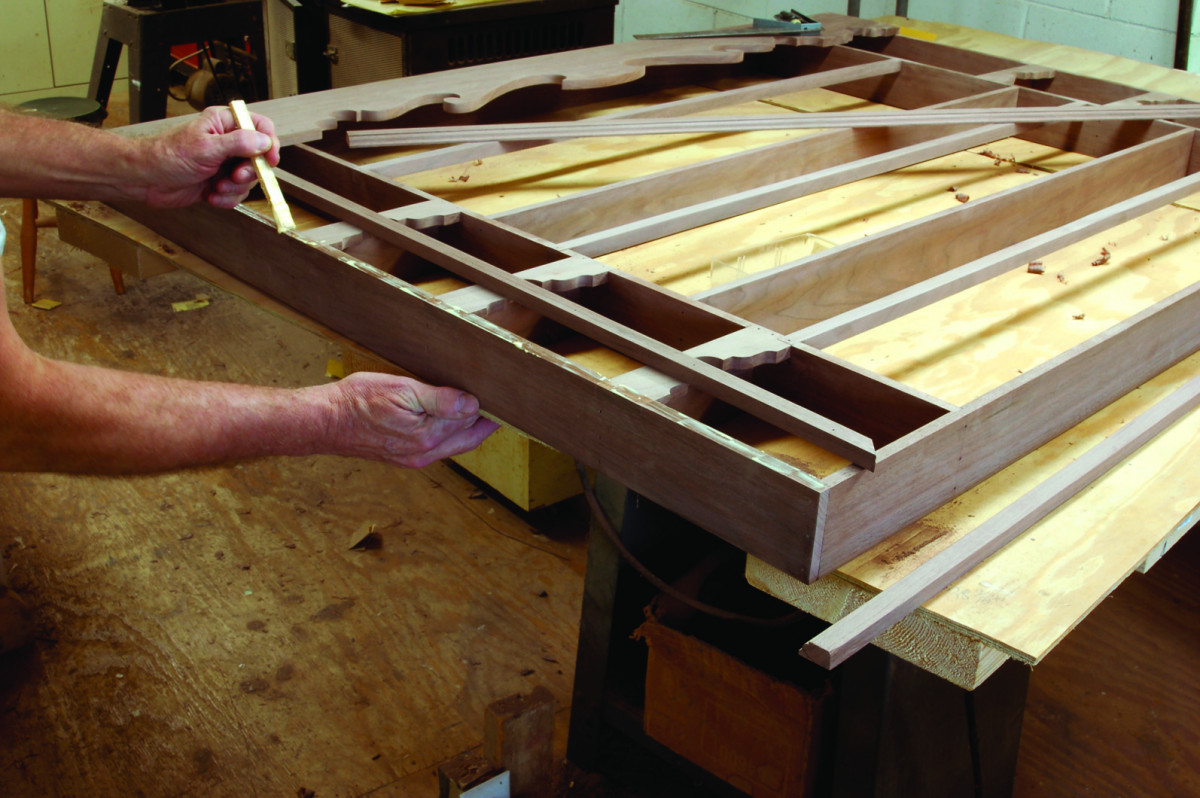
I finished up the frame by nailing the safety bars into their notches.
Installing Mouldings
Double your precision. The partition mouldings enter the bottom moulding with the double-miter joint shown here. The same joint is used when the middle shelf mouldings enter the partition mouldings.
The first moulding I installed was the bottom portion of the crown moulding. I cut the parts on a miter box – leaving each a bit long – then brought them to the final length with a miter plane and a shooting board. (The plate rack’s mouldings required two different shooting boards – one for the flat miters and one for the box miters.)
Shooting to size. I rough cut the miters on the male part with a saw, then finalized the miter with several strokes of a miter plane on a shooting board. The miter is finished when it just meets the central raised portion of the moulding.
I then screwed these pieces into place from the back side. I next added the 13⁄4” x 13⁄4” pieces of the crown moulding, again cutting each piece slightly long and bringing them to length on a shooting board. I screwed the long central piece in place from the back side. The two end pieces of this moulding I press-fit with glue by holding each piece in position for 60 seconds while the glue grabbed.
I then cut and fit the 1⁄2” x 7⁄8” mouldings for the front edges of the ends and the bottom. I nailed (and glued) the two end pieces into position but I left the bottom loose because I had to fit the joints where the partition mouldings would meet this bottom section.
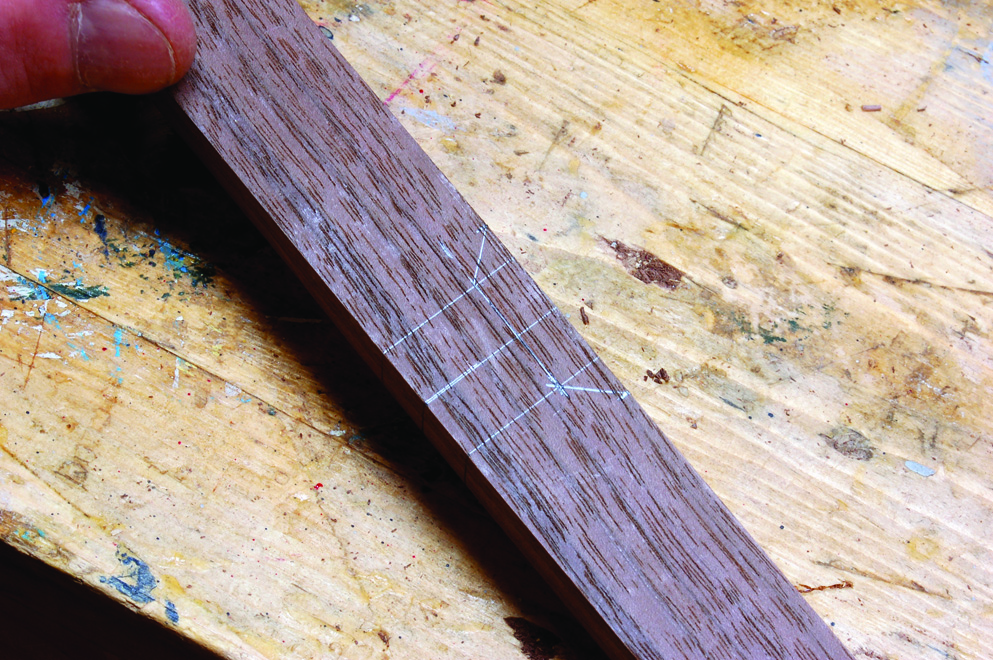
The miter’s mate. This photo shows the layout of the joint’s female part. The marks on the right edge of the moulding indicate the full width of the male moulding while the marks at the left-hand side of each diagonal indicate the width of the central raised portion of the male moulding. Staying clear of the layout lines, I cut the joint on my band saw.
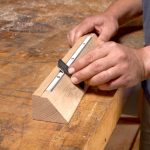
These meetings of end and partition mouldings require a double miter. I first cut the 45° ears on the male section, roughing in the cuts by sawing a bit outside a mark made on the bottom side by a bevel square. I then finished up these angles with a miter plane on a shooting board.
I laid out the female halves of each joint on the bottom side of the bottom moulding, then roughed in that joint on my band saw and finished up with a paring chisel. When those joints were finished, I nailed the bottom into place. But I couldn’t, at that time, nail the partition mouldings because those first had to be fit for the long middle shelf mouldings. These joints were double miters just like the joints connecting the partition and bottom mouldings.
Hanging the Rack
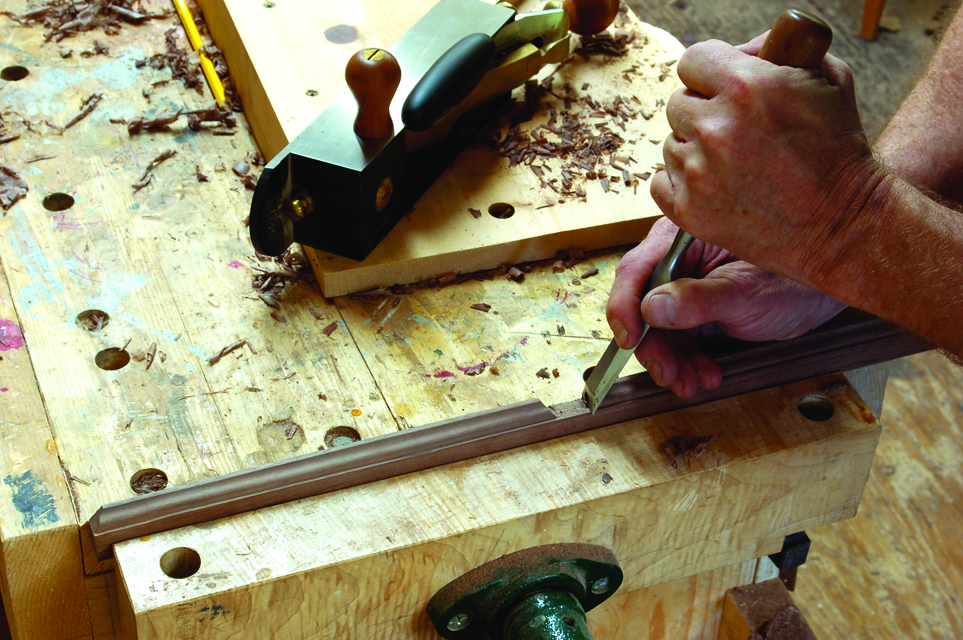
Pare to fit. I then fine-tuned the female part of the joint with a paring chisel, giving the part several test fittings.
Lester Margon said that original plate rack has “Standard hangers … fastened to the rear edge of the top and bottom members so that the rack may be secured to the wall.” I wasn’t sure what “standard hangers” meant so I chose to hang my version from a 1×2 walnut cleat that is screwed to the wall and to the underside of the plate rack’s top. Because this meant that the whole rack – and whatever was displayed upon it – would be hung from the top, I reinforced the top with several hidden glue blocks and a pair of metal corner brackets.
Here are some supplies and tools we find essential in our everyday work around the shop. We may receive a commission from sales referred by our links; however, we have carefully selected these products for their usefulness and quality.