We may receive a commission when you use our affiliate links. However, this does not impact our recommendations.
Develop a delicate touch by creating graceful shapes.
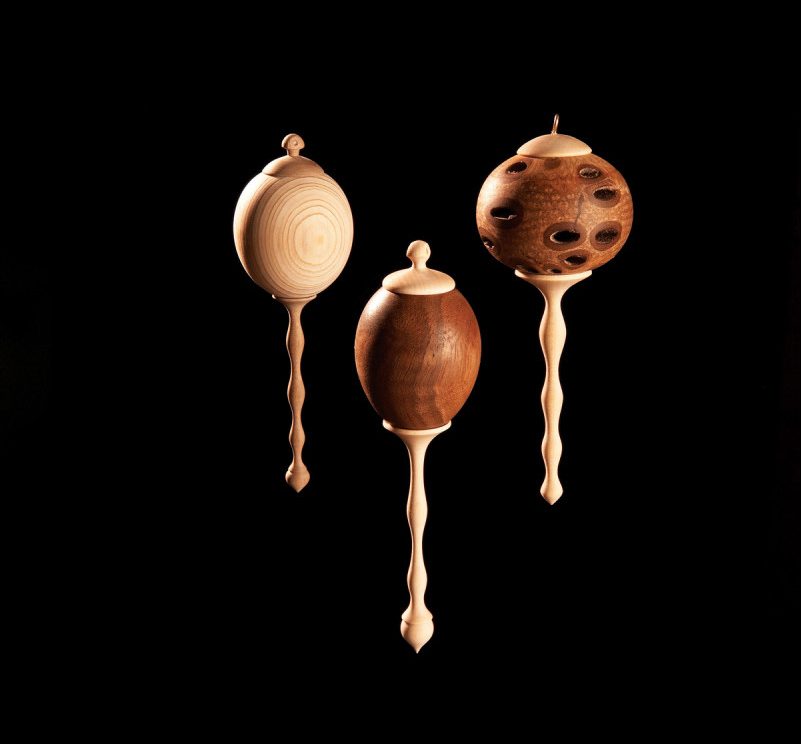
As an alternative to mass-produced items, Christmas ornaments rank high on the list. They easily become treasured keepsakes and the delicate spindle work and hollow turning involved will certainly test your skills.
Each ornament contains three parts. I suggest making the long “icicle” spindle first, then the top cap and last, the hollow bulb. This approach allows careful fitting of the icicle and cap to the bulb as well as working out the proportions to enhance the overall look.
Part of designing wooden ornaments is selecting and mixing materials. For the spindle work, almost anything goes, but dense woods such as hard maple, cherry, cocobolo and goncalo alves are well suited for turning the thin diameters and fine details that characterize the best ornaments. The hollow bulb-shaped body can be turned from virtually any interesting-looking wood or other material, including spalted wood, dyed, bleached or colored wood, plywood, plastic—even Banksia pods.
To hollow the bulb, you’ll need a small straight scraper and at least one offset or bent scraper. The rest of the turning can be done with basic spindle-turning tools: a roughing gouge, a detail gouge, a thin kerf parting tool and skew chisel.
Turn the Icicle
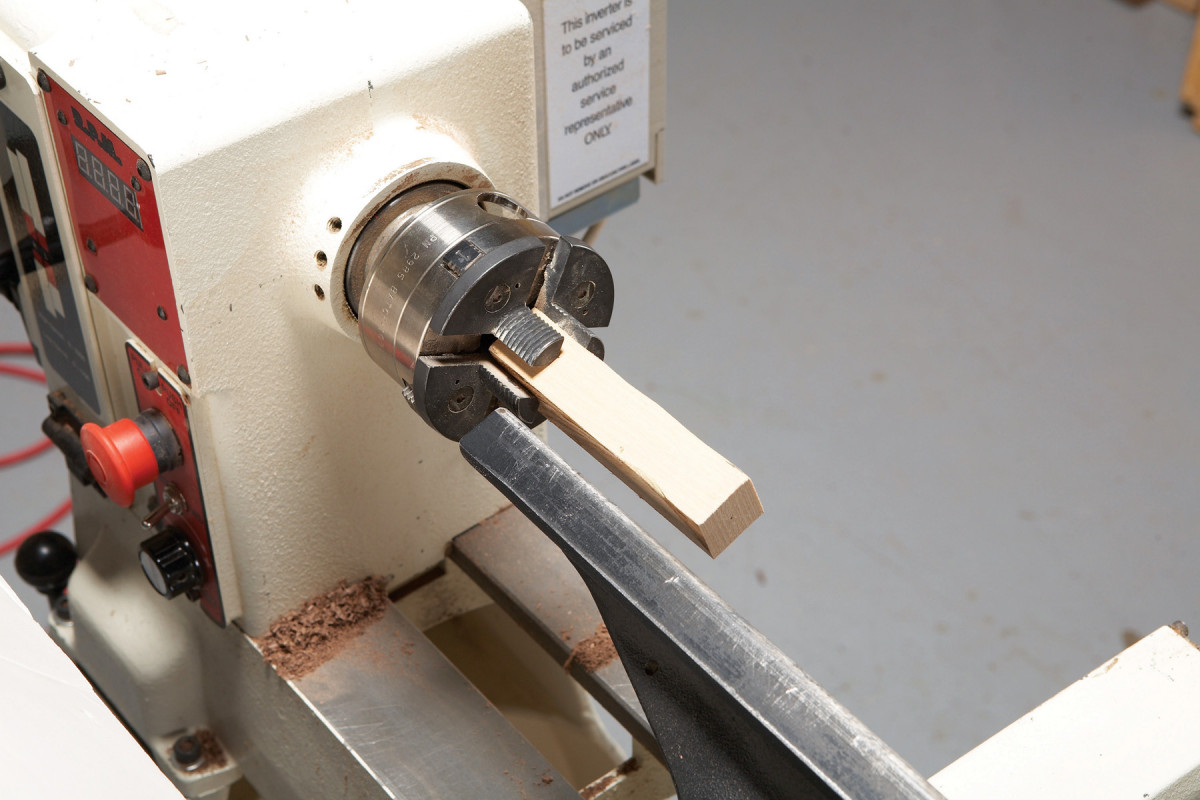
Photo 1. The ornament contains three parts, a round or oval bulb, a cap and an icicle! Mount a blank for the icicle in the scroll chuck. Engage the tailstock’s live center. Then use a roughing gouge to round the blank.
Install a 3/4″ to 1″ square blank in a scroll chuck, using the small jaws (Photo 1). This blank can be as long as you want, but 4″ is a good length to start with. Use the tailstock to center the blank in the chuck: Loosely mount the blank in the chuck, after marking the center of its tailstock end. Bring up the tailstock and engage its live center in the blank’s center mark. Then tighten the chuck).
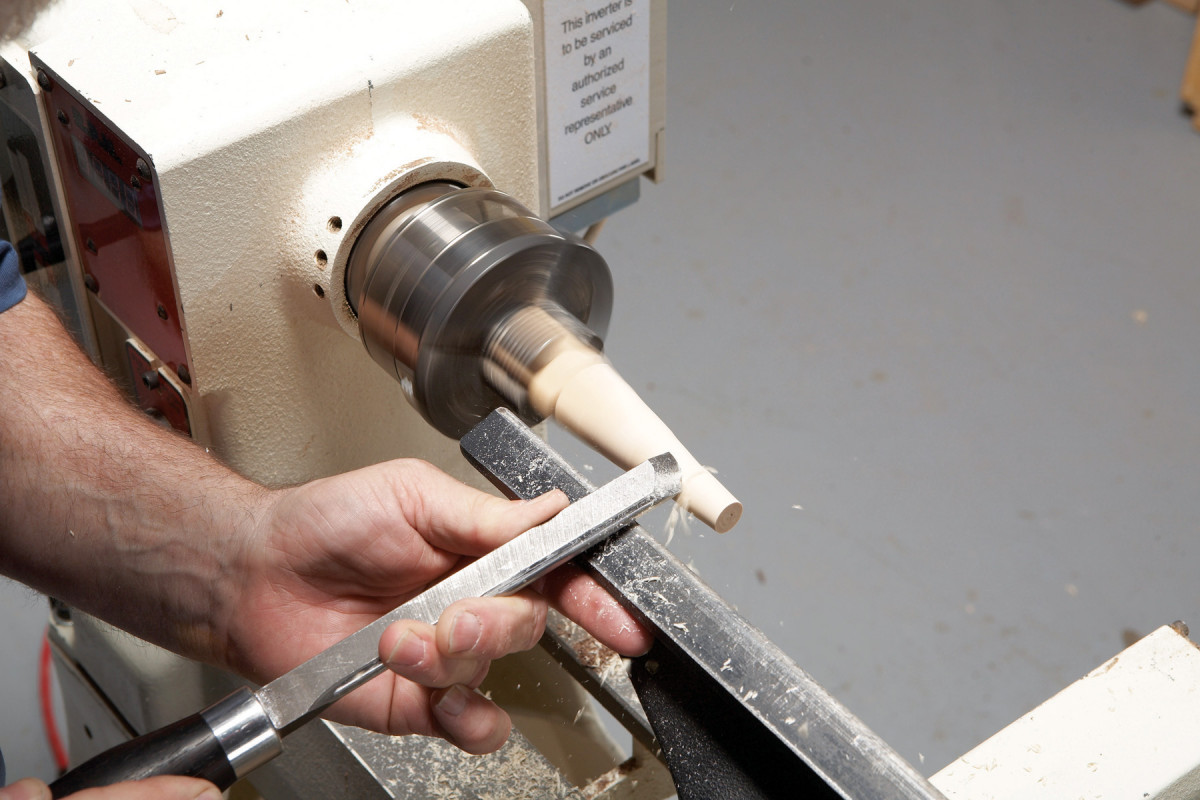
Photo 2. Turn the end of the spindle down to about 3/8″ dia. after removing the tailstock. The goal is to create a spindle that’s thin and delicate, like an icicle.
Round the blank with your roughing gouge, being careful to not get too close to the jaws of the chuck.
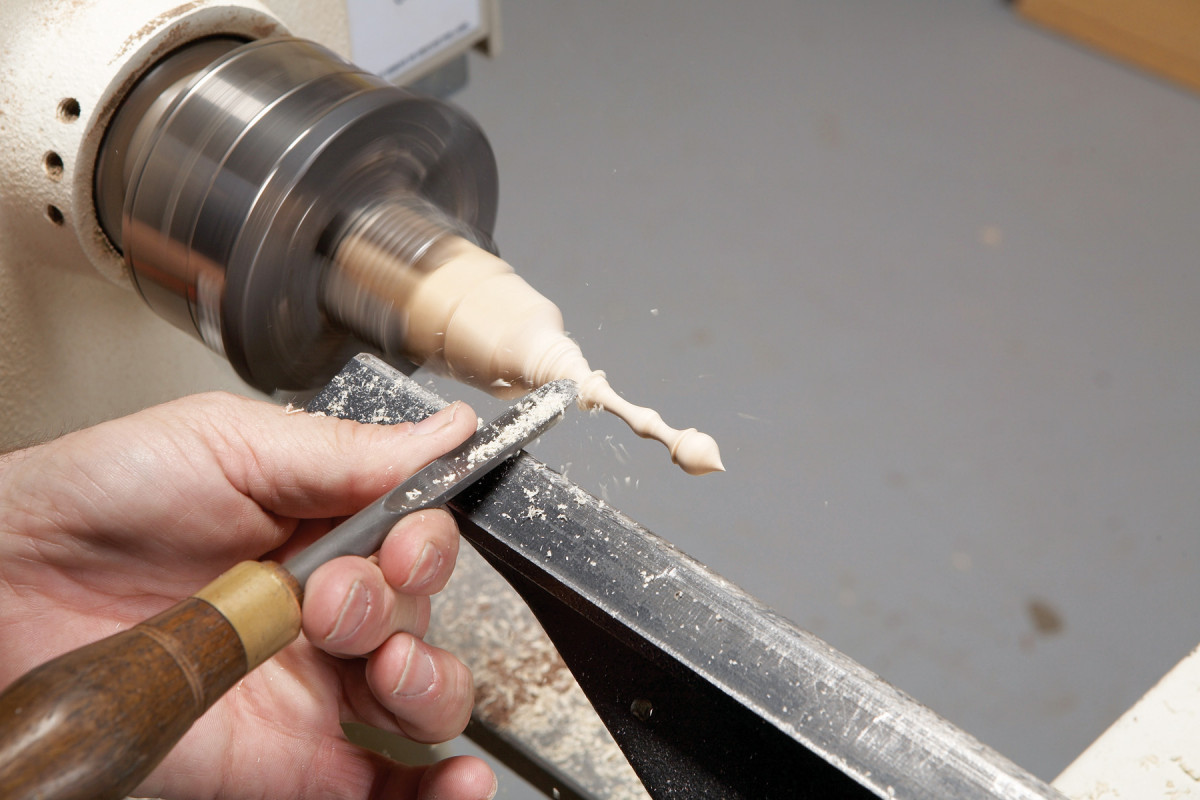
Photo 3. Create tiny details of your own design. Start at the end of the spindle and work towards the headstock, to avoid a break. Making your ornament as light as a feather, so it hangs effortlessly, is another goal.
Pull away the tailstock and start working that end of the blank (Photo 2). Move one step toward the headstock after finishing each detail. It’s quite difficult to go back, due to the small diameters (Photo 3).
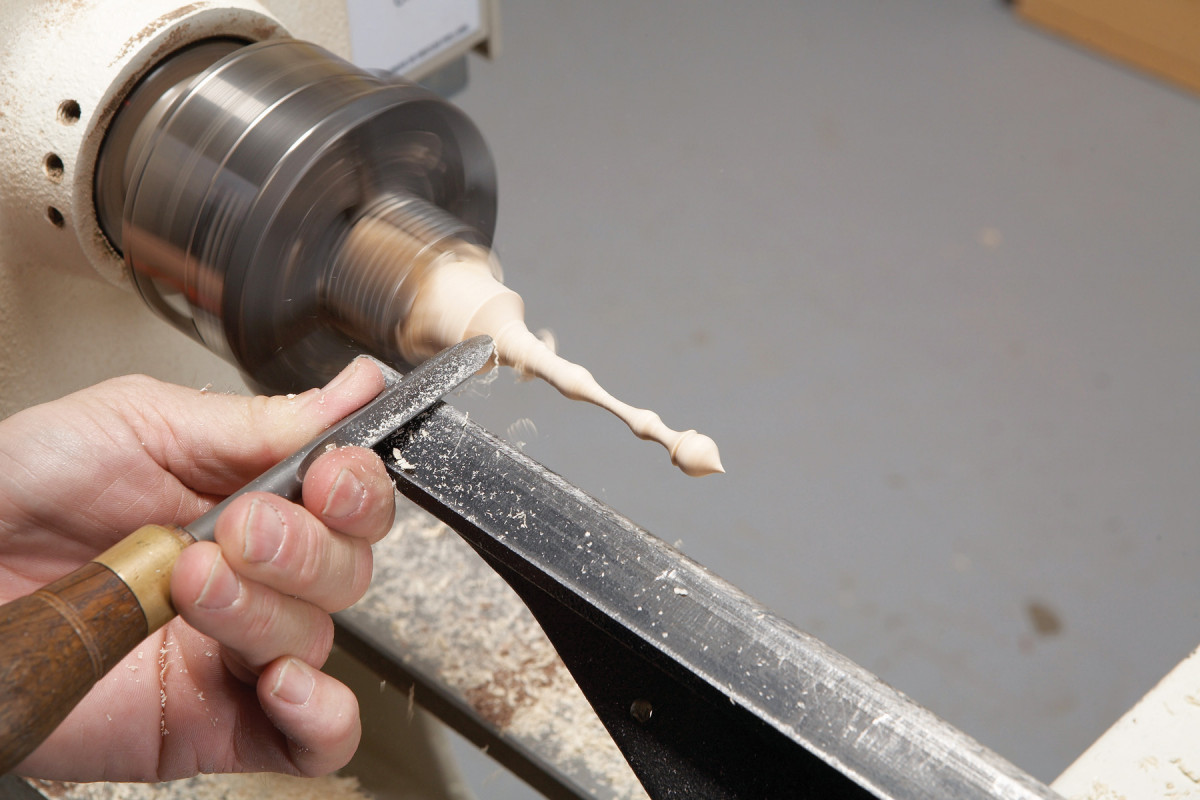
Photo 4. Flare the shoulder as you near the chuck. Leave sufficient material between the shoulder and the chuck to create a tenon and part off the spindle.
As you near the chuck jaws, leave room for three elements: a flared shoulder, a tenon and sufficient waste material for parting off (Photo 4).
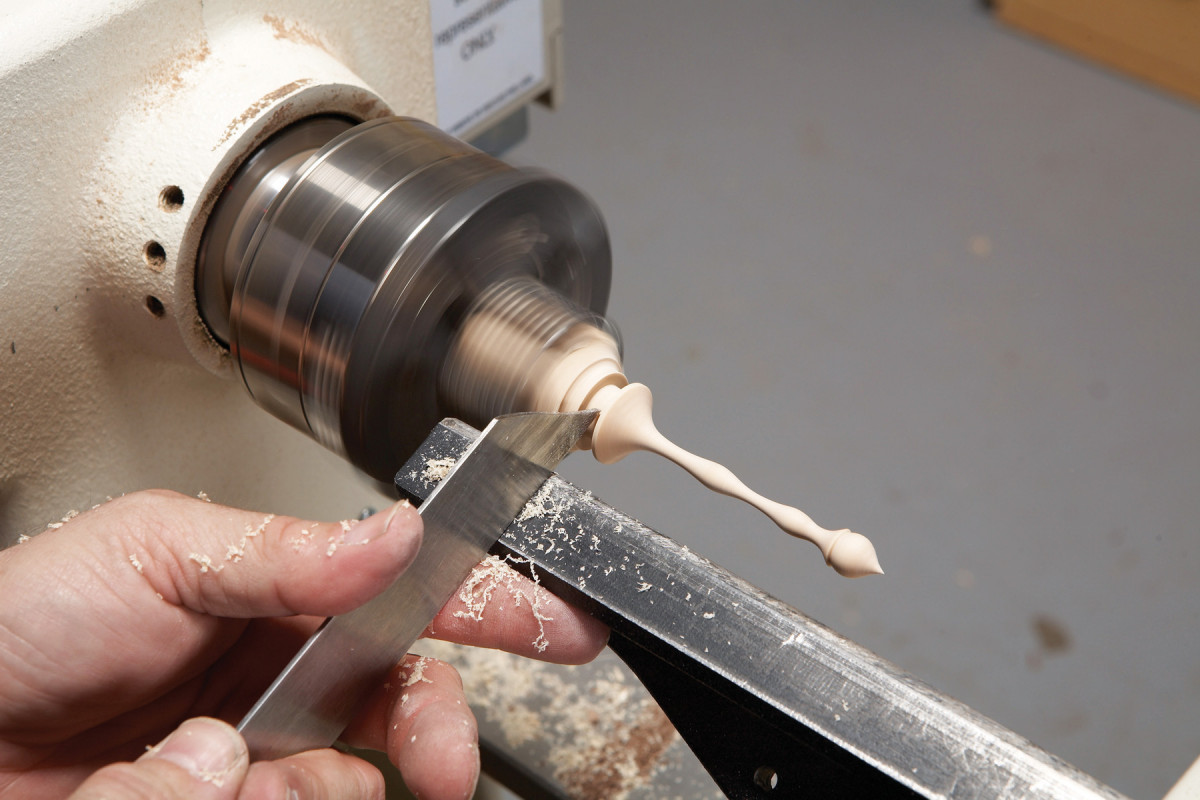
Photo 5. Cut a 1/4″ long tenon with a thin kerf parting tool. Turn the diameter to just over 1/2″, so you can carefully fit the tenon into the body of the ornament.
The tenon is based on the size of the bulb, so a diameter just over 1/2″ is a good starter for the ornaments shown here (Photo 5).
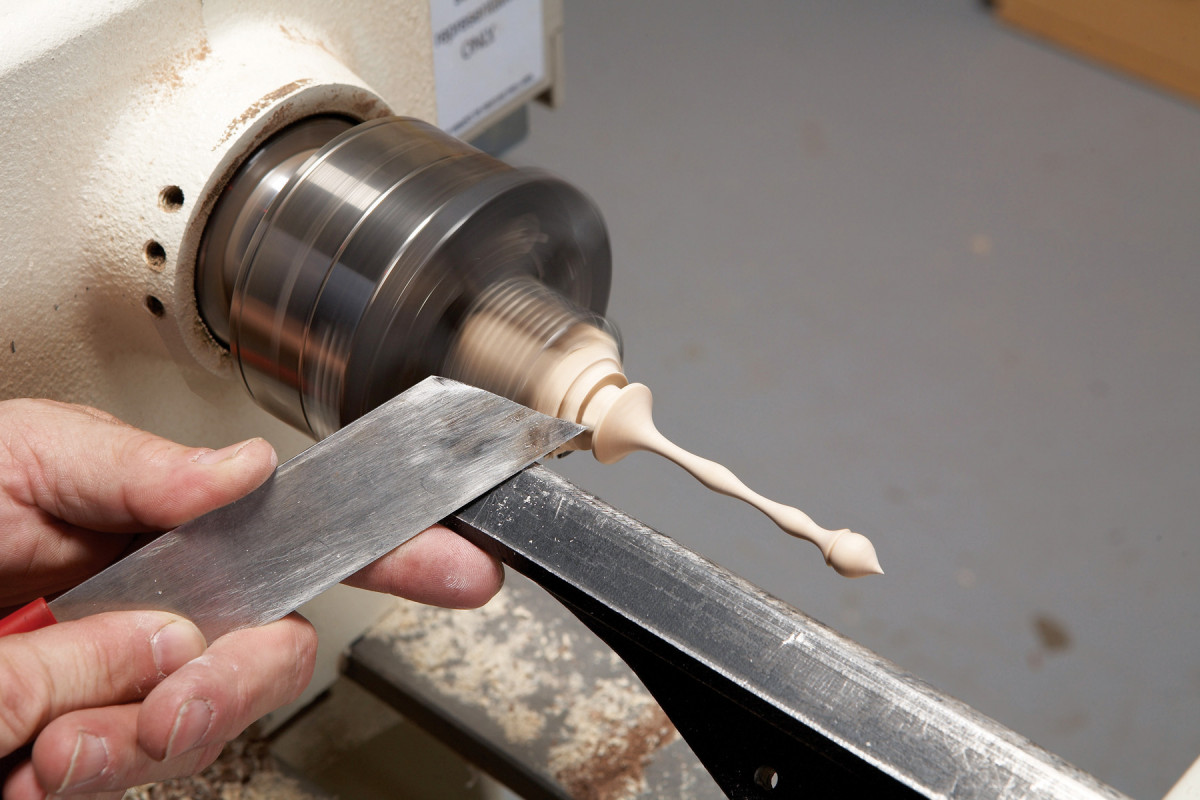
Photo 6. Undercut the back of the flared shoulder, so it will fit snugly against the bulb’s rounded surface. Then carefully part off the icicle.
Undercut the inside of the shoulder with the long point of the skew or a thin kerf parting tool (Photo 6). This is tricky, because you’re working so close to the chuck jaws, so go at it carefully. The goal is to create a concave area that the bulb will nest into in order to create a clean-looking joint.
Complete the icicle by blending the shoulder into the detailed part of the turning. Finish-sand and then part off the icicle from the chuck.
Turn the Cap
You can make the cap from wood left in the chuck from turning the icicle, a contrasting wood, or material of a larger diameter than the icicle. Whichever you choose, mount the blank in the scroll chuck.
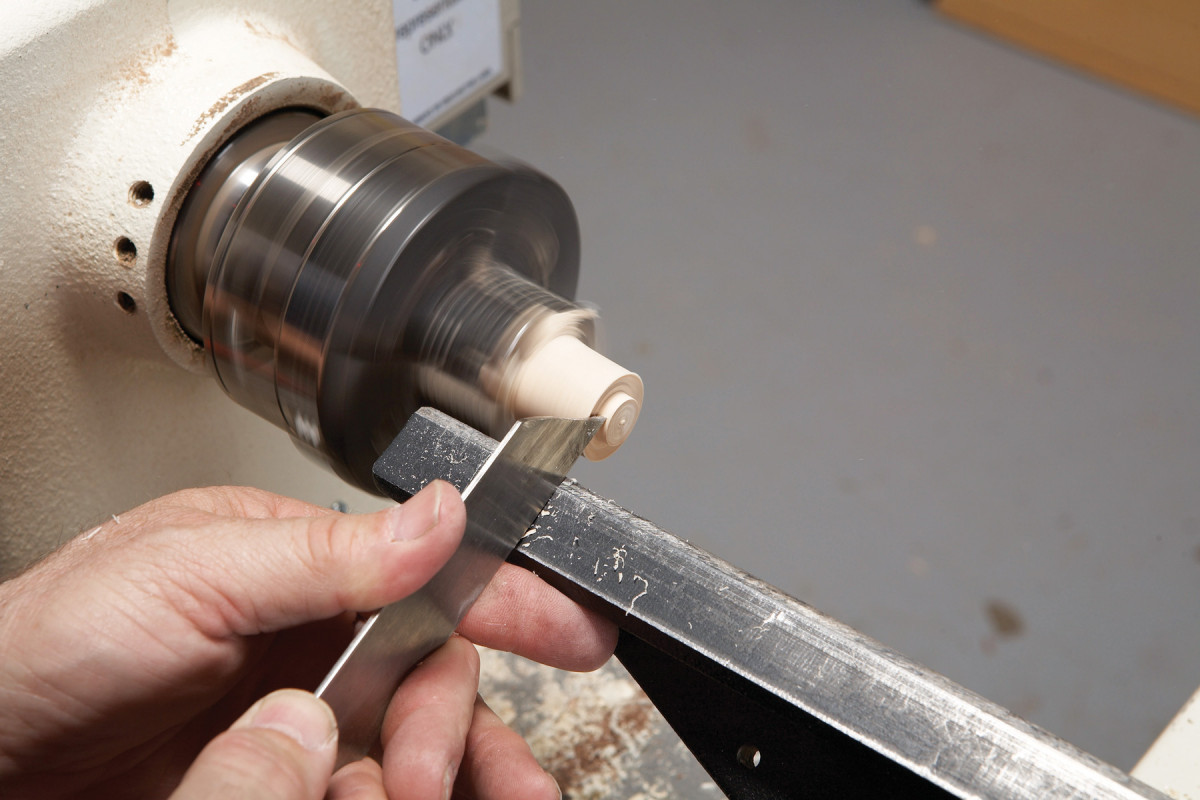
Photo 7. Mount a short, square blank for the cap. As before, turn from the end of the blank towards the chuck. You can create the tenon on either end, depending on how delicately you intend to shape the cap’s top.
Establish and turn the tenon for mounting the cap to the bulb (Photo 7). If you intend to turn a cap with long and delicate shaping, it’s best to turn the tenon on the headstock end, as I did while turning the icicle. Otherwise, the tenon can go on either end of the blank. I normally turn this tenon to the same diameter that I used for the icicle’s tenon.
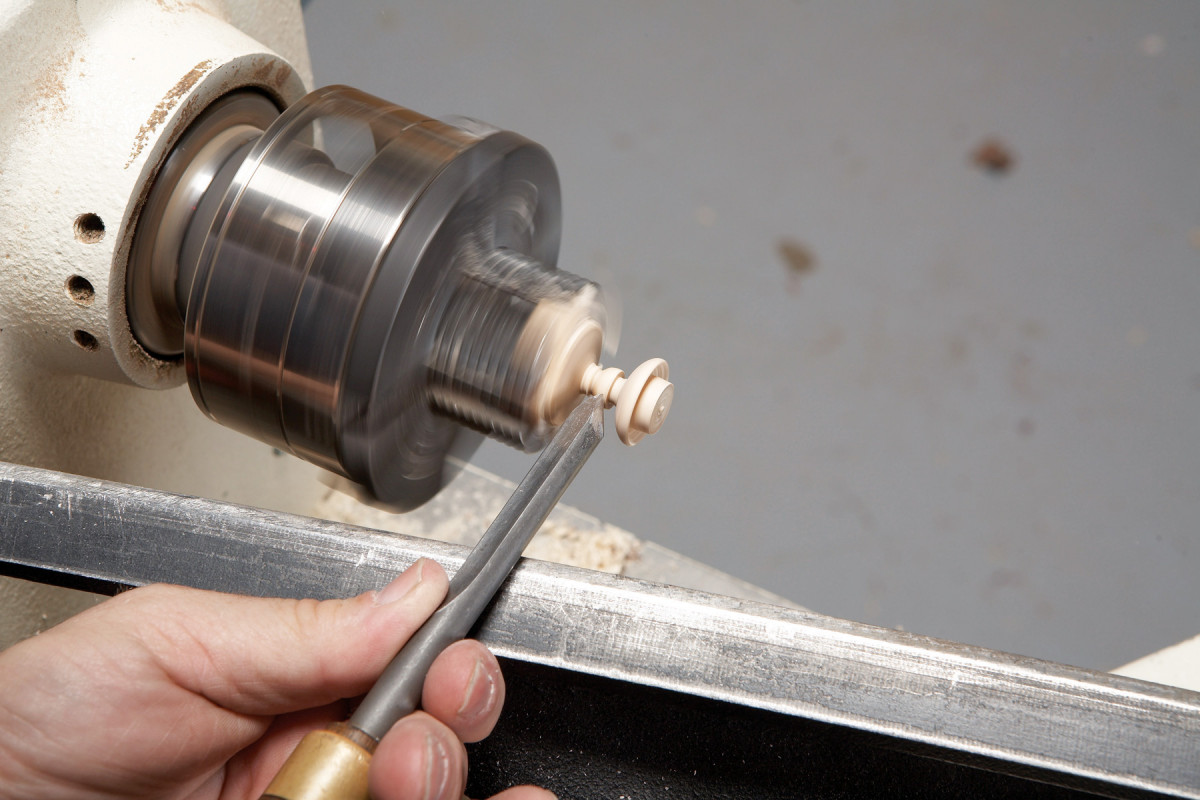
Photo 8. Work the top of the cap. If you plan to drill a hole for hanging the ornament, create a small ball or elliptical shape on the end of the cap. If you plan to thread in a metal eyelet, just leave a small flat area at the very top.
Turn tiny details and a concave shoulder, as you did on the icicle (Photo 8). Again, the concave shoulder will create a clean, flush fit when you attach the cap to the bulb.
Decide how the ornament will hang, either from a hole drilled through the cap or from a metal eyelet threaded into top of the cap. For an eyelet, just provide a small flat area for mounting. For a through hole, turn a 1/4″ to 3/8″ diameter round or elliptical shape at the top of the cap. Finish sand and part off the cap from the chuck.
If you decided on through-hole hanging, flatten the shape you turned at the top of the cap by sanding both sides. One easy way to do this is to mount a small sanding disc in the headstock, using a Jacob’s style chuck. Finish up by drilling a 1/8″ hole through the flattened area. If you’re going to thread in an eyelet, simply drill a small pilot hole on the top of the cap.
Turn the Bulb
Decide on the bulb’s shape and dimensions. Shaping options include a ball, an ellipse and an egg, to name a few. The bulb’s size can be quite varied, but I suggest starting with something around 1-1/2″ to 1-3/4″ in diameter and about 2″ in length. Allow extra length for mounting the blank in the chuck as well as the additional material that you’ll need for turning the bulb from both ends.

Photo 9. Mount the square for the bulb in the scroll chuck’s regular size jaws.
Start the square blank between centers to create a tenon for the small jaws or install the regular jaws and directly mount the blank. (Photo 9).
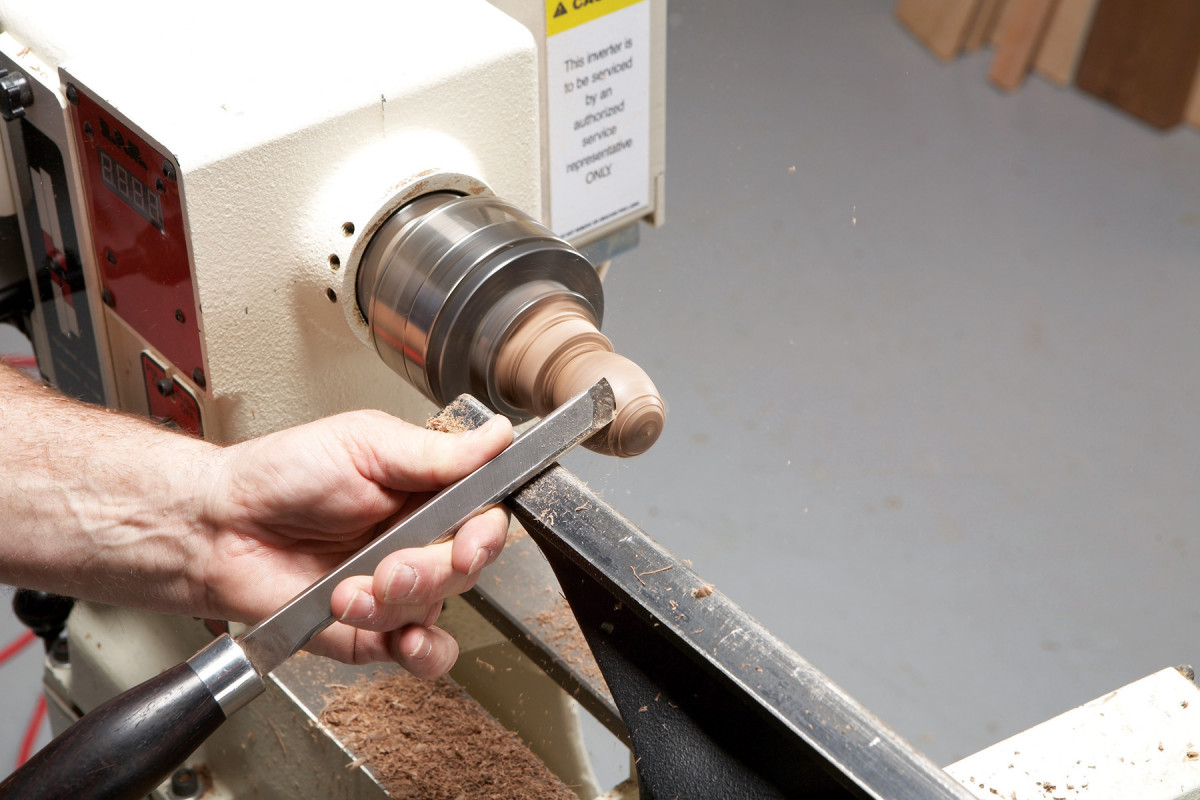
Photo 10. Shape the blank into an egg or ball form, using the roughing gouge. Leave the headstock end a bit oversize.
Create the bulb’s basic shape, but do not reduce the diameter completely at the headstock end (Photo 10).
Photo 11. When the bulb’s shape is about 80% complete, drill a 1/2″ dia. hole approximately three-quarters of the way through. Wrap a piece of tape on the bit to gauge the depth.
Using a Jacob’s style chuck mounted in the tailstock, drill a 1/2″ hole about three-quarters through the bulb (Photo 11).
Fit the icicle to the bulb. You may need to slightly enlarge the hole to fit the tenon. You may also need to lightly shape the end of the bulb, so it fits into the icicle’s concave shoulder. When the icicle fits perfectly, finish-sand the outside of the bulb.
Hollowing through a small opening is a form of blind turning. Using the small straight scraper, open up the inside of the body. Stop to clear chips often and be careful to work the shape to roughly match the outside. Keep the walls at least 1/4″ thick at this time.
To create a lightweight bulb, you’ll need to further reduce the wall thickness, a process that requires making careful measurements of the wall. Sometimes it’s possible to use small double-ended calipers for measuring, but I use nothing more than a section of stiff, but springy wire. Bend the wire into the shape shown in Photo 13, closed down to about 1/4″ at its opening. With the lathe off, insert the tool and simply move it from the rim along the wall. When the wall thickness is 1/4″ the tool will just pass through. Thinner areas will show as a gap above the outside; thicker areas push the wire open.
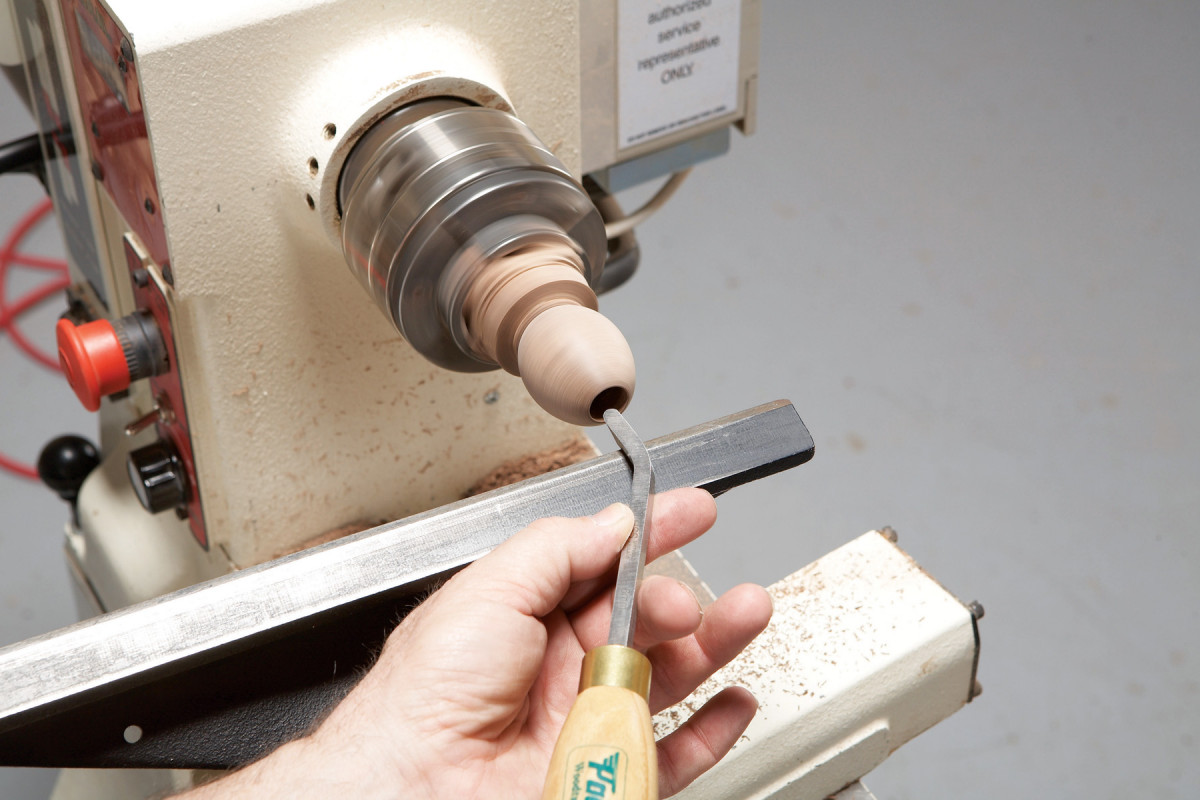
Photo 12. Hollow the bulb in stages. First, use a straight scraper to expand the drilled hole. Then switch to a bent-shaped scraper to work the inside walls.
You’ll need a bent-shaped scraper to reach the inside areas from the bulb’s midpoint to just below the rim (Photo 12). Strive for a finished wall thickness between 1/8” to 3/16”. Start from the rim, measure often, and follow the bulb’s outside shape until you reach the end of the drilled hole.

Photo 13. Use a piece of bent springy wire to gauge the wall thickness. Strive for a finished thickness between 1/8″ and 3/16″¬—the thinner the walls, the lighter the bulb.
The other end will be completed in a later step, when you’ll remount the bulb, turned end-for-end, a technique called “reverse chucking” (Photo 13).
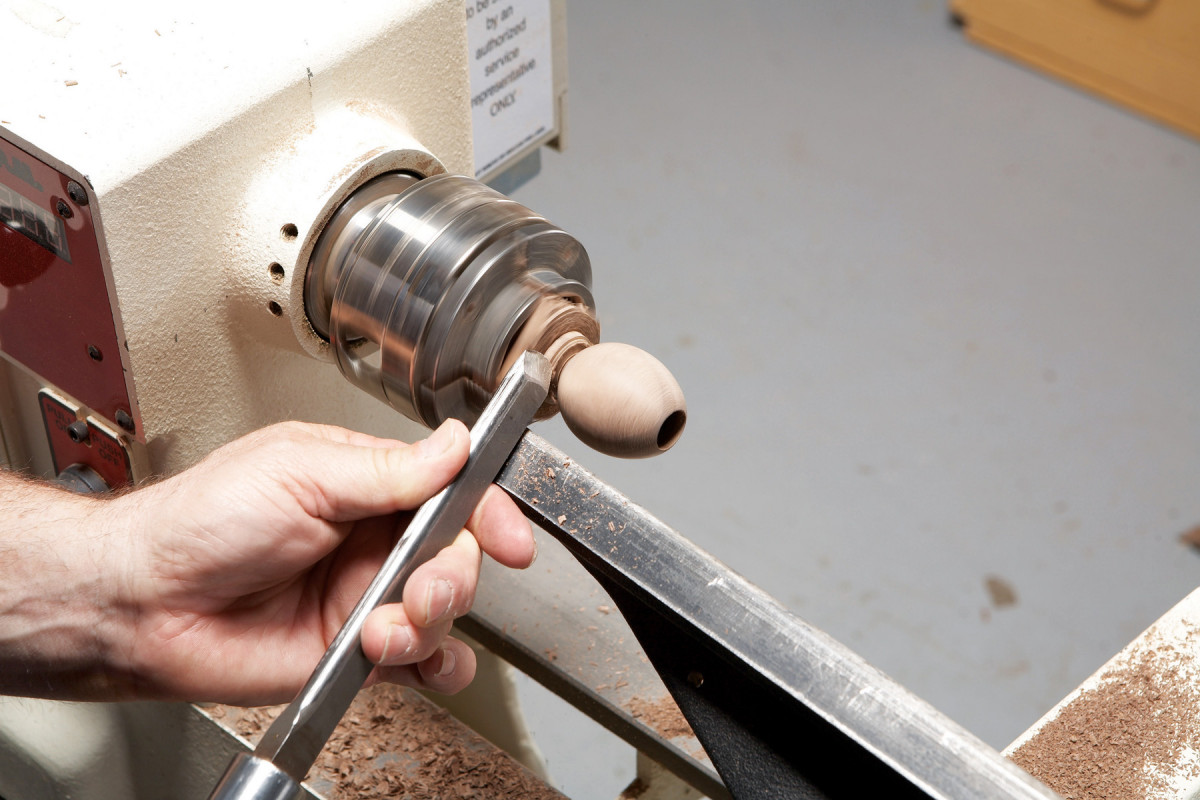
Photo 14. Part off the bulb, using a skew chisel, after you’ve sanded to at least 220 grit, so no tool or scratch marks remain.
Part off the bulb from the chuck, a tiny bit longer than its finished length (Photo 14).
Turn a tenon and shoulder to mount the finished portion of the bulb. This is a tricky step: The tenon has to be tight enough to hold the bulb firmly enough to drill and lightly turn the unfinished end, but loose enough for you to pull the bulb off when it’s finished. If the tenon ends up slightly undersize, to shim it with tissue paper so you can complete the bulb.
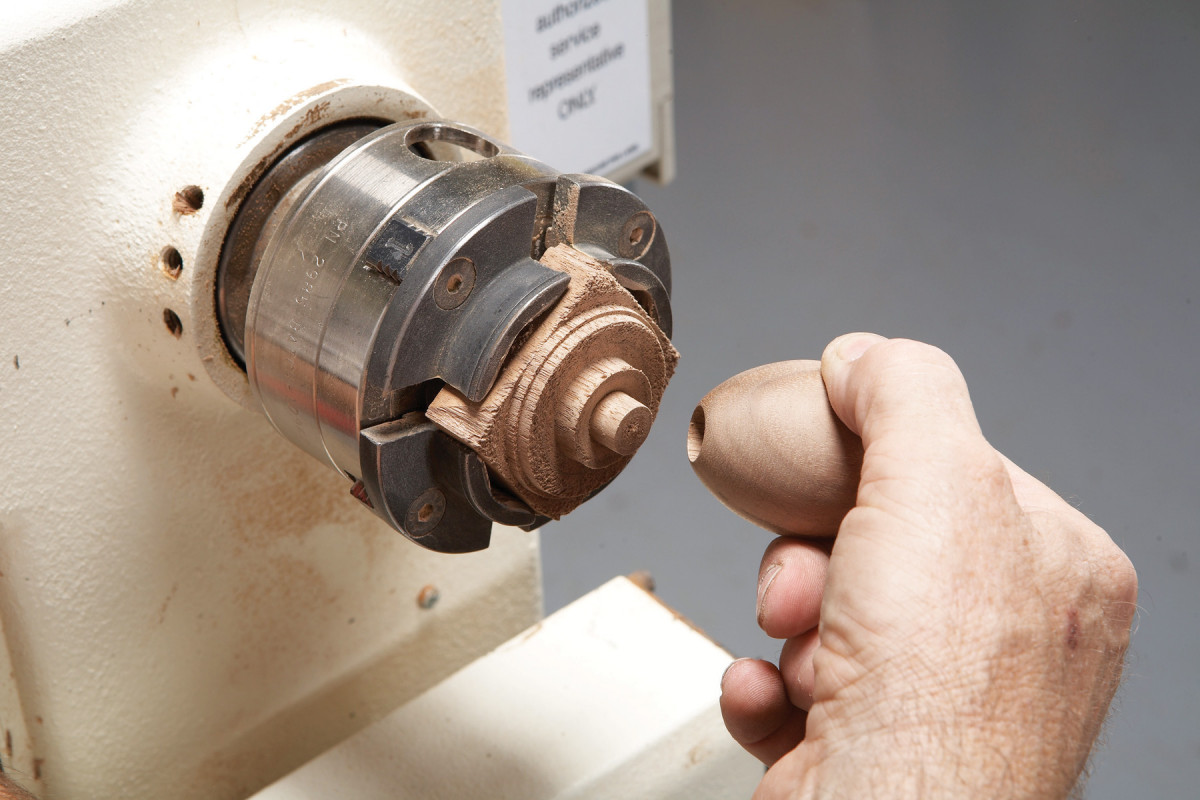
Photo 15. Remount the finished part of the bulb on a tenon and concave shoulder you’ve turned on the waste material remaining in the chuck. Then complete the bulb’s unfinished end: Drill through, shape the inside and sand the outside.
Mount the bulb on the tenon. Then drill all the way through, using the Jacobs chuck, as before. Then lightly turn the inside walls to blend into the areas previously turned from the opposite direction (Photo 15).
Fit the cap to the bulb the same way you fit the icicle. This involves fitting the tenon and lightly shaping the area around the opening to create a clean fit. Finish-sand the entire outside of the bulb.
Glue the cap and icicle to the bulb. You can use just about any glue; I use quick-set epoxy. Hang your ornament with fishing line or thread.
Finishing
 I usually apply finish while the pieces are still on the lathe. You have numerous choices, including shellac, wiping varnish or oil finish.
 Wax is also an option, to adjust the sheen. If you wait until the ornament is assembled, you could suspend it before applying the finish—then you could even use a spray-on finish.
Here are some supplies and tools we find essential in our everyday work around the shop. We may receive a commission from sales referred by our links; however, we have carefully selected these products for their usefulness and quality.