


We may receive a commission when you use our affiliate links. However, this does not impact our recommendations.
 Get inspired to give bird carving a try by learning about the sculptural process.
 Get inspired to give bird carving a try by learning about the sculptural process.
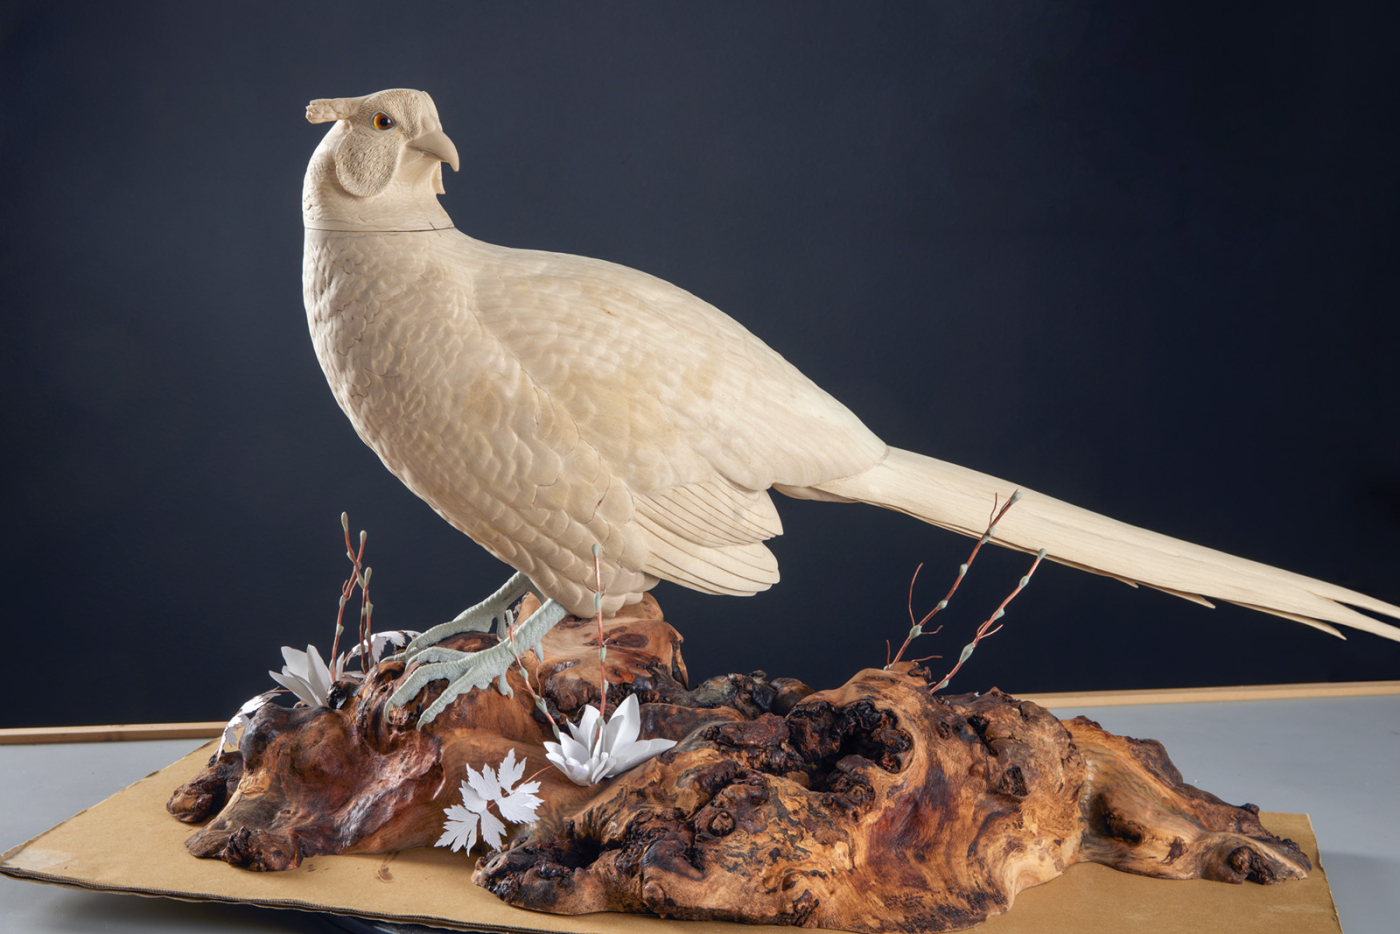
Project #2404 • Skill Level: Advanced • Time: 3-6 mos. • Cost: $250
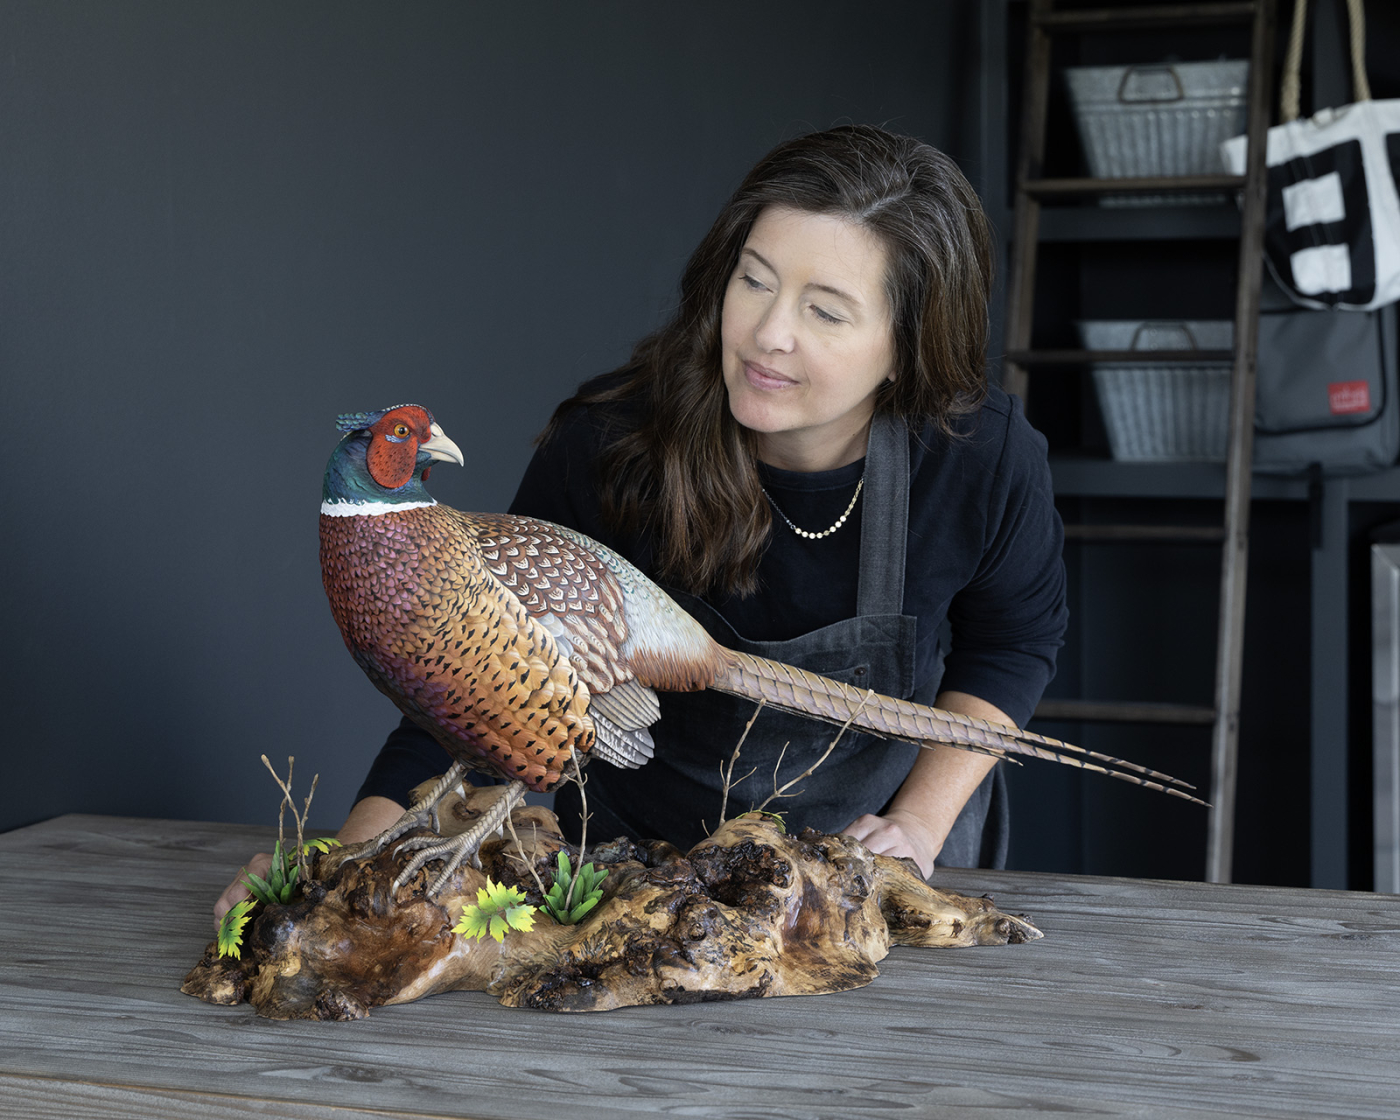
I love to be outside no matter the weather conditions. I am rarely without binoculars and always have an eye to the sky. When I catch a glimpse of something wild and wonderful, I’m often amazed I was in the right place at the right moment. When I was recently asked why I carve birds—“why birds?” Honestly, the answer is endless. At the heart of it is a connection to nature. Birds kick my curiosity into overdrive—bird calls, plumage colors, feather shapes, amusing behavior, mechanics of flight, migration patterns—and it all invites me to learn more. The concept of using a rigid material like wood to create a visually soft, lofty bird carving—recreating and sharing a moment in time—challenges and drives me.
How & Why I Carve
I only carve with tupelo and I wouldn’t trade it for the world. It has five significant properties that make it ideal for carving. It’s strength makes it robust enough to carve ultra-thin and not break. It’s softness makes it easy to work with. It is primarily grainless making bits and burning pens react uniformly. It’s light in weight making unique compositions possible. And, it holds a sharp edge making it possible to achieve extreme, non-fuzz detail unlike basswood.
There are significant similarities between carving and building a cabinet, table, or bookcase. Patterns, rough cuts, dowel joints, assembly, and adding stand out details to name a few. The difference between the two are how the individual maker interprets what they see when observing or studying reference to inform decisions and guide direction. For example, judging readiness to move on to the next stage in the process (Have I rounded the body enough?), evaluating symmetry accuracy (Is my centerline true and straight over all plains and curves?), visually comparing one element to the next (Is the eye channel below the ear tuft?), and observing reference material for direction (Is my feather flow accurate?).
While I’m not able to provide every how-to detail of this pheasant carving in this article, I carved the head and tail separately so you could choose to carve only a bust or a tail feather if desired. My hope is that you enjoy learning more about the process and are inspired to carve a bird whether that is a pheasant or not. What I cover in this article applies to any bird you wish to carve. Give it a try!
Reference, Study, and Composition
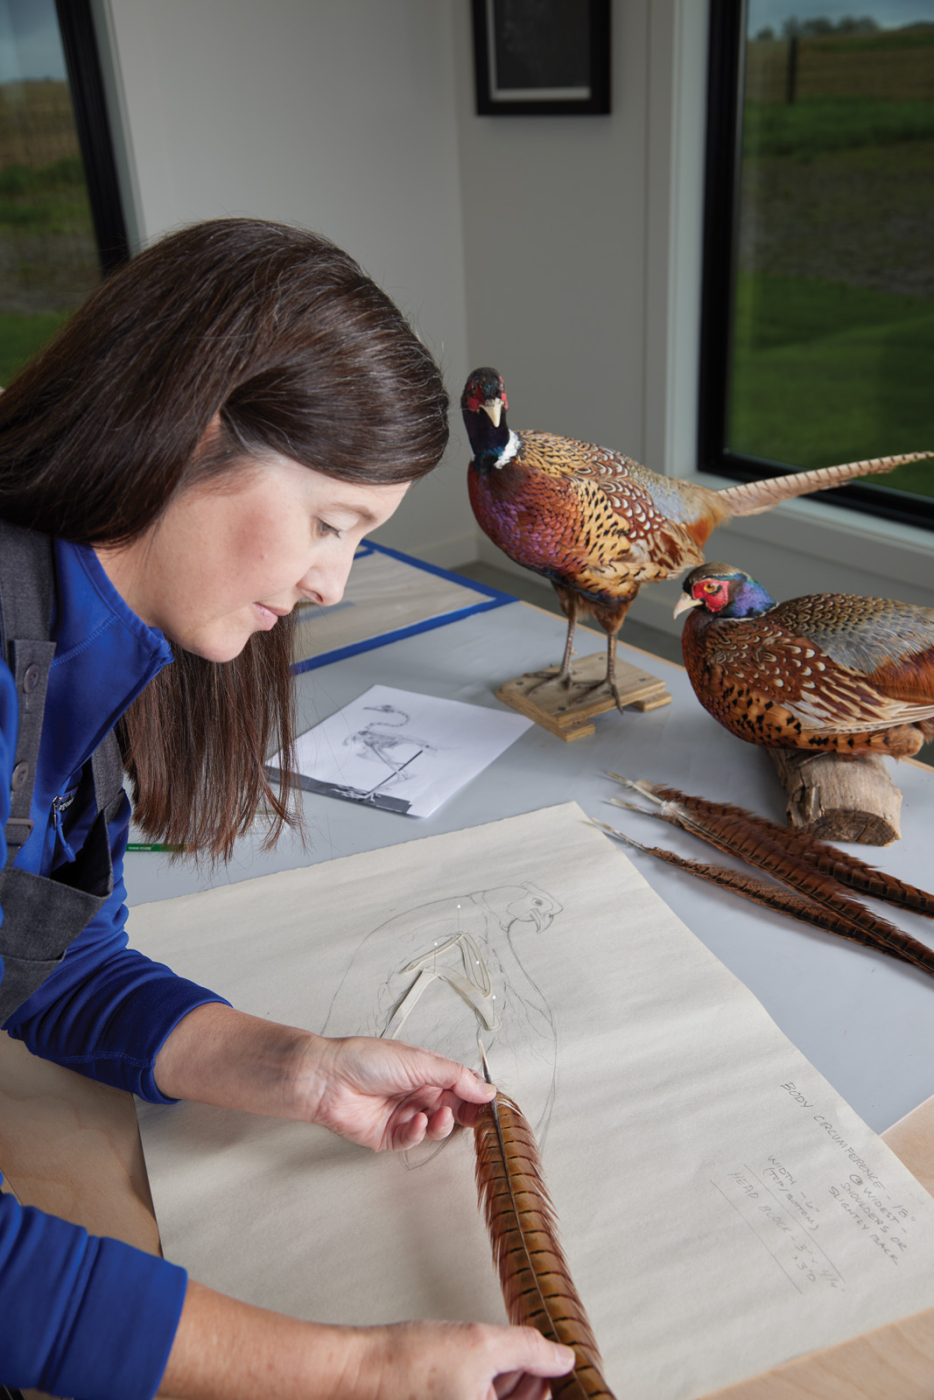
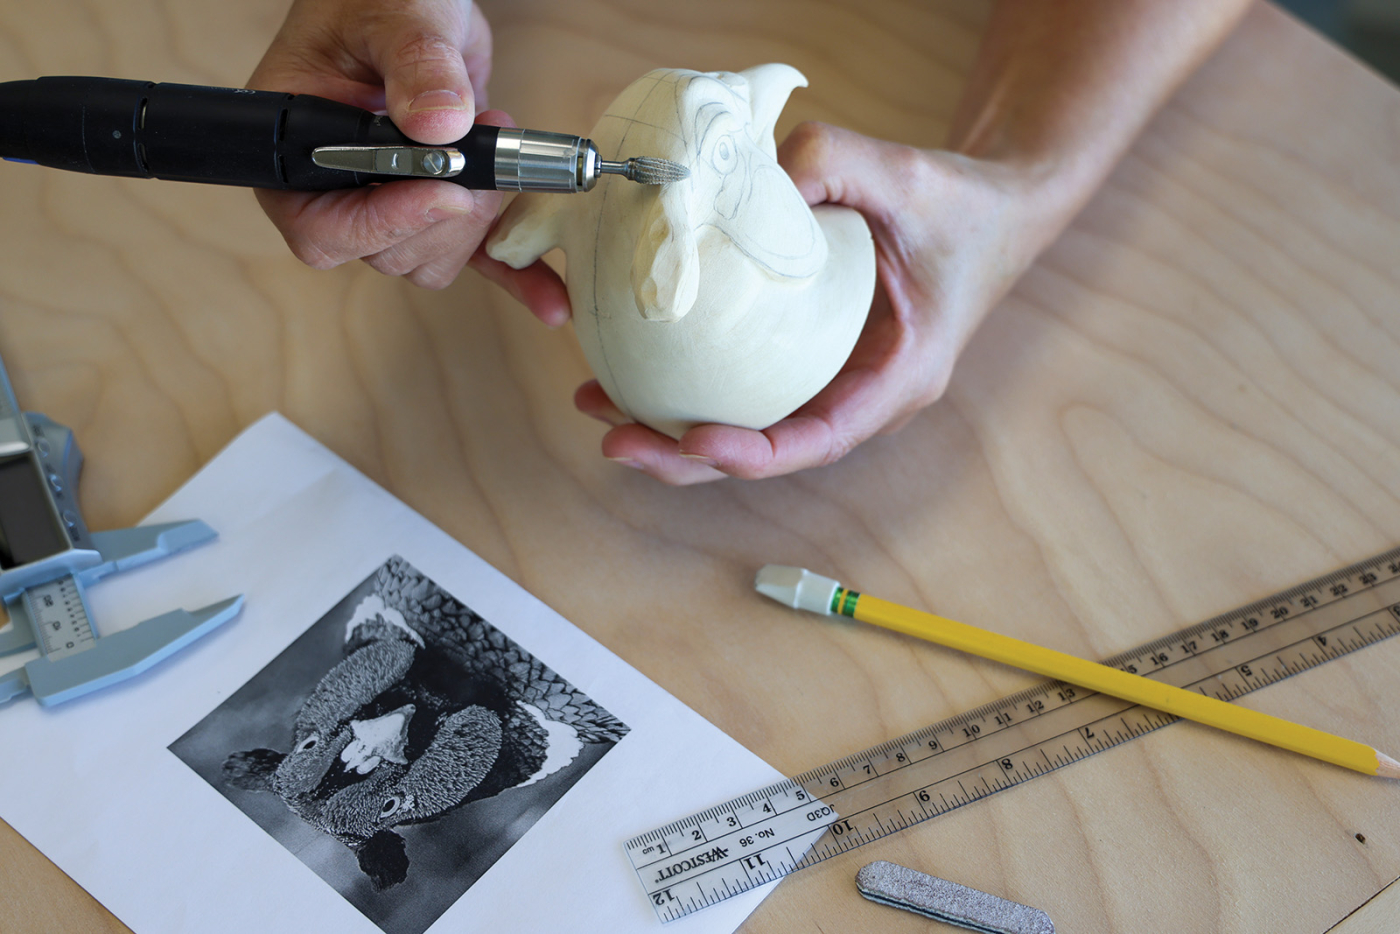
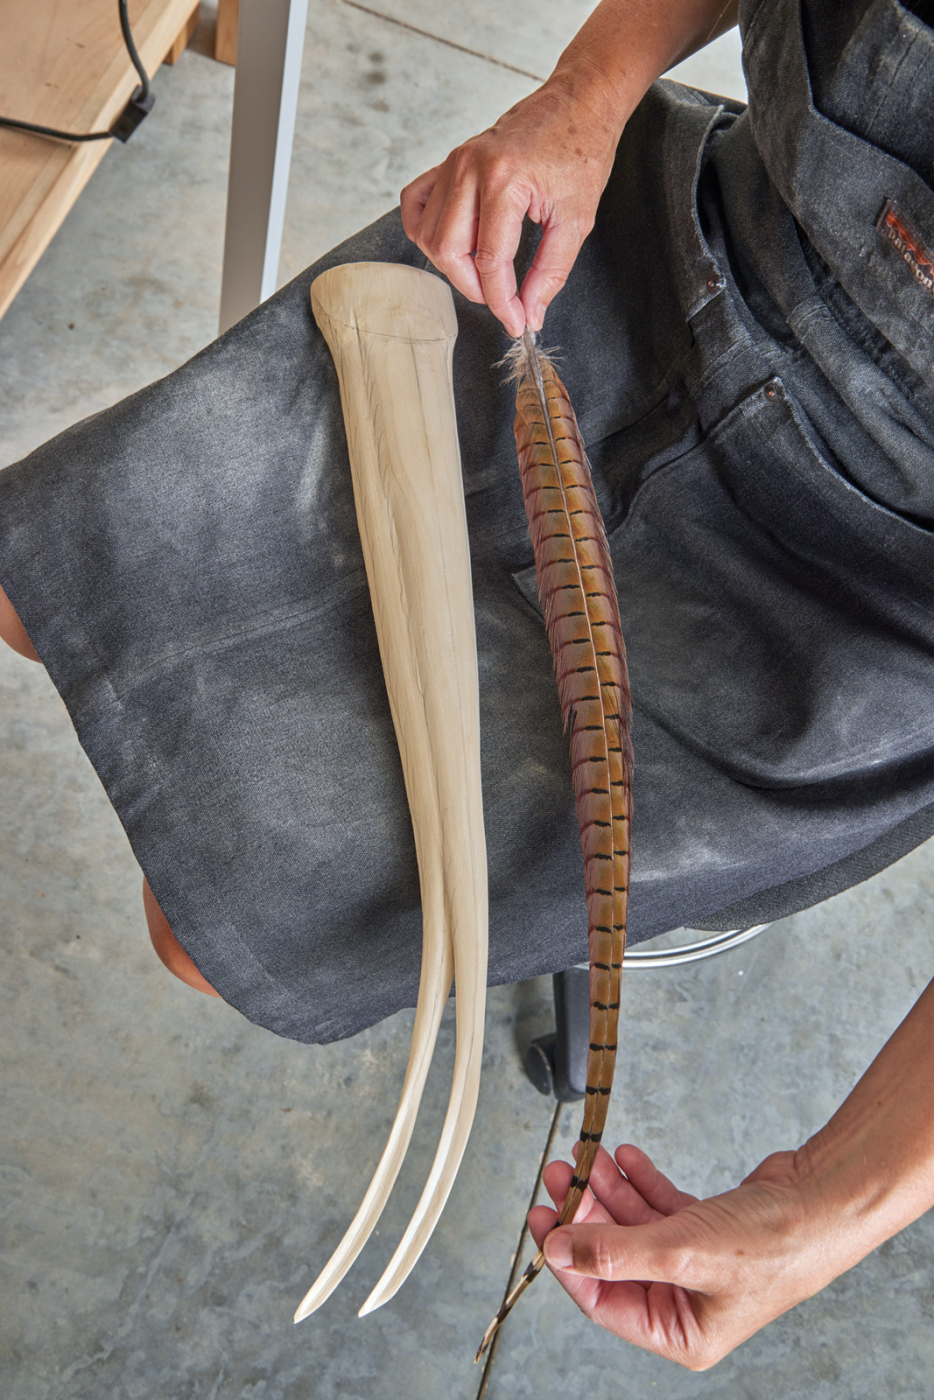
Start by gathering visual references. You can never have enough. Take your own images, research images and videos on the Internet, locate a study skin, frozen bird, mounted bird, or observe at a zoo or aviary—whichever is accessible to you. This bird isn’t a protected species so reference is much easier to come by, however, if you decide to carve a different bird, please be aware of possession laws. It’s important that you gather enough to know the bird—meaning you can see all the details from all angles, and you understand how it stands, moves, and behaves. Post your reference where you can view it often and easily. I have a metal wall above by my carving workbench with magnets where I post my top 20-25 images. I also used a study skin, two mounted pheasants, and plenty of tail feathers.
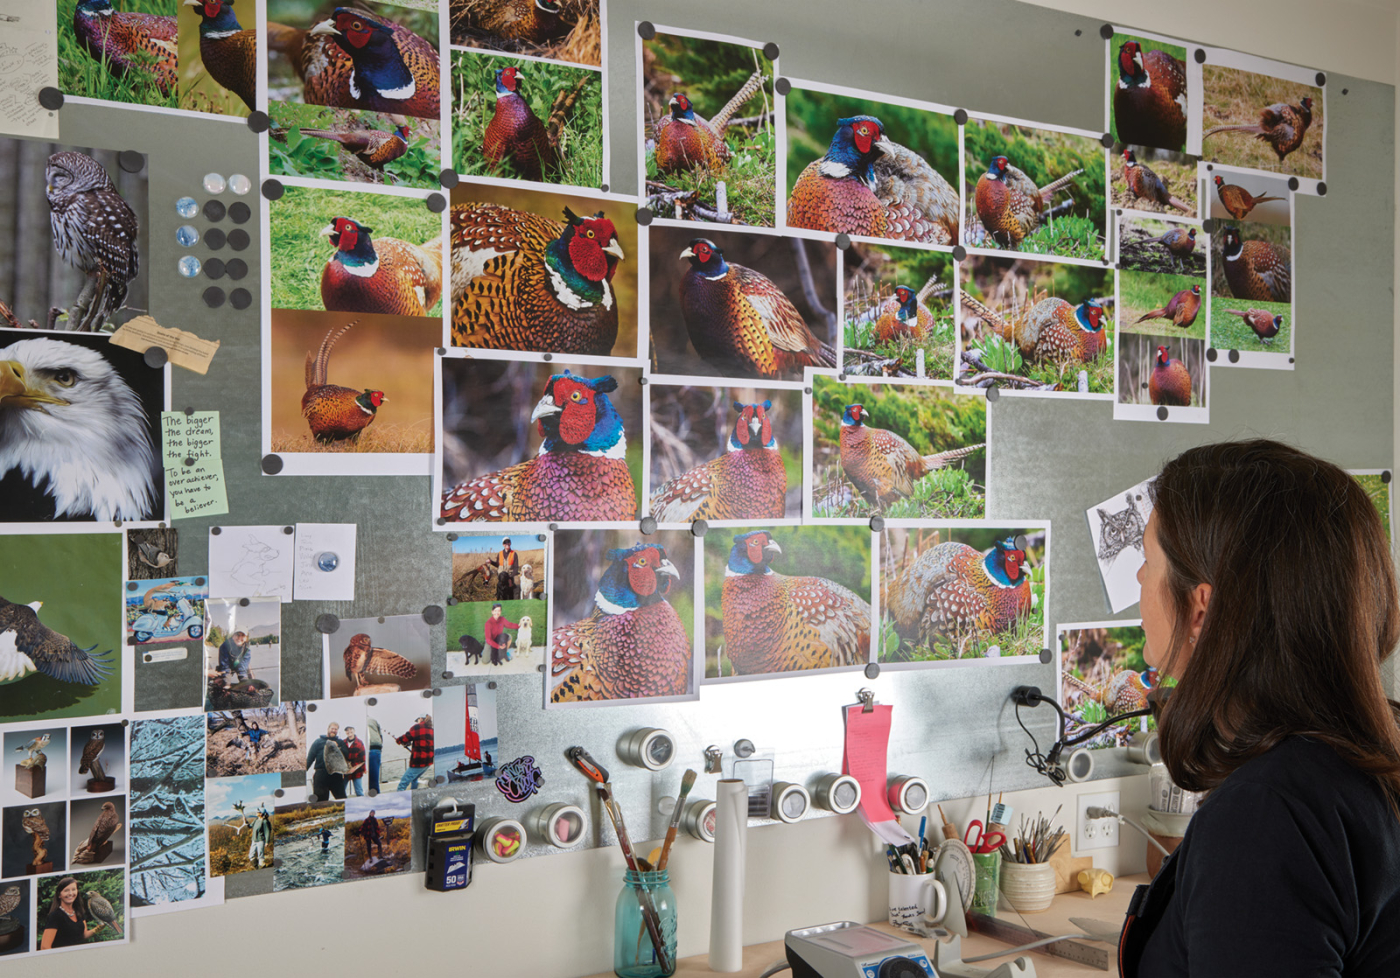
1 Gather as may visual references as possible at the onset. If you wonder how something is shaped or flow into another section of the bird, look at your reference first. The better you know the bird you are carving, the better the end result. I provided the patterns for this project, but if you are carving a different bird, create a composition, your patterns, and a carving plan as your first step.
Study your references to determine a composition you find pleasing. Make decisions such as how to position the tail, head, and feet. Each of these considerations adds character and adds interest to the composition. For the pheasant I wanted to portray him in spring plumage, looking over his shoulder with the tip of his tail bent by the wind and a mean facial expression like he is going to fight over a hen.
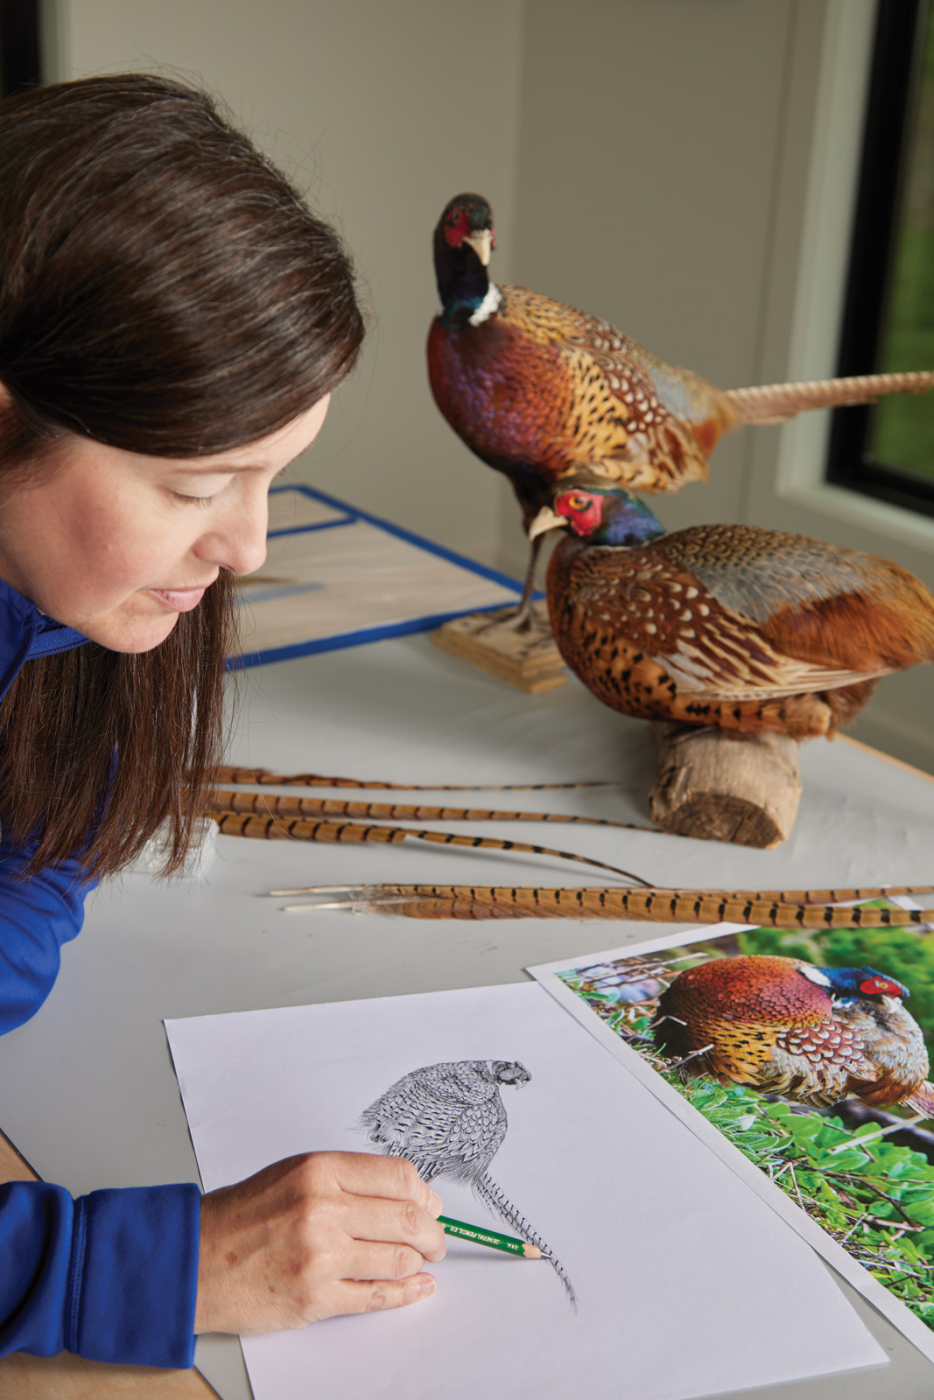
2 Before starting, I draw the composition to plan out the carving. This further helps me to determine the personality I would like the final carved pheasant to embody.
Diagrams

Pattern Making and Roughing Out
There are many places to purchase patterns. I have always made my own. If you are going to create your own pattern for a different bird, knowing bird anatomy is essential. For instance, I went as far as studying the skeleton and recreating a paper version for wing and leg accuracy.
3 Understanding anatomy is key!
4 Enlarge the patterns to the scale you want to pursue (full, half, or 1/3 are common).
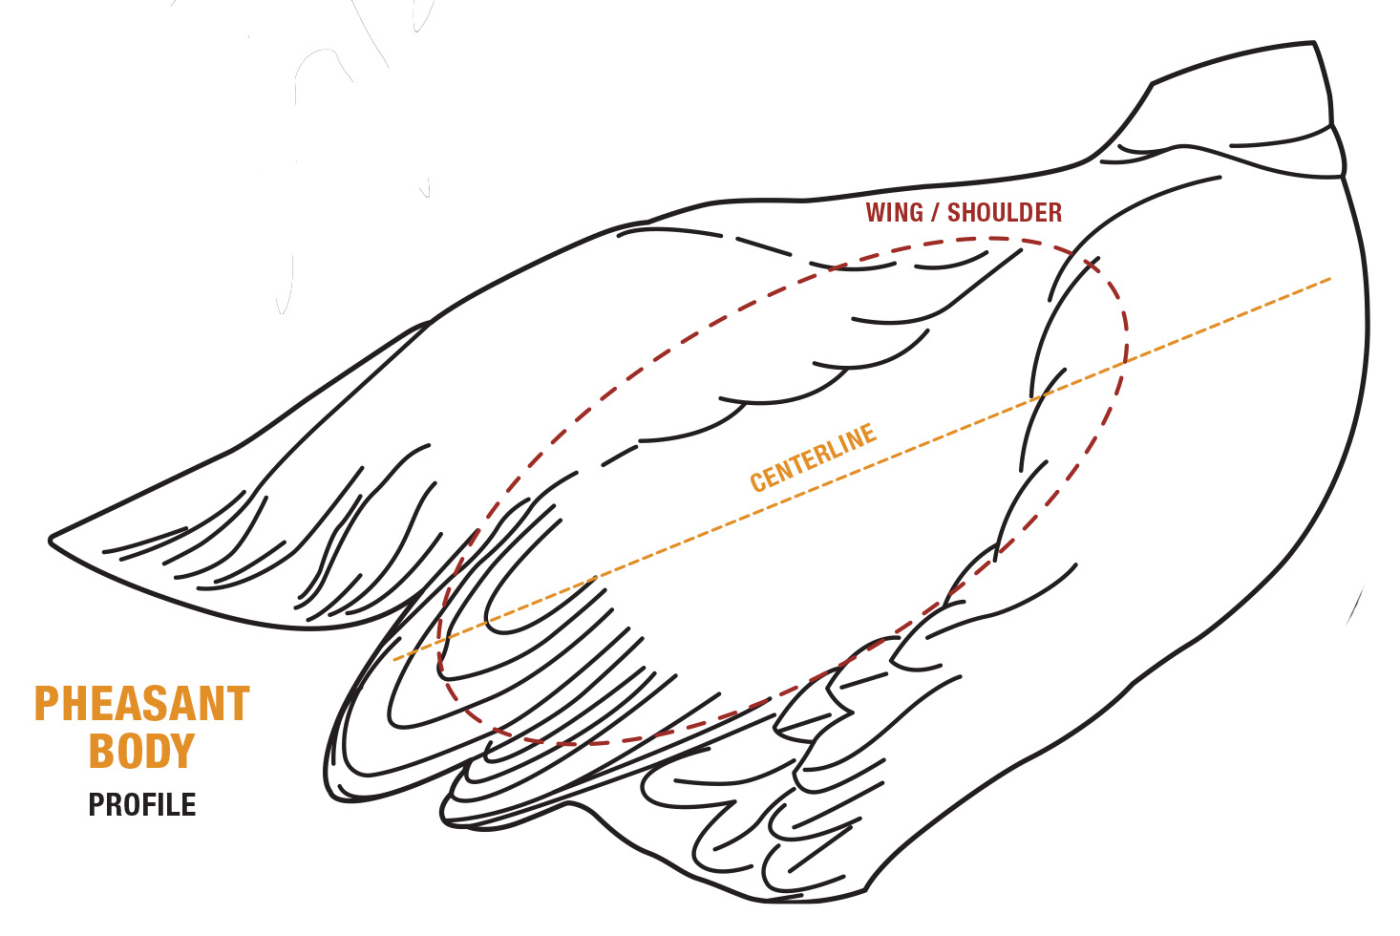
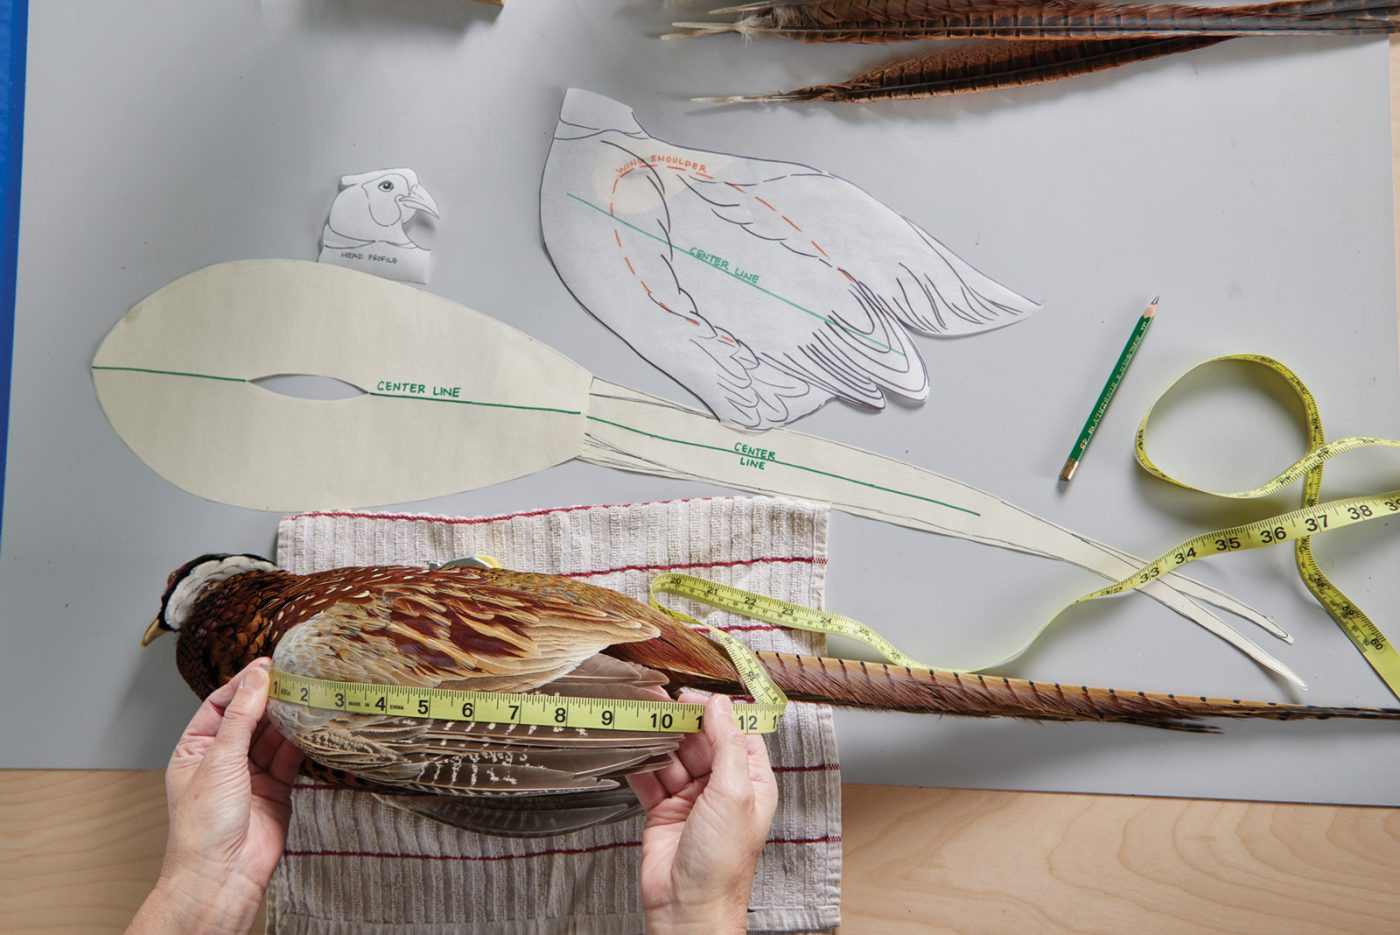
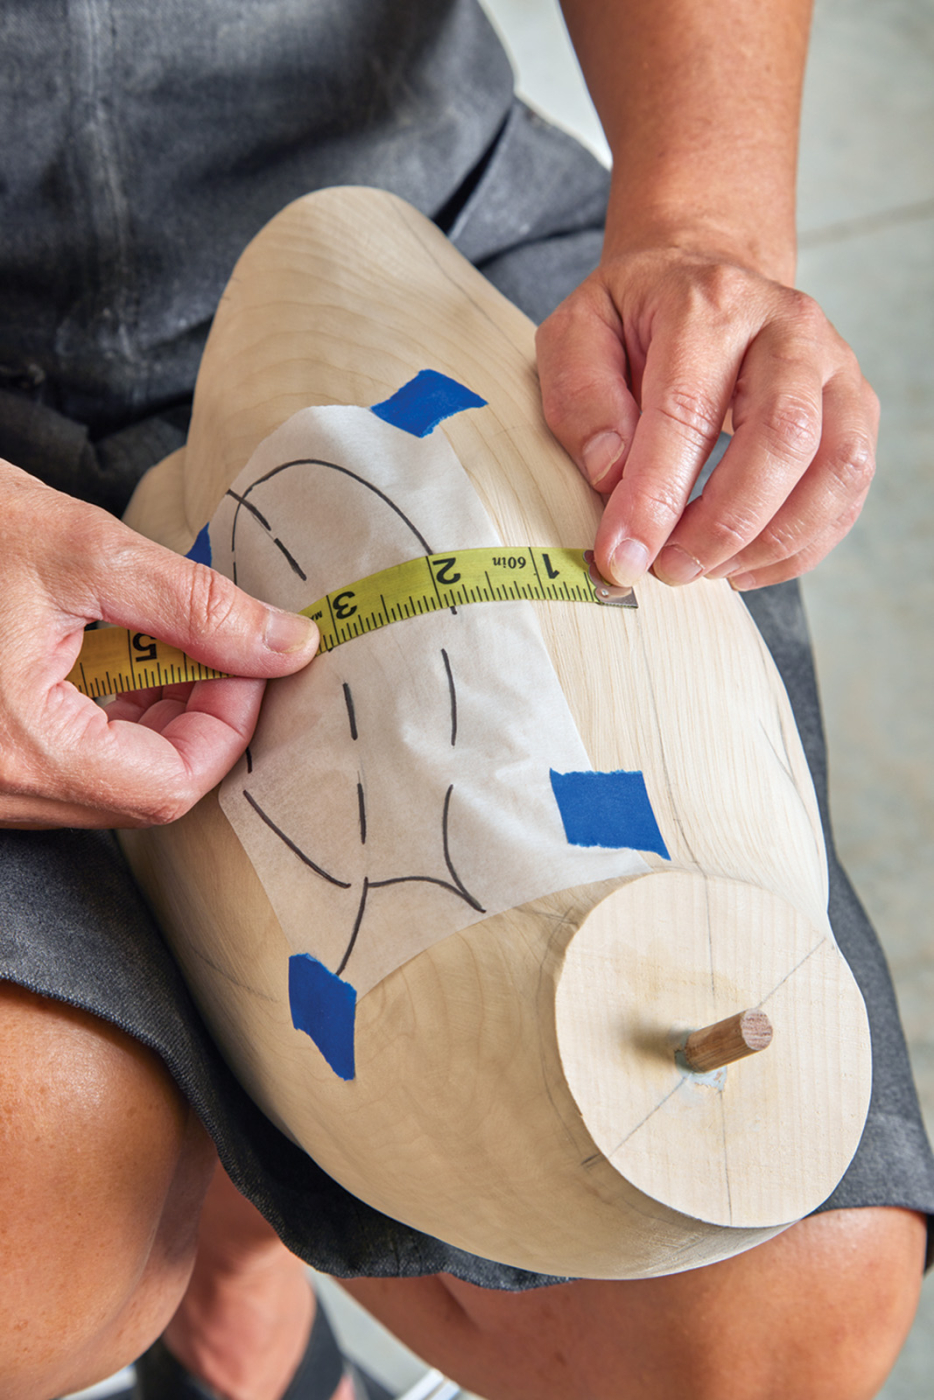
At the end of my pattern making process, I ended up with a top and profile pattern for each of the three segments of the bird: head, body, and tail. I’ll use them during two stages of the project: for cutting out the rough shape on the bandsaw, and later, for determining details like the position of feather groupings.
I transfer the profile pattern of each segment to each block of wood I have selected, making sure the grain runs with the length of the pattern. Cut out the profile pattern of each and establish a centerline. This line should never be lost from this point on. As you progress to rounding, carving feather groups, and carving texture, be careful to keep a portion of this line so it can be drawn back.
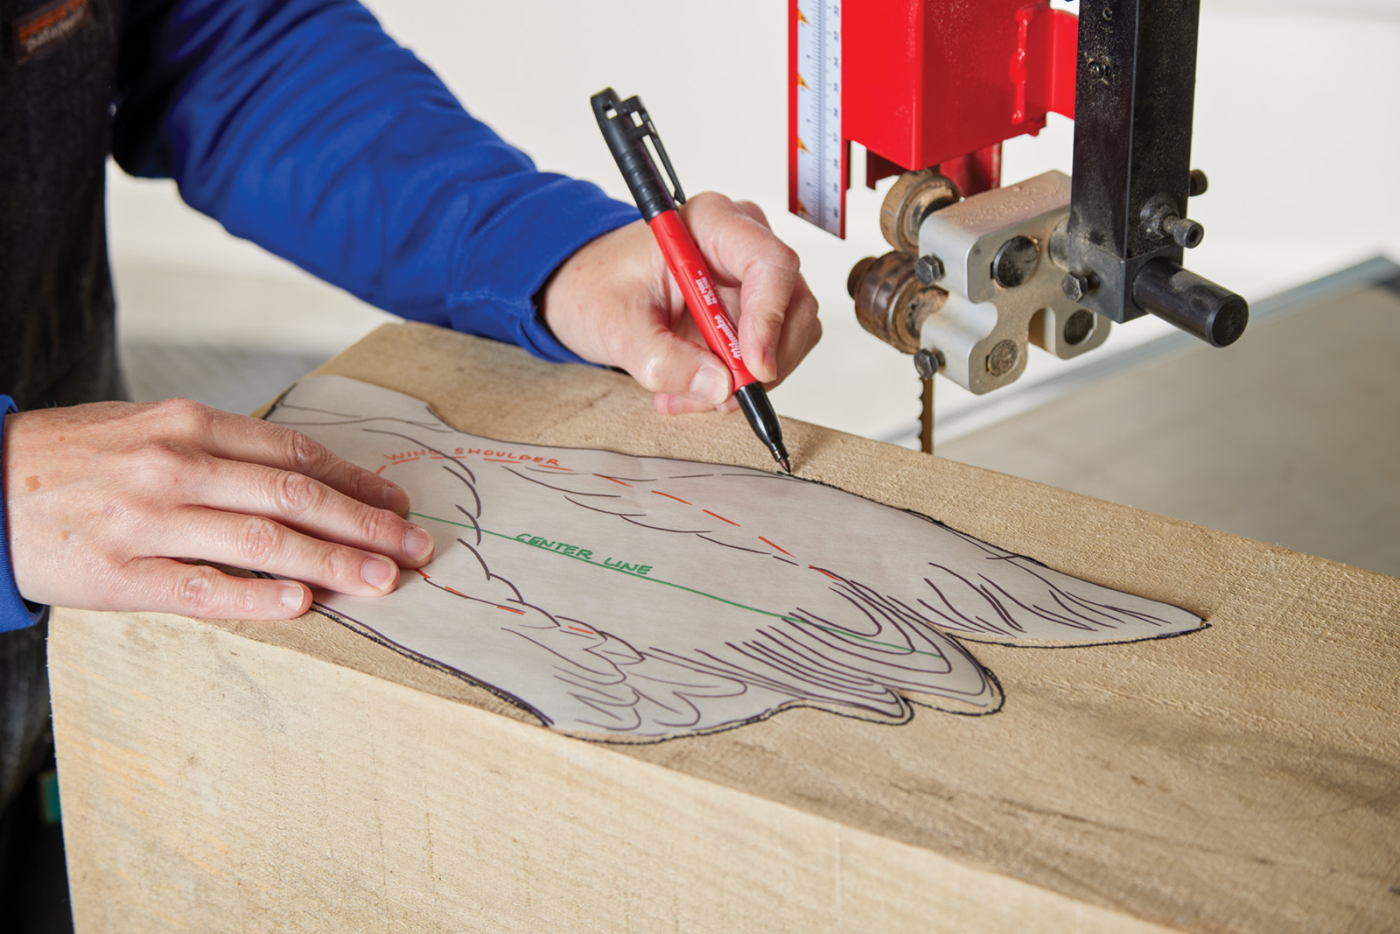
5 Transfer each to tracing paper. Then trace the rough shape outlines of the head, body, and tail on your wood blocks.
Trace the top view pattern being careful to hold the pattern straight and not along the profile curvature or the dimensions will become skewed. Note: The slit in the top pattern allows you to align the pattern centerline with the wood centerline.
Cut out the body on the bandsaw. Use the discarded side pieces to stabilize the bottom of the piece when you start to cut the top view.
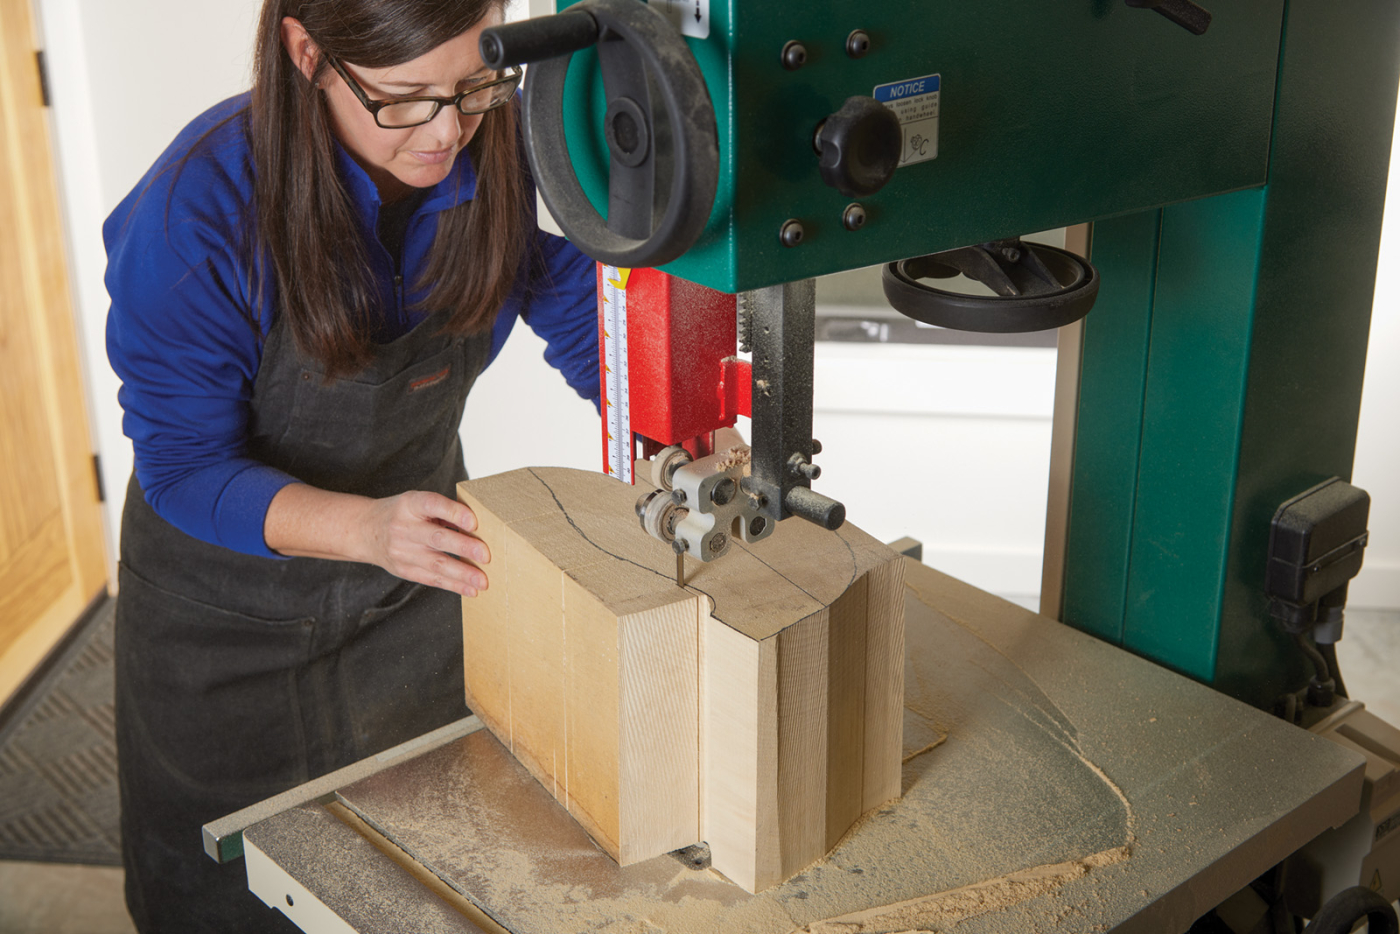
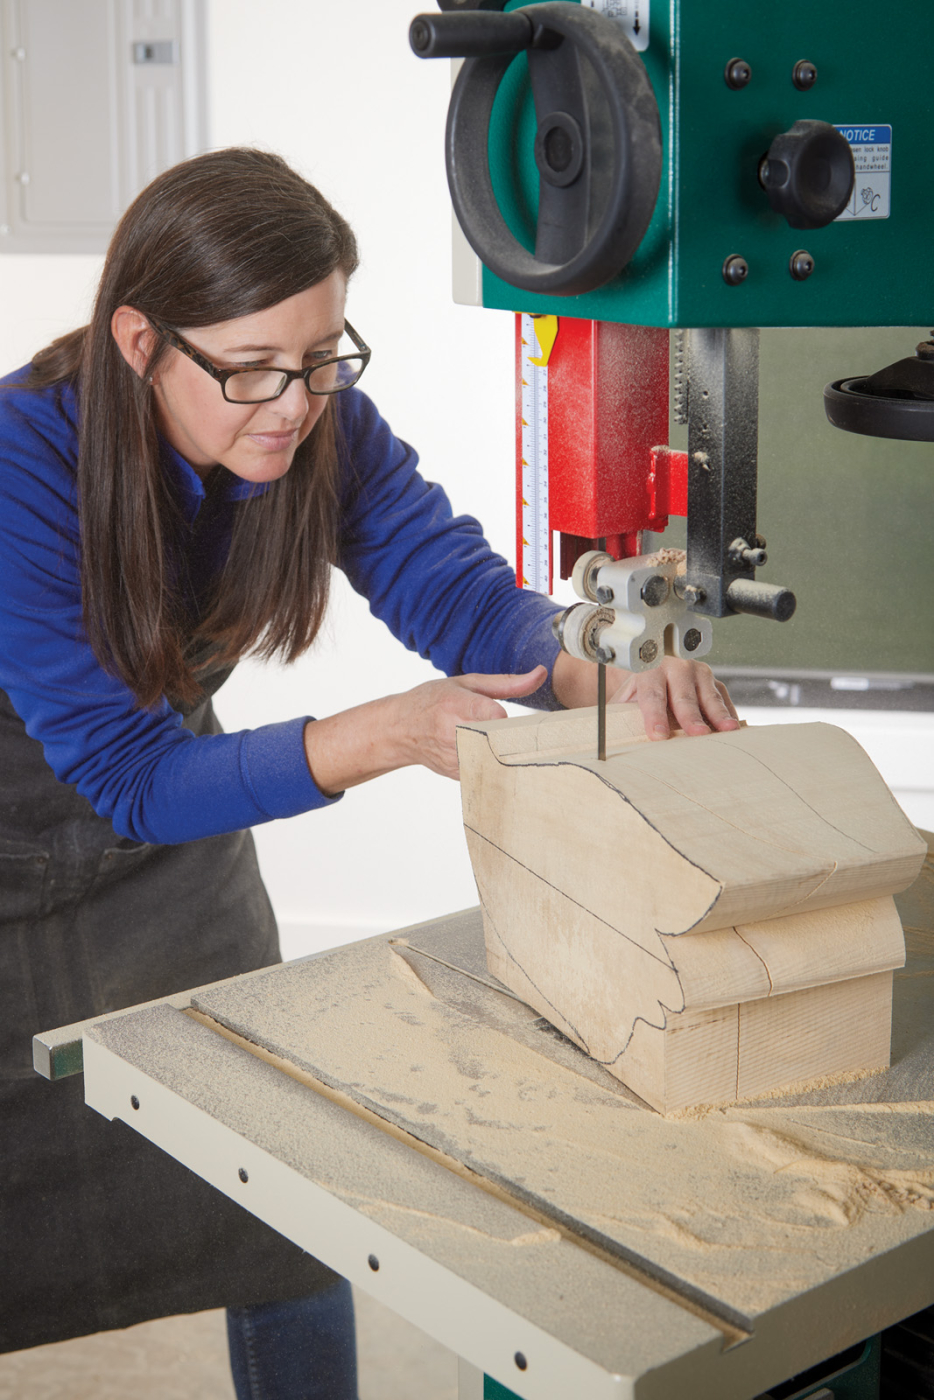
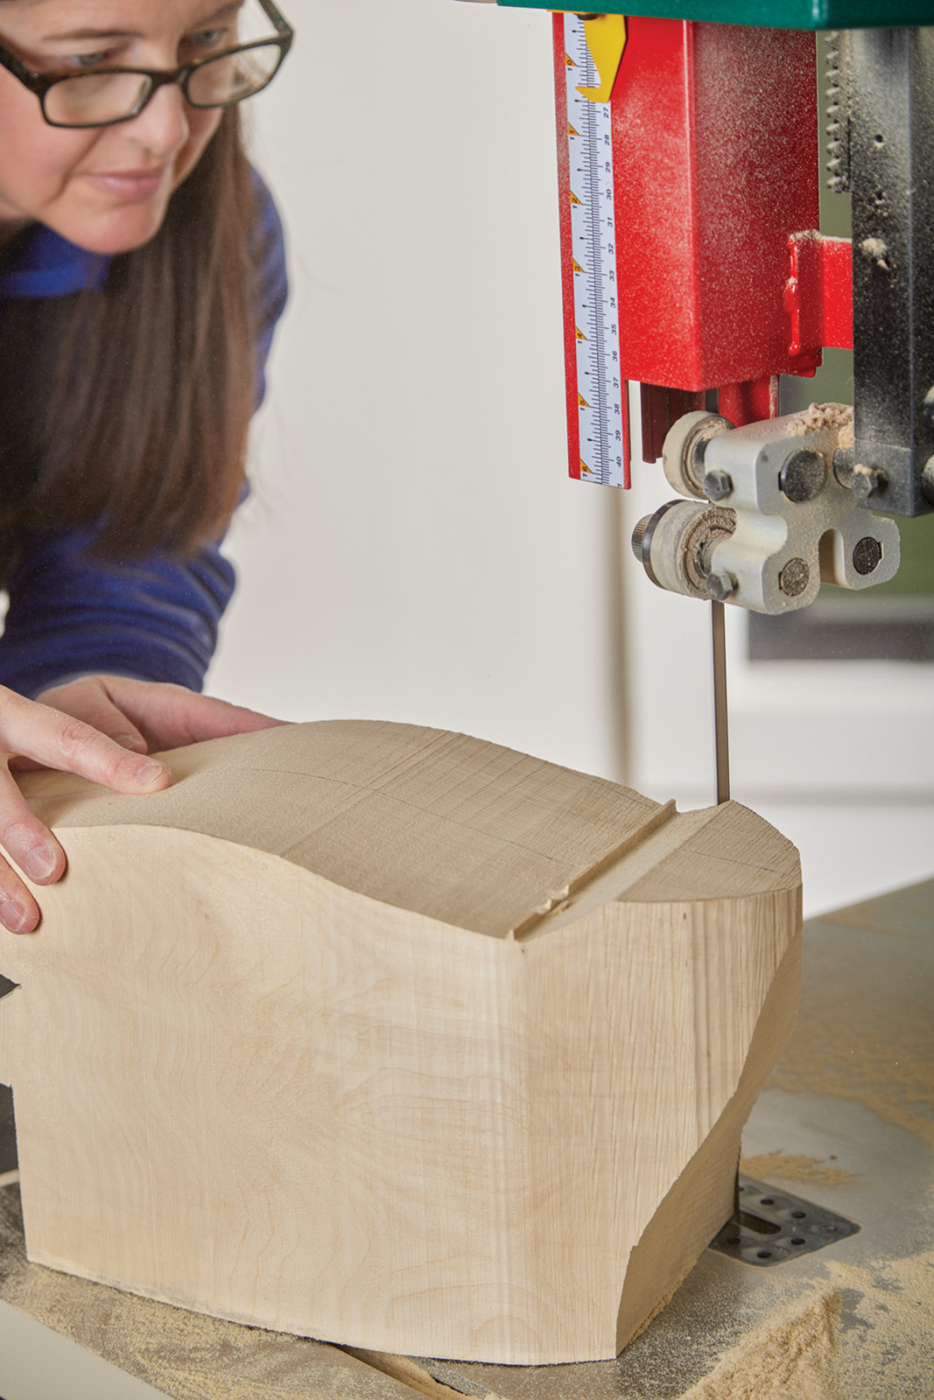
6-8 Begin to cut out the rough shapes on the bandsaw starting with the profile following by the top.
Rounding and Shaping the Body
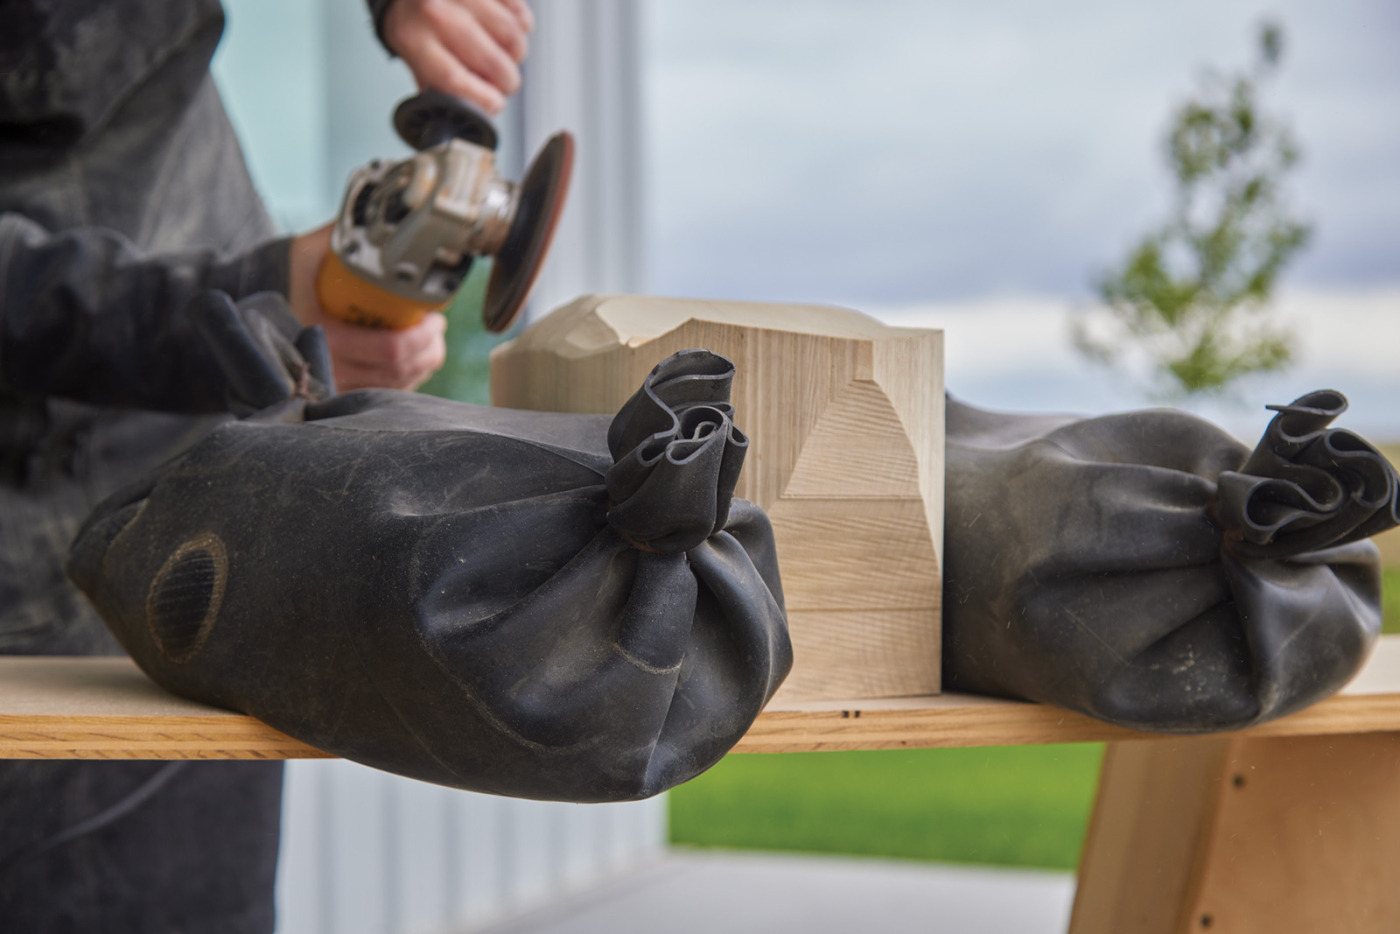
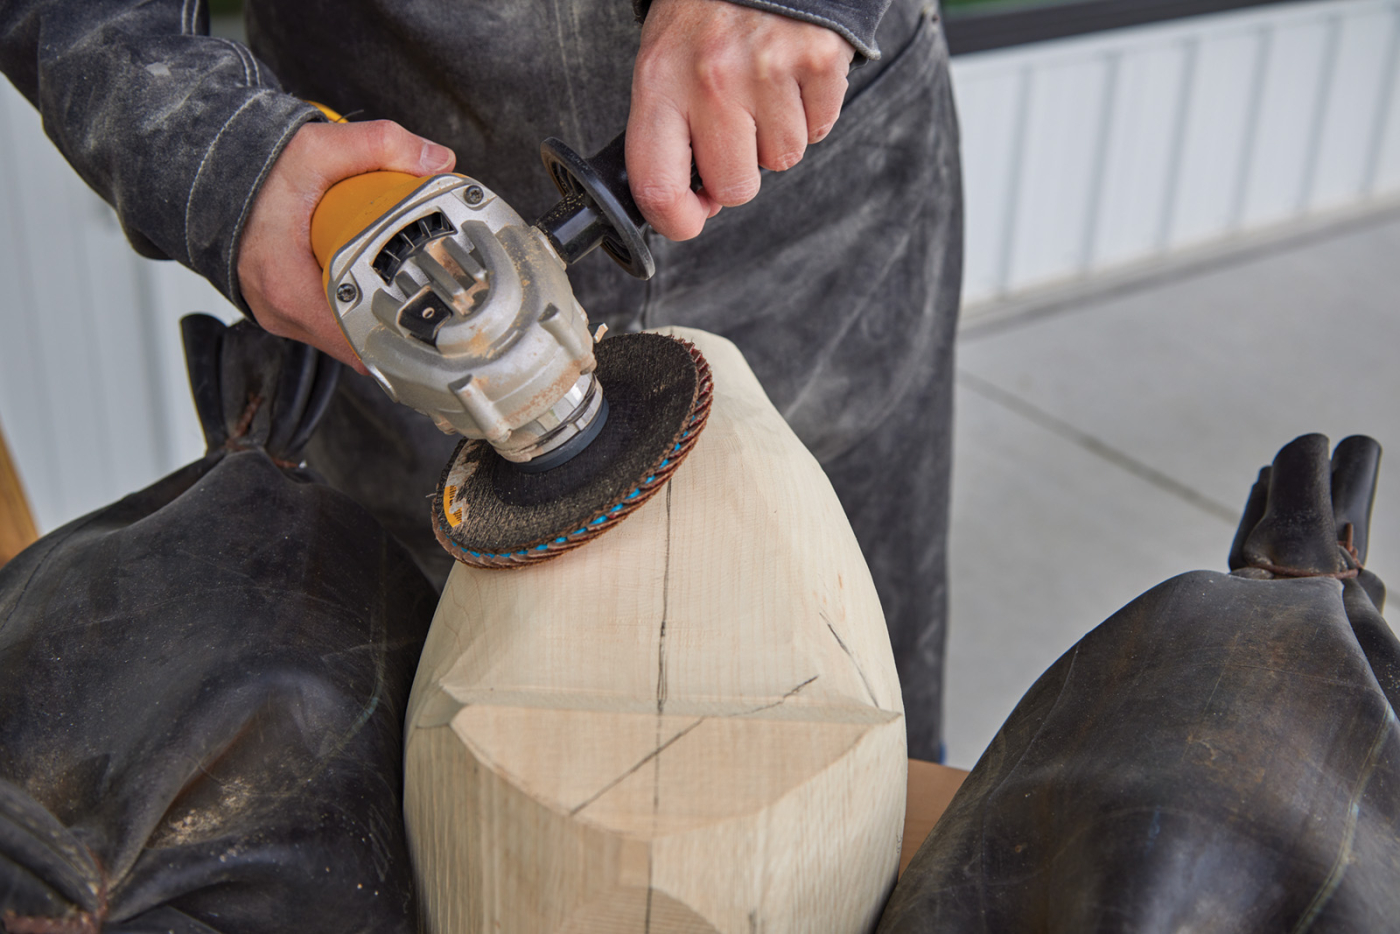
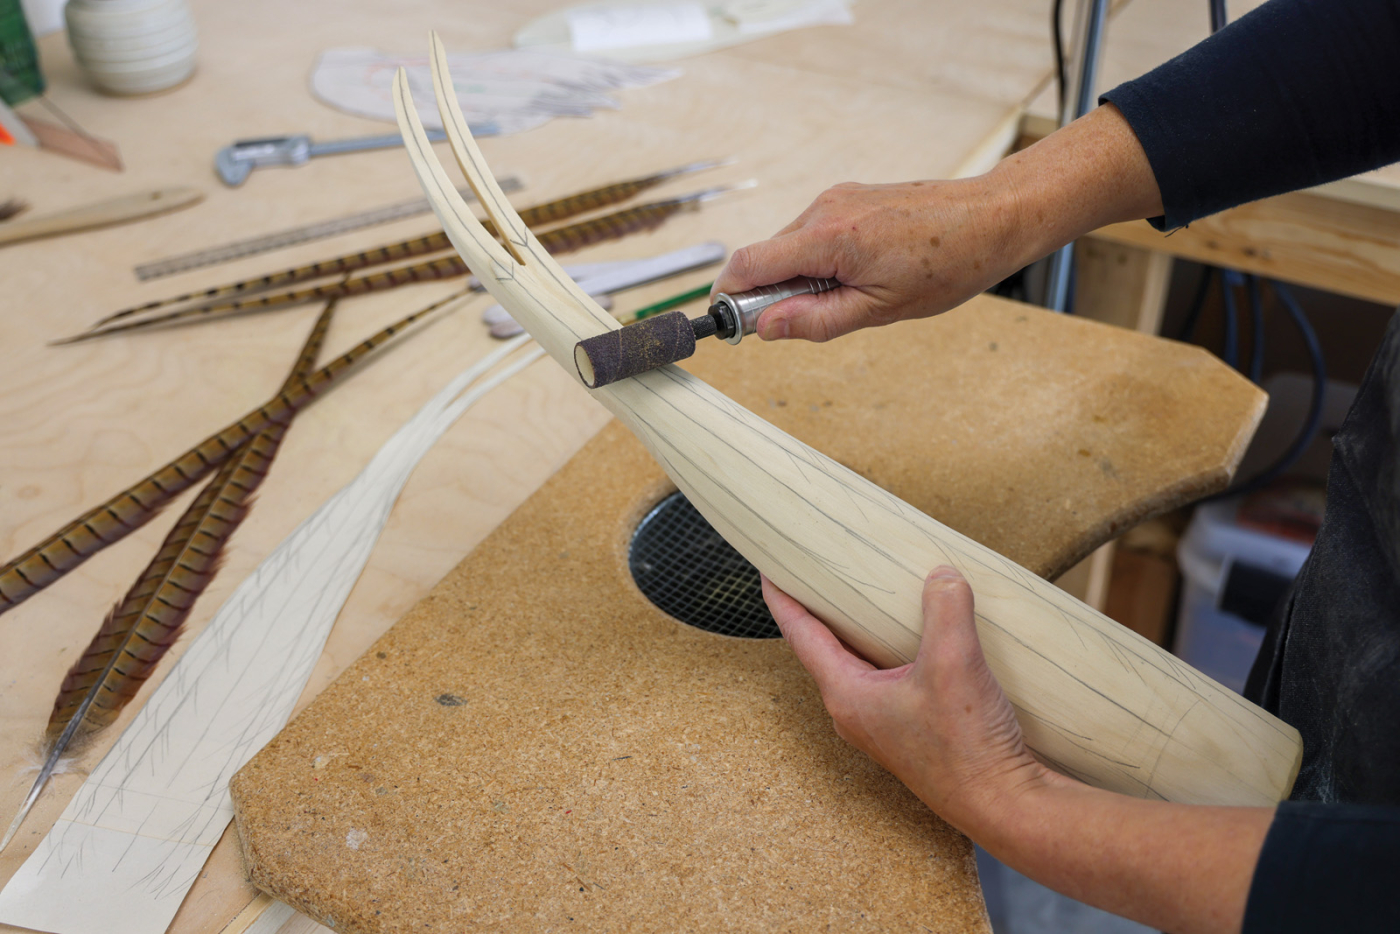
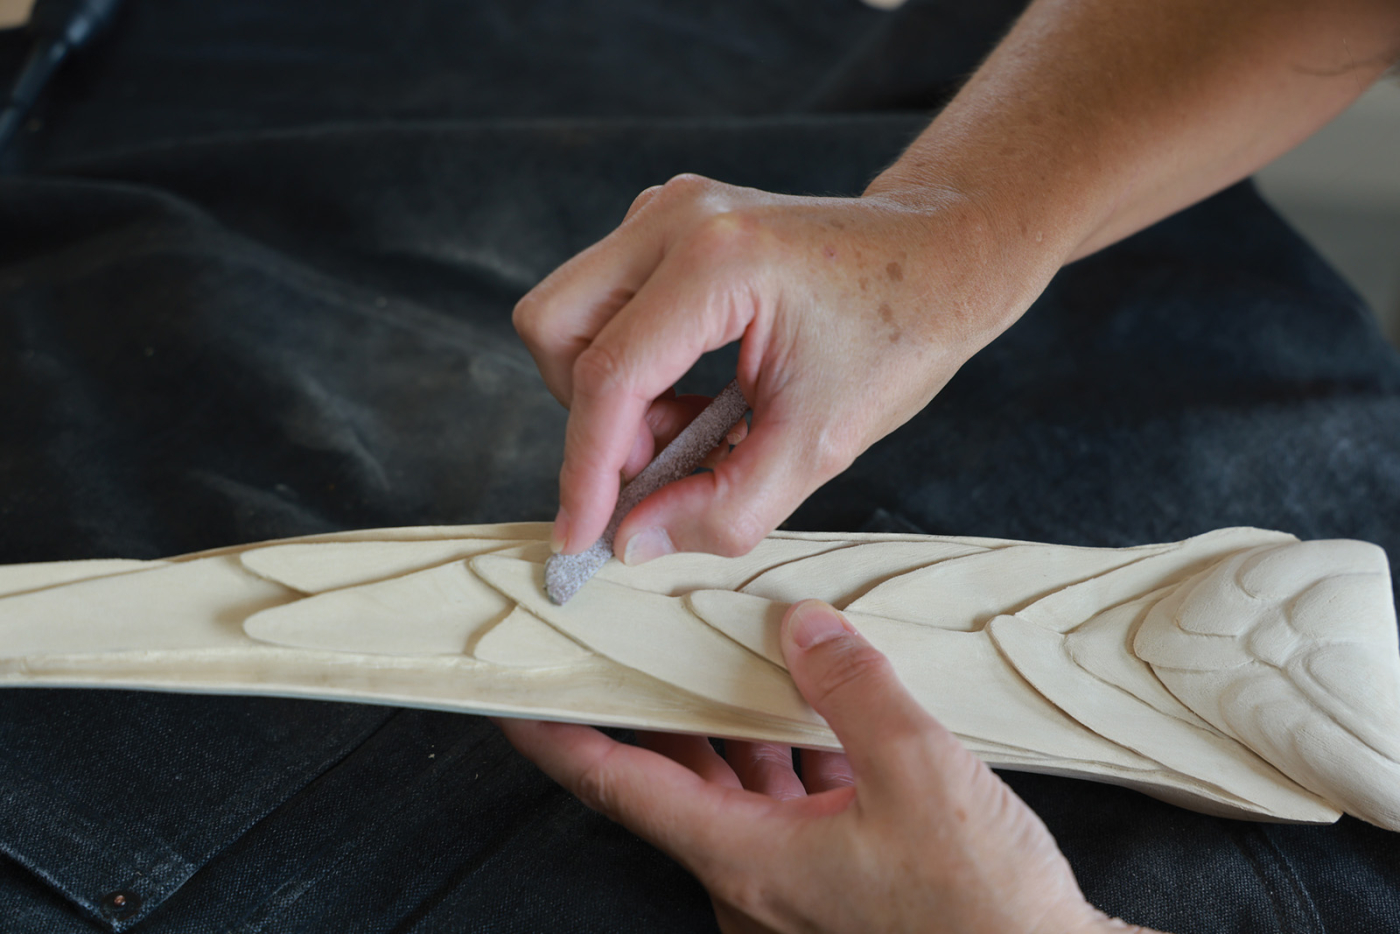
With the centerline clearly visible, the quickest way to round off the square edges is to use a 4“ DeWalt grinder with a 40- grit flap disc. This is an aggressive disc removing wood very quickly, be careful not to remove too much. A contour gauge can be helpful to make sure each side has the same curvature. (See photo 12.) You don’t want to remove too much from the neck area until you’re ready to fit the head. The same would be true for the tail to body union. When you have a good round shape with equal sides, transition to the Foredom with a 50- or 80-grit sanding drum to fine tune the shape. (See photo 13.)
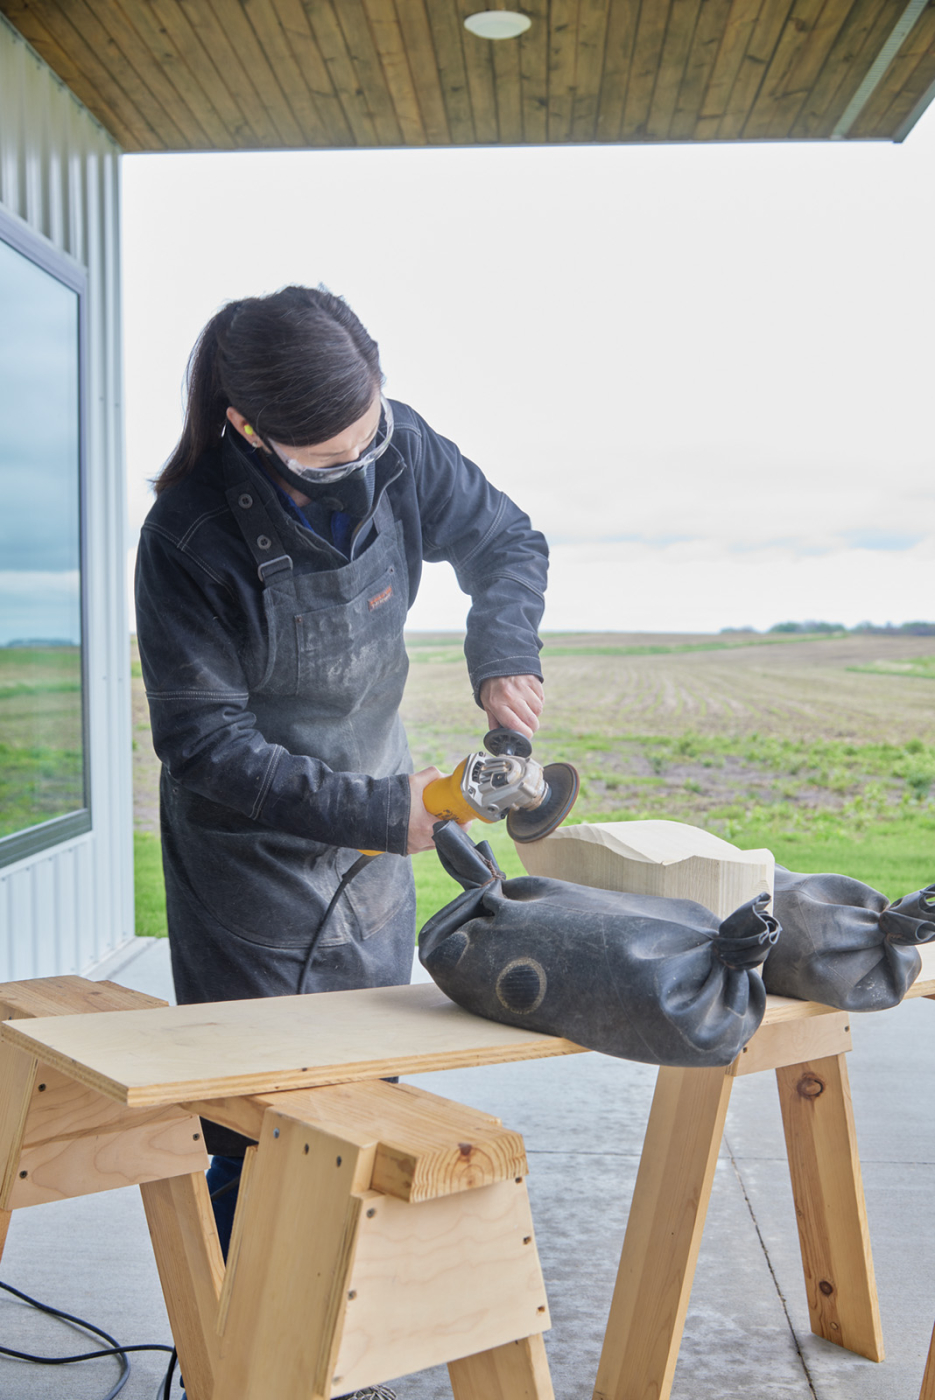
9 Use a 4″ grinder with a 40-grit flap disc to begin to round the edges of the body.
10 Continue to use the grinder to rough in the round shape.
11 At this stage there is a quite bit of wood to remove and the grinder makes quick work of this.
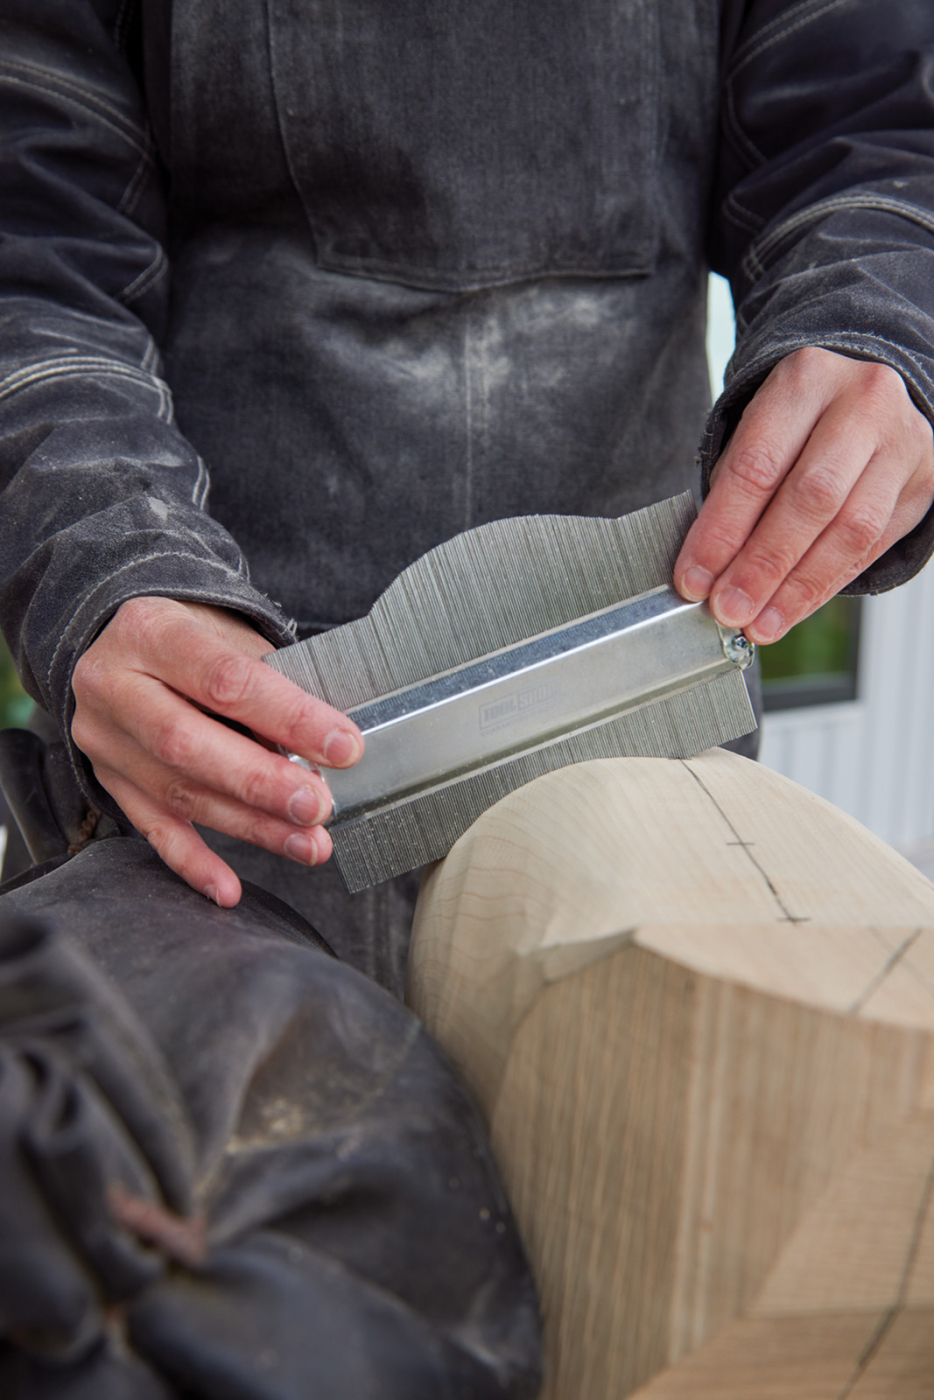
12 A contour gauge is helpful to check symmetry.
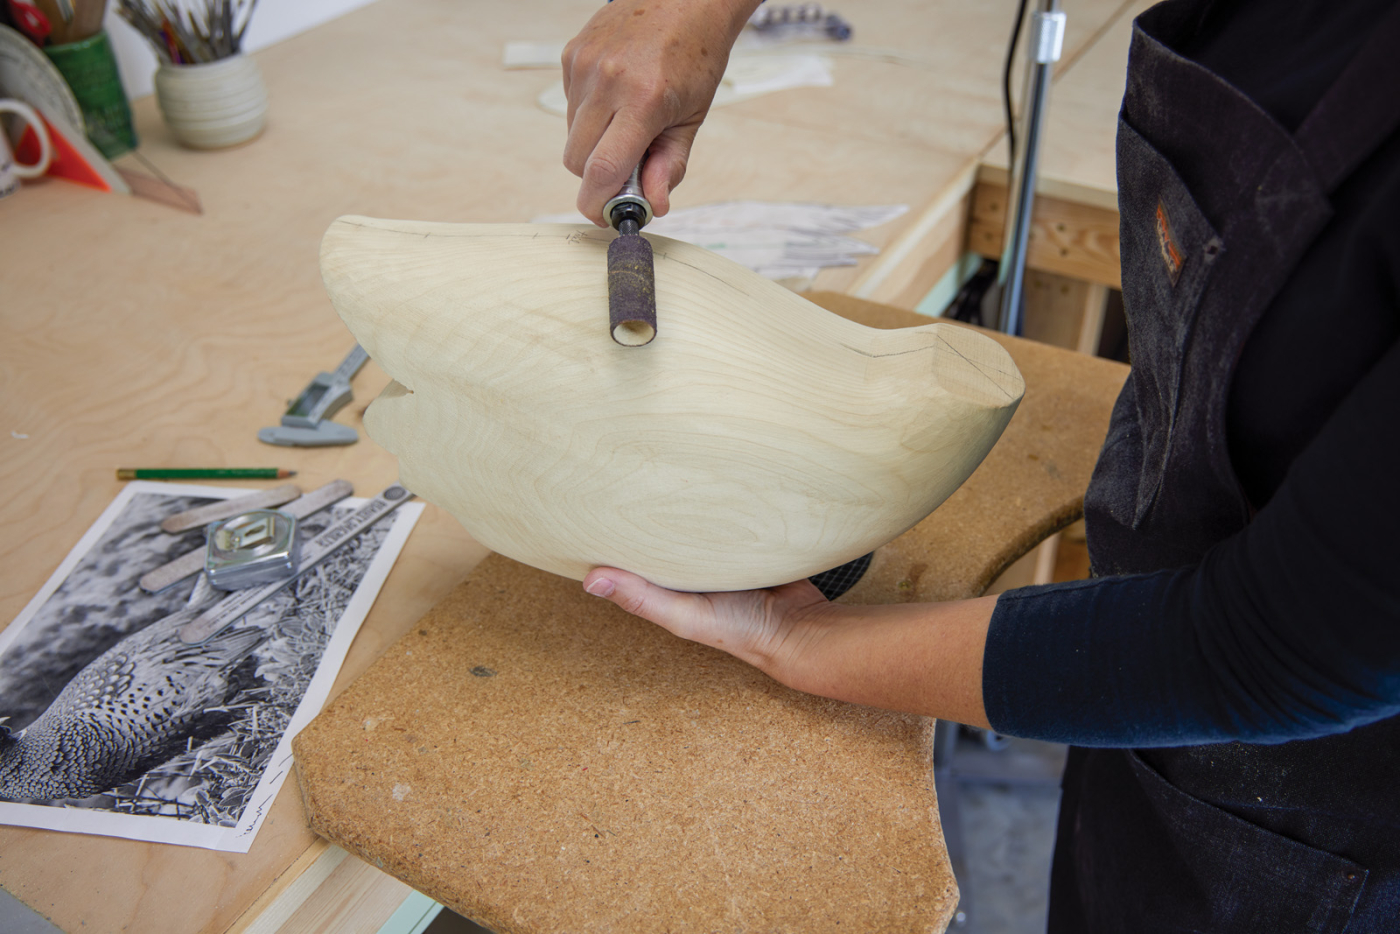
13 Further refine the shape with the Foredom tool with a 50- or 80-grit sanding drum.
Tip: I’ll use approximately two dozen foam-centered, double-sided fingernail files (80-grit on one side and 100-grit on the other side) purchased in bulk from a beauty supply store to do quite a bit of hand profiling. Light gray is best because it doesn’t leave a color residue. I have found I can cut these to any shape or size to reach an area or get a desired result. I have more control when removing a minute amount over the power tools. I won’t be mentioning each time I use them throughout the article, but you’ll notice them in the background of a lot of the images.
Cutting Out and Preparing the Head
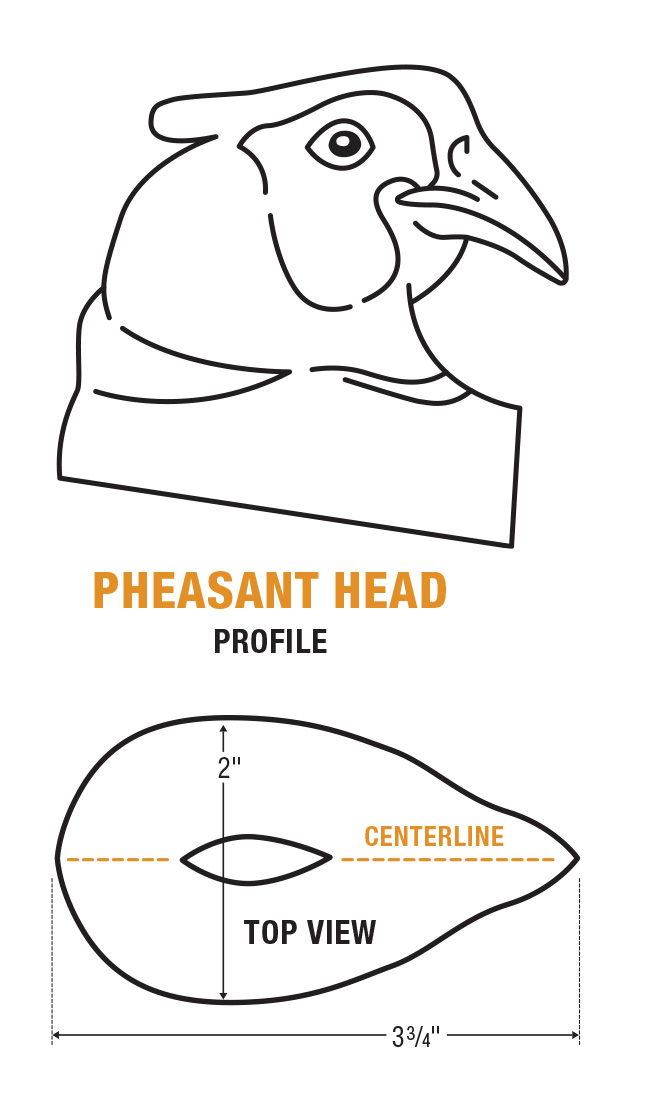
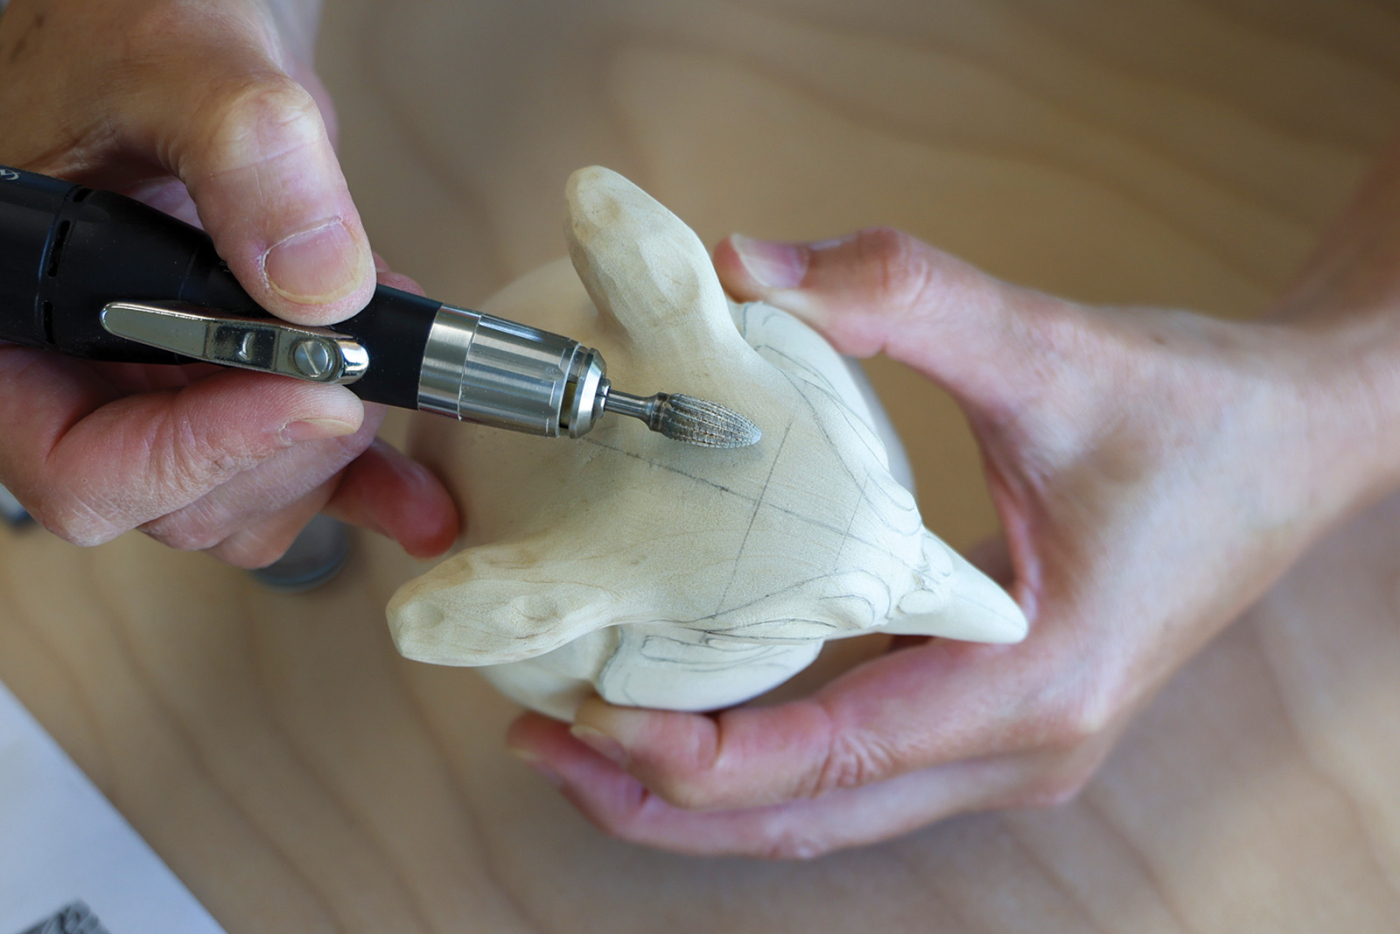
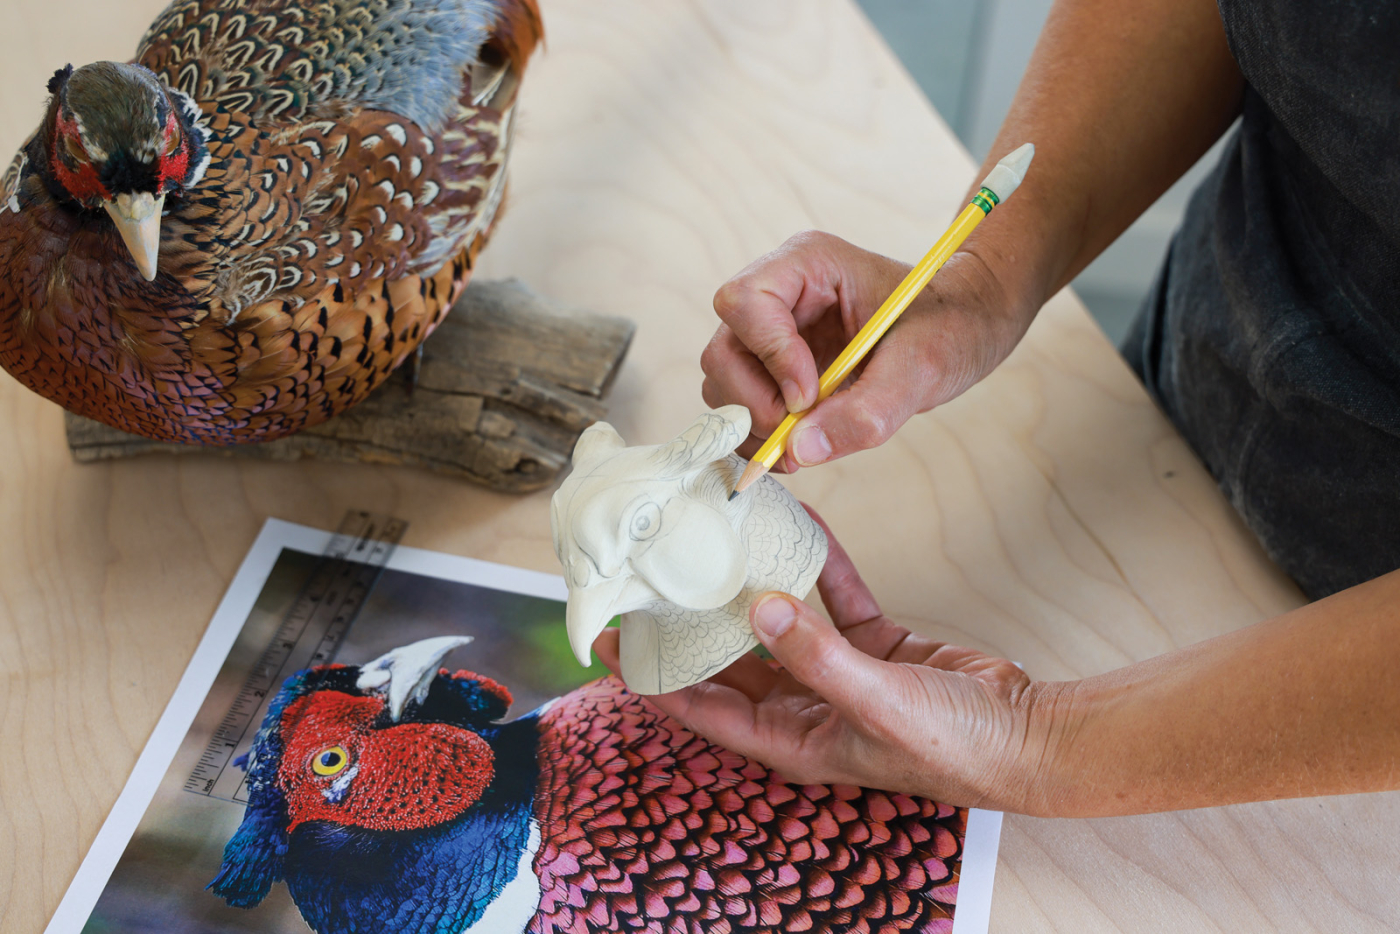
Now switch focus to the head and cut out the profile and top patterns just as you did the body making sure to work from and preserve the centerline. Use the Foredom with sanding drums to refine the exact pattern lines. The neck is wider than the top of the head. Be sure to work around the ear tufts. Spend some time here to be exact and symmetrical.
Next, create two head detail patterns on tracing paper that are the mirror opposites of each other. You can tape them to a window to identically trace them easily. Turn both patterns over, and using a soft pencil, trace the lines that you can see through the tracing paper. Be exact here and use a sharpened pencil. You’re creating a transfer paper of sorts so you can transfer the pattern to the wood with a ballpoint pen or stylus when pressing on the non-pencil side of the pattern.
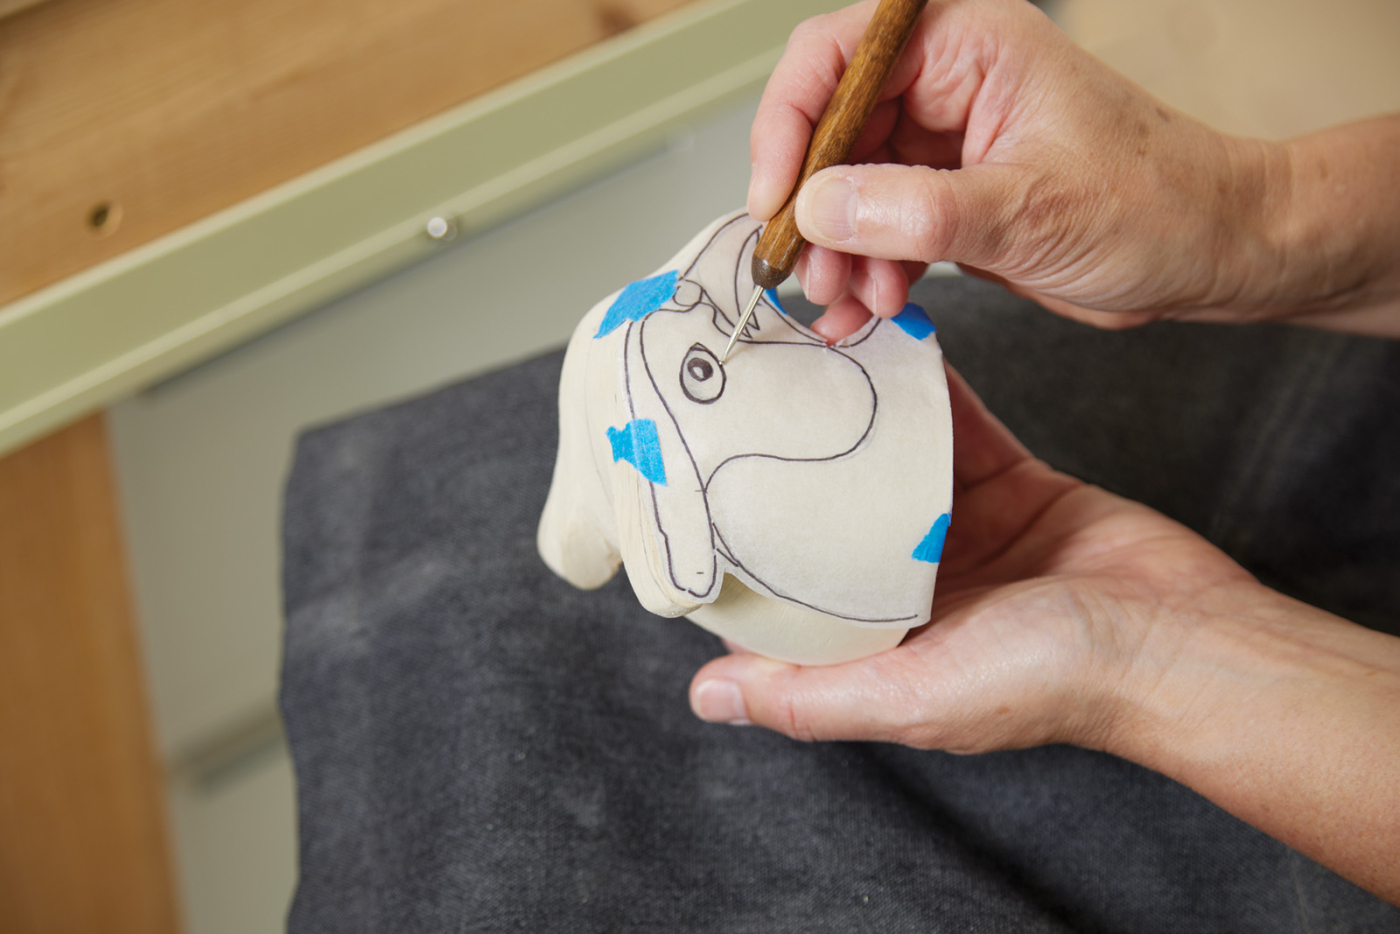
14 After carefully placing both sides of the face detail patterns, use a stylist or ball point pen to transfer the lines.
Once both are identically traced with pencil, turn them back over and use small pieces of tape to adhere each side of the face to the head (non-pencil side out). Alignment and measure are key here. I find it easier to start the alignment at the front of the beak on the centerline and shift each pattern up or down. That way I have one point to pivot from that is common. If you find any discrepancies, adjust one side or the other. Once the patterns are equally placed, use a ballpoint pen or stylus to trace the lines. (See photo 14.) Remove the patterns to reveal the transferred pencil lines. Using the soft pencil go over the lines to make them more visible. Double check the alignment of the lines by measuring from the centerlines again. If these aren’t exactly accurate, erase, reposition, and trace again. Or adjust an edge of a line freehand if a slight adjustment is needed.
15 Take the time to double check symmetry and detail placement accuracy.
Shaping the Head
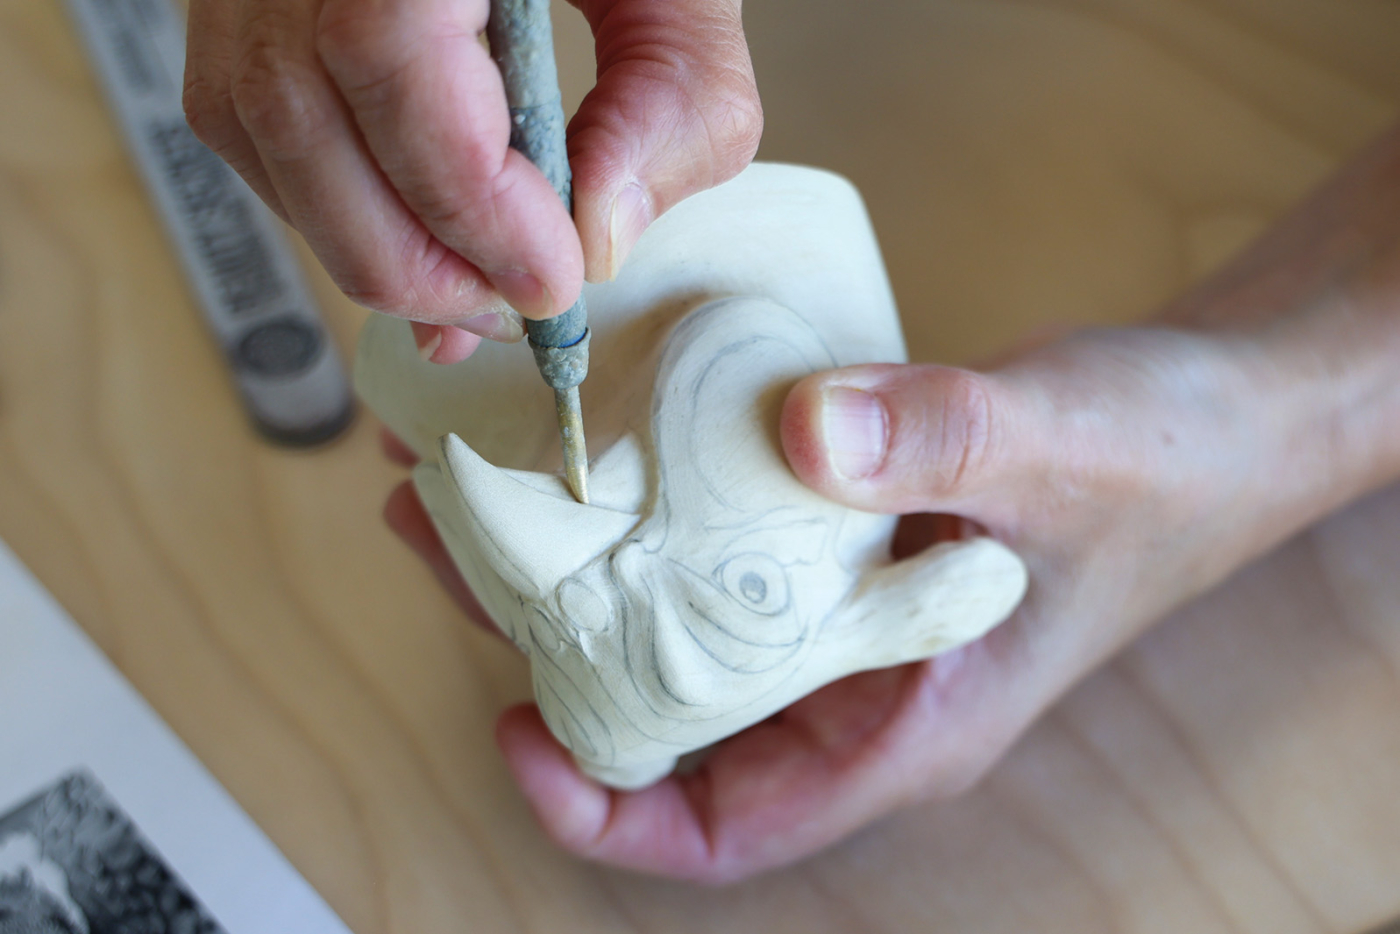
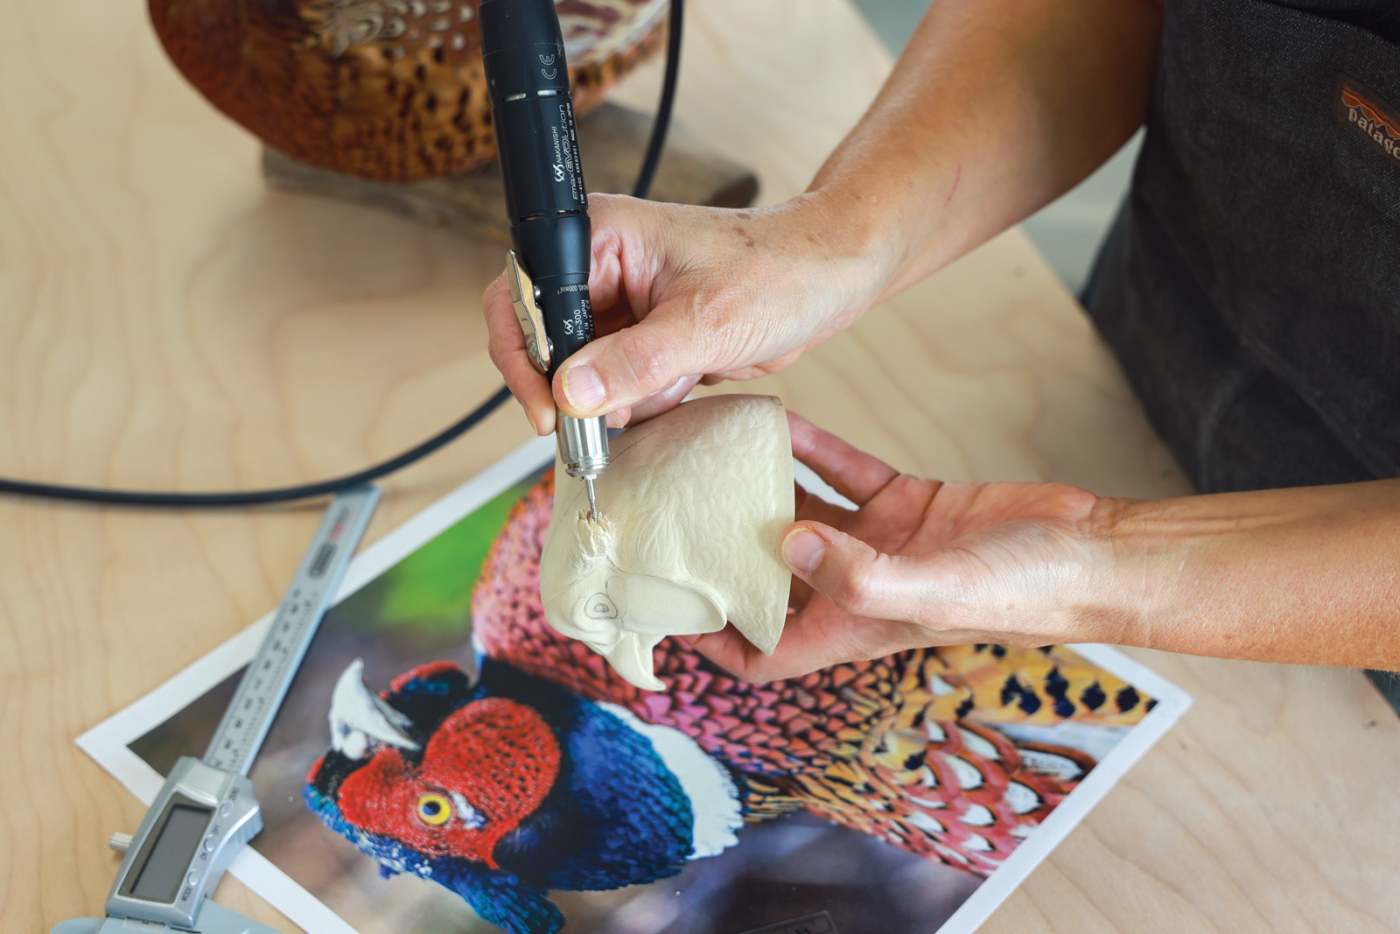
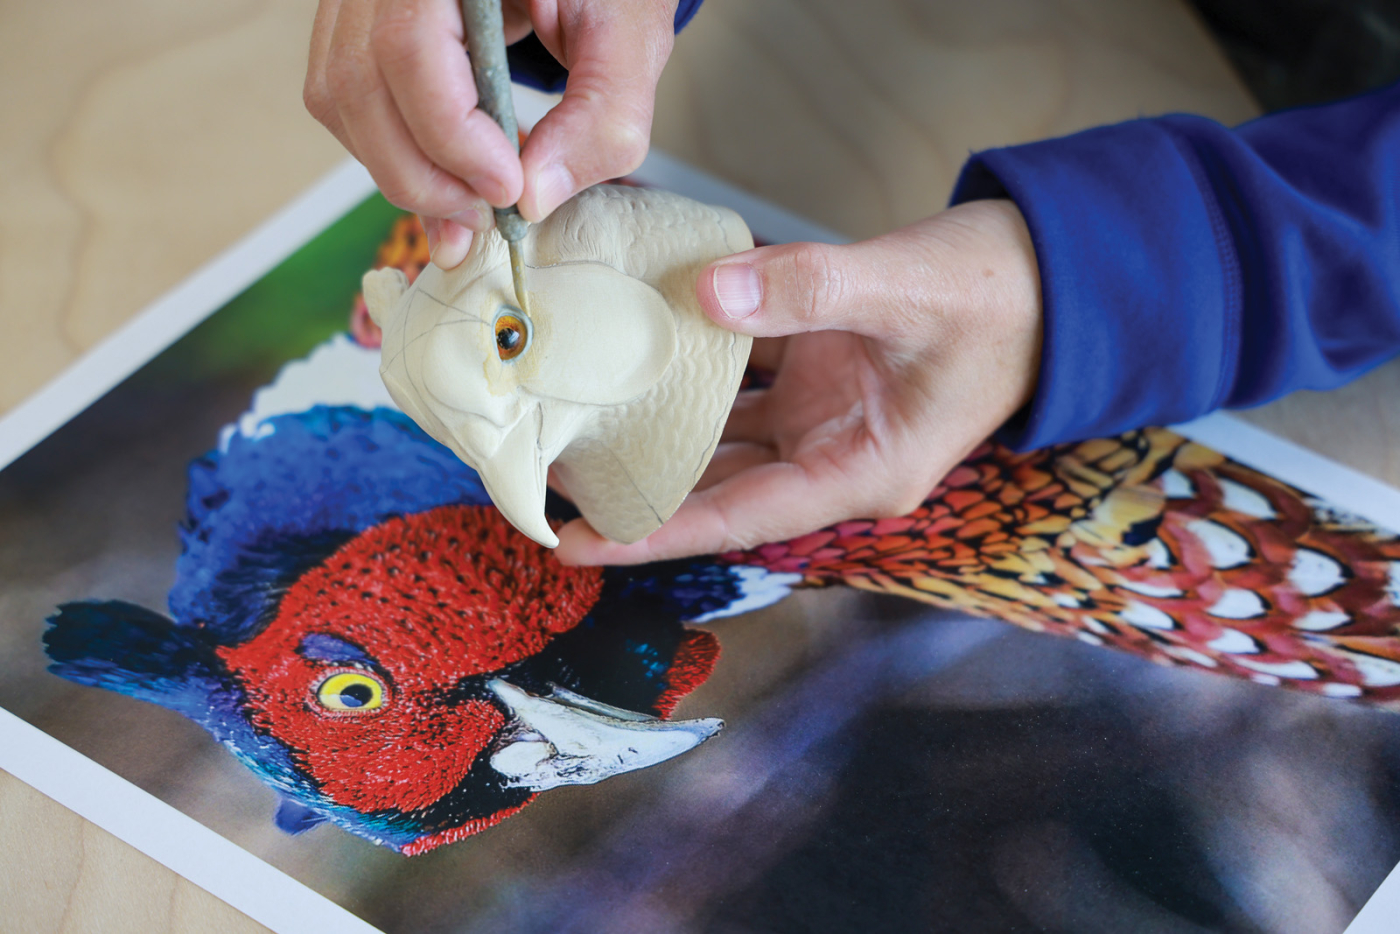
Carve the ear tufts and the wattle, to establish a cheek, with the NSK. I tend to like the flame Saburr tooth bur, but it is aggressive and removes wood quickly. If you prefer to be cautious, the flame carbide cutter may be a better option. Use what you are comfortable with and have good control over. Keep in mind the depth you are aiming for. It will likely take several passes to reach the desired depth. The wattle is shallow so apply less pressure. Carve the eye channel with the same bit. Observe the alignment of the eye channel to the ear tuft—one flows under the other. Taper the bottom of the eye channel down leaving the top edge. You are beginning to create the top of the wattle, so look at your reference when removing the bottom portion of the eye channel—remove only the bottom edge.
16 Carve the eye channel and taper the bottom of the eye channel down leaving the top edge that will become the eyebrow area.
17 Carve the ear tufts and wattle with the NSK (micromotor).
Continuing to the beak, round the top edges down being careful to remove the same from each side. Observe your reference for curve direction. Remember to always keep to centerline. Don’t sharpen the beak nail (tip) at this time. It will be too fragile. That is one of the last things to do to the head. Round the top of the head and ear tufts after studying your reference. Note the eyebrow shape details and the layers of feathers that separate the ear tufts. Mark the details for both sides and create the relief with a small round diamond bit.
18 Round the beak from the top down being careful to remove the same from each side. Use a dental tool to press in the line between the top and bottom of the beak.
19 Round the top of the head and further separate the ear tufts.
20 Always double-check to make sure everything is symmetrical before moving on.
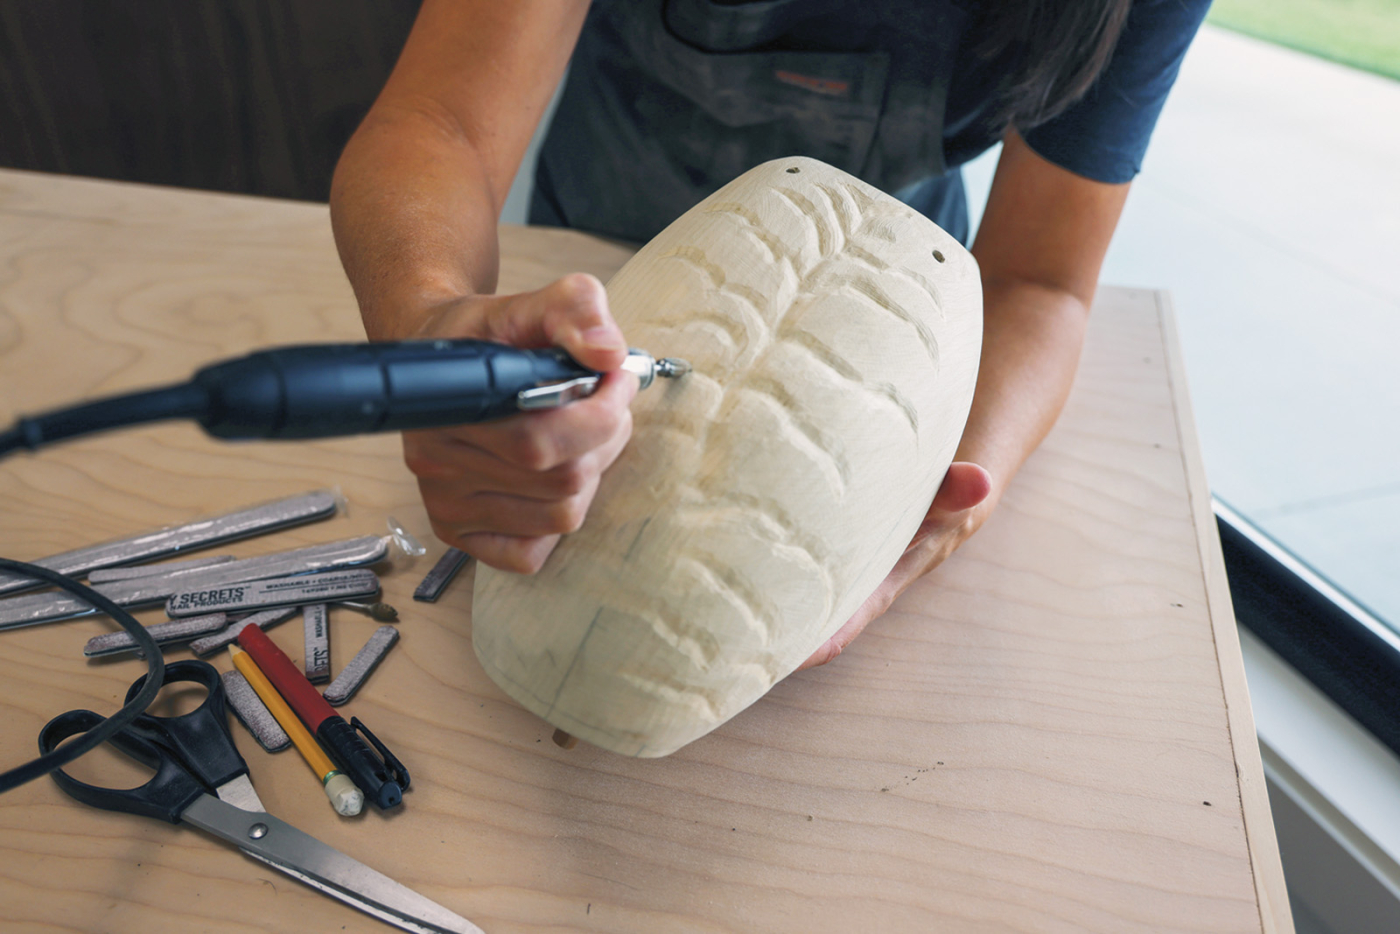
Shaping the Top of the Tail
Use the bandsaw to cut out the shape of the tail. Then profile the top of the tail with the Foredom using a 50- and 80-grit sanding drum.
21 Profile the top of the tail with the Foredom stopping short of the last 7-8″ where the tail changes from a convex shape to a slight upward facing “V”.
22
You want to round down from the deck feather (center feather) to the outside edge of the longer feather underneath, but stop short of the last 7-8“ of the tip of the tail. Here, the convex shape gradually transitions to a shallow upward “V” shape within the last 5-6“.
Tip: It’s best to carve the top of any feather first before carving the underside in essence bringing the underside up to meet the top.
Carving the Feathers Underneath the Tail
Using the same tracing paper/pencil method as the face, transfer the lower tail feathers. Beginning with a flame Saburr tooth bur in the NSK, remove the wood beyond the newly drawn feathers to form the concave shape underneath the longer feathers toward the tail. Be cautious of the depth and transition to a convex shape near the last 5-6“ of the tip of the tail. Next, using either a flame diamond cutter or flame Saburr tooth bur in the NSK, carve the outside edge of each newly transferred feather. Begin with the longer feathers and work toward the short feathers thinking through how they overlap as you carve. Frequently check the profile and carving depth as you work. You want to see the feathers drop down some from the three longest feathers, while not interfering with the edge of those longer feathers.
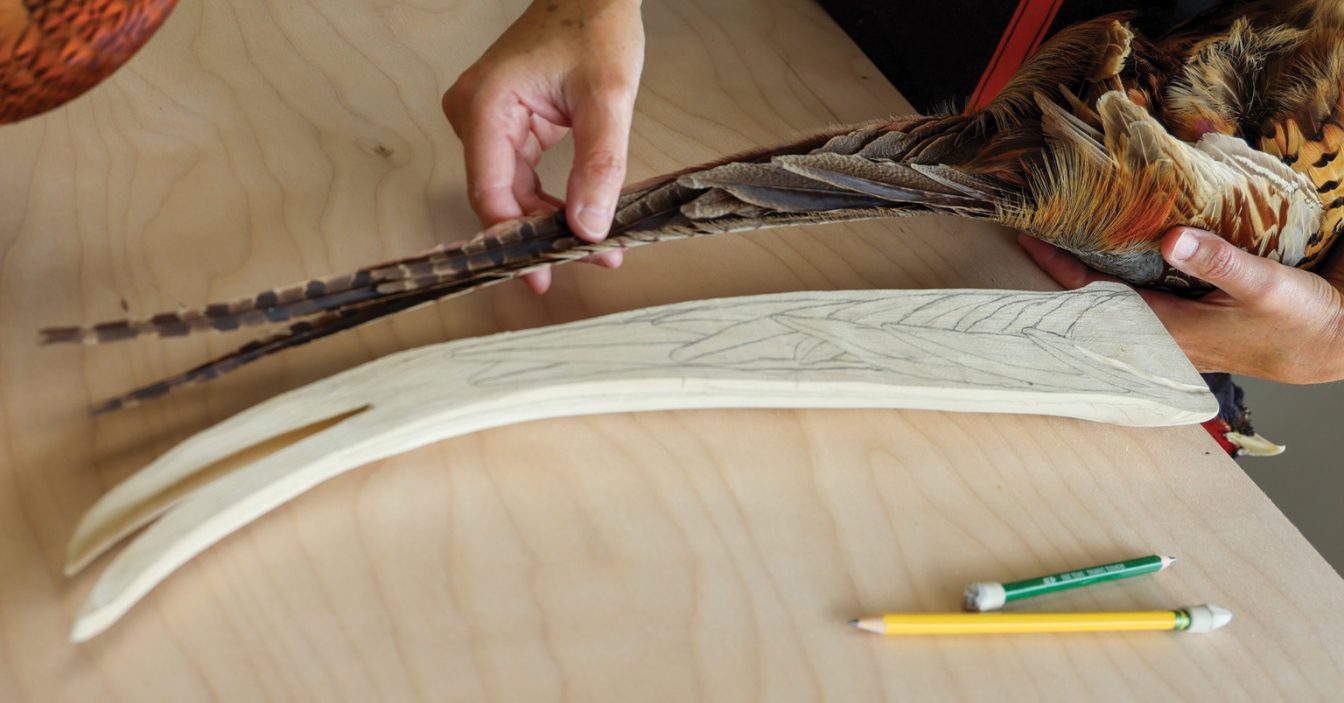
23 Transfer the lower tail feather pattern. Compare with your references before carving.
24 Form a concave shape under the longer tail feather you just profiled on top. Again, stop 7-8″ from the tail tip where it transitions to the shallow “V” shape. Work around the edges of each shorter tail feather removing wood to stack the feathers from the tips to the base.
Be aware of the depth and the edges of the longest feathers. There is more depth at the tips of the feathers than at the base because of how the quills enter the body.
Tip: It’s important to be careful of the tail tip while working because it will gradually become more and more fragile.
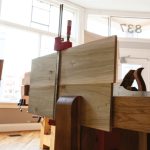
Joining Head, Body, & Tail
To dowel the head to the body, find the center of the neck platform on the body and center of the bottom of the head. Test fit to ensure good overlap and positioning with the head turned. Drill a hole in both pieces and glue a dowel into the body only. I used a 3/8“ dowel, but any size will work. This will add strength to the final union, but in the meantime will allow for sanding the neck to the body and adjustment of the head turn. The tail is doweled in the same manner with a dowel glued in the body and the tail sliding on temporarily underneath the upper tail coverts.
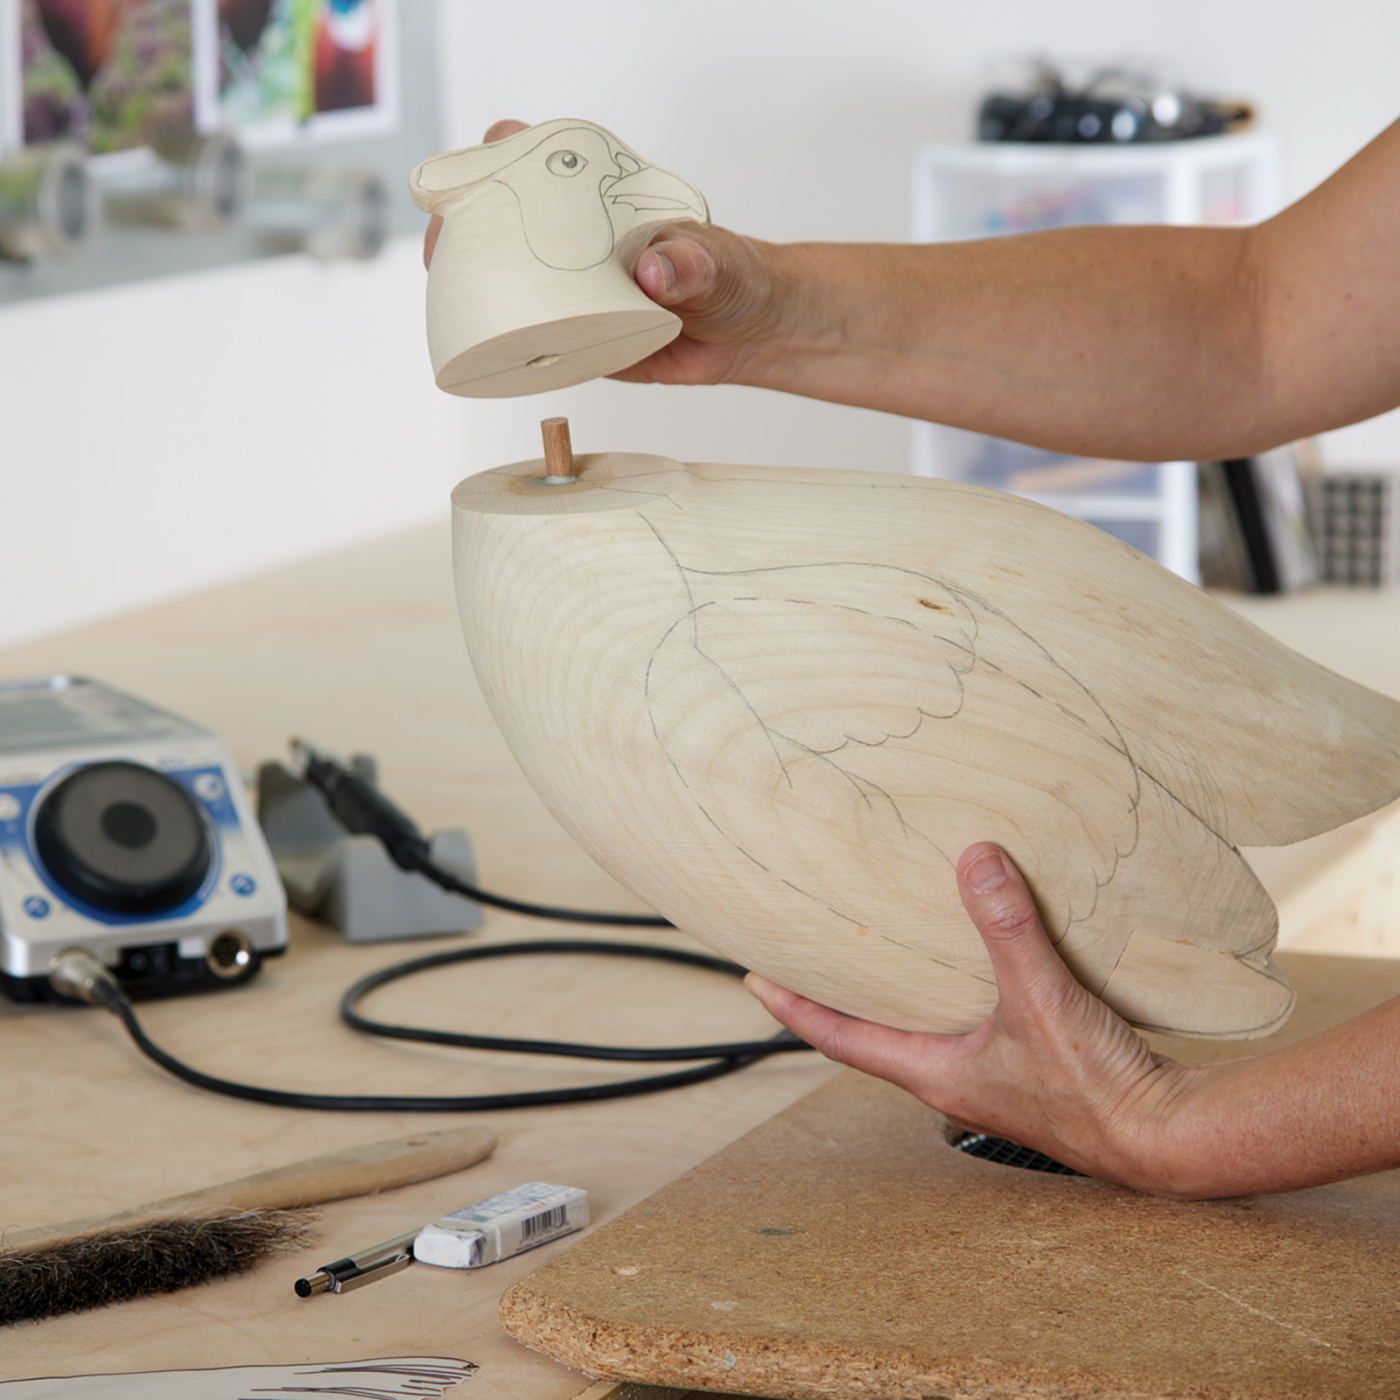
26 Create doweled union in two areas: body to head and body to tail. This allows you to sand between the two and form a smooth union. Glue the dowels to the body, but not to the head or the tail.
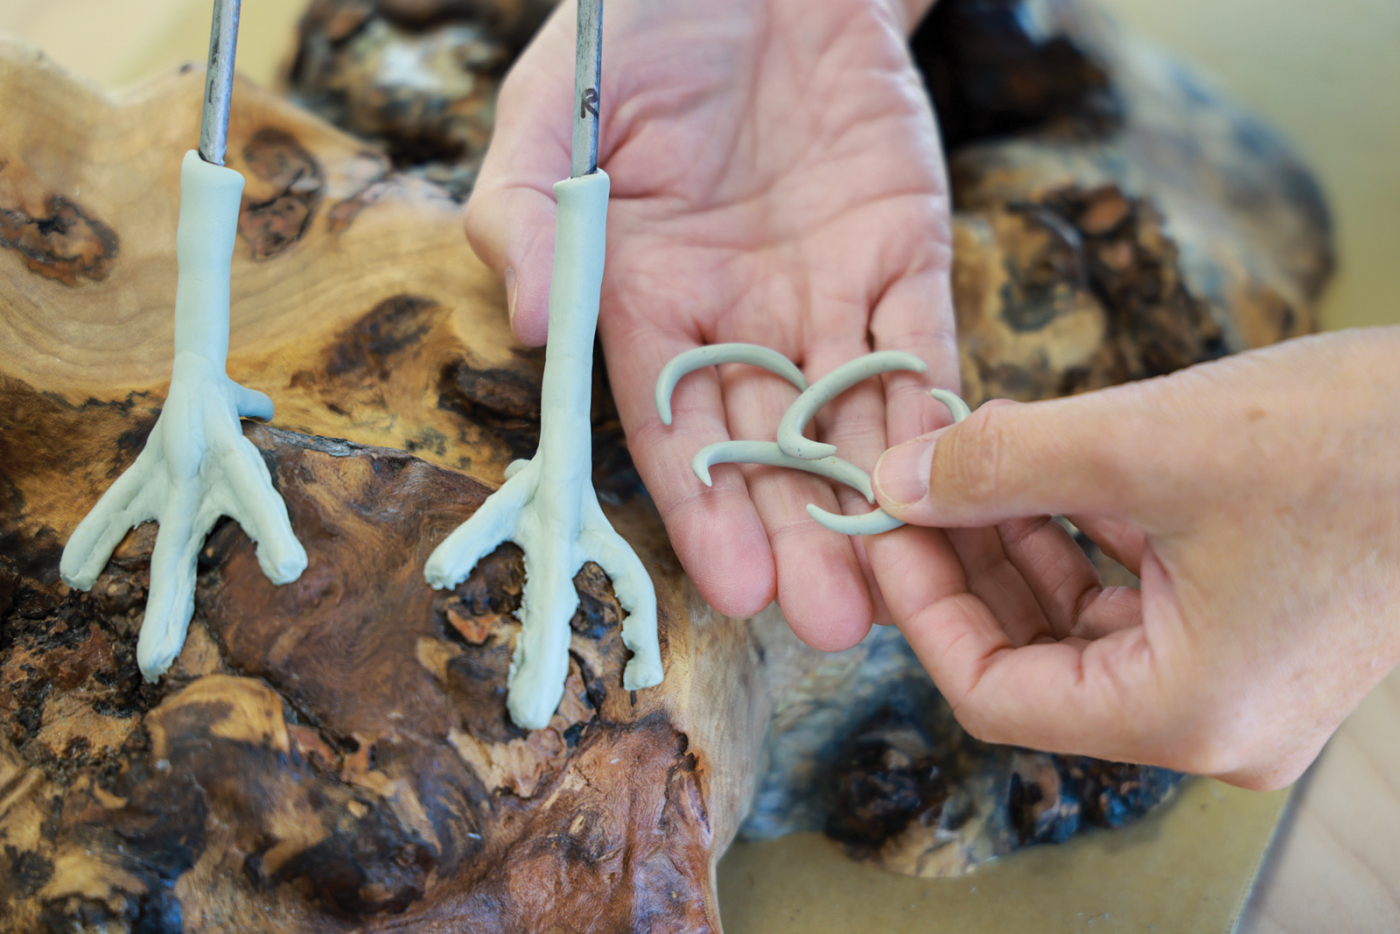
Leg Supports & Standing the Body on the Base
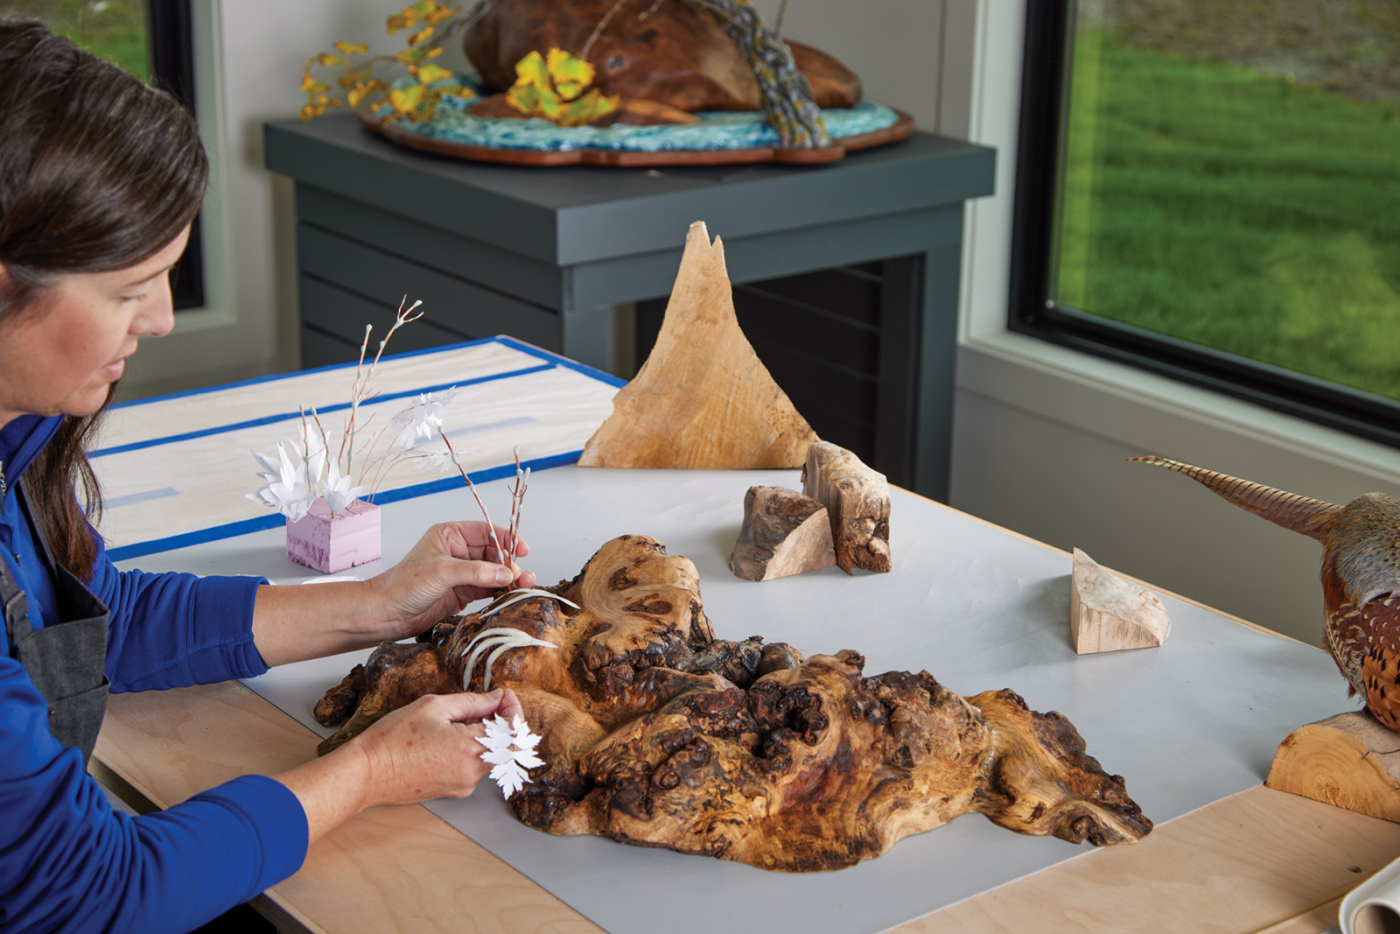
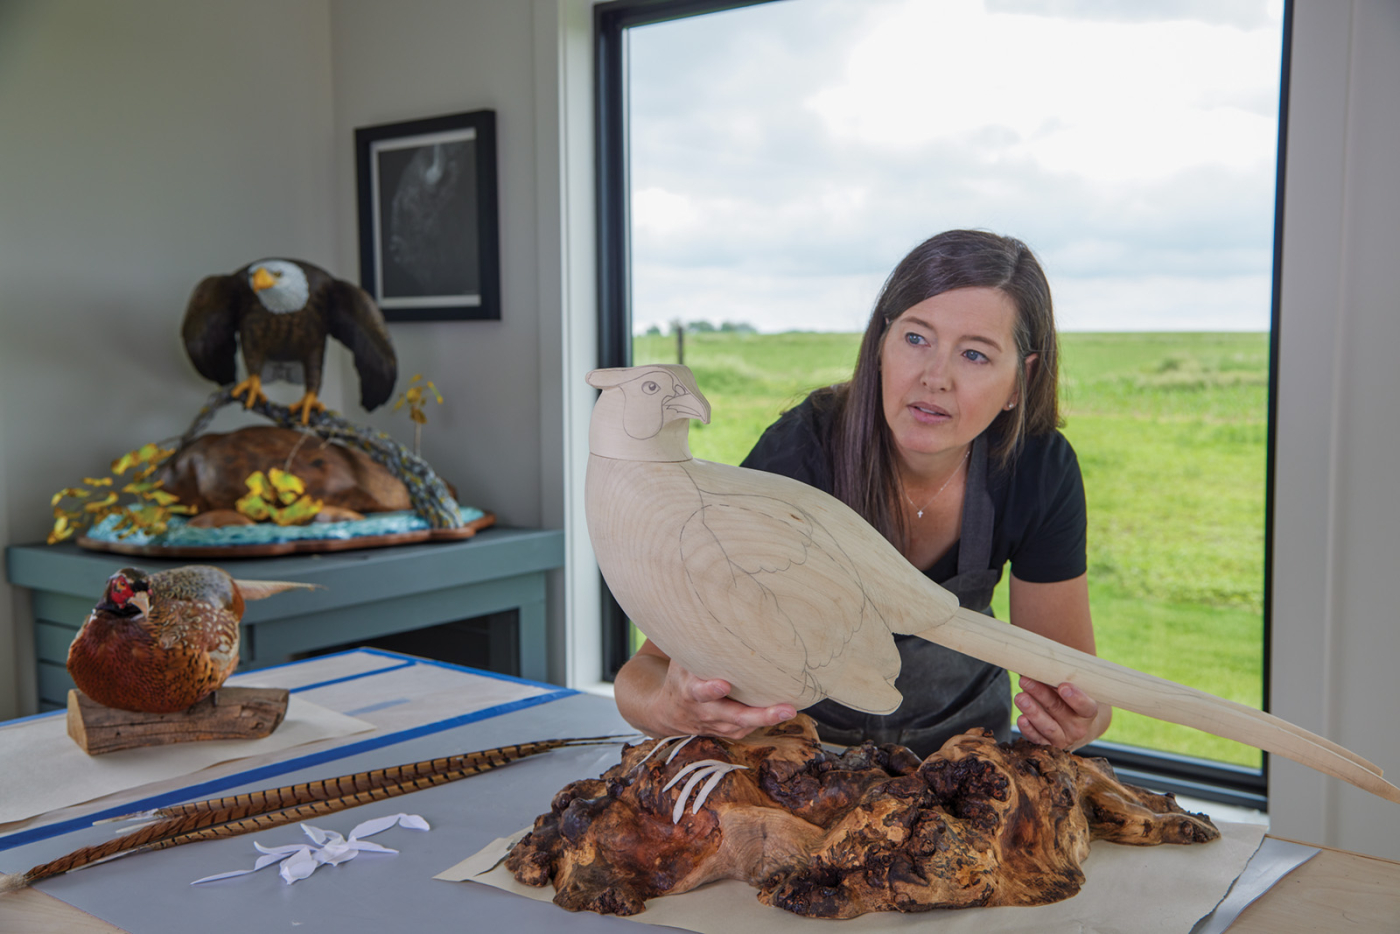
For my base, I used five pieces of red oak burl that I configured to make an abstract S-curve. You can create any type of base that suits you. The process for the legs and feet is the same regardless of the base.
27 Plan the placement of the feet on the base for a natural look.
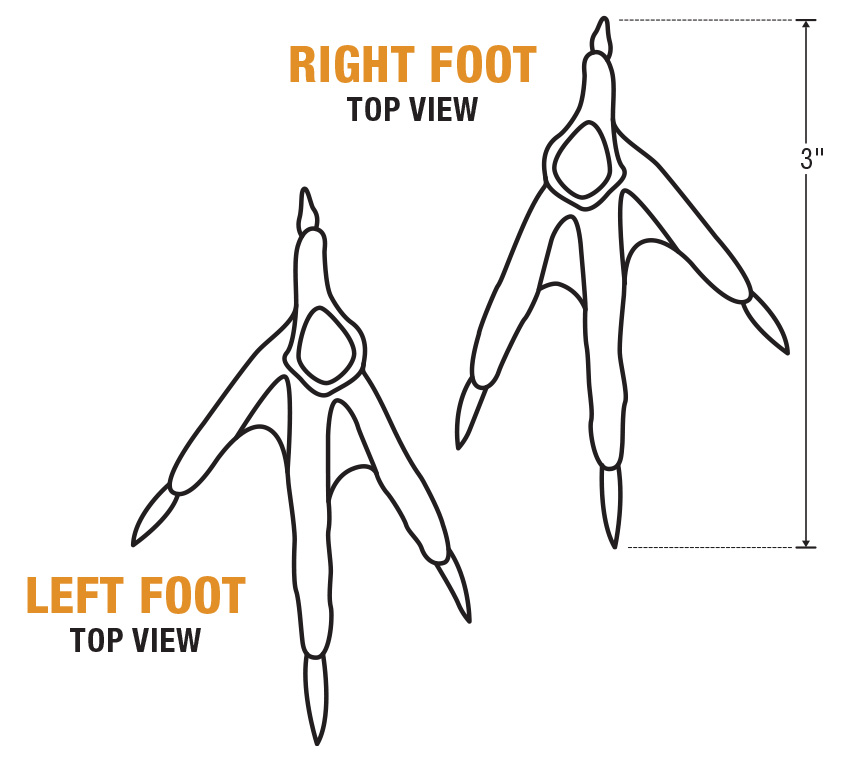
Determine where you want the center of each foot to be on the base. They should be approximately 3“ center to center. Envision where each toe will extend from the center of each foot for a placement with a realistic and believable toe position. You may want to angle the feet on the base or offset one foot with the other—your choice, I chose angled.
Cut two pieces of 1/4“ steel at 7“ lengths for the legs. Length can be approximated; it just needs to be long enough to slide the bird’s body on the end and be stable.
28 Hold the body in position over the base to approximate angles and balance.
Note: The angle of the leg and foot position can make or break the physical and visual balance of the bird. I hold the legs and body together to visualize angles and compare the reference photos during this stage before I bend or drill. (See photo 28.)
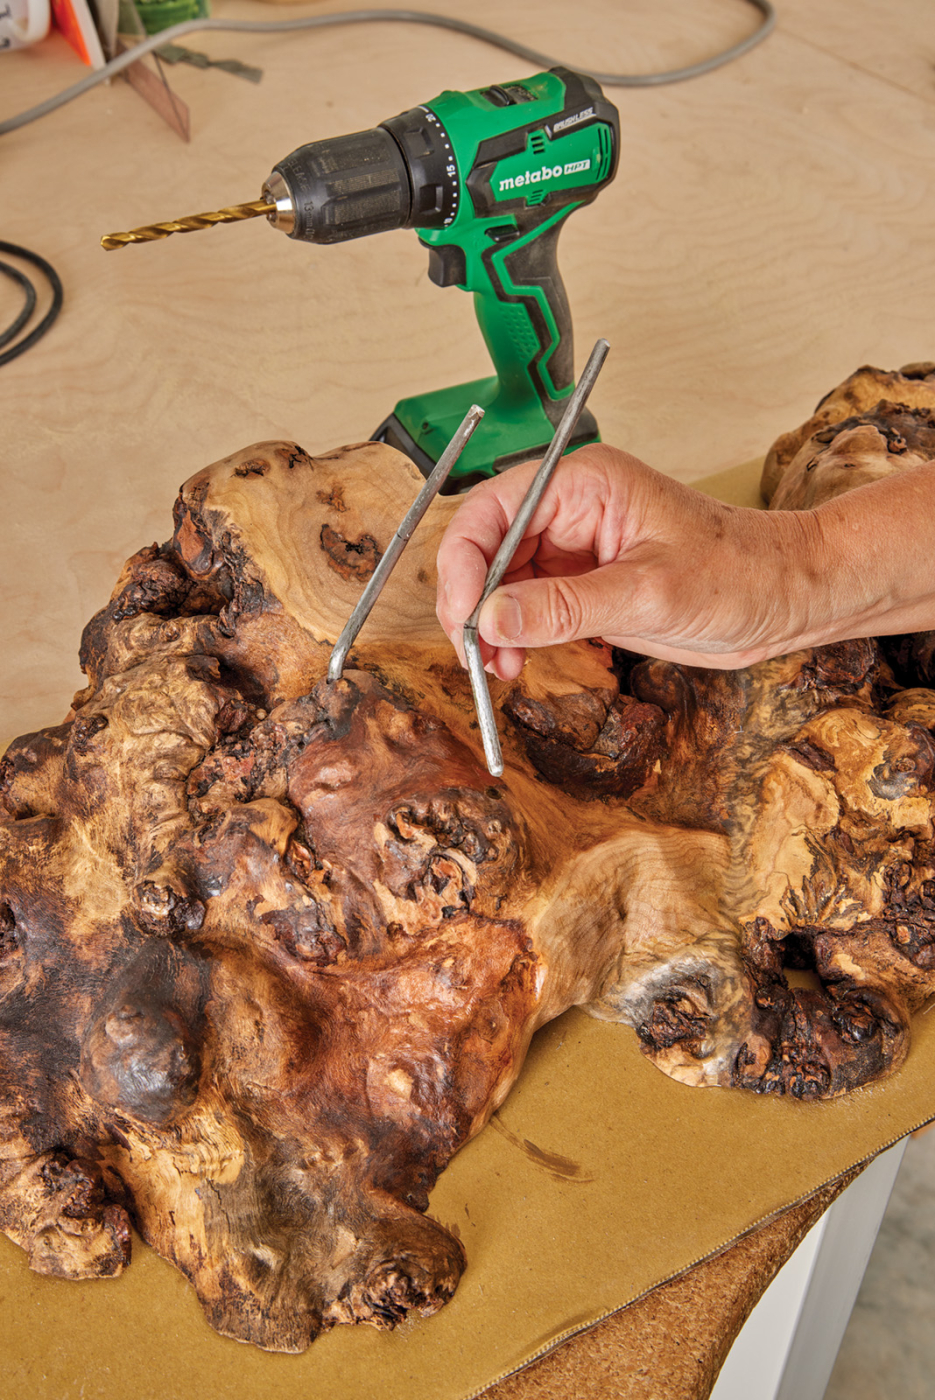
29 Once you have planned the feet and the balance of the bird, mark and drill straight down to accept the lower portion of the steel support/leg. Use your reference to determine the bend angle when creating the foreleg.
Based on your leg study and placement decisions, mark the steel rod foot position on the base and drill each rod foot position on the base and drill each hole straight down. (See photo 29.) Bend the rods approximately 1.5–2“ up from the bottom and be mindful of the angle that will become the foreleg. With the rod in place in the base, mark the angle the rods go into the body of the bird at the correct distance apart—centered to the bird’s chest—and drill a hole for each rod. Slide the bird onto the legs. This is a good point to check that the body and head are level. Adjustments can be made later, but it will be much easier at this stage.
Adding Feather Groups & Large Areas of Texture
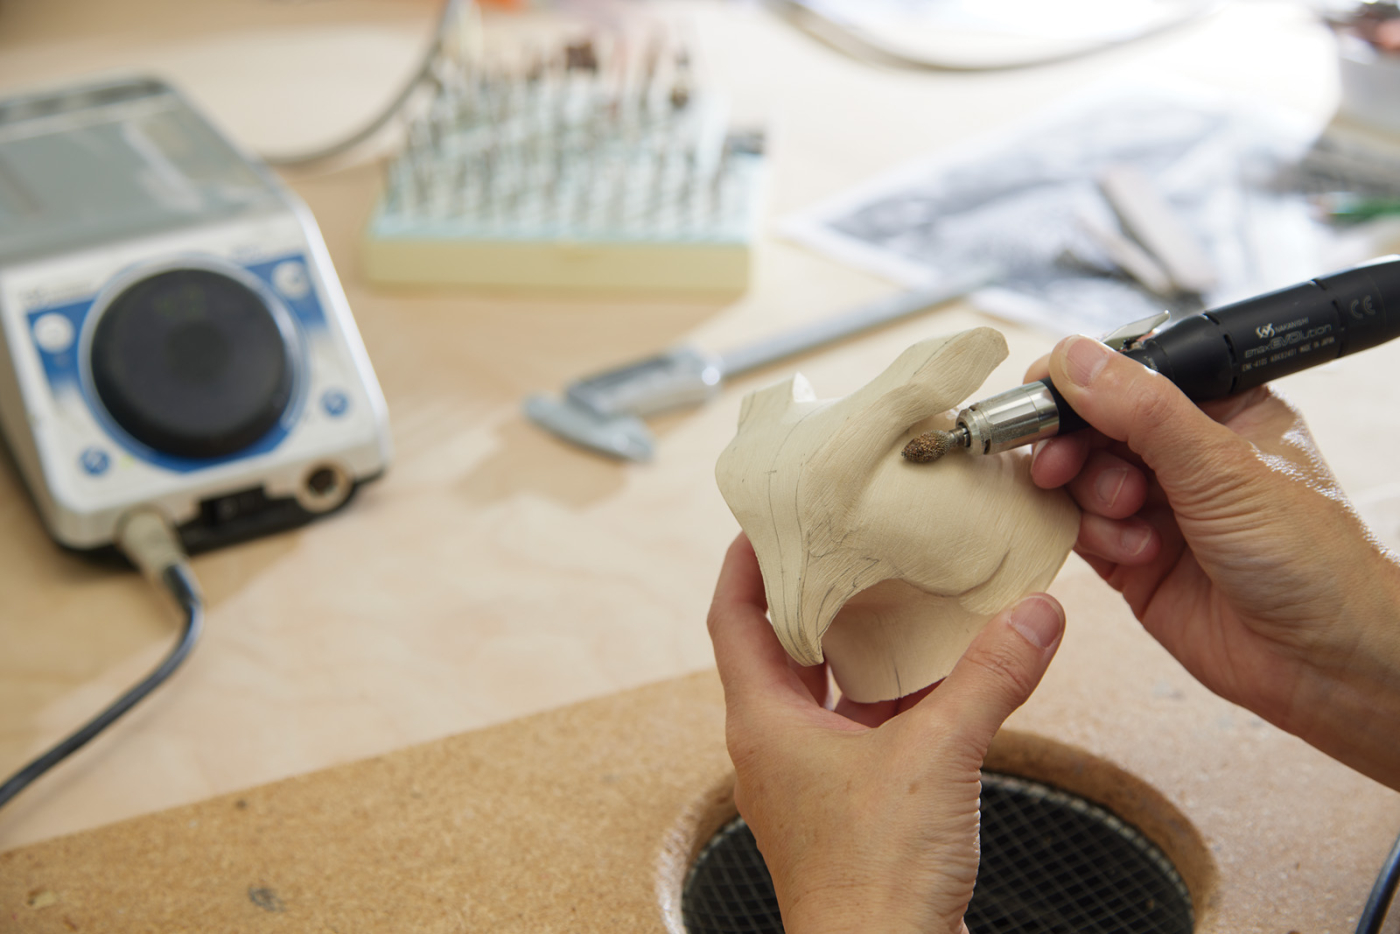
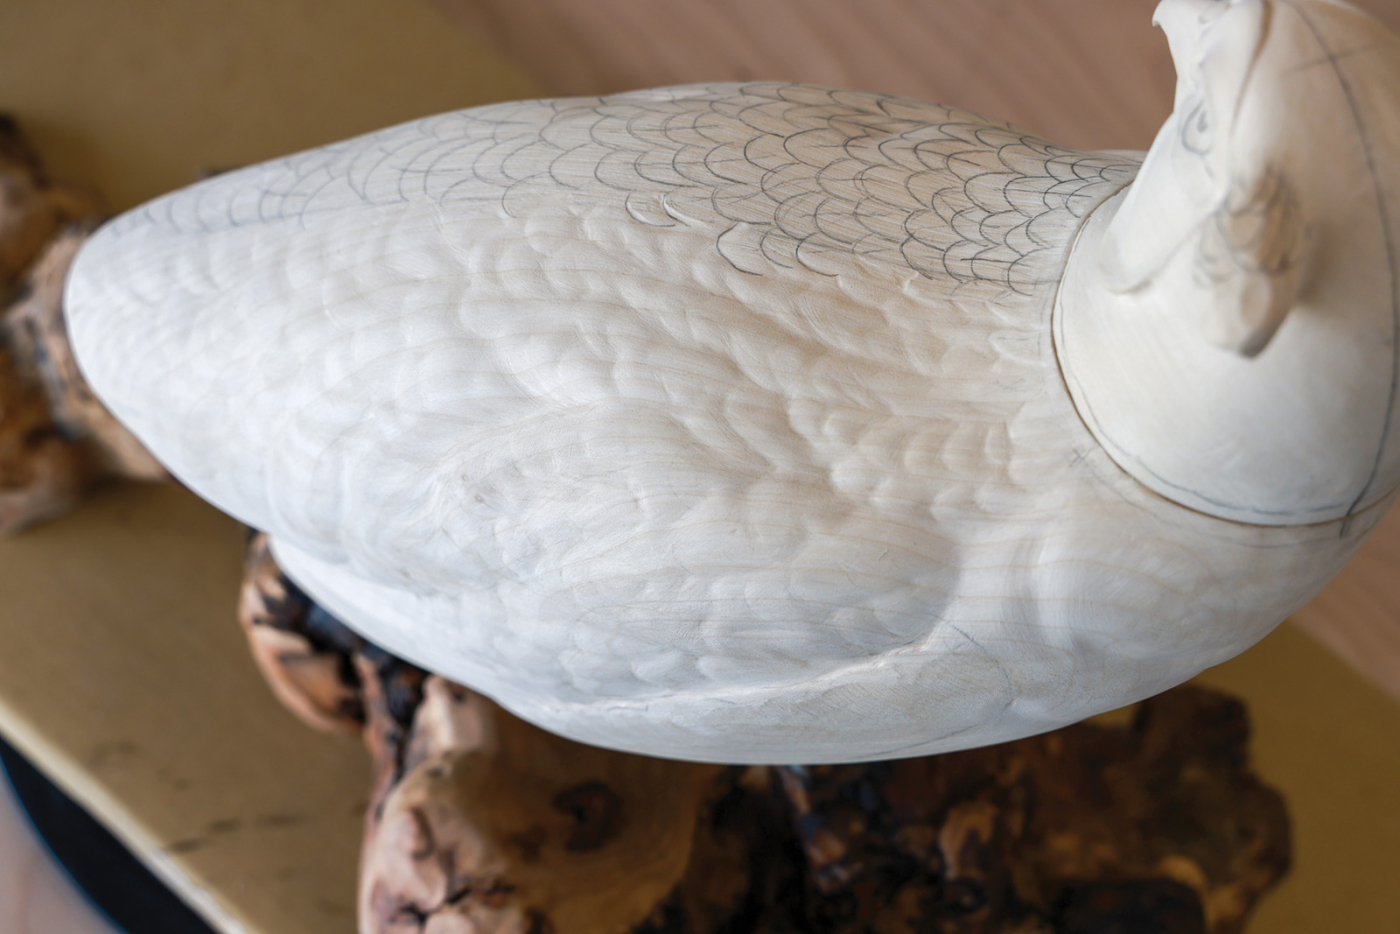
Isolating feather groupings from the profile pattern, create mirrored patterns of each grouping and use the tracing paper/pencil method to tape and transfer each pattern to the body of the bird using the centerline to guide placement. You’ll want to do this for the scapulars, nape, and wings across the back and sides. A reminder: it is important to know bird anatomy. Once all of those areas are marked, begin profiling each area starting with the chest feathers overlapping the wing. Next round the wing tip back and down to tuck under the upper tail coverts. Lastly, work on the scapulars and finally the nape. These are subtle lines carved with a flame carbide cutter in the NSK. Be gentle and think about the depth you want to create between the soft feather layers.
30 Measure from the centerline to align each feather grouping pattern.
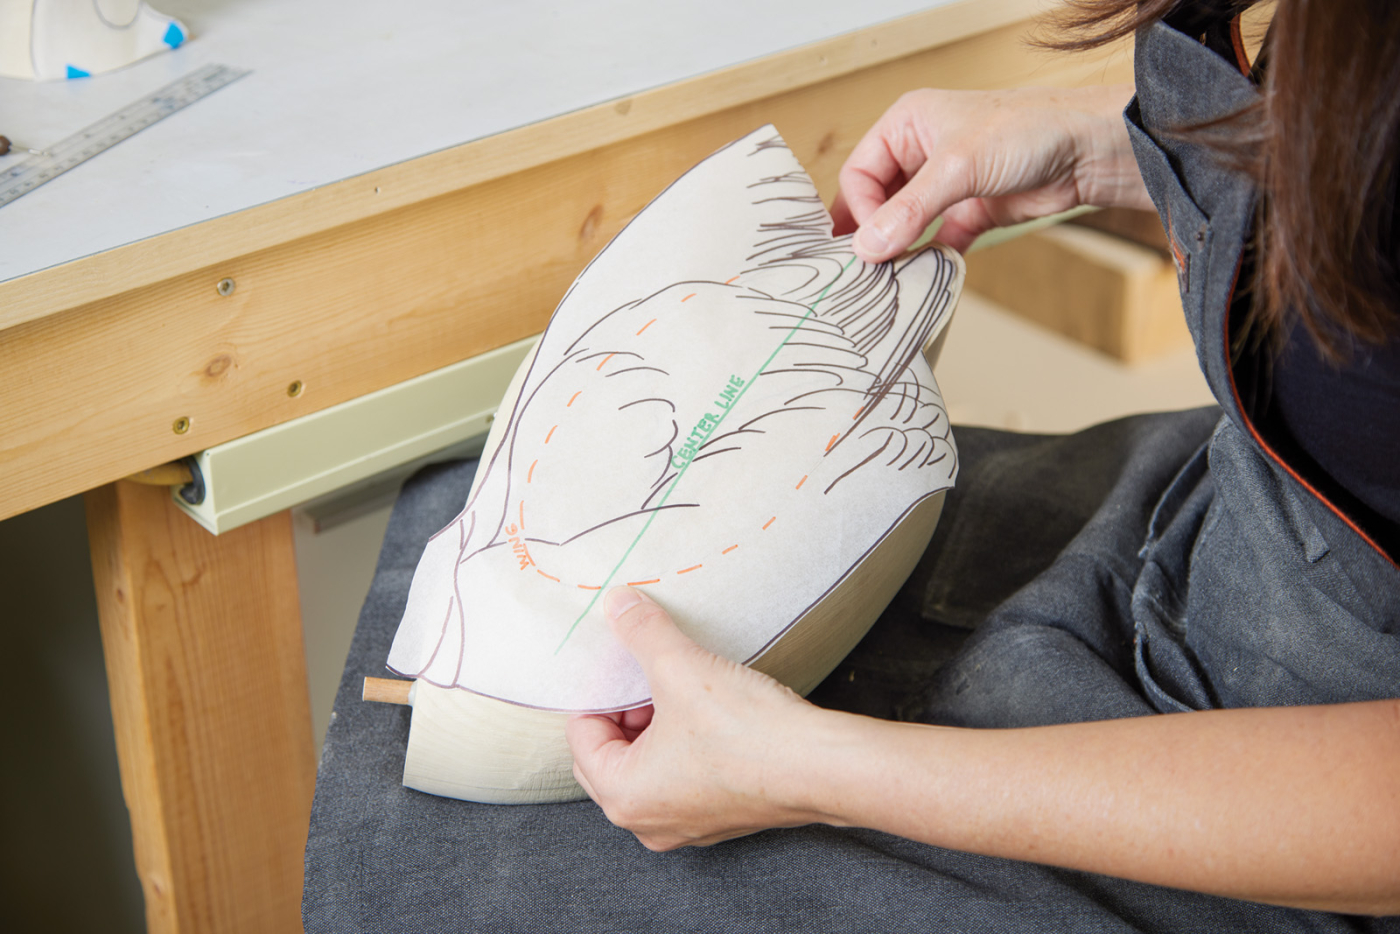
31 Then transfer them to the wood as a unit.
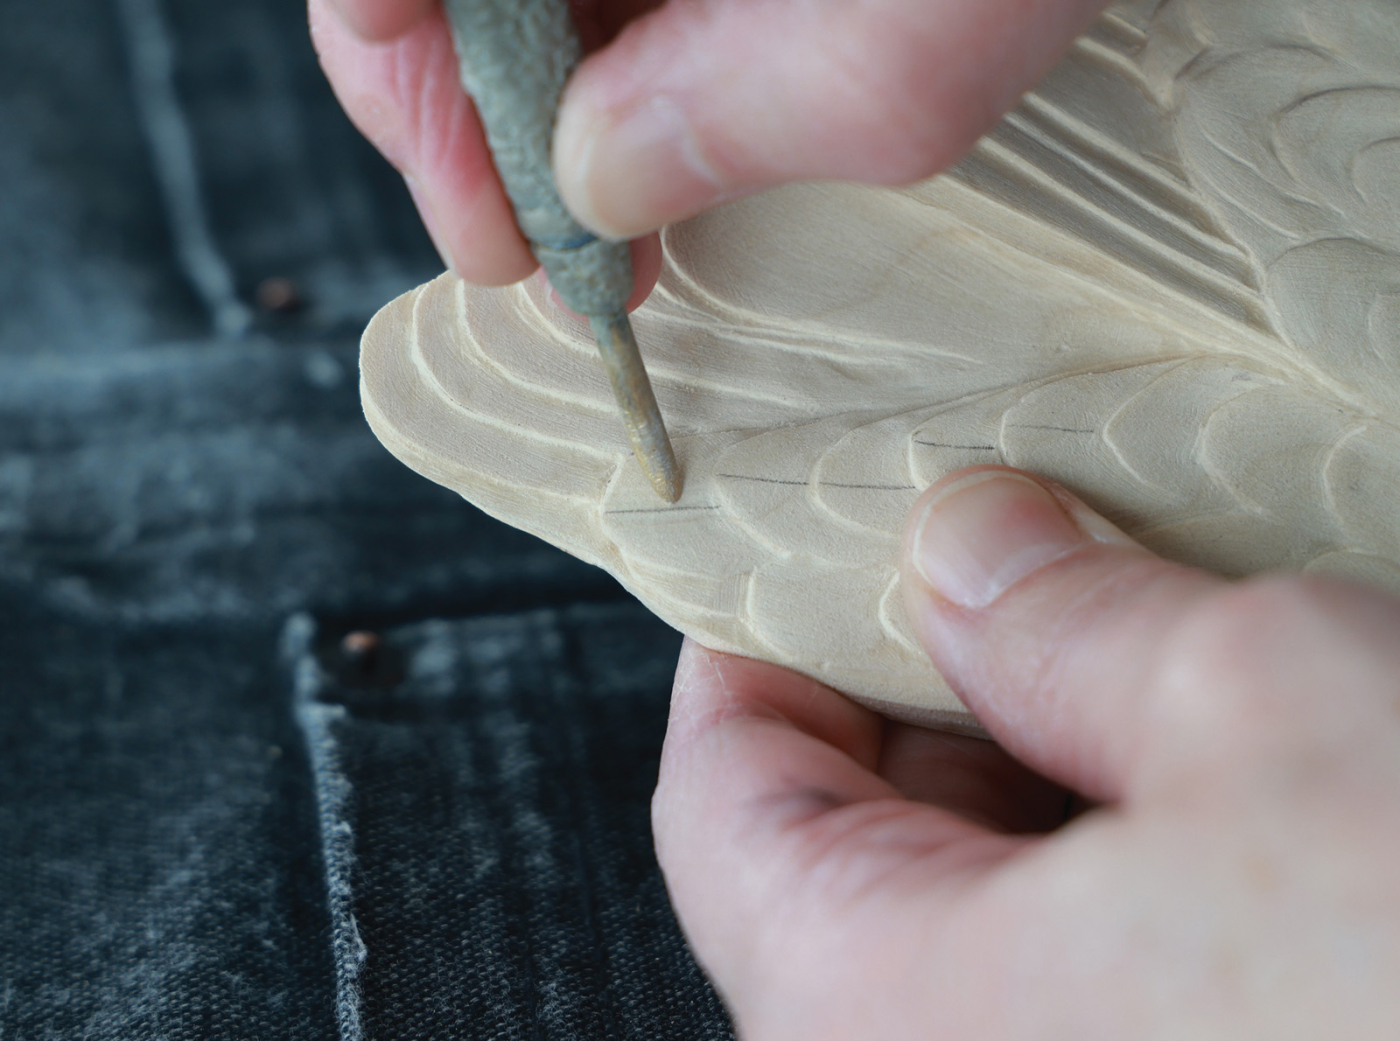
Once the feather groups are in place, begin to mark smaller sections within these larger groupings to profile undulations, valleys, or indentations. When looking at your reference, you can see how the light catches sections of feathers or perhaps there is a small valley between 5–10 feathers. These areas can be drawn on freehand. The key is not to be too patterned or uniform. Use a flame carbide cutter to add these subtle lines. Then, using the fingernail file, smooth out the edges. When done they should look very soft and begin to look lofty.
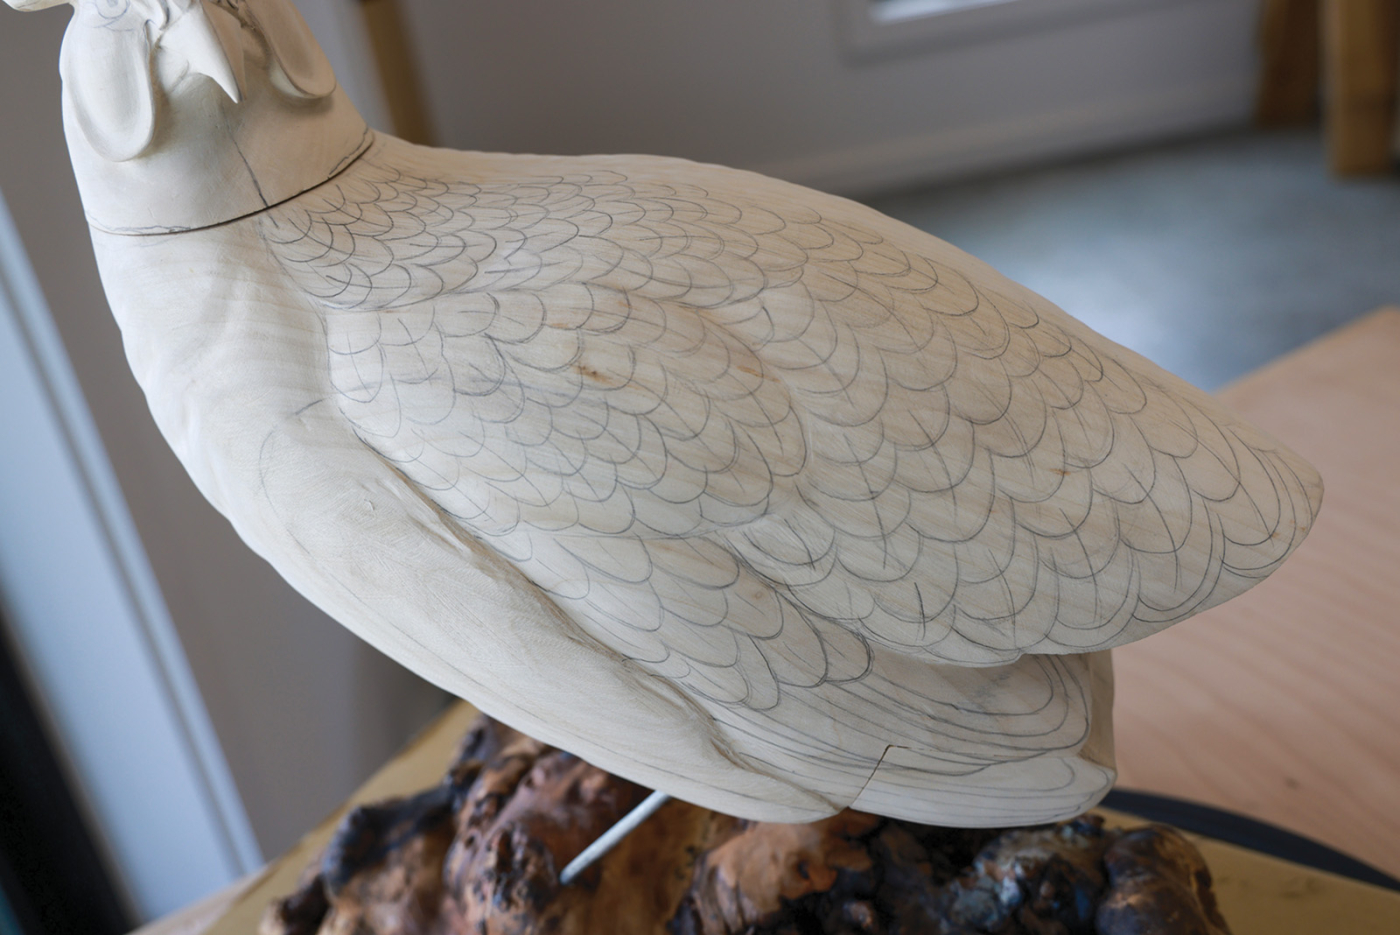
32 Draw individual feathers within each grouping. I find it easiest to draw the feather flow as swooping lines and then add each feather shape.

33 After drawing one side on the wood, copy it and transfer it to the other side.
Wing Feather Relief
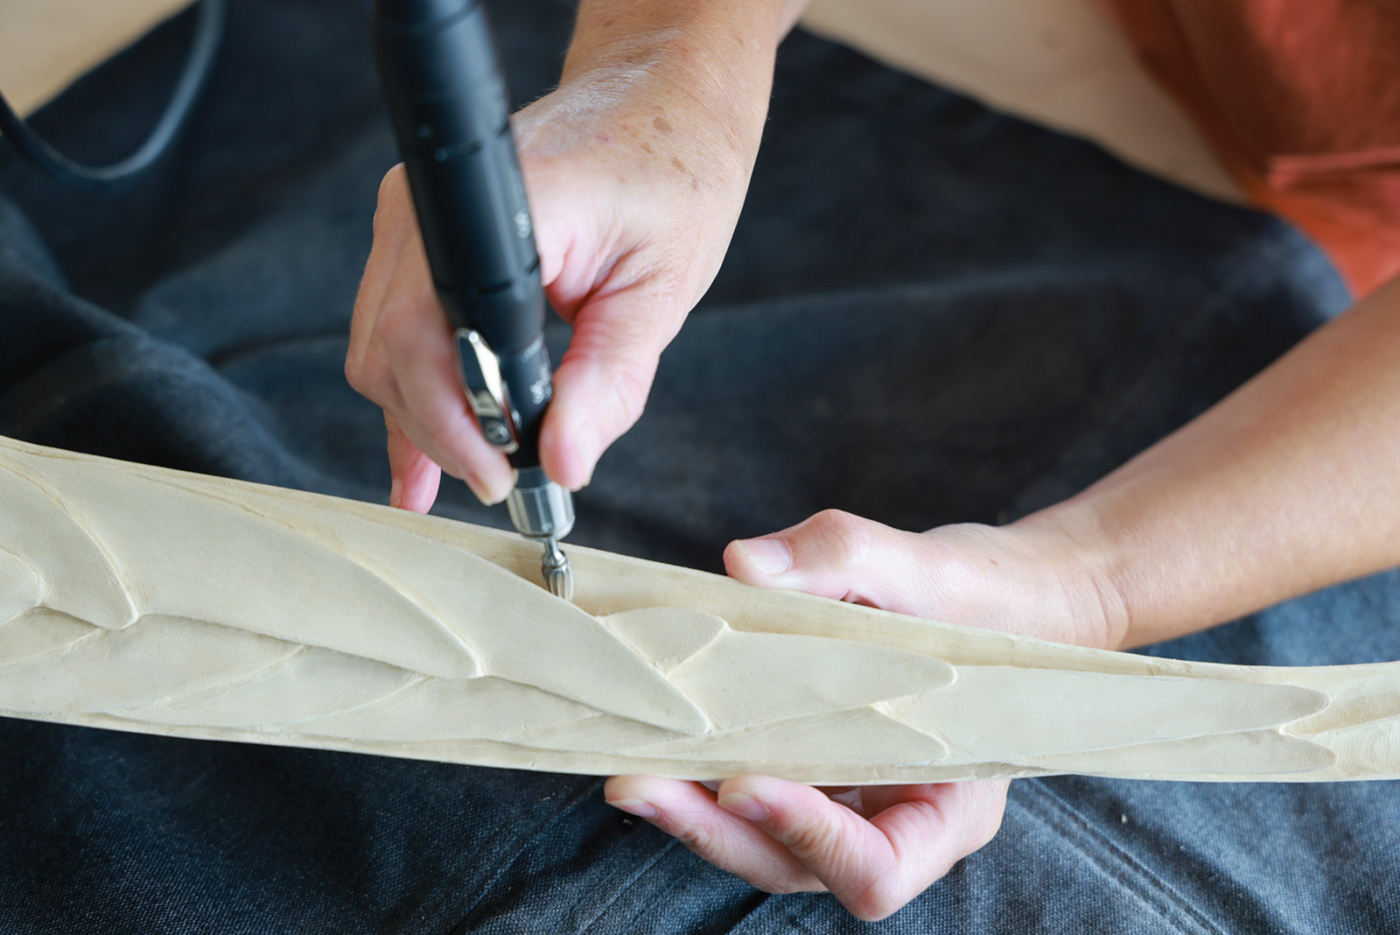
Returning to the profile pattern, trace the primary and secondary feather groupings of the wing together as one unit. Create a mirrored pattern. Use the tracing paper/pencil method to tape and transfer each pattern to the lower portion of the wing. Using either a flame carbide cutter or flame Saburr tooth bur in the NSK, separate the primary feather group from the secondary feather group being sure to preserve the curvature of the wing—creating two tiers of stacked feathers.
Redraw individual feathers on both tiers and use a cylinder diamond safe-end bit in the NSK to carve below each pencil line to create a stacked effect. Be sure to preserve the curvature of the wing and angle of the feather. Use a fingernail file to profile and refine each feather. Once satisfied with the top surfaces, transfer each feather outline around the wing tip and under the wing with a pencil and continue to carve the outline of each feather. Refine with the fingernail file. Then, as a final touch, use a flame diamond bit in the NSK to carve between each feather tip to add separation.

34 For individual feather relief, use a flame carbide cutter to carve below each line working on a few feathers at a time. Remove the lower edge of the grove you just cut so the feathers begin to “stack.”
35 When sanded with a fingernail file they will look smooth and soft.
Individual Feather Relief
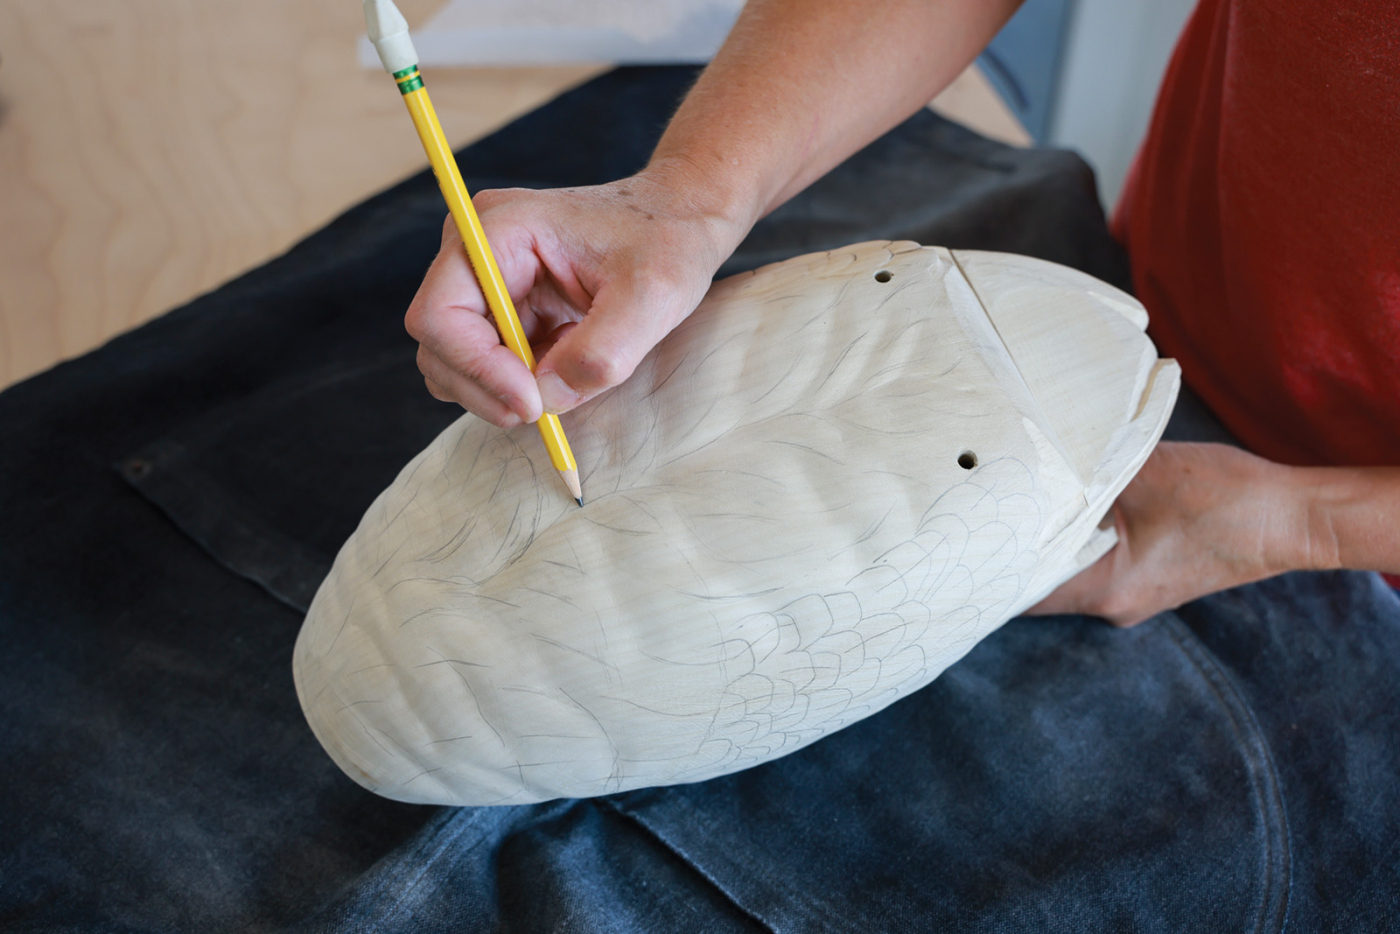
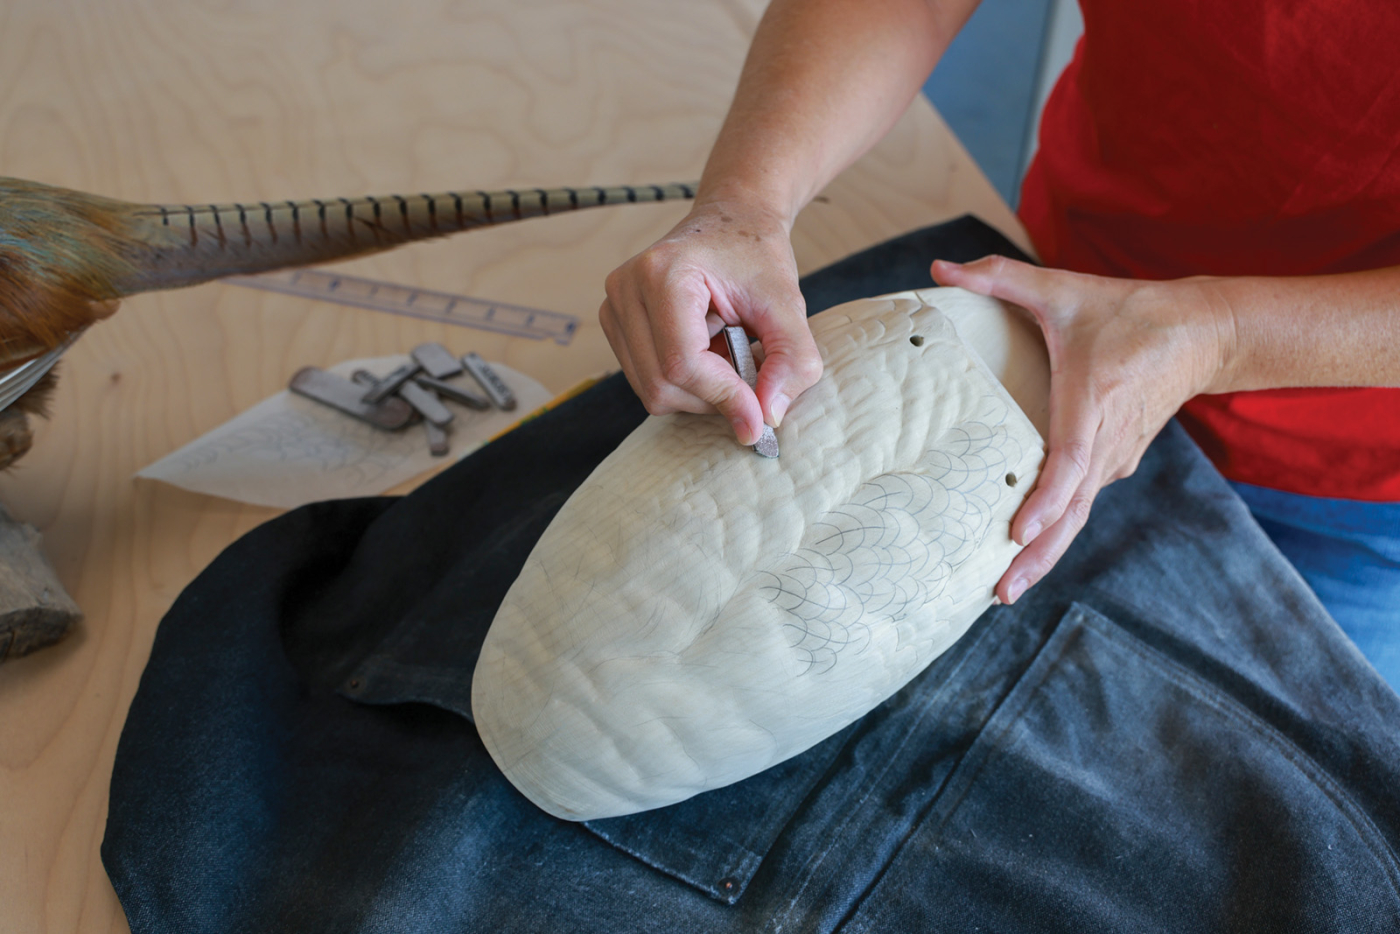
Refer to your references to observe the feather flow on each feather grouping or section of the bird and note the direction of the quills. Draw the feathers being mindful to not make them too uniform and allow for some staggering when overlapping. Trace what you draw for use on the other side.
There are several bits that can be used for individual feather relief carving—a ball diamond or a flame carbide cutter are common—use what is comfortable to you. Carve below each line working on a few feathers at a time from low to high. This relief is shallow and subtle. Use the bit to remove the lower edge of the grove you carved to “stack” the feathers. Then sand with the fingernail file to shape each feather. The end result of each feather should look soft and rounded.
36 Use the same process as the back down the chest, carving larger feather groups, followed by individual feathers and finally smoothing with the file.
37
38 Look at your reference for feather flow direction.
Continue this process on both wings, across the back, and upper and lower chest. The feathers change to a longer thin shape where the body meets the top of the tail (or upper tail coverts). Study your references for shape and flow and use the same process. It is a good idea to do this with the tail in place to ensure a smooth transition.
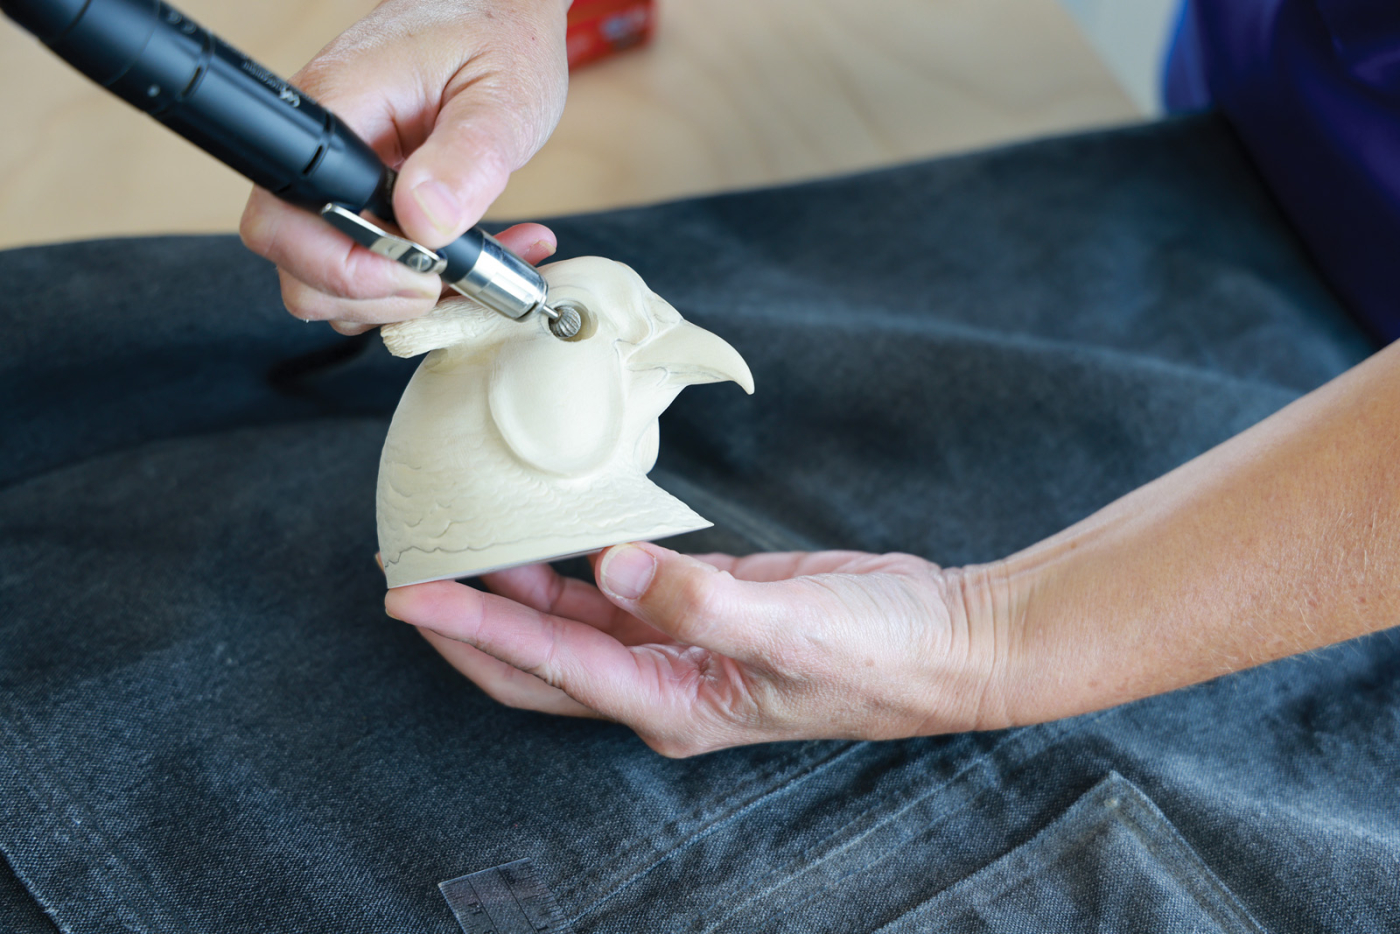
Texturing the Head & Setting the Eyes
The head texturing process is the same as the body, except the scale is smaller and depth is more shallow. The wattle is a different texture. Refer to your reference. I used a combination of very small ball and flame diamond bits for the head and for the wattle.
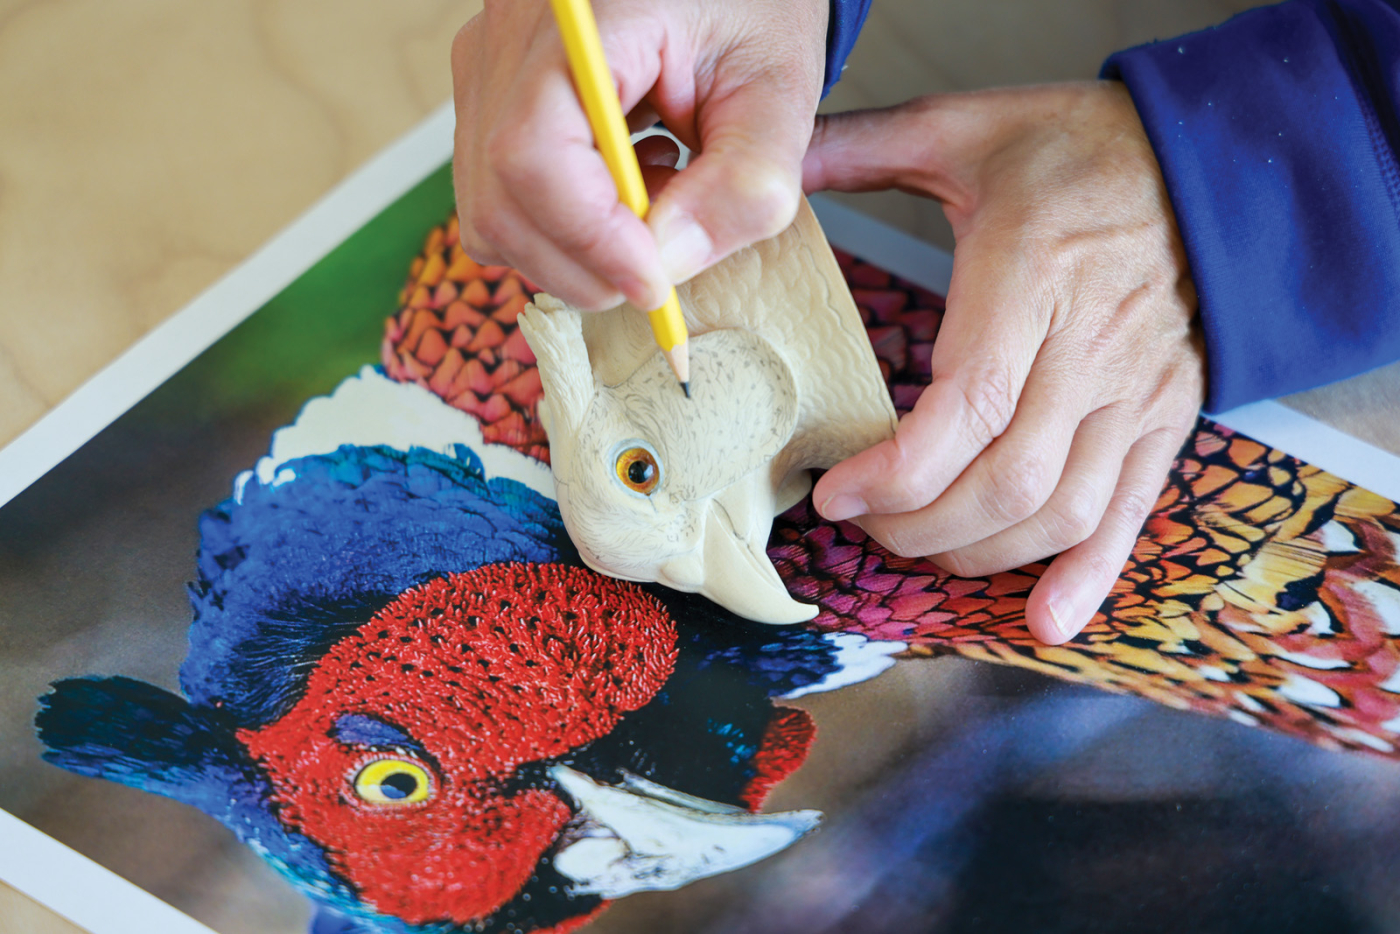
39 Draw individual feathers on one side of the head and transfer them to the other side being mindful of feather flow direction.
40 Refer to your reference for feather size and shape.
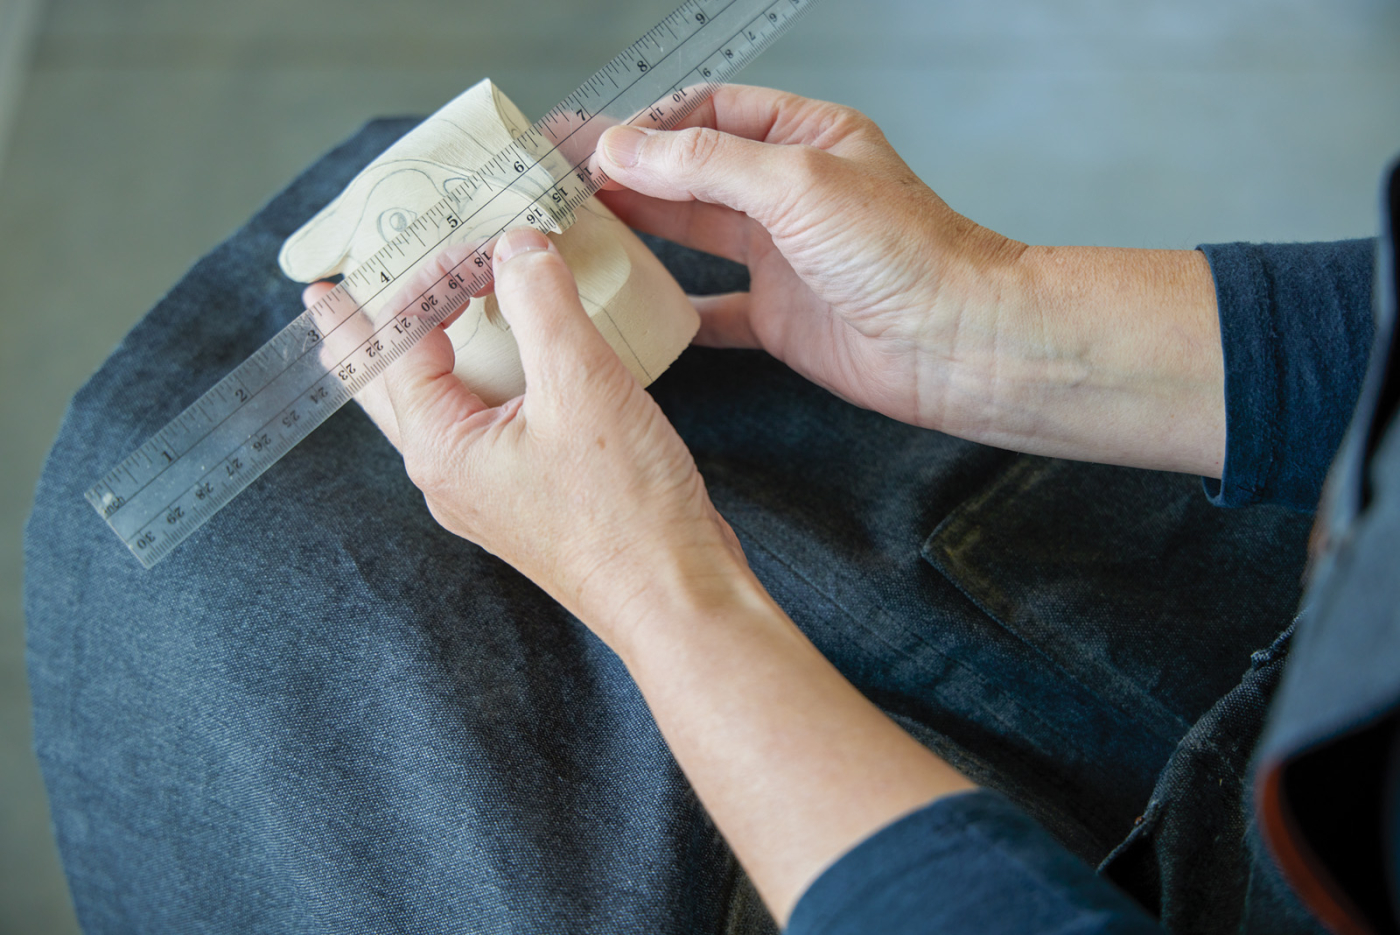
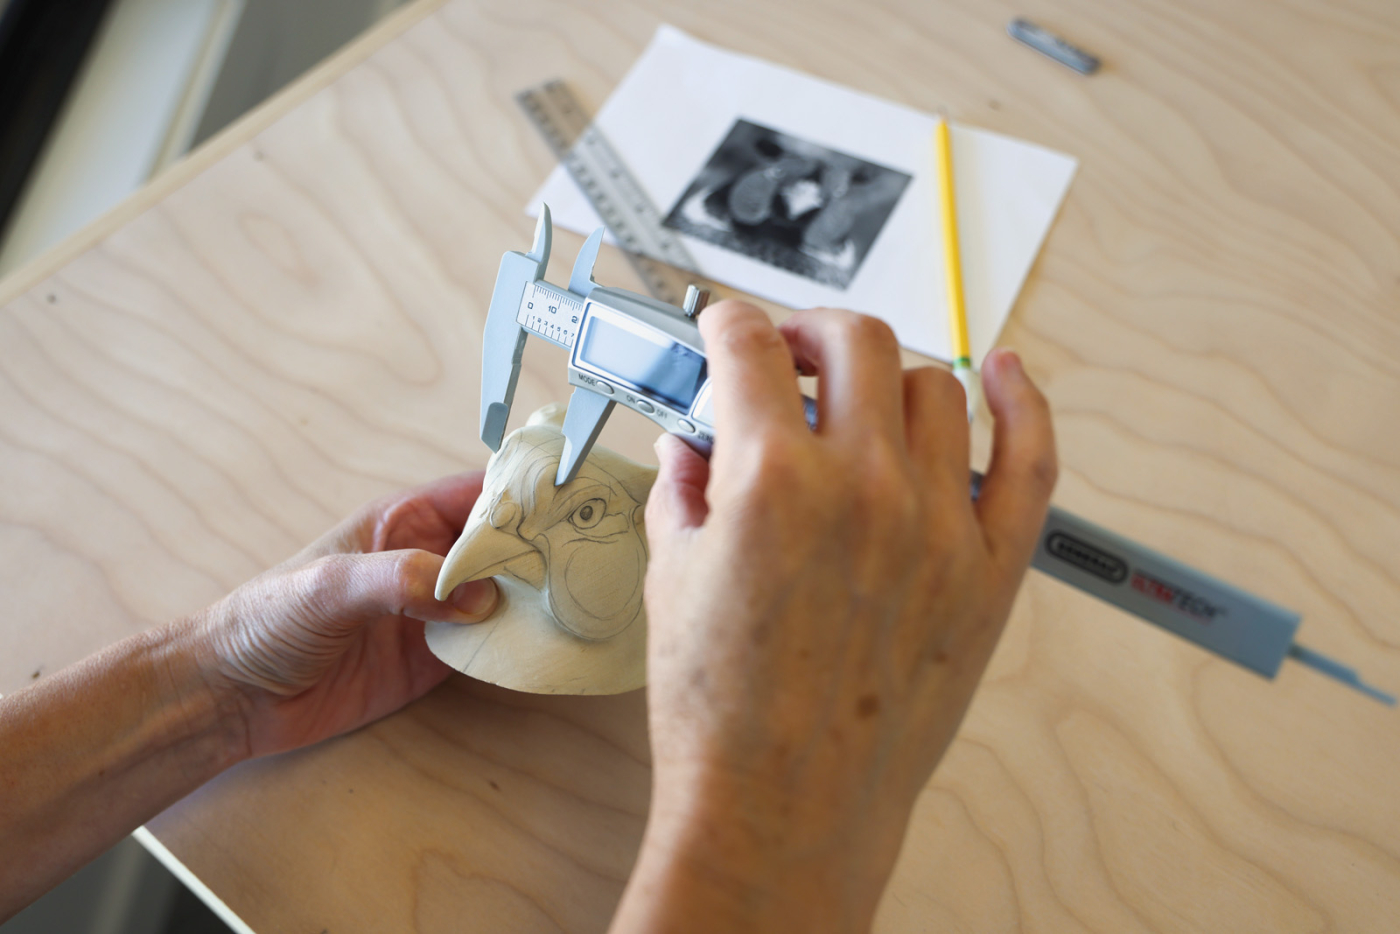
Measuring and marking during this stage is key. The “eye sockets” that you’ll carve need to be exact in placement, shape, and depth. I like to use calipers to measure out from the centerline to the inside and outside of each eye socket and from the top to bottom. Then use a round carbide cutter to create each socket. You can also measure back from the nail of the beak. A common mistake is to not set the eyes deep enough. Continually check the placement, shape, and depth as you remove wood. Once satisfied with both sides, gently remove the edges of the socket. This is a light removal, just knocking the sharp edge down.
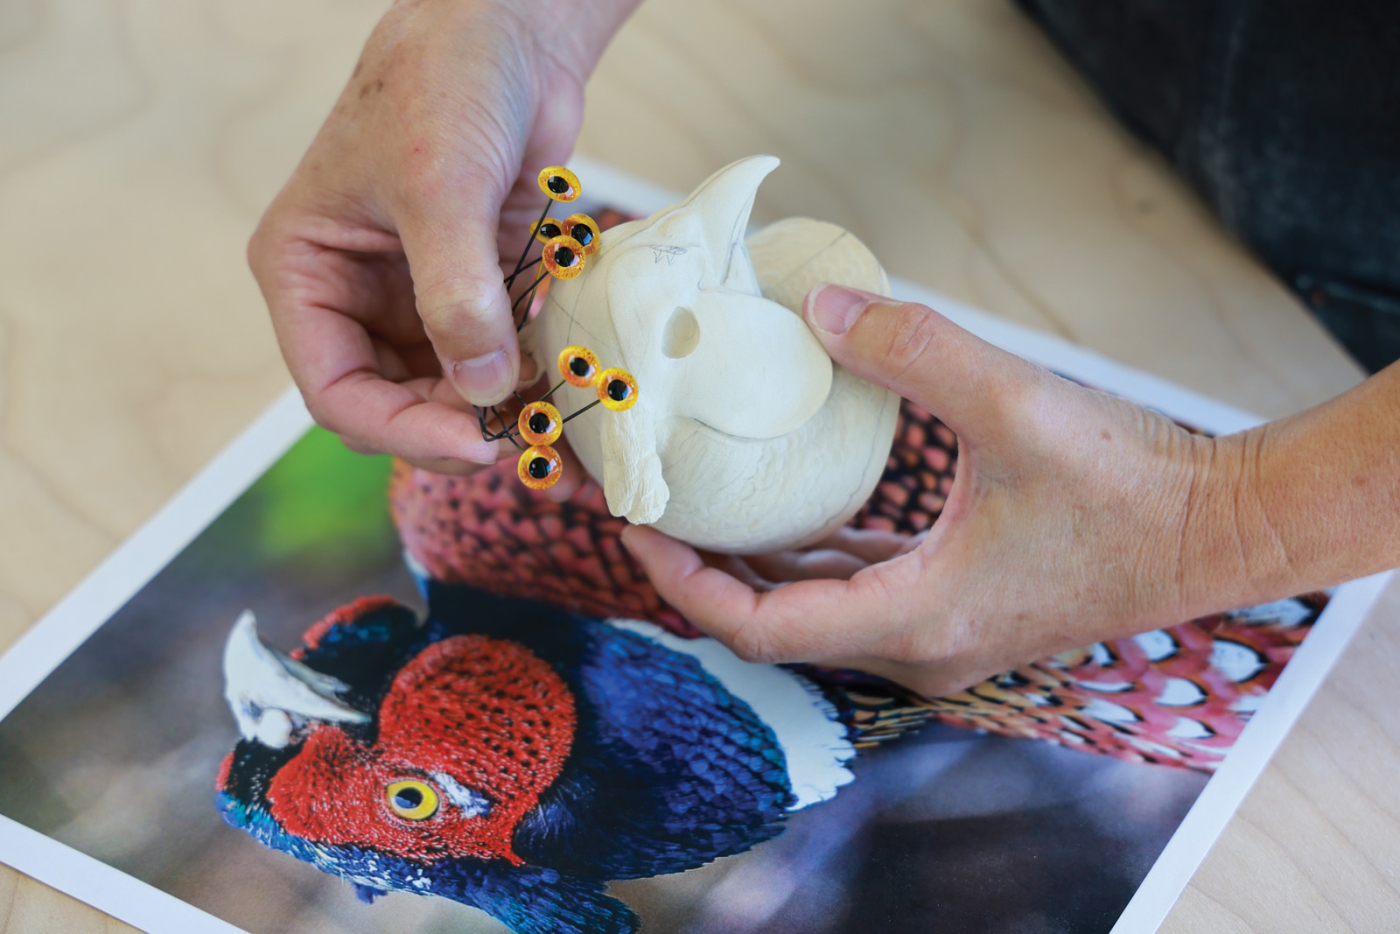
41 Mark the center of each eye socket. Then draw the full socket shape using the template and your photos for reference. Once accurate placement is achieved, carve using the NSK.
A common mistake is to not set the eyes deep enough. Dry fit the eyes and view the head from the top to double check they are deep enough. Don’t be afraid to carve them a little deeper and check again.
43 Mix a small amount of two-part epoxy to place in one socket at a time and seat the eye in epoxy. Align the pupil to the socket center line. Angle the eye so it is “looking” at the nail of the beak. Set the other eye to match.
Mark the center of each eye socket at the front, top, and bottom making sure the alignment is the same on both eyes. Mix a small amount of two-part epoxy putty (like Magic Sculpt or A+B Epoxy) and put a small amount in one eye socket (generally the size of a pea). Using a pheasant glass eye on a wire (with the wire cut and ground off), seat it into the epoxy. It is helpful to have a close-up image of a pheasant looking directly into the camera lens. Center the eye with the marks you made earlier and align the eye so the bird is “looking” at the nail of the beak. After setting both eyes, measure out from the centerline to all edges of the pupils and glass eye for exact symmetry. You will also want to look at the bird from the top view to be sure the eyes are set at the same depth. A pencil with an eraser makes a good tool for making slight adjustments to the eye position. This is a crucial step in the process and one you want to spend some time getting right.
44 Mark the flow of the wattle texture and the larger indentations.

45 Use a small flame bit to create this texture working the bit in the same direction as the groves.
Once the eyes have set and dried overnight, make a thin, short roll or “snake” of epoxy to form the eye ring and lid. Begin at the inside corner (where the tear duct would be on a human) and carefully ring the eye. With a dental tool or stylus, gently blend the outside edge of the epoxy into the wood making sure to not alter the inside of the rolled shape. Repeat on the other side taking care to match the first side. Use a clear ruler to measure out from the center line to check both eye rings for symmetry.
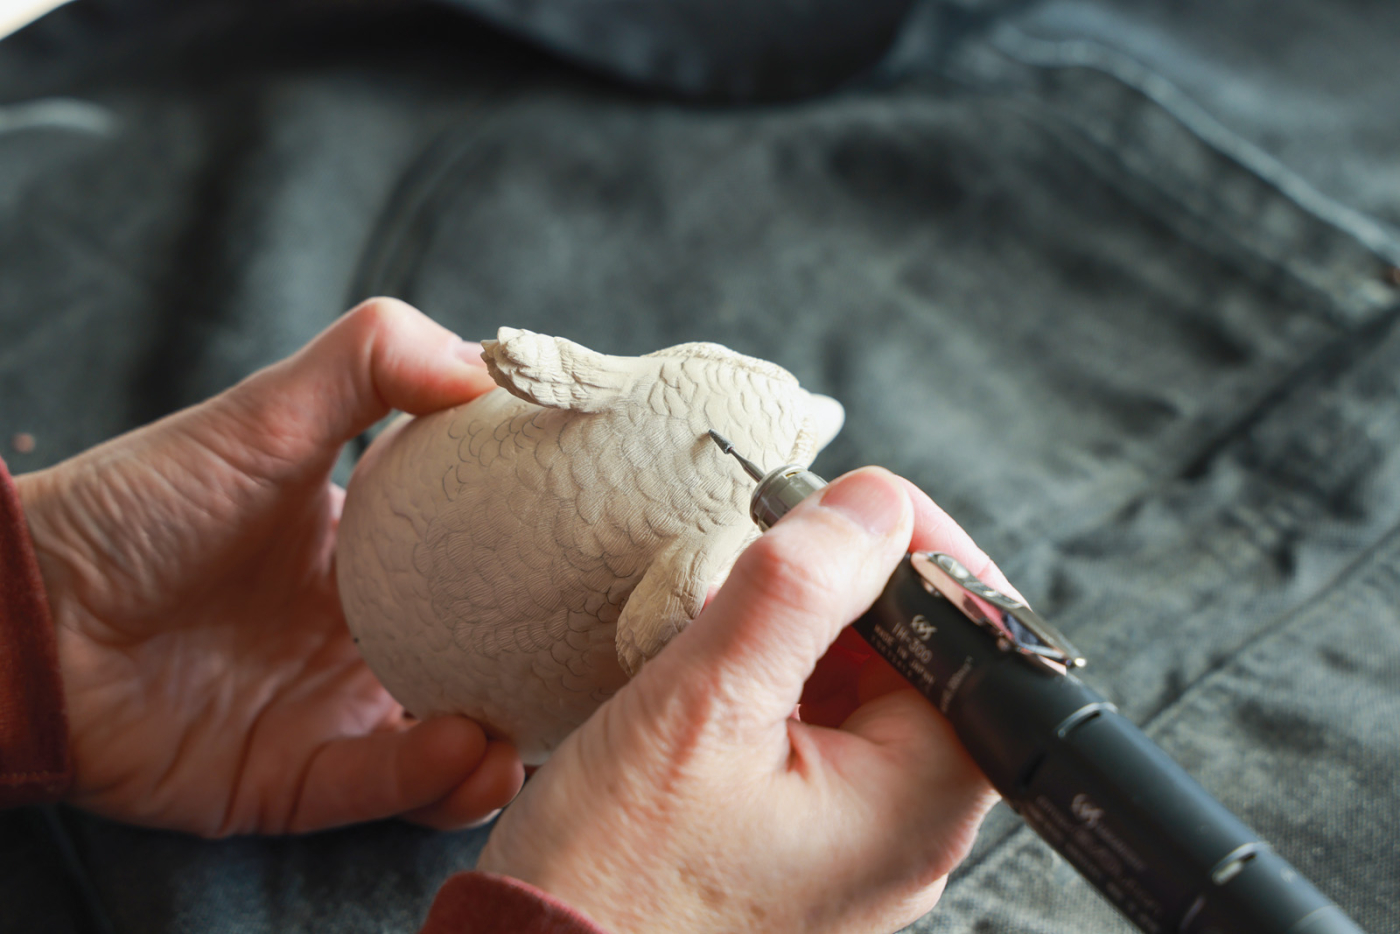
46 I used a stoning bit in the NSK with a gentle touch to texture the head. I wanted more texture for mica powder in the iridescent paint to catch light when I got to that stage.
Making the Feet
I have made feet from wood and from two-part epoxy depending on the support that is needed. In this case, the steel rods are needed to support such a large bird with a long tail, so epoxy was a logical choice. Begin by outlining each foot with tracing paper and create a hole in the center to slide over each steel rod. Use your reference to best understand how the pheasant stands and how the toes interact with the surface it is standing on. Tape them in place on your base and cover them with plastic wrap so the two-part epoxy doesn’t stick to the base. Cover the steel with epoxy up to where the legs go into the body. Next, roll epoxy into the toes, position them over the tracing paper template, and with a dental tool or stylus, blend the putty into the epoxy to cover the steel. Let this dry overnight.
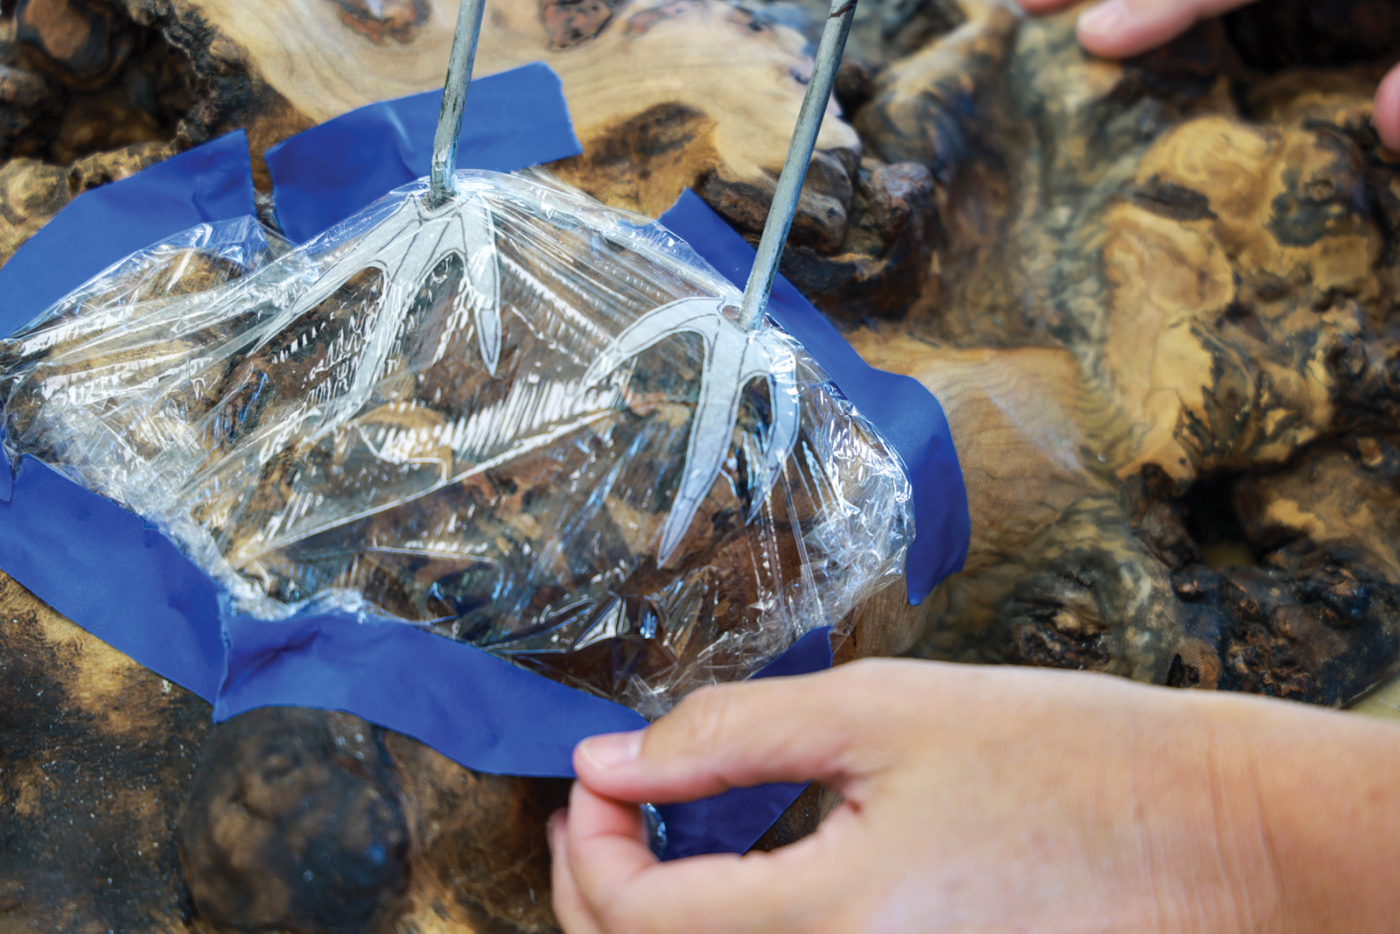
47 Position the feet templates into place on your base. Tape a piece of plastic wrap on top of the base to cover the templates. This gives you an easy way to remove the feet once completed.
In the meantime, create several rolls of epoxy that have tapered and slightly curved ends to resemble a shallow “C” for the toenails. Create two curved cone shapes for the spurs. Let these dry overnight as well.
48 Cover the forelegs with two-part epoxy to the approximate diameter of the final leg. Remember to have the plastic wrap in place over the base. Add each toe and blend it into the foreleg epoxy with a dental tool. Let them dry overnight on the base. Before cleaning up, create the toenails and spur and set aside to dry.
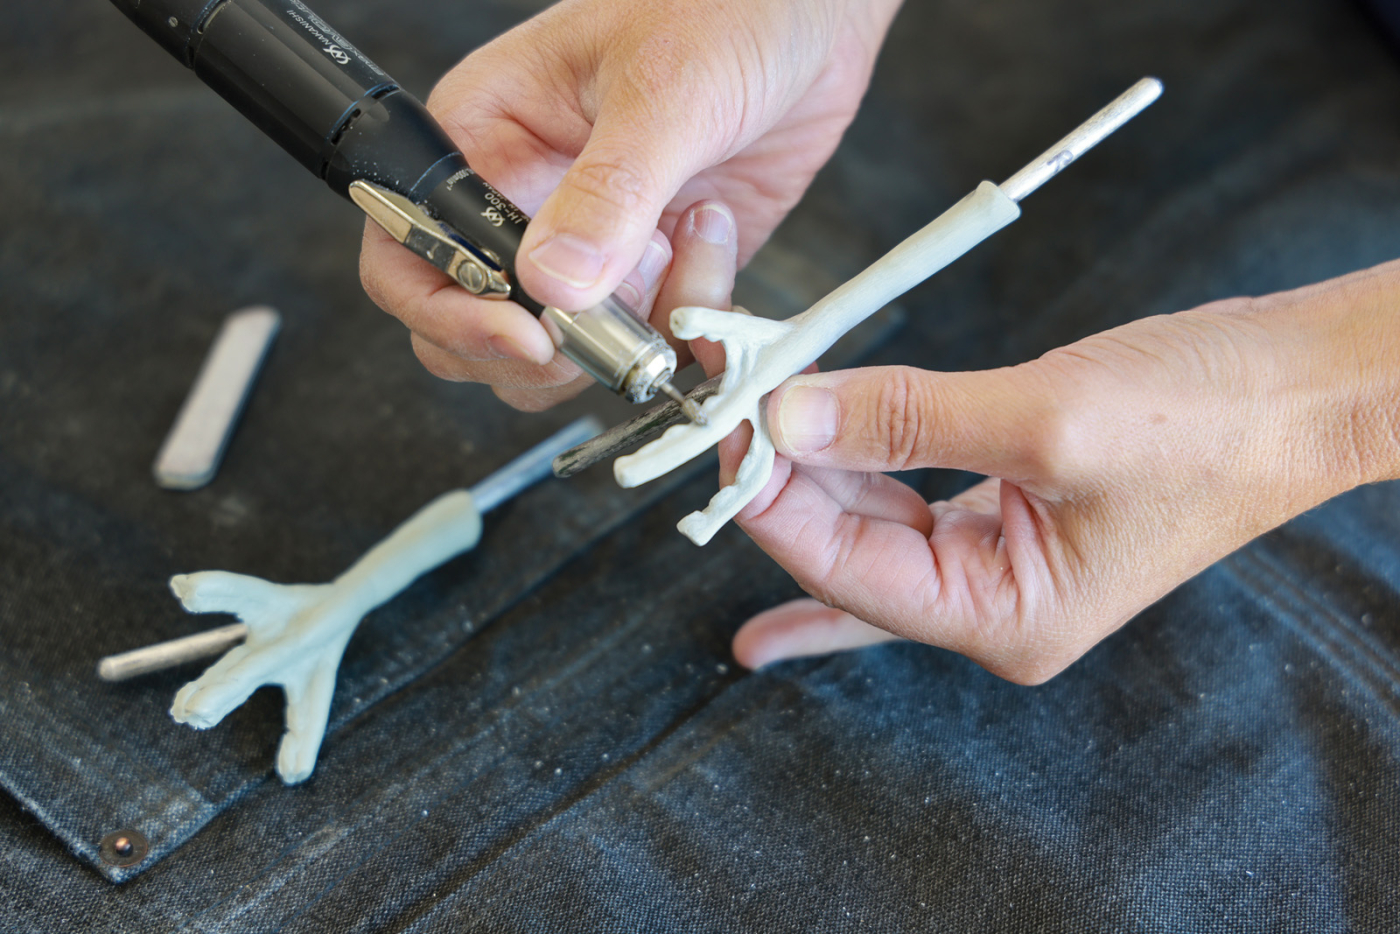
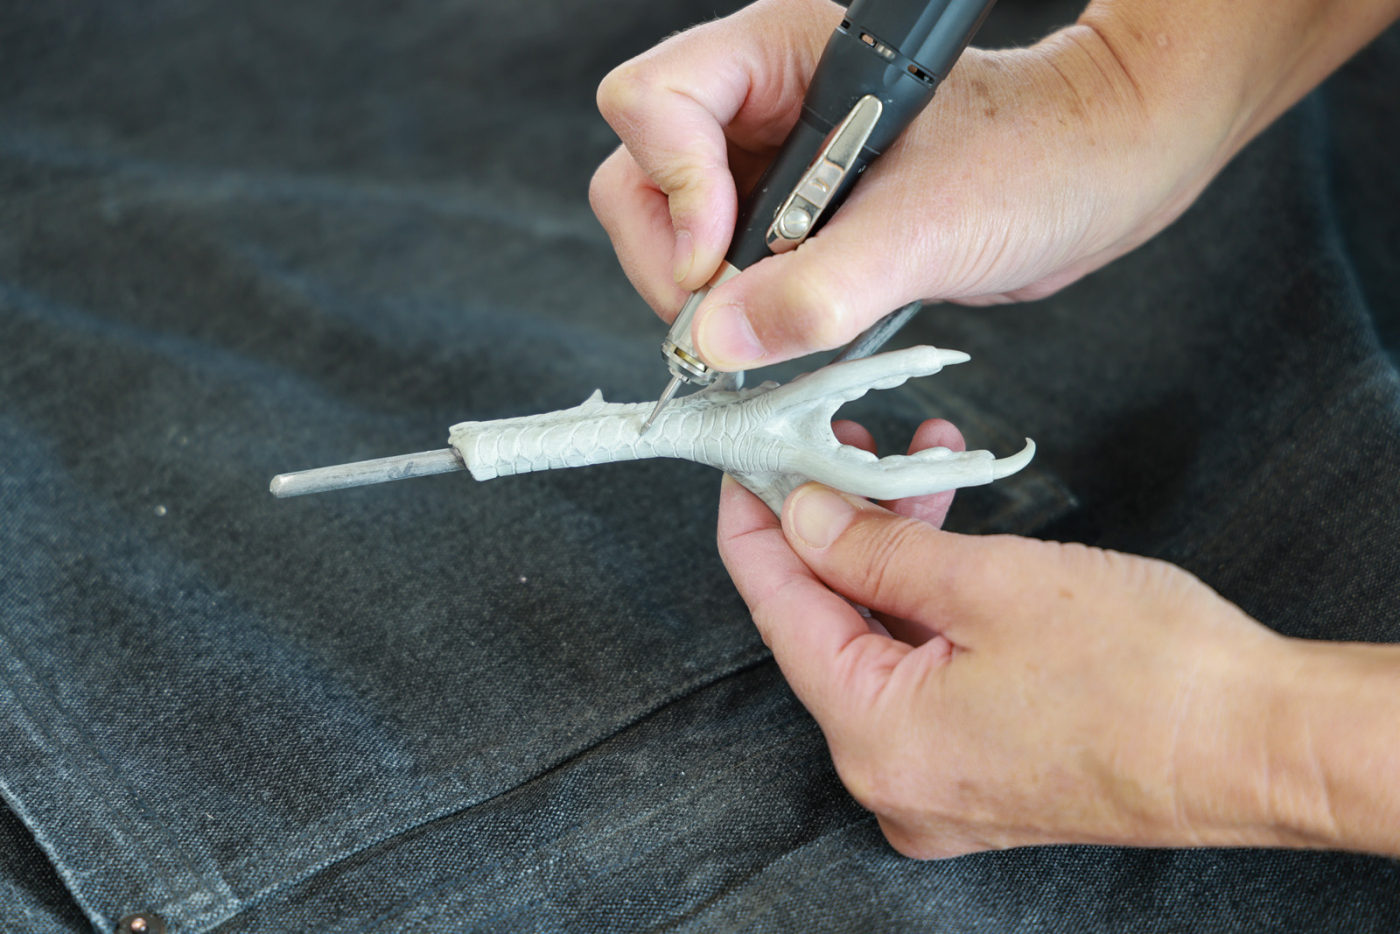
49 The next day, use the NSK to shape the foreleg and toes to the correct dimensions.
Next, use a combination of very small ball and flame diamond bits to begin to further define the large surface areas of the toes, pads, webbing, and hallux (back toe). After measuring for length, cut each toenail off the end of the “C” shape. Using a ball diamond bit, carve a concave grove under each toenail and shape the end of the nail to a point. Create a grove for the toenail to rest in at the end of each toe and affix the toenail with two-part epoxy putty. Be sure to affix the toenail while the foot is on the base for proper toenail alignment. Let the nails dry overnight. Repeat the process for each spur.
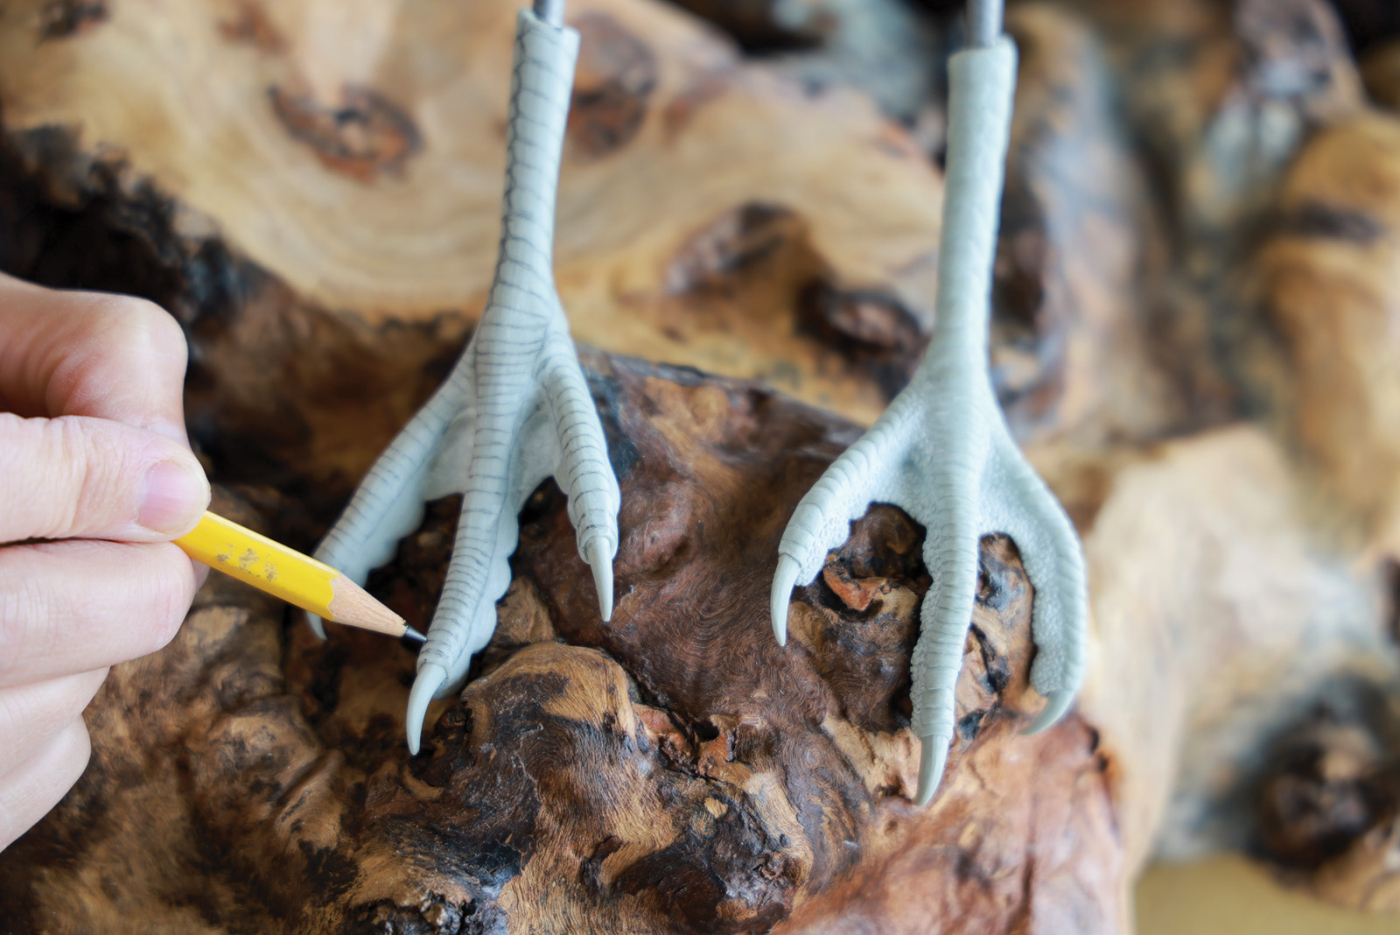
50 Draw the overlapping scale pattern on the forelegs and tops of the toes. Using your NSK, carve this relief first.
51 Then, draw the smaller pattern on the sides and back of the foreleg and the sides and bottom of the feet. You can carve these as larger indentations or individual small bumps
Now study the feet in your reference photos and add as many details as you would like. The tops of the toes and forelegs have an almost reptile-looking, scale pattern to them. The bottom pads have a tiny bump texture. I love carving the feet, so I go as far as wearing a magnifying visor to add literally hundreds of tiny bumps per foot.
When adding individual feathers around the legs, you’ll want to pay close attention to your reference for feather flow. The further down the chest the feathers go the more open and loose they appear.
52 At this stage, I permanently glue the head and tail to the body. For transporting or shipping, the feet are glued to the base, but the bird is not glued to the legs. (For clarity, the entire bird lifts off of the feet which are glued to the base).
Adding Feather Quills and Barbs
In preparation for wood burning, I hand sand the entire bird with gradually finer sandpaper up to 1200-grit. With a pencil, I redraw the quills for each feather starting underneath the tail working to the top of the tail up the body to the head. With a tool like a dental tool, I press on each side of the line to dent the tupelo and form a raised quill. I also add barb splints to appropriate feathers with this tool. I draw woodburn guide marks roughly every 1/4“ so I can keep the barbs flowing the same. With a feather as long as the tail, it can be easy to get off the angle; therefore, the guides come in handy. For this bird, the burning depth is light because the feathers aren’t coarse.
53 After drawing on all of the quills, I use a dental tool to press on each side of the quill line to dent the tupelo and raise the quill.

54 Before wood burning, prepare the bird by hand sanding with up to 1200-grit. This will reduce the carbon build up on the tip of the wood burning pen. Starting underneath the tail, press in each quill with a dental tool or stylus and mark the direction of the barbs along the length of the feather as a guide. Test your wood burner for the appropriate heat setting and begin to burn in each barb per feather. The longer the barb the slower you want to move the pen because it cools the more it is in contact with the wood. It’s a good idea to test and practice barbs before working on the bird.
On the head and in places where the feathers are different in texture—where the body meets the tail (upper tail coverts) for example—I use a stoning bit in the NSK to add the same type of detail. It is a very light touch with little relief.
Preparing for Paint
Once all of the minute texturing is finished, I coat the eyes with eye protector or a frisket masking material. It allows me to paint right up to the glass eye and even get some paint over the eye with easy removal later. Next, the pieces needs to be sealed and readied for painting. I use a product called Japan Oil in white which serves both purposes. I apply several thinned coats so I don’t fill in the wood burning or stoning textures. Once dry I begin to paint the colors and patters.
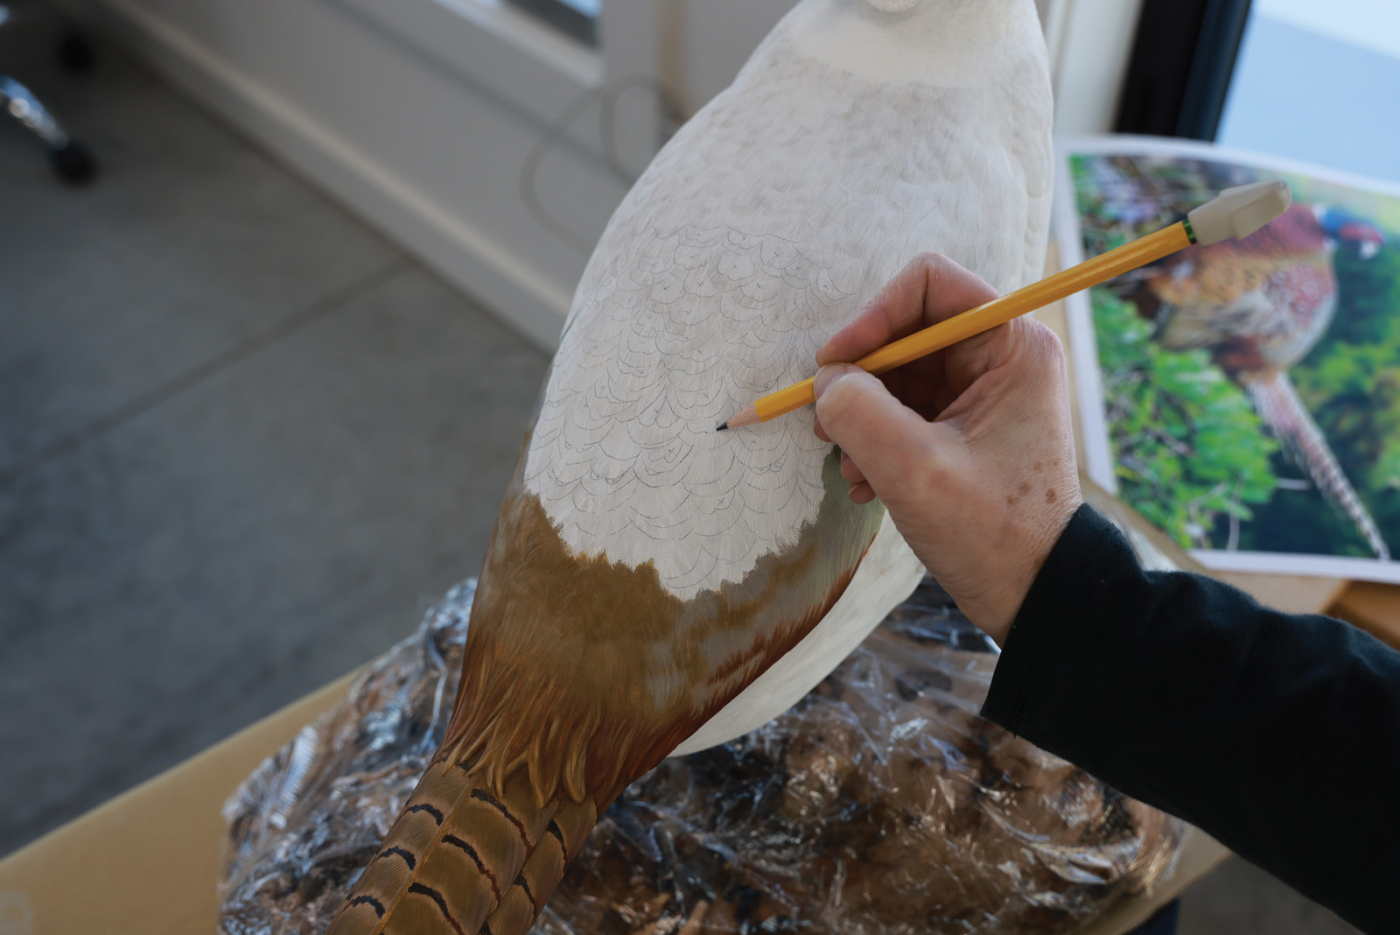
55 After masking the eyes, I thinned white Japan Oil with mineral spirits and applied three light coats over the entire bird. Be careful not fill in the texture by using too much. Two reasons for the coating: It seals the wood without raising the grain like a sanding sealer would and it creates a uniform “canvas” of white to paint on. If you were to use a clear coat, the tan color of the wood would skew the paint colors and the paint wouldn’t be as true or bright.
Painting the Pheasant
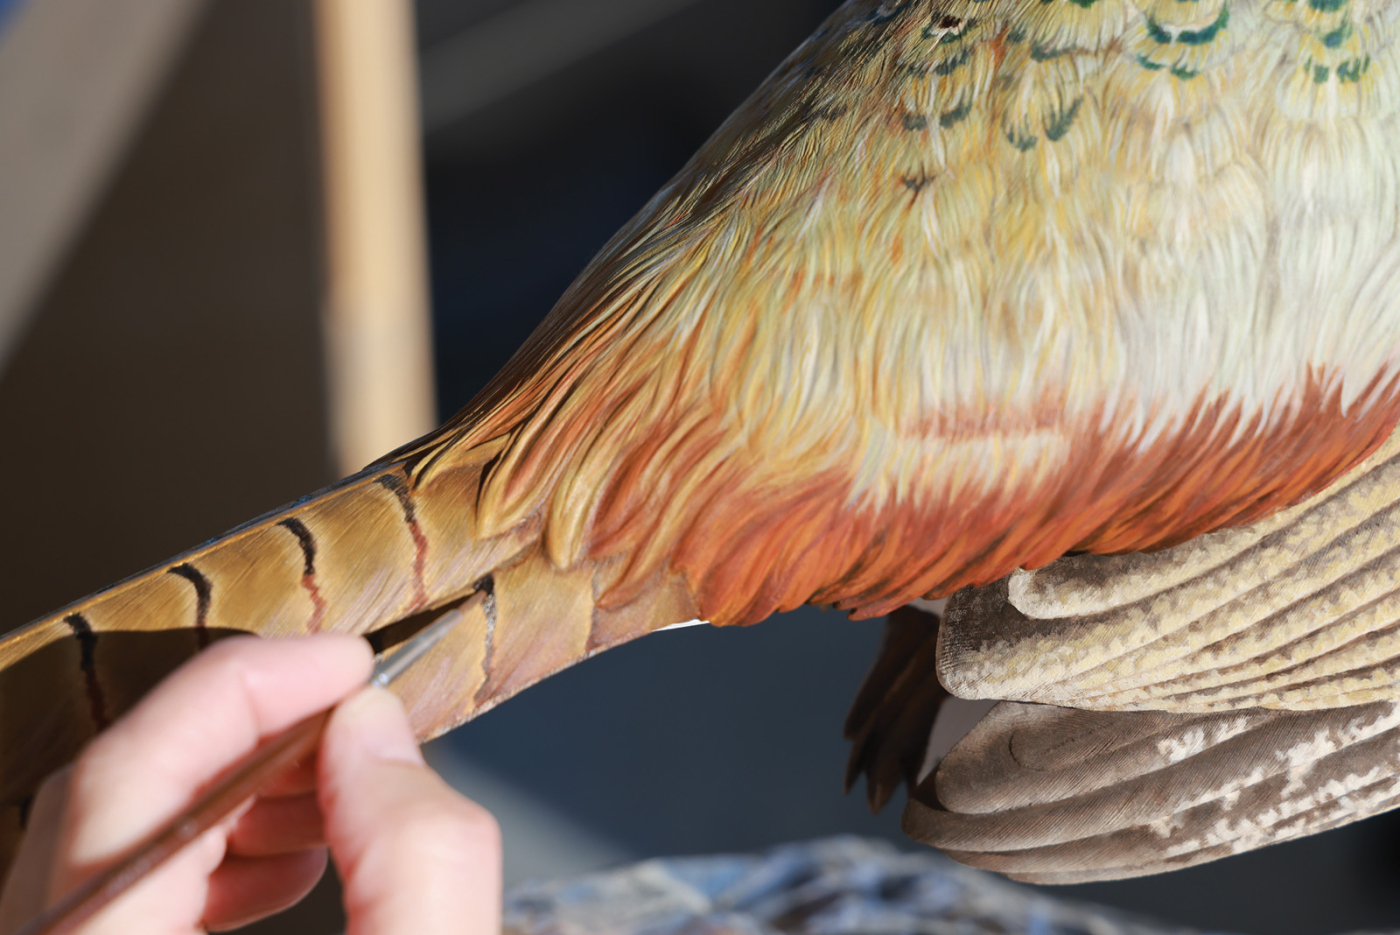
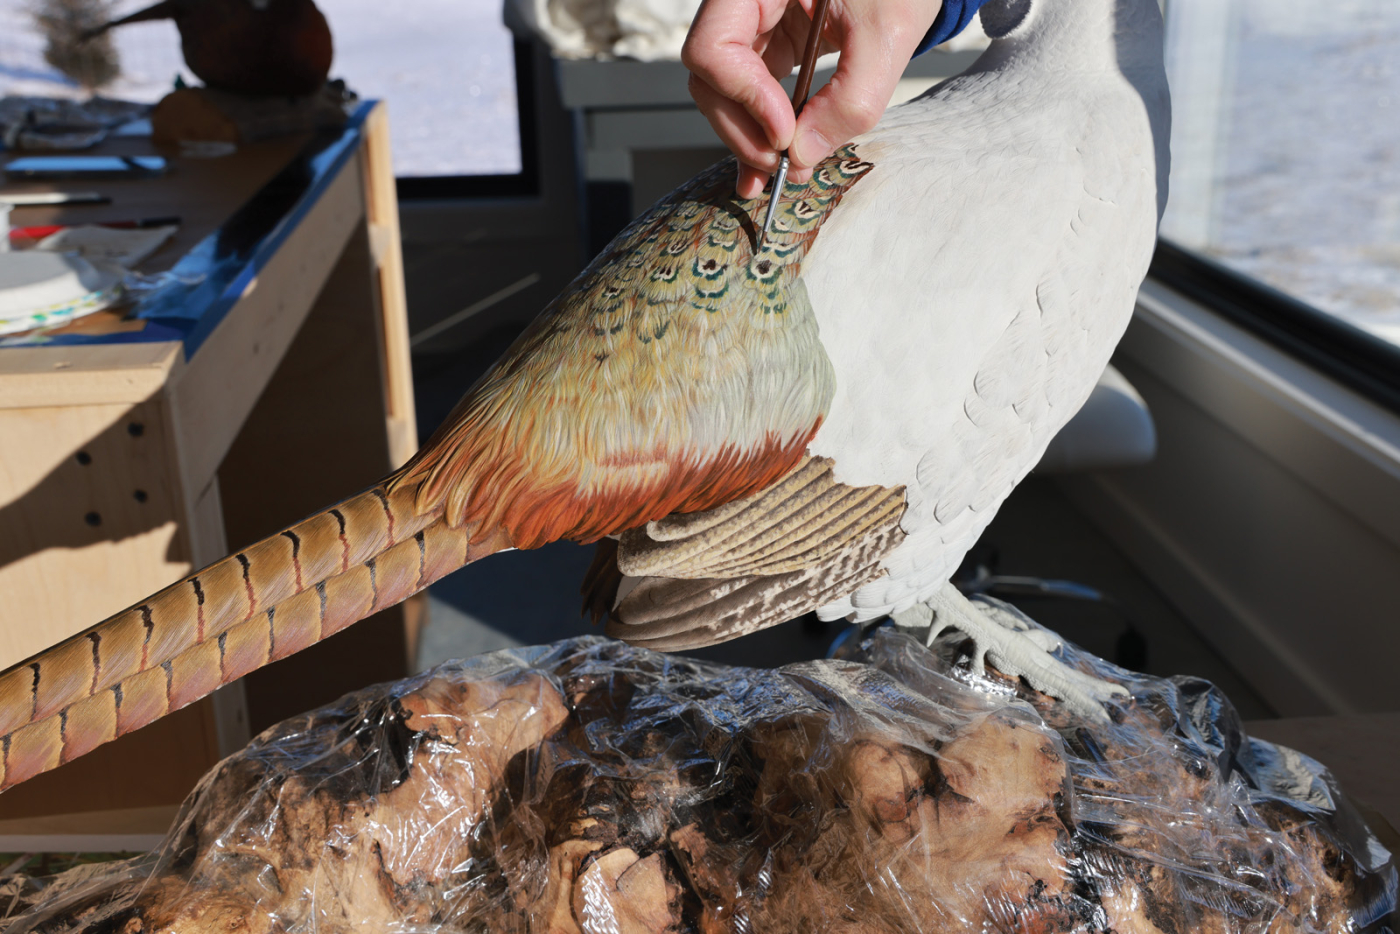
I start under the tail working toward the top of the tail and up the body to the head. It is more typical for carvers to use acrylic paint and a combination of brush and airbrush, but I prefer oil paint and brush application only. I treat each feather like it is a canvas and don’t tend to wash large areas with color. Each feather is painted with multiple coats of paint gradually gaining depth through saturation, highlights, and lowlights. The last step is adding iridescent paint to the upper chest and head.
56 Begin painting under the tail working your way to the top of the tail and up the back. Then move to the chest, head, and feet.
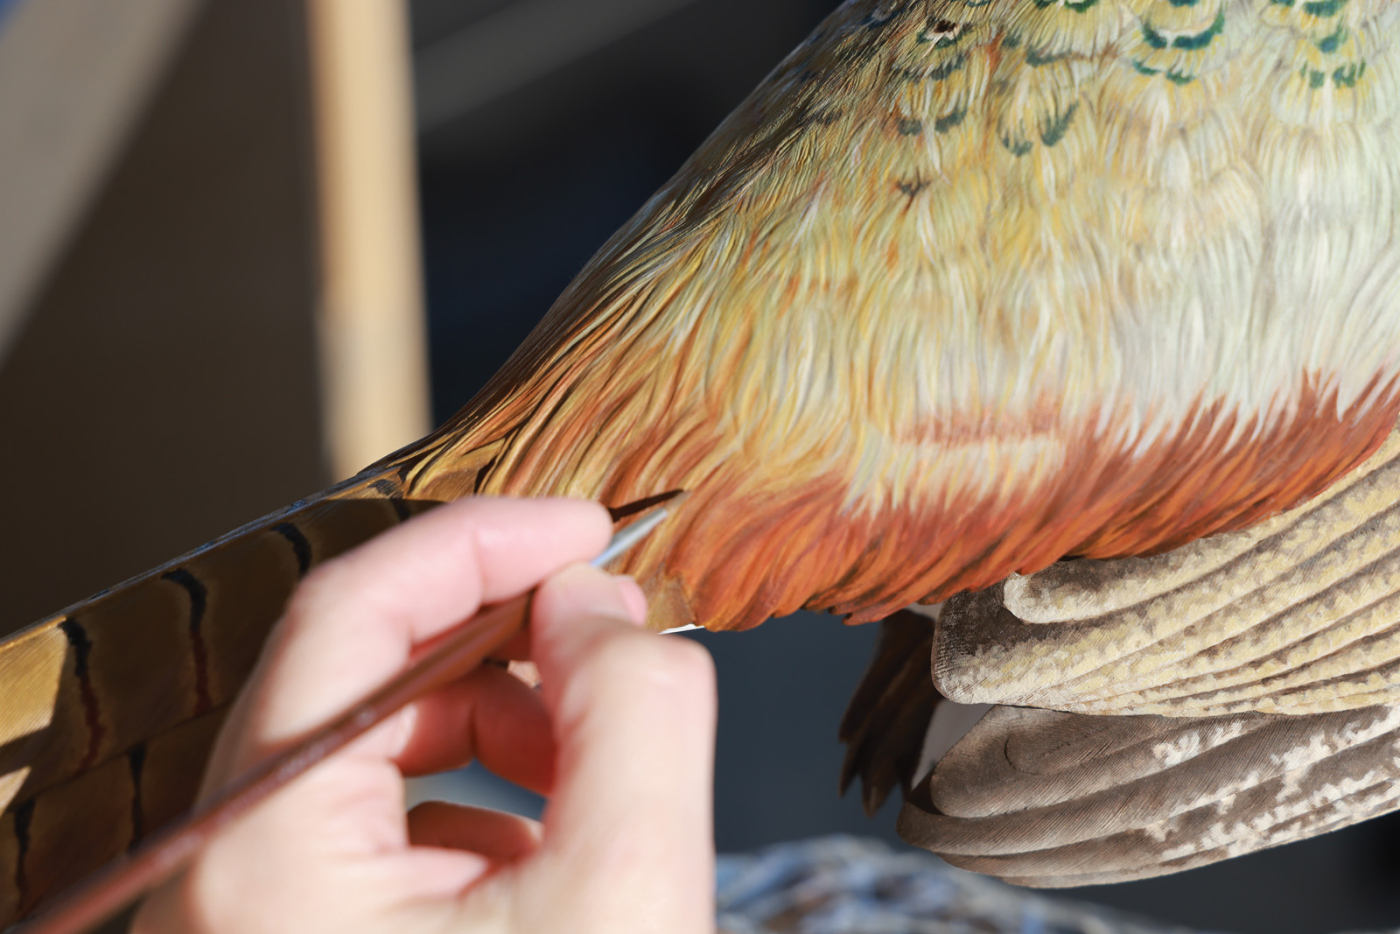
57 I use thin coats to block in the color patterns, carefully blending the colors together while not muddying them.
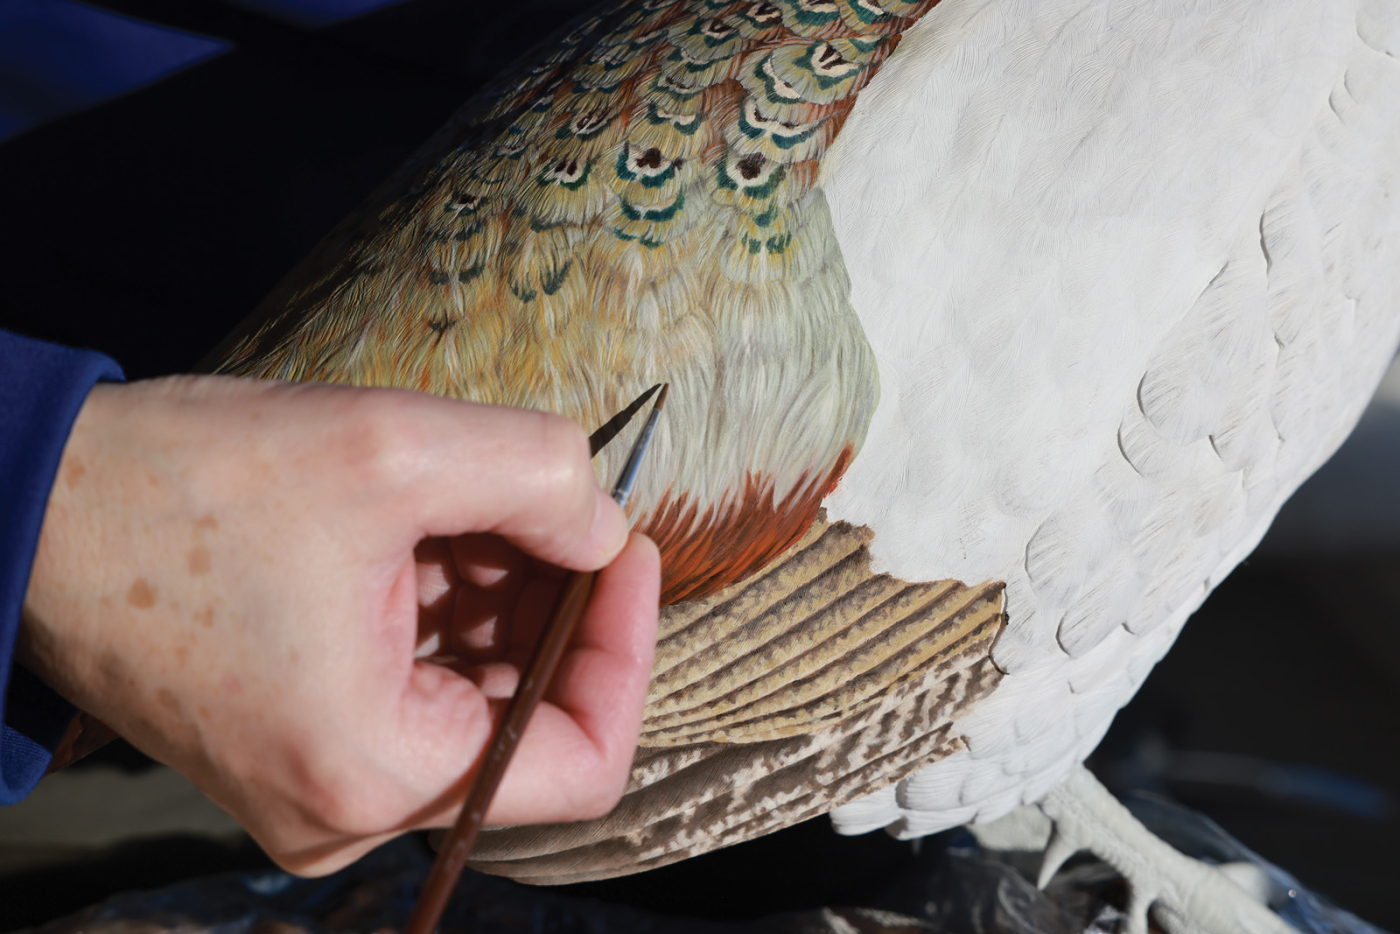
58 I circle back over the entire bird 4-6 times to define pattern edges, add intensity, shadows, highlights, and finally accent with iridescence when appropriate.
59
I hope I have encouraged you to try something new by experiencing and practicing a new skill set. And, maybe even given you a reason to pick up a few new tools! If so, welcome to the world of bird carving!
Online Extra: Check out the full list of paints used.
Here are some supplies and tools we find essential in our everyday work around the shop. We may receive a commission from sales referred by our links; however, we have carefully selected these products for their usefulness and quality.


Well. . first I’ll say, the finished project is amazing. But as a traditionally trained woodcarver. . I wouldn’t classify this as carving. It is using a die grinding type tool to machine wood. It would only be considered carving by the most generic definition of the word. That isn’t to demine the work or talent it takes to manufacture this project. It’s just the way I see it. I couldn’t sell that personally as a “carved” item, because most would believe it was done then with hand and chisel, and that isn’t the case. It would feel like a lie to me.
If you started your ‘HAND CARVING’ with a hand saw and a tree, then I would buy you are a purist. I cut and season my own wood, work it with hand tools but I would never be such a SNOB to say that this is not hand carved. In the same way that a marble carver would use a pneumatic chisel, a rotary tool is an extension of the artists hand, This is truly an artist and I hope that she appreciates that many of us are not snobs but appreciate talent as offered. I will be posting this to all of the wood carving groups I work with I hope they are as appreciative as I am.