We may receive a commission when you use our affiliate links. However, this does not impact our recommendations.
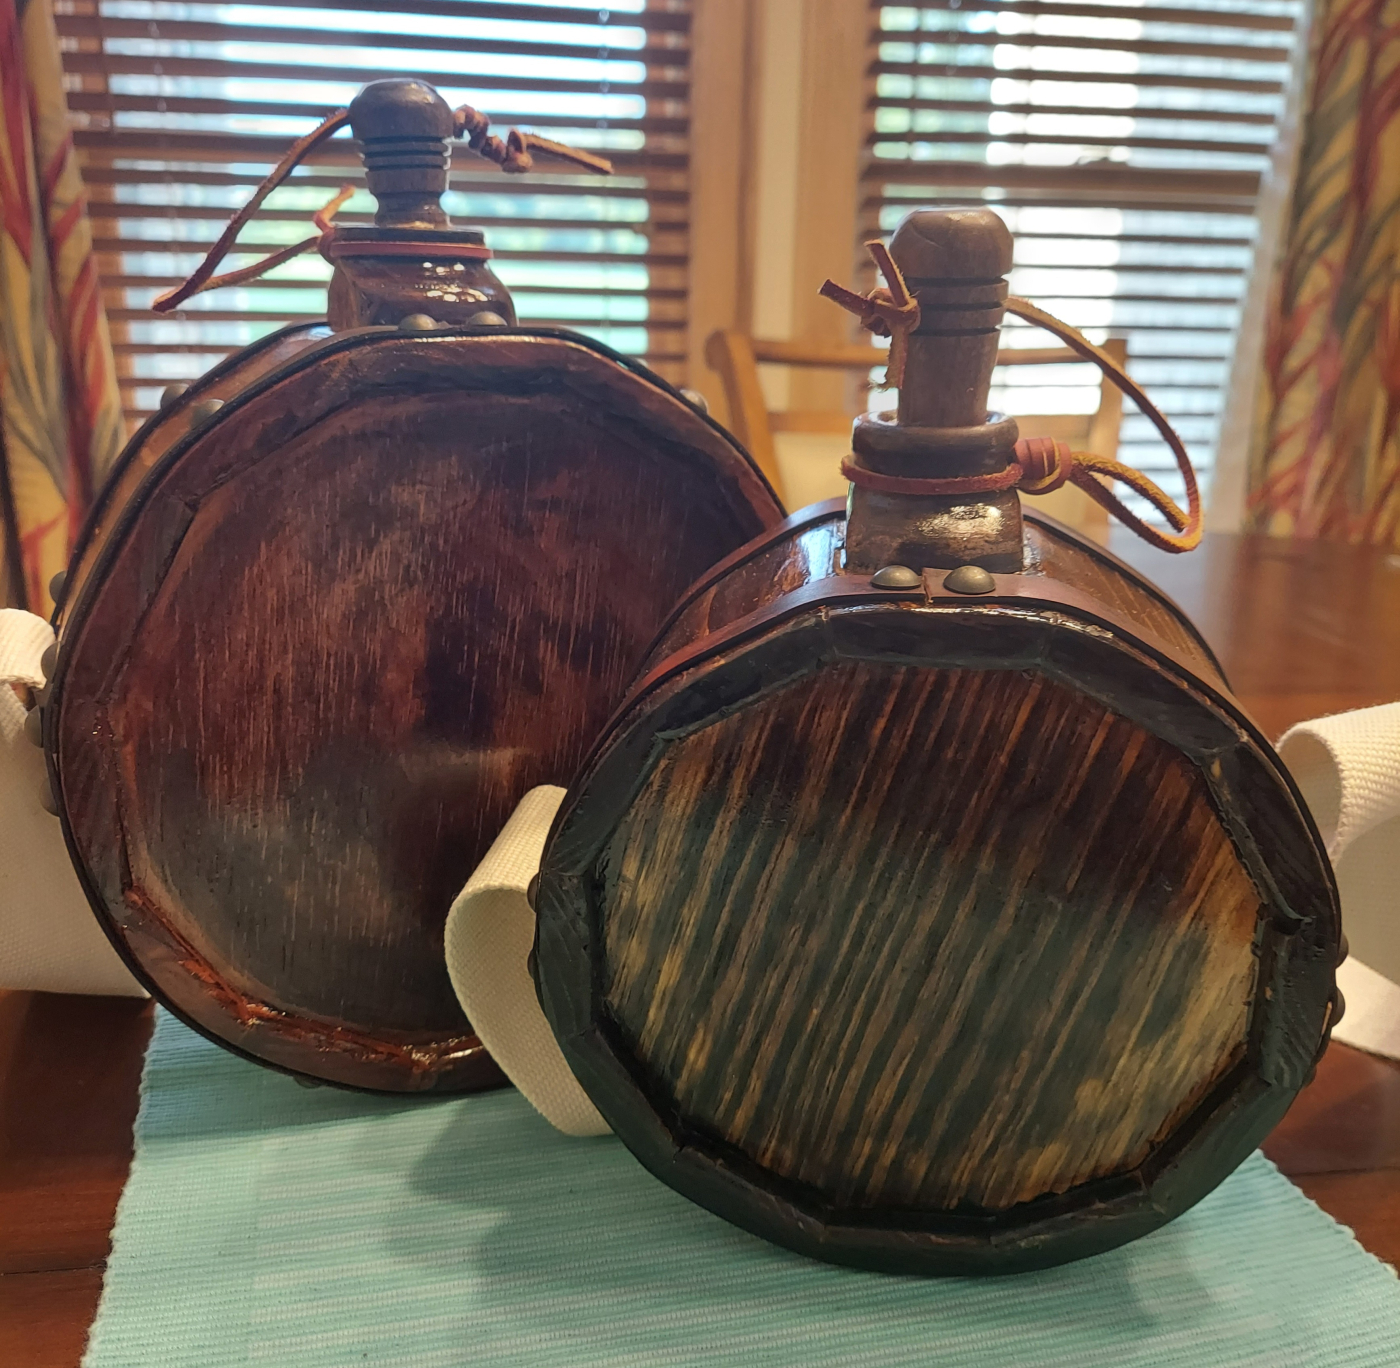
Completed Small and Larger Wooden Canteens
Designing Your Canteen
I initially started my search of how to make a wooden soldier’s canteen of the revolutionary war period, as most folks do nowadays, with a Google search. You will get everything that you probably don’t want and little on the subject except for the sutlers who advertise and sell “Colonial or Reenactment Clothing”. A Wooden 18th Century styled canteen range from kits costing about $35.00 to finished wooden canteens costing $110.00. After that, you venture into antiquities and out-of-period (not Revolutionary War) gear. These retail canteens and kits are mostly pine lumber, where actually antiquities show oak wood. This also means that wooden canteens were “coopered” in the same manner as a large barrel, using the metal hoops/rings to press the staves firmly against one another to prevent leaking. At the beginning of the 18th Century, and for some years after, the soldier’s canteen was a wooden, drum-shaped affair, provided with a spout.
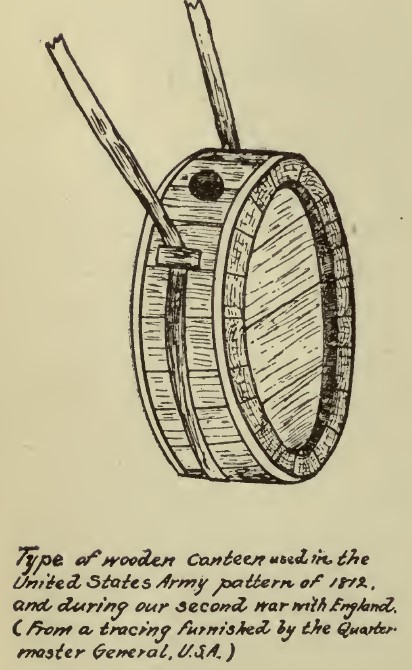
1874 Model of US Army Canteen, From History of the Military Canteen (Nov- 1900)
Google has some nice pictures, but a set of plans or instruction for building a canteen is not to be found, in the direct sense anyway. My internet searching identified a drawing of a “Lewis and Clark (L&C)” canteen (below). The diagram provides. The rough dimensions and accouterments of a barrel-shaped wooden canteen. I will continue to call it the “L&C diagram” but have seen other places where it’s referred to as the uniform and kit of the 42nd Highland Regiment, an Australian Napoleonic re-enactment society. The actual author or artist is not known, but the drawings are very informative.
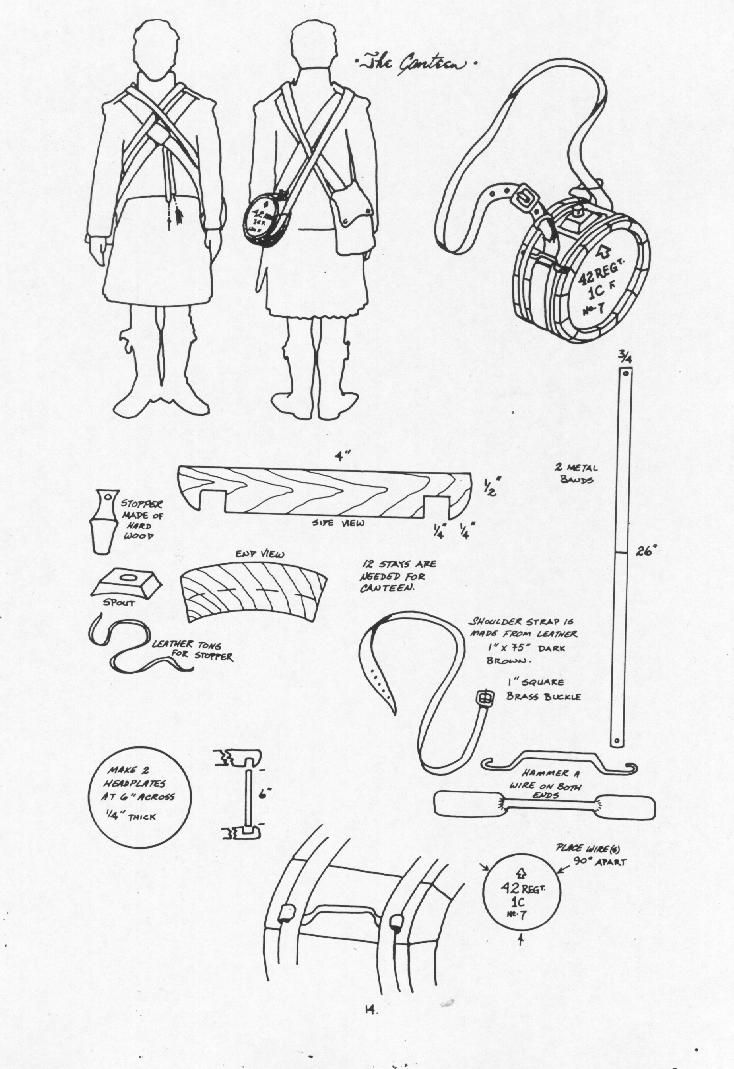
The L&C Diagram of Canteen Construction
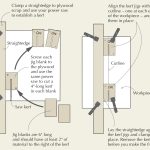
Most of us do not have the equipment or skills to forge iron/metal hoops to build our 18th Century vessel, so in keeping with the canteens and kits mentioned above, you have enough information to make your simplified version of a reproduction. Now with the size and shape imaged in a sketch, The angular measurements for the side pieces, or the staves is the next thing to determine. I do not have one of the kits to compare the dimensions and have only seen pictures as shown above.
Staved or segmented construction figures in a lot of projects, from ornamental bowl turnings, to musical drums, porch pillars, and whiskey barrels. Coopering is an art itself, a skilled trade that dates back over 4,000 years. Herodotus (b. 485 BC) described palm wooden casks in shipping Armenian wine to Babylon. Around 350 BC, Celts were using watertight barrels that bulged at the middle to withstand stress and could be rolled as well as stacked. The wooden canteen can only be surmised to be a manufacturing technique similar to its big barrel brother.
Coopers were skilled technicians, fashioning barrels from raw wood through many processes. They were in great demand in Colonial America. I can imagine that smaller containers such as canteens and buckets could have been an apprentice skill builder or the smaller cut-off pieces from barrel making were used in smaller containers.
Now back to building our reproduction wooden canteen.
Staves and Segments
As discussed, a wooden 18th century canteen is more or less a shortened wood barrel with the sides made from staves. Less the coopering tools and techniques, we will pursue a suitable reproduction that you can build in your home workshop. The questions we now ask ourselves is;
- What miter angle (or bevel) do I need for the side staves?
- How long (or wide) should I make the stave pieces?
Finding those answers is relatively easy, and there is an interesting how-to article in Wood Magazine that demonstrates the mathematical formulas for calculating the angles/miters. Since we know we are making a canteen for our Uniform Kit, I have provided the measurements for a large and small version of the reproduction canteen.
First, let’s get our terminology straight. Staved cylinders (what we are trying for) and segmented rings may seem alike to woodworkers, but they’re two different approaches in making rounded structured wood objects. In general, the grain in rings constructed from segments runs horizontally and the individual pieces are glued end to end. On the other hand, the grain in staves runs vertically, and are glued edge to edge. In our case, “Bevel-to-bevel”. For our canteen project, we will be using staves where the grain runs over the long direction of the stave/piece.
So, things can become confusing when we start talking about the distance between the angles. On a stave that distance is the width, but on a segment, it’s the length. For our canteen project, we’ll refer always to length. As shown in the L&C diagram we know the canteen stave is 4 inches long. So, for bigger canteen is to make a wider stave, in other words make a larger diameter ring. I made my first prototype of a larger canteen as later shown in diagrams and tables. However, for your “Uniform Kit” I would recommend the smaller version.
So, what is the Angle for the Staves?
A full circle contains 360 degrees. So, to make our canteen from a number of straight pieces, all of the angles of the corners should add up to 360 degrees. In the table below six equal-length sides, the six 60-degree corners add up to 360 degrees.
But, 60 degrees is not the angle you need to cut on the ends of each piece. Because two sides come together to make the angle, each side must be miter-cut to exactly half the total corner angle, or 30 degrees. So, half of 60 is 30.
Here’s the rule for finding the angle: To determine the corner angle for a figure with any number of equal-length sides, divide 360 degrees by the number of sides. To find the miter angle, divide the corner angle by two.
To achieve a round canteen with minimal cutting, the more staves in the circle the more rounds appearance, and less finishing will be needed, to get a round appearance. A canteen with 6 or 8 sides could be made, but the round hoop work for coopering (a real canteen) would not work effectively. 10 seems like a good number, but I have been doing 12 staves, as it appears more rounded. 16 is a bit awkward for the smaller canteens since the pieces would be so narrow. So, now we have an understanding of the dimensions of the staves we will work with 12 sides/staves. The examples for the large and small canteens are both designed with 12 staves.
So, how big will it be?
The article from Wood Magazine about working with staves and segments details the mathematics of calculating of how big it will be. Great, if you are designing a porch post or even a canteen. But I have done all of that for you. No math calculating needed. My prototype canteen was about 8.5 inches in diameter. It turned out pretty big, and by mathematics, it holds about 3⁄4 of a gallon. Enough for a long march, but I think every day use a smaller 1 quart would probably suffice for SAR uniform kit. With this in mind I am providing a table for the dimensions for both the larger 3⁄4-gallon sized canteen and the smaller 1-quart canteen in the following tables.
 Not much changed between the two examples provided. We know the stave is 4 inches long, on the outside width of the stave changes. Without having to write about mathematics, the diagrams and information tables were generated using the online tool listed in Reference 2.
Volume of Example Canteens
The cylinder is a three-dimensional shape having a circular base. A cylinder can be seen as a set of circular disks that are stacked on one another. Now, think of a scenario where we need to calculate the amount of water that can be accommodated in a cylindrical box or a stave barrel canteen.
In other words, we mean to calculate the capacity or volume of this box. The capacity of a cylindrical box is basically equal to the volume of the cylinder involved. Thus, the volume of a three-dimensional shape is equal to the amount of space occupied by that shape. Not wanting to do an algebra class you can adjust your numbers to calculate the cylinder volume using a calculator from at: https://www.omnicalculator.com/math/cylinder-volume
After the canteen is completely assembled it is estimated that the volume will be as follows.
In part two, I’ll go over how to construct your canteen.
Here are some supplies and tools we find essential in our everyday work around the shop. We may receive a commission from sales referred by our links; however, we have carefully selected these products for their usefulness and quality.