In Projects, Shop Blog, Techniques

We may receive a commission when you use our affiliate links. However, this does not impact our recommendations.

Fab Frames

No miters and no fuss! Multiples and cool variations are easy.

by Tim Johnson


Forget about cutting and fitting miter joints the next time you make
a picture frame. Scrap wood, a saber saw, a fence-equipped router table
and three common router bits are all you need to make this one. 

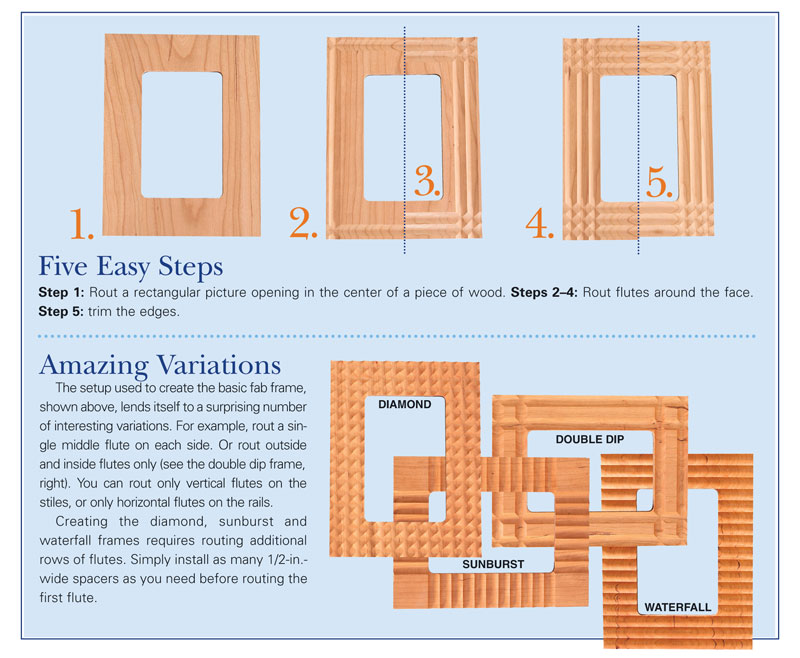
The process couldn’t be simpler: Saw and rout an opening for a 4 x
6-in. image in the center of a board; then rout flutes around the face
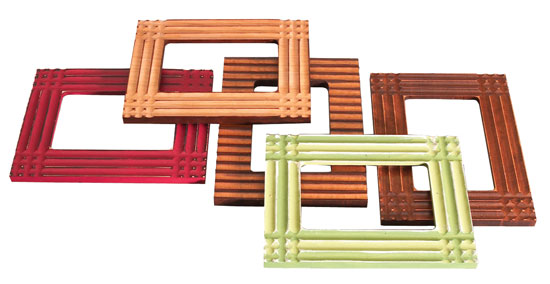
(Fig. A, below). This procedure is ideal for making multiple frames, and changing the pattern is so
easy that you can rout several different-looking frames at the same
time (see “Amazing Variations,” below)

Those large offcuts you’ve been saving are perfect for this project,
but you can also make frame blanks by gluing up narrow stock. Hardwoods
such as birch, maple, cherry, beech, walnut and poplar are good choices.


Shape the Blank


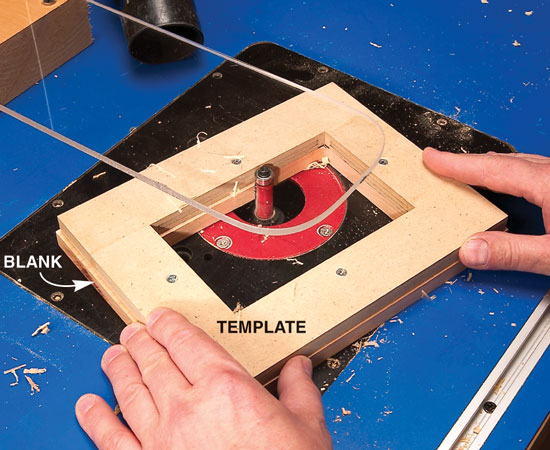
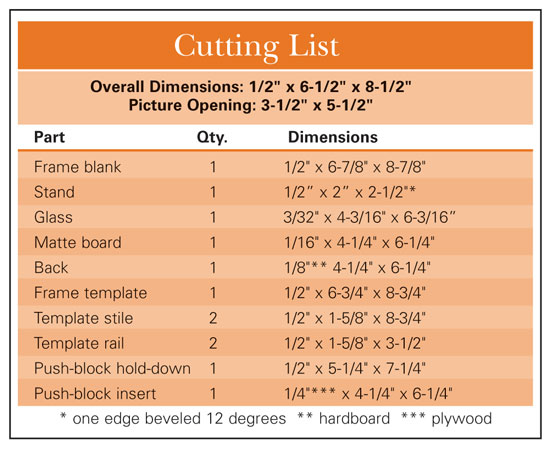
1. Glue together a template sized precisely, as shown in Fig. B
(below). Drill shank holes for the screws that will hold this template
to the frame blank.


2. Plane wood for the blank to 1/2-in. thickness. This piece must be
at least 12 in. long to safely pass through your planer. You can skip
this step and use thicker stock, of course—your finished frame will
just look heftier.


3. Cut the frame blank to size, 1/8 in. wider and longer than your template.


4. Center the template on the blank and attach it with one screw.
With a pencil, trace the picture opening onto the blank. Mark the
template so you’ll use the same screw hole when you remount it in Step
6.


5. After you’ve removed the template, drill access holes for the
saber-saw blade in the blank, near the corners of the picture opening.
Then rough-saw the opening 1/8 in. or less away from the traced line.


6. Remount the template using all four screws.


7. Using a flush-trim bit (see Sources, below), rout the blank to
match the template (Photo 1). Feed the blank clockwise to rout the
inside and counterclockwise to rout the outside. Tear-out may occur at
the corners when you rout the blank’s outside edges, but it’s OK,
because the routed blank is still oversize. It will be trimmed to its
final size later.


8. Complete the picture opening by installing a rabbeting bit and
routing a 9/32-in.-deep x 3/8-in.-wide rabbet for the glass, matte
board, image and back. Square the rabbet’s corners with a chisel.


Rout the Flutes


I’ll explain how to rout the basic frame, but you can use the same steps to create several variations. 


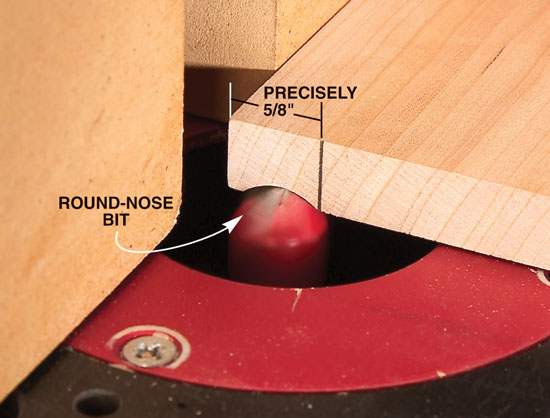
The frame’s 1/2-in.-wide flutes are routed with a 3/4-in.-dia.
round-nose bit that’s partially recessed in the router table. This
setup creates shallow flutes that look much better than the deep flutes
a 1/2-in.-dia. bit would create.


9. Raise the bit to set the flute’s width (Photo 2). The flutes
should measure about 1/64 in. less than 1/2-in. wide. Flutes wider than
1/2 in. won’t work.


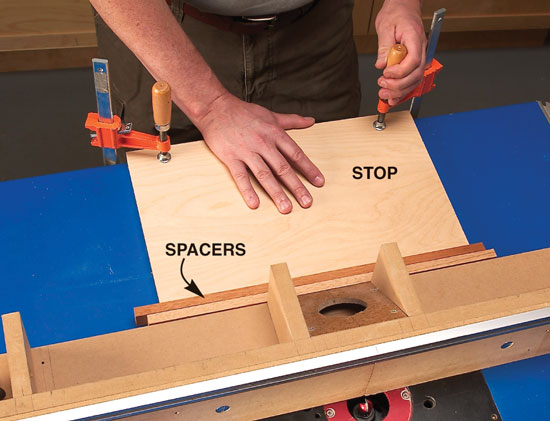
10. Lock the fence in position to rout the outside flutes (Photo 3).
When properly located, these flutes leave 1 in. for the two remaining
flutes.


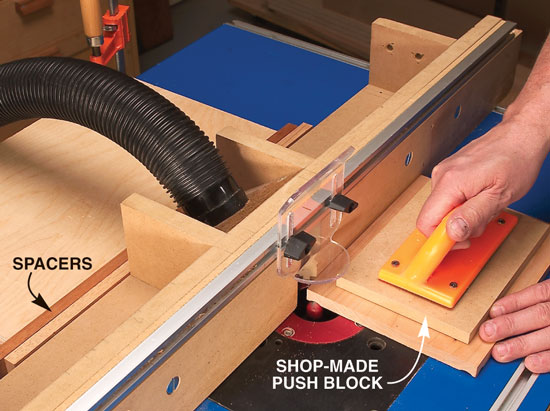
11. Mill a pair of long spacers exactly 1/2 in. wide and install
them behind the router table’s fence. A clamped-on stop holds them in
place (Photo 4).


12. Rout the outside flutes all around the frame blank (Photo 5). A
shop-made push block with an insert that fits into the rabbeted picture
opening makes routing super-easy and safe. (Fig. C, below). 


13. Loosen the fence and remove one spacer. Firmly push the fence
against the remaining spacer and clamp it in place. This adjustment
moves the fence exactly 1/2 in. so you can rout the middle flutes. As
you rout across the grain, use a slow feed rate to minimize tear-out
between the two flutes.


14. To rout the inner flutes, simply remove the remaining spacer and reposition the fence against the stop.


Finishing Touches


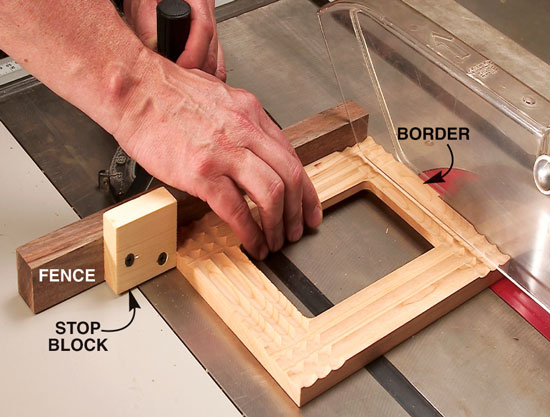
15. Trim the frame’s sides on the tablesaw (Photo 6).


16. Sand the flutes to eliminate ridges and blend uneven spacing.
Sanding also gets rid of tear-out between the flutes. I use Tadpole
contour sanders to help with this job (see Sources, below), but a
detail sander or sandpaper wrapped around a dowel will also do the
trick. 


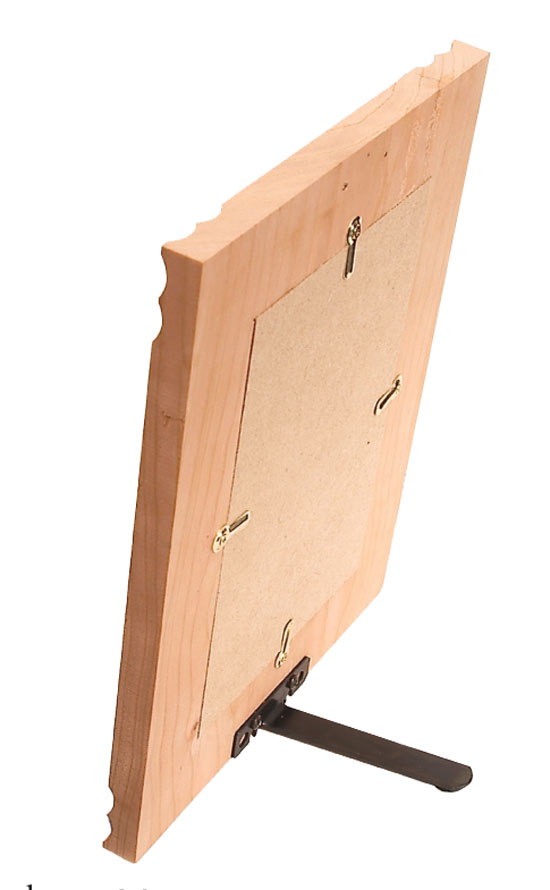
17. To make a stand for the frame, saw a 12-degree bevel on one edge of a long blank. Then cut the stand to size. 


18. Glue the stand to the back of the frame. You don’t have to use
clamps. Just brush a coat of glue on the stand’s beveled edge. With the
frame lying on its face, press the stand onto the frame, flush with the
bottom edge. Rub the stand back and forth to set the glue; then let the
assembly dry. As an alternative, the EaselMate frame stand doesn’t
require gluing and it’s removable (below).


19. Apply your favorite finish to both sides of the frame. I prefer
aerosol-spray finishes for small jobs like this, because they’re fast,
but you won’t have to worry about drips if you choose a wipe-on finish.
Or you could be adventurous (see “Great Fun To Finish,” right).


20. Install the glass, matte board, image and the back. Then screw
on the turn buttons (see Sources, below). You should be able to use the
screw holes that remain from fastening the template.


Photo 1: This picture frame is just a piece of wood with a
rectangular hole cut in it. After rough-cutting the picture opening in
an oversize frame blank, use the routing template (Fig. B, above) and a
flush-trim bit to cleanly rout both the inside and outside edges. 


Photo 2: Dial in the flute’s width by adjusting the bit’s height.
Make test cuts in a scrap piece until the flute measures slightly less
than 1/2 in. wide. It’s easy to eyeball this measurement on a coarse
scale: Just sight along both graduations’ inside edges.


Photo 3: Set the router table’s fence to rout the outside flutes.
Draw a line on your test piece exactly 5/8 in. from the edge. Then make
test cuts until the flute’s inner edge precisely aligns with the line.


Photo 4: Install a pair of 1/2-in.-wide spacers and a stop behind
the fence. This setup makes it easy to accurately reposition the fence
for routing the middle and inside flutes. 


Photo 5: Rout the flutes, starting at the outside edge. To rout the
middle flutes, simply remove one spacer and reposition the fence.
Remove both spacers to rout the inside flutes. 


Photo 6: Trim the frame to its final size by sawing off the
borders. Trimming the frame after routing the flutes eliminates the
possibility of router tear-out on the outside edges.


Instant Frame Stand: The EaselMate frame stand screws on in a
minute. This pro-quality stand makes it easy to change the frame’s
display from vertical to horizontal or convert it for wall mounting
(see Sources, below).


Great Fun To Finish: My children had a blast painting and staining
these frames. They quickly discovered how easy it was to highlight the
flutes by sanding the finish or by adding additional colors. 


Sources  

(This information may have changed since the original publication date.)

Freud Inc., www.freudtools.com, (800) 334-4107

1/2-in.-dia. flush-trim bit with three cutting flutes, #44-104, $20; Rabbeting bit with bearing, #32-102, $26. 3/4-in.-dia. round-nose bit, #18-112, $26. 


Rockler, www.rockler.com , (800) 279-4441

7/8-in. brass-plated turn buttons, #27912, $2 for a pack of eight.


Klingspor’s Woodworking Shop, www.woodworkingshop.com , (800) 228-0000

Tadpole contour sanders, convex set, #KL20000, $5.


Albin Products Inc.,  www.albinproducts.com , (800) 225-6821

EaselMate frame stand, pack of two, $6; pack of six, $16; pack of 12, $30. 


This story originally appeared in American Woodworker October 2006, issue #124.


October 2006, issue #124

Purchase this back issue.


Product Recommendations

Here are some supplies and tools we find essential in our everyday work around the shop. We may receive a commission from sales referred by our links; however, we have carefully selected these products for their usefulness and quality.

Recommended Posts

Start typing and press Enter to search