


We may receive a commission when you use our affiliate links. However, this does not impact our recommendations.
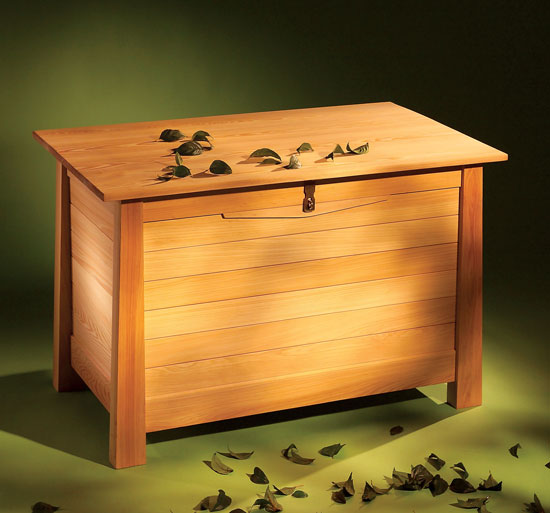
Cypress Chest
Beautiful outdoor storage made to take the elements.
by Dave Munkittrick
|
Storage is like money; we never seem to have enough. Well, I can’t help you much with your finances, but I can give you a hand on the storage front. A frequently I used cypress to build this chest. It’s a beautiful, cream-colored wood similar in appearance to a lightcolored cedar or fir. Cypress is about 50% harder than clear cedar but about half the cost (see Sources, page 7). Cypress is a rot-resistant member of the pine family
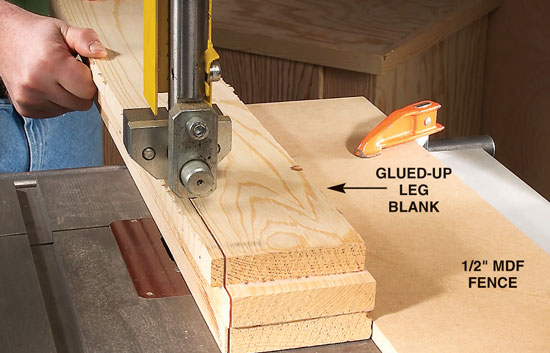
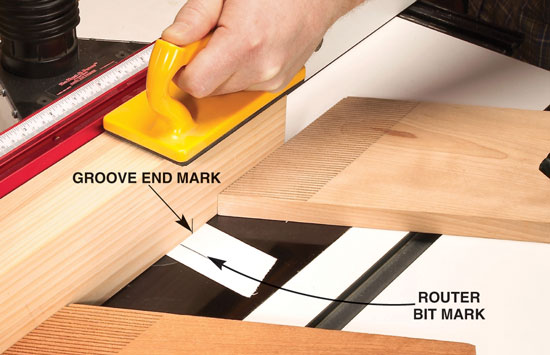
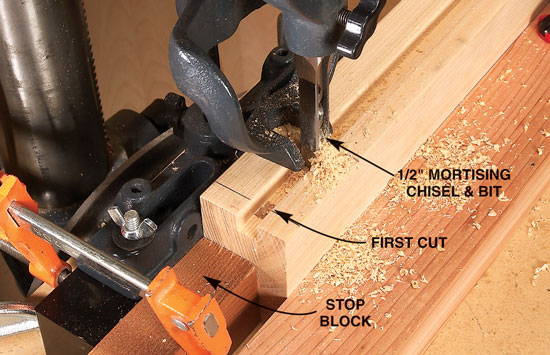
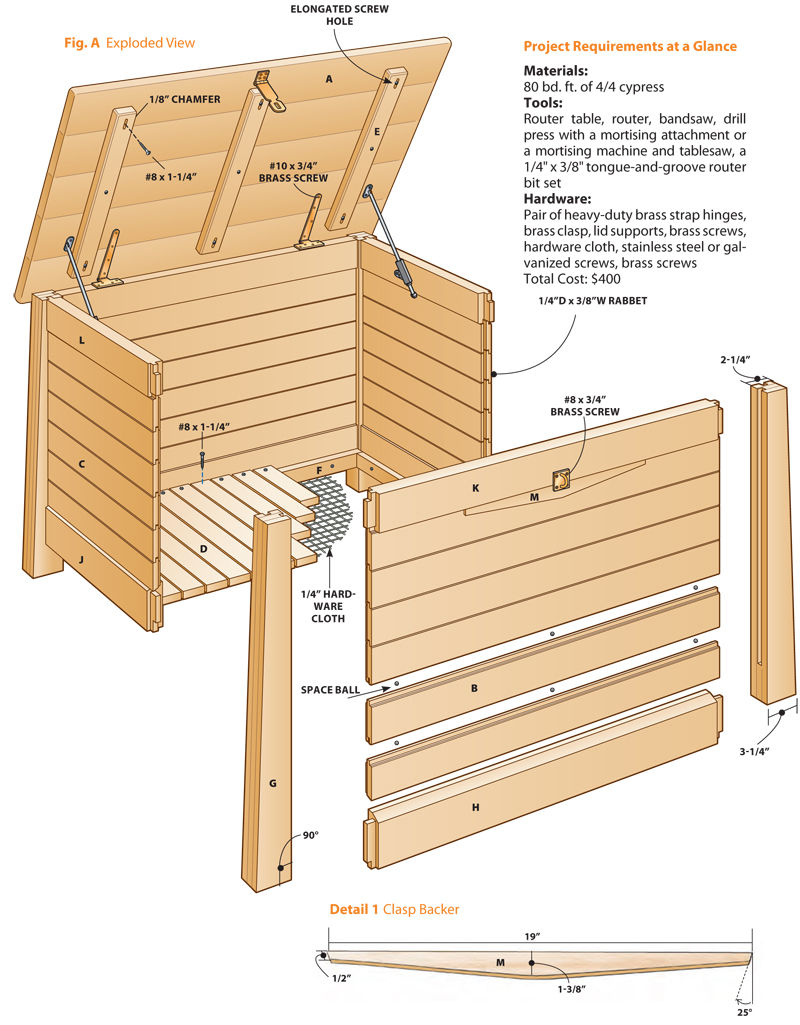
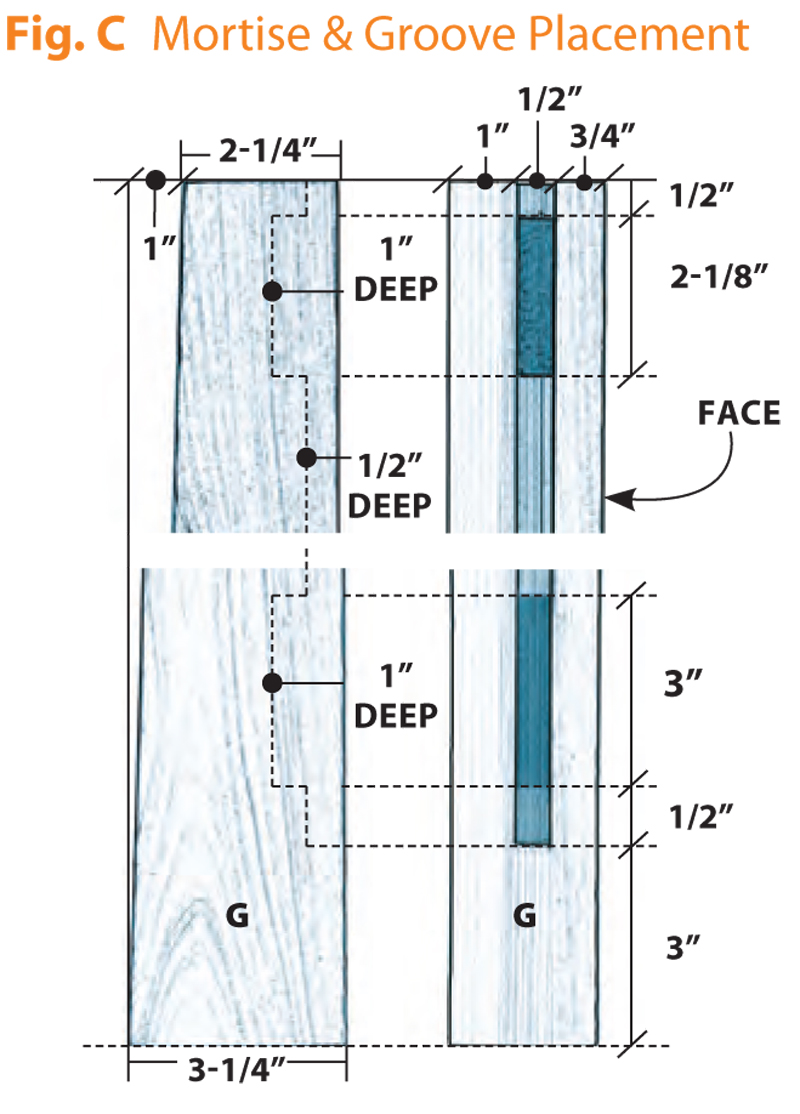
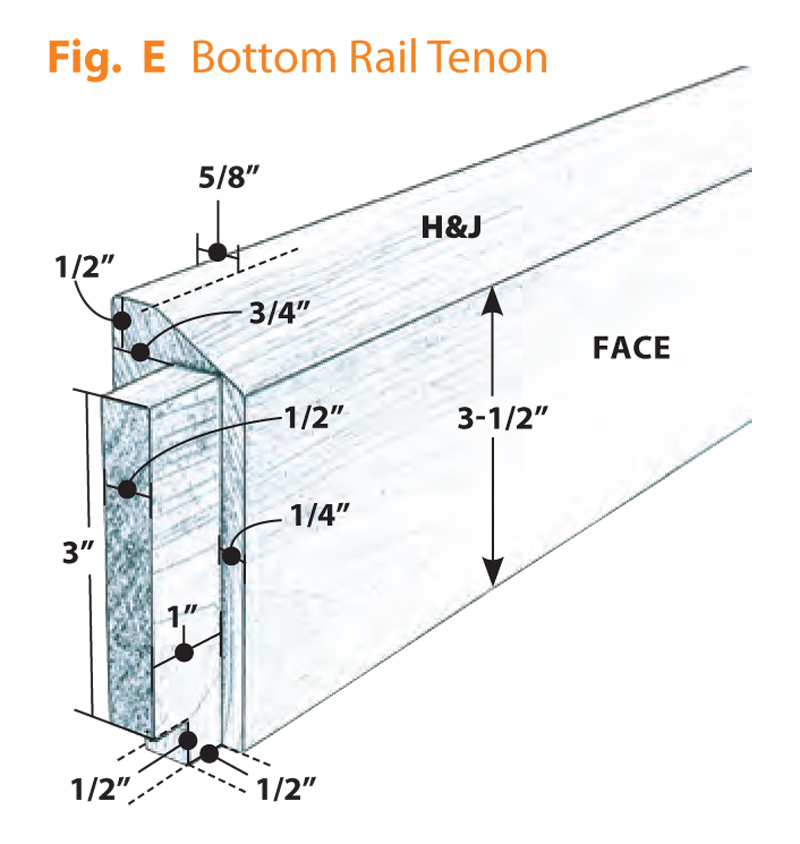
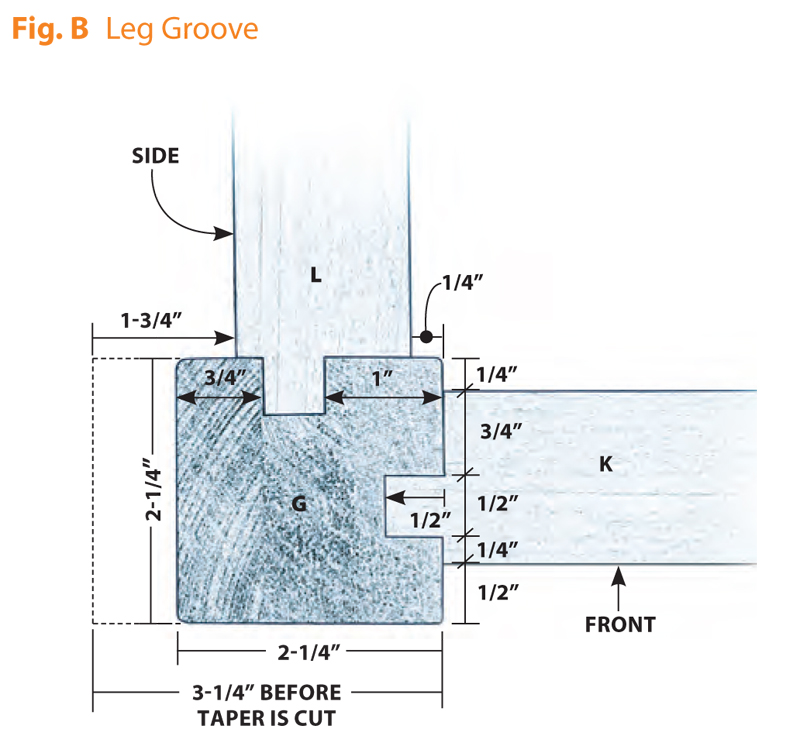
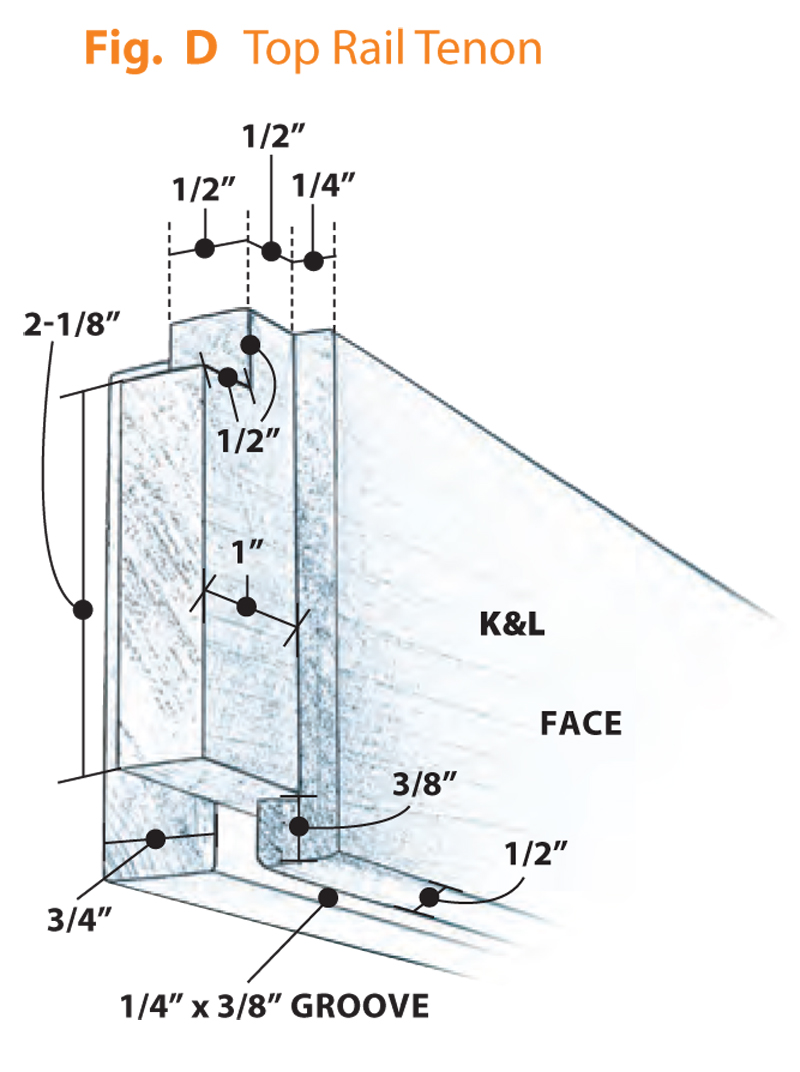
Build the Legs and RailsIf your lumber is kiln-dried and your chest will be kept outdoors, I recommend stacking your lumber in a covered area outside for several weeks before you build. Kiln-dried cypress will have around 8% moisture content; you can expect it to stabilize around 12% after it’s been outside. 1. Sort your wood and select the best-looking pieces for the lid (A) and front panel (B). Rough-cut your stock according to the Cutting List (see page 7), but leave 2. Use a waterproof glue, like Titebond III, to face-glue three pieces of 3/4" stock for each leg (G). Glue up two pieces for the rail stock (H through L). Make an extra leg 3. Trim the leg blanks to size after the glue has dried (Photo 1). Don’t cut the tapers yet. The grooves and mortises are cut while the leg blank is still square. 4. Lay out the groove location and the taper (Figs. B and C, page 5) on each leg. Position the legs on your bench just as they’ll be on the chest to make sure you’ve got everything oriented correctly. 5. Cut the stopped grooves on each leg (Photo 2; Fig. B). It takes two fence settings to complete the two grooves. The 6. Use a 1/2" chisel to square the corners where each routed groove ends. 7. Head to the drill press to cut the mortises (Photo 3; Fig. C). The mortise is really just a deeper part of the groove that accepts the tenon. 8. To finish machining the legs, cut the taper on the bandsaw. This can easily be done freehand. Use a 1/2" or wider blade and follow the line carefully. Sand the sawn surface smooth. Note: Save the offcuts to use as clamp pads during assembly. 9. Now that the legs are finished, turn your attention to the rails. Lay out the tenons (Figs. D and E, page 5) on each end and cut them on the tablesaw. Use a test piece to check the fit of the tenons in the leg grooves. Shoot for a snug fit accomplished without a mallet. 10. Lay out and cut the tenon haunches on the bandsaw (Photo 4). 11. Dry-fit all the legs and rails to ensure all goes well at assembly. If a tenon bottoms out in the mortise before the joint is tight, trim 1/16" off the tenon length. It’s a good practice to put a slight chamfer on the tenon’s ends to help it slide into the mortise.
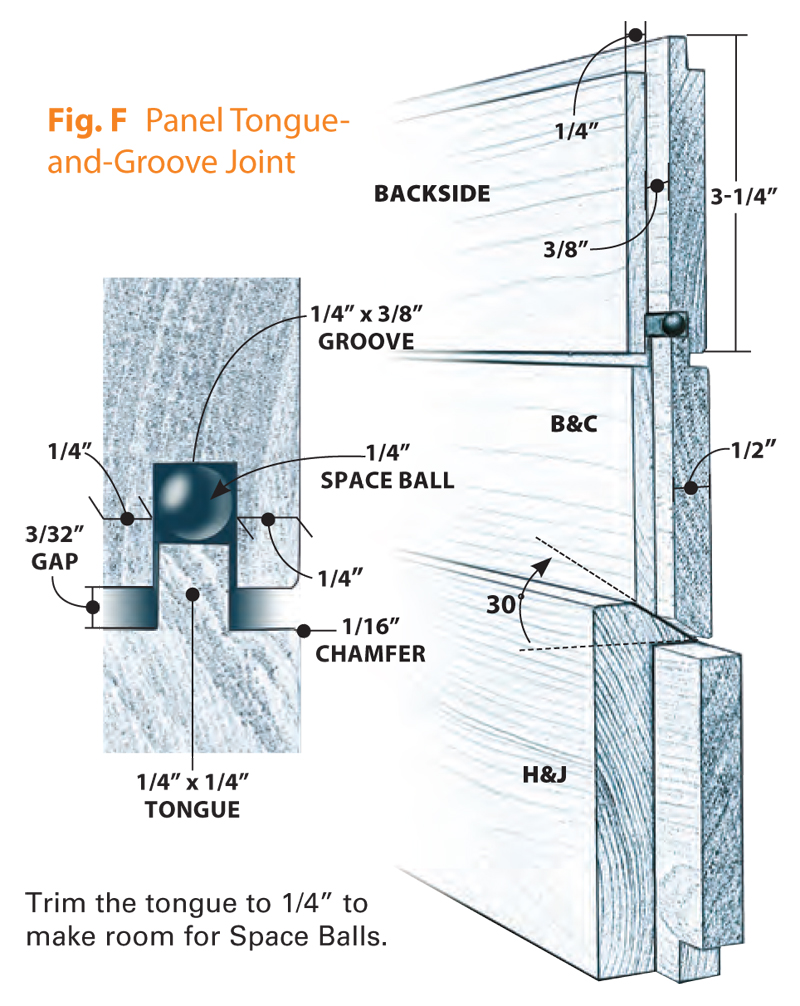
Machine the Panel12. Machine the tongue-and-groove joints in all the panel pieces (Photo 5; Fig. F, page 6). 13. Don’t forget to machine the groove in the bottom of the upper rail (Fig. D) and to put a 30° bevel on each bottom panel board where it mates with the 30-degree bevel on the bottom rail (Fig. F). 14. On the tablesaw, shave 1/8" off the length of each tongue. This is necessary to make room for the Space Balls (see Sources, page 7) that fit between each tongue-and groove panel board. Cypress is a stable wood, but it still moves, and these panels are trapped in their frames. Space Balls are like little rubber blueberries that keep an even gap between the boards but allow for seasonal expansion and contraction of the wood. 15. Cut rabbets on the ends of each panel board so they fit snugly into the leg grooves (Fig. F).
Assemble the Chest16. Sand all the box parts through 120 grit. 17. Assemble the two end panels with waterproof glue and clamps (Photo 6). 18. After the two end panels are complete, assemble the rest of the chest in the same fashion. Set both front and back rails and panels into one end panel, add the second end panel and clamp. Be sure to check that your assembly is square.
Build the Lid19. While the glue dries, edge-glue the boards for the lid. Take care to align each board flush. It’s best to glue one board at a time for this operation. 20. Sand the top to 120 grit. 21. Cut the battens (E) and chamfer the outside edges (Fig. A, page 4). 22. Predrill countersunk holes in each batten on the drill press. Note: Be sure to elongate the screw holes on the ends of each batten to allow the lid to expand and contract (Fig. A). 23. Attach the battens to the lid with screws.
Install the Bottom24. Cut the hardware cloth and screw it onto the bottom of the deck cleats. 25. Cut the deck cleats (F) and install them with screws along the bottom edge of the bottom rails (Fig. A). 26. Cut the decking (D) to fit. Predrill countersunk holes in the ends of each deck board and attach to the deck cleats
Add the Hardware27. Mount the hinges on the chest (Photo 8). 28. Glue the clasp backer (M) to the upper panel board and add the clasp (Fig. A, Detail 1). 29. Position and attach the lid closers. 30. I painted the bottom of each leg with a couple coats of two-part epoxy. This seals the leg ends and keeps them from wicking up any moisture. This is especially important if the chest sits on a concrete or 31. You may choose to leave the wood raw. Cypress will age to a beautiful silver-gray color. If you want to preserve the color, look at some of the outdoor finishes designed for decks. Just remember, these finishes require frequent maintenance to keep their good looks. If you plan to put the chest in an enclosed porch, you’re free to use your favorite finish.
Sources(Note: This information may have changed since the story's original publication date.) Steve Wall Lumber Co., walllumber.com, 800-633-4062, 80 bd. ft. of 4/4 cypress, $3 per bd. ft., $240. Lee Valley Tools, leevalley.com, 800-871-8158, Pair of 4" x 8" brass T-hinges, #01H14.30, $62; 1-1/8" x 4" brass safety hasp, #01H15.04, $24; Two pairs of flap stays, #00U06.01, Mcfeely’s, mcfeelys.com, 800-443-7937, Space Balls, 100 pack, #PBS-1000, $6; 8 x 1-1/4" No-Co-Rode flat-head screws, 100 pack, #0812-FCT, $7; 8 x 5/8" No-Co-Rode self-drilling washer-head Bolt Depot, boltdepot.com, 866-337-9888, 10 x 3/4" brass flat-head screws, #1857, $.20 ea. or $12 for box of 100. MLCS, mlcswoodworking.com, 800-533-9298, One tongue and-groove assembly, 1/2" shank, #7844, $35; 1/4" shank, #5544, $35
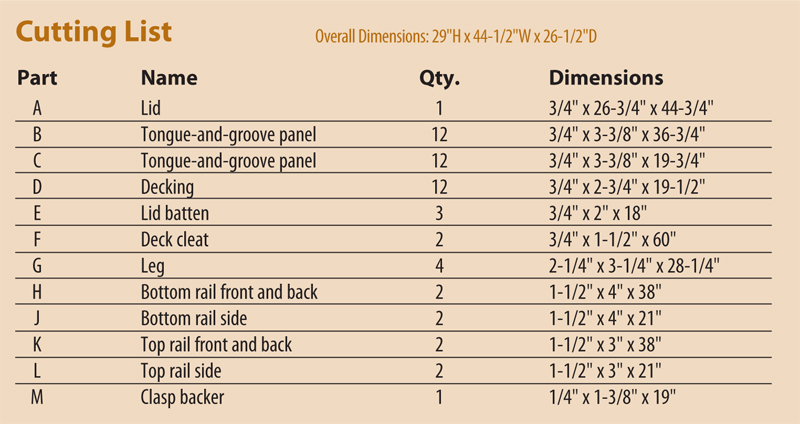
Cutting List
|
Click on each image to see a larger version.
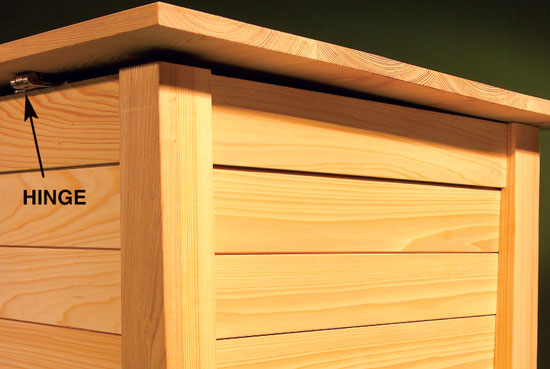
The top sheds rainfall because the lid has a broad overhang and its hinge creates a gentle slope.
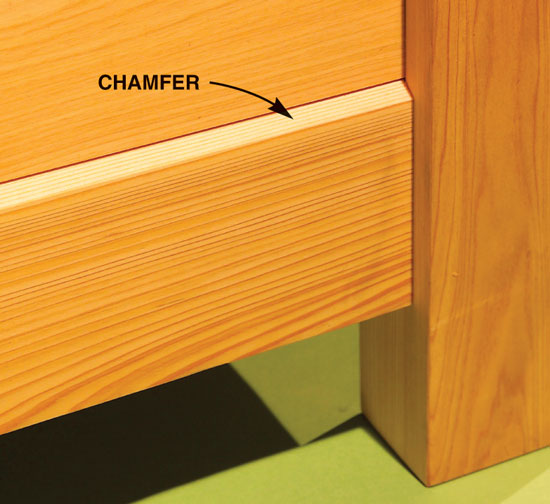
A chamfered bottom rail prevents rainwater from
A deck-like bottom with gaps between the boards
1. This entire project, even its stout legs, is built with rot-resistant cypress, a lightweight, weatherproof wood. To make the leg blanks, glue three pieces together and cut the stack on the bandsaw. Guide the cut with a 1/2" tall fence that will contact only the bottom board.
2. Rout stopped grooves to house the panels and the rail’s tenons. The grooves are too long to use a stop block. Instead, mark where the groove ends on the edge of the leg. Make another mark on the router table across from the front of the bit. When the two marks meet, stop the router and remove the leg.
3. Cut the mortises on the drill press with a mortising attachment and a 1/2-in. chisel and bit. The groove guides the chisel so you don’t get slightly staggered holes. A stop block ensures each mortise is the same distance from the end.
4. The rails have haunched tenons.The haunch fills the groove made on the router table and strengthens the joint by increasing the glue surface. Cut the tenons on the tablesaw; then bandsaw a notch to create the haunch on each tenon.
5. Cut the panel boards with a tongue-and-groove router bit set. Use a chamfer bit to ease the edges where the boards meet. Featherboards keep the stock flat on the table to ensure straight tongues and grooves.
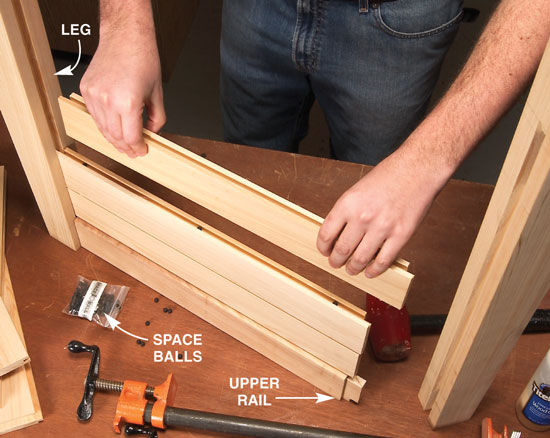
6. Assemble the chest upside down. Glue the top rail into one leg. Then stack the panel boards adding three or four Space Balls in each groove.
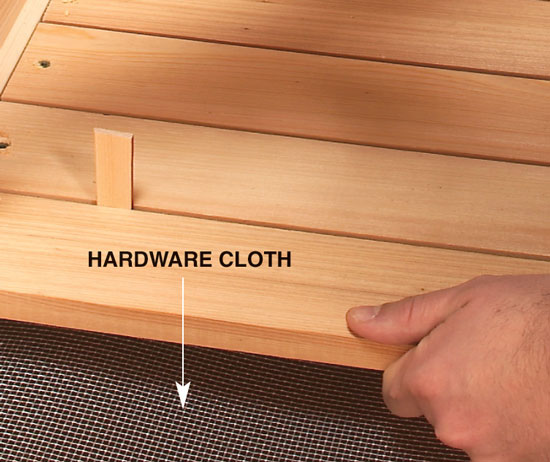
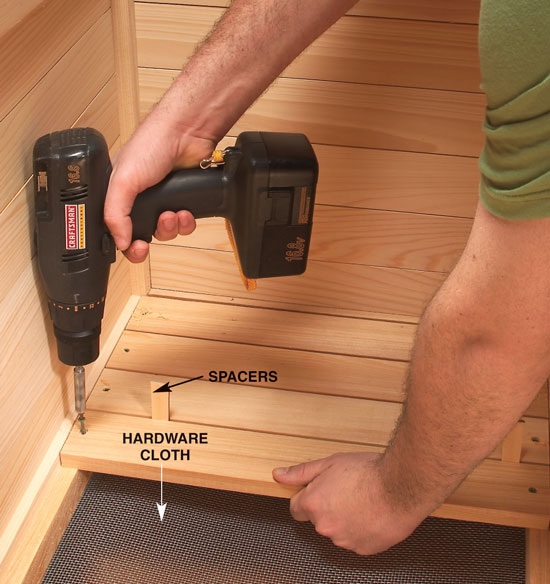
7. Screw down the decking using 1/4" thick spacers to maintain even gaps. Hardware cloth is screwed to the bottom of the deck cleats to keep critters out of your chest, yet allow air circulation.
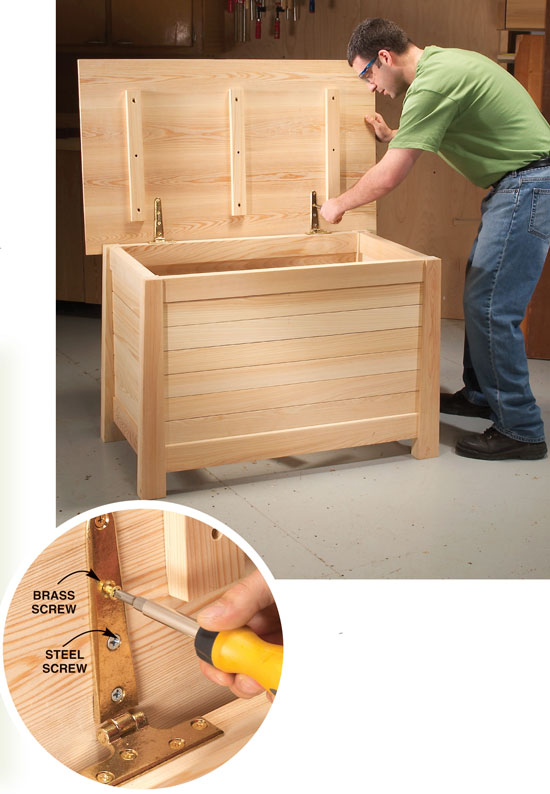
8. Mount the hinges with steel screws first. Then replace them with the brass screws. The steel screws pave the way, making it easier to drive the softer brass screws without breaking them. |


|
Click on each image to see a larger version.
Fig A: Exploded View
Fig. C: Mortise & Groove Placement
Fig. E: Bottom Rail Tenon
This story originally appeared in American Woodworker May 2005, issue #114
|
Click on each image to see a larger version.
FIg. B: Leg Groove
Fig. D: Top Rail Tenon
Fig. F: Panel Tongue-and-Groove Joint
|

Here are some supplies and tools we find essential in our everyday work around the shop. We may receive a commission from sales referred by our links; however, we have carefully selected these products for their usefulness and quality.


