We may receive a commission when you use our affiliate links. However, this does not impact our recommendations.

Contemporary Bookcase
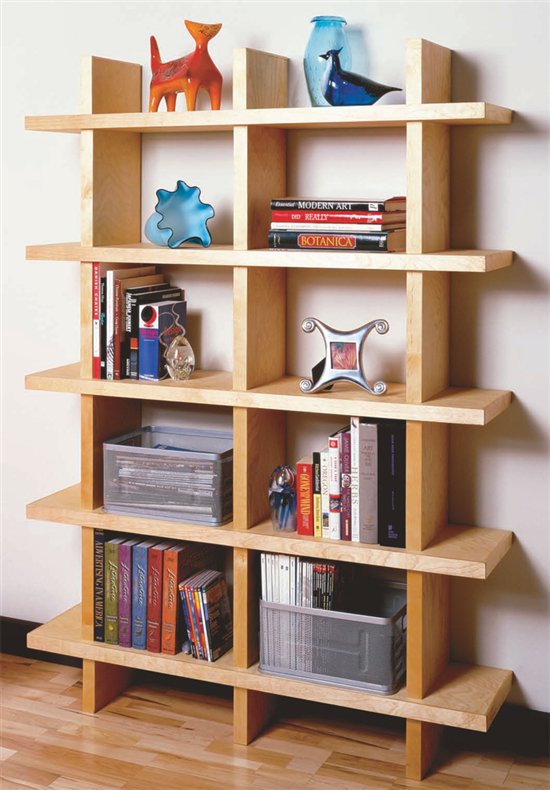
Fresh, clean lines, simple, strong construction, and a design you can modify to fit any room.
By Randy Johnson
The credo of many great 20th century architects was “Form Follows Function.” And for this bookcase, it certainly does. The strong shelves are supported in a straightforward fashion by equally strong uprights. No decoration, no superfluous details, not even a back to mar its perfect geometry.
For you, the woodworker, this bookcase has beauty of a different kind.The joinery is amazingly simple: Long threaded rods are concealed inside the pieces and tie the whole bookcase together. There are no angles to cut, no mortises, no traditional joinery of any kind. And finishing is a breeze because all the parts are finished separately before they’re put together.You can buy all of the wood and hardware at a home center..
For tools you’ll need a tablesaw, dado blade, jigsaw, sliding miter saw, planer, jointer, drill press, hand drill, router and router table. If you don’t have a sliding miter saw for the wide crosscuts (Photo 11) use a tablesaw sled instead.
Laminate the plywood
The backbone of this bookcase is the laminated plywood parts. They make it strong and stiff and give it the look of solid wood. The laminations also provide an easy hiding place for the threaded rods that hold the parts together.
| 1. Cut all the plywood parts oversize. Leave the plywood for the vertical partitions (parts L, M and R) as long panels. The individual vertical partitions are cut to final width and length later.Add 1/2 in. to the width and length of the shelves (parts A) which are also cut to final size later. |
|

|
| 2. Make room for the threaded rods that hold the parts together by dadoing grooves into the backside of the vertical partition panels (parts L, M and R). See Fig. B for the placement of these grooves. When the panels are sandwiched together, these grooves create the holes for the threaded rods. |
|
 |
| 3. Glue together the panel halves for the vertical partitions (parts L, M and R).We glued up all three pairs at once to help keep them flat. This is a big glue up, so use a slow-drying glue. Use 5/16-in.-square wood pegs at both ends to keep the panels aligned. The pegs get drilled out later. Use clamping cauls to protect your plywood. If you don’t have enough clamps, you can precut your panels in half and glue them up as shorter sections. (Use square alignment pegs in both ends of these shorter panels, too.) This is also the time to glue and clamp the plywood for the shelves parts A). |
|


|
Mark and cut the parts
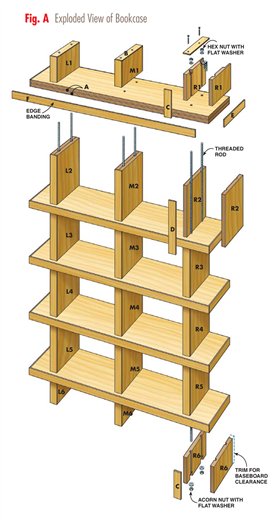
Carefully mark and label the individual vertical partition parts. We used a special labeling system that makes it easy to rematch the grain during final assembly.
| 4. Trim the glued-up panels to final width. Measure and cut carefully so the holes are equally spaced from each trimmed edge (Fig. B). Scrape off any glue drips from the plywood edges before cutting to prevent the drips from hanging-up on the saw fence. Also, this is the time to trim the plywood shelves to final width. |
|
 |
| 5. Label the individual vertical partitions (parts L, M and R) on the long panels.The markings help you rematch the grain during final assembly. Use the letters L, M and R for left, middle and right and number from the top down.The double lines represent the location of the shelves and will be cut away when the sections are sawn apart. |
|
 |
| 6. Rough cut the long panels into two parts so they’re easier to handle and edge band. Use spacer blocks to provide clearance for your jigsaw blade. Your sliding miter saw would also work for this rough cutting. |
|
 |
| 7. Trim the top end of the vertical partitions to final length (parts L1, M1 and R1). Cut the glued-up shelf panels (parts A) to final length at this time also. A sliding miter saw is a great tool for this job because it’s quick and accurate. Prescore the plywood to reduce veneer chipping (see Oops!, below). |
|
 |
Oops!
Don’t let chipped plywood veneer ruin a good day in the shop. Take preemptive action by prescoring the top side of your plywood.Make the scoring cut about 1/8-in. deep on the pull stroke and then, with a return push stroke, complete the crosscut. This reduces or eliminates most veneer chipping. |
|


|
Edge-band the plywood
Edge banding covers the edges of plywood and makes the panels look almost like solid wood planks. Make the 1/4-in.-thick edge banding by resawing 3/4-in.-thick by 1-3/4-in.-wide lumber in half. Remove the saw marks and reduce the stock to 1/4-in. thickness with a planer.
| 8. Edge band the fronts of all the partition-panel sections (parts L, M and R). Overhang the edge banding about 1-in. beyond the top end of parts L1, M1 and R1. This overhang is trimmed after the next step. Use a caul to protect the edge banding and spread out the clamping pressure. |
|
 |
| 9. Attach the top edge banding (part B, Fig. E) with two small trim screws (see Sources, page 108). DO NOT GLUE. Then trim the overhanging front edge banding flush, using a handsaw. |
|
 |
| 10. Flush trim the front and top edge banding on the vertical partitions (parts L, M and R). |
|
 |
| 11. Crosscut all the vertical partitions (parts L, M and R) to final length. |
|
 |
Rout, drill and assemble
Use your router to cut the grooves that house the hidden assembly and mounting hardware. Then counterbore for the nuts and washers and drill the shelves for threaded rods. Assembly is a breeze—just slip the parts together and tighten the nuts.
| 12. Trim off 3/4 in. of the back edge of the bottom partitions (parts L6, M6 and R6).This provides clearance for your wall’s baseboard so the bookcase stands flush against the wall. Make sure to re-label the backs of the bottom partitions (L6, M6 and R6) with their location markings. |
|
 |
| 13. Rout the grooves for the wall-mounting brackets into the top partitions (parts L1, M1 and R1, see Fig. E for details). First remove the top edge banding strips (parts B) and replace them with short pieces of scrap edge banding.These temporary pieces are needed as spacers because the front edge banding overhangs the top edge. They are left short so they don’t interfere when routing the groove. Use a 1-in.-diameter straight bit for the routing. Cut the deeper top groove in two or three passes. |
|
 |
| 14. Drill holes for the assembly nuts and washes. Drill into the center of the square wood pegs that are glued into the panels. Only the top and bottom partitions (parts L, M and R) receive these large holes. |
|
 |
| 15. Ream out the square holes in all of the vertical partitions (parts L, M and R) with a long drill bit (see Sources, below). This removes any dried glue, wood splinters and remaining wood pegs. |
|
 |
| 16. Edge band the shelves (parts A). Start with the ends (parts E) and then add the front edge banding (parts F). Trim any overhanging edge banding with a handsaw and flush trim the long edges with a flush-trim bit in your router. |
|
 |
| 17. Drill holes for the threaded rods in the shelves. Lay out these holes carefully and use a drill press to ensure that the holes go straight through the shelves. See Fig. D for the layout dimensions. After all the parts for the bookcase are fabricated, do a final sanding. Then apply a clear finish of your choice. Finishing prior to final assembly is a lot easier than brushing or spraying all those inside corners once the bookcase is put together. |
|
 |
| 18. Saw the mounting L-bracket and threaded rods to length. The length of the short leg on the mounting angle is not critical, just cut it off about 1/4-in. beyond the first hole. |
|
 |
| 19. Assemble the prefinished bookcase on the floor. Lay the parts on their backs and slide them onto the threaded rods. Start with the bottom partitions and shelves and work your way to the top. The acorn nut at the bottom acts as a bolt head and makes tightening a lot easier. After sliding all the parts together, put a regular hex nut and washer on the top end. Lightly tighten the parts using a socket wrench at each end. The vertical partitions should selfalign, but if you notice one that’s slightly out of alignment, give it a little bump until it’s lined up. When everything is perfectly aligned, do a final tightening. |
|


|
Anchor it to the wall
It’s important to anchor this bookcase (like all tall bookcases) to the wall. The brackets that do the job on this bookcase are totally hidden. In general, bookcases tend to be unstable, and adding books and such can make the situation even worse—once an unanchored bookcase starts to fall, there’s little stopping it. Always anchor bookcases and other tall furniture pieces to the wall, especially if small children are around.
| 20. Mark the inside of the groove on the wall after standing the bookcase against it. |
|
 |
| 21. Attach the L- brackets to the wall with screws and wall anchors (see Sources). Align the top of the L-bracket 5/8-in. down from the top of the pencil marks. |
|
 |
| 22. Screw the L-bracket to the bookcase. If you’re setting your bookcase on carpet you should leave the screw head sticking up about 1/4-in. above the L-bracket. This allows the bookcase to settle into the carpet. Once you’ve secured the L-brackets to the bookcase you can screw the top edge banding strips (parts B) back in place. |
|
 |
Make it big or make it small
| Want to fill your whole wall (even around a window!) with enough storage for a whole library? You can do that!
The shelves of our bookcase can easily be made longer than 8 ft. by staggering the plywood pieces when you glue them together. If you measure carefully you’ll even be able to hide the joints under the vertical partitions. Use a biscuit joint below the window openings to keep the vertical partitions lined up.
Need a small bookcase? No problem. You can make this bookcase smaller, too. You can even edge band both sides of the shelves and use the unit as a room divider. Just be sure to fasten it to the floor.
You can also make it low, with a piece of glass on the top for a contemporary sofa table. For a low design, skip the trim screws in the top edge banding (parts B) and just glue it on. When it comes time to assemble, epoxy the threaded rods into the square holes in the bottom of the top partitions. Then assemble and fasten the parts together, from the bottom, with regular hex nuts.
|
|
 |
Sources
(Note: This information may have changed since the story’s original publication date.)
Woodcraft,
woodcraft.com, 800- 225-1153 Titebond Extend Glue, #140441, $6.99 per pint.
McFeely’s, mcfeelys.com, 800-443-7937
1-5/8″- #7 Square Drive Trim Screws, #0715-TSO, $7.45 for a box of 100; Drywall anchors, #SSA-1000, $2.48 each.
AceTool, acetoolonline.com, 877-783-8899, 5/16″ x 12″ drill bit, #DW1608, $9.83.
Cutting list

This story originally appeared in American Woodworker September 2002, Issue #95.

September 2002, Issue #95
Purchase this back issue. |
|
Fig. A: Exploded View

Fig. B: End View of Vertical Partitions

Fig. C: Layout for Vertical Partition Panels

Fig. D: Drilling Layout for Shelves

Fig. E: Cut-Away Detail of Top Partition

Fig. F: Plywood Layout

|
Product Recommendations
Here are some supplies and tools we find essential in our everyday work around the shop. We may receive a commission from sales referred by our links; however, we have carefully selected these products for their usefulness and quality.


