|
A trim router is a precision tool—if it’s
tuned up correctly. Tuning corrects two
common problems: an uneven cut and a sticky base.
By an uneven cut, I mean a roundover, chamfer or
molding that’s deeper on one side of a top than on
another. If you’re routing a roundover with a router
that’s not tuned, one side may be perfect, but another
side may have an unwanted fillet (see photo, above). A difference as small as 1/64 in. in the depth of
cut can be troublesome. You can work around this
problem by rotating the router as you go around the
top—that is, always keeping the same side of the base
on the top. The trouble is you must then remember
which side is which, so it can be easy to foul up.
The uneven-cut problem has two causes. First,
your router’s base and baseplate may not be flat. This
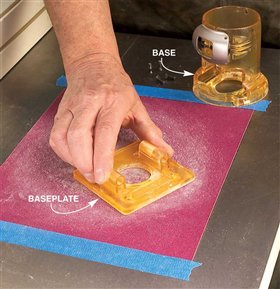
is easy to fix: Lap them both on sandpaper (Photo 1).
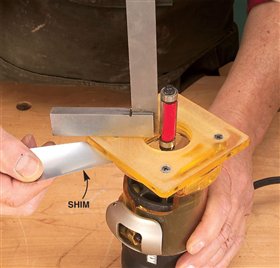
Second, the baseplate may not be square to the bit. A
few shims can solve that (Photo 2).
The sticky-base problem makes it hard to achieve a
precise depth-of-cut setting. On many trim routers,
you slide the base up or down the motor housing to
set the depth of cut. Sliding the base in a smooth
motion can be difficult or impossible, however. Some
bases stick and slip in a herky-jerky fashion.
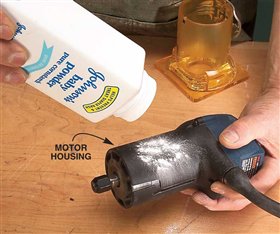
Lubricating the base makes it slide much easier
(Photo 3).
|
|
Click any image to view a larger version.

1. Flatten the base and baseplate. Begin tuning your trim router by examining its base and
baseplate. Unscrew the baseplate and try to rock both parts
on a flat surface. If they don’t sit flat, your depth of cut will
change as you go around a top. Tape a sheet of 120-grit
sandpaper to the top of your tablesaw and sand the baseplate’s
top and bottom sides until they are flat. Sand the
base flat, too.

2. Square the baseplate. A flat baseplate should be absolutely square to the bit. If
it isn’t, you’ll cut deeper from one side of the baseplate than
from another. Put a long straight bit in your router, tighten
the base and use a small square to check the perpendicularity
of the bit to the baseplate. If one or more sides is low,
loosen the baseplate and insert a metal or paper shim
between the base and baseplate. Tighten the baseplate and
use the square to check each side.

3. Lubricate a sticky base. Now that your baseplate is flat and square, you’ll want
to be able to precisely slide the base up and down on the
motor housing to set the depth of cut. Remove the base and
sprinkle some talcum powder on the motor housing.
Smooth the powder around until only a thin film remains
and then replace the base. The powder should eliminate any
sticking problem and it won’t harm the machine.
|


