We may receive a commission when you use our affiliate links. However, this does not impact our recommendations.

Tips for
Building Cabinets with Pocket-Hole Joinery
New tools and improved techniques make pocket-screw assembly faster than ever.
By Brad Holden
Many production shops
use pocket-hole joinery
to build cabinets
because it’s fast, easy and efficient.
You don’t need an armload
of pipe clamps. There are
no unsightly face-frame nail
holes to fill. And you don’t
have to wait for glue to dry
before you move on to the
next step.
All these advantages
are a boon to the small
home shop, too. In
addition, pocket-hole
joinery doesn’t require
large, stationary
machinery. Everything
you need can be
stored in a drawer.
Pocket holes are
amazingly simple
to make. All you
need is a drill, a drilling
jig and a special
stepped drill bit.
Kreg Tool Co.,
which specializes in
pocket-hole joinery
systems, has some terrific
new jigs and specialized
clamps I’ll
show you. I’ll also share
some techniques that
make pocket-hole joinery
easier than ever.
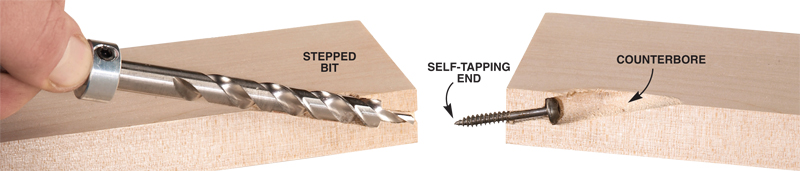
What is a pocket hole?
A pocket hole runs at a 15-degree angle. It’s created
by a stepped drill bit guided by a jig (see Tip 1, below).
The bit’s leading end makes a pilot hole; the rest of the
bit enlarges the pilot hole to accept the screw’s head,
forming a counterbore.
Pocket-hole joinery uses specialized screws. They’re
hardened to prevent the screw from snapping and the
head from stripping out. They have self-tapping ends,
so you don’t have to drill another pilot hole into the
mating piece. Screws with fine threads are designed
for hardwoods. Screws with coarse threads are
designed for softwoods, plywood, particleboard and
MDF. A combination thread is also available for generalpurpose
use. Pocket screws’ heads have a large, flat
bottom to help pull the parts together. |
|
Click any image to view a larger version

|
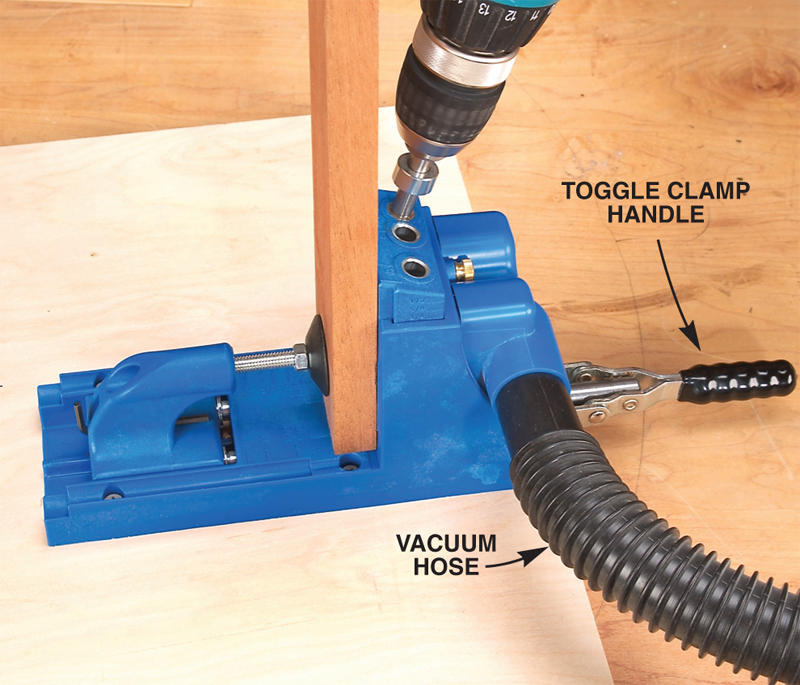
1. Drill holes faster
My favorite new pocket-hole jig has a slick attachment for a
vacuum hose. I can just hear you saying, “Who cares about a
little drilling dust?” Well, I was skeptical, too, until I tried it.
I can drill much faster with the vacuum attached because I
don’t have to remove the bit to clear chips. In addition, the bit
never clogs, and there’s no mess to clean up.
The vacuum attachment is part of the new Kreg K3 Master
System (see Source, below). It’s also available as an upgrade
kit to the Kreg Standard Pack. The Master System has a new
front-mounted toggle clamp that makes setting up a board for
drilling super easy. (The toggle clamp is mounted in the rear
on older Kreg models.) |
|
|
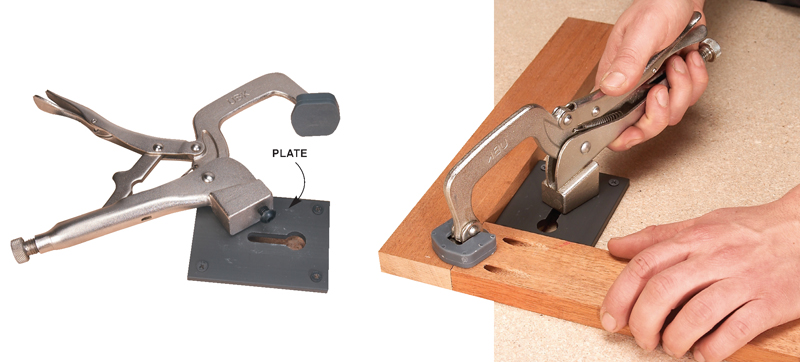
2. Use a bench klamp
Here’s a way to hold parts perfectly even and flat while you screw
them together. It’s the Kreg Bench Klamp, a locking-jaw clamp that
fits into its own special plate (see Source, below). You can surface-
mount the plate on a benchtop or a separate board. This
device provides that third
hand you’ve always
wished for when trying
to hold pieces in
place and screw
them together at the
same time. The edges
of the plate help you keep the
pieces aligned as you screw them
together. |
|
|
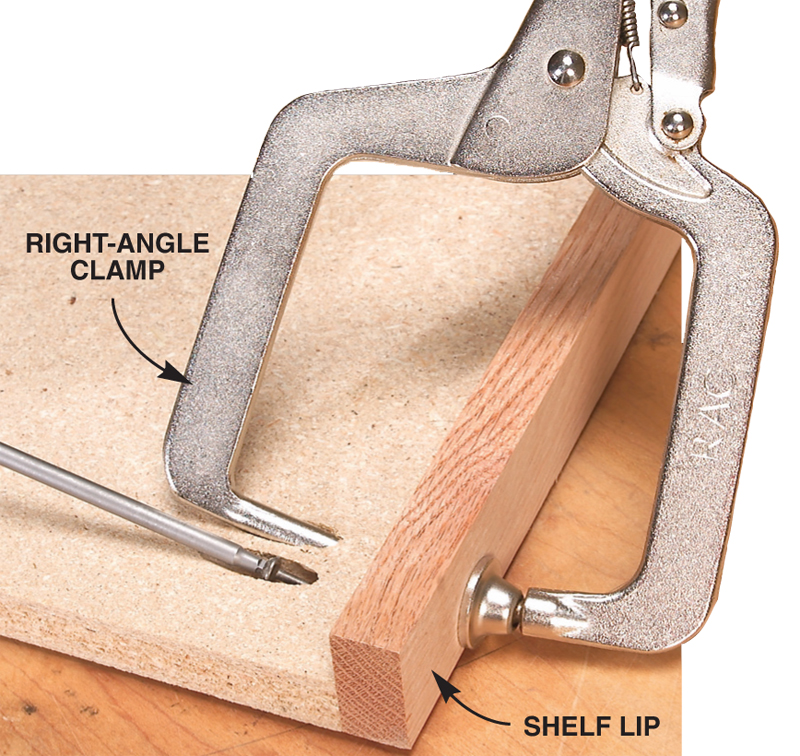
3. Clamp near the screw
When parts have to fit just so—for example, when you’re
attaching a hardwood lip to a shelf, as shown here—it’s best
to clamp as close to the screw as you can. In these situations,
I drill two holes side by side. I put a specialized Kreg Right
Angle Clamp in one hole and drive the screw in the other.
This locking clamp has one round jaw that fits right into a
pocket hole (see Source, below). |
|
|
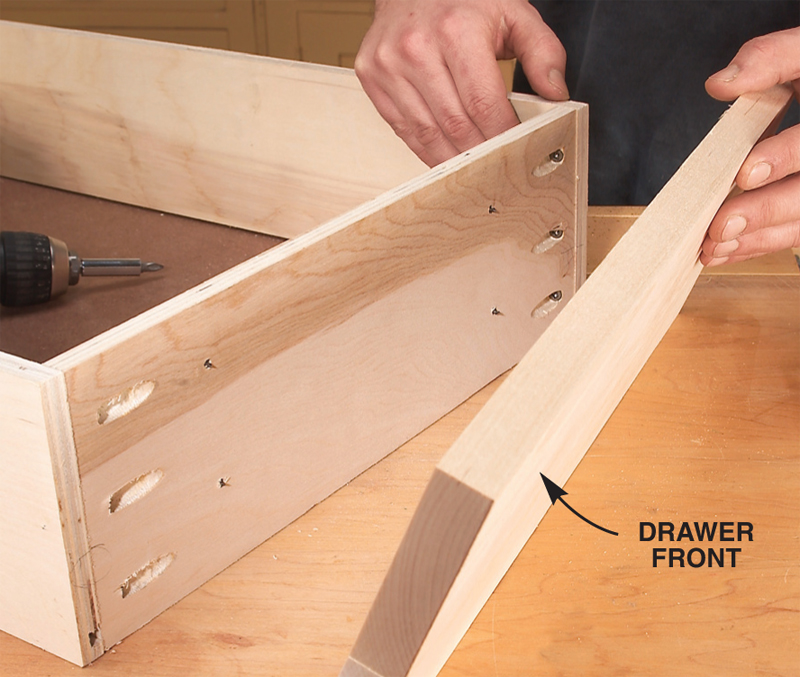
4. Assemble drawers in minutes
Drawer boxes are quickly and easily assembled
using pocket holes. Drill the holes on the
front and back pieces of the box. Then cover
the holes with an attached front.
Use 1-in.-long pan-head screws for 1/2- to
5/8-in.-thick sides. These short screws have
small heads, which dig in an extra 1/16 in.
when you drive them. Set the drilling depth
1/16 in. shallower than you would for longer
screws. |
|
|
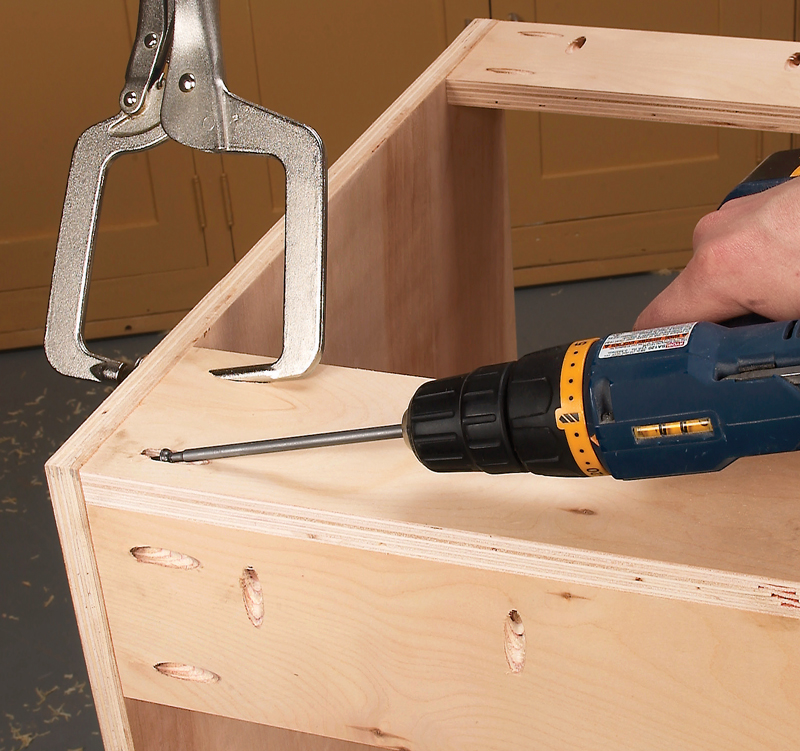
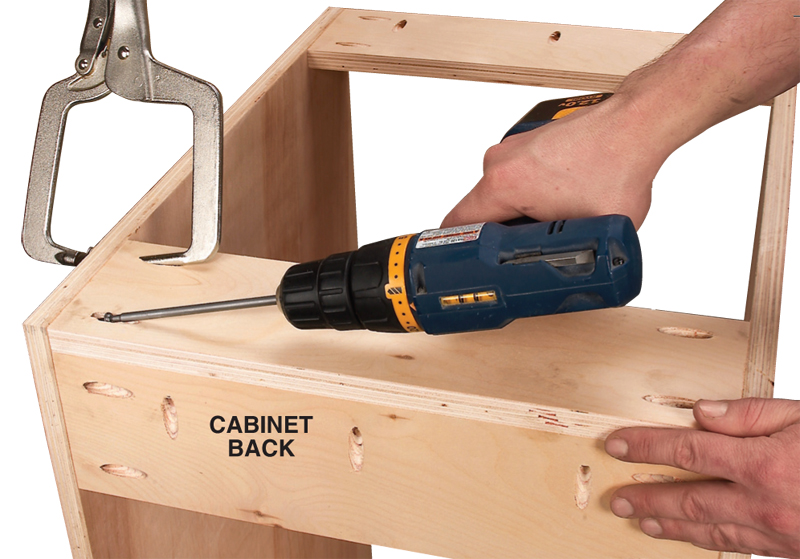
5. Assemble an entire cabinet
You can use pocket screws when you fasten and glue all
the parts of a plywood cabinet, even the top rails. You don’t
have to fumble with pipe clamps or protect the cabinet’s
sides from clamp dents. The only trick is to figure out—in
advance—where the holes will go so they won’t show. |
|
|
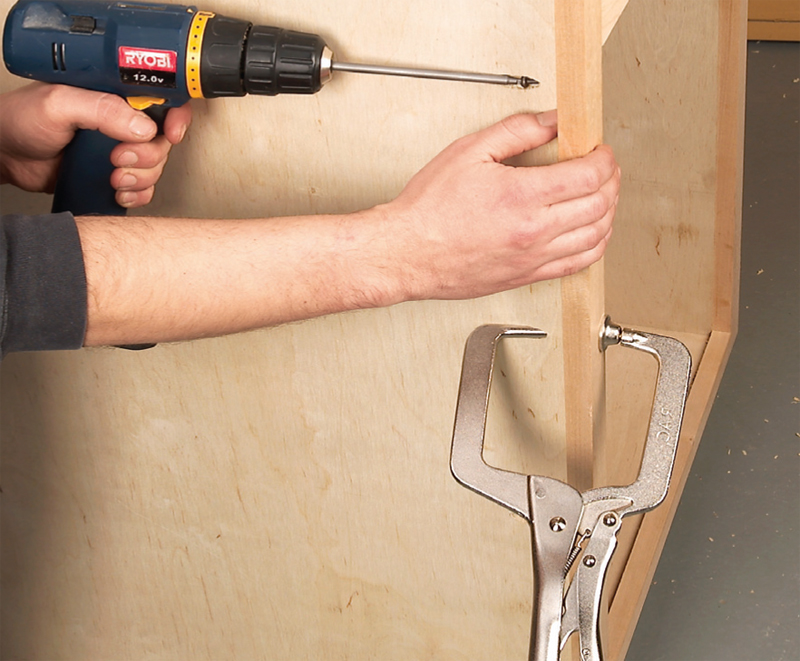
6. Attach a face frame
When you’re using clamps, face frames are a
pain in the neck to glue on a cabinet—you’ll wish
you had three arms! Pocket holes make the job a
lot easier, because the screws do the clamping.
For easier alignment, it sure helps to use a Right
Angle Clamp.
Because this side won’t show when I install the
cabinet, I’m putting the pocket holes on the outside.
On a finished side, drill the holes inside the cabinet. |
|
|
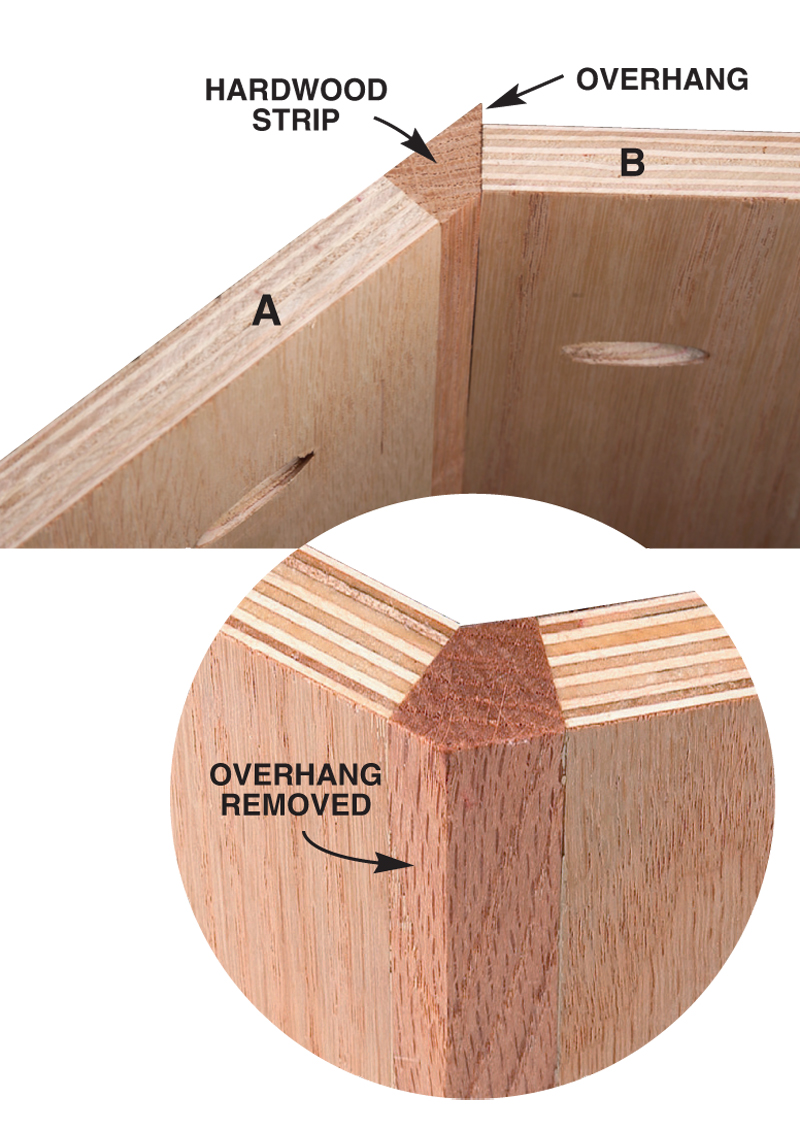
7. Assemble a tricky corner
Slanted corners look great on plywood cabinets, but they are a real
bear to assemble. Where do you put the clamps? It’s much easier to let
pocket screws do the work by drawing the pieces together without
clamps.
This method uses a strip of hardwood, rather than just the plywood
panels, to form the corner. Using a hardwood strip offers two benefits.
First, a solid piece of hardwood is much more durable than plywood
veneer. Second, aligning the parts isn’t as fussy. You plane, rout or sand
the strip’s overhanging point after the joint is assembled (see photo, right
bottom). You can’t do that with plywood.
To make this joint, rip an angled edge on a hardwood strip. The strip
must be at least 1 in. wide for a 135-degree corner. Fasten the strip to
panel A with 1-in.-long pocket screws. Drill pocket holes in panel B and
assemble the corner. Trim the point flush. |
|
|
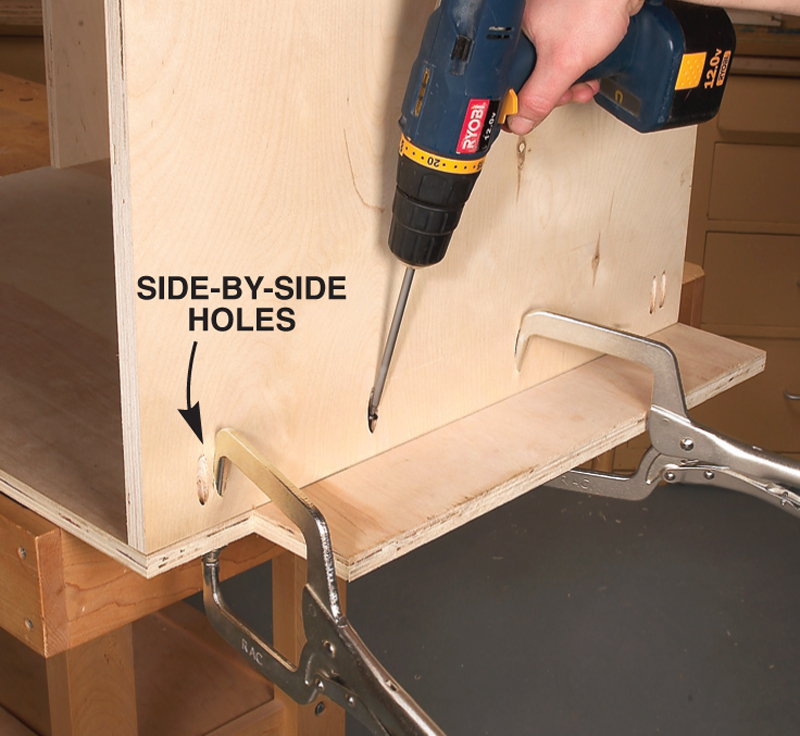
8. Install bottoms and shelves
You don’t have to fuss with dadoes or rabbets when
you use pocket screws to join bottoms and shelves. Drill
holes on the underside to keep them out of sight. I use
two Right Angle Clamps and drill the outer holes in
pairs. During assembly, I work from the outside in. I
align the shelf by putting clamps in the innermost sideby-
side holes, and then put screws in the other holes. |
|
|
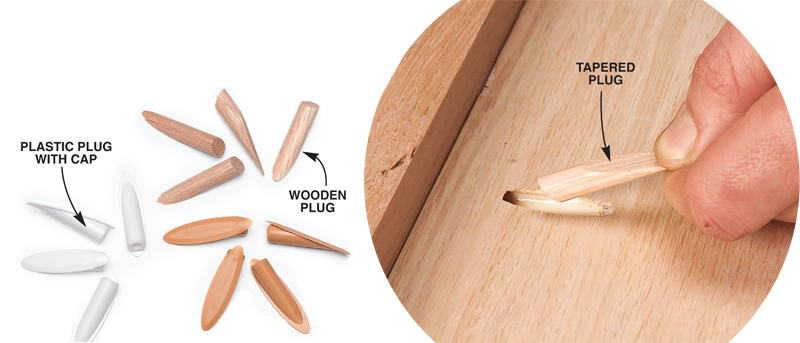
9. If you can’t hide ’em, plug ’em
No doubt about it, a cabinet full of pocket-screw holes doesn’t look attractive. If
the holes will show, you sure won’t want to drill them on the cabinet’s outside.
They should go inside instead, where you can fill them with plugs. Premade
tapered plugs are available in seven different wood species (see Source,
below). Glue them in the holes and sand them flush. For melamine
cabinets, use plastic plugs. Their caps cover the holes so sanding is
unnecessary. You can also use plastic plugs in wood cabinets. |
|
|
Source
(Note: Product availability and costs are subject to change since original publication date.)
Kreg Tool Co., kregtool.com, 800-447-8638, K3
Master System, #K3MS; Standard Pack,
#K3SP; Upgrade kit,
#K3UP; Bench
Klamp, #KBK; Right
Angle Clamp, #RAC;
Solid-wood plugs and caps.
This story originally appeared in American Woodworker July 2006, issue #122.
Purchase this back issue. |
|
|
Product Recommendations
Here are some supplies and tools we find essential in our everyday work around the shop. We may receive a commission from sales referred by our links; however, we have carefully selected these products for their usefulness and quality.