We may receive a commission when you use our affiliate links. However, this does not impact our recommendations.

12 Tips for Better Sharpening
Get better results in
less time with these
great tips.
By Ed Krause
Hand tools are a joy to use, but only when they’re sharp. Just as
learning to walk is the prerequisite to running, successful sharpening
is the key to “unplugged”woodworking.Try these tips and
you’ll be surprised at the strides your sharpening skills take and by
the quiet satisfaction you get from your hand tools.
Homemade Angle Checker
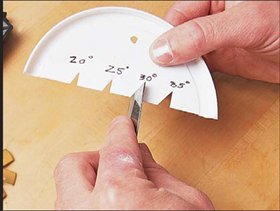
This angle checker, made from a plastic lid, is a simple
(and free) way to check the bevel on your chisels and
planes. It only takes a few minutes to make.
Simply cut a 4- to 6-in. diameter plastic lid in half.
Then, using a protractor,mark the desired angles on a
piece of paper. Cut out the triangles and use them as a
template to mark the angles on the lid.Cut out the angles
on the lid with a pair of scissors.Drill a hole at the top and
hang it on the wall near your grinder. |
|
Click any image to view a larger version.

|
No More Waterstone Mess
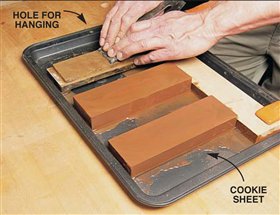
There’s no getting around it—waterstones are messy.
Here’s a simple tip for keeping that mess contained: Pick
up a heavy-gauge, 13 in.by 19-in. cookie sheet (about $7)
at the grocery store, hardware store—wherever. It’s large
enough to easily hold three stones. Use a 3/4-in. board
pushed against the stones and clamp down the board and
the cookie sheet on your bench.When you’re done, just
wipe the cookie sheet dry and hang it on the wall. |
|
 |
Dress for Success
Ever lose your temper? I mean your chisel’s temper.Don’t
get burned by a clogged, uneven grinding wheel.Dressing
your grinder wheels periodically to keep them clean
and flat helps prevent the excess heat that leads to bluing
and loss of temper(s).
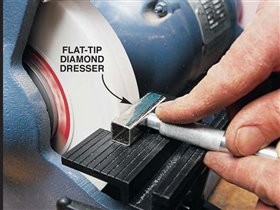
Single-point diamond wheel dressers do a great job but
they’re difficult to use freehand. Try a flat-tip diamond
dresser instead. It has 36-grit diamond stone particles
imbedded in a 1/2-in.wide by 3/4-in.-long face. Simply
place it on your grinder’s tool rest and make contact with
the wheel. |
|
 |
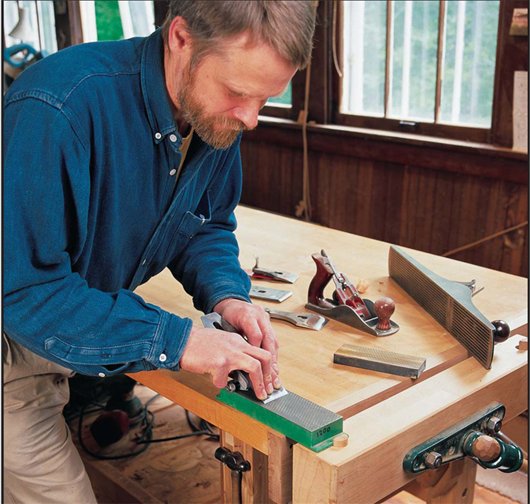
Surefire Scraper Filing
You’ve probably heard other woodworkers talk about what
a great tool the scraper is, but maybe you’ve never had
much luck with one yourself.Using them is easy; getting a
good edge on them is the tough part. The hardest step in
sharpening a scraper is the first one—filing the edge square
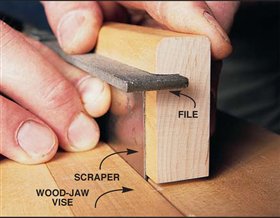
and flat. Start off right with this easy-to-make file holder:
Cut a kerf equal to the thickness of an 8-in.mill file in
a 1-1/4-in. thick by 4-in. wide by 6-in.-long piece of
wood.The kerf should be a little deeper than half the width
of the file.This allows you to set the file at different depths
to avoid dulling it in one spot. Clamp the scraper in a
wood-jaw vise.Push the scraper firmly against the holder
while filing for a perfectly square edge. |
|
 |
Custom Gouge Strop
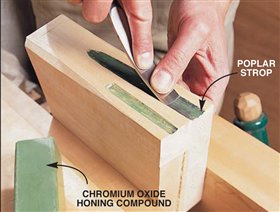
Getting a mirror finish on the contoured profiles of
carving gouges can be a real hassle. The curved surfaces
don’t lend themselves to polishing on a flat stone or
strop.Making a custom strop is easy.Use the chisel to cut
its own contour in a piece of poplar or basswood. Rub
chromium oxide polishing compound in the contour and
you have a custom-made strop. |
|
 |
Easy Knife Sharpening
Don’t keep your sharpening skills confined to your shop
tools. Why not tackle that dull set of kitchen knives
you’ve been crushing tomatoes with? Here’s a great tip:
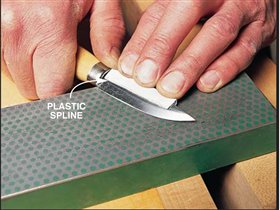
Go to any office supply store and buy one of those looseleaf
folders with a plastic spline (about 40 cents).Cut and
trim the spline to fit over the back of the knife. The
spline raises the back of the knife just enough to put a
consistent bevel on the cutting edge.Now your knives will
glide right through those tomatoes! |
|
 |
Spend Less Time Sharpening
Less time sharpening means more time woodworking. Isn’t
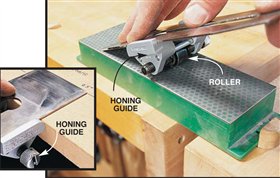
that what we all want? Honing guides get the job done fast,
but setting the blade in the guide to get the right bevel angle
can be time consuming.
Here’s a quick trick:Mark the appropriate blade extension
for each bevel angle on your benchtop,or a wood scrap,
for convenient reference. Hold the edge of the blade to
the desired bevel mark, butt the guide to the edge of the
bench and tighten. The side-clamp honing guide, shown
above, automatically squares the blade and prevents it
from rocking or shifting in the jig. |
|
 |
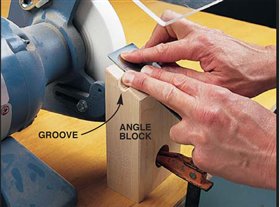
The Right Angle Every Time
Chisels and planes have bevel angles from 25 to 35
degrees depending on their intended use.You can buy a
jig for grinding these angles, or make your own angle
blocks at no cost!
Make one block for each angle. Glue up a block
2-1/2 in.deep by 4-in.wide by 10-in. tall.Mark the desired
angle on the top of one side.Drill a 1-in.hole through the
side of the block at the halfway point of your angle mark.
Then cut the angle on your tablesaw. The remaining
groove makes an excellent guide for your fingers.Cut the
block to length so the top is equal to the center height of
your wheel.To secure the block, drill a 1-1/4-in.hole near
the bottom of the block for a bar clamp. |
|
 |
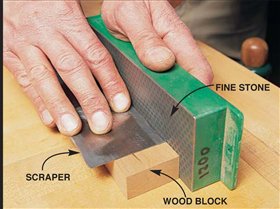
Fine Edge On Your Scraper
The edge left after filing a scraper is a little rough for fine
work. Use a piece of wood to align the scraper when
moving it against the stone and you’ll retain the square
edge you achieved with your file jig.
An extra-fine (1,200) diamond stone is a good choice
for this because the scraper won’t wear a groove in the
stone. |
|
 |
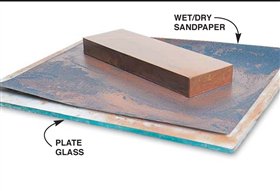
Keeping Waterstones Dead Flat
Waterstones are great for sharpening bench tools, but their soft
binder makes them prone to dishing out and grooving. Fortunately,
flattening them is no big deal.An 11 in. by 12-in.piece of
1/4-in.plate glass and a sheet of 180-grit wet/dry sandpaper provide
a cheap, perfectly flat abrasive surface for flattening all
your waterstones.The glass will cost you about six bucks (be sure
to have the edges sanded) and the wet/dry sandpaper about 70
cents a sheet.Both are available at hardware stores.Use water to
hold the paper on the glass and to flush away the slurry. |
|
 |
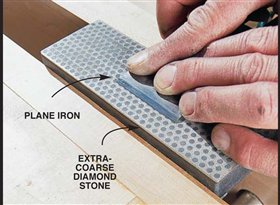
Flatten Blade Backs Fast
It would be great if chisels and planes came from the factory
ready to use, but they don’t. A perfectly flat,mirrorlike
finish on the back is essential for a truly sharp edge.
Flattening always requires a large dose of elbow grease and
patience. The fastest method is to use an extra-coarse
diamond stone. It won’t dish out the way oilstones and
waterstones do and it can easily be clamped in a vise.
Once you have a flat surface, move on to finer stones
until your chisels and planes shine like a mirror. |
|
 |
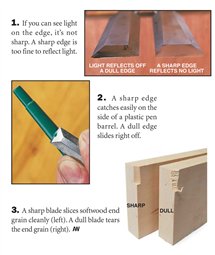
3 Ways to Test for Sharpness

|
|
|
Product Recommendations
Here are some supplies and tools we find essential in our everyday work around the shop. We may receive a commission from sales referred by our links; however, we have carefully selected these products for their usefulness and quality.
