|
One of my favorite tools is a legendary Stanley No. 50
chisel. Made in the 1920s, it had seen hard times.
Restoring it was a labor of love, and well worth
the effort. Its steel holds a long-lasting, super-sharp edge.
No doubt you’ve got some beat-up chisels in your toolbox
that could be revived, too.
I’ll take you through the complete process of
restoring a chisel that’s in tough shape. These steps
are equally useful for a new tool, fresh from the
box. Please notice that I put equal emphasis on
the chisel’s bevel and back. Both must be in
perfect condition, for every sharp edge has
two sides. Let’s begin with the back.
Evaluate the back
Inspect the back by sanding with fine
paper (Photo 1). Put 220-grit pressuresensitive-
adhesive (PSA) sandpaper on a
flat surface, such as a granite surface
plate, 1/4-in.-thick piece of glass, castiron
tablesaw wing or jointer bed (see
Sources, below). Sand the back a few
times using diagonal strokes.
Sanding reveals low spots. With an old
tool, you’ll probably find rust pits, large
hollows or a dip at the leading end.
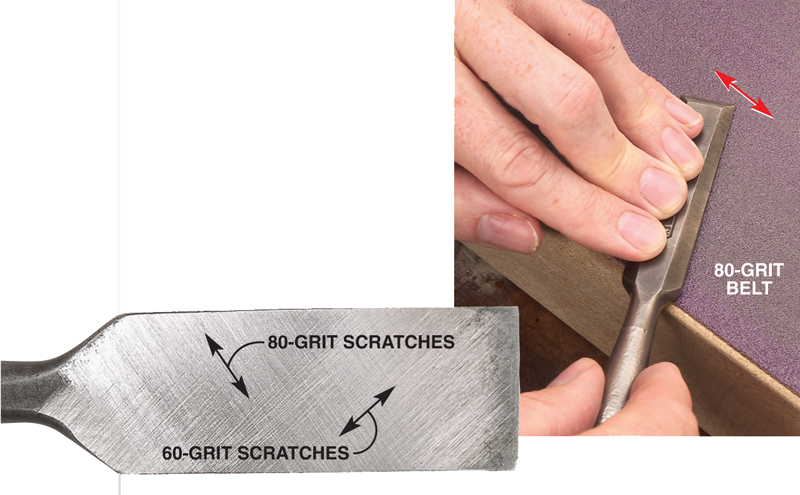
Flatten the back
My chisel’s back looked so bad that I
began flattening with 60-grit paper
(Photo 2). If the inspection sanding
indicates few low spots, begin with a
finer grit. The point is to avoid making
unnecessarily deep scratches. Machinists
call this process lapping. For the coarse work, I use premium-grade sanding belts
stretched tightly on a shop-made jig (see
Sources, below, and “The Lapping Jig,” below). They can be reused many times,
unlike PSA paper. Lapping a back in poor
condition may require many strokes,
which is hard on your hands, so I often
wear rubber-coated gardener’s gloves and
take frequent breaks.
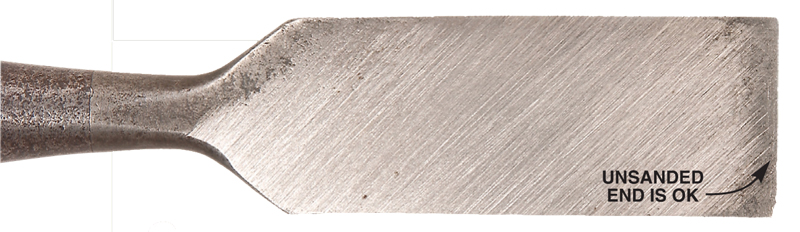
Continue sanding until you reach the
bottom of the low spots. How far up the
back must you go? Two to three inches
are minimum, but I usually lap the whole
back. (A totally flat back enables me to
use guide blocks when I pare mortises,
tenons and dovetails.) If 1/4 in. or less of
the back’s leading end is lower than the
worst rust pits and hollows (and that’s
not unusual), don’t worry about it
(Photo 3). Let it go. It’s too much work to
lap the entire back down to this level.
Instead, you’ll grind off the leading
end later.
Smooth the back
Smoothing the back requires going
through a series of finer grits (Photo 4).
With each one, you must remove all traces
of the scratches made by the previous grit.
How can you tell when that happens? I
change direction with each grit. This
makes coarser scratches easy to distinguish
from finer ones. On the 60-grit paper, for
example, I held the chisel pointed right.
On the 80-grit paper, I pointed it left. It
doesn’t pay to skip grits. If you start with
60-grit, continue with 80-, 100- and 120-
grit papers.
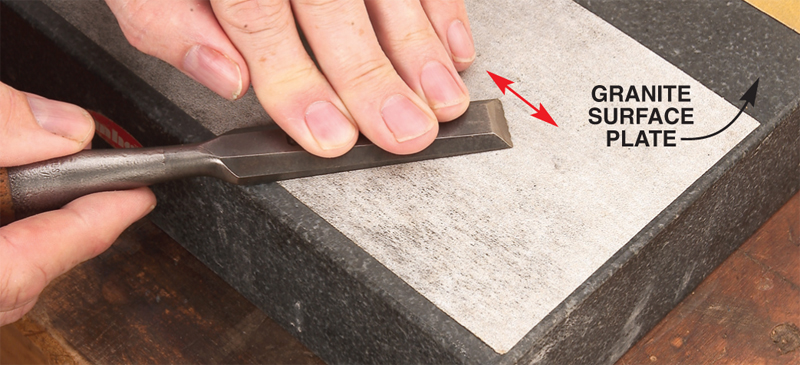
Precision is critical as you continue to
refine the back. After a 120-grit belt, I
switch to 150- and 220-grit PSA paper
(Photo 5). (Fine sanding belts won’t
work because their backing has too
much give. This rounds over a chisel’s
sides.) Mount the PSA paper on an
absolutely flat surface. I prefer a granite
surface plate because, unlike glass, granite
is virtually unbreakable. The granite
also can be stored with sandpaper stuck
to it, which you can’t do when using your
tablesaw or jointer bed as a flat reference
surface.
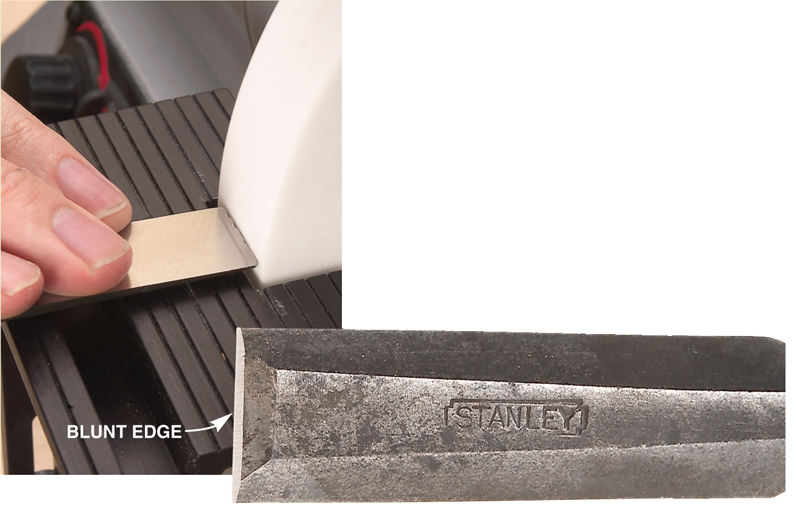
Grind a new bevel
Grind a blunt edge if the bevel
requires major reshaping (Photo 6). This
is the best strategy when the back’s leading
end is low or if the bevel is heavily
nicked or out of square. The blunt edge
should be square to the chisel’s sides.
Draw a pencil line across the back to
guide your grinding. Continue to grind
until you’ve removed all the low spots.
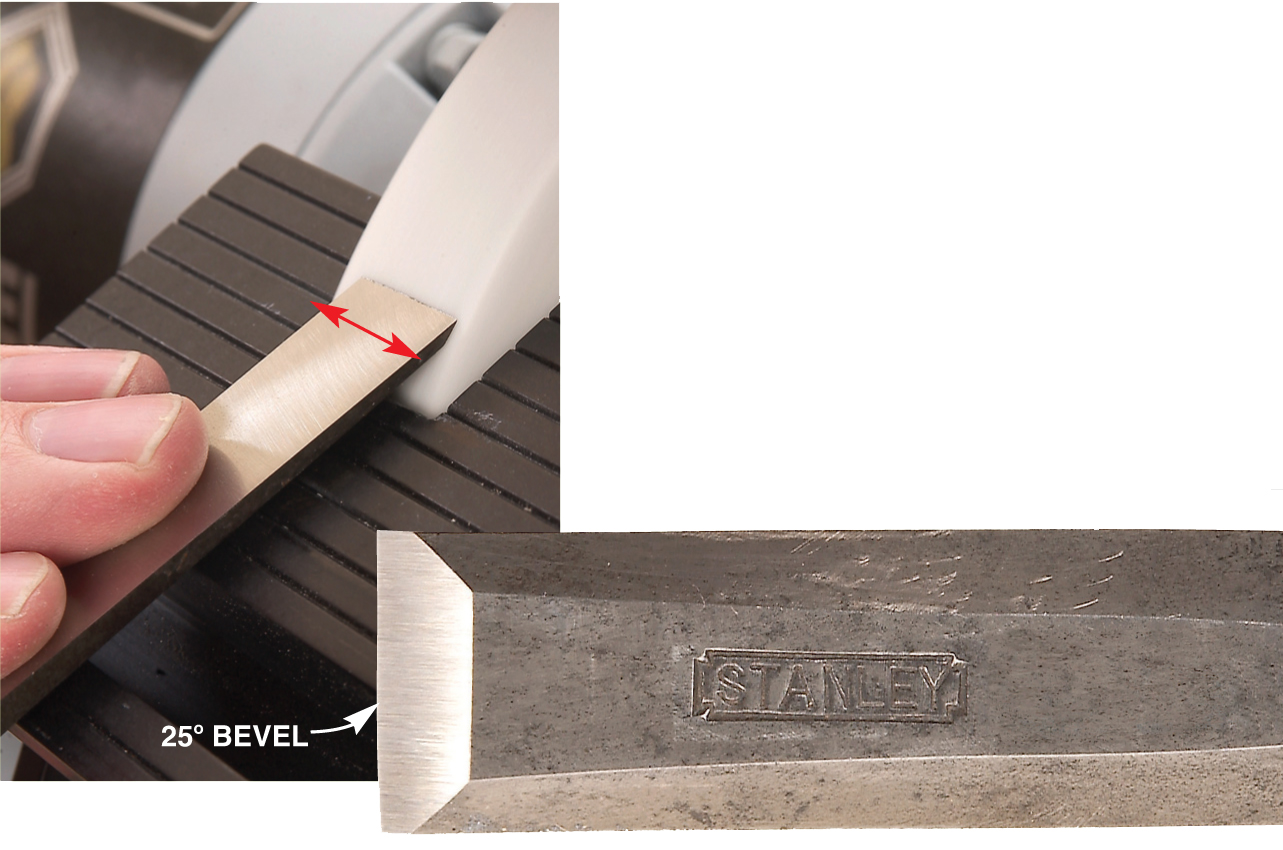
Adjust the tool rest and grind a
25-degree bevel (Photo 7). Go right up to
the leading end. The bevel doesn’t have to
be perfectly straight, but a straight end is
easier to hone than a crooked one.
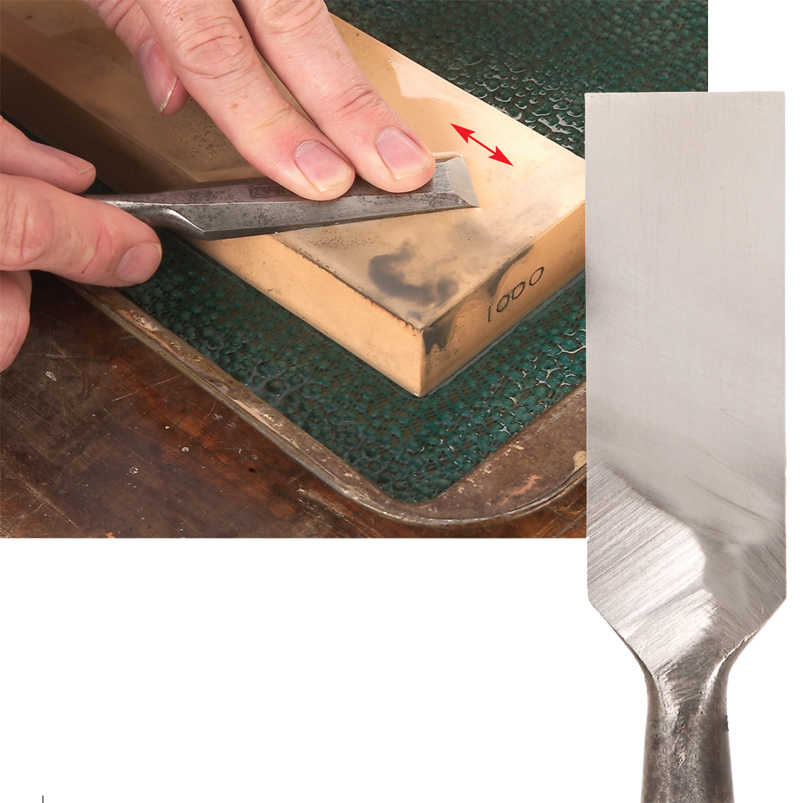
Polish the back
Continue lapping the back by polishing
it on your sharpening stones (Photo
8). Your goal is to achieve a mirror surface,
but you can’t get there in one step.
I use three waterstones: medium (800 or
1,000 grit), fine (1,200 or 2,000 grit) and
super-fine (4,000, 6,000 or 8,000 grit).
Begin with a medium stone, but first
make sure it’s flat.
A medium stone won’t create visible
scratches. Instead, you’ll get a very dull
shine. This should extend all the way
across and 1-1/2 in. to 2 in. up the chisel’s
back.
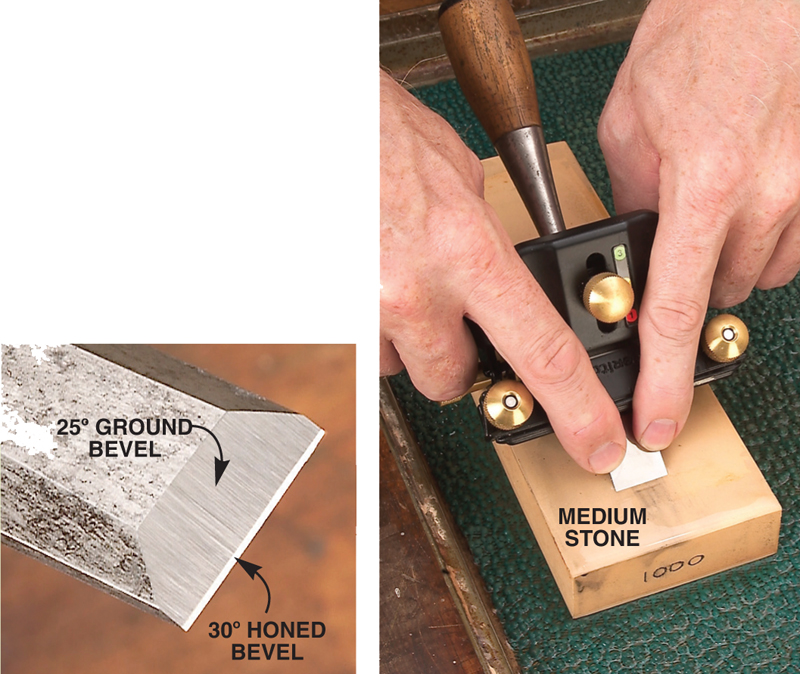
Hone the bevel
Begin honing the bevel on the medium
stone (Photo 9). I prefer the Veritas Mk.
II honing guide because it’s easy to set up
and handles a wide variety of chisels (see
Sources, below). Place the chisel in the
guide at the correct projection to hone a
30-degree bevel. This is 5 degrees steeper
than the ground bevel, so you’ll only be
sharpening the leading edge. Creating
two bevels saves time and effort.
Hone until you feel a wire edge along
the chisel’s back (Photo 10). This small
metallic ridge must extend all the way
across, from corner to corner. A wire edge
is the best indication that the honed bevel
and the back meet, creating a sharp edge.
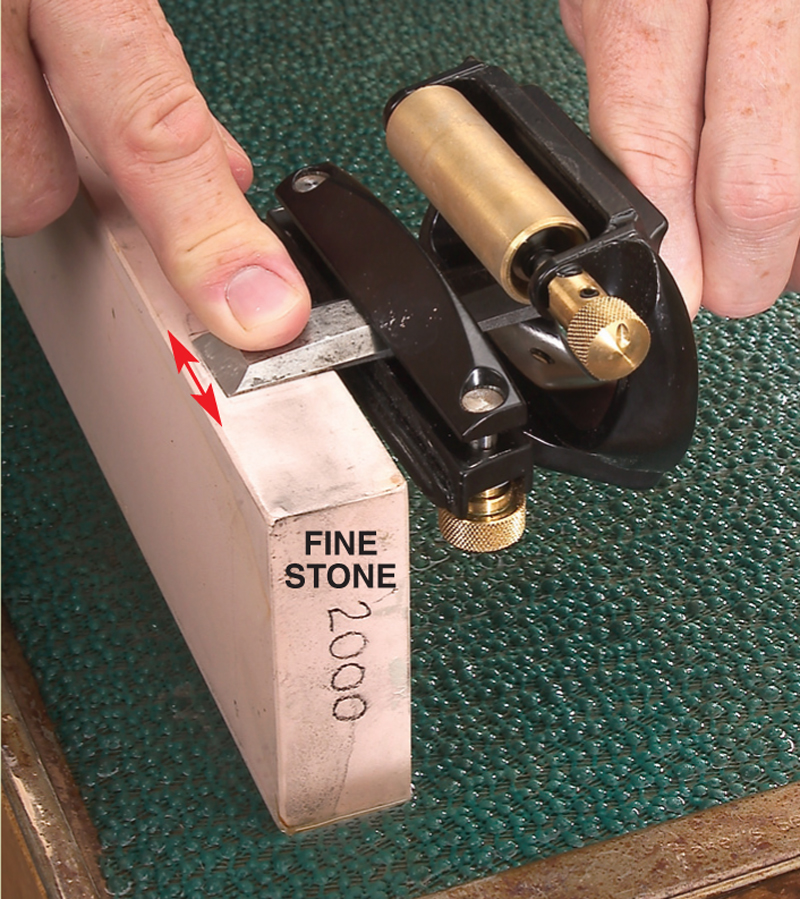
Remove the wire edge on a fine stone
(Photo 11). Polish the back until you can
no longer feel a ridge. (After your tool has been restored, you should only
remove its wire edge on your super-fine
stone.) Keep polishing the back until it’s
evenly shiny.
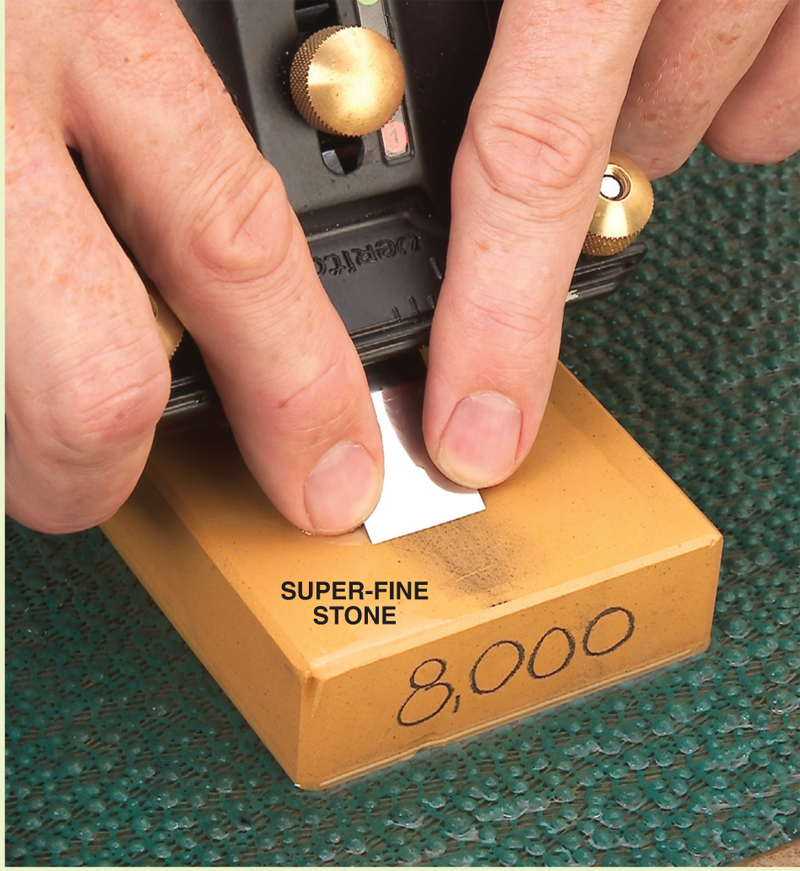
Hone the bevel on a super-fine stone
(Photo 12). With the Mk. II honing
guide, you can increase the bevel angle
by 2 degrees to save time honing on the
super-fine stone. This creates a narrow
microbevel. A microbevel isn’t necessary
on a freshly ground chisel, but after a
number of sharpenings, the 30-degree
bevel will grow quite wide. At this point,
honing a microbevel on the super-fine
stone makes sharpening more efficient.
Most times, you won’t be able to feel a
wire edge develop while you’re using a
super-fine stone. The best strategy is to
hone six strokes or so, flip the chisel and
polish the back six strokes. Repeat this
process three or four times.
Inspect the edge before you remove
your chisel from the honing guide.
Catch the reflection from a light or window.
You should see a bright line extending
to the leading end from tip to tip. If
you see a dull line at the leading end,
you haven’t honed enough on the superfine
stone. If everything looks OK,
remove the chisel from the guide and
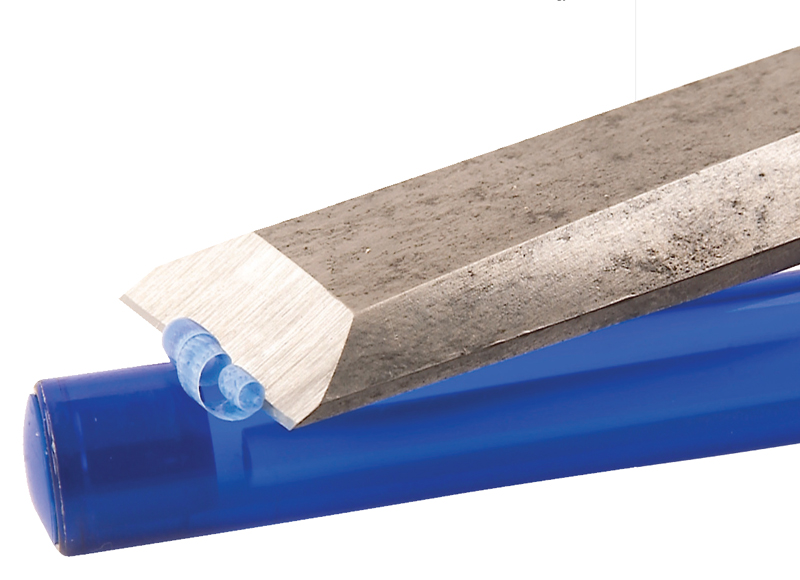
test it on the barrel of a pen (Photo 13).
You should be able to hold the chisel at a
very low angle and make a curl. Now
that’s sharp!
Sources
(Note: Product availability and costs are subject to change since original publication date.)
Grizzly Industrial, grizzly.com, 800-523-4777,
Granite surface plate, 2 in. x 9 in. x 12 in., #G9649.
Klingspor, woodworkingshop.com, 800-228-0000,
Premium sanding belts, available in many sizes and grits.
Lee Valley, leevalley.com, 800-871-8158, 150-grit
PSA sandpaper, 30-ft. roll, #68Z72.04; 220-grit PSA sandpaper,
30-ft. roll, #68Z72.06; Veritas Mk. II honing guide,
#05M09.01.
This story originally appeared in American Woodworker November 2006, issue #125.

November 2006, issue #125
Purchase this back issue.
|
|
Click any image to view a larger version.
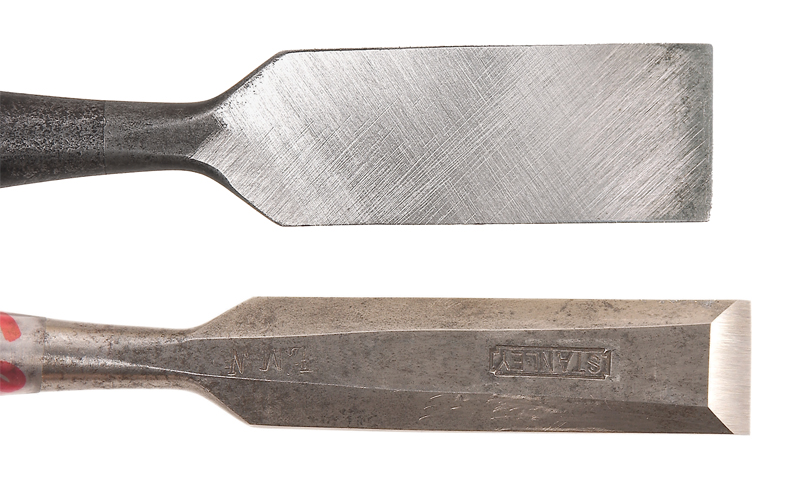
1. An old chisel usually needs lots of help. Lightly sanding the
back reveals hollow spots, rust pits and a rounded-over or
low leading end. This chisel’s bevel is also chipped and uneven.
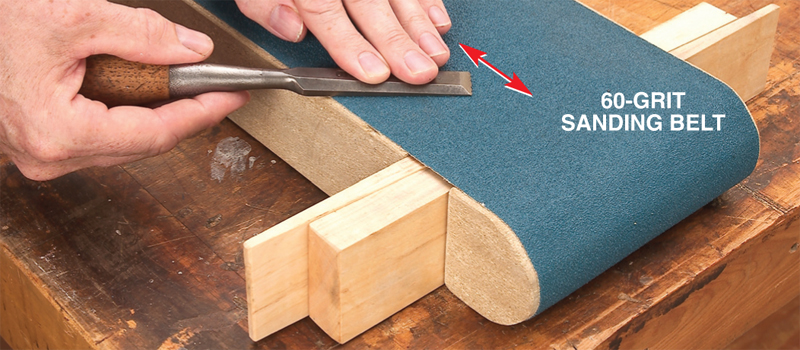
2. Flatten the back on sandpaper using heavy pressure and
diagonal strokes. I prefer to work on a 6-in. x 48-in. sanding
belt. It’s easy to reuse and lasts a long time. The belt is stretched
taut on a shop-made jig (see “The Lapping Jig,” below).
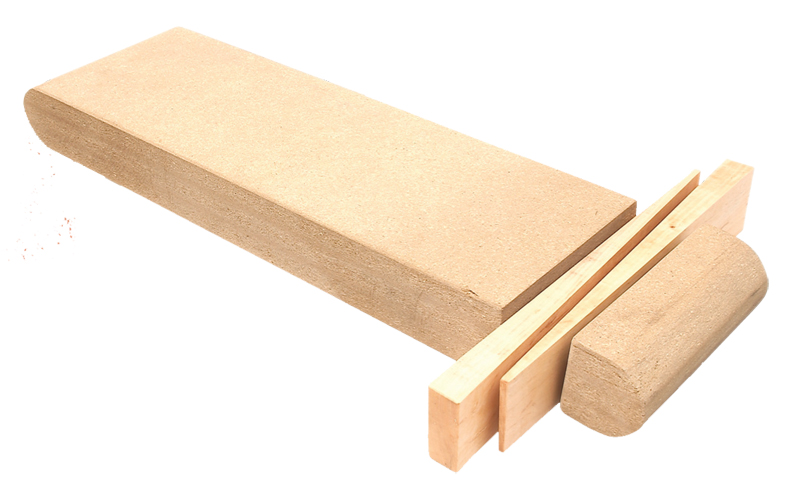
The Lapping Jig
Opposed wedges tighten
a sanding belt placed
over this jig. Strike the
wedges with a hammer to stretch the paper
taut. This jig works for a belt of any size, though
I prefer 6-in. x 48-in. belts for their huge surface
area. Make the jig from three layers of 3/4-in.
MDF glued together. To round the ends, make
two 45-degree crosscuts first, and then sand in
between them.
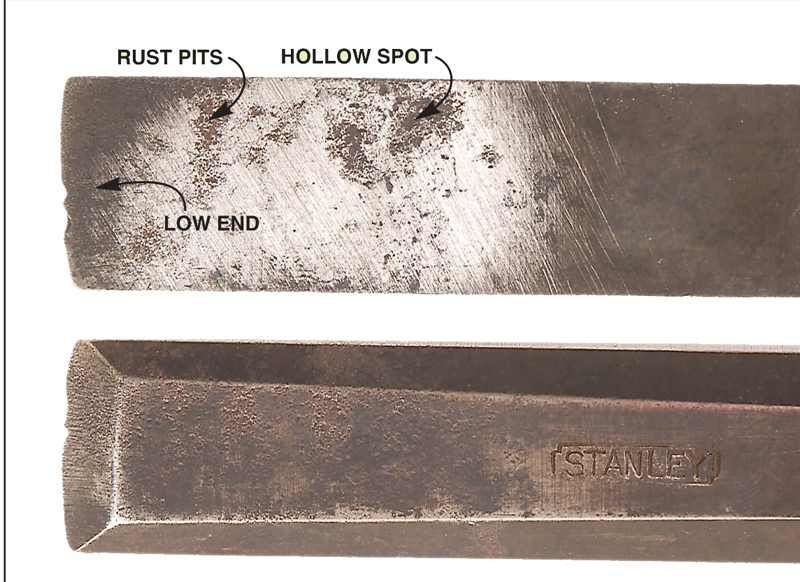
3. Sand until the back is level. You’ll know you’re done when
all the rust pits and low spots are gone and the back is
completely covered with scratches. If the leading end is low
and unscratched, don’t worry about it. You’ll grind this off later.
4. Start smoothing the back
with finer grits. Hold the
chisel in an opposing diagonal
direction on each grit.
Keep sanding until all the
scratches from the previous
grit are gone. It’s easy to distinguish
new scratches from
old ones because they run in
opposite directions. Go up to
a 120-grit belt.
5. Switch to 150-grit pressure-sensitive-adhesive (PSA) sandpaper
and a flatter surface, such as a granite surface plate.
Repeat the process with 220-grit paper. The back isn’t fully polished
yet, but it’s time to take a break and go to the grinder.
6. Grind off a leading end
that’s low, nicked or
uneven. Create a blunt edge
by positioning the tool rest
approximately 90 degrees to
the wheel. A blunt edge is
much less prone to overheating
than a thin edge. That’s
important when you’re
reshaping an entire bevel.
7. Grind a new 25-degree
bevel. Grind all the way
up to the leading end. Make
sure the end is square within
a few degrees. To prevent
overheating, frequently dip
the chisel in water as you
approach the leading end.
8. Polish the back on a medium stone until all the
220-grit scratches are gone. A medium stone creates
a dull grey finish. You only have to work the first
two inches or so, not the entire back.
9. Hone the edge at 30
degrees to create a new,
narrow bevel. I use a honing
guide to ensure that each
stroke follows precisely at
the same angle.
10. Feel for a wire edge. This small, raised ridge of metal on the
back’s leading end indicates it’s time to stop honing. Be sure
to check the corners. The wire edge must go all the way across.
11. Polish the
back on a
fine stone. Push
down on the back
with one finger to
ensure the back
stays flat to the
stone. When the
back is uniformly
polished and the
wire edge is gone,
turn the chisel
over. Hone on the
same stone until
you feel a new
wire edge.
12. Hone the edge and polish the back on a super-fine
stone. A wire edge created by this stone is difficult
to detect, so go back and forth between the bevel and the
back a few times. Both surfaces will have a mirror polish—
the key to an ultrasharp tool.
13. Test your edge on a plastic pen barrel. If you
can push the chisel at a very low angle and
create a long curl, the chisel is good to go. The ultimate
test for a sharp chisel is paring end grain.
After I lapped and honed my tool on an
8,000-grit stone, it passed with
flying colors.
|