


We may receive a commission when you use our affiliate links. However, this does not impact our recommendations.

Precise Hand-Cut Dovetails
A new approach to half-blind dovetails guarantees a precision fit.
By Tom Caspar
The handmade half-blind dovetail joint is an enduring symbol of fine craftsmanship. Every proud woodworker who has conquered the dovetail wants to show it off. In the old days, when every piece of wood was worked by hand, mastering this joint took lots of practice. But not today. Using machined parts and my new method, you can make perfect half-blind joints the very first time you try. There’s no fussy trial-and-error fitting.
Generally, a woodworker can follow one of two paths to make dovetails by hand. The classic artisan’s method requires going for broke and sawing precisely on a line. It’s fast and rewarding, but it takes a sure eye and a steady hand. The second, more cautious, approach allows you to saw away from a line, then pare to the line using a chisel. It’s slower, but by guiding the chisel with a jig, anyone can do it. That’s the method I’ll show you here. The secret is to use very sharp chisels with specially ground sides (Photo 16), and stick to the directions.
Tools and Materials
You’ll use 3/8-in. (10-mm) and 1-in. (26-mm) chisels for paring. These should be high-quality tools, so their edges stay razor-sharp (see Source). For chopping end grain, it’s best to use a 1/2-in. firmer chisel (see Source), but a bench chisel will do. For paring into corners, grind a 12-degree skew angle on a 3/8-in. or 1/2-in. standard bench chisel (Photo 36). You only need a left or a right skew, not both. You’ll also need a sliding bevel gauge, a small square, a Japanese dozuki saw (see Source) or a dovetail saw, a coping saw with a 10-tpi blade and a mallet or hammer.
Wood selection is important. For easy paring, the drawer front, or pin board, should be straight-grained and moderately dense. Walnut, cherry and mahogany are excellent choices. The drawer side, or tail board, should be light in color and also easy to pare. Basswood is the best choice, but white pine and yellow poplar are good, too. To start, machine each piece flat and square. Make the three guide jigs (Figs. A, B and C. Orient the drawer side so the grain on its face runs toward the back. This makes the completed joint easier to plane flush. Sharpen your chisel, and let’s begin.
|
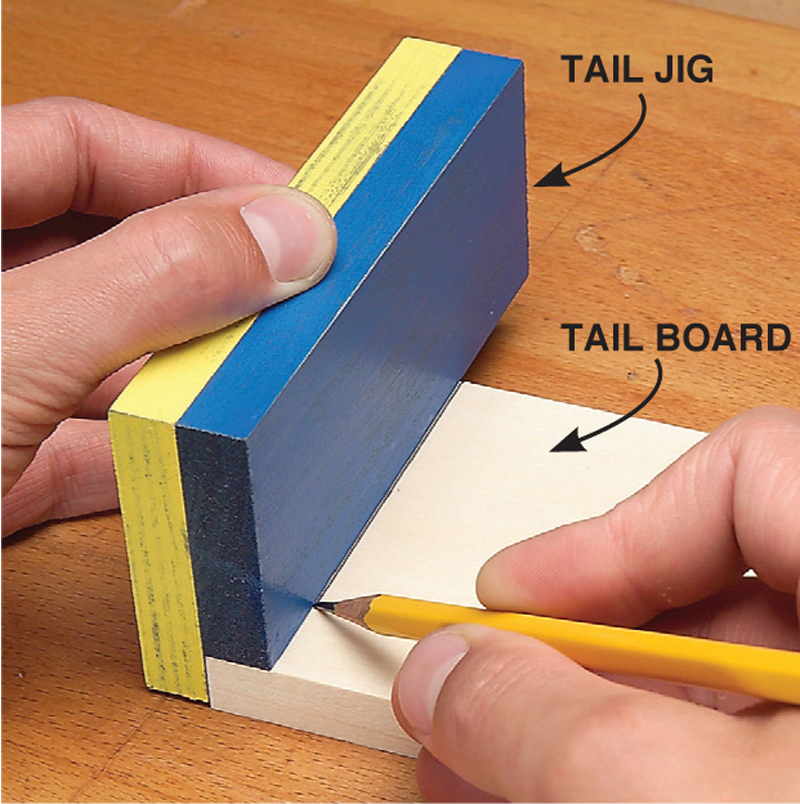
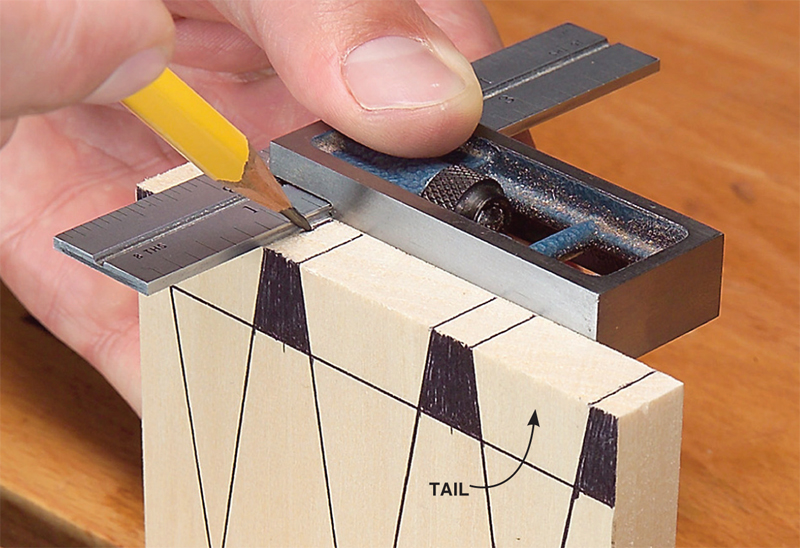
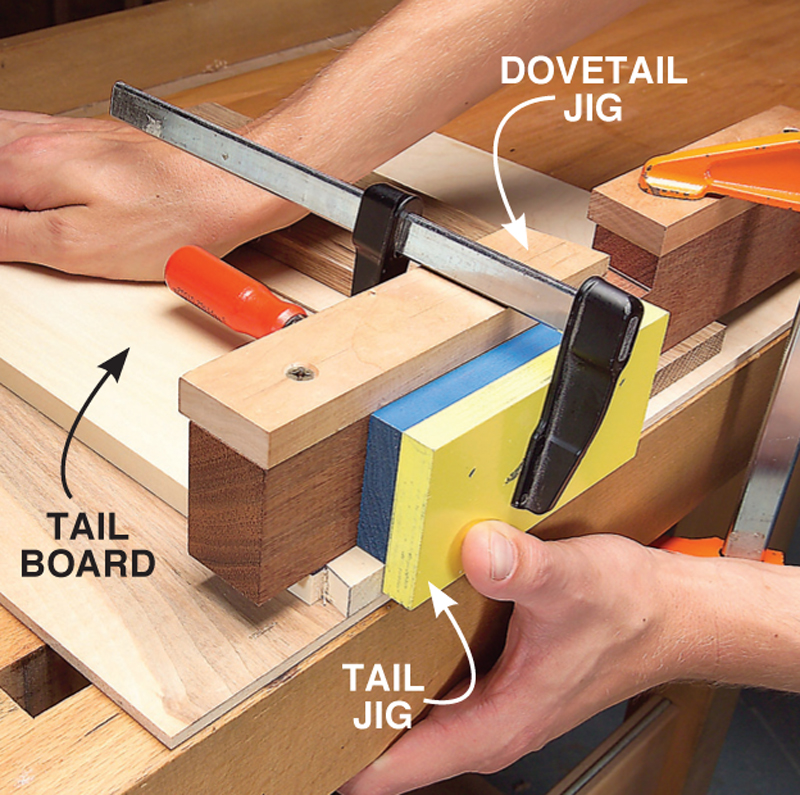
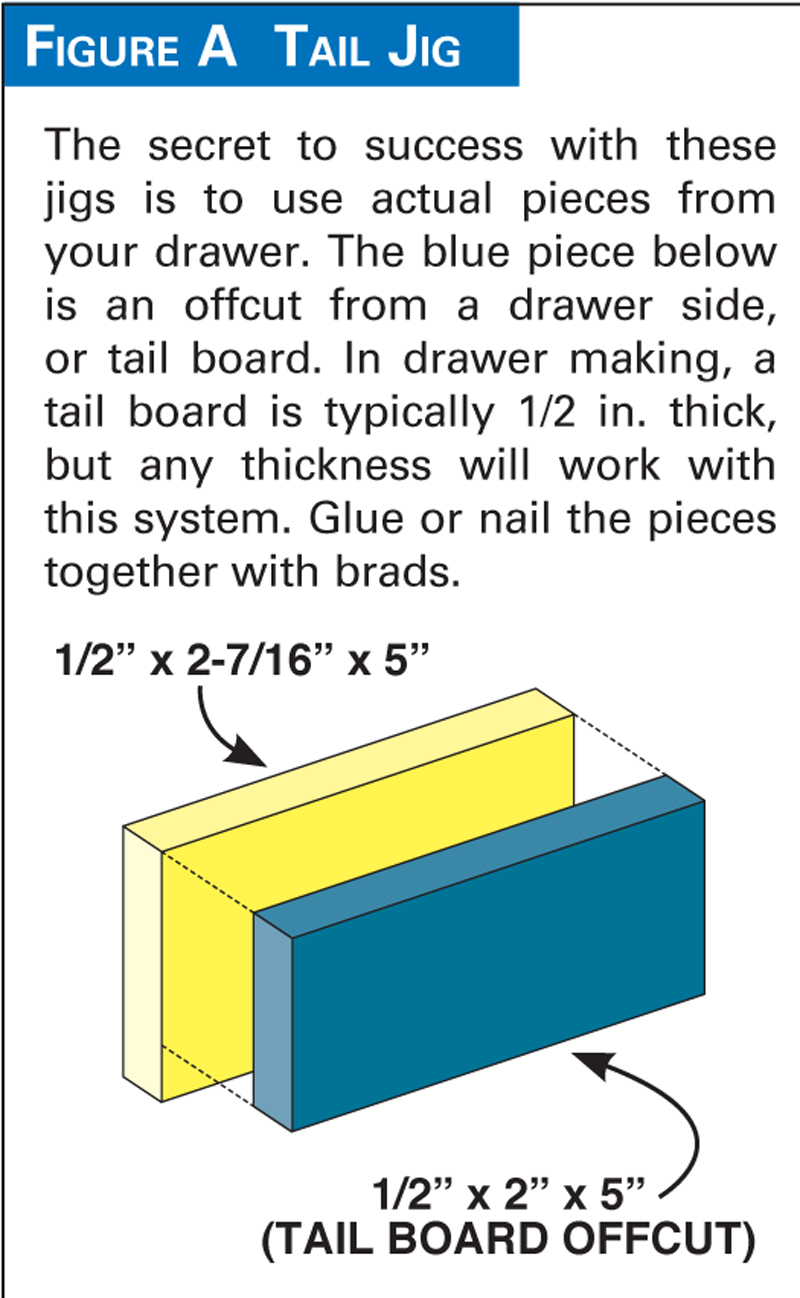
1. Draw a pencil line across the tail board to indicate the dovetails' lengths. Here, you'll use the first of three simple jigs (Fig. A). This is the tail jig. I've painted its components so they're easy to see. |
Click any image to view a larger version.
|
|
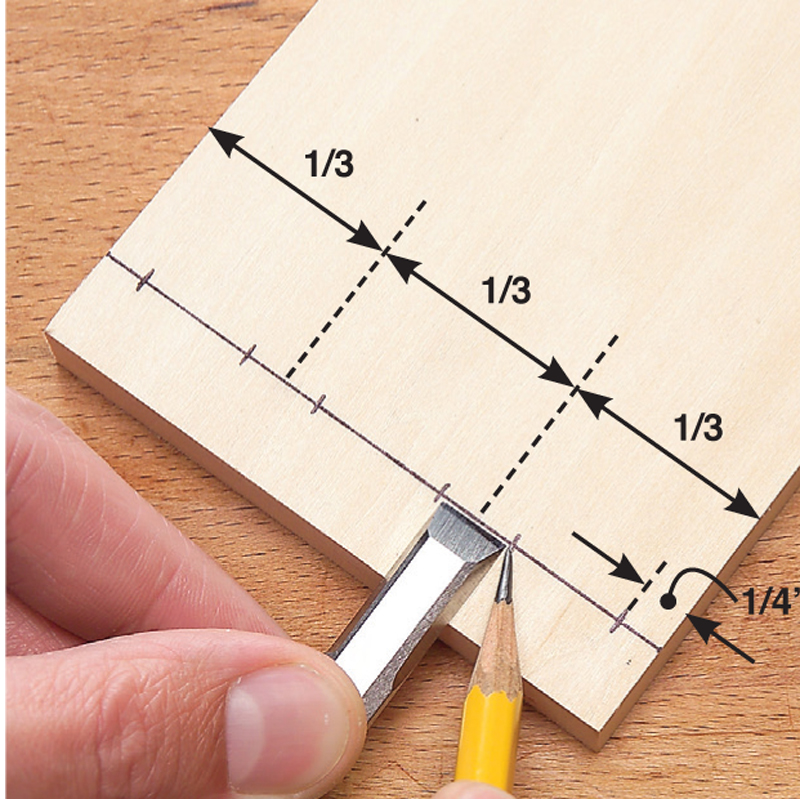
2. Draw a pair of marks for each pin socket. Evenly space the sockets by eye. Make each mark 1/32" on either side of a 3/8" chisel. This ensures that the chisel will fit insde a completed socket. Draw marks for the outer half-pins. |
|
|
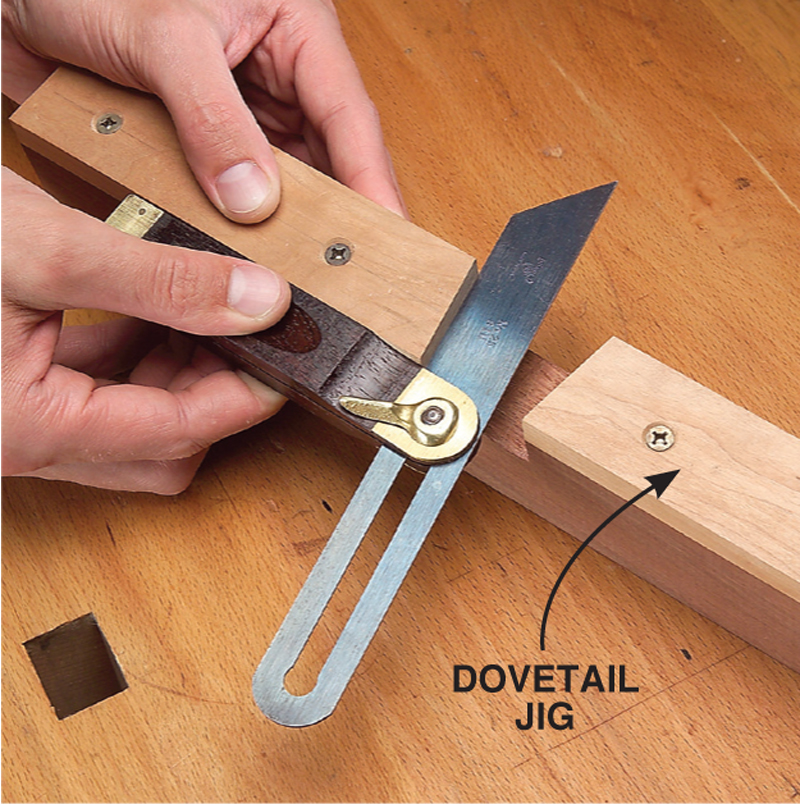
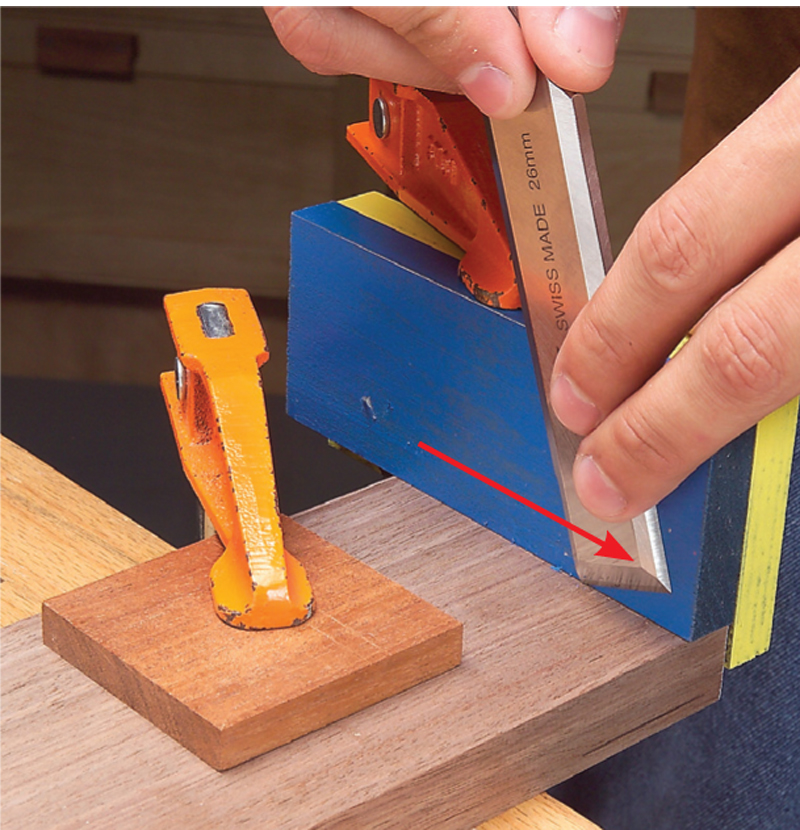
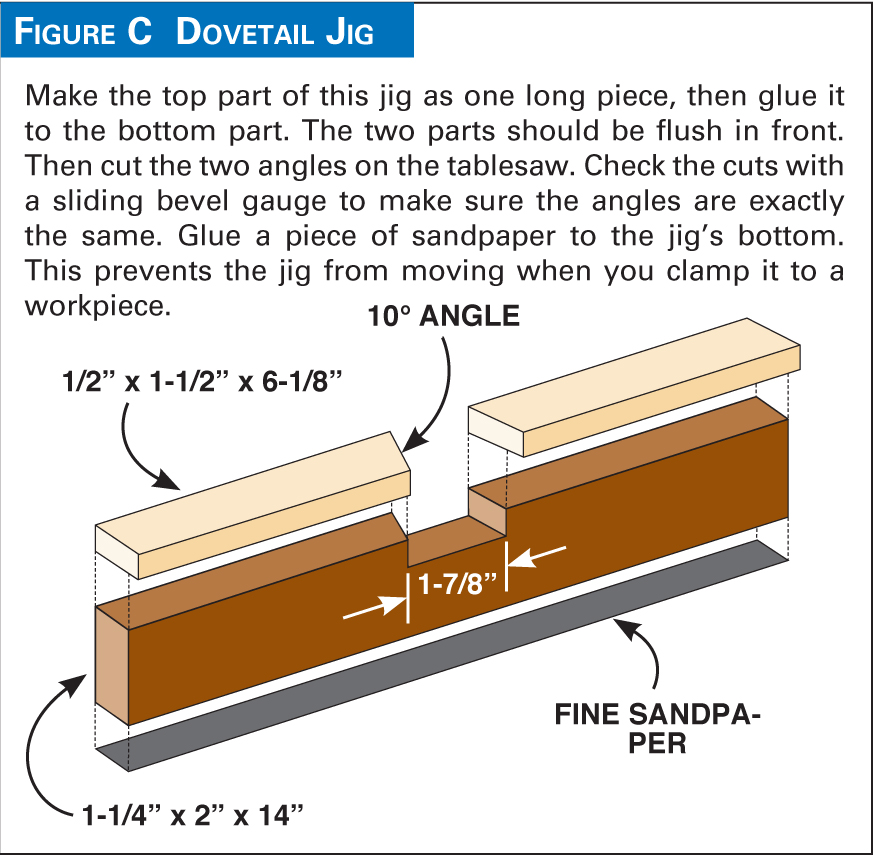
3. Transfer the dovetail angle from a jig to a sliding bevel gauge. The dovetail jig has two equal angles precisely cut on the tablesaw (Fig. C). This jig will guide your paring cuts in the final steps. |
 |
|
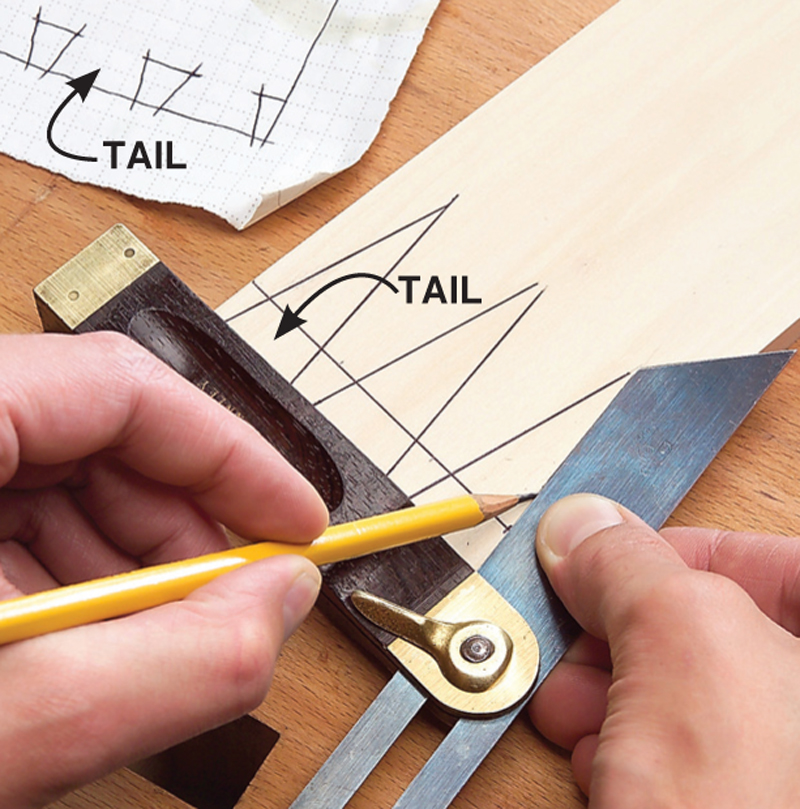
4. Lay out the tails. Draw long, fine lines through each pin mark to make triangles. Each one forms a tail. Refer to a sketch so the lines angle the right away. Flip the square as needed, so most of its handle always butts against the board's end. |
|
|
5. Draw square lines across the board's end to complete the tails. Shade the pin sockets between the tails to clearly indicate the waste areas you'll remove. |
|
|
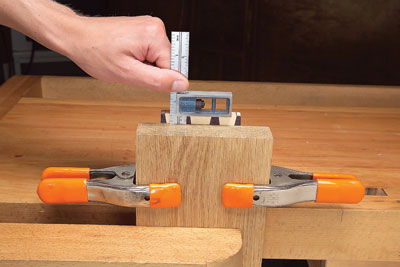
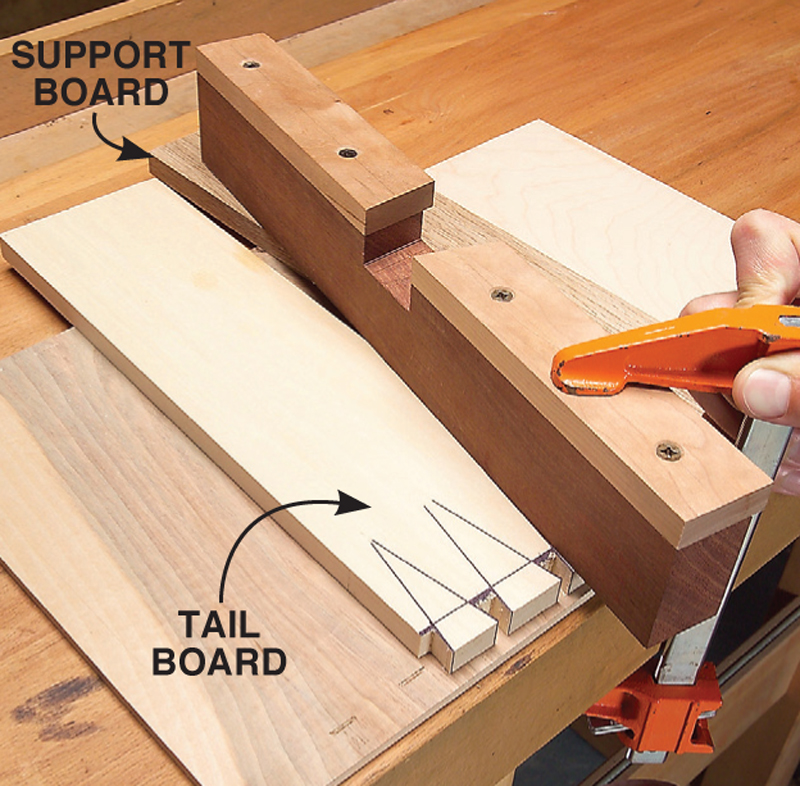
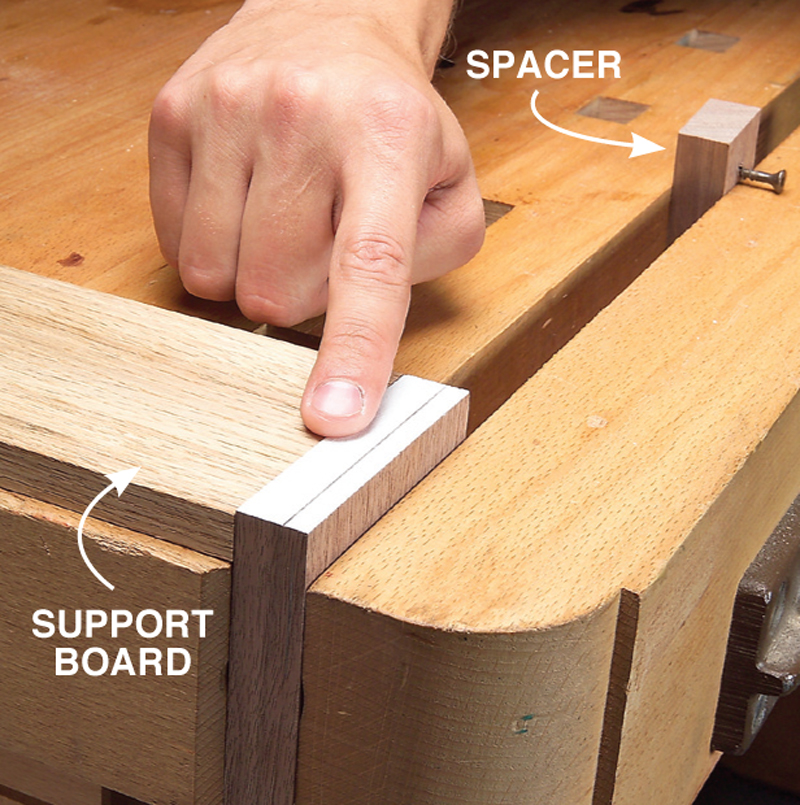
6. Clamp a thick, wide board to the tail board. Position it 1/16" above the pencil line you drew in the first step (Photo 1). Use a small square to check the distance. Raise the boards to a comfortable sawing height. |
|
|
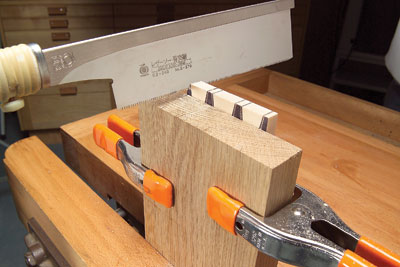
7. Rough-cut the tails. Saw 1/32" inside each pencil line, within the darkened waste area. Keep the saw level and stop when you reach the guide board. |
|
|
8. Remove the half-pin waste pieces at both ends of the tail board. Like the last saw cuts, these cuts are approximate. Saw level along the top of the guide board, being careful not to cut into the tails. |
|

|
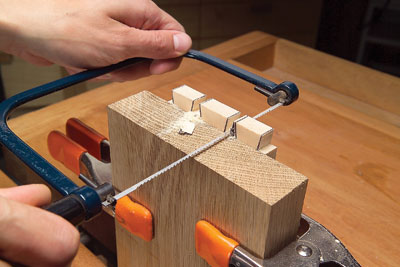
9. Remove the full-pin waste pieces with a coping saw. First make one diagonal cut. Then come back across, flush with the guide board, to release the waste piece. Now you're ready to pare the tails exactly on the layout lines. |
|
|
10. Set up the tail board for paring. Place a piece of scrap plywood under it to protect the bench. Clamp the dovetail jig precisely along one of the angled layout lines. Support the jig, if needed, with another piece that is the same thickness as the tail board. |
|
|
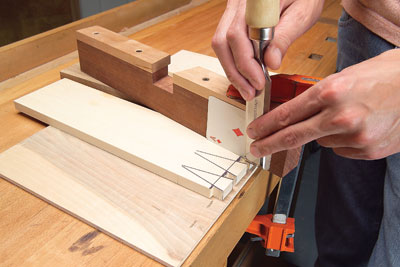
11. Pare the tail using a 1" chisel. It's easy to balance along the jig's side. The thinner the shaving, the better. To control each shaving's thickness, begin with one or more playing cards against the jig. Remove one card after each stroke. |
|
|
12. Pare the last shaving with the chisel against the jig. For a super-smooth cut, work your way in from the end of the tail, taking one-third of a full shaving's width at a time. Reposition the dovetail jig on the other layout lines to pare both sides of each tail. |
|
|
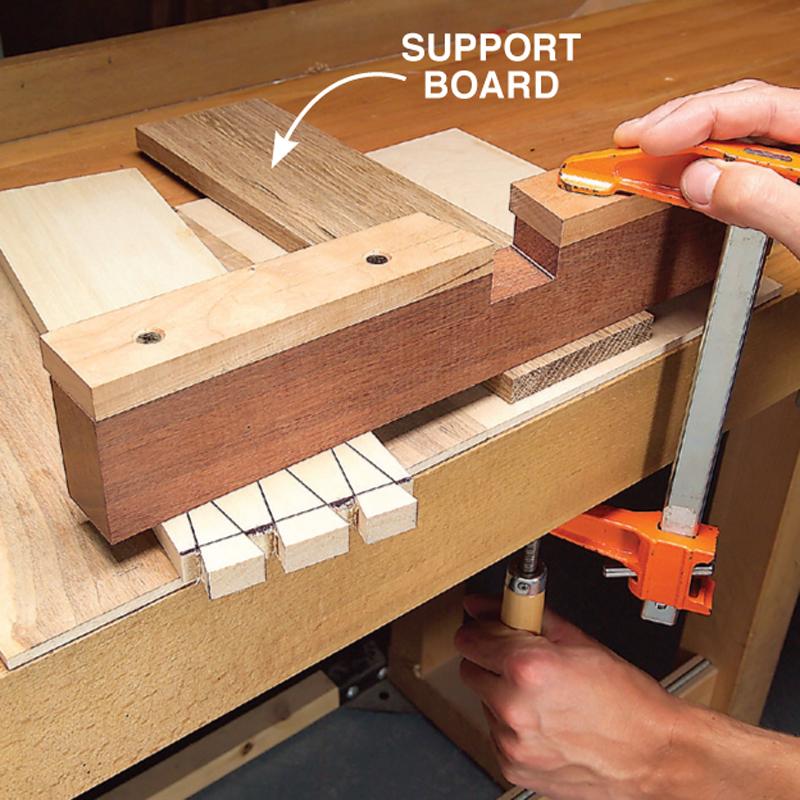
13. Set up the jig to pare each socket's end grain. First, loosely clamp the dovetail jig on top of the support board. |
|
|
14. Clamp the tail jig to the dovetail jig. Slide the tail board to butt up against the tail jig. Place and tighten a clamp to the left of the tail baord and remove the tail jig. Tighten the support board clamp. |
|
|
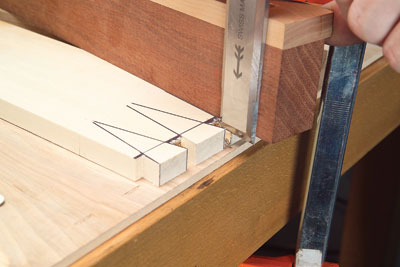
15. Pare the end grain. Use laying cards to minimize each shaving's thickness. You may have to start with three or four cards. Drive the chisel with a malley, if necessary.
|
|

|
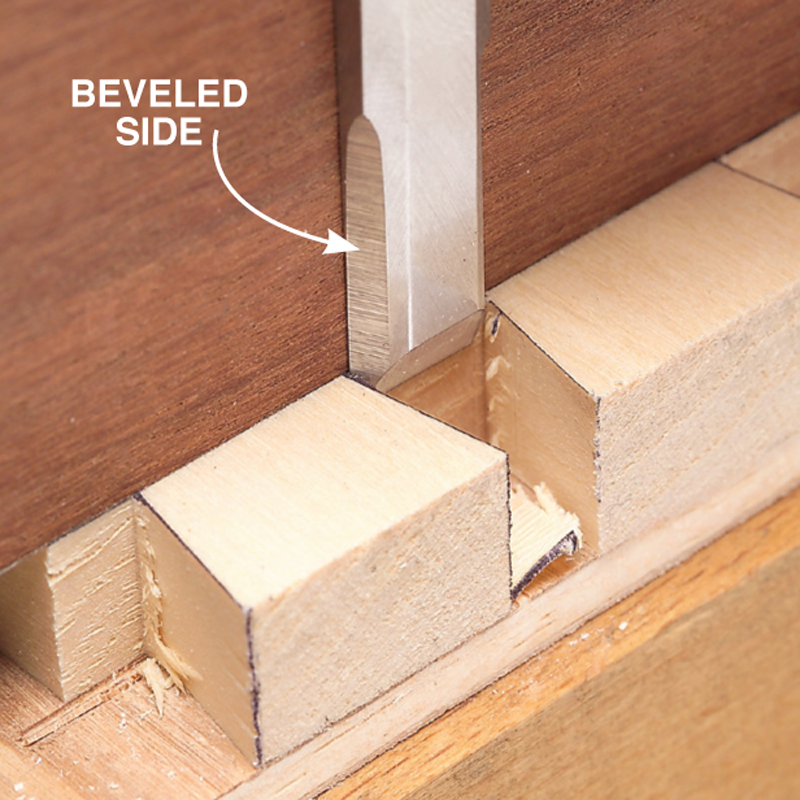
16. Bear against the jig on the last cut. To pare into these acute corners, dring 12-degree bevels on both sides of your chisel. Extend the bevels back 3/4". A 12-degree bevel is slightly steeper than the 10-degree dovetail angle. |
|
|
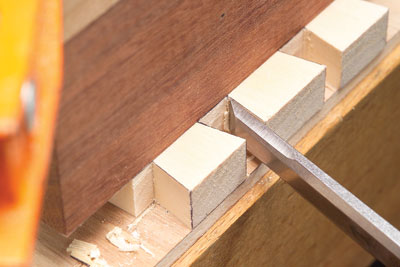
17. Clean the corners by pairing from the end. Then pare from above, as in the last step, to release the shaving. Your tails are now perfectly straight, smooth and square to the board's face. The almost look machine made! |
|
|
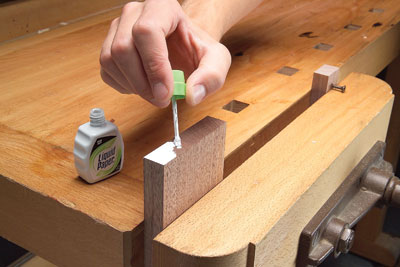
18. Prepare the pin board to make very fine layout lines easier to see. Coat its end with a primer coat of shellac or varnish, followed by white correction fluid. Primer prevents the white fluid from penetrating into the end grain. |
|
|
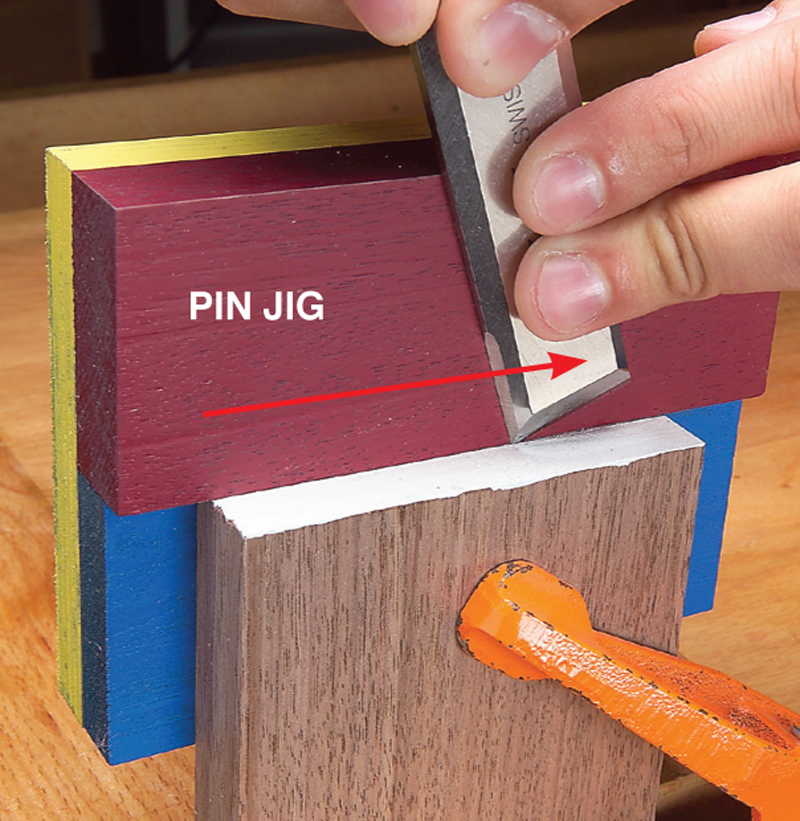
19. Clamp a third jig, the pin jig (Fig. B), to the pin board's end with the corner of the wide chisel. One light pass will do it. This is the baseline for the tail sockets. |
|
|
20. Clamp the pin board level with the support board from Photo 10. The pin board must be rock solid for laying out the pins. Prevent the vise from racking by inserting a spacer that's the same thickness as the pin board. |
|
|
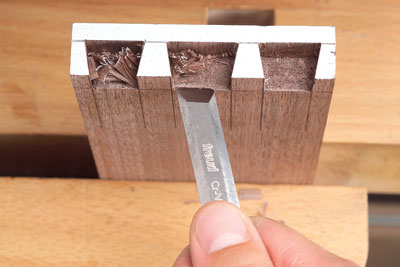
21. Mark the pin board by lightly pushing on a chisel butted to the side of each tail. This leaves a distinct, super-thin line. Butt the tail board's end to the scribed line (Photo 19). Use a square to align the pin and tail boards. |
|

|
22. Clamp the tail jig to the pin board's inside face and scribe another line with your chisel. This line indicates the pins' depth. After assembly, the pins will be flush with the tails, which makes gluing and clamping easier. |
|
|
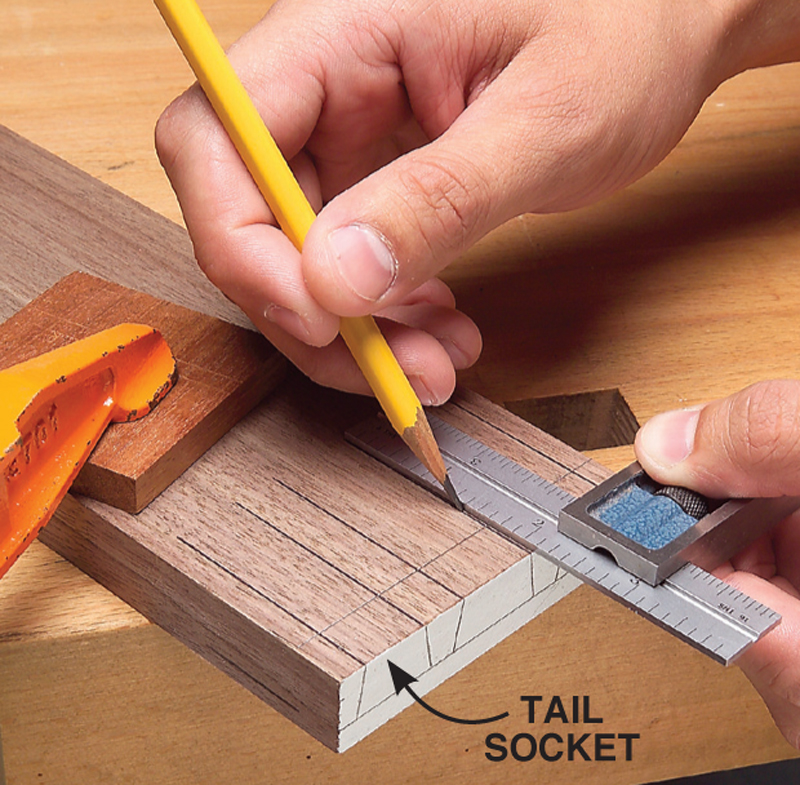
23. Draw the pins on the board's inside face. Go well beyond the scribe line. The longer the lines, the easier they will be to follow when you asw. Shade or mark Xs in the waste areas, or tail sockets, between the pins. |
|
|
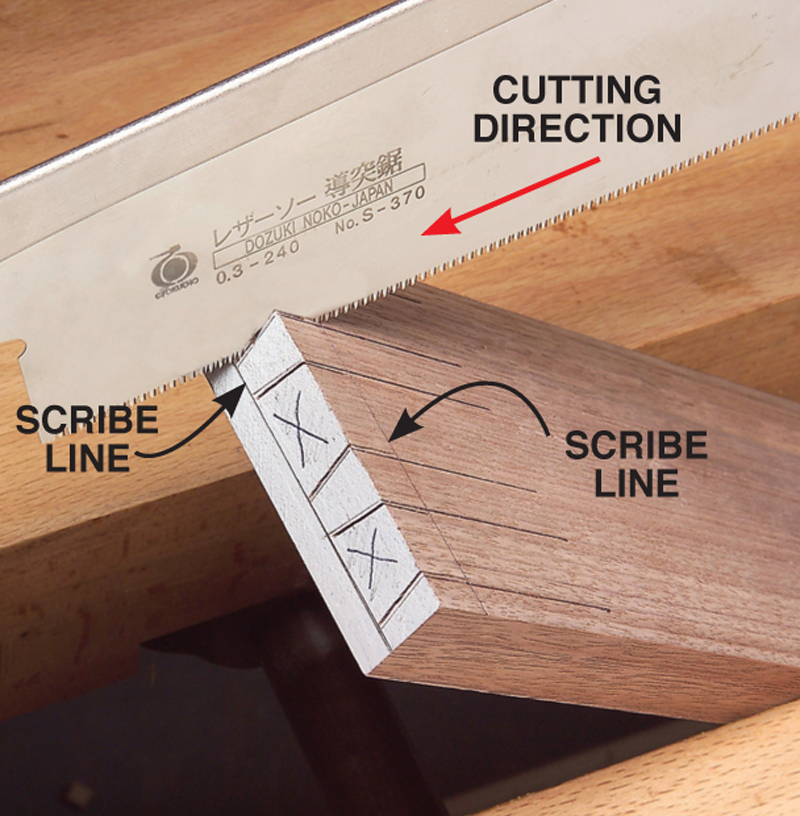
24. Saw the pins. Stay 1/32" inside the lines. Stop short of both scribe lines. Clamp the pin board diagonally in the vise so you can see both faces. This enables a pull saw to cut smoothly because it's cutting the grain. |
|
|
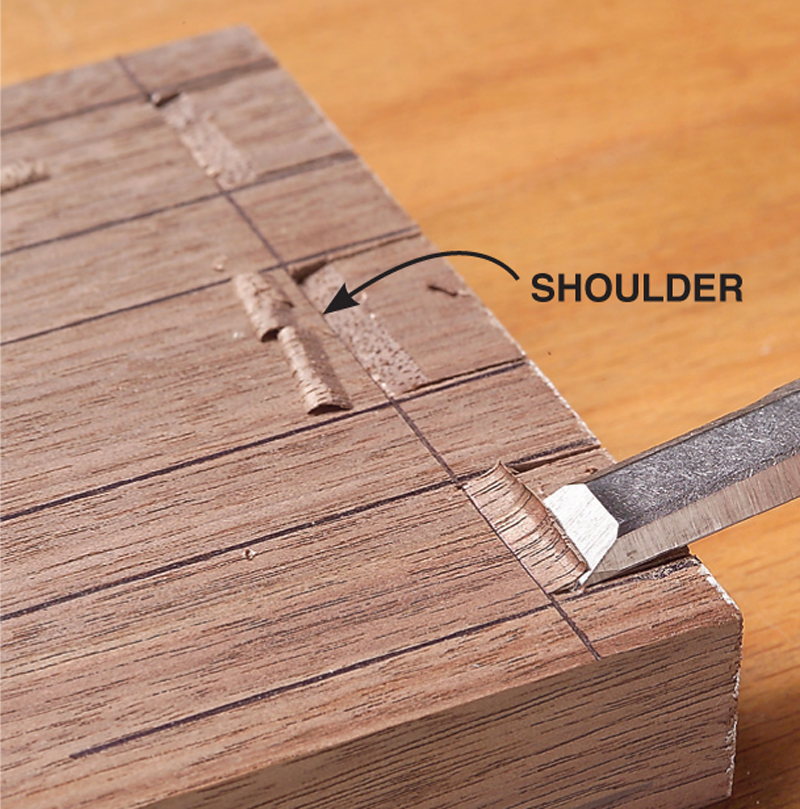
25. Pare at a shallow angle to create small shoulders in each tail socket. Clamp the board down, push almost to the scribe line, twist and lift out a thin chip. These shoulders will guide the chisel in future paring cuts. |
|
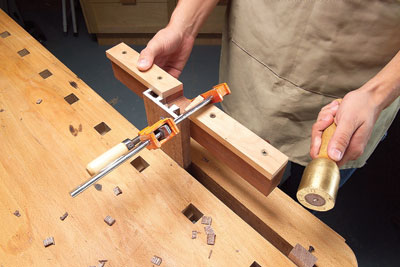
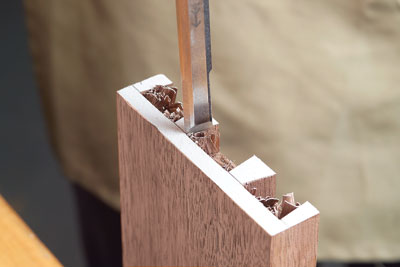
|
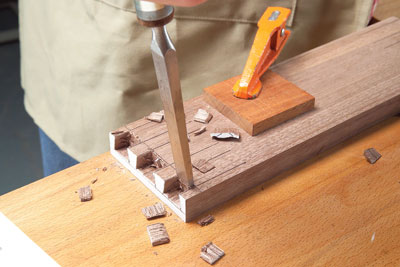
26. Chop the tail sockets. Hit the chisel once, straight down, 1/32" away from the shoulders. Switch to a 1/2" firmer chisel for this heavy-duty work. Reserve your bench chisels for paring. Sharpen the firmer chisel at a durable 35-degree angle. |
|

|
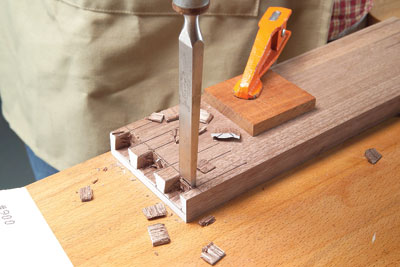
27. Make chips! After each downward chop, lower the chisel, bevel down and split off a thick chip with a single blow into the end grain. Twist the chip to pry it loose. Continue chopping downward and sideways until you're within 1/16" of the lower scribe line. |

|
|
28. Finish chopping the shoulders right on the scribe line. Rest the chisel against the small shoulder (Photo 25), hold it plumb and strike one blow. By taking a thin shaving, you'll make a crisp, clean, deep shoulder. |
|
|
29. Lean the chisel a few degrees on the second blow; continue at that angle to the bottom of the tail socket. This traditional undercut ensures the joint goes together without any gaps along the scribed line. |
|
|
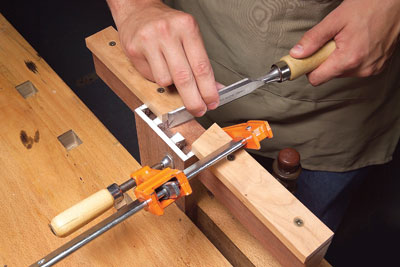
30. Pare to the scribe line. Clamp the pin jig to the pin board once more, and use the playing card technique to remove thin shavings. Pare into the corners with the bevel-sided chisel. |
|

|
31. Remove the shavings by cutting them off at the base. Push hard and give a little twist; they'll pop right out. Don't bother for now with the shavings stuck in the corners. |
|
|
32. Pare the pins with the dovetail jig. Clamp it to the pin board. Align one side of its notch with one of the saw cuts to remove a thin shaving with the wide chisel. This will be a sneak-up-to-the-line approach, without using playing cards. |
|
|
33. Tap the dovetail jig after each shaving to shift the notch closer to the pin layout line. Pare again. Each shaving should be very thin, so you can easily make an accurate cut. You don't have to loosen the clamp, because the jig shifts so little. |
|
|
34. Make the last paring cut right on the layout line. This method is so precise that you can split a hair, which is about the thickness each of these layout lines cut into the paint. Pare all the pins this way. |
|
|
35. Pare the corners from above. The chisel's beveled edge lets you get right into this tight angle. |
|
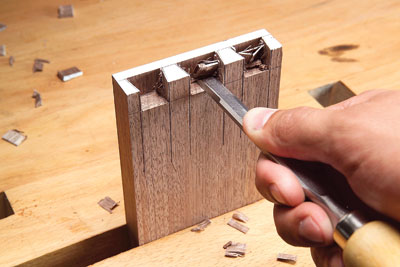
|
36. Clean out the corners with a homemade skew chisel. Push the chisel into the corner, twist it and pop out the shavings. For a right corner, flip the chisel over and use it bevel down. This tool does the job very quickly. |
|
|
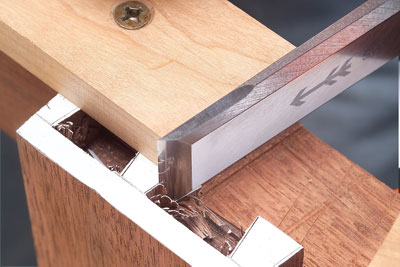
37. Test the joint's fit. The pin and tail boards should go together without any additional work and end up flush. If seating the joint requires more than light hammer taps, use the dovetail jig to pare the pins that are tight. |
|

|
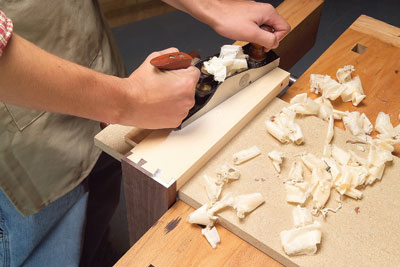
38. Even up the joint after it's glued. It only takes a light sanding or a few plane strokes to remove the white paint and make the pins flush with the tails. Now you'll see how tight the fit really is! |
|
SourceNote: Product availability and prices are subject to change. Woodcraft Supply, woodcraft.com, 10-mm Pfeil bench chisel, #05T18, $36.99; 26-mm Pfeil bench chisel, #50T22, $32; 1/2" Sorber firmer registered chisel, #13R61, $41; Dozuki Z saw, #12F27, $55.50. This story originally appeared in American Woodworker January 2006, issue #119.
|
Fig. A: Tail Jig
Fig. B: Pin Jig
Fig. C: Dovetail Jig
|


Here are some supplies and tools we find essential in our everyday work around the shop. We may receive a commission from sales referred by our links; however, we have carefully selected these products for their usefulness and quality.


