


We may receive a commission when you use our affiliate links. However, this does not impact our recommendations.
Make a big splash with a small piece of rare wood.
By Tom Caspar and Jon Stumbras
This story originally appeared in American Woodworker March 2005, issue #113.
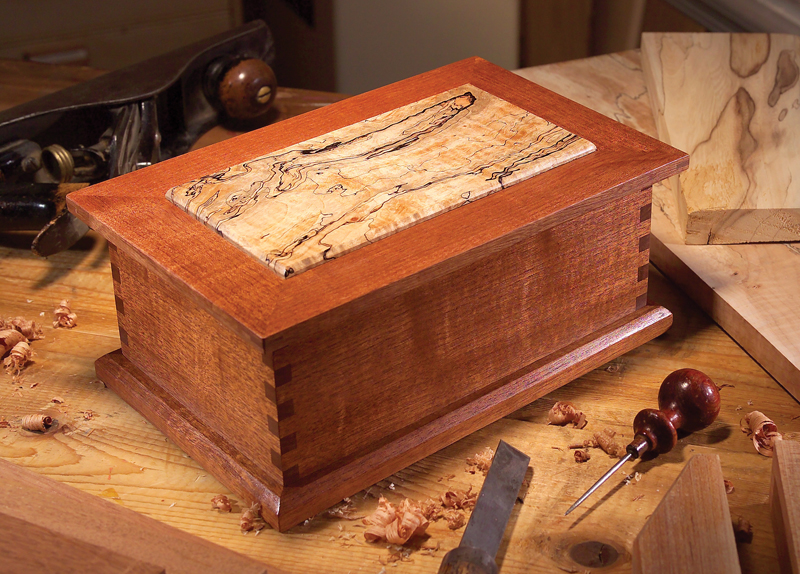
I’ll bet somewhere in the dark recesses of your shop you’ve squirreled away a small piece of special wood, just waiting for the right project. No doubt you’ve saved it to become the centerpiece of something well-crafted, small in scale and novel in design. This jewelry box is the perfect project to showcase that dusty board.
Select the Wood
You’ll need very little wood to make this box. The star of the show is clearly the lid’s center panel. When you open the lid, you also see the bottom side of this fabulous piece. I used spalted big-leaf maple (see “Spalted Wood,” below), but you can use any piece of wood that has a fabulous curl, wild burl or unusual bird’s-eye pattern.
For the rest of the exterior, it’s best to choose a rich but understated wood, so as not to detract from the panel. I chose mahogany for its warm color and lack of prominent grain. Walnut or cherry would also work well. If you’re conservative about cutting, you can get all the parts from a rough 4/4 or 5/4 board that’s 5-1/2 in. wide and 4 ft. long.
For the interior trays, you’ll need a little 1/4-in. plywood and some 1/8-in.-thick solid wood that looks elegant, such as rosewood. I chose cocobolo.
What is spalted wood?
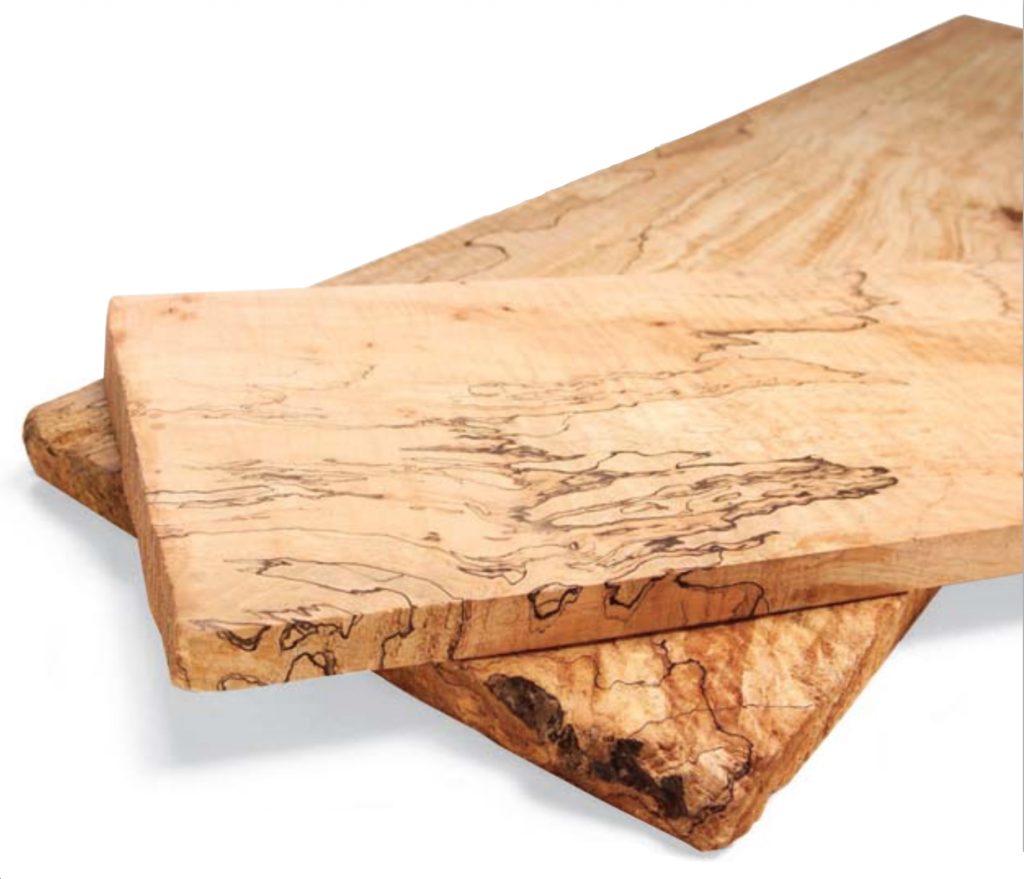
Spalted wood is just a fancy name for partly decayed wood. Its spectacular colors come from different colonies of fungus, which start the decay process. Black lines between the colors are actually barrier walls set up by competing colonies to protect their territories. Spalting is most prominent in light colored woods, such as maple and beech, but almost any kind of wood can be spalted. No two pieces are alike.
Where can I get it?
If you’re lucky, you can find spalted wood in any firewood pile. If green wood isn’t dried in ideal conditions, it can be attacked by fungus and start to spalt. For use in woodworking, the trick is to catch the wood at the right stage of decay and stop the fungal attack by quickly drying the wood to a fairly dry moisture content, from seven to 12 percent.
One of the best ways to order spalted wood is on the internet. Some sites provide a digital photo of an individual board, so you can see exactly what you’re buying. I bought my wood from BuzzSaw International. The firm specializes in figured West Coast big-leaf maple. It’s a bit spendy ($7.50 to $50 for 1 bd. ft.) but truly gorgeous.
For more standard wood at about $5 to $7 for 1 bd. ft., try West Penn Hardwoods. The site doesn’t show photos of individual boards, however.
What’s it like to work with?
The best spalted wood machines just like a regular board, but some pieces can be a real challenge. Decay is a gradual process, so some parts of a board can be very hard and others very soft. Soft spots can peck out when planed or become dished when sanded. Turners often use cyanoacrylate glue to penetrate and harden soft spots.
You can best capture spalted wood’s natural look by using a fast-drying finish, such as lacquer or shellac. Soft spots can soak up a lot of slower drying finishes, such as oil and varnish, which will unnaturally darken the wood.
Caution: Fungal spores can be an irritant. Use good dust collection and wear a respirator or mask.
Build the Box
1. Resaw boards for the box’s sides (F, G, H) and the frame pieces that go around the lid (B, C). It’s best to start with 1-1/4-in. (5/4) lumber and plane it to 1 in. thick. If you cut a dead straight line, however, and your wood is very stable, it’s possible to resaw rough 1-in. (4/4) boards. Make some extra pieces to help with machine setups later. Plane the lid pieces to 7/16 in. and the side pieces to 3/8 in. Rip the side parts to rough width (see Cutting List).

Resaw a straight-grained piece of mahogany to make the box’s sides and lid. This project is a perfect opportunity to make a little bit of beautiful wood go a long way.
2. Cut 3/8-in.-wide box joints on all side pieces. Set the bit as high as the side is thick, so the box-joint fingers are flush when the joint is assembled. Begin cutting the box joints from the bottom edge of each piece.
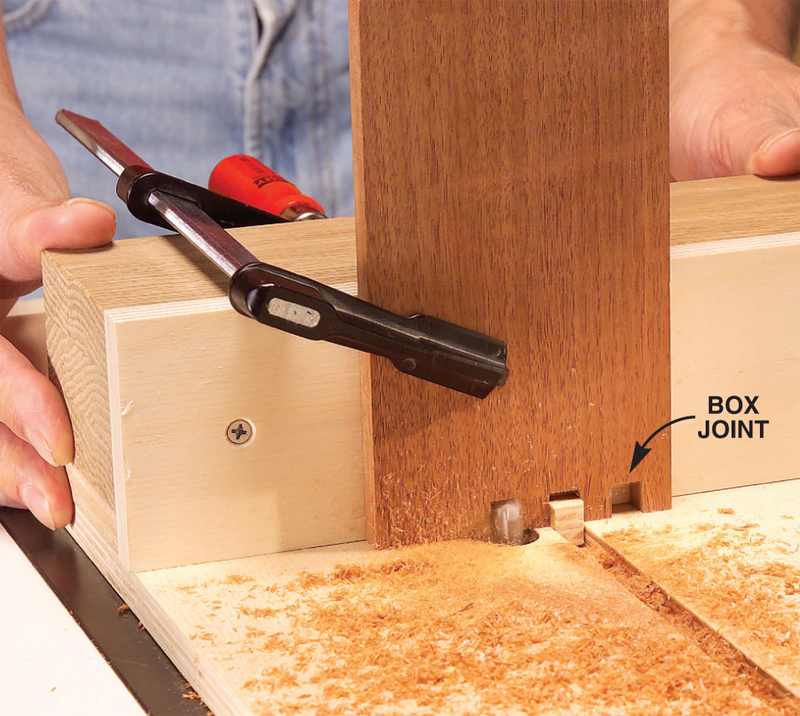
Cut box joints using a router table. You could use a tablesaw, but perfect results are surprisingly easy on the router table.
3. Rip the box sides to final size. The exact width doesn’t matter, as long as each cut lines up exactly with the joint’s fingers or notches. Note that the back (G) is lower than the sides by the width of one box-joint finger.
4. Glue the box together. Cut spacers (J) to length so the hinge fits comfortably between them. Glue the spacers to the box.
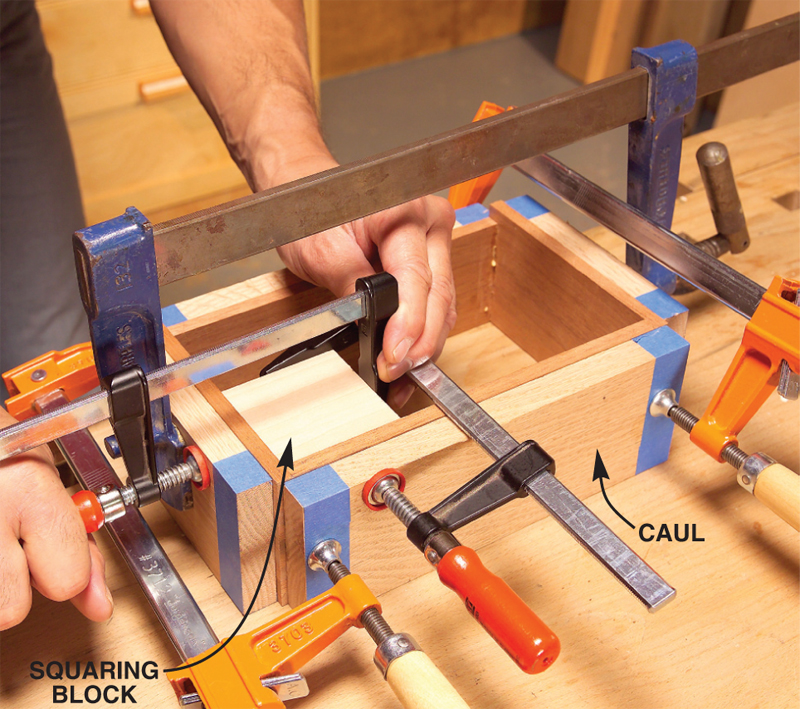
Clamp the box together with hardwood cauls. Tape the cauls’ ends to prevent them from sticking to the box. To pull the box square, clamp a block to one inside corner.
5. Glue the tray supports (K, L) to the inside of the box. Sand flat the bottom and top edges of the box.
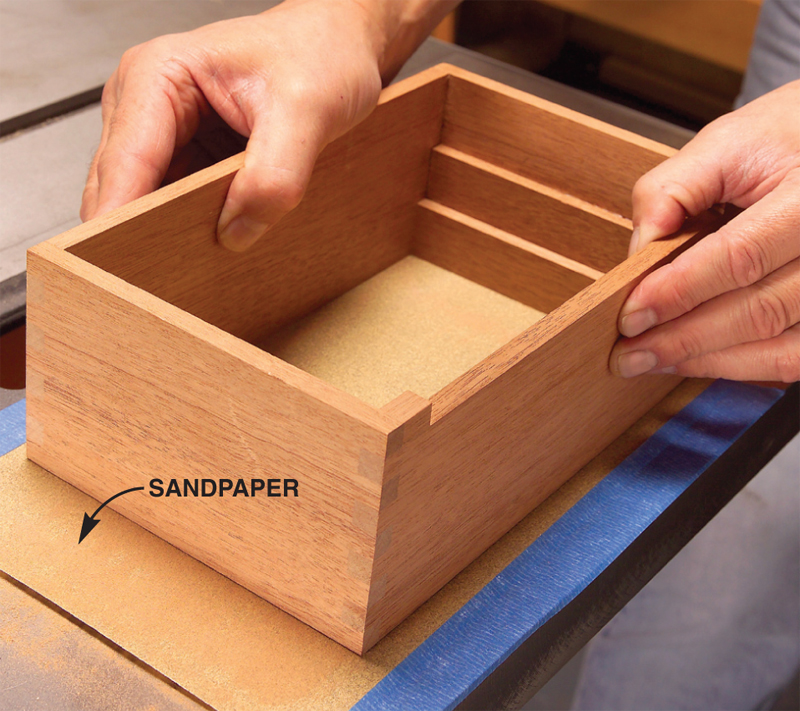
Level the bottom of the box on 100-grit sandpaper taped to your table saw. This eliminates annoying gaps between the box and its base. Level the top edge by sanding, too.
Frame the lid
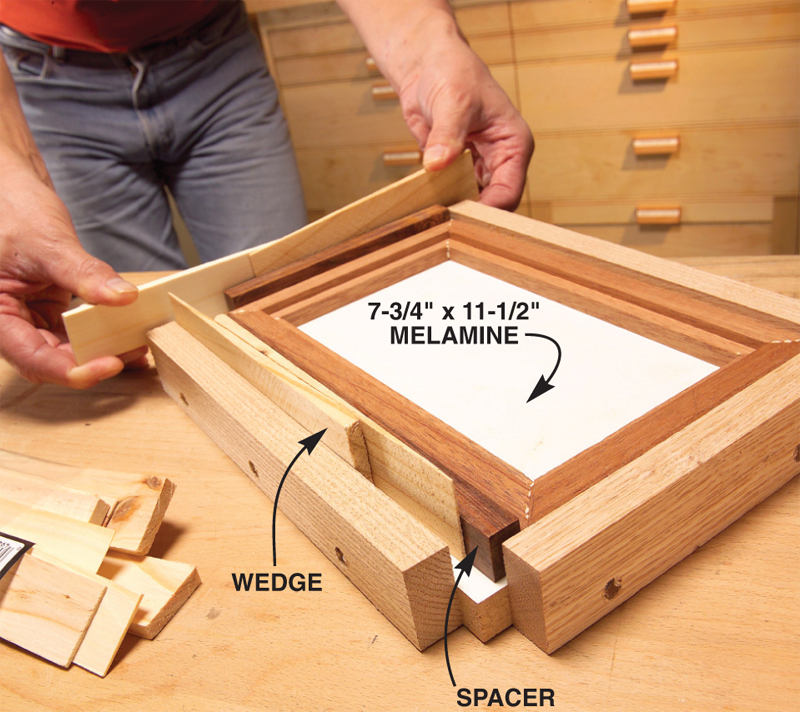
6. The lid’s raised panel (A) is the box’s centerpiece, so it pays to be particular about how the grain pattern is oriented. Make a simple window to figure out how to cut your showy wood.
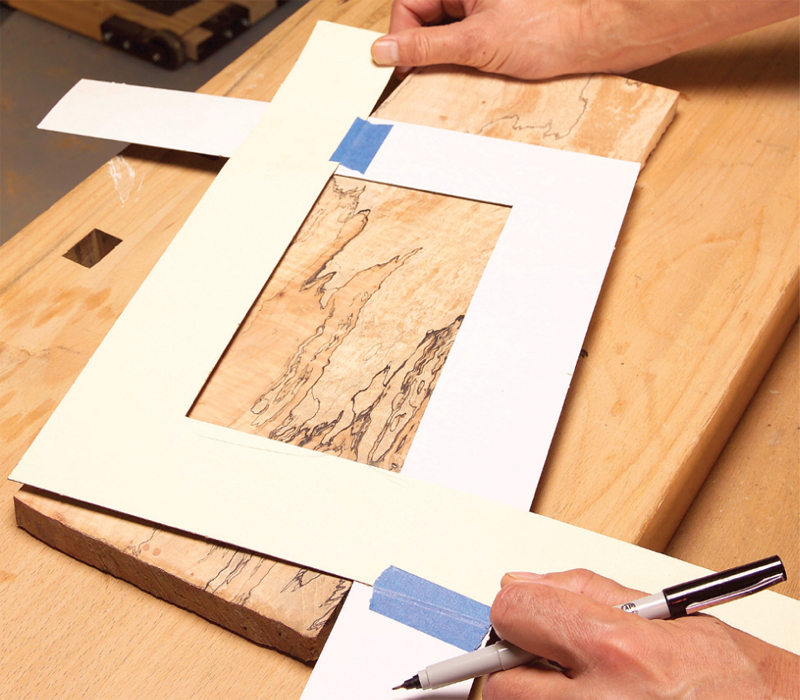
Make the lid’s panel from that stunning piece of wood you’ve been hoarding. To find the best grain orientation, make two cardboard L shapes by tracing a carpenter’s square. Tape them together to form a window the same size as the panel.
7. Cut grooves all the way around the panel (Fig. B). Cut the ends first; then raise the bit 1/16 in. and cut the sides. This added depth in the long grooves leaves room for the panel to expand and contract.
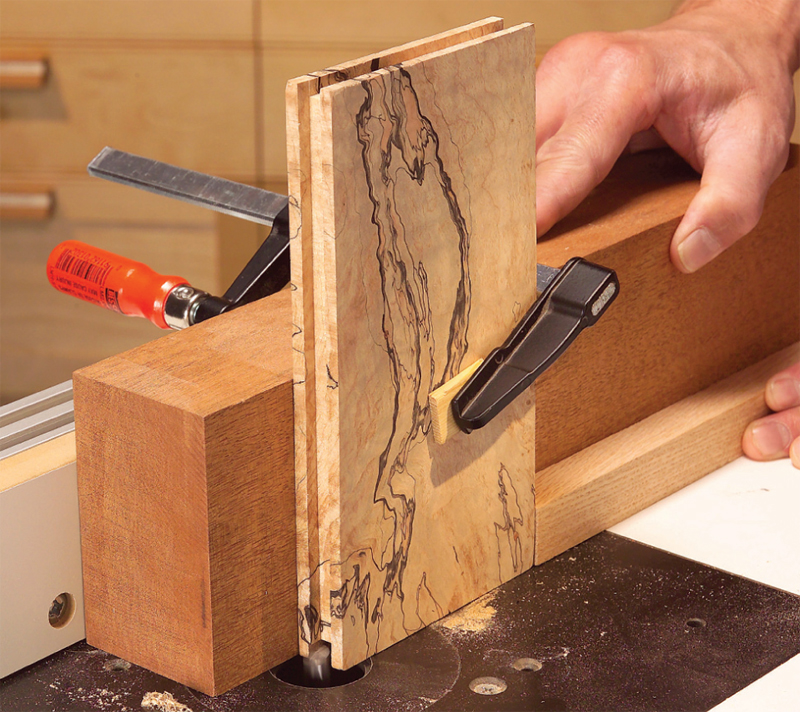
Rout grooves in the panel’s sides. Clamp the panel to a
long, thick support board. This works better than a tall fence to prevent your precious piece from accidentally tipping in any direction.
8. Rout a small chamfer around the top and bottom of the panel. Sand the panel to 220 grit.
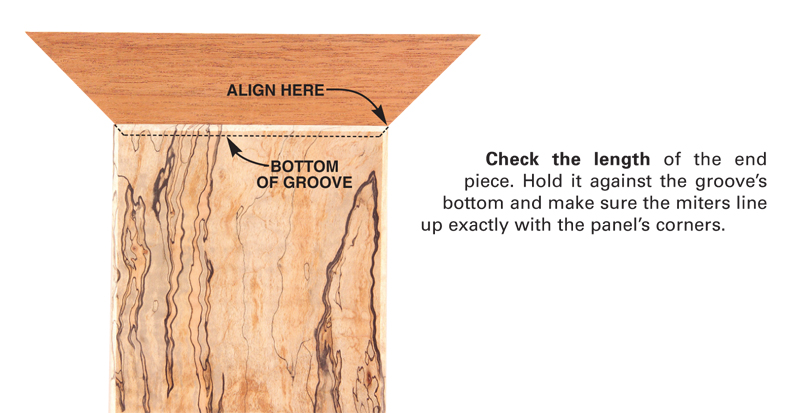
9. Plane the frame pieces to exact thickness, so they fit snugly in the panel’s grooves. Miter the pieces on the table saw. First cut the short pieces (C), so their miters line up with the lid’s corners. Clamp both pieces in the panel; then cut the long pieces (B) to fit.
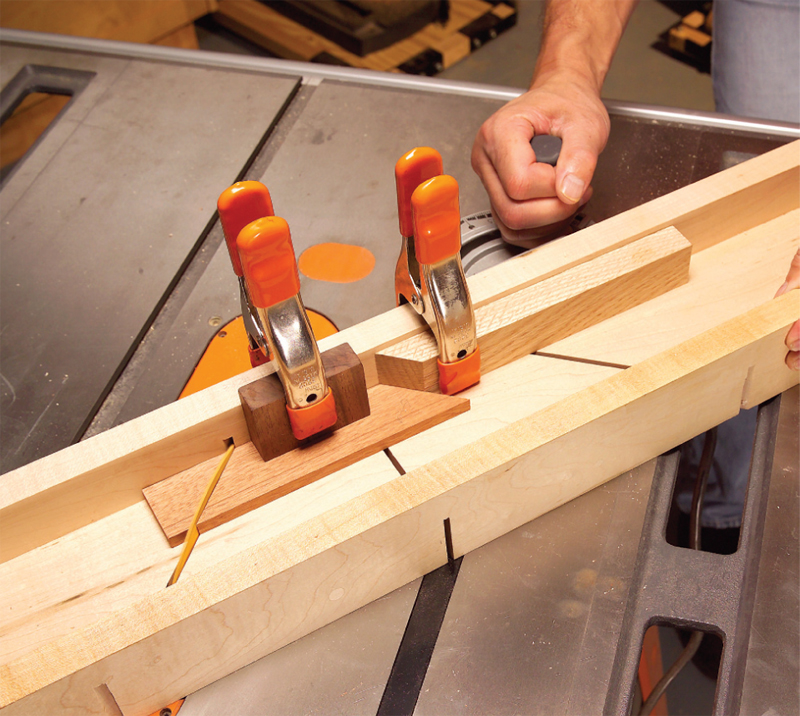
Miter the small frame pieces that go around the panel. You could use a simple fence on your miter gauge, but I built a long miter box to safely hold the workpiece, a stop block and the offcuts.
10. Rout grooves on the ends of the frame pieces using a slot cutter (Fig. C).
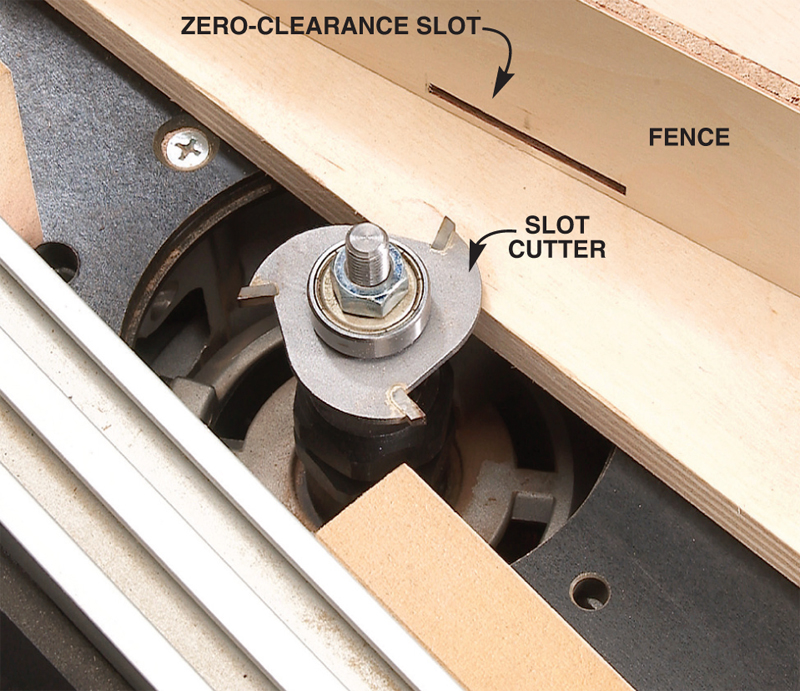
Set up your router table for cutting grooves in the frame pieces. Here’s the arrangement, taken apart. The grooves are cut with a 1/8-in. slot-cutting bit. The cutter sticks through a zero clearance slot in a 1/4-in. plywood fence. If your router table has a large opening around the bit, use plywood to cover the hole.
Rout grooves the full length of each miter. These grooves will hold a thin spline, which strengthens the joint and guarantees the frame pieces will glue up perfectly even with each other.
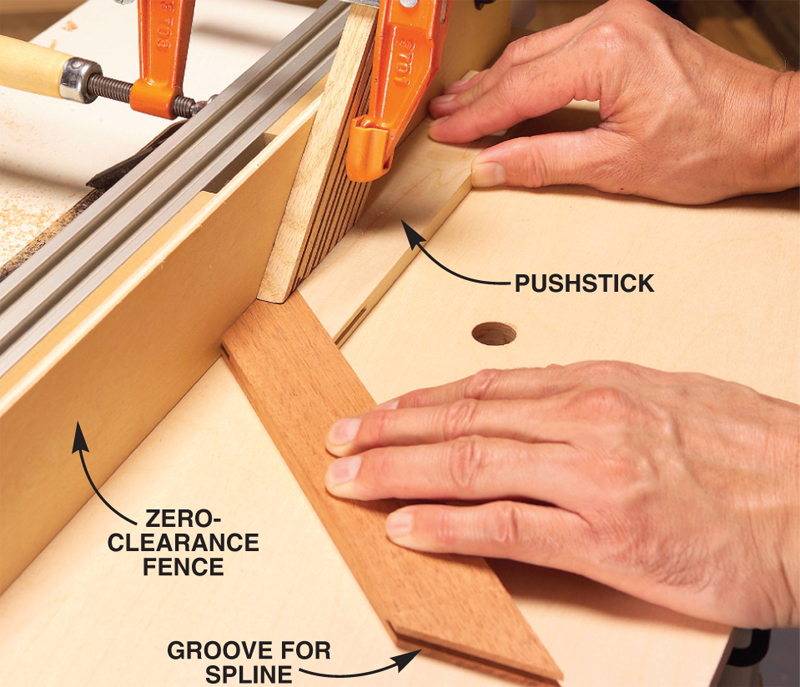
11. Make the splines (D). Their exact thickness is very important. Too tight, and you won’t be able to slide them in the grooves after you add glue. Too loose, and they won’t align the frame pieces. The spline’s width should be 1/64 in. less than both grooves’ combined depth.
12. Glue the short frame pieces first. Be fussy about aligning their miters with the panel’s corners. Let the glue dry overnight. Then add the long frame pieces, one at a time. Align the miters first; then push in the spline from the joints’ ends.
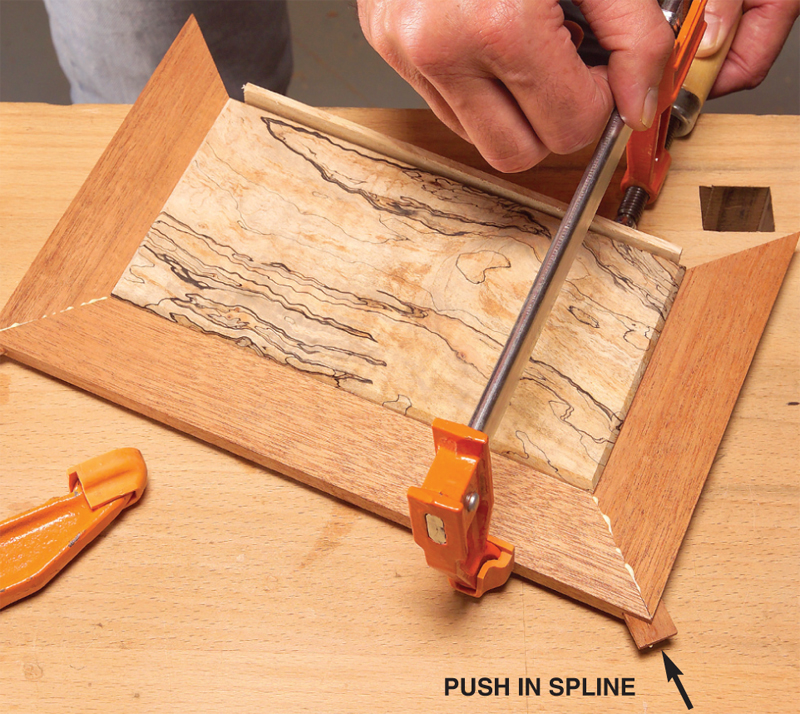
Glue the frame pieces in stages. Glue the short pieces first, right to the panel, putting glue only in the middle two inches of the groove. Then add the long pieces, one at a time. Here, glue only goes on the miters, not in the panel’s grooves. The panel is then free to expand and contract, just like a raised-panel door.
13. After the glue is dry, use a handsaw to trim the protruding splines. Even the frame joints with 150-grit or finer sandpaper. Finish sanding to 220 grit.
Make the base
14. Make the base parts (M, N) from one or two long pieces of molding. First, chamfer the outside edge on the router table (Fig. D). Second, cut the rabbet on the router table or table saw. The rabbet’s depth should match the thickness of the plywood bottom (P). Cut the pieces to length.
15. Glue the base together with an opposed-wedge jig. To apply clamping pressure, use carpenter’s shims—you’ll find them ready-made at hardware stores.
Glue the base. Thin pieces can be difficult to clamp, so I borrowed a jig that musical instrument makers use. Clamping pressure is applied by sliding together two opposed wedges (carpenter’s shims). Use the same jig for gluing the sides of the trays to 1/4-in. plywood.
16. Cut the bottom to fit the base and glue it into the rabbets.
Create the trays
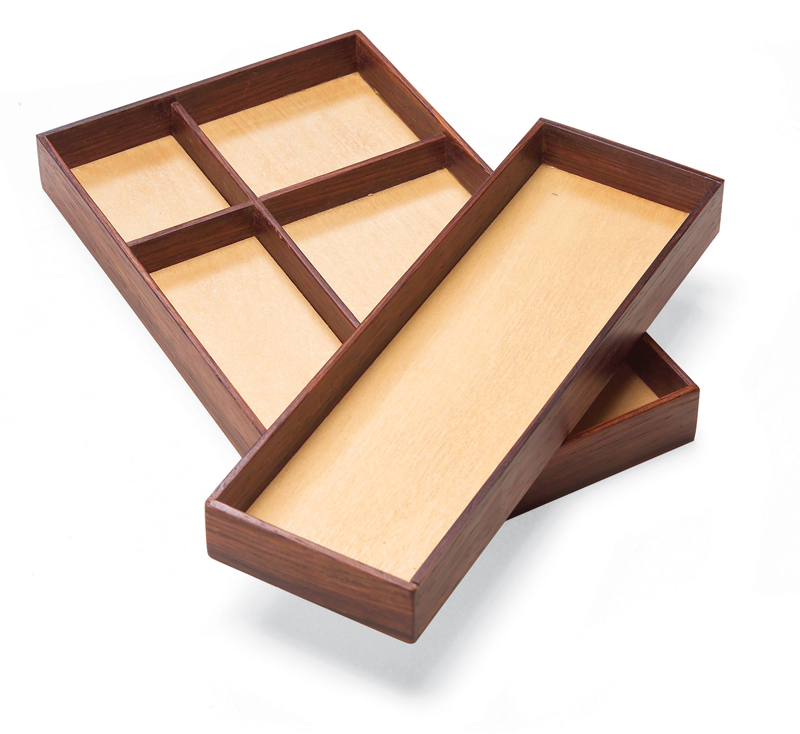
17. Cut the trays’ bottoms (Q, R) to exact width, but leave them 3/4 in. extra long. On the table saw, cut 1/8-in.-wide grooves, 1/8 in. deep, wherever you want to
insert dividers (Fig. A).
18. Mill a few long pieces for the trays’ sides (S, T, U, V) and dividers (W, X, Y). Plane them to fit into the grooves in the bottoms. Rip all the sides and dividers to final width. Cut the long sides 3/4 in. extra long.
19. Glue the long sides to both trays using the same opposed-wedge jig you used for the base. Add shims to span the distance between the trays and the jig’s sides.
20. Crosscut both ends of each tray. Measure their length directly from the inside of the box. When you add in the two end pieces, there should be 1/16-in. wiggle room between the ends of the trays and the ends of the box.
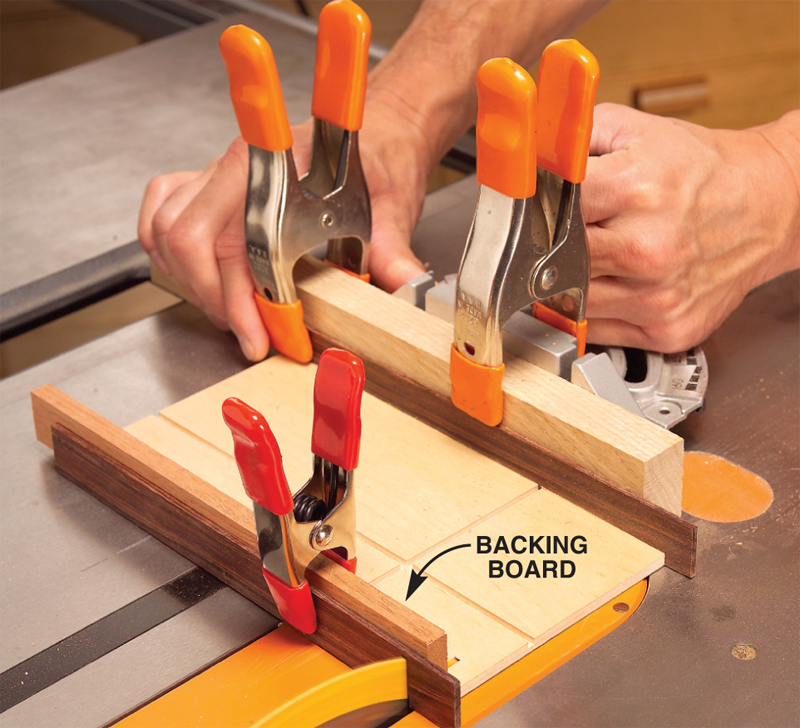
Crosscut the trays after gluing on their long sides. The tray’s corners are simply butt joints, so this cut ensures the tray’s bottom and sides are perfectly flush. Use backing boards behind both side pieces to eliminate any chance of chip-out.
21. Cut the short sides 1/4 in. extra long. Glue them to the trays using the opposed-wedge jig. Cut the ends flush and sand them even.
22. Cut the long divider (W) to fit. Glue it into the groove. Clamps aren’t necessary. Cut and glue the short dividers (X, Y).
Install the hinge
23. A shim (E) fits between the hinge and the lid (Fig. E). To calculate the shim’s exact thickness, place the closed hinge on the back edge of the box. Measure the distance from the top of the hinge to the top of the box and add 1/32 in. Crosscut the shim to fit between the spacers (J), allowing for 1/16 in. of play.
24. Glue the shim to the lid using spring clamps. Use a spacer to make sure the shim is parallel to the lid’s edge.
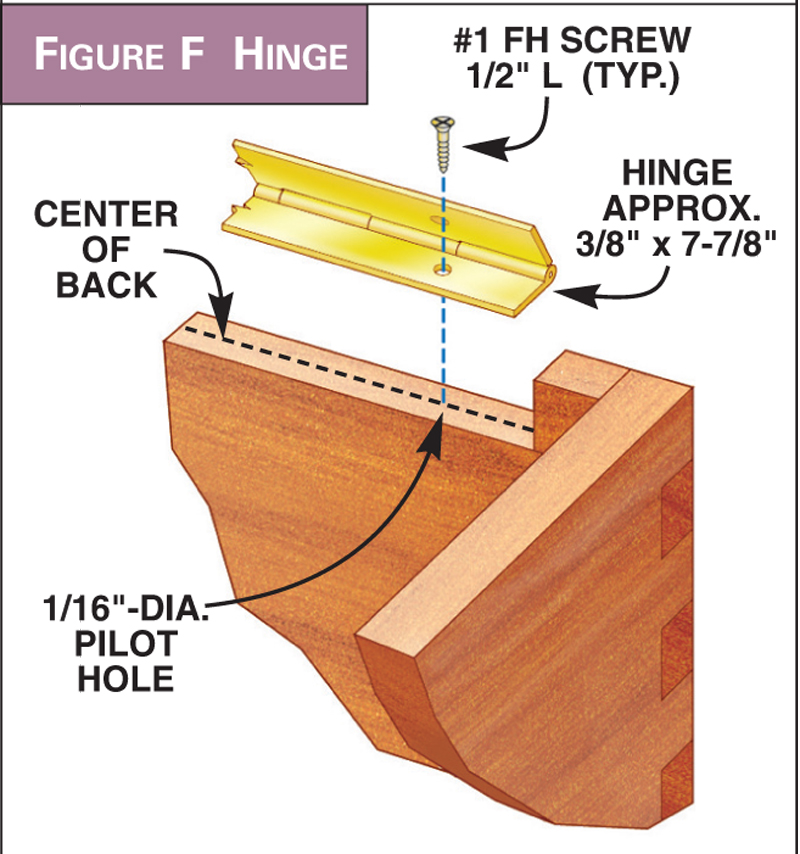
25. The hinge screws are centered on the box’s back edge (Fig. F). Draw or scribe a line down the center of the back. Put the hinge in place and mark the locations of the screw holes with an awl. Set up a drill press with a fence to drill the holes using a 1/16-in. bit.
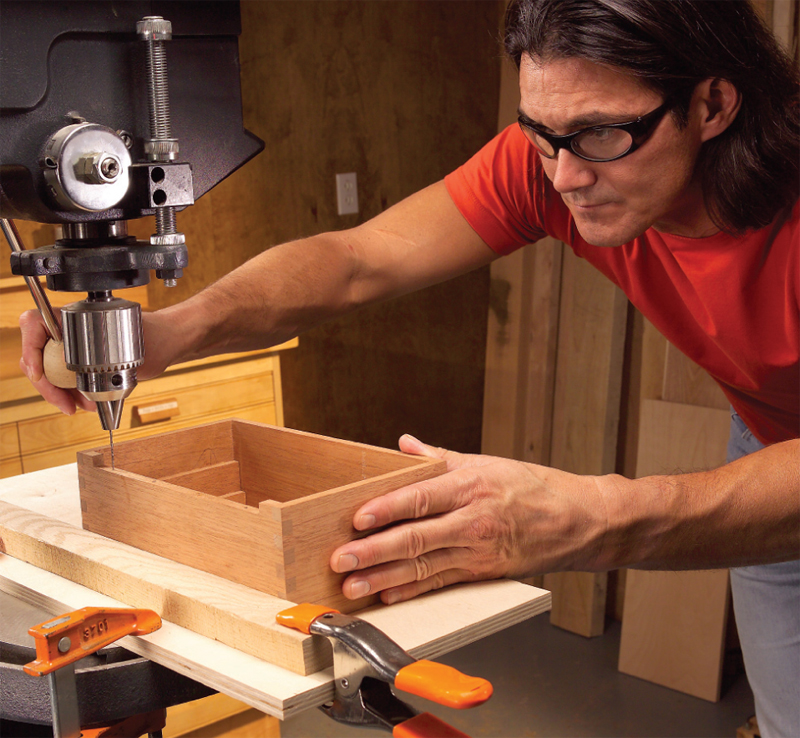
Drill holes for the hinges. Use a drill press and a fence with this tiny 1/16-in. bit. Mark each hole with an awl before you drill to keep the bit from wandering.
26. Draw or scribe a line down the center of the shim under the lid. Mark the screw locations directly from the hinge, as in Step 25. Drill holes for the screws using the drill press.
Finish and assemble
27. To accurately mark the screw holes for attaching the base to the box, set the box on top of the base. Draw the outside perimeter of the box on the base’s top. Mark screw locations 3/16 in. inside the lines. Drill and countersink holes for the screws.
28. Turn the box over, place it on some tall blocks and clamp the base to it. Drill pilot holes for the screws into the box. Disassemble.
29. Finish the base, box and lid as separate parts.
30. Screw the base to the box. Screw the hinge to the lid, and then attach the lid to the box. The hinge has a built-in stop, so the lid won’t open too far.
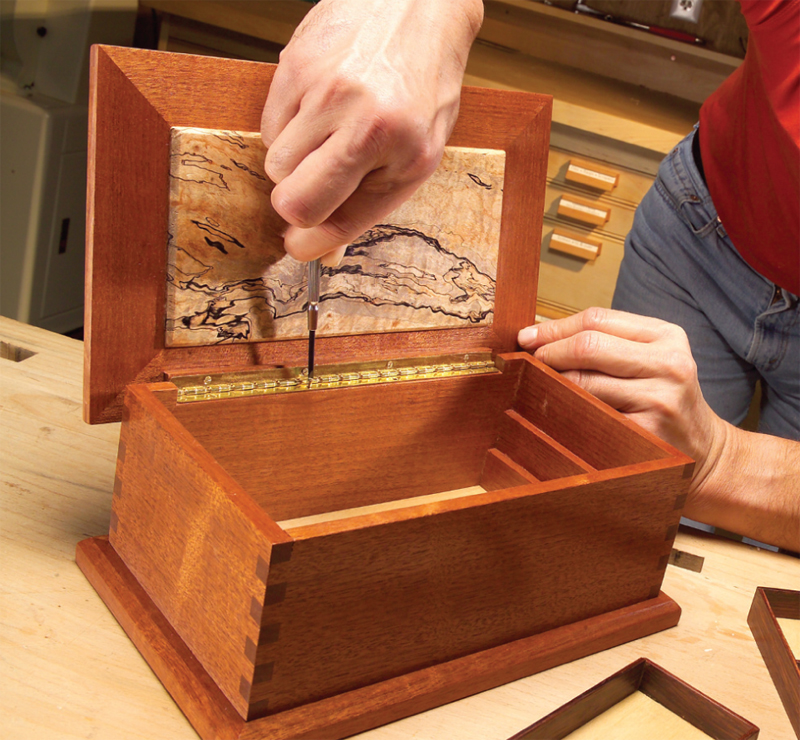
Install the hinge and lid. These No. 1-size screws are delicate, so take it easy. Use a very small screwdriver that fits tightly in the screw’s slot to avoid marring its head.
Oops! Fixing a Mistake
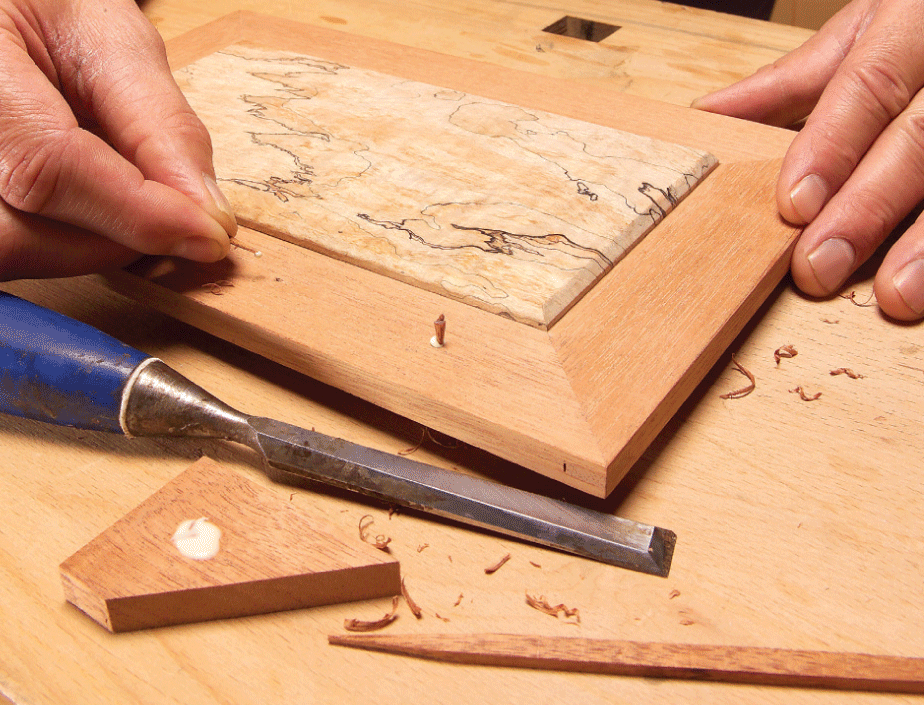
Four nasty holes, right through the top.
Can you believe it? I drilled hinge screw holes all the way through the top of my box lid! Fortunately, the fix was easier and more invisible than I could have imagined. First, I found a piece of mahogany whose end grain was so light in color that it would blend with the face grain of the piece I drilled through. (I just wet the piece with water to see what its color would look like with finish on.) I made some tiny toothpicks from that wood, tapped them into the holes with glue and pared them flush. Now, everyone thinks my box lid is perfect, but I know where the bodies are buried!
Sources
Note: Product availability and prices are subject to change.
MLCS Woodworking, mlcswoodworking.com, 800-533-9298,
3/8-in. carbide spiral bit, 1/2-in. shank, #7467;
1/8-in. slot cutter with bearing, 1/2-in. shank, #7645;
45-degree chamfer bit, 1/2-in. shank, #7674;
Rabbeting kit, 1/2-in. shank, #8667.
Lee Valley, leevalley.com, 800-871-8158,
Box stop hinge, 200 mm x 9 mm, #00D80.05;
No. 1 brass screws, 1/2 in. long, #91Z01.03X.
Popularwoodworking.com is a participant in the Amazon Services LLC Associates Program, an affiliate advertising program designed to provide a means for sites to earn advertising fees by advertising and linking to Amazon.com and affiliated websites.
Project Requirements
Fig. A: Exploded View
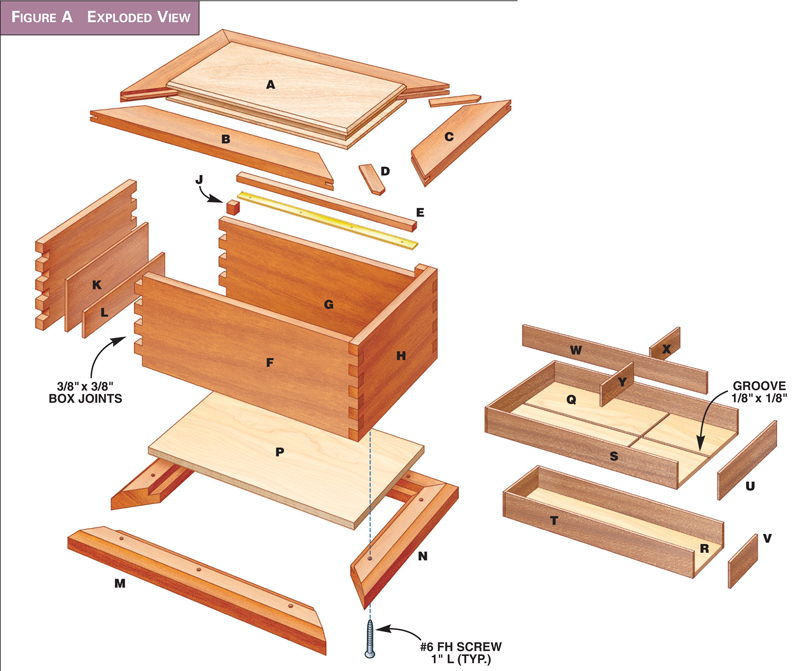
Fig. B: Panel
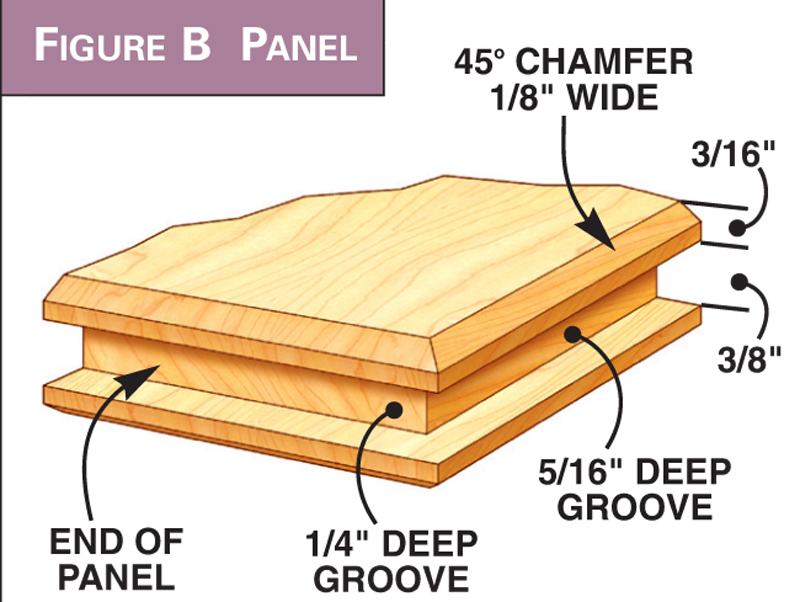
Fig. C: Frame
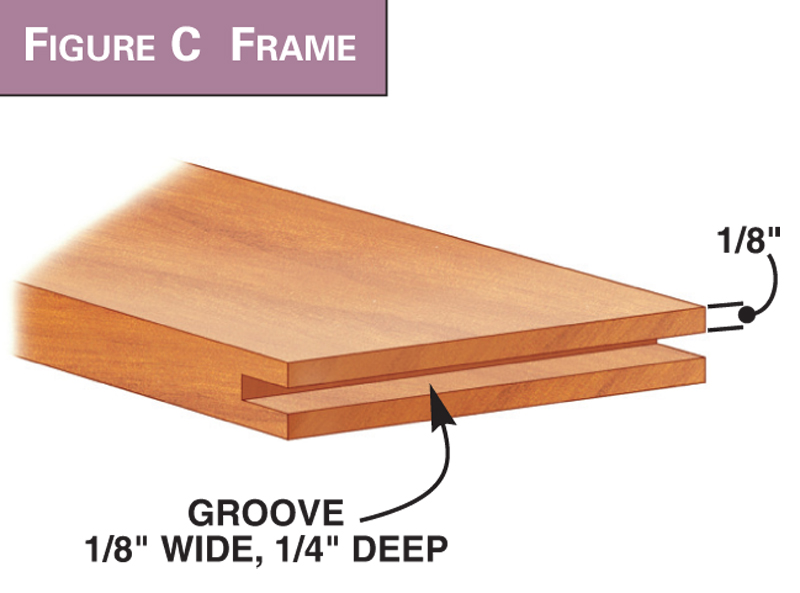
Fig. D: Base
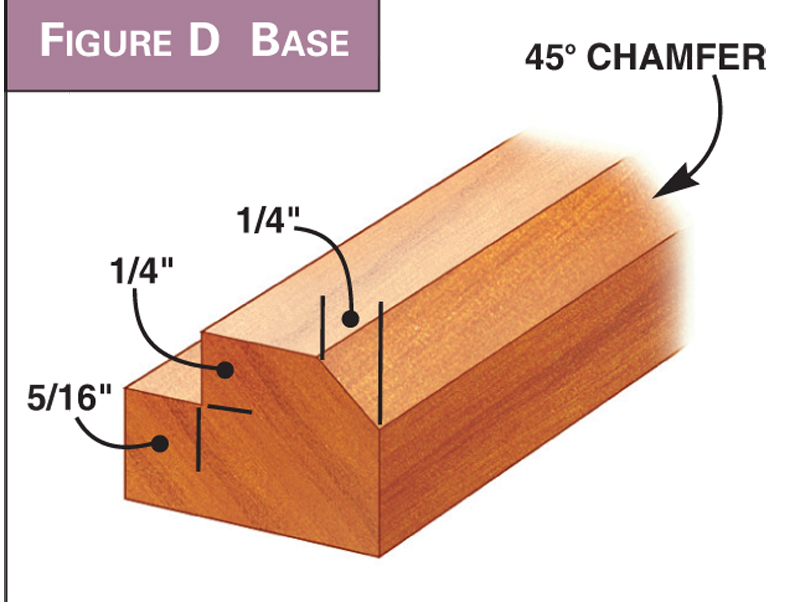
Fig. E: Underside of Lid
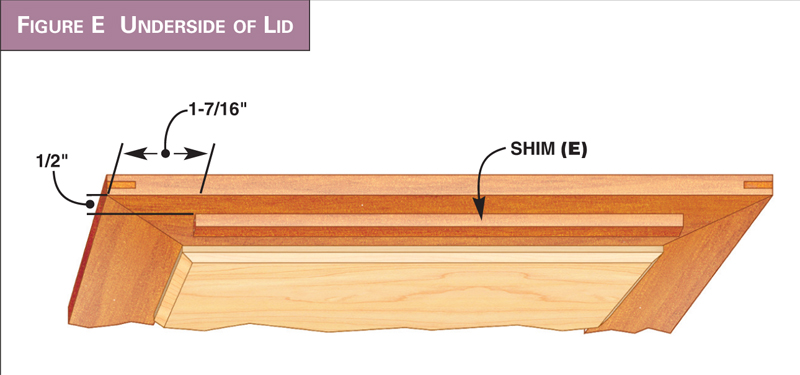
Fig. F: Hinge
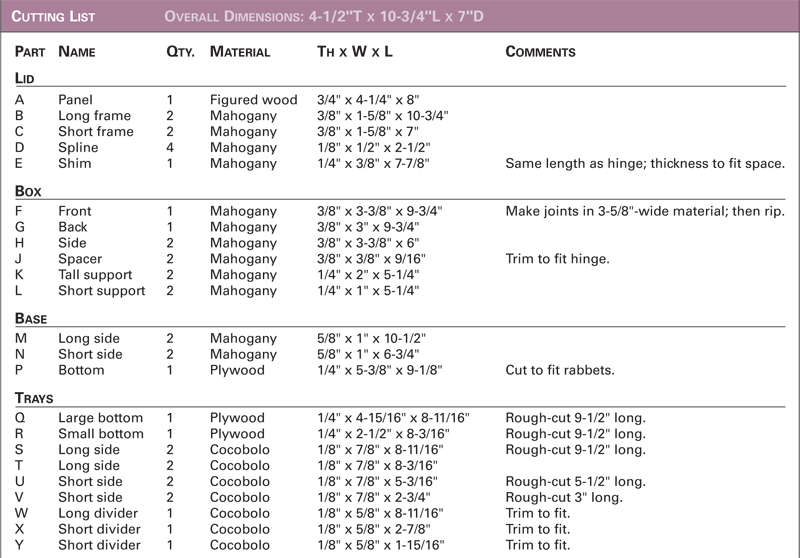
Cutting List
 This story originally appeared in American Woodworker March 2005, issue #113.
Here are some supplies and tools we find essential in our everyday work around the shop. We may receive a commission from sales referred by our links; however, we have carefully selected these products for their usefulness and quality.


