Some of our favorite woods have
large, open pores on the surface.
Mahogany, walnut, teak, koa, ash, oak,
and rosewood all fall into this category.
With these and other woods you have a
choice; apply a thin finish that lets the
pores show, or use pore filler to create
a glass-smooth, pore-free surface.
Which you choose is strictly a matter of
taste, but if you go for the second
option, known as a “filled finish,” you
need to know about pore fillers.
What Is a Pore Filler?
Pore filler, also called semi-paste filler,
is a thick mixture of inert solids and
resin that can be packed into wood
pores. The inert solids are usually
ground-up sand, but they can be powdered
rock (talc or pumice) or wood dust
(called wood flour). The resin in the mix
acts as a binder to keep the solids together
and stuck in the wood pores.
In theory, you could fill the pores by
building up layer after layer of finish
and sanding it back. However, this is a
very tedious process, and is likely to
result in pores showing up again some
months later as the finish packed into
them shrinks. Pore filler is a quicker
and more reliable path to the same end.
Filler does not shrink after it dries.
As a result, once applied, it levels the
entire surface of the wood, pores and
all. Don’t confuse pore filler with wood
putty, which is a thicker mixture meant
for filling gouges and dings in wood.
Pore filler is too thin to fill large
gouges, and putty is too thick to fill
pores easily.
When to Use Them
On woods with very fine pores, such as
maple, cherry, poplar, and most softwoods,
filler isn’t necessary. On large pored
wood, filler can be used for two
main reasons: To create a level base for
the finish; and to create color contrast.
Gloss finishes and solid colors benefit
greatly from a level finishing surface. When pores show under these finishes
they tend to detract from the elegant
appearance. Even worse, when you try
to polish a high-gloss finish with open
pores, the rubbing compound will
often pack into them, leaving you with
an unsightly mess. When you finish
open-pored woods with either a solid
color or with a gloss finish, use pore
filler first.
A colored pore filler can either
change the overall color of the wood
or create an interesting contrast
between the wood and its pores. A
pore filler that is darker than the general
color of the wood creates contrast
between the pores and the background
wood. This makes the wood
appear darker and adds richness and
character to the wood by making the
pores more obvious (Photo 7). The
same is true of a light pore filler. It
creates contrast while making the
wood lighter in color. And while
wood purists may blanch, using pore
filler colored to contrast with typical
wood tones can create stunning
effects that Mother Nature never
imagined (Photo 6).
Oil vs. Water
Pore fillers are sold both in oil-based
and water-borne varieties. They both
do the same basic job, but waterborne
fillers have several advantages.
They have fewer annoying fumes, dry
faster, and are compatible with virtually
any finish: water-borne, oilbased,
shellac or lacquer.
Water-borne pore filler is available
in a wide range of typical wood colors
or neutral (a pale ecru color). If you
find it necessary, you can alter the colors
yourself using UTCs (universal
tinting colors), which come as thick
liquids or pastes. UTCs can usually be
found at a well-stocked paint or home
store, or at woodworking specialty
stores. UTCs usually slow down the
filler’s drying time.
Applying
Water-borne Filler
Instead of brushing, I scrub waterborne
fillers directly into the wood
using the finest nylon abrasive
pads—the white ones. Gray pads are
the second finest, and will do in a
pinch. The pad lets me get the filler
onto the wood and pack it into the
pores all in one step.
As soon as I get it scrubbed in, I
squeegee off all of the excess with a plastic scraper or old credit card.
Once the excess is squeegeed off,
I let the filler dry. In a few hours,
depending on the humidity, I can
go back, sand the surface, clean
off the sanding dust with a cloth
dampened lightly with water, and
the piece is ready for finish.
Fig. A

The pores of red
oak are large enough
to see and feel even through
a finish (left). Pore filler levels the
surface of the wood so it looks and
feels smooth. |
|
Click any image to view a larger version.
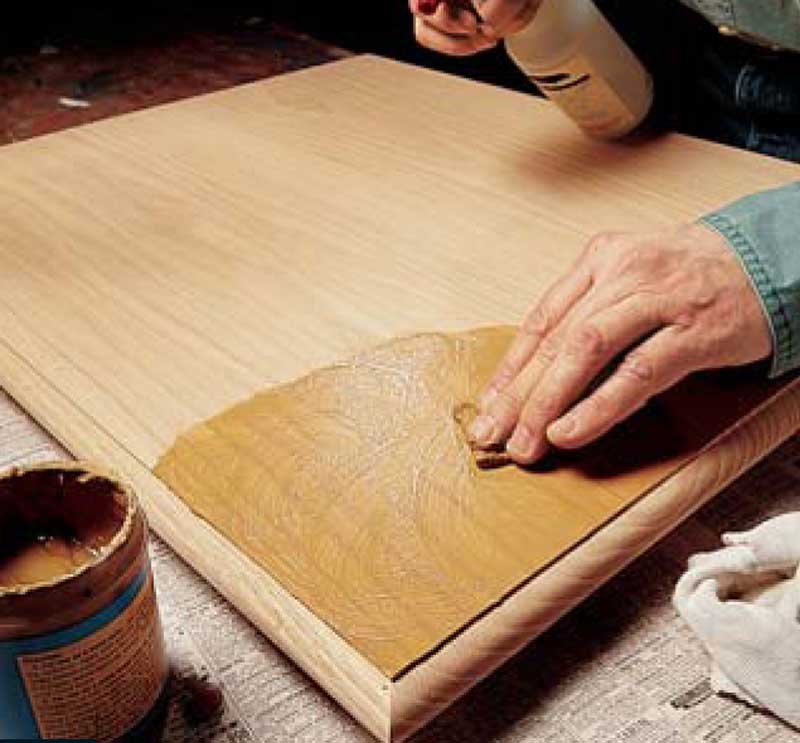
1. Work filler into the pores
by rubbing with a white nylon pad.White
pads are the finest of the nylon abrasives,
containing only talc. If the filler sets up too
fast, spray it with water to keep it workable.
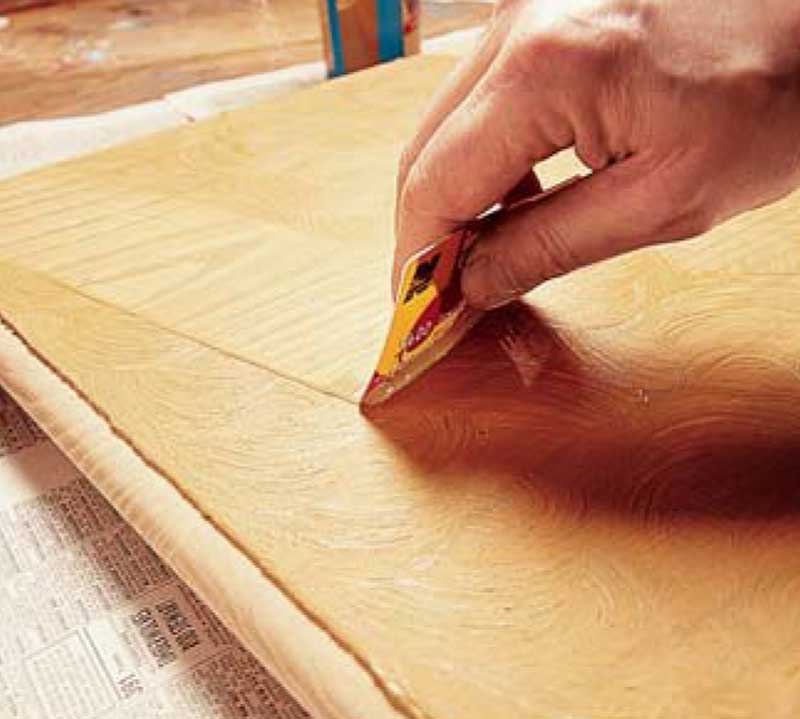
2. Squeegee the excess filler
slurry from the surface, while it’s still
wet. A credit card makes a great
squeegee. Let the filler dry completely
before sanding.
3. Clean a profiled edge using a
credit card cut to match the profile.
Curved surfaces and inside corners are
the toughest areas to clean of excess
filler. Credit cards can be cut and filed
so they can get into tight areas.
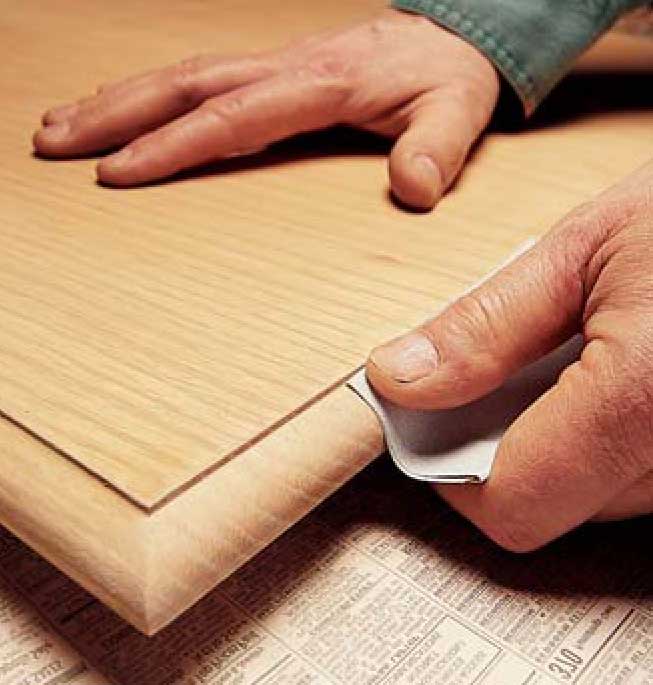
4. Sand with 220-grit, selflubricating
sandpaper to remove the
dried filler from the surface.This is an
important step. Any filler left on the
surface shows up when the piece is
finished, so be thorough.
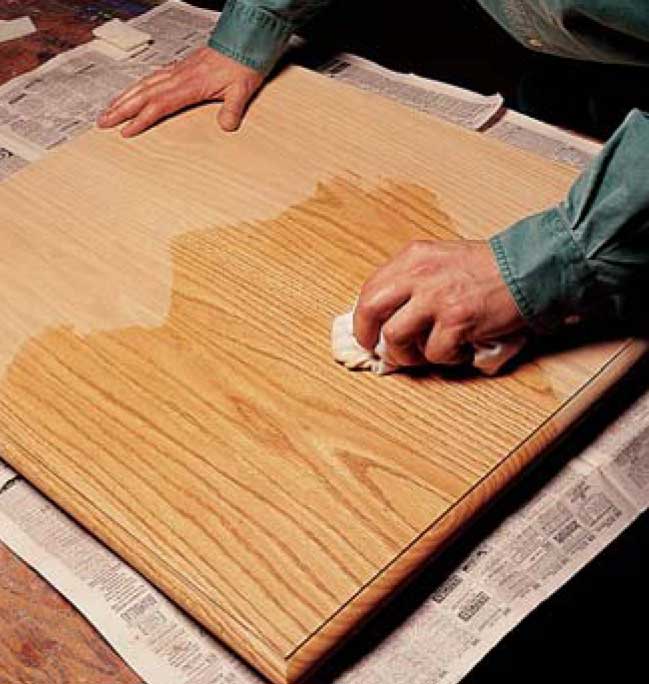
5. Wipe the surface clean with a
cloth dampened with water (about as
damp as a healthy dog’s nose) to
remove the last bit of sanding dust
and it’s ready to finish.
6. An eye-catching look can be achieved by using a colored filler
that contrasts with the natural tones of
the wood (above, top) or by applying
contrasting-colored pore filler over a
colored, sealed surface (above). Use 320-
grit sandpaper to remove the filler
without disturbing the color below.
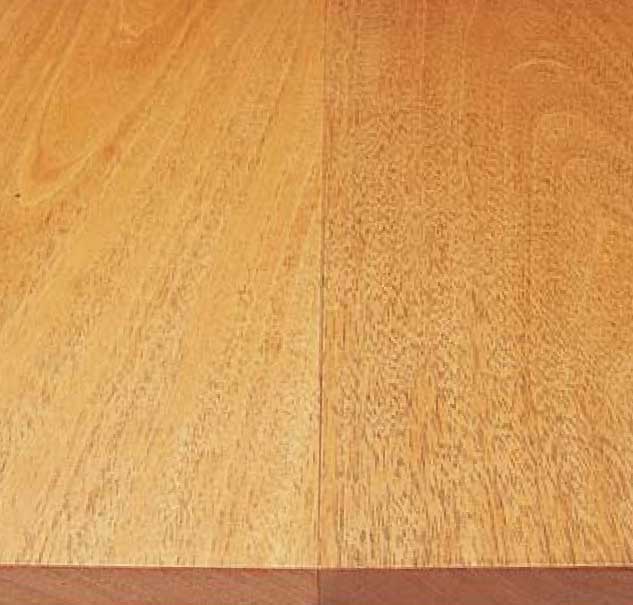
7. Dark-Colored filler makes the sample on the right appear
darker than its companion, which has
neutral filler. Both samples came from
the same mahogany board. |