


We may receive a commission when you use our affiliate links. However, this does not impact our recommendations.
Composing a Tabletop
Two ways to create a beautiful top.
By Ian Kirby
The top is the first thing people
will see when they admire a table
you’ve made. The selection and
arrangement of the boards is a testament
to your skills and sensitivity to
the beauty of wood. If you take the
time to study wood at the lumberyard
and cut your boards with care, you
will be able to compose them into an
elegant arrangement.
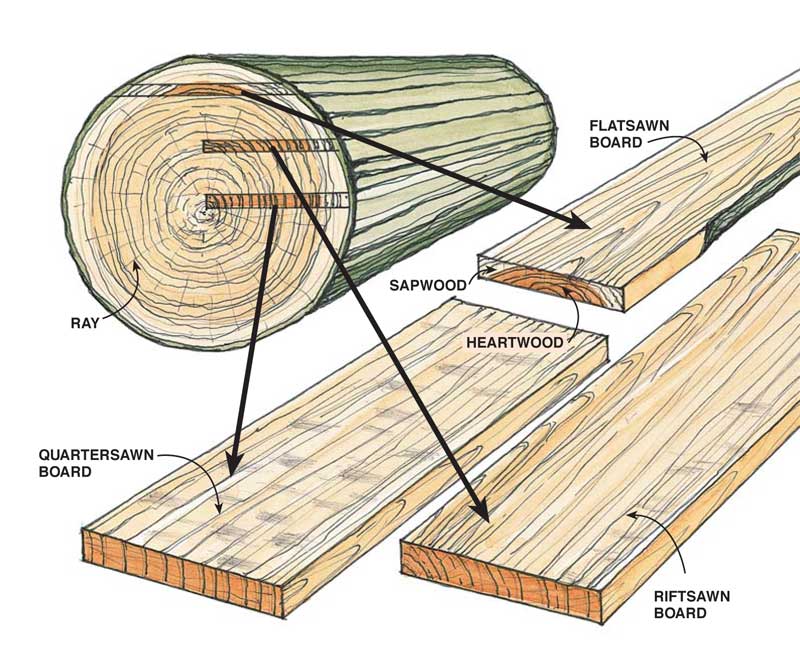
The grain pattern of every board is
unique. But its overall figure is a result of
how the board was sawn from the tree
(Fig. A). As you sit at the drawing board,
thinking about your table and its top,
consider these two basic choices of wood
figure:
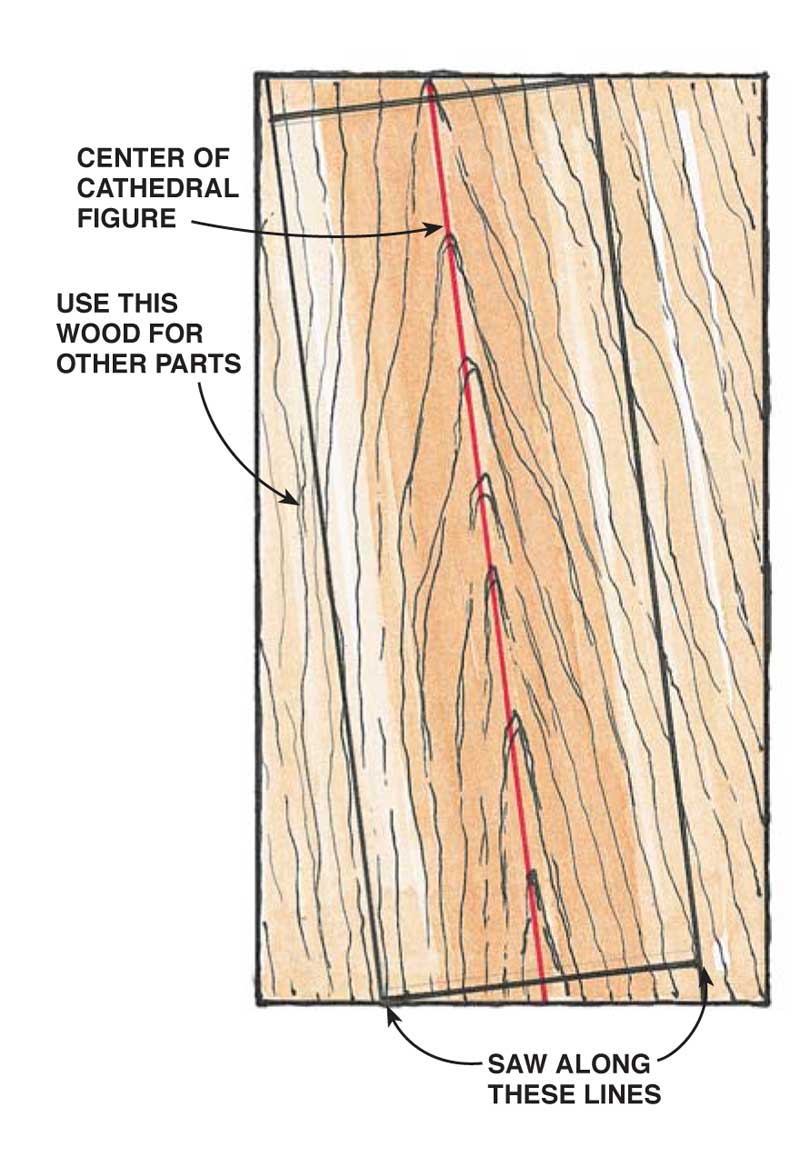
Cathedral Figure. In this top you
emphasize the long arches of flatsawn
wood. This cut is the most commonly
available kind of lumber but also the
most likely to distort unless it’s properly
dried.
Straight figure. Here you see the
long, straight lines and flashy rays of
quartersawn or radially sawn wood,
which expands and contracts the least
and is the most stable. Quartersawn
wood is not readily available in most
species, but you can saw your own in
your shop.
Before you leave the drawing board,
make a bill of materials and a full-size
drawing of the tabletop. You might simply
chalk the outline on a 4×8 sheet of
plywood. You’ll use this drawing as a
guide throughout the process of harvesting
your boards and composing them
into a beautiful expanse of wood.
|
Fig. A: Study the end grain of a board |
Click any image to view a larger version.
|
At the Lumberyard
The lumber pile is where desire meets
gritty reality—you probably won’t find
the wood you’ve imagined, so you have
to be flexible and make the most out of what you can get.
Go to the lumber pile with a tape
measure and pad of paper, a 12-in.
straightedge (to check for cupping), a
crayon or chalk (to sketch a plan for
harvesting your top right on the boards),
and a knife or block plane. If you’ve got
a moisture meter, take that too.
At a large lumberyard you’ll find
boards stickered in piles or stored in
bins. Most will be rough-sawn and hard to decipher. Is that light patch sapwood
or not? Is there any quartersawn figure in
the board? Answers to both of these
questions will come from studying the
end grain of the board to reconstruct
how the board was sawn from the tree.
You might be able to choose the
boards you want, but more likely you’ll
have to buy from the top of the pile. At
a specialty dealer, you’ll probably find the
wood already planed on both sides so
you can see and select the figure, but it will come at a higher price.
You’re looking primarily for color and
figure in a stack of lumber. To see the
color, plane a little patch. Wet it to see how
it might finish up. If your boards don’t
match in color, don’t lose heart. Take the
long view—time and exposure to light
evens out most color variations in heartwood.
Look carefully for sapwood. It’s
generally a distraction in a top made of
dark-colored heartwood. Reject boards
with lots of sapwood or plan to saw it off. White sapwood may not be a problem in
light-colored species.
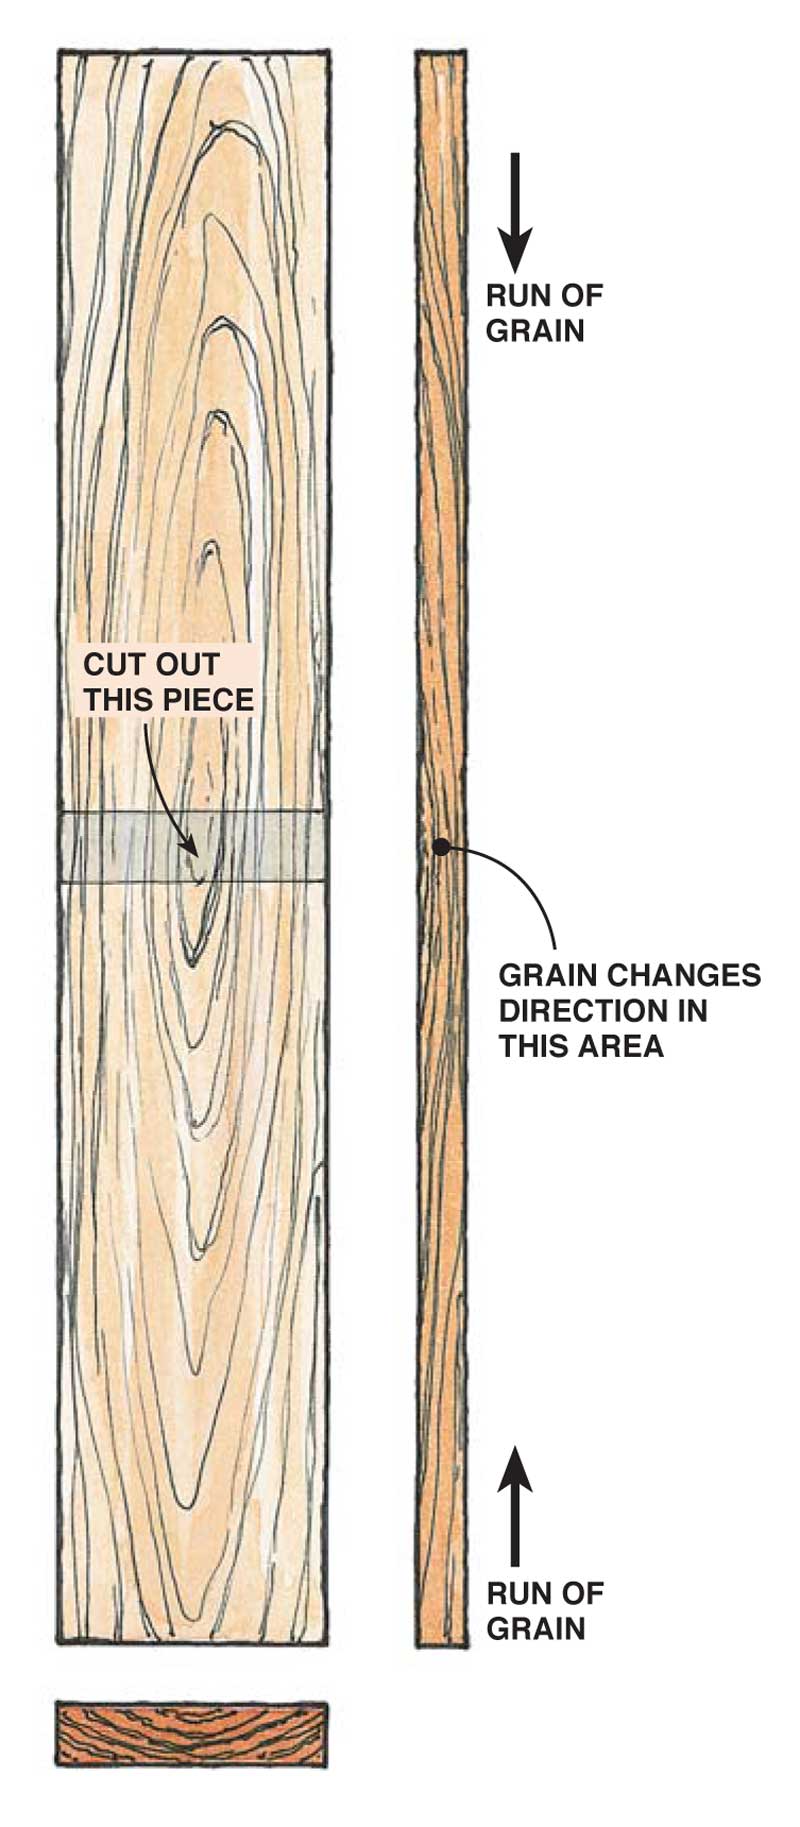
If the figure of a board you like doesn’t
run parallel to the side of the board, don’t
worry. You will be able to harvest the look
you want back in the shop.
Moisture Content
Try to get wood that has been kiln dried
to 6 to 8 percent moisture content and
stored indoors since it left the kiln. This
wood is likely to remain flat and stable.
You won’t have to worry about a top cupping
if you use kiln-dried wood and finish
both sides. Some woodworkers insist on placing
all the bark sides or all the heart sides up.
Others claim that you should alternate heart
and bark sides. This disagreement is a holdover
from the days of air-dried wood and
uncertain moisture content. With dry wood,
it doesn’t matter what arrangement you
choose. You’re free to go for what looks best.
If you’re not sure about the moisture content
of the wood at the lumberyard, go
ahead and buy it, but don’t plan on making
your top right away. Back in the shop, harvest
the top boards and other parts you’ll
need and cut them at least 1⁄4-in. oversize in
length and width. Don’t thickness plane the
boards. Pile the wood indoors on a flat surface
with 3⁄4-in. wooden stickers separating
each board. Let the wood acclimate for a
couple of months. Then plane everything flat
and square.
Building a Top with a Cathedral Figure
If you’ve got what rose to the top of a lumberyard pile, genuine run-of-the-mill
boards, most of them will be flatsawn. Discard boards that bow or twist, then
sort through the rest for the arches of cathedral figure that catch your eye.
|
Fig. B: Mark the defects with |
|

|
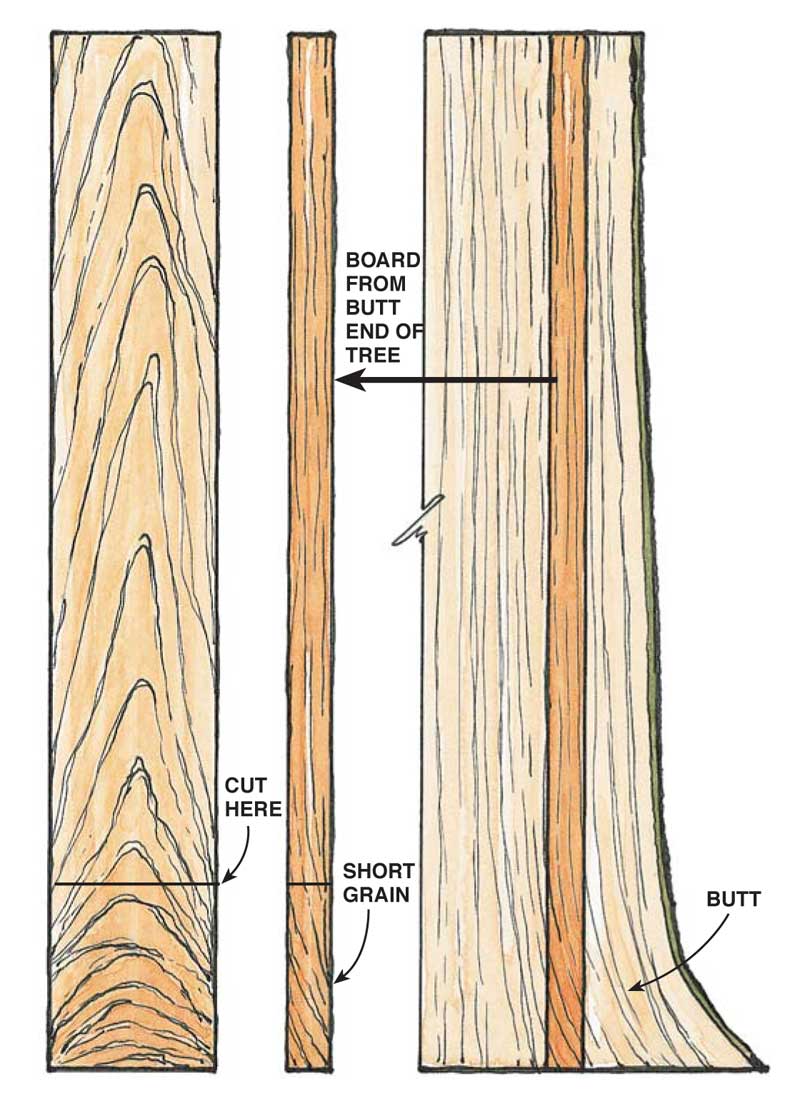
Fig. C: Cut off short grain at |
|
|
Fig. D: Cut out ovals in the middle of |
|
|
Fig. E: Snap a chalk line down the center |
|
|
Fig. F: Select and compose your cathedral top to create a balanced, harmonious Add matched pairs of boards to either side. Slide them by each other until the When you’ve arrived at a good arrangement, draw a pair of sweeping lines |
|

Building a Top with a Straight Figure
Choose either quartersawn or riftsawn wood if your
table design calls for a straight-figured top. Quartersawn
wood is least likely to distort. It expands and
contracts less than flatsawn wood.
Quartersawn wood can be quite striking in species
with clearly visible rays, like oak, maple, cherry, or
lacewood. You see a broad cross section of the rays
as they exit the face of the board. The rays form a
random pattern that contrasts with the board’s
straight figure. The figure in riftsawn wood resembles
quartersawn, except the rays are very small.
Quartersawn red and white oak should be relatively
easy to find, but other species aren’t routinely cut on
the quarter. You can harvest your own quartersawn
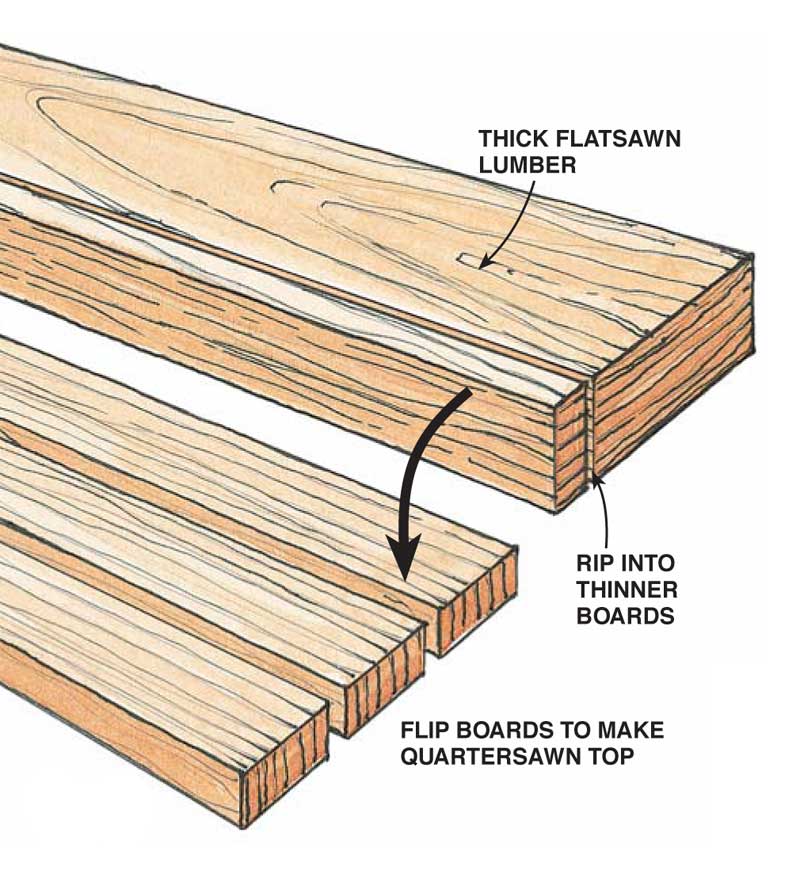
wood from riftsawn boards or thick flatsawn lumber.
|
Fig. G: Read the end-grain of |
|

|
Fig. H: Rip the flatsawn lumber into |
|
|
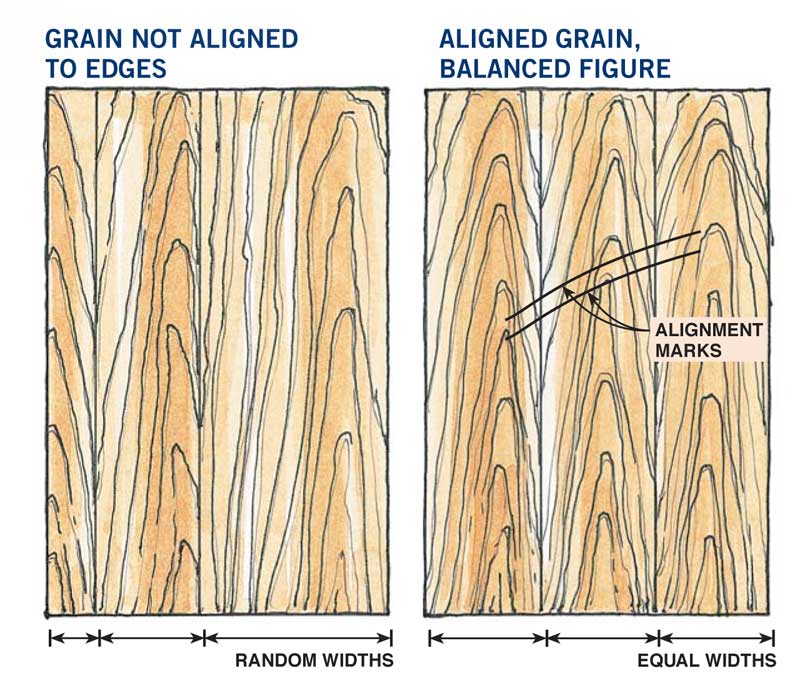
Fig. J: Compose the quartersawn top symmetrically about its centerline for a |
|
|
This story originally appeared in American Woodworker August 1999, issue #74.
|
|

Here are some supplies and tools we find essential in our everyday work around the shop. We may receive a commission from sales referred by our links; however, we have carefully selected these products for their usefulness and quality.


