


We may receive a commission when you use our affiliate links. However, this does not impact our recommendations.
Furniture Repair Tips
Tricks for taking it apart and getting it back together.
by Mac Wentz
Major furniture repair often involves disassembling the piece and
putting it back together. Sounds simple enough: knock things apart and
glue them back together. But anyone who’s tried this knows that it never
goes that smoothly. This article will show you some slick ways to deal
with the most common and frustrating aspects of the job. Plus, we’ll
show you some shortcuts that might help you avoid
disassembly altogether. Just keep in mind that these methods aren’t
meant for fine antiques. If you suspect that a piece of furniture is
especially old or valuable, have an expert take a look (see
“Antiques-Repair & Restore” in the Yellow Pages).
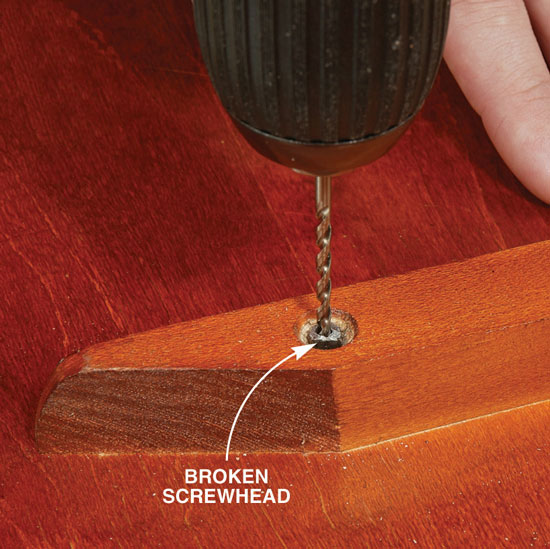
Twist out damaged screws with an extractorThere are lots of ways to attack screws with damaged or broken-off heads. But in most cases, drilling into the screw and using a screw extractor is the most foolproof method. Extractors come in sizes small enough to remove 3/32-in.-dia. screws and are available at home centers for $3 to $5. Centering a drill bit on the jagged end of a broken screw can make you curse. So begin by drilling a starter hole with a tiny bit (1/16 in. or so), which is easier to control.
|
Click on any image to view a larger version.
Drill a hole in the screw shank. No need to drill deep—1/8 to 1/4 in. is usually deep enough.
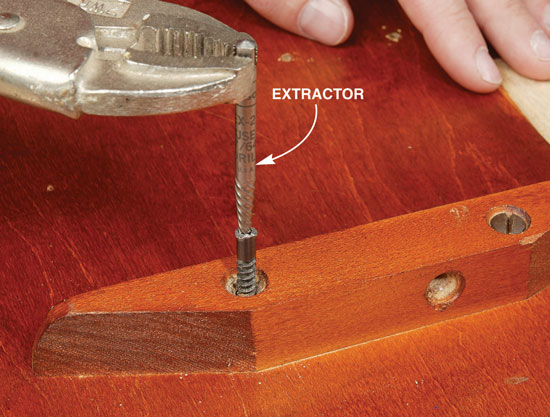
Remove the broken screw by inserting the extractor and turning counterclockwise. The extractor will lock into the hole and twist out the screw. |
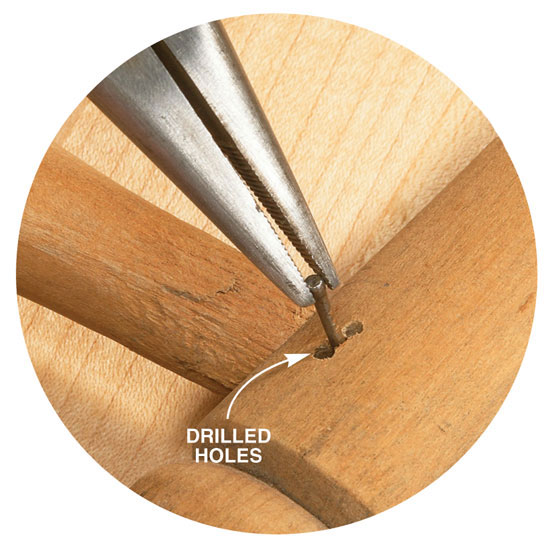
Drill holes to get a grip on nailsSome nails are easy to deal with. Sometimes you can separate the parts and then remove the nails. Other times you might be able to drive a nail right through the part and out the other side. But in some cases there’s no alternative to pulling them. And that means you need a way to grab the nail’s head. If you can’t get hold of the nail’s head, drill holes—just large enough for needle-nose pliers—on opposite sides of the nail shank. Run the bit right along the shank and bore as deep as the shank, if possible. This will help to loosen the nail.
|
 |
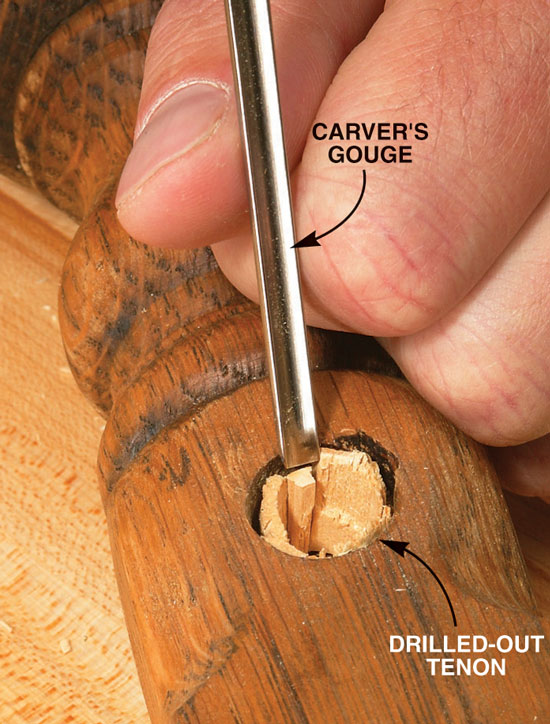
Hollow out, then chip out broken tenonsWhen half of a dowel or tenon stays in its hole, you’ll be tempted to grab a bit of the same size and completely drill it out. But this is almost certain to leave you with an enlarged, off-center hole. Instead, use a bit that’s about 1/8-in. smaller than the socket. Then break out a section of the remaining material and the rest will chip out easily. A small carver’s gouge is the perfect tool for the job, but a narrow chisel or even a sharpened screwdriver will
work, too.
|
 |
Disassemble with a hammerDespite the variety of spreading clamps and prying tools available, hammers are still the favorite disassembly tools of furniture repair pros. Some use rubber mallets, others like dead-blow hammers, which have heads filled with sand or metal shot to eliminate bounce-back. Either way, you’ll need a collection of wooden blocks, cardboard or carpet scraps to prevent surface damage. Cover your workbench with carpet or a heavy blanket and swing away. Try to knock joints straight apart. Some twisting and wrenching is inevitable, but keep it to a minimum and you’ll avoid breaking joinery.
|
 |
Inject epoxy into loose jointsThis is a fix that makes furniture-repair purists cringe, but let’s face it: some pieces just aren’t worth the time it takes to make a first-class repair. Epoxy injection is fast and easy, but also a bit of a gamble. It doesn’t work every time and if it doesn’t, you’re stuck with a loose joint that’s almost impossible to pull apart and reglue.
The goal is to force epoxy into the pocket between the end of the tenon and the bottom of the mortise or socket. That way, epoxy will flow into gaps around the tenon. The hole you drill into the pocket should be sized so that the tip of your syringe seals tightly when inserted. As you apply pressure to the syringe, wiggle the loose part so epoxy flows all around the tenon. You’ll get the best results using low-viscosity epoxy that will inject and flow easily (see Sources, page 55).
|
 |
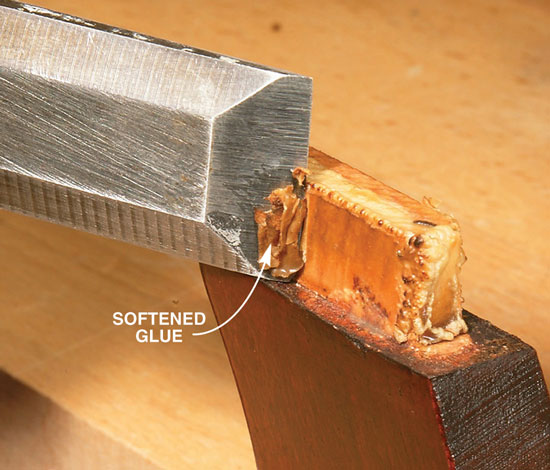
Heat and scrape glue off tenonsNew glue doesn’t adhere very well to old glue, so you have to get rid of the old stuff before reassembly. Turn a heat gun on old glue, and it reacts just like old paint, becoming soft, gummy and easy to scrape off. Just remember that a heat gun is designed to destroy finishes and can even ignite wood. Have a wet rag handy to keep things cool. |
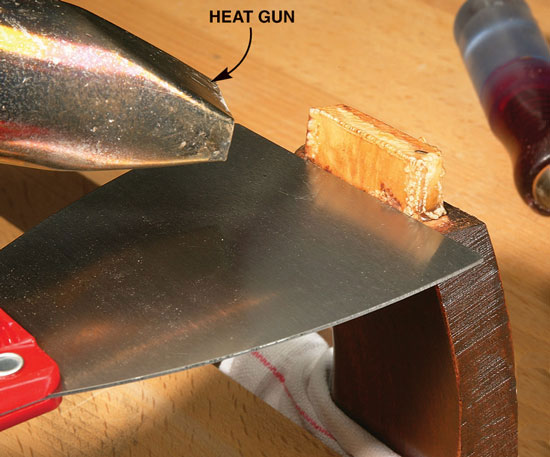
Shield the nearby finish with a broad putty knife as you apply heat to the old glue. If your heat gun is adjustable, start out using the lowest heat setting.
Scrape away the softened glue immediately. It will cool and harden in just a few seconds. Any leftover glue residue can be removed with light sanding. |
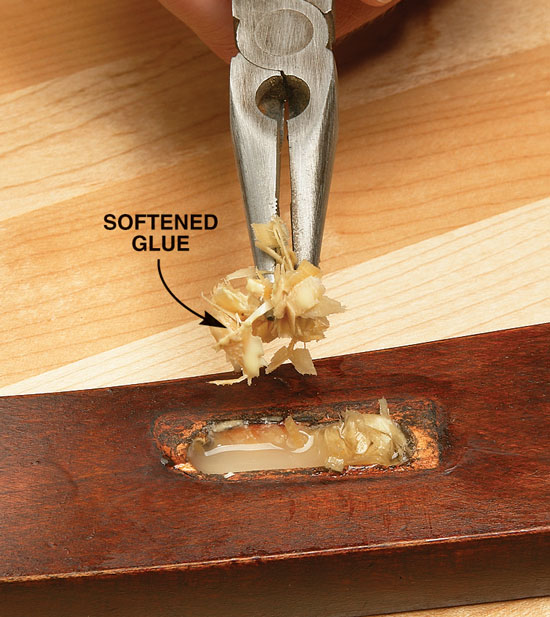
Shavings and hot water get glue out of holesScraping, sanding or reaming old glue out of a socket or mortise is slow, tedious work. And it’s tough to do without enlarging the hole. So why not let heat and moisture do the work for you? A big syringe lets you put steaming-hot water right where you want it and crushed shavings from a block plane are great for soaking up the softened glue. You might have to repeat the process a couple times, but it’s still safer than other methods. |
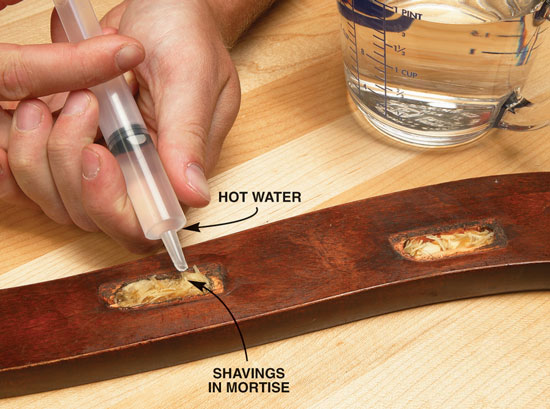
Pack the socket or mortise with wood shavings and then add steaming-hot water. Be careful not to drip on the surrounding finish.
Pull out the shavings with needle-nose pliers after 15 minutes or so, then repeat the process if necessary. Let the wood dry out for a couple days before reassembly. |
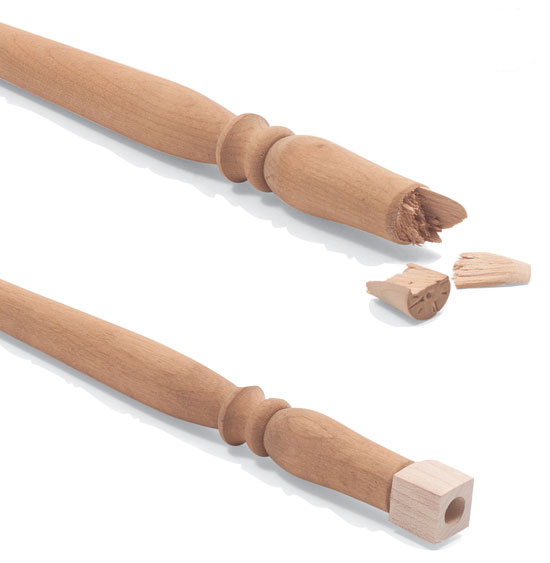
Rebuild a broken tenonA broken tenon may seem like a disaster, but it’s actually pretty easy to fix. The first step is to trim off the rough, broken end. Then glue in a block in place of the missing tenon. If you’re fixing a chair leg or some other part that will bear a lot of stress, use epoxy, because standard glues don’t bond end grain very well. With the block in place, drill a dowel hole through the block and into the part. The photos at right show the rest of the process.
|
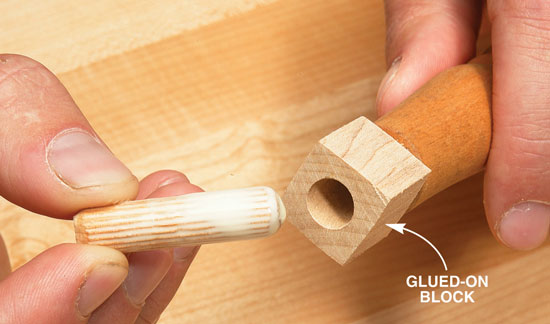
Insert a dowel to reinforce the joint between the glued-on block and the original part.
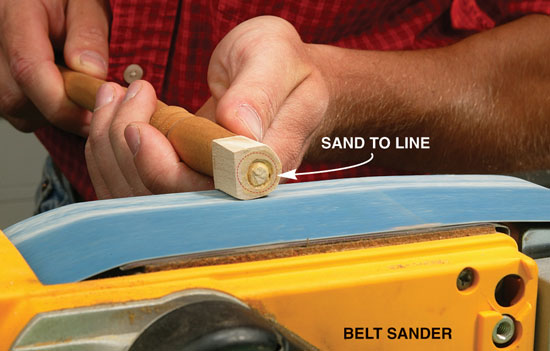
Round the block to create a new tenon. A circle traced on the end of the block is a helpful guide. You can patiently sand or carve until you get a snug fit, or you can go for a “close enough” fit and glue the joint with epoxy, which will fill any gaps. |
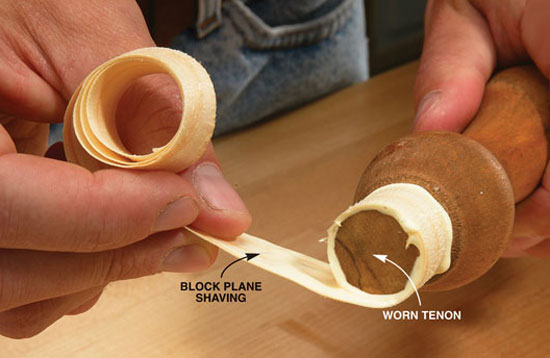
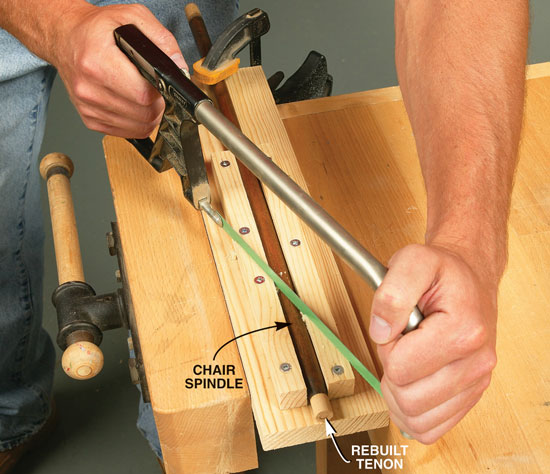
Wrap up a worn down tenonWhen a joint loosens and begins to wobble, the tenon and socket wear each other down. To enlarge the tenon and restore a tight fit, wrap it with a shaving from your plane. Keep in mind that wear and shrinkage turn round sockets and tenons into ovals. This means you’ll have to do some careful sanding to shape the tenon just right. |
 |
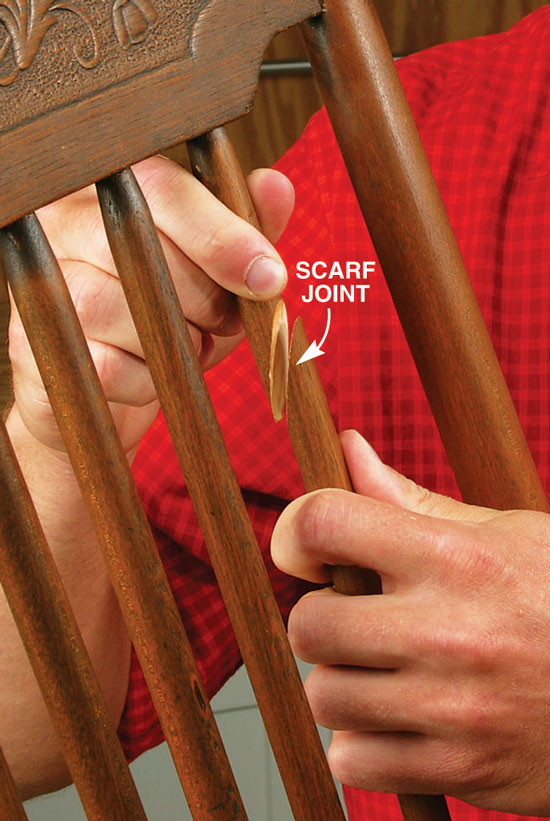
Insert a spindle or rungA broken spindle or chair rung can be removed well enough. But how do you get the repaired or new part back in without major disassembly? The answer is a scarf joint: a long, tapered cut that provides plenty of surface area for a strong glue joint. A scarf joint is less visible than a simple crosscut. |
Make a scarf cut, slicing the part in two. A fine-tooth dovetail saw is perfect for the job, but a fine hacksaw blade also leaves a clean cut with almost no tear-out.
Glue and insert the ends of the scarfed part. Then immediately glue the scarf joint together. |
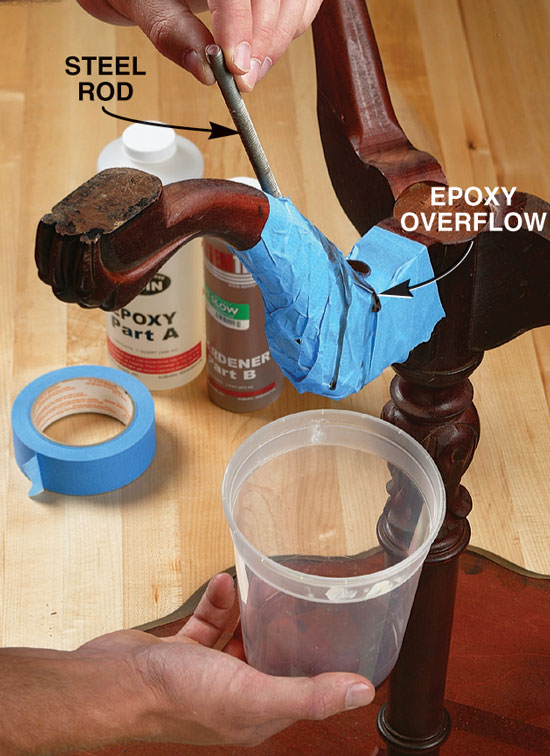
Restore strength with steelMost furniture fractures can simply be glued back together. But some breaks are messy, leaving splintery fractures that won’t form a strong glue joint. You could replace the entire part, or you might be able to reinforce it from inside—usually without removing it. Begin by gluing the part back together as you normally would. Next, you’ll need a long drill bit and a steel rod cut to length. Diameters depend on the repair, but the bit should be 1/16 in. to 1/8 in. larger than the rod. Steel rod (threaded or smooth) and 12-in.-long bits are available at home centers.
|
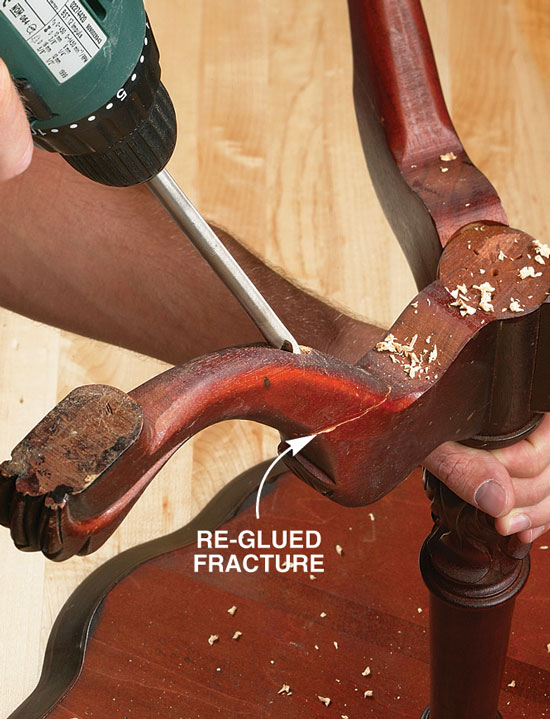
Bore a deep, oversized hole that extends through the re-glued fracture. For easier drilling and less stress on the fracture, start with a smaller bit before drilling the full-diameter hole. Pull the bit out every few seconds to clear wood chips.
Partly fill the hole with epoxy and insert the steel rod. Be prepared for epoxy overflow as you insert the rod by taping adjacent surfaces and watching for drips.
|
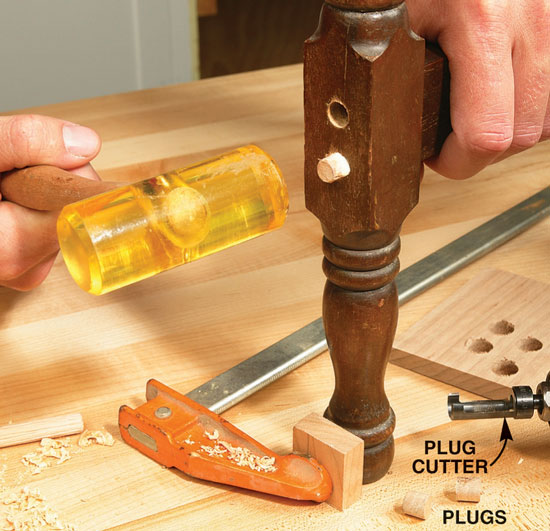
Through-dowels for loose jointsAny joint that can be drilled into from one end is a candidate for a through-dowel. This is an easy repair, but leaves holes to plug, so it isn’t for cherished heirlooms. You can make your own plugs with a plug cutter ($4 at home centers) or buy them. Face-grain plugs blend with the surrounding wood better than plugs cut from end grain (see Sources, below).
|
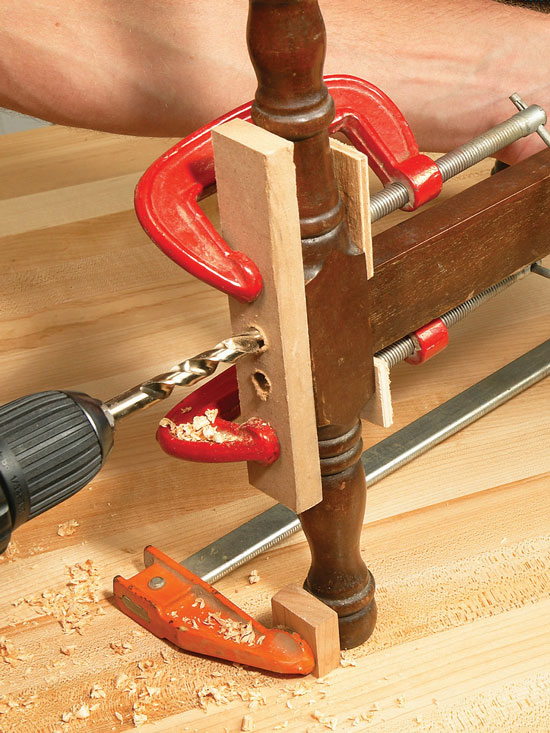
Drill a hole—or two—through the joint. For a clean hole, clamp a block in place to prevent tear-out. Also, use a clamp to keep the joint from spreading as you drill.
Drive dowels through the joint. Remember to set the dowels deep enough to allow for plugs. |
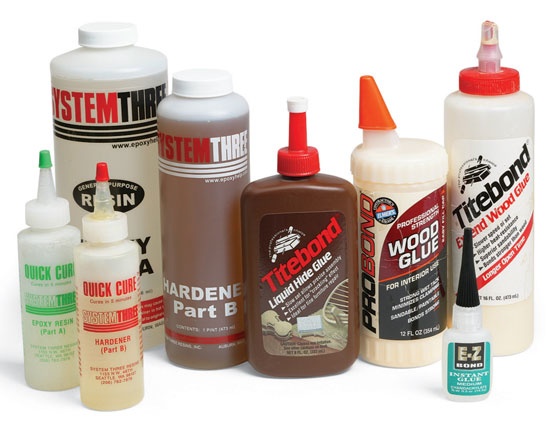
Choosing glue for repairsStrong and convenient, yellow wood glue is a good choice for most repairs. But there are glues that offer advantages for special situations: Slower Glues: Depending on factors like temperature and wood species, standard wood glue can set in as little as five minutes. When you need more time for complex assemblies such as chairs, try liquid hide glue or Titebond’s Extend, a slower-setting version of yellow glue. Both offer about twice the open time of regular wood glue (see Sources, below). Faster Glue: Cyanoacrylate, often referred to by the brand name “Super Glue,” is perfect for small repairs because it sets in minutes or even seconds depending on the formulation. Instead of finding ways to clamp small or odd-shaped parts, you can hold a repair together by hand until the glue sets. Gap-Filling Glue: Although mixing is a pain, two-part epoxy is the best choice for a joint that doesn’t fit quite right. Epoxy makes sloppy-fitting joints strong because it becomes a firm, strong-bonding gap filler as it cures. Standard wood glues shrink as they dry and are too brittle to bridge gaps. Polyurethane glue expands to fill gaps, but doesn’t cure hard enough to become a sturdy gap filler.
|
 |
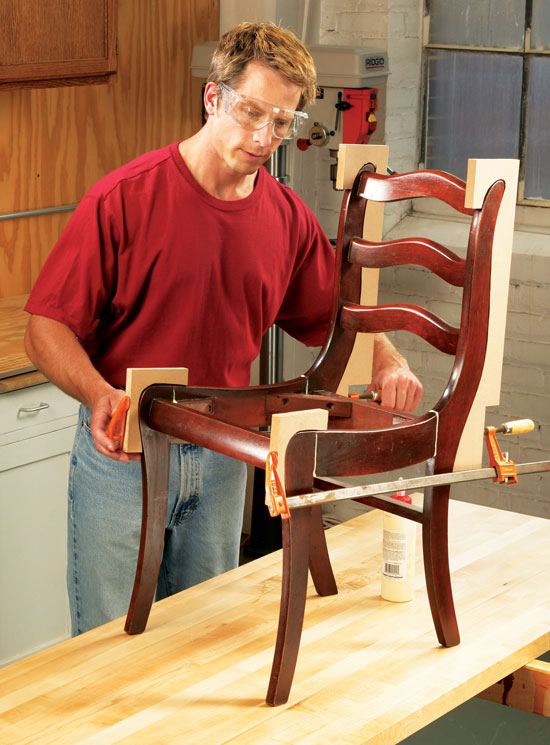
Rehearse before you glueClamps are great for squeezing flat, parallel parts together, but most furniture throws you a few curves. Even a clamping job that looks simple can turn out to be tough. So don’t touch that glue bottle until you’ve done a complete dry run.
Sources(Note: Source information may have changed since the original publication date.)
This story originally appeared in American Woodworker October 2003, issue #103.
|
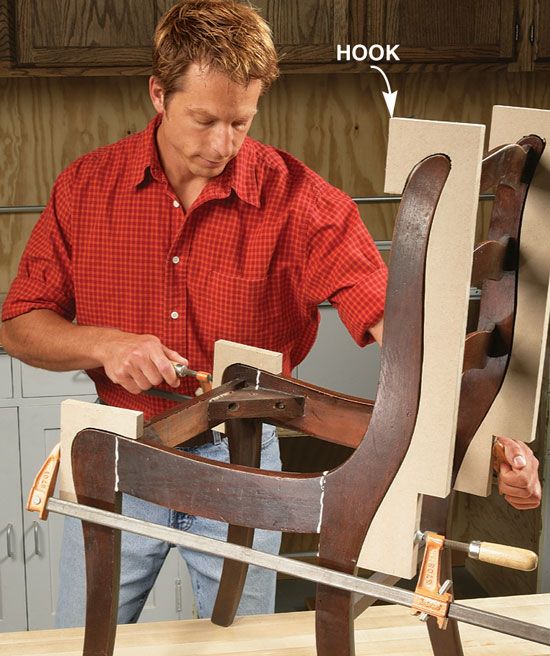
Make custom clamping blocks to provide parallel surfaces for curved parts. Curves sometimes require blocks that hook over the part to keep the block from slipping as you apply pressure.
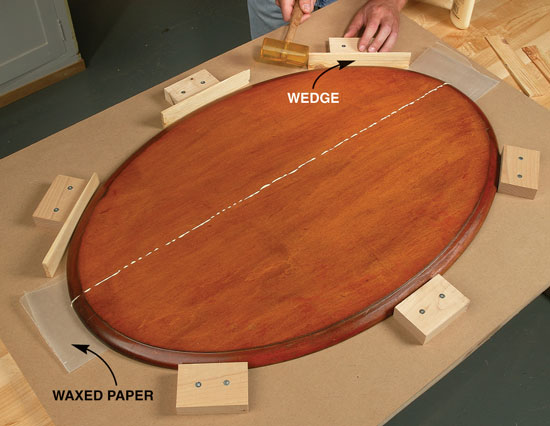
Squeeze together curved tops with blocks and wedges. Just screw the blocks to a sheet of plywood or MDF and drive in shims to apply pressure.
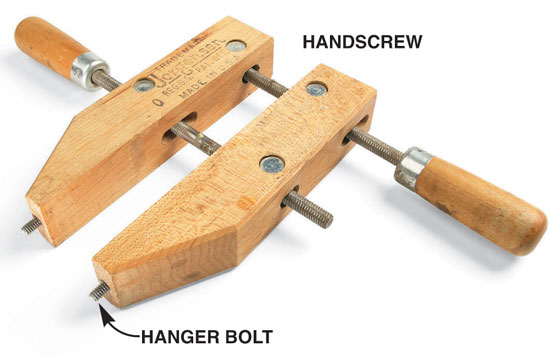
Pull together odd shaped parts with handscrews. Screw hanger bolts—which are half screw, half bolt—into the ends of handscrew clamps. Then drill holes in the back side of the piece to accept the hanger-bolt tips. |


Here are some supplies and tools we find essential in our everyday work around the shop. We may receive a commission from sales referred by our links; however, we have carefully selected these products for their usefulness and quality.


