We may receive a commission when you use our affiliate links. However, this does not impact our recommendations.
Modular Desk System
Mix-and-match components make a desk that fits your needs.
By Bruce Kieffer
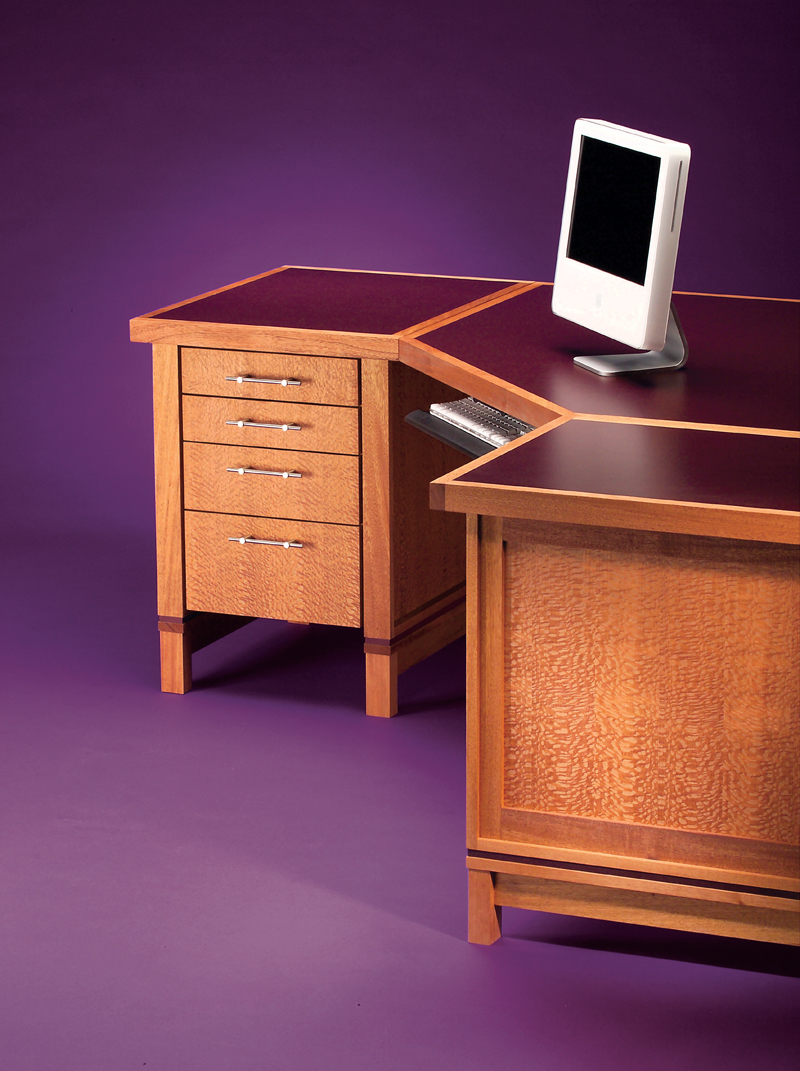
This computer-desk system has more going for it than great looks. The system is based on modular components that can be assembled in a variety of ways to make the “perfect” desk, whether small, giant-size, or somewhere in between. Making the components is as easy as it gets—no complex joinery, just screws and biscuits.
I designed two different drawer configurations. The two-drawer unit has one drawer sized to accept hanging files and the other sized for CDs (see photo below).
You’ll Love These Drawers!
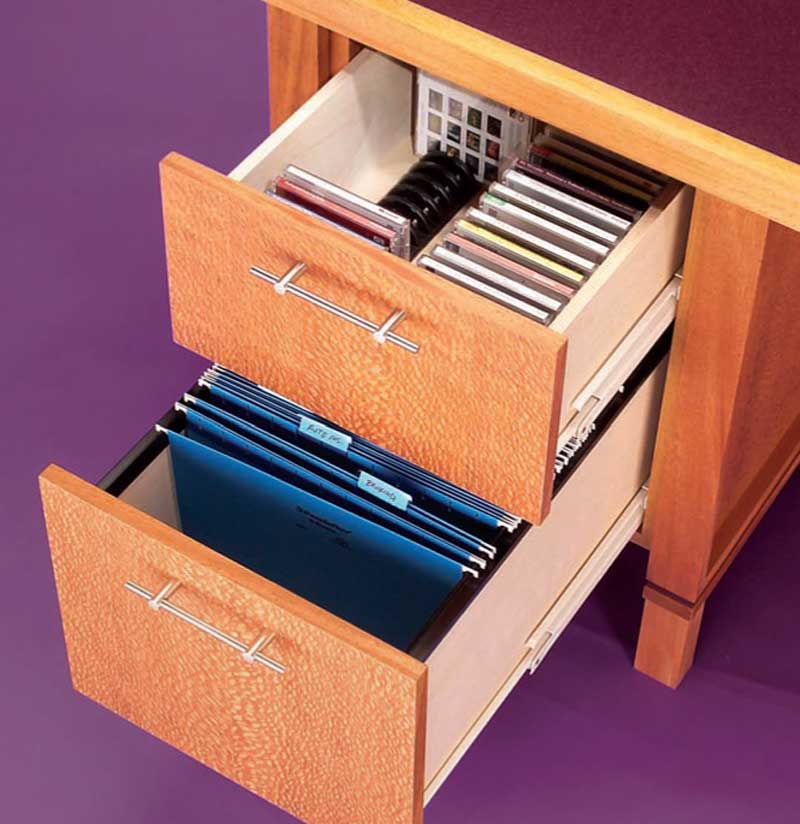
The slides have 1-in. overtravel, meaning they pull out all the way—and then an inch more. Add plastic drawer accessories to hold CDs and to make a hangingfile drawer.
The four-drawer unit features two pencil drawers, a letter drawer and a CD drawer. The drawers are built around a European undermount slide system that greatly simplifies drawer construction.
An easy-access wire track neatly takes care of wire management. The channel also supports the top and provides an attachment point for the modesty panels.
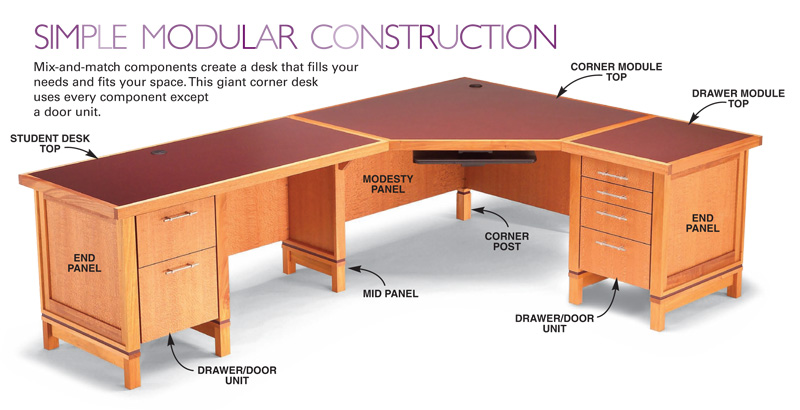
Plan Your Desk
Decide which configuration you want to build. Every configuration requires a different amount of material, so you’ll need to figure the sizes and quantities of wood, sheet stock and laminate needed to build your desk.

Custom Lacewood Panels
I used lacewood-veneer panels trimmed with mahogany and dark laminate accents to build the components. If you’re wondering how I made the lacewood panels, well, I didn’t! I ordered them custom-made (see Sources, below). Buying custom panels is expensive, but much simpler than veneering your own. To order custom panels, list the panel sizes you need and whether they are one-sided or two-sided; then call for a quote, including shipping costs. For desks that get placed against walls, there’s no need to use expensive veneer on the back of the drawer/door units and modesty panels, unless you think that someday the desk may be placed in the middle of a room.
Build End Panels
1. Cut the pieces A1 through A11 to size. Be precise when you cut these pieces. They all have to fit together well when the end panel is assembled (Fig. A, below).
2. Drill the screw holes in the panel top and bottom edging (A3, A6) and the base cap (A5, Fig. L, below).
3. Cut biscuit slots for attaching the front and back edging (A7, Photo 1). Cut biscuit slots in the feet (A2) and rail (A4). Use a 5/8-in.-thick spacer to center the rail on the feet.
4. Glue and screw the bottom edging (A6) to the panel (A1, Photo 2). Glue and biscuit the front and back edging (A7) to the panel. Center the top edging on the panel; then glue and screw it in place.
5. Glue and biscuit the feet to the rail and screw on the base cap to create the base assembly.
6. Glue the laminate edging (A11) to the spacer (A10) using contact cement. Apply two coats of Danish oil finish to the panel and base assembly.
7. Use a nail gun to tack the laminateedged spacer to the base cap. Then drill holes through the spacer using the predrilled holes in the base cap as guides. Screw the base assembly to the panel. Add the panel trim (A8, A9) to any end panels that face out on the assembled desk.
Build Mid Panels
Mid panels are built just like end panels. Attach the brace (B3) after the top edging (B4). Drill a 2-3/8-in.-dia. hole at the upper back end of the panel for passing wires (Fig. B, below).
Click any image to view a larger version.


1. Align the panel’s front and back edging with biscuits. To center the edging, place a 3/4-in. spacer on top of the panel and adjust your biscuit jointer’s fence to center the grooves on the panel. Then cut the biscuit slots in the edging without using the spacer.

2. Fasten the top edging with screws. Support the panel on top of two 3/4-in. spacers. That centers the bottom edging with the panel. Use a small amount of glue so squeeze-out is minimal. Predrill countersunk pilot holes before you insert the screws (Fig. L, below).

3. Angled glue-ups can be tricky. Use a wide piece of 3/4-in. plywood to create an edge parallel to the front. Crank the clamps that hold the plywood to the top, and use moderate pressure on the clamps that hold the edging. Otherwise, the plywood may slip.

4. Sand the front edging flush with the side edging using a long sanding block. PSA sandpaper and an 8- to 10-in. block of MDF work great. The long block is guided by the side edging to ensure a perfectly flush joint.

5. Assembling the corner unit is a twoperson job, because the unit is large and heavy. The wire track and cleats support the corner unit top. Note:The wire track is screwed to the modesty panel first.
Build a Drawer Unit
8. To make a drawer unit, glue and screw the sides (C2), top and bottom (C3) together. Screw the back (C1) to the box to square it up (Fig. C, below).
9. Glue on the stiles flush with the outside edges (C5); then cut the rails (C6) to fit and glue them in place.
10. Screw the drawer-slide spacers (C7) in the box (Fig. M, below). Mount the drawer slides flush with the top of the spacers.
11. Drill holes through the box sides for attaching the box to the end panels.
Build a Door Unit
A door unit is made the same as a drawer unit without the slide spacers (C7). Drill holes in the sides for the adjustable shelf pins before you assemble the box. Make a shelf (C4) and apply iron-on mahogany edge banding to the front edge. Note: The hinge-mounting plates are attached to the stile, centered 3 in. up from the bottom of the unit and 3-3/8 in. down from the top.
Build Drawers and Doors
12. Cut the drawer parts (D1 through D15) and rabbet the ends of the drawer sides (D7, D9, D11, D13) (Fig. D, below). Glue and nail the drawer box together.
13. Use mahogany edge banding to cover the edges of the drawer faces.
14. Drill holes for the drawer handles in the drawer faces (D1 through D5). Drill oversize holes through the drawer fronts (D8, D10, D12, D14) to fine-tune the drawer faces’ position and attach them.
15. To make a door (D6), cover the edges of the door with mahogany edge banding. Drill holes for the door handles and the hinge cup holes (Fig. E, below).
Make the Desk Tops
Building the straight desk tops is fairly easy (Fig. F, below), but the corner unit offers some challenges, so, that’s the focus here.
16. Cut the shape of the corner unit top (E10, Fig. G, below). Drill the wire grommet hole, or holes, using a 2-3/8-in.-dia. hole saw. You want to drill these holes now, because the laminate would ruin a hole saw.
17. Adhere the decorative laminate and cabinet liner (E15, E20) with contact cement. Trim away the overhanging laminate edges using a flush-trim bit.
18. Locate the center of the wire grommet hole under the laminate by tapping the surface until you hear a hollow sound. Drill a hole through the laminate that is large enough to fit your flush-trim bit, and trim the laminate.
19. Cut and fit the corner unit side edging pieces (E3, Fig. H, below). One end of each edging piece is 45 degrees and the other is 90 degrees. Make sure their lengths are perfect. You don’t want to have to trim them anymore after they’re glued on.
20. Cut biscuit slots to join the top and edging pieces. Glue and clamp the side edging pieces (E3) to the top.
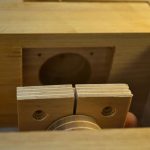
21. Attach the corner unit’s front edging piece (E2, Photo 3) and the back two edging pieces (E1). Note: The rear corner edging joint is mitered.
22. When the glue is dry, sand the edging joints flush (Photo 4).
Build Modesty Panels, Wire Tracks
23. Cut the modesty panels to size (F1, F2) and drill three holes (no countersink) on each side (Fig. H, below) for the pan-head screws that attach the panel to a component.
24. To make wire tracks, drill countersunk holes in the channel pieces (G1, G3) for the screws that attach the wire tracks to the modesty panels and the tops. Assembly the wire tracks as shown in Fig. J, below.
25. Don’t glue the fill strips (G5, G6) onto the wire tracks yet. You may need to tweak their thicknesses slightly during the desk assembly so the tops of the wire tracks are flush with the tops of the end panels and corner post.
26. If you want a wire grommet hole closer to the front of the corner unit desk top, then make a short section of wire track to carry wires from that hole to the wire tracks in back.
Build a Corner Post
27. Miter one edge of each leg blank (H3, Fig. K, below). Glue the mitered edges together. Wrap masking tape tightly around the pieces to hold them together as the glue dries.
28. Glue and clamp the foot and corner block (H1, H4) in place.
29. Use a tablesaw with a dado blade to cut 1/8-in.-deep grooves in the legs and foot for the laminate (H5).
30. Attach the cap (H2), glue the dado laminate pieces in the grooves and finish the corner post with Danish oil.
Assemble a Standard Corner Desk
31. Apply Danish oil to any unfinished parts. Screw the drawer units to the end panels. They rest on the end-panel lower lips and are set tight to the rear lips. A slight gap between the front-panel edging and the front of the drawer box is OK.
32. Attach handles to the drawer faces, and then the drawer faces to the drawers. The oversize holes allow you to fine-tune the drawer front position for even margins.
33. Attach the drawer module tops. Align the tops so they’re tight to the front of the panel top edging pieces.
34. Screw the left modesty panel to the corner post and the end panel of the left drawer unit. Attach the right modesty panel the same way.
35. Screw the cleats (E9) to the undersides of the drawer unit tops (Fig. H) and screw the wire tracks to the modesty panels. Attach the corner module top (Photo 5).
36. Screw the corner module top edges to the drawer unit top edges (Fig. H). Then screw the cleats to the underside of the corner unit top edging and the wire tracks to the top.
37. Add the file drawer hanging file rails, the CD drawer storage tracks, computer and peripherals. Now you’re ready to get some real work done—right.
Cutting List

Project Requirements

Fig. A: End Panel

Fig. B: Mid Panel

Fig. C: Drawer/Door Unit

Fig. D: Drawer Box

Undermount Slides

Undermount drawer slides make drawer construction a cakewalk, because they wrap around the bottom edge of the drawer box. This allows you to apply the drawer bottom rather than build it into grooves in the drawer parts. The drawer slides cover the 1/2-in. plywood edge for a good-looking drawer that’s as strong as it is easy to build.
Fig. E: Door

Fig. F: Laminate Top

Fig. G: Corner Unit Top Layout

Fig. H: Corner Module

Fig. J: Corner Module Wire Track

Fig. K: Corner Post

Fig. L: Screw-Hole Layouts

Fig. M: Drawer-Slide Spacer Heights

Sources
Note: Product availability and prices are subject to change.
Wood River Veneer, woodriverveneer.com, 800-875-7084, Lacewood-veneered MDF panels, custom-made, check current price.
Woodworker’s Hardware, wwhardware.com, 800-383-0130, Blum cream-colored 22-in. full-extension drawer slides, #B430E 22CM; Blum 95-degree self-closing clip hinges, #B071T9580; Blum 3-mm cam-adjust face-frame hinge-mounting plates, #B175H6030; Clear polyurethane bumpers, 1/16-in. x 5/16-in. dia., #3MSJ5302; Brass spoon shelf supports, 1/4-in. dia., #HB21C25; Fastbond green 30-NF water-based contact adhesive, 3M21185; Fine-thread square-drive pan-head screws, No. 6 x 1-1/4 in., #KTSPS F125; Deep-thread square-drive flat-head screws, No. 8 x 1-1/4 in., #SCS8X114F; Deep-thread squaredrive flat-head screws, No. 8 x 1-1/2 in., #SCS8X112F; Deepthread square-drive flat-head screws, No. 8 x 1-3/4 in., #SCS8X134F; CD storage track, 11-5/16 in. x 2-9/16 in., T4238 LA; Black cable grommet, 2-3/8 in. dia., #CPF 2600; Hole saw, 2-3/8 in. dia., P47227; Hole saw arbor for a 3/8-in. chuck, P45319; PVC hanging file rail for 1/2 in. drawers, #CPF 32500 2-ft.; Keyboard arm and mouse tray package (optional), 10-1/2 in. x 21-in., #WWK5930.
Lee Valley and Veritas, leevalley.com, 800-871-8158, 96-mm stainlesssteel bar handles, 01W76.10.
Woodworker’s Source, woodworkerssource.net, 800-423- 2450, Iron-on mahogany edge tape, 7/8-in. x 25-ft., 20012030.
Nevamar, nevamar.com, 800-638-4380, Plastic laminate, 4-ft. x 8-ft. sheet, #AL2004; Cabinet liner/backer for top undersides, 4-ft. x 8-ft. sheet.
McFeely’s, McFeelys.com, 800-443-7937, Magzilla magnetic bit holder, #MH-9900; Squaredrive bit, No. 2 x 6 in., #HX-0265.
Local lumberyard, Shop-grade birch plywood, 3/4 in. x 4 ft. x 8 ft.; Baltic birch plywood, 1/2 in. x 5 ft. x 5 ft.; MDF, 3/4 in. x 49 in. x 97 in.; MDF, 1/2 in. x 49 in. x 97 in.; Mahogany, 4/4; Mahogany, 5/4; Mahogany, 8/4; Poplar, 4/4.
Local paint store, Natural-colored Danish oil finish.
This story originally appeared in American Woodworker October 2005, issue #117.

Here are some supplies and tools we find essential in our everyday work around the shop. We may receive a commission from sales referred by our links; however, we have carefully selected these products for their usefulness and quality.