|
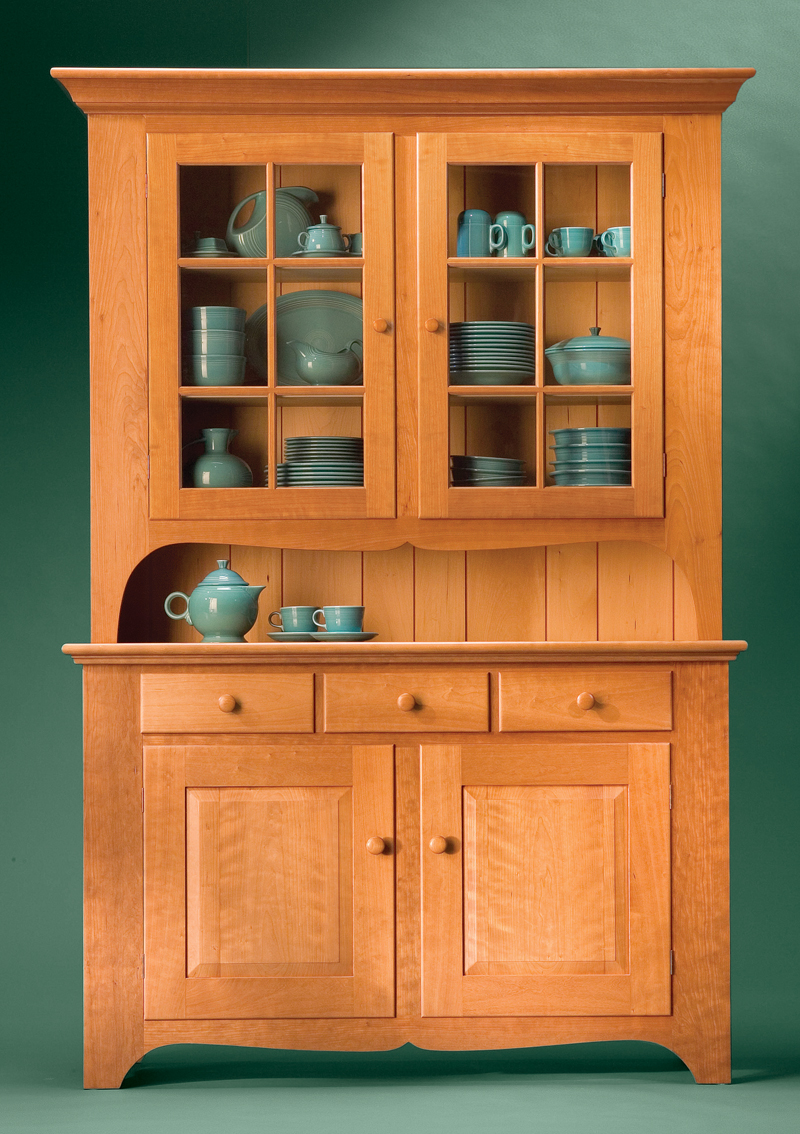
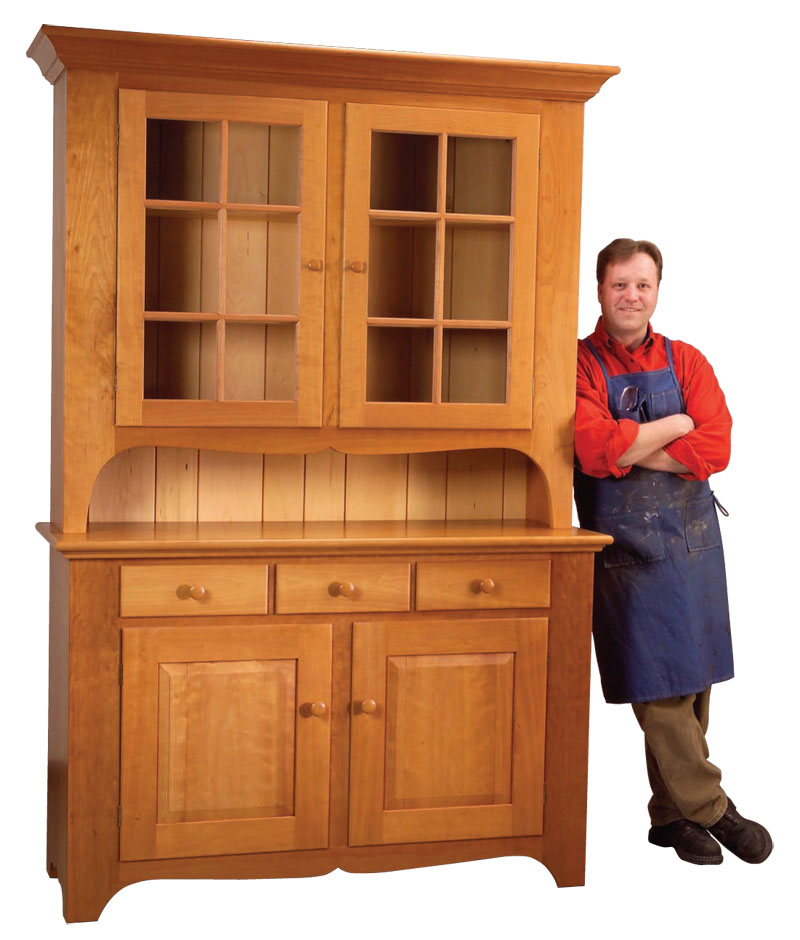
Tall and stately, this cupboard promises to be the
focal point of any dining area. A functional wonder,
it combines elegant display with spacious
storage. For you as a builder, though, this cupboard is loaded
with something quite different: advanced techniques that will
challenge your woodworking skill. It has all the stuff to be
your next dream project.
You’ll be working wood on a grand scale. This cupboard is
more than 7 ft. tall and nearly 5 ft. wide. You’ll glue up boards
to make all the wide cabinet pieces. You’ll build the dovetailed
drawers, raised-panel doors and divided-light doors. To
top it off, you’ll make your own crown molding.
You’ll need a fully equipped shop to complete this project,
along with dedication and determination. But if you accept
the challenge, I guarantee you’ll have the woodworking time
of your life!
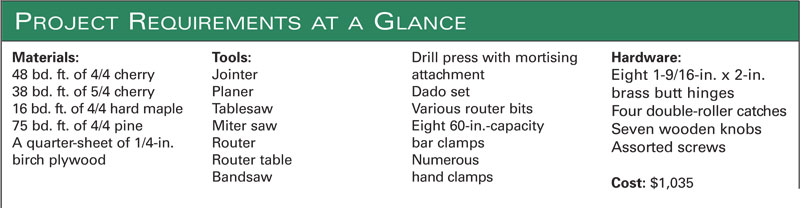
Carefully select 48 bd. ft. of 4/4 cherry for the two cabinets
and 38 bd. ft. of 5/4 stock for the doors, base cabinet top and
the crown molding. In addition, you’ll need 16 bd. ft. of 4/4
hard maple for the drawer sides and support system and 75 bd.
ft. of 4/4 pine for the shelves and back boards. I spent about
$1,000 on lumber.
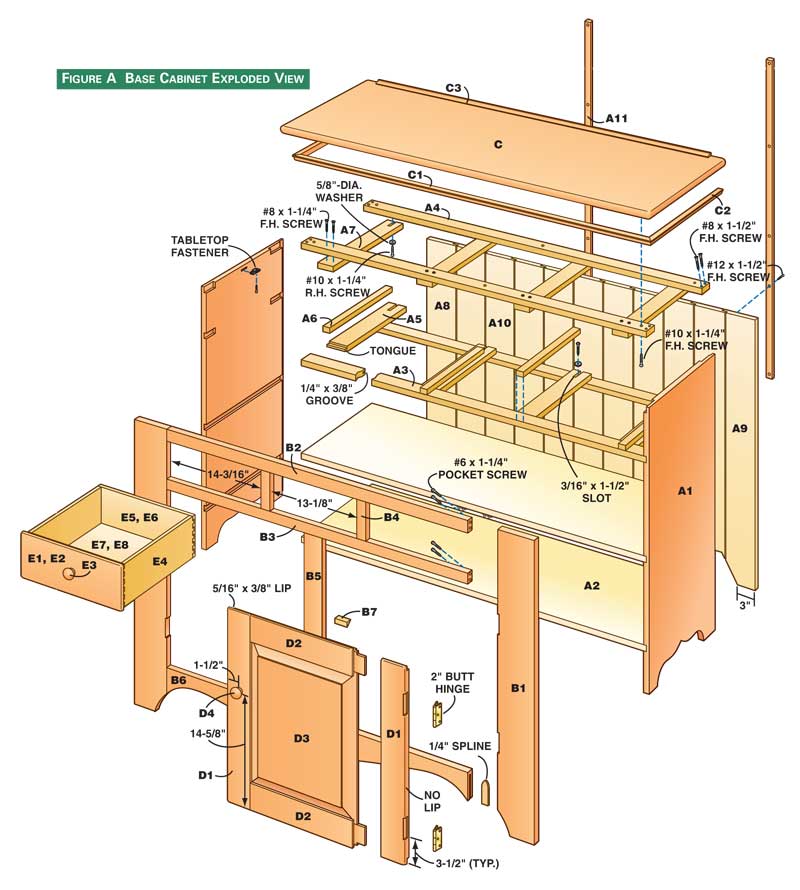
Build the Base Cabinet
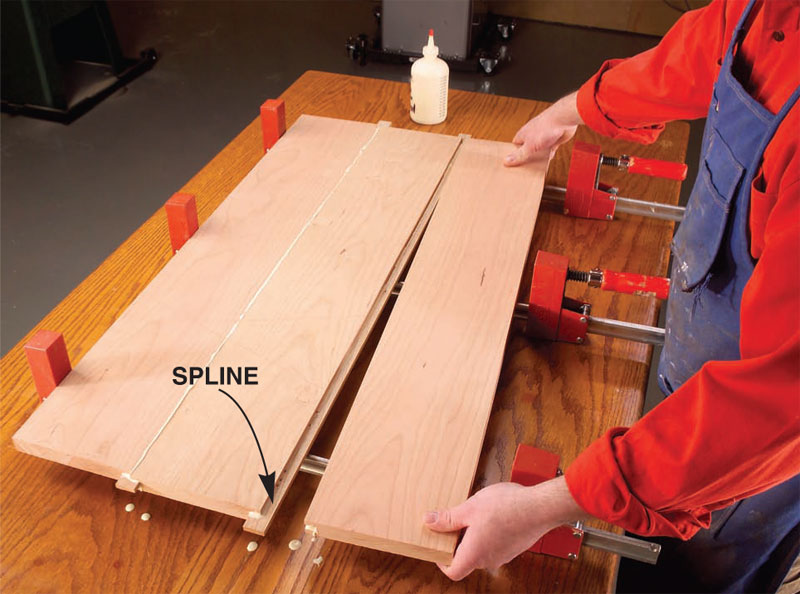
1. Glue up blanks for the cherry cabinet sides (A1, Fig. A, below) and the pine shelves (A2). Splined joints keep the
faces aligned (Photo 1). Cut the sides to final dimensions
(see Cutting List, below).
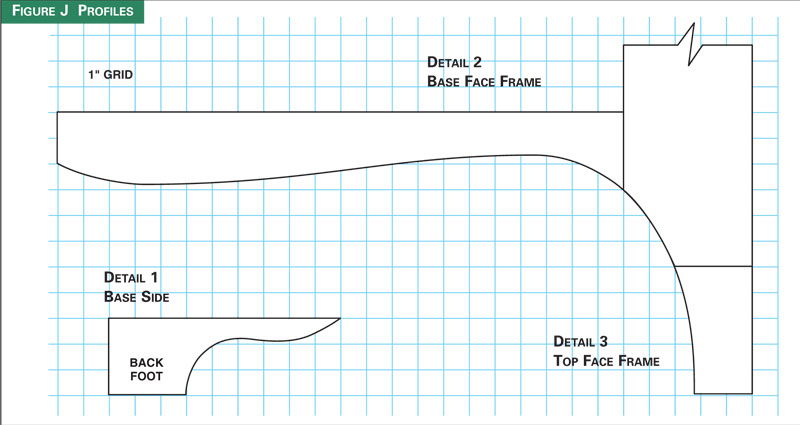
2. Rough-cut the decorative profiles on the bottoms of the
sides and then rout the final profiles with a template (Fig. J,
Detail 1, below).
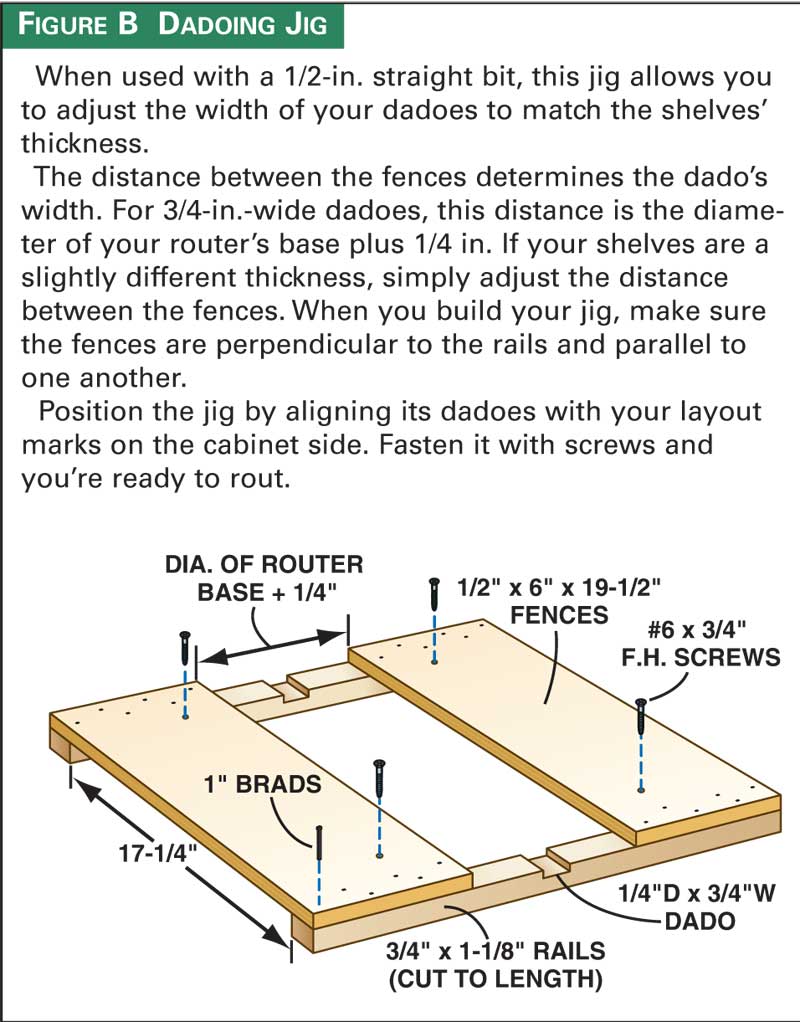
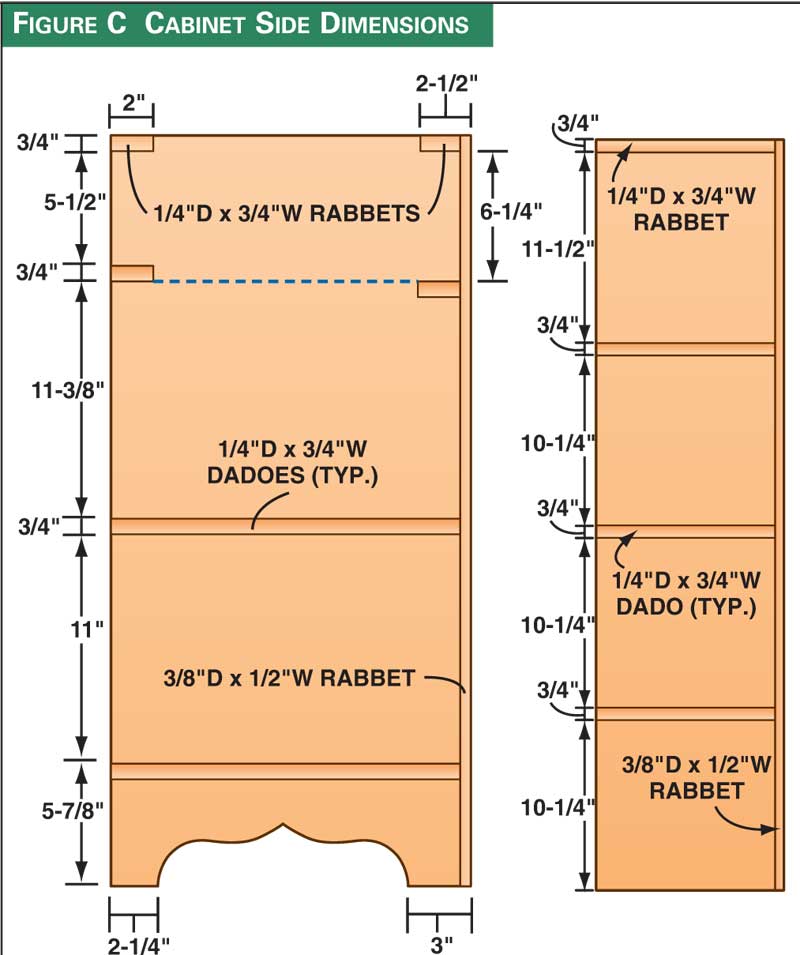
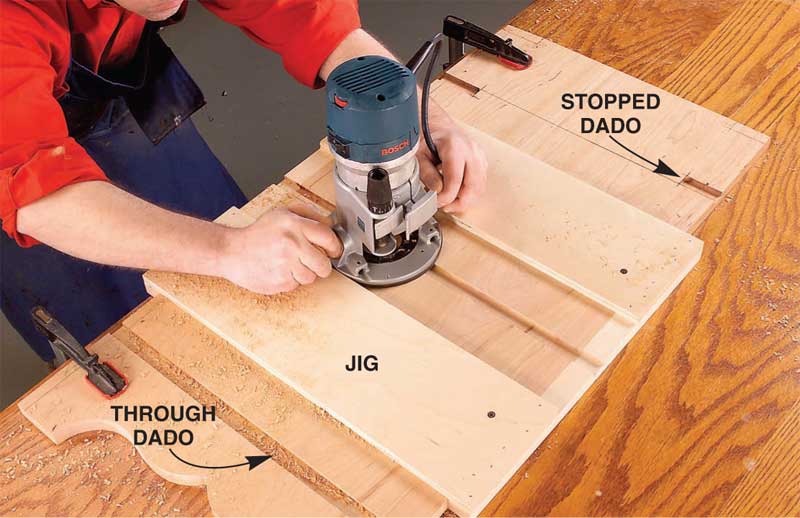
3. Rout 1/4-in.-deep dadoes for the shelves (Fig C, below)
with a straight bit and a jig (Photo 2). To prevent blowout at
the end of the dadoes, the jig’s rails should fit snugly over the
base cabinet sides. Before routing each dado, fasten the jig in
position by screwing it to the cabinet sides. Rout 1/4-in.-deep
stopped dadoes for the drawer rails (A3). Make sure the front
dado’s bottom edge aligns with the back dado’s top edge. Use
the jig to rout the 1/4-in.-deep stopped rabbets for the top rails
(A4), too. Rout the full-length 3/8-in.-deep rabbet on the back
edge on the router table, using a fence and the straight bit.
4. Cut the pine shelves and maple rails to final dimensions.
They’re all the same length.
5. Rout a centered 1/4-in.-wide groove in the back edge of
the front drawer rail.
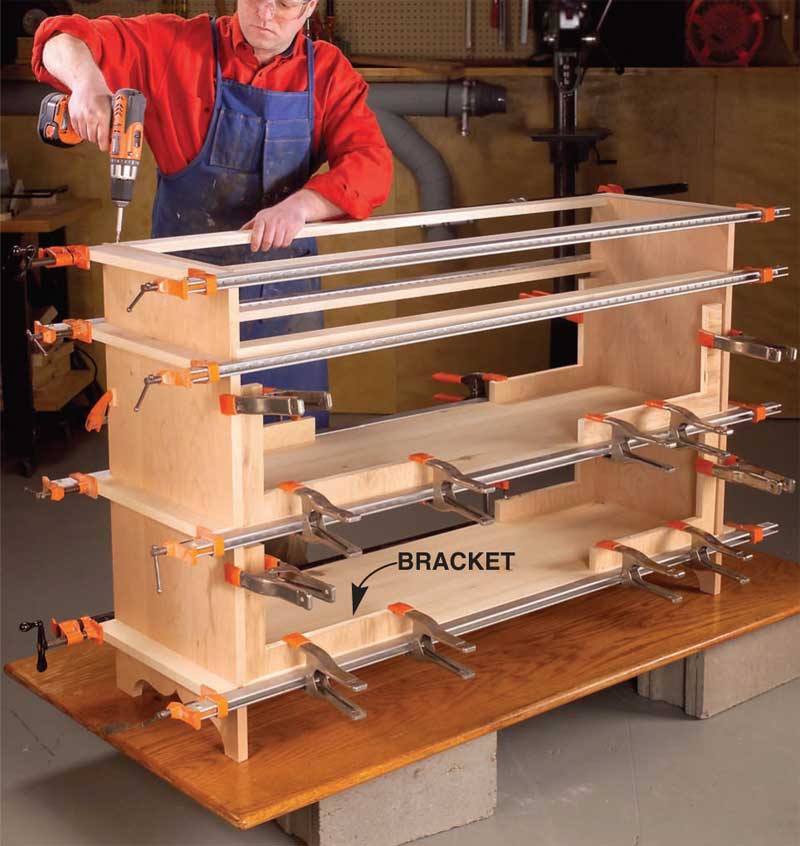
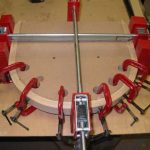
6. Glue together the base cabinet, making sure the shelves,
rails and sides are flush at the front. Use cauls on the shelves to
apply pressure evenly all along the joints. Clamp 90-degree
brackets in the corners to help keep this large cabinet square
(Photo 3). After clamping the cabinet together, make sure it’s
still square by measuring diagonally; both diagonal measurements
should be the same. Install both top rails (A4) when you
clamp, but leave them unglued until the cabinet has been
squared. Then glue and screw the front top rail. Screw the
back rail in position, but leave it unglued so it can be removed.
Assemble and Install the Face Frame
Pocket-hole joinery is a great choice for this job (Photo 4).
Biscuits are too large for all the narrow pieces, dowels aren’t
as accurate and mortise-and-tenon joinery takes too long.
Pocket-holes are drilled on the back side of the face frame, so
make sure to orient all of your pieces back side up.
7. Cut the face-frame stiles and rails to final dimensions.
The outside stiles (B1) are 1/16-in. oversize in width, so the
face frame is slightly wider than the cabinet. After the face
frame is glued on, its overhanging edges are routed flush.
8. Drill pocket holes in the top rail (B2), drawer rail (B3),
drawer stiles (B4) and door stile (B5).
9. Rout stopped, centered slots for splines in the bottom
rail (B6) and in the outside stiles (Photo 4, inset). Splines are
a better choice here than pocket screws, because you’ll rout
through these joints when you shape the face frame’s curved
profile.
10. Glue and clamp the splined joints. Then fasten the rest
of the face-frame pieces with pocket screws. Measure the
diagonals to make sure the face frame is square.
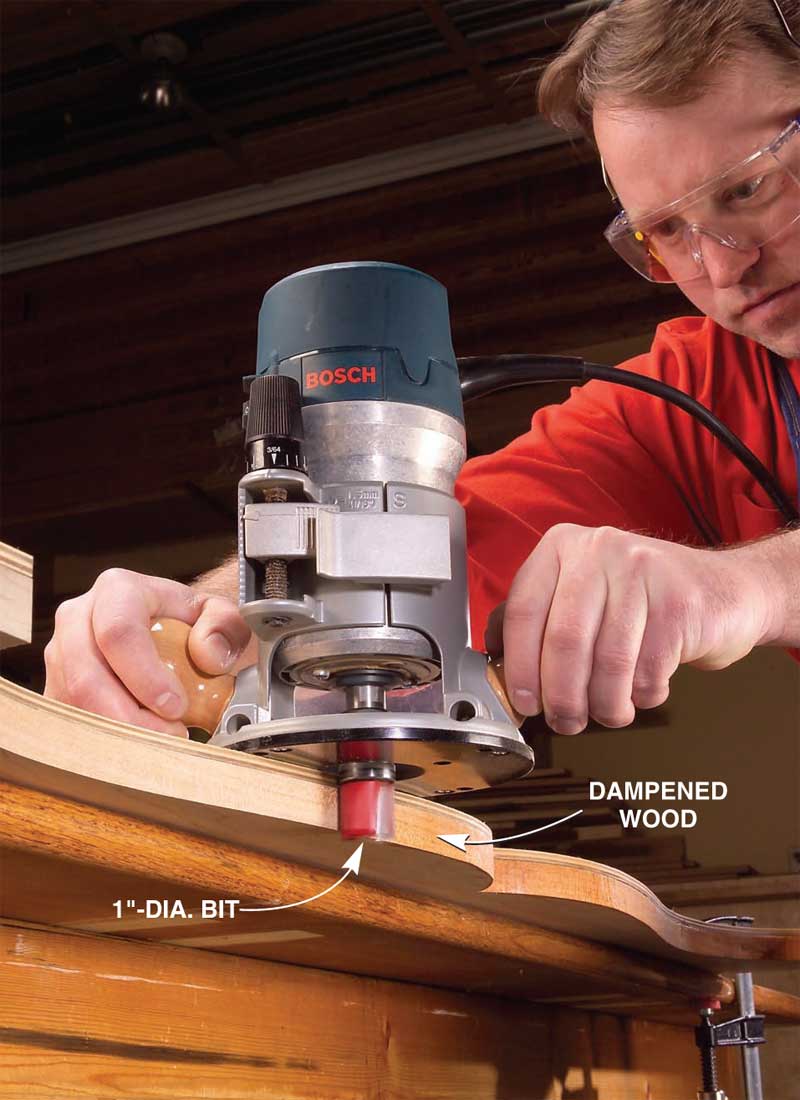
11. Rout the decorative bottom profile (Fig. J, Detail 2, below). You’ll have to rout against the grain during a portion
of each pass, so tear-out may occur (Photo 5). After routing,
finish cutting the profile’s center point with a chisel or
file.
12. Glue the face frame onto the cabinet. Make sure the
top edges of the face-frame rails (B2, B3 and B6) are flush
with the cabinet rails (A3 and A4) and the bottom fixed shelf
(A2). Equalize the overhang on both sides. Tack the frame
with a couple brads so it stays in place when you apply the
clamps. After the glue has dried, remove the clamps and trim
the face frame stiles flush with the cabinet sides.
13. Glue on the shelf support (B7).
Install the Drawer Supports
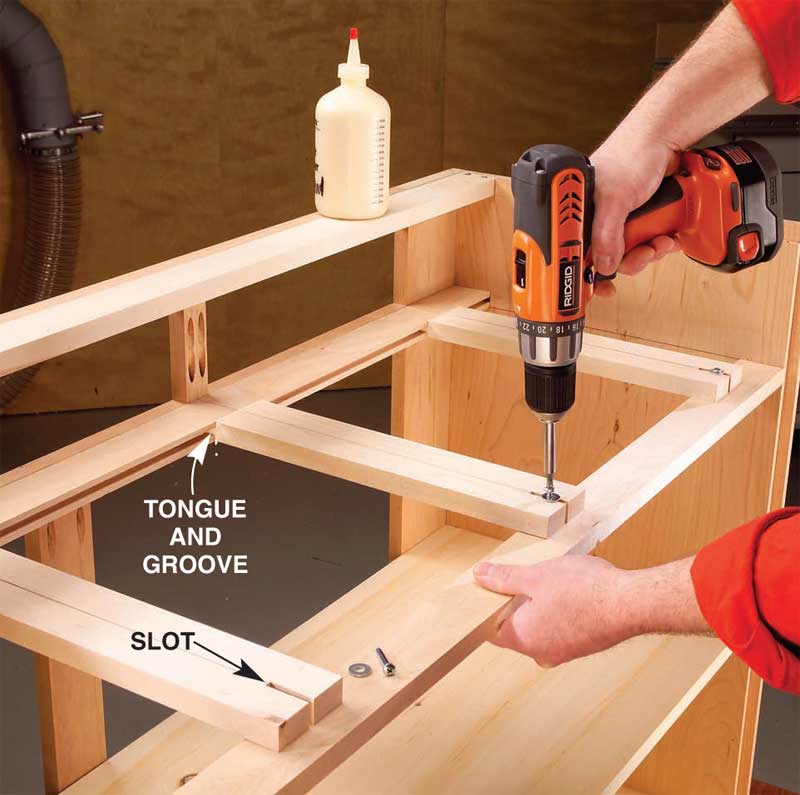
14. Remove the cabinet’s back top rail for access. Cut centered
tongues on the front edges of the maple drawer supports
(A5). Test-fit the supports in the grooved front drawer
rail: Their faces must be flush for the drawers to slide smoothly.
Cut centered slots in the back edges, to allow for seasonal
movement (Photo 6). Install the drawer supports.
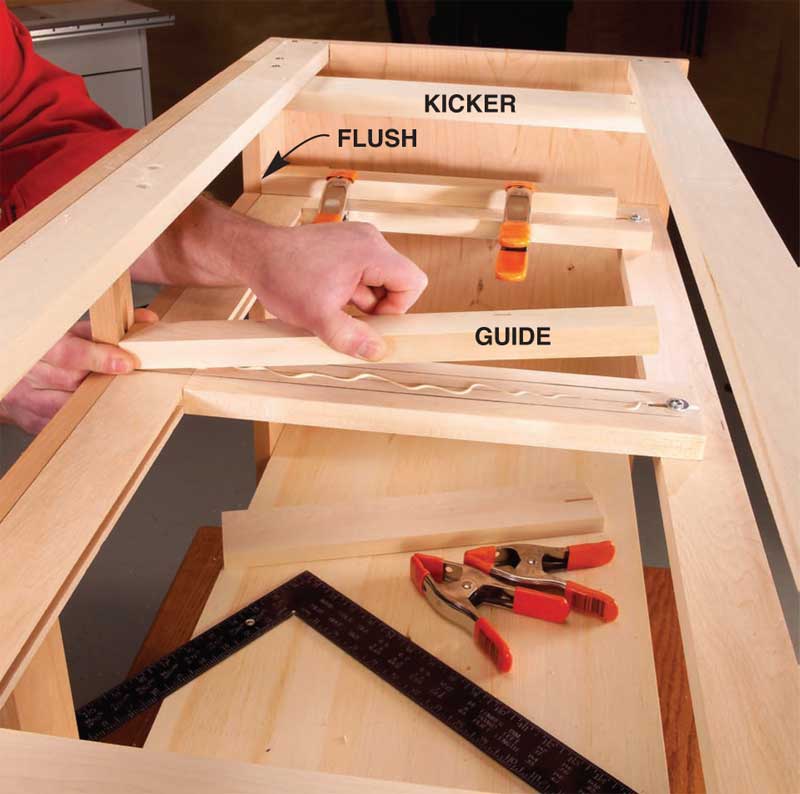
15. Glue and clamp the maple drawer guides (A6, Fig. A;
Photo 7) and then fasten the back top rail to the cabinet with
glue and screws. Install the maple kickers (A7). They’re slotted
at the back, like the drawer supports, to allow seasonal
movement. Butt the kickers behind the face frame and glue
and screw them to the top rail. Fasten them to the back top
rail with screws and washers.
Make and Install the Top
16. Glue together boards for the top (C), using splines for
alignment. If you don’t want the splines to show on the ends,
simply rout stopped grooves and cut the splines to fit. Cut the
top to final dimensions.
17. Rout the top’s edge profile (Fig. A, Detail 1) with a
1/2-in.-radius half-round bit (see Sources, below) and an
edge guide installed on your router.
18. Rout the 1/4 -in.-radius ogee trim molding profile (see
Sources) on wide 3/4-in.-thick blanks. Cut
the front trim (C1) and side trim pieces
(C2) and the thinner top back trim piece
(C3) as offcuts from these blanks.
19. Fasten the top to the cabinet with
screws through countersunk holes in the
top rails and a couple of metal tabletop fasteners
(see Sources) in the sides. Rout slots
in the cabinet sides for these fasteners.
20. Miter the front trim to fit and glue it
on. Then miter and attach the side trim. Glue the miter and about the first 4 in. of the molding. Nail
it at the back to allow the seasonal movement of the cabinet
top and sides.
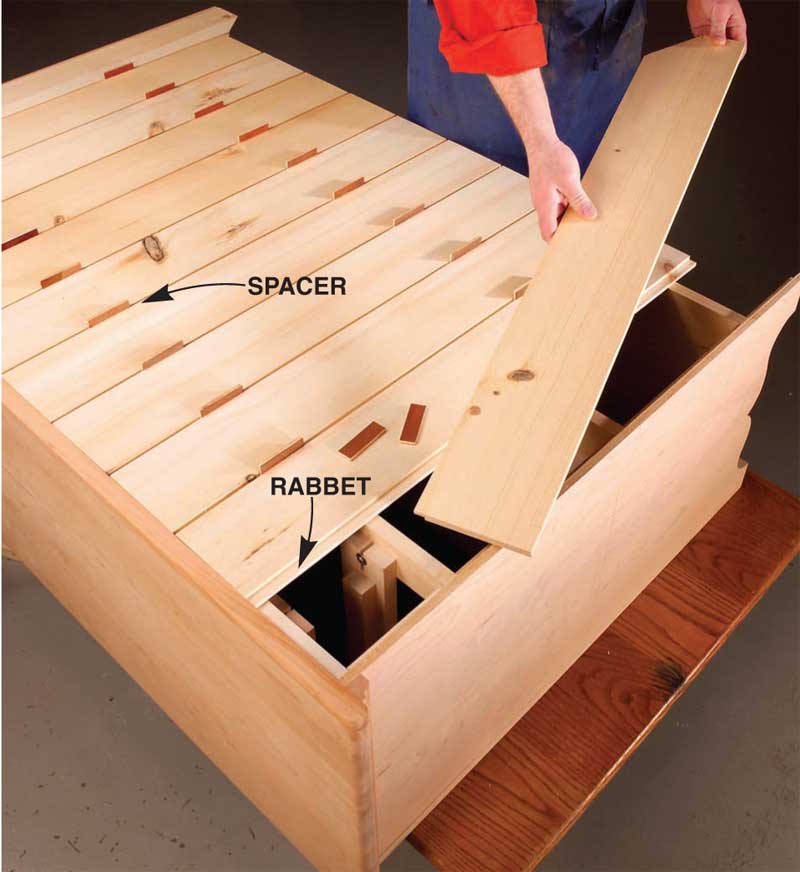
Install the Back Boards
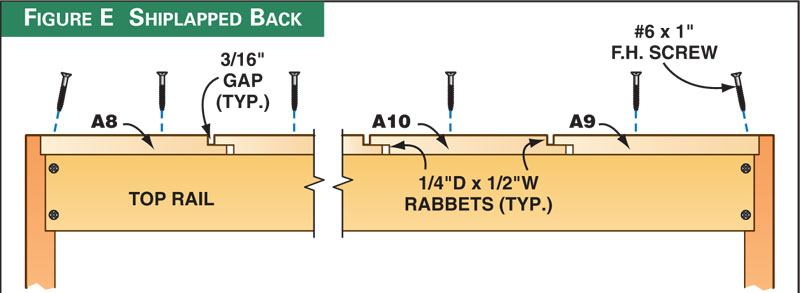
Shiplapped boards disguise seasonal movement by overlapping,
so gaps don’t appear between boards during dry seasons
(Fig. E, below).
21. Cut the pine back boards to final dimensions. The outside
back boards (A8 and A9) are different widths to center the
back’s pattern when it’s viewed from the front of the cabinet.
22. Rabbet the back face of the left side back board (A8).
Rabbet the front face of the right side back board (A9).
Rabbet both faces of the inside boards (A10). Drill countersunk
holes for screws. Cut the angled feet on the outside
boards.
23. Lay the cabinet on its face and fit the boards. Work
from one edge to the other, using spacers to create even overlaps
between boards (Photo 8). Make adjustments, either by
changing the thickness of the spacers or the width of the two
outside boards, until all the boards fit. Then fasten the
boards with countersunk screws. Add rigidity to the cabinet
by gluing the outside boards in the rabbets.
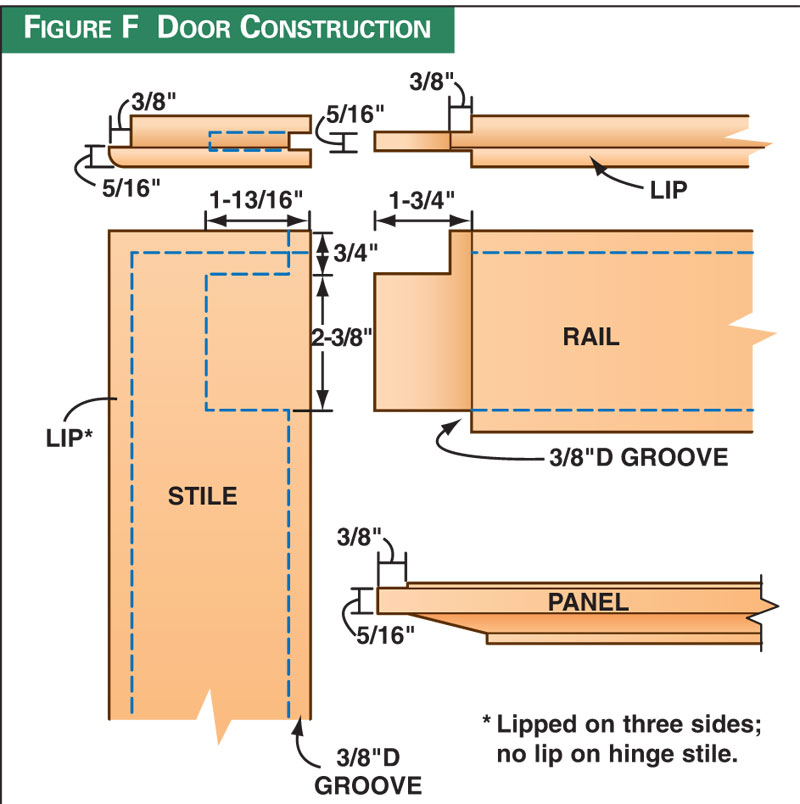
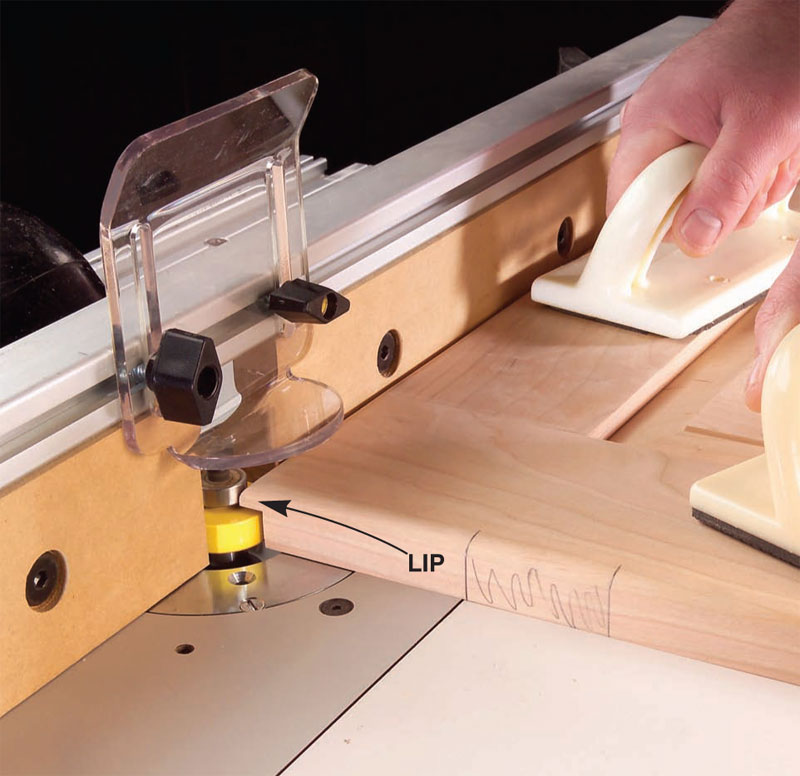
Build and Install the Doors
The doors feature raised panels and haunched mortise-and-
tenon joinery (Fig. F, below). Their outer edges are
lipped, so the doors overlay the openings in the cabinet.
24. Saw centered grooves in the inside edges of the stiles
(D1) and rails (D2).
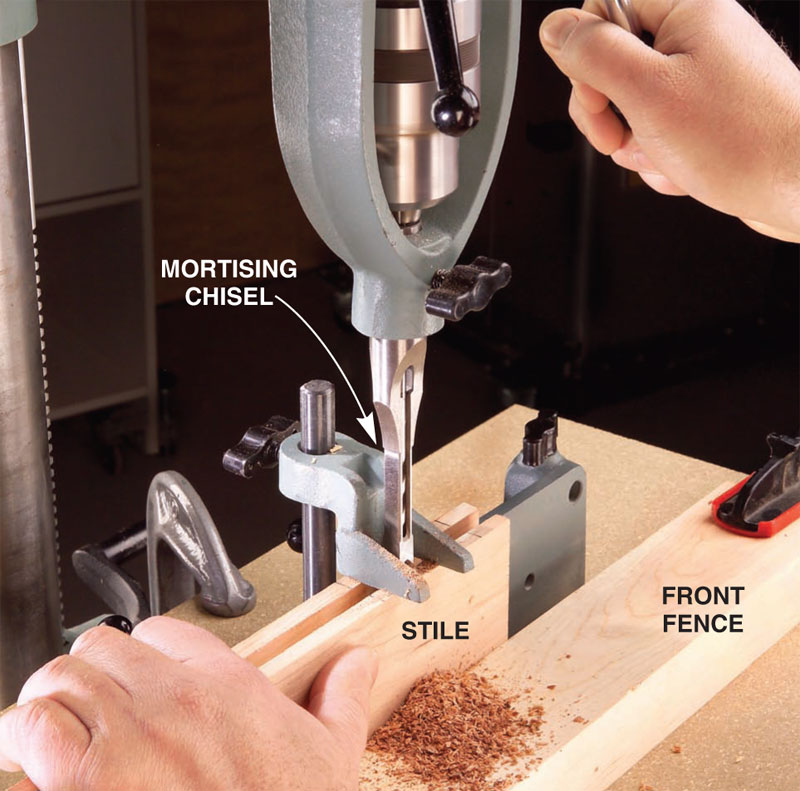
25. Cut mortises in the stiles (Photo 9).
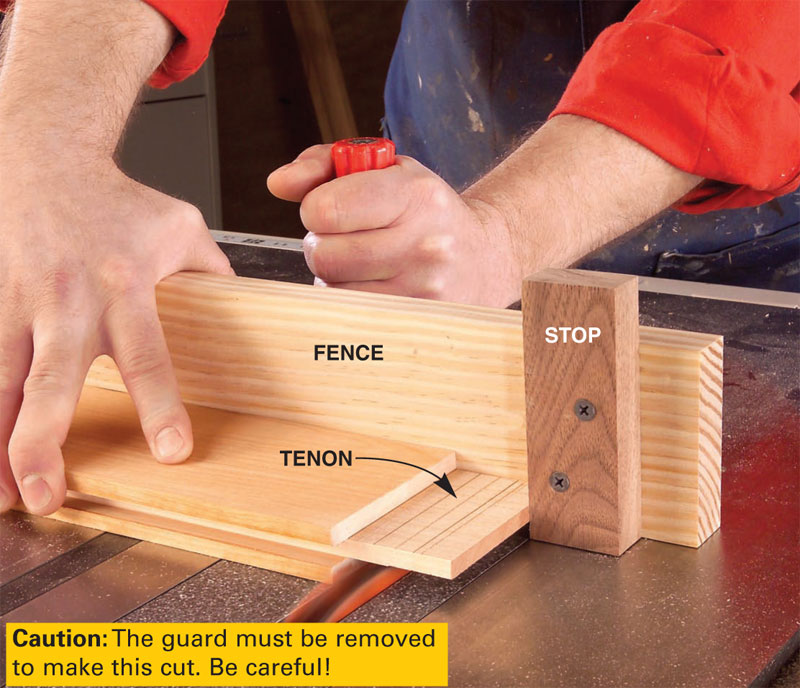
26. Saw tenons on the rails (Photo 10). Adjust the height of the dado until one pass on each face creates a tenon of the
proper thickness. Saw out the haunches on the bandsaw.
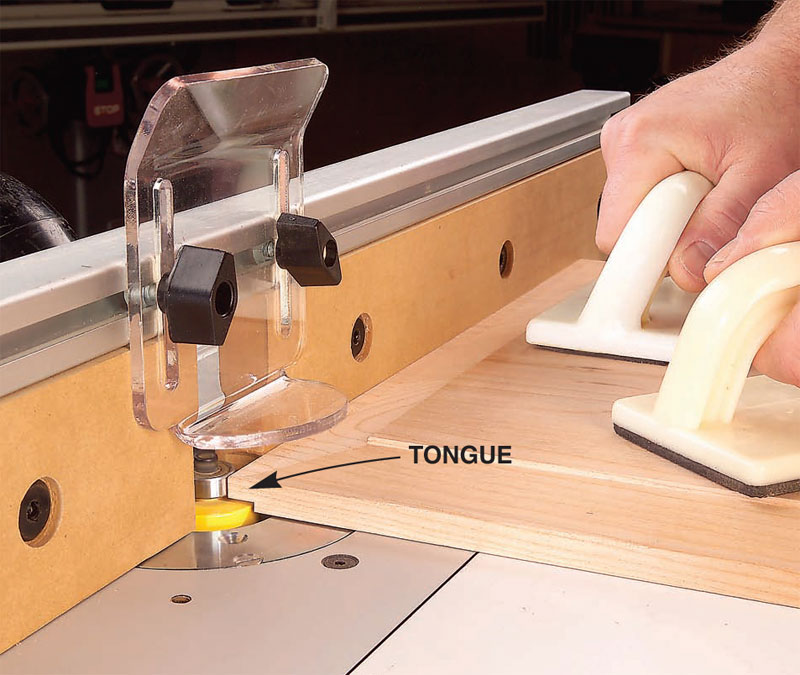
27. Raise the panel (D3) on your router table with a panel-raising
bit (see Sources, below). Then rabbet the back (Photo 11).
28. Glue the doors together after assembling them without
glue to test the fit. Brush glue into the mortises and onto
the tenons. Don’t glue the panel. It must be free to expand
and contract inside the frame. To make sure my panels don’t
get stuck, I always finish them prior to assembly. I also wax the
edges, so any glue that happens to squeeze into the panel
grooves during glue-up won’t stick.
29. Round-over the doors’ front edges with a 1/4-in.-
radius bit. Then rabbet the back edges on three sides (Photo
12). Don’t rabbet the hinge stile.
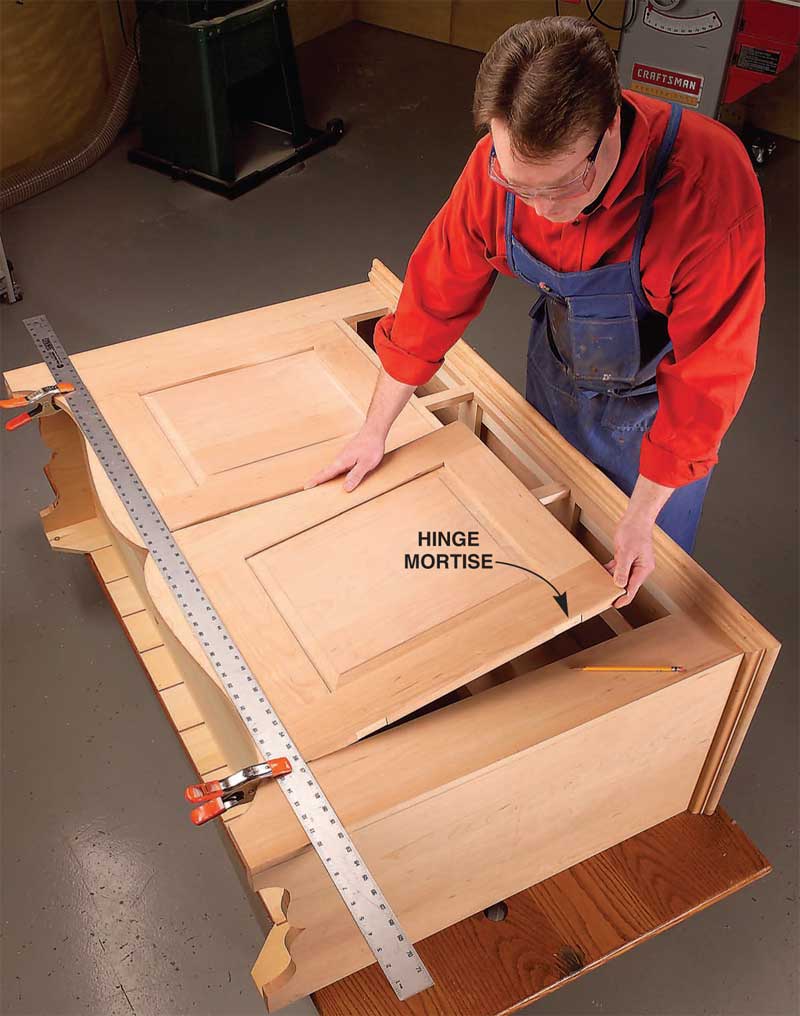
30. Cut hinge mortises in the doors. Then position the
doors on the cabinet so you can transfer the mortise locations
to the face frame (Photo 13). Cut these mortises, install the
hinges and mount the doors. Note: Because of their overlay
style and the use of traditional butt hinges, the doors swing
open slightly less than 180 degrees.
31. Mark locations for the knobs (D4; see Sources, below) and drill holes for the screws.
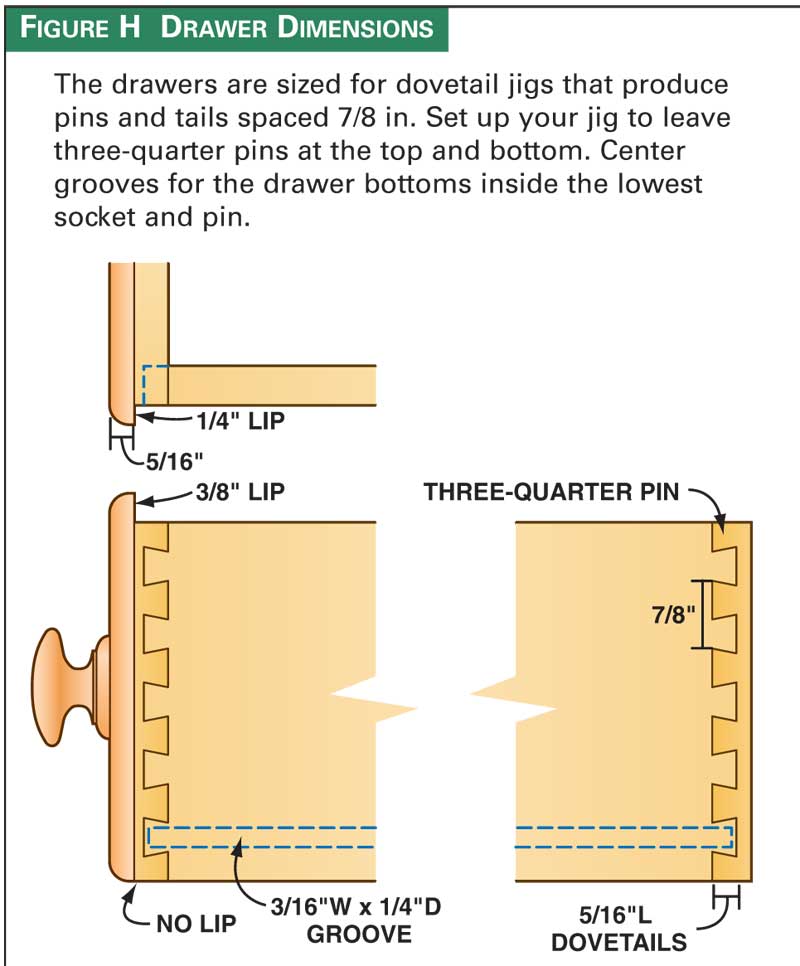
Build the Drawers
The drawer fronts (E1 and E2) are rounded-over at a 1/4-in.
radius and lipped 3/8 in. on top and 1/4 in. on the ends, so
they cover the openings. The bottoms aren’t lipped. The
drawers fit inside the openings with 1/16-in. width and 1/8-in.
height tolerances. The knobs (E3; see Sources) are centered
in the drawer fronts.
The maple drawer sides (E4) and backs (E5 and E6) are
sized for machine-cut dovetails, with three-quarter pins at the
top and bottom (Fig. H, at right). The plywood drawer bottoms (E7 and E8) fit in grooves centered in one of the dovetails,
so they’re hidden.
The fact is, you don’t have to use a jig to make the drawers.
In the 19th century, drawers in cabinets like this one were often
hand-dovetailed, but just as often, they were simply butted and
nailed. That means you can choose the drawer joinery method
that suits your taste and skill level. To make drawers, all you really need to know are the size of the drawer fronts and the size
and depth of the drawer openings.
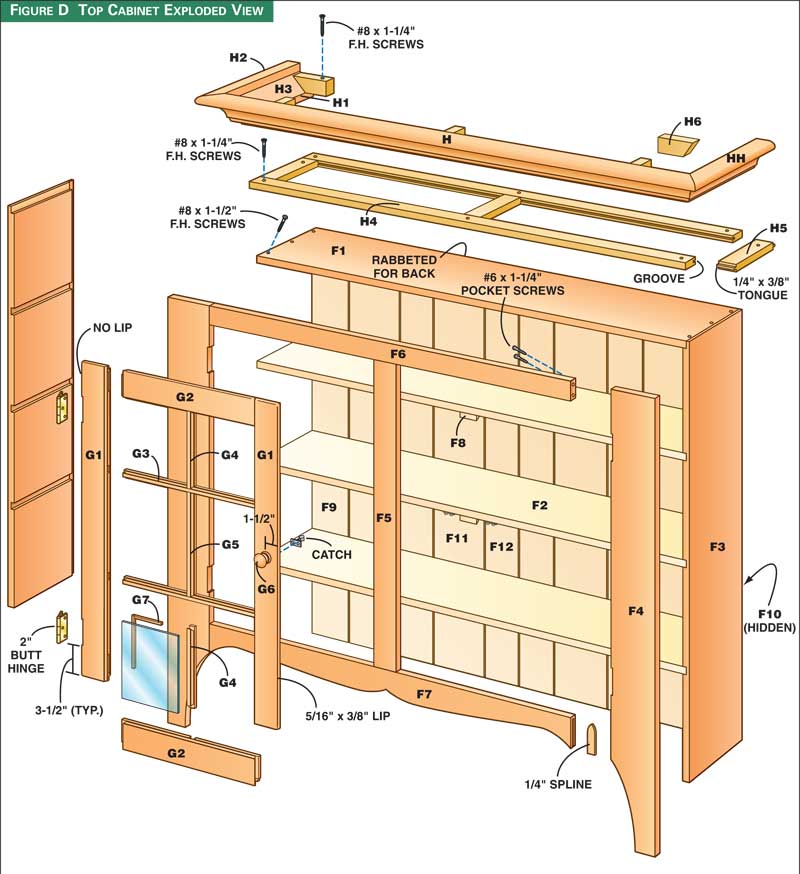
Build the Top Cabinet
The top cabinet is constructed the same way as the base,
with shelves (F1 and F2, Fig. D, below) glued into dadoes
and rabbets in the sides (F3). A face frame (F4 through F7)
is glued to the front, supports (F8) are glued under the
shelves and shiplapped boards (F9 through F12) are screwed
to the back. The back shows on this cabinet, so I used wide
and narrow boards for visual interest. The top shelf is rabbeted,
like the sides, to house the back boards.
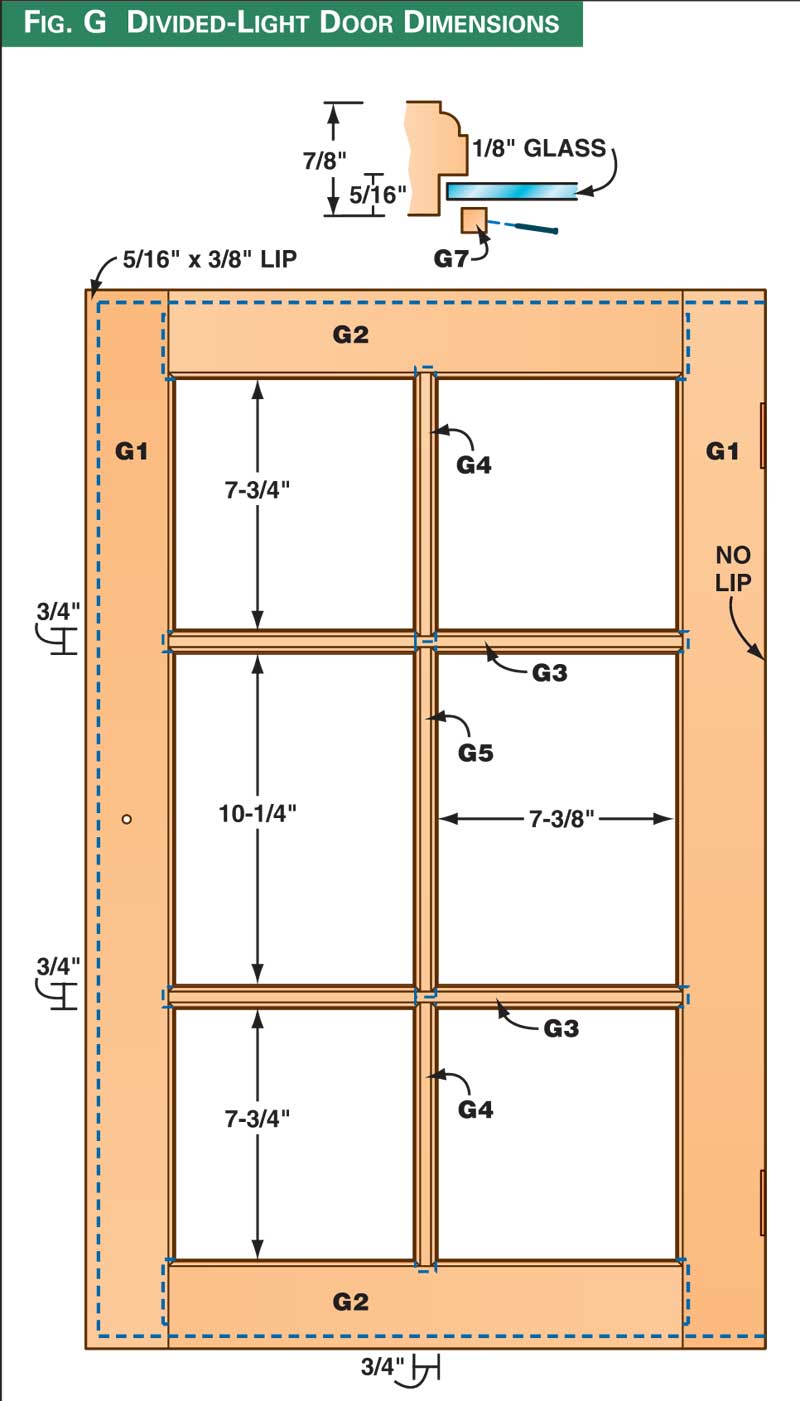
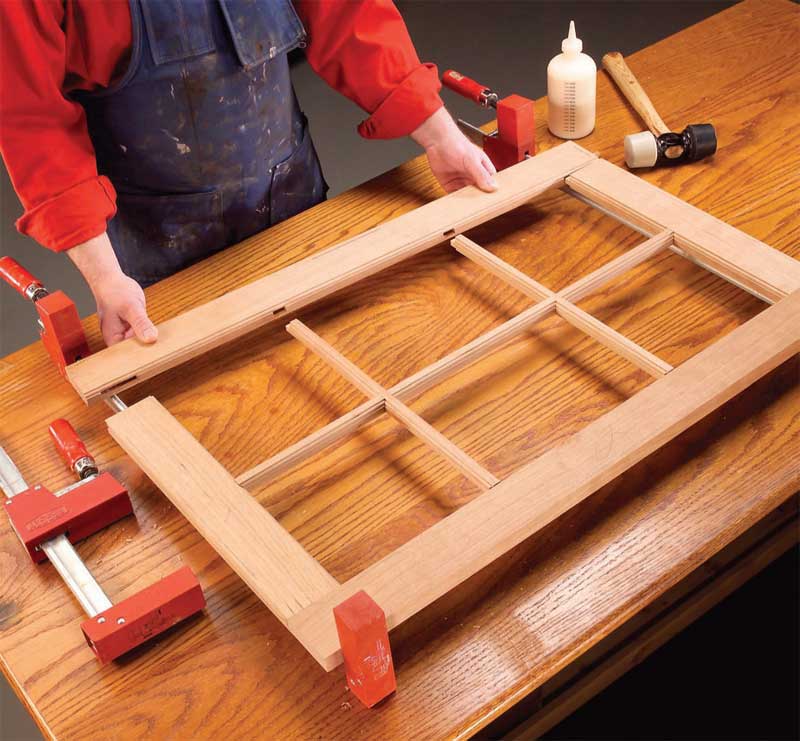
Build Divided-Light Doors
These handsome doors feature mortise-and-tenon construction
that’s modified to incorporate multiple individual
panes of glass (Photo 14). In the old days, this complicated
joinery was done by hand. Today, special router bit sets make
the job easier.
Building these doors is in itself an advanced project, so
we’ve devoted an entire story to show you exactly how to
make them. Most of the work is done on the router table, but
you also have to chop mortises. For complete how-to instructions, click here to download them. The dimensions for
the glass openings (Fig. G, below) and for the door parts
(G1 through G5) are dedicated to the same Freud router bit
set (see Sources, below).
32. After gluing the door frames together, round-over the
edges and rout lips on three sides, as you did on the solid
panel doors on the base cabinet. Similarly, chop the hinge
mortises, install the hinges and mount the doors. Then mark
and drill screw holes for the knobs (G6).
33. Remove the doors. Install the glass panes and retainers
(G7) after you’ve applied the finish.
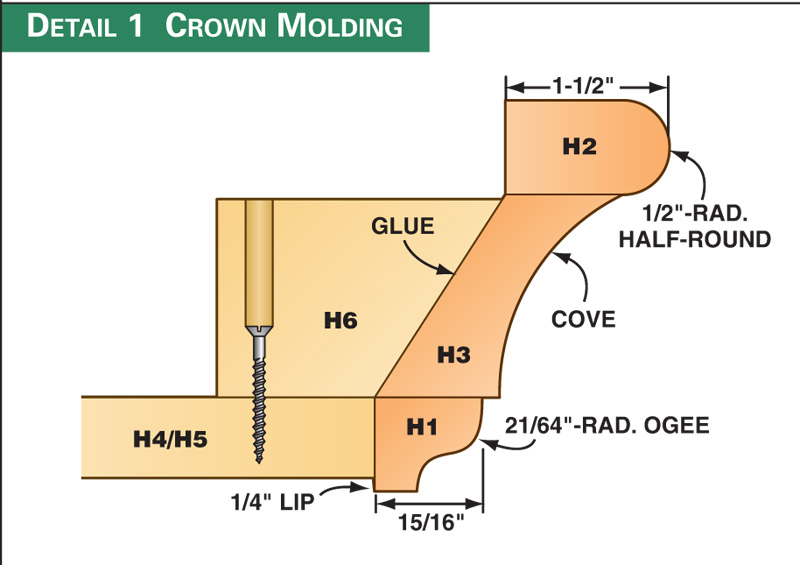
Build and Install the Crown Molding
The crown molding consists of three separate moldings
(H1 through H3) that are glued together (Fig D, Detail 1, below). This molding mounts on its own web frame, which
is then attached to the cabinet. If the molding were directly
attached to the cabinet, seasonal movement would eventually
break open the miter joints.
34. Rout the 21/64-in.-radius ogee (see Sources, below
right) and 1/2-in.-radius half-round profiles for the base
(H1) and cap moldings (H2) on opposite sides of a wide
blank. Then rip the finished moldings (oriented as offcuts)
from the blank.
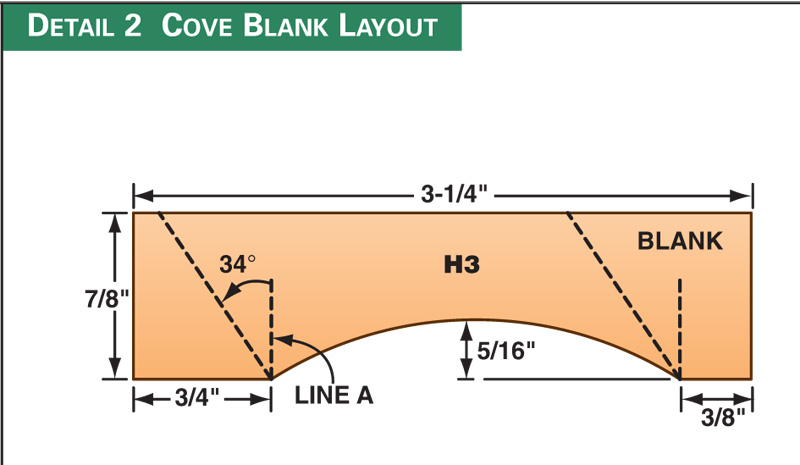
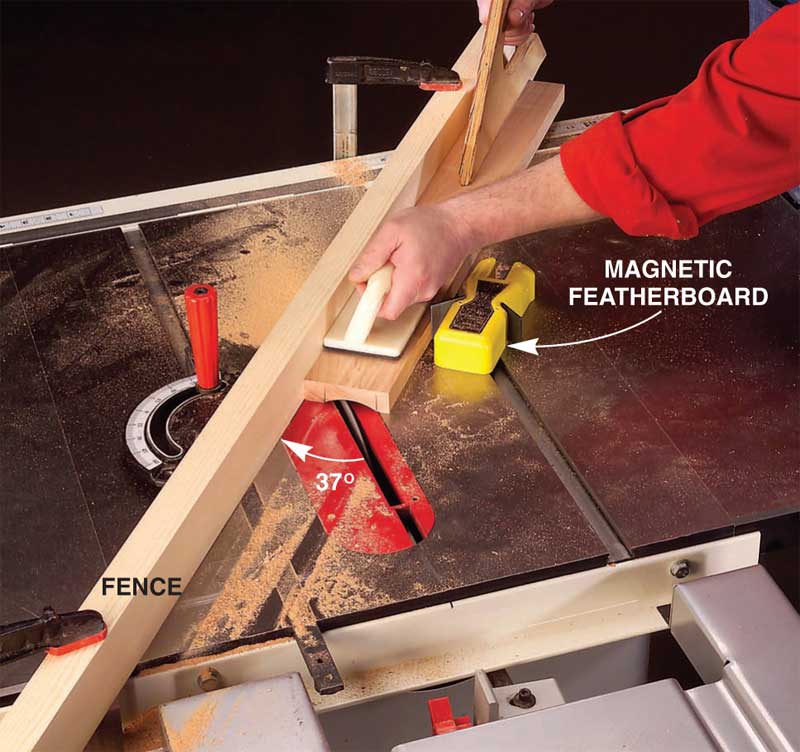
35. To make the cove molding (H3), start by drawing the
cove profile (Fig. D, Detail 2, below) on both ends of a
3-1/4-in.-wide test blank. The profile is offset to one side, so
make sure it’s oriented the same way on each end. Draw vertical
lines to mark the start and end of the cove. Mark one as
line A.
36. Unplug the saw. Set the blade height at the depth of
the cove, 5/16 in.
37. Set your miter gauge at a 37-degree angle to the blade
and install a long, straight fence.
38. Adjust the fence’s position by moving the miter
gauge forward or back. Hold the blank against the fence
and use line A (Fig. D, Detail 2) as a guide for positioning.
When line A intersects the point where the blade enters the
throat plate, clamp the fence to the saw table.
39. Install a featherboard to keep the blank from wandering
away from the fence as you make the cut. Lower the blade
to 1/16-in. exposure and cut a test cove to familiarize yourself
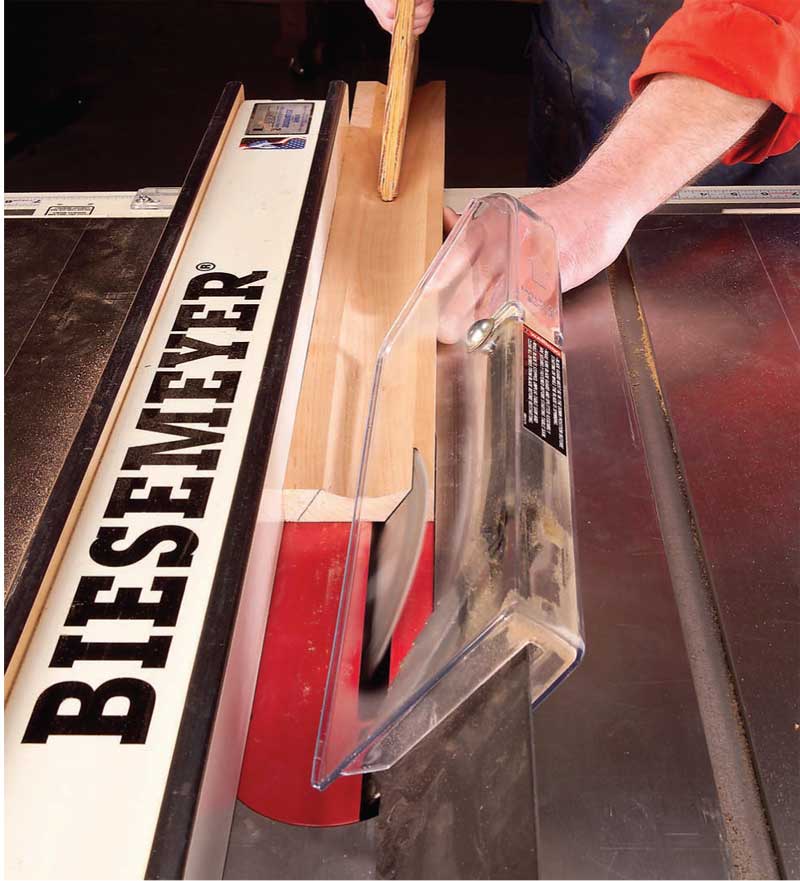
with the process. Then cut the coves (Photo 15).
40. Saw the cove’s beveled edges at 34-degree angles
(Photo 16). Orient the blank cove face up for both cuts. Save
the larger beveled offcut. Handle the beveled cove molding
carefully; its top edge is fragile.
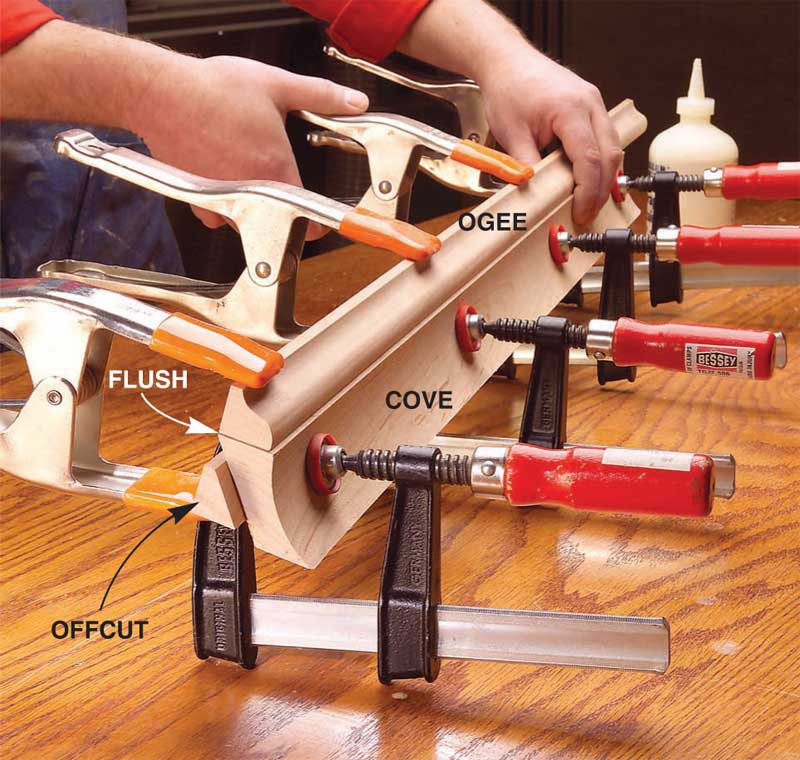
41. Use the beveled offcut to glue the ogee-profile base to
the cove (Photo 17). The cap glues on easily with spring
clamps only. Sand the molding to remove the saw marks.
42. Build the maple web frame (H4 and H5). This frame
isn’t glued to the cabinet, so tongue-and-groove joinery is better
than pocket holes. The frame is slightly longer than the
cabinet, so the lipped molding will drop easily over the sides.
43. Fit the front crown molding (H) to the frame by mitering
the corners. Then glue it on, using rabbeted spacers to
create a uniform 1/4-in. overhang (Photo 18).
44. Miter and fit the side moldings (HH). Then glue them
on. Fit and install the brackets (H6).
45. Screw the crown assembly onto the top cabinet.
Finally, Assemble the Cupboard
46. Make two stays (A11) to fasten the cabinets together.
Position the top cabinet on the bottom cabinet so you can
mark and drill countersunk screw holes on the stays. The
screws go into two shelves in the top cabinet and both rails
and one shelf in the bottom cabinet.
47. If necessary, install the top trim molding (C3) to cover
the joint between the back boards of the top cabinet and the
top of the bottom cabinet.
And Finish
The only finishing mistake you can make with cherry is to
stain it. Cherry ages to a beautiful deep color with just about
any finish, so it doesn’t need stain. Just give it time. For
appearance, long life and durability, I prefer a surface finish,
like shellac or lacquer. Cherry will age faster with an oil finish;
however, an oil finish enhances cherry’s unpredictable
figure, which can appear mottled or even blotchy. Surface
finishes minimize this figure.
Leave the pine interior unfinished and a fresh scent will fill
the air whenever you open the cabinet doors.
Project Requirements

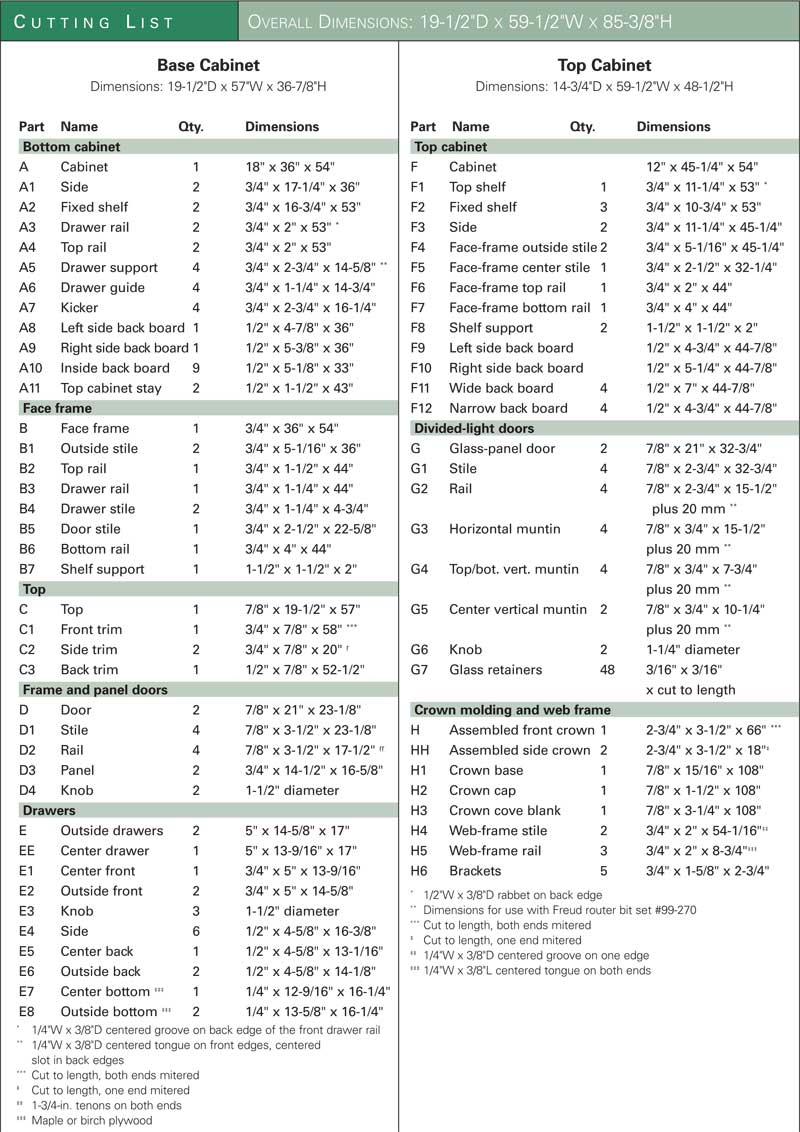
Cutting List
Fig. A: Base Cabinet Exploded View
Fig. A, Detail 1: Top Edge Profile
Fig. B: Dadoing Jig
Fig. C: Cabinet Side Dimensions
Fig. D: Top Cabinet Exploded View
Fig. D, Detail 1: Crown Molding
Fig. D, Detail 2: Cove Blank Layout
Fig. E: Shiplapped Back
Fig. F: Door Construction
Fig. G: Divided-Light Door Dimensions
Fig. H: Drawer Dimensions
Fig. J: Profiles
|
|
Click any image to view a larger version.
1. Start by gluing up the cabinet sides. Splines keep the
boards aligned, so the joints will be flush on the glued up
surface.
2. Rout dadoes in the sides to support the shelves and
rails. You can’t go wrong when you use this shop-made
jig (see Fig. B., below).
3. Glue the base cabinet together on a flat surface. To
square the cabinet, clamp shop-made 90-degree brackets
in the corners before you tighten the bar clamps.
4. Assemble the face
frame with pocket-hole
joinery. This method is fast
and easy. You drill holes
with a dedicated jig, clamp
the pieces together and fasten
them with special
screws. The joinery is hidden,
because it’s on the back of the frame.
Assemble the face frame’s
bottom corners with
splines so you won’t have
to worry about hitting a
screw when you rout the
decorative cutout.
5. Rout the decorative cutout with a template and a flushtrim
bit. You have to rout against the grain during this
operation. To minimize tear-out, rough-saw the profile to
within 1/16 in. of the pattern line, so you can make a light
pass. Dampen the wood before routing and use a large diameter
bit (see Sources, below).
6. Attach the drawer supports. Glue the tongue-and-groove
joints at the front. Secure the backs with screws and
washers through the slots. This assembly method accommodates
seasonal movement that occurs in the cabinet’s
solid wood sides and shelves.
7. Install drawer guides and kickers so the drawers track
smoothly. Guides limit side play. They must be flush
with the edges of the openings, perpendicular to the face
frame and parallel to each other. Kickers keep the drawer
from tipping when it’s opened.
8. Build the back from boards with overlapping rabbets.
These overlay joints are called shiplaps. Work from one
end to the other, using spacers to maintain even gaps
between boards. Plane or rip the last board to fit.
9. Build the raised-panel doors. Cut mortises in the stiles,
using the groove to guide the mortising chisel. Keep the
stile firmly in position by clamping a fence in front.
10. Cut tenons on the door rails using a dado set and the
miter gauge. Install a fence and stop block. The fence
controls tear-out and the stop block determines the tenon’s
length.
11. Rabbet the back of the door panel. By adjusting the
bit’s height, you’ll make tongues that exactly fit the
grooves in the stiles and rails.
12. Rabbet the doors to create lipped edges. Lipped
doors are easier to install than inset doors because
they hide all the gaps. In the 19th century, lipped doors were
used on cupboards like this one to keep out mice.
13. Transfer the hinge mortise locations from the doors
to the cabinet. Use a straightedge to align the doors
and center them in the openings.
14. Build frames for the glazed doors. You’ll need a specialized
router bit set (see Sources, below) and a
router table. For complete how-to instructions, see “Divided-Light Doors.”
15. Build the crown molding in three sections. Create the
middle cove section by passing the cove blank over the
tablesaw blade at an angle, using a fence set at 37 degrees.
Fastening the fence to the miter gauge makes it easy to set
this angle. Cut the cove by making light passes, raising the
blade in 1/16-in. increments.
16. Saw the edges of the cove section at 34-degree
angles. After making the first cut, reposition the fence
on the other side of the blade to make the second cut.
17. Glue the crown molding together in stages. Clamping
a beveled offcut to the back of the cove makes it easy
to glue and clamp the ogee. Orient the two sections by
keeping them flush at the back.
18. Glue the crown molding onto its own web frame.
Rabbeted spacers align the molding and assure a uniform
lip. When the crown is installed, the lipped molding
covers the joint between the frame and the cabinet.
Graceful curves, a wide stance and prominent crown molding
reflect this cupboard’s Pennsylvania heritage, where
similar pieces have been built for more than 200 years.
Other Pennsylvania design cues include the step-back style
with glazed doors over an open sill and the three drawers
banked over a pair of raised-panel doors in the base.
|