


We may receive a commission when you use our affiliate links. However, this does not impact our recommendations.
The American Woodworker Router Table
You won’t find this router table in any store or catalog.
by Dave Munkittric
| This router table incorporates all the best features found in those store-bought systems at half the cost! At AW we’ve had the opportunity to study and use most of the router-table systems on the market. From that experience we’ve designed our own fully featured, easy-to-build router table. Commercial cabinet-based tables sell for $400 to $500; you can build ours for a little more than $200. You’ll save enough to buy yourself a new router!
Check Out These Great Features
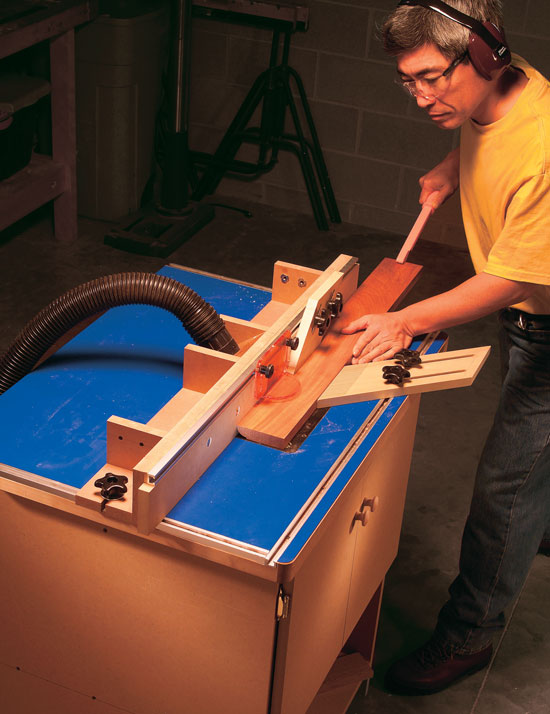
The All-Important FenceAt the heart of any great router-table system lies a well-designed fence. This one offers all the desirable features that we’ve identified in our router table tool tests, including • An easy-to-use, tool-free fence can be set and adjusted in an instant (Photo 1). • Easy-to-make sacrificial subfences can be adjusted for any size bit or used to create zero-clearance openings (Photo 2). They’re easy to make from plain old 3/4-in. MDF. • Quick, rock-solid fence settings are made possible by T-tracks in the table (Photo 3). For fine adjustments, leave one hold-down tight to create a pivot point for the fence. • Fence-mounted T-track for attaching accessories (Photo 3). • A dust port for picking up the debris that routers kick out
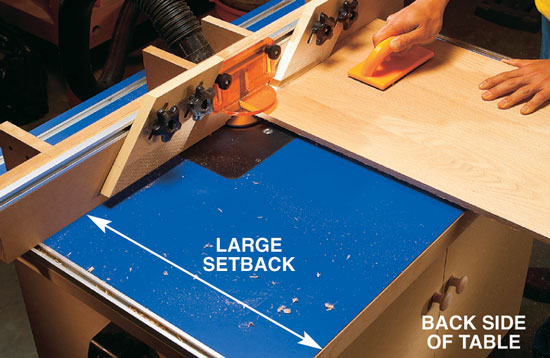
The Sag-Free TopWe’ll show you how to build flatness into your top and keep it there. Our top’s features include: • A dead-flat top that will never sag because it’s supported by braces built into the cabinet (Fig. A, below). • A versatile offset router mount puts the router near the front edge for easy access and easy stock feeding. This is where you’ll do 90 percent of your routing. The other 10 percent will be at the back of the table, which offers more table support for routing large stock, such as door panels (Photo 4). • Plastic laminate for a slick, durable top. We put the laminate on both surfaces to protect and stiffen the top. • A router-mounting plate allows easy removal of the router for bit changes and hand-held work.
A Large, Easy-to-Build CabinetMade from heavy, vibration-absorbing MDF, the cabinet goes together with butt joints and screws. There’s plenty of storage plus the following features: • The capacity to handle the largest routers on the market for a router table that approaches the capabilities of a shaper. • A pair of doors on the front and back cut noise while giving you access to the router from either side of the table. • An external power switch (no wiring required) makes routing easier and safer. Easier because there’s no fumbling under the table to turn on your router. Safer because who wants to be opening doors and groping for the power switch in an emergency
Build the Base and TopYou’ll need a tablesaw, router, jigsaw, belt sander, drill and drill press to build this table. We’ll build from the bottom up, starting with the cabinet. It serves as a solid foundation for the working parts of our table. Ready? Here we go
Build the Cabinet1. Start by cutting the cabinet and top parts according to the Cutting List, below 2. Assemble the cabinet with butt joints and screws (Fig. A). Use the toe-kick (F) as a spacer for setting the bottom shelf (Photo 1). Make a similar 12-1/2-in. spacer to set the middle shelf. Check for square as you build 3. Add the braces (E and G) to support the top. The narrow brace (G) at the front of the cabinet makes it easier to adjust the router. Cleats (R) are glued at right angles to the support beams to provide a flange for screwing the top down onto the cabinet. 4. Hang the doors with self-closing, surface-mount hinges.
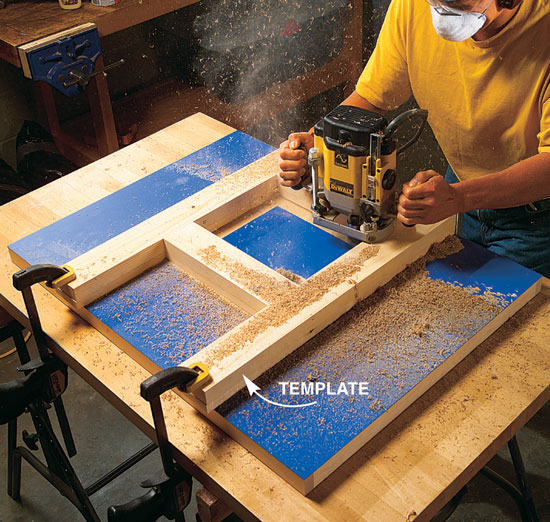
Build the Top5. Glue together the two MDF pieces (C) that make up the top (Photo 2). Then, trim the substrate flush and square (Photo 3). Important: leave an extra 1/2 in. on the width to be trimmed after the hardwood edges are applied 6. Glue on the two short pieces of hardwood edging (Q). Trim to finished width on the tablesaw leaving the hardwood flush with the front and back of the substrate (Photo 4) 7. Glue the long hardwood edge (P) to the front and back of the top. Trim and sand the hardwood edges flush with the MDF. Then, round the corners with the belt sander. Now you’re ready for the plastic laminate 8. Glue the plastic laminate (S) to the top and bottom of the substrate with contact cement (Photo 5). Trim the laminate flush with the top using a flush-trim bit. File a slight bevel along the laminate edge to remove the sharp edge and prevent chipping 9. Cut the recess for the mounting plate with a router (Photo 6). Cut the hole for the router with a jigsaw. For greater detail on cutting the opening for your mounting plate, see AW #85, February 2001, Hang a Router…Perfectly, page 90. 10. Rout the channels for the T-tracks (Photo 7). Build the Fence11. Cut the MDF parts for the fence (H through K). Carefully lay out the location of the supports, cutouts and slots on the base and face pieces 12. Rout the slots in the fence face (Photo 8) and at the ends of the base. The slots in the face allow the subfence to slide back and forth to create the adjustable opening. The slots in the base allow the fence to skew and pivot for fine adjustments. They also facilitate attaching and removing the fence from the top 13. Cut out the bit opening in the face and base of the fence (Photo 9). A 45-degree bevel at the back of the cutout on the base (Fig. C) helps with dust collection 14. Assemble the fence with screws (Photo 10). Drill your pilot holes a little deeper than the screws to prevent splitting the small support blocks 15. Drill and countersink holes for each subfence.
Tip: As long as you’re making two subfences, you may as well make a dozen. That way you’ll always have a fresh one when you need it and you won’t be tempted to “make-do”
Sources(Note: This information may have changed since the story’s original publication date.) Home Depot, Two sheets MDF; unit cost $21, total cost $42; One 30″ x 96″ plastic laminate, $40; One 24″ x 48″ 1/4″ hardboard, $3; One quart contact cement, $6; Four pair self-closing hinges, $4 each, total cost $16; Four wood knobs, $1 each, total cost $4 TWC, thewoodworkerschoice.com, 800-892-4866, Two 24″ T-track, #698, $11 each, total cost $22; Two 48″ T-track, #701, $17 each, total cost $34; One Deluxe Phenolic Router Mounting Plate, #933, $50 Highland Hardware, highlandhardware.com, 800-241-6748, One Router-Table Switch, #104903, $14 Woodhaven, woodhaven.com, 800-344-6657, One 4″ Guard, #224, $8.
This story originally appeared in American Woodworker March 2003, issue #99 |
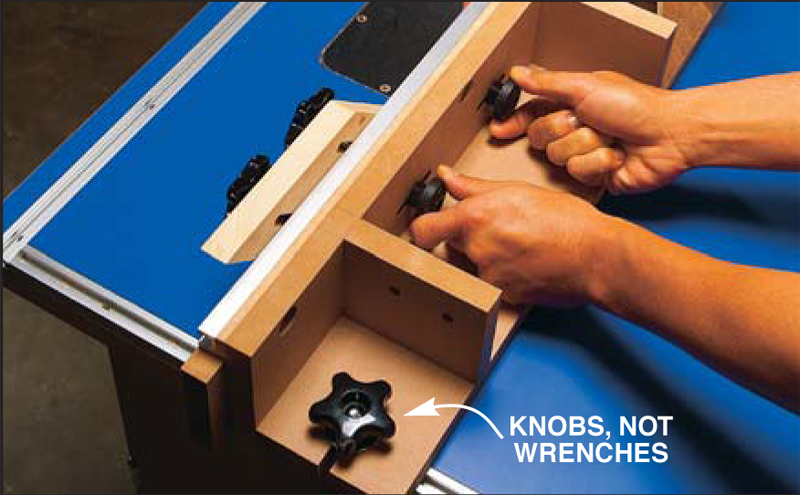
A totally tool-free fence. Forget about wrenches, screwdrivers or clamps for fence adjustments.
Easy-to-make, sacrificial subfences allow you to make a zero-clearance opening for super-clean, super-safe cuts. Simply slide the infeed fence slowly into the spinning bit.
T-tracks provide slide-and-lock adjustments for maximum versatility. They make for super-smooth fence adjustments and convenient attachment points for accessories.
You can work at the back of the table to take advantage of the large setback to support big stock, like this door panel. That way you’re not having to divide your attention between feeding the stock and keeping it from falling off the table.
Photo 1: Assemble the cabinet with butt joints and screws. Use the toe-kick as a spacer for locating the bottom shelf. Spring clamps are like having a third hand for supporting cabinet parts during assembly.
Photo 2: Glue together the two top pieces on a flat surface, such as your tablesaw. Sandbags (wrapped in plastic to avoid spills) provide the clamping pressure. Be sure to offset the two pieces by about 1/4 in. This will give you two clean edges to place against your tablesaw fence as you cut the top to final dimensions (see Photo 3).
Photo 3: Trim the built-up top on the tablesaw using the two offset edges against the fence. You’ll have to make four cuts to get the whole top square with flush edges. Leave an extra 1/2 in. on the width for trimming the hardwood edges (see Photo 4).
Photo 4: Cut the top to final width with the hardwood edging glued onto the sides. The hardwood is placed just shy of one edge on the MDF core. This leaves a clean edge to reference against the tablesaw fence for the first cut. The second cut is made to final width and leaves the hardwood perfectly flush with the edges of the MDF.
Photo 5: Apply the plastic laminate. Slip sticks prevent the plastic laminate from sticking to the top before you have it properly positioned. When the laminate evenly overlaps all four edges of the top, slip one stick out at a time and apply pressure to the laminate using a block of wood or a roller.
Photo 6: Rout the recess for your mounting plate. Build the template to fit snugly around your mounting plate. Use a top-bearing flush-trim bit to cut an exact-size opening. Make sure the template is deep enough to accommodate the bit length. Use a jigsaw to cut a hole in the center of the recess, leaving a 1/2-in. ledge for the mounting plate (Fig. A).
Photo 7: Rout channels for the T-track with a 3/4-in. straight cutter and an edge guide. Cut the full-length dado at the front of the table first; then cut the stopped rabbets on the two edges.
Photo 8: Rout slots in the fence parts using your newly built table and a temporary fence. Drill a 1/4-in. hole at the beginning and end of each slot. With the router turned off, set the blank against the fence so the 1/4-in. straight cutter protrudes through the first hole of the slot. Hold the blank firmly and turn on the router. Push the blank forward until the bit reaches the second hole.
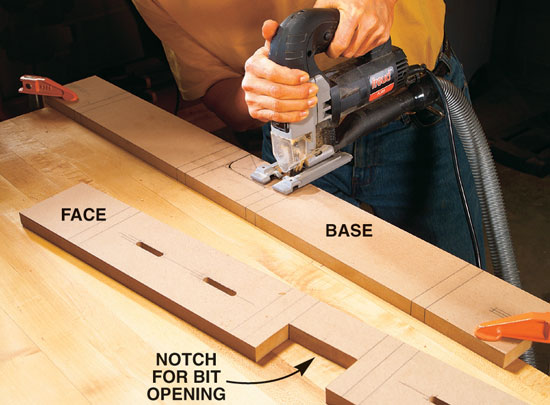
Photo 9: Cut notches in the fence parts with a jigsaw. Once the fence is assembled, the notches form an opening in the fence to accommodate the router bit.
Photo 10: Assemble the fence with screws. Check each support block for square before you use it. Perfectly square support blocks ensure a perfectly square fence. |


|


Here are some supplies and tools we find essential in our everyday work around the shop. We may receive a commission from sales referred by our links; however, we have carefully selected these products for their usefulness and quality.


