We may receive a commission when you use our affiliate links. However, this does not impact our recommendations.
|
|
|
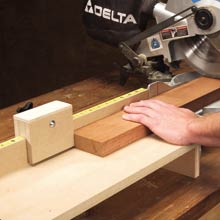
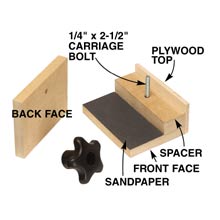
This handy stop grips tightly and is easy to adjust, so you can lock in crosscuts. A spacer the same thickness as the saw's auxiliary fence is the key. Sandwiched between the two clamp faces, this spacer makes the stop fit the fence perfectly. Sandpaper affixed to the stop's front face provides a secure grip. Glue the spacer and front clamp face together, making sure their edges are flush. Then glue on the plywood top. Align the back clamp face flush with the glued-up front assembly and drill a 1/4-in. hole through all three pieces. Glue sandpaper to the front clamp face. Install the carriage bolt, set it with a hammer and attach the knob. I mounted the knob on the back face so it would be out of the way. The top's overhang keeps the back face from spinning as you tighten the knob.
Here are some supplies and tools we find essential in our everyday work around the shop. We may receive a commission from sales referred by our links; however, we have carefully selected these products for their usefulness and quality.


