


We may receive a commission when you use our affiliate links. However, this does not impact our recommendations.
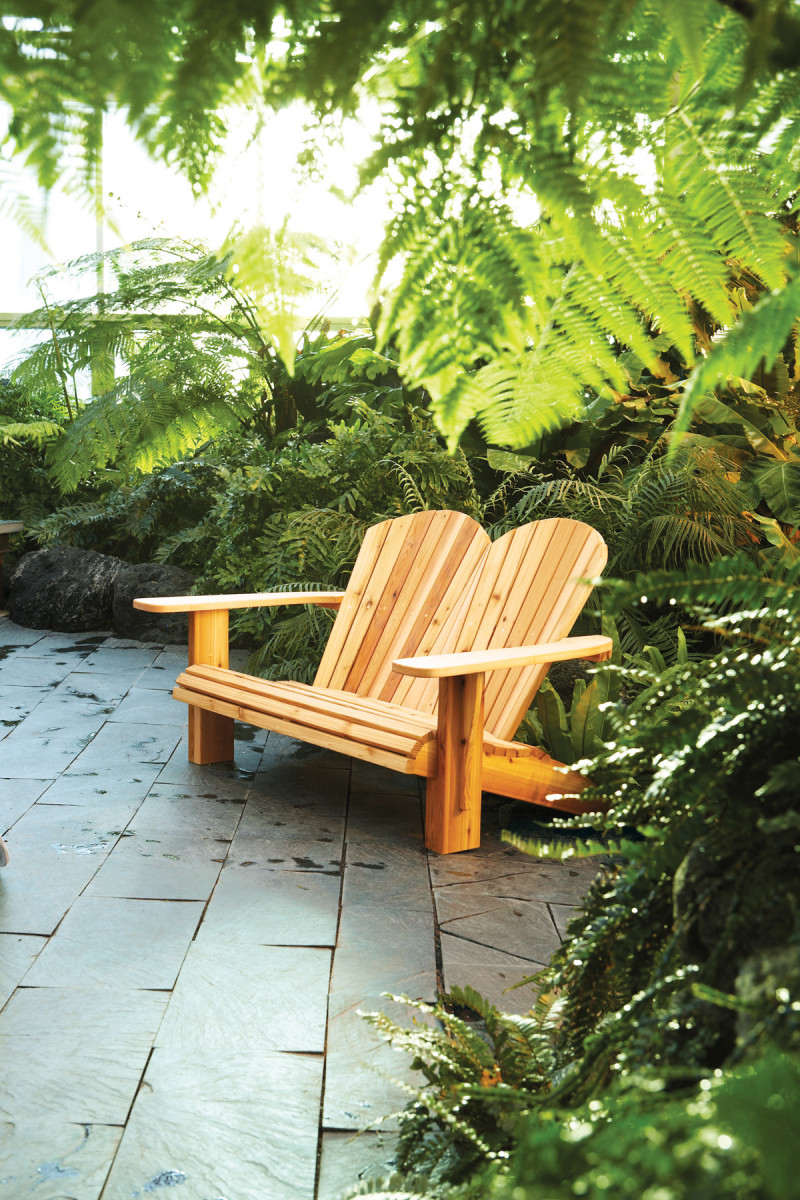
It’s just as comfortable as it looks.
Editor’s note: This article originally appeared in the May 2008 issue of American Woodworker
There it was–an Adirondack loveseat–sitting right on the deck of the Tin Fish, a restaurant overlooking Lake Calhoun in the heart of Minneapolis, my hometown. I’d been thinking of building one for years, but I’d never found one I liked–until now.
I asked the owner, Sheff Priest, where he got it. “Oh, that’s something my Dad made for us–he’s quite a woodworker,” Sheff said. “It’s been used constantly for three seasons now.” Jack Priest-that’s Sheff’s dad–had really done his homework, and built a loveseat that was both comfortable and durable.
Jack has kindly given us permission to publish the plans for his project. I’ve changed the arms and their supports a bit, as well as the back’s profile, but that’s what Adirondacks are all about. Once you’ve got the basic structure down, you can personalize it any way you want.
MATERIALS AND TOOLS
This project is built from Western red cedar, dimensional lumber commonly available at home centers and lumberyards for exterior projects. You’ll need two 2×6 boards, 8-ft. long, and nine pieces of 5/4 lumber (1-in. thick), 6-in. wide and 12-ft. long. Dust from cutting Western red cedar can be hazardous to your health, so wear an appropriate dust mask and work in a wellventilated shop or outdoors. Use deck screws that won’t rust to assemble the project. You’ll need a box of 1-3/4-in. long screws and a box of 1-1/4-in. long screws. You’ll also need some cedar screw-plugs (see Sources). You’ll need a tablesaw, bandsaw (or jigsaw), router table, cordless drill and a rasp to build the loveseat. A miter saw is also handy.
MAKE THE BACK LEGS
The loveseat sits on three back legs: two on the sides (A1, Fig. A) and one in the center (A2). They’re virtually identical, except for one important detail: the notch for the lower back rail (A3). It’s positioned farther back on the center leg than on the outer legs (Fig. B). To ensure that all the legs come out the same, make one paper pattern for all three. Trace around the pattern on three leg blanks cut to the same length, omitting the notches. Then draw the notches directly on the legs. In addition, set your miter saw to 18 degrees and cut a miter on a scrap piece of 1×6. Use this piece to draw the angled lines that indicate the location of the front legs. Draw them on both sides of each outer leg (Fig. A, Detail 1).
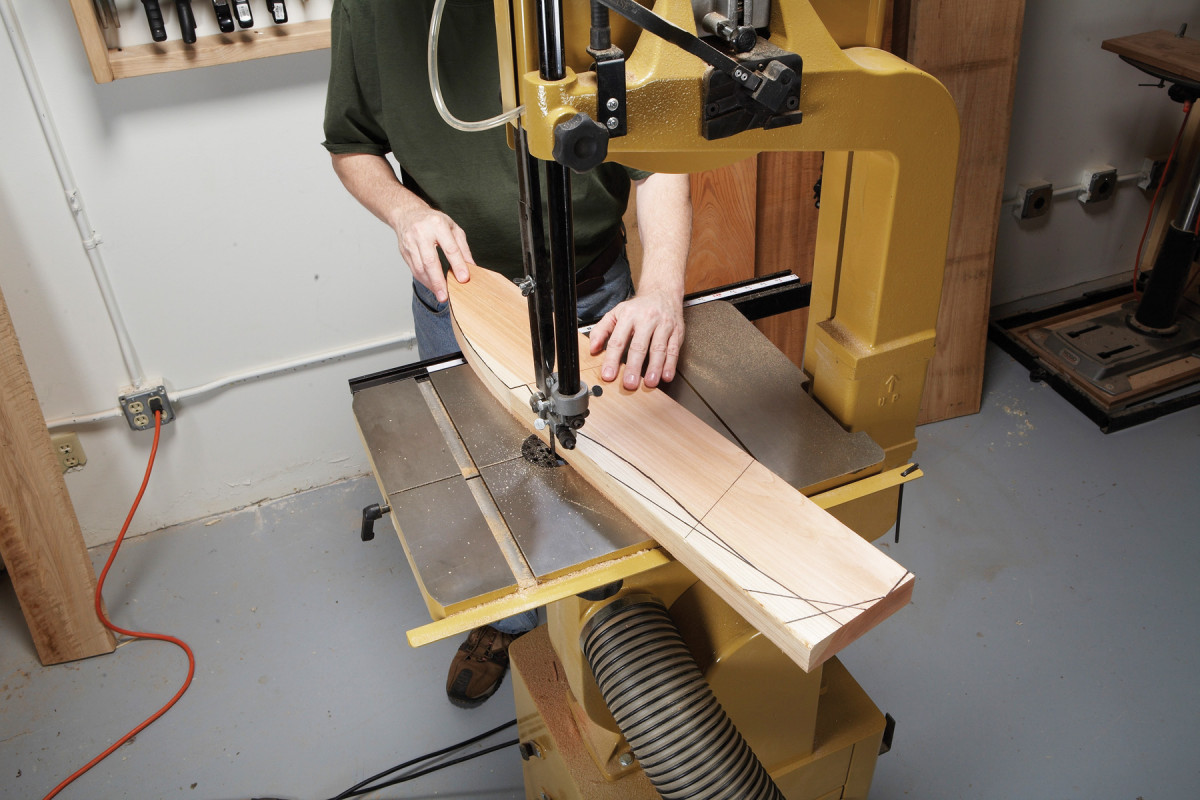
1. Begin building the loveseat by sawing out the back legs from a Western Red Cedar 2×6. You’ll get the most accurate cuts by using a bandsaw, but you could use a jigsaw, instead.
Saw the legs (Photo 1). Smooth the saw cuts with a rasp or coarse sandpaper wrapped around a block.
START THE SEAT
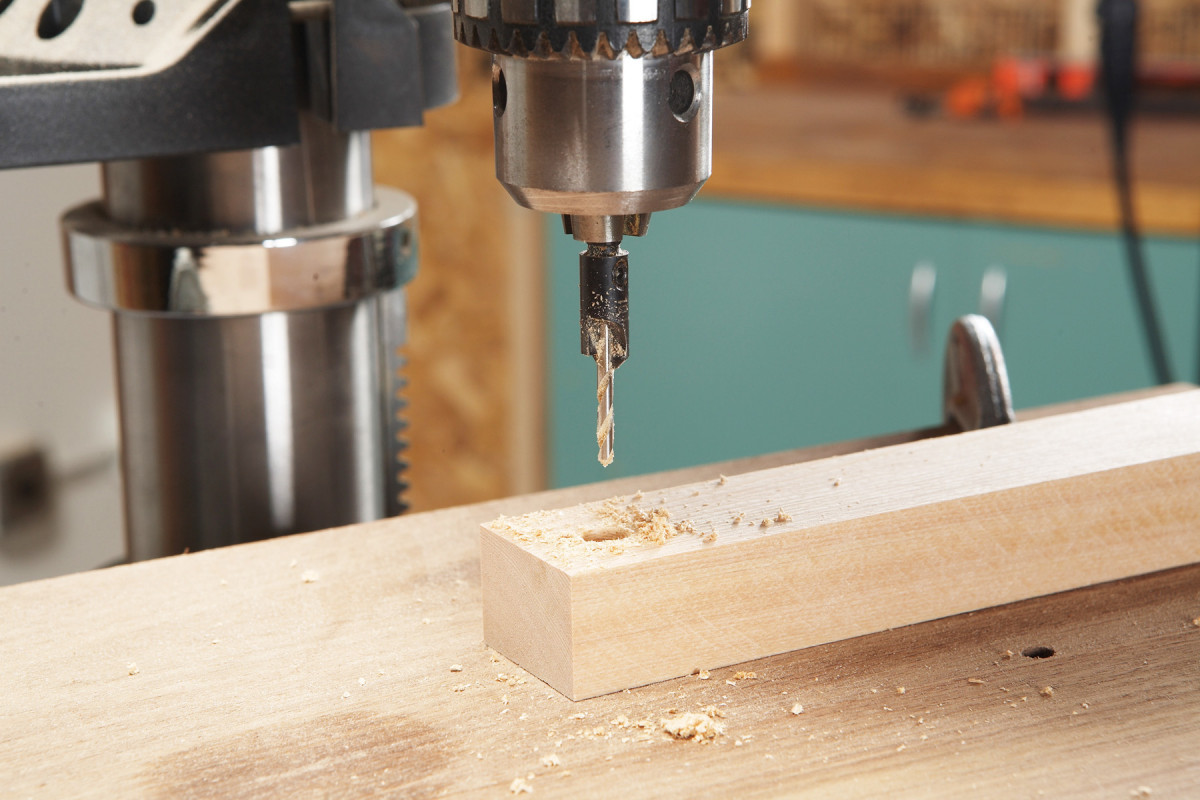
2. Joinery is simple: just screws and glue. You’ll cover every screw hole with a plug later on. As you build the loveseat, drill holes for the plugs and screws simultaneously with a combination bit.
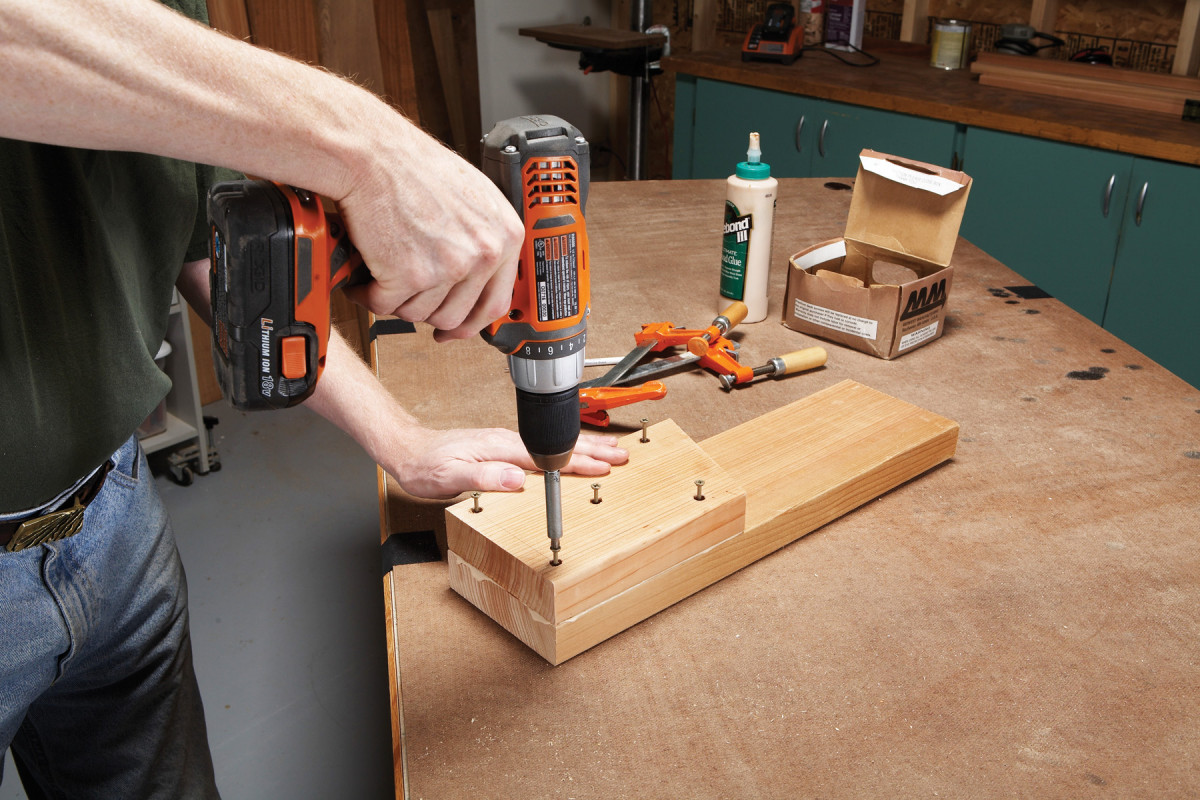
Make the seat slats (A3). Discard pieces with large knots—they’ll weaken the slats. Drill holes for screws and plugs in the ends and middle of all the slats (Photo 2). Make the plug holes about 1/4-in. deep. If you use two bits to make these stepped holes, drill the larger ones first. Round the top edges of the slats using a 1/4-in. roundover bit and a router table.
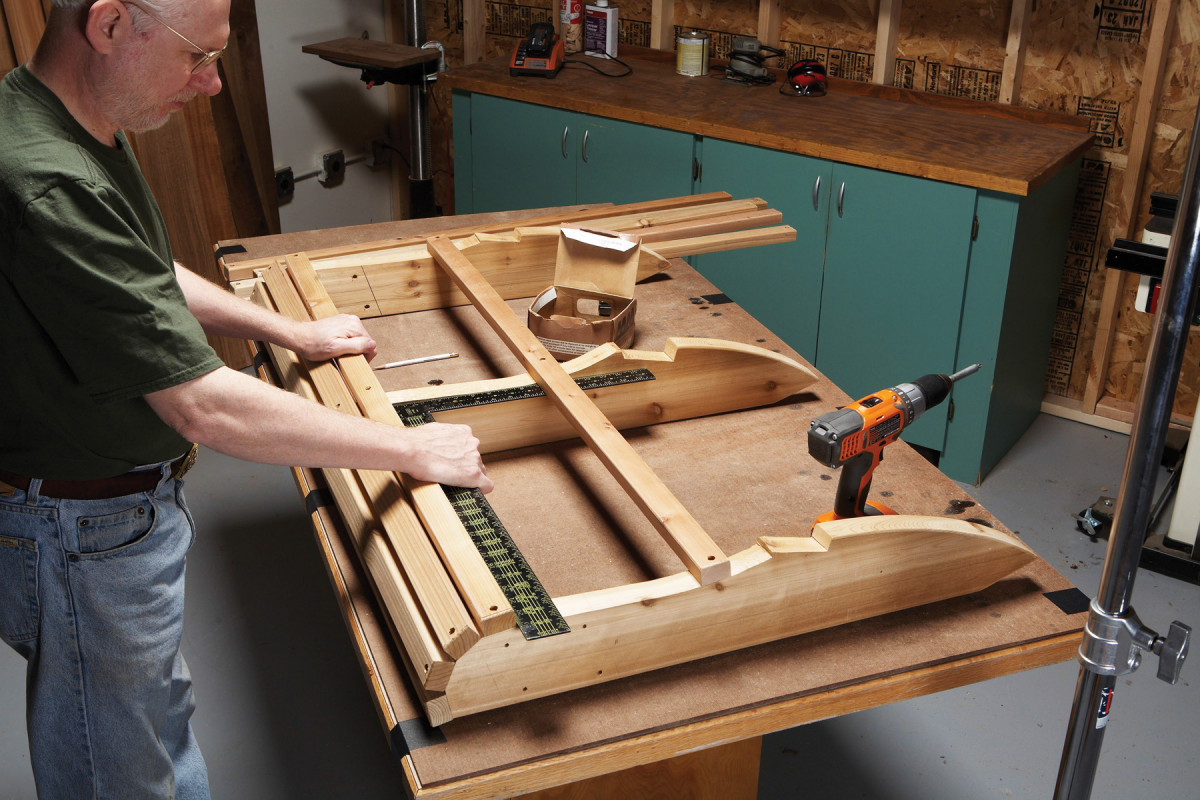
3. Assemble the seat. Fasten the first four seat slats, which are made from 5/4 boards. Check for square as you go. Temporarily add a slat to space the legs the correct distance.
Clear a large, flat work area and arrange the back legs. Line up their front edges. Temporarily fasten one of the rear slats to the middle of each leg. Glue and screw the first four slats (Photo 3).
About This Loveseat
This Adirondack two-seater was primarily designed by Minnesota woodworker Jack Priest. He built it as a center piece for the deck outside his son’s restaurant, The Tin Fish, overlooking LakeCalhoun, in Minneapolis. We’ve changed the arms and their supports a bit, as well as the back’s profile, but that’s whatAdirondacks are all about. Once you’ve got the basic structure down, you can personalize it any way you want.
ADD THE FRONT LEGS
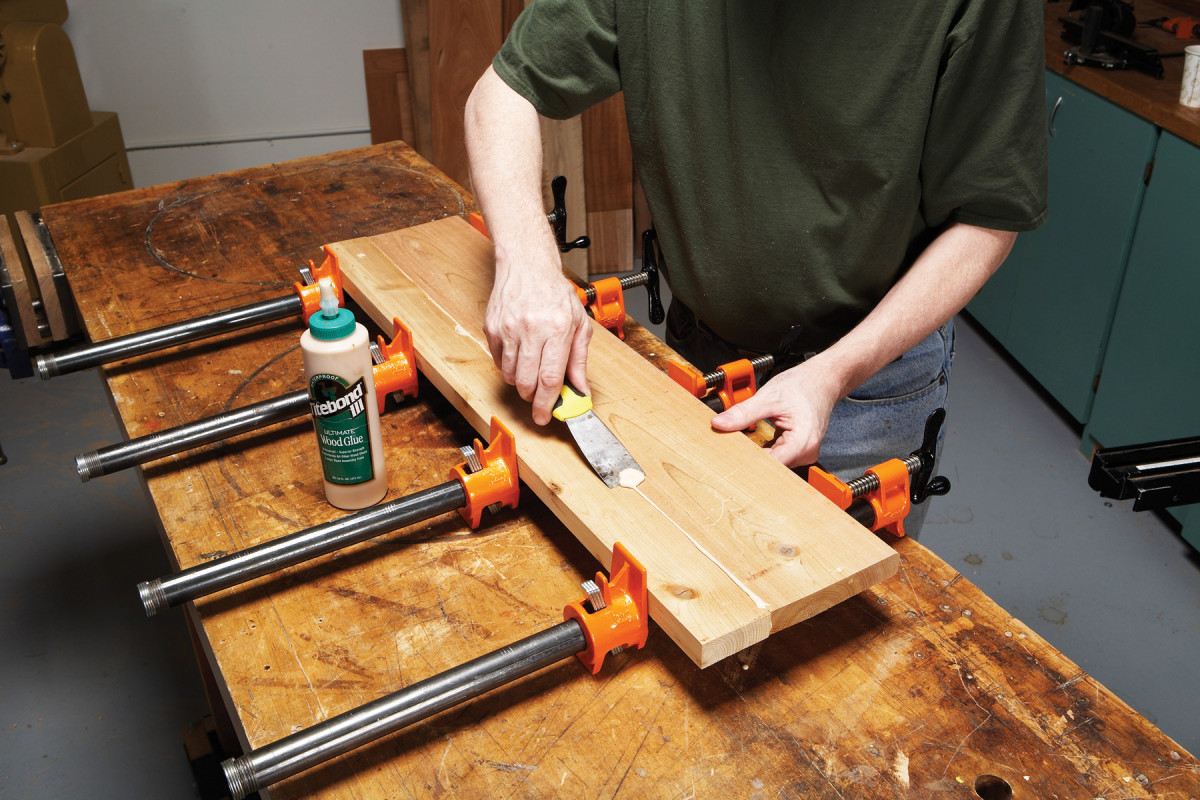
4. Screw and glue together the front legs. Use a water-resistant glue to assemble all the parts of the project.
Make the two pieces that comprise each front leg (B1 and B2) from one long blank. Rip the blank using the tablesaw to remove its rounded edges. This makes a better-looking joint when you glue the pieces together. Cut one end of the blank at 18-degrees, then cut the inner leg to exact length (Fig. C). Cut the outer leg to length, then glue and screw together the leg pieces (Photo 4).
5. Glue and screw the front legs to the seat assembly. Then add the rest of the seat slats and the lower back rail. Assembly is much easier if you work on a large, flat surface, such as a door.
Apply glue to the front legs and clamp them to the back legs. Use the lines you drew in Step 1 to position the front legs. Drill holes in the front legs for screws and plugs, then run in the screws (Photo 5).
FINISH THE SEAT
Make the back seat slat (A4, Fig. D) and lower back rail (A5, Fig. E). Note that the inside curve on each end of the lower back rail consists of three flat sections, to receive three back slats. The straighter these sections are, the stronger your joints will be. After sawing, use a rasp to straighten these cuts, if necessary. Use a rasp to flatten the center straight section, too. Drill holes for screws and plugs in the back seat slat and lower back rail, then round over the edges of both parts with a router bit. Don’t round over the inner edge of the lower back rail, where the back slats go.
Remove the seat slat you temporarily screwed to the back legs. Glue and screw the lower back rail in position. Screw the back seat slat next to it, but don’t glue it. Add the rest of the seat slats. Space them about 1/4-in. apart. Temporarily clamping some slats in position may make it easier to space them.
Remove the back seat slat.
ADD THE ARM ASSEMBLY
6. Glue the arms together from two pieces of 5/4 material. To make a tight, invisible joint, first remove the rounded edges of this construction lumber by ripping the boards on the tablesaw.
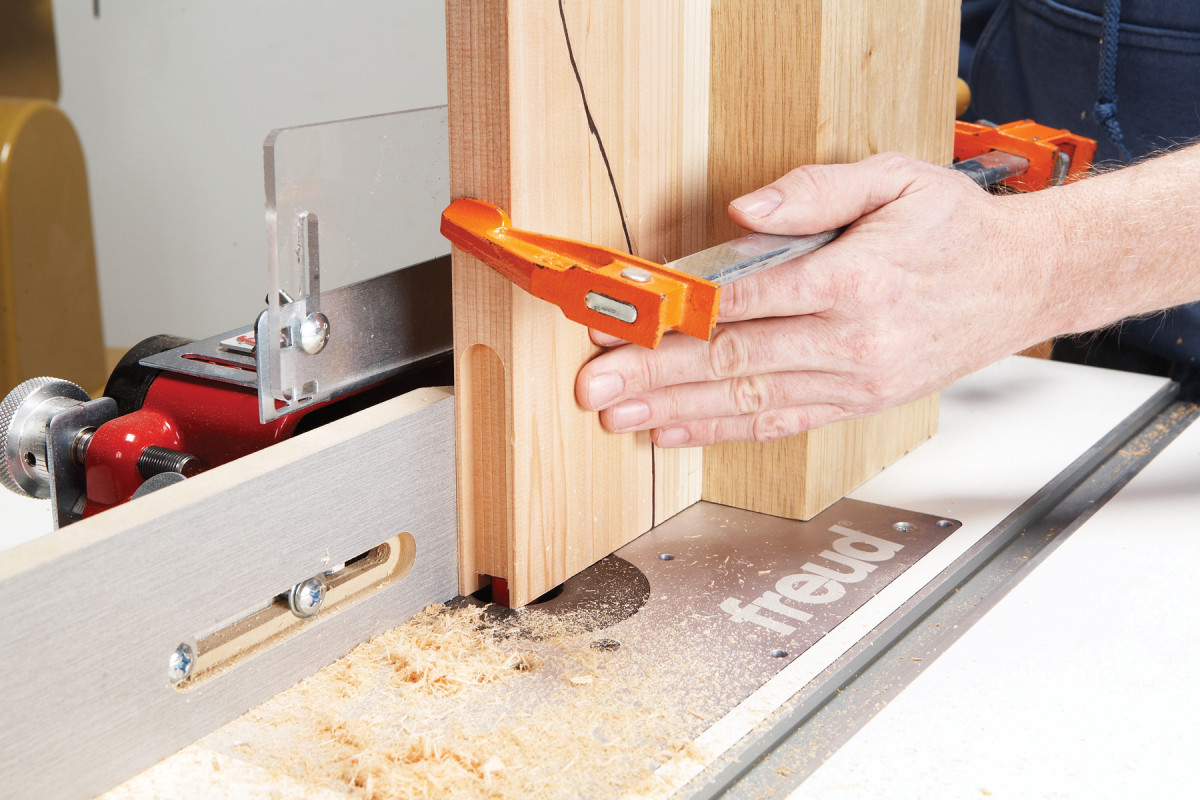
Rip two pieces of 1×6 for each arm (C1) and glue them together (Photo 6). Cut each blank to length, then saw out the curves (Fig. F). Sand the glue joint flat, then round over both sides of the arm with a router bit. Don’t round the curved section where the arm overlays the back rail. 11. Make the upper back rail (C2). This piece has three straight sections on either side (Fig. G), like the lower back rail. Trace the curves of the arm pieces on the ends of the rail. Cut out the rail using a bandsaw, with the table set at 90 degrees, and straighten the flat sections with a rasp. Rout a 30-degree bevel on the inside edge of the rail (Photo 7). Note that the bevel doesn’t extend to the straight section that sits in the notch on the back legs–just on the part you bandsawed out. Alternatively, you could tilt your bandsaw’s table to 30 degrees and skip the routing, but you’ll have more cleanup work to do.
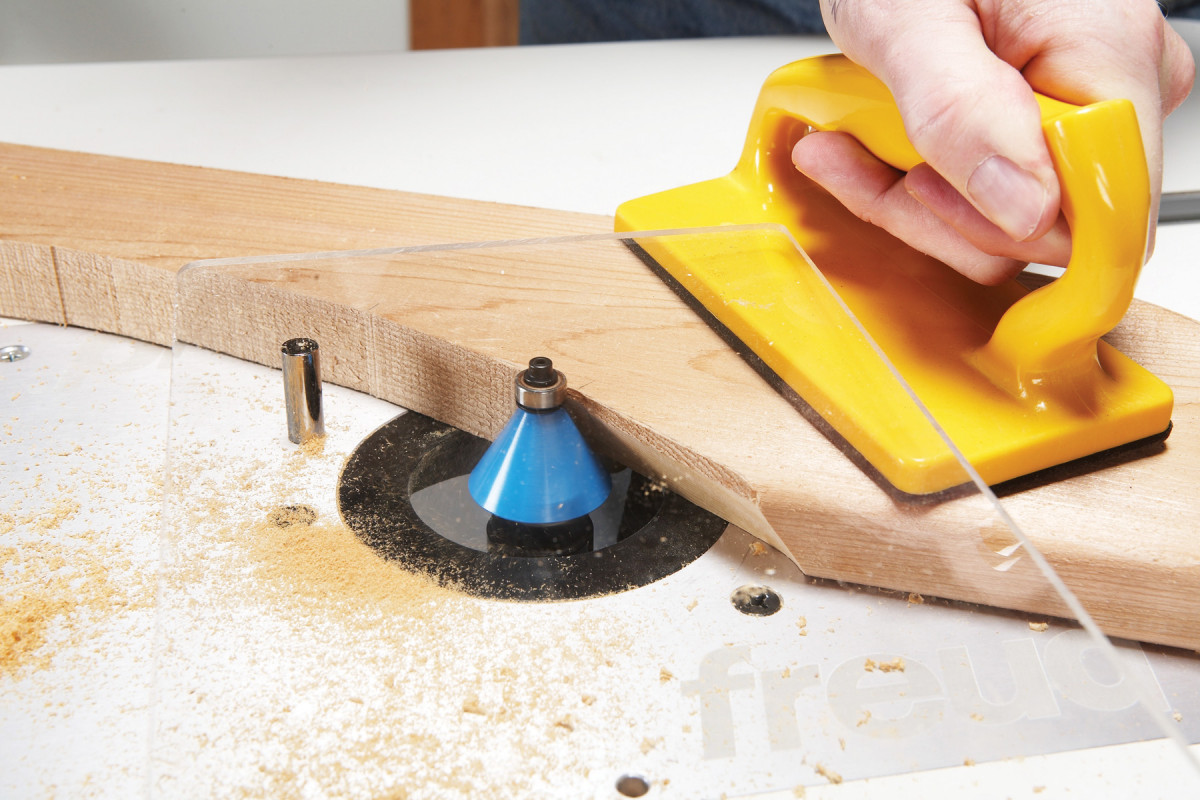
7. Rout a 30- degree bevel on the upper back rail using a router table. The loveseat’s back slats lean against this piece; with an accurately made bevel, you’ll get tight, strong joints.
Glue and screw the arms to the upper back rail. Note that the inside edge of each arm is square to the back rail (Fig. A, Detail 3), and that the screws go from underneath the back rail and into the arms.
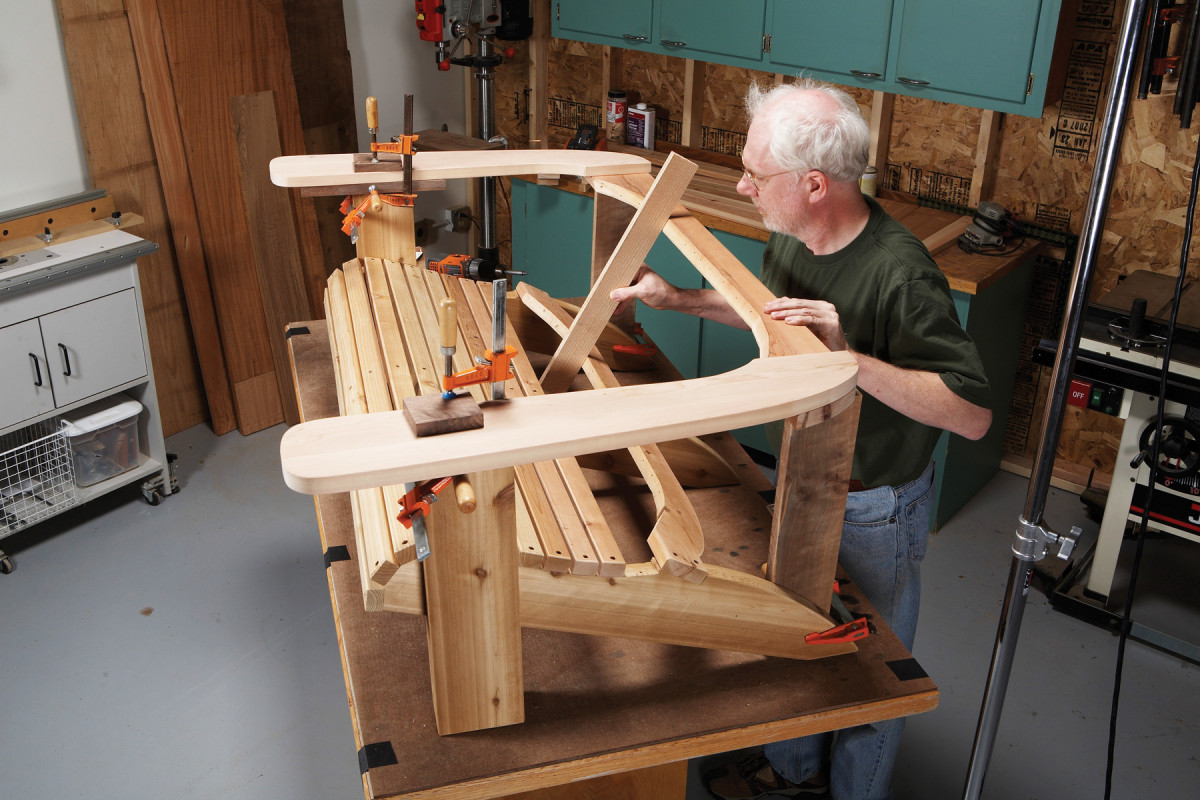
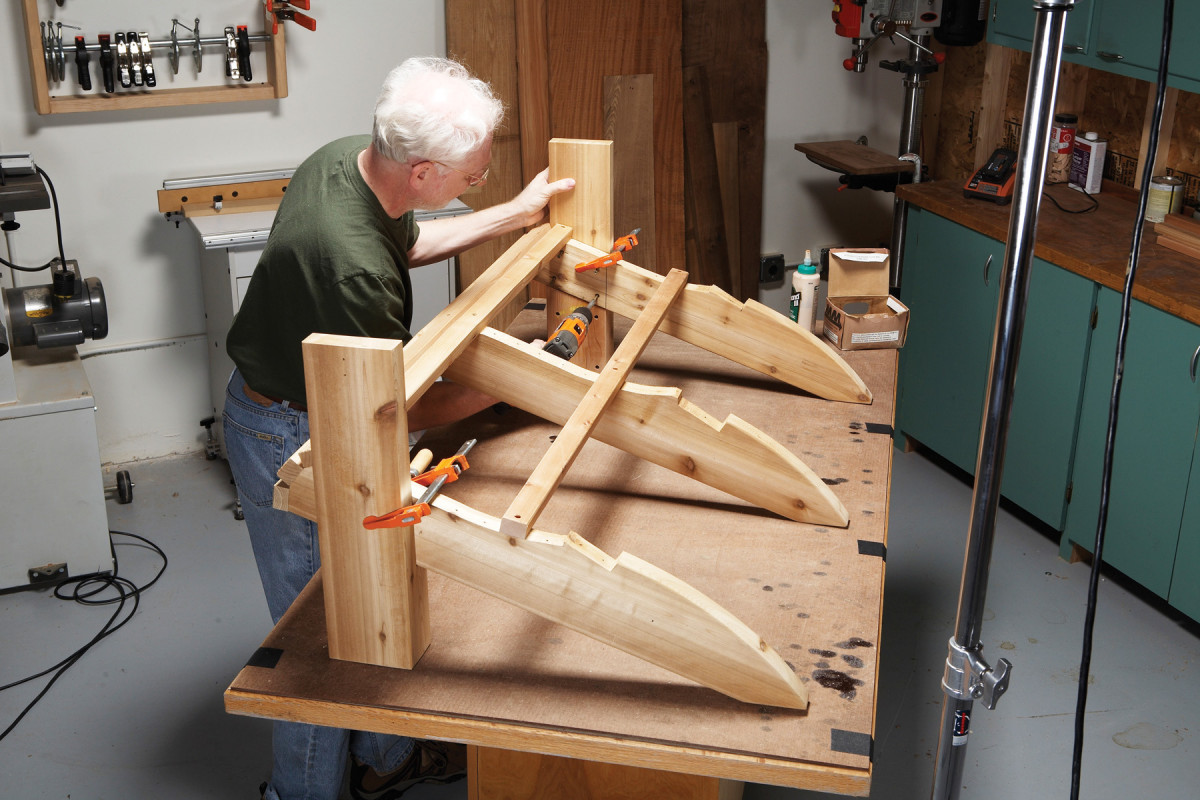
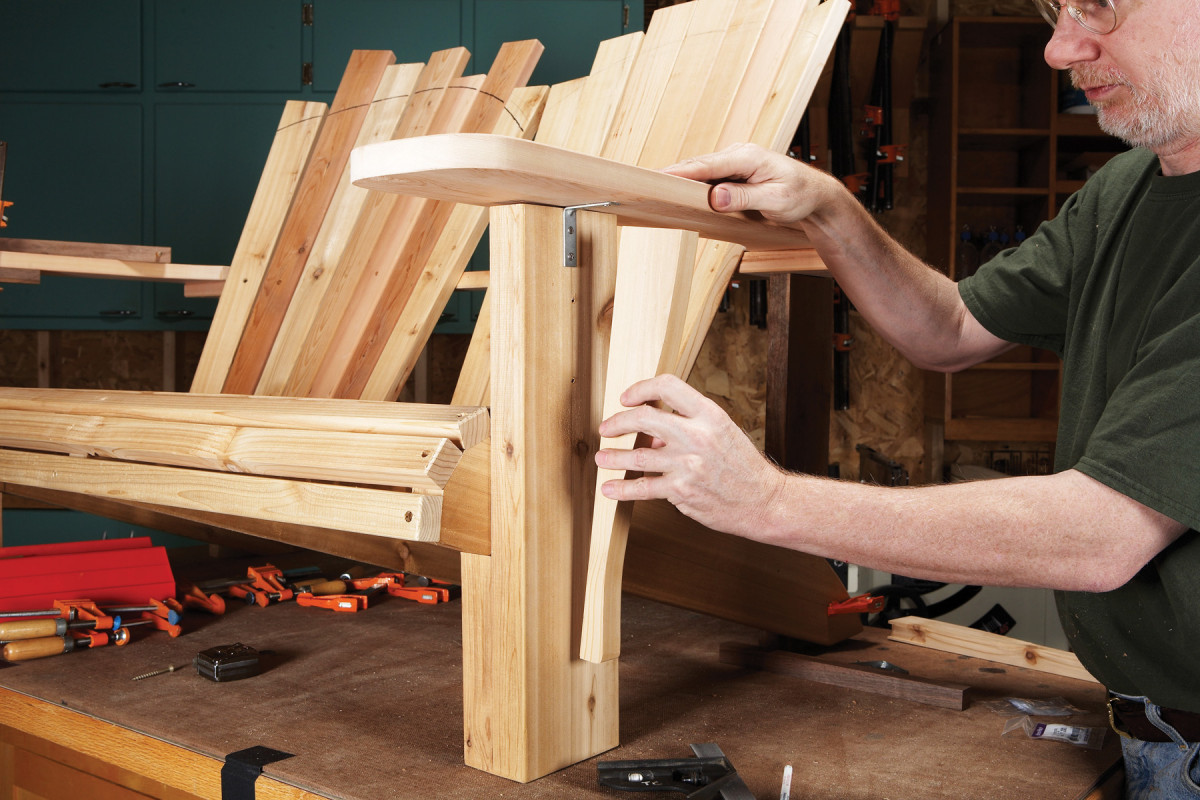
8. Add the arm and upper back rail assembly. Stand it on two supports and adjust its position until the bevel you routed is in line with the lower back rail. Check this with a straightedge.
Cut two temporary support pieces (C3) to hold the arm assembly. Prop the assembly on these pieces and the front legs (Photo 8). Once the assembly is correctly positioned front-to-back and side-to-side (Fig. A, Detail 1), clamp it to the front legs, so it can’t shift.
FIT THE BACK SLATS
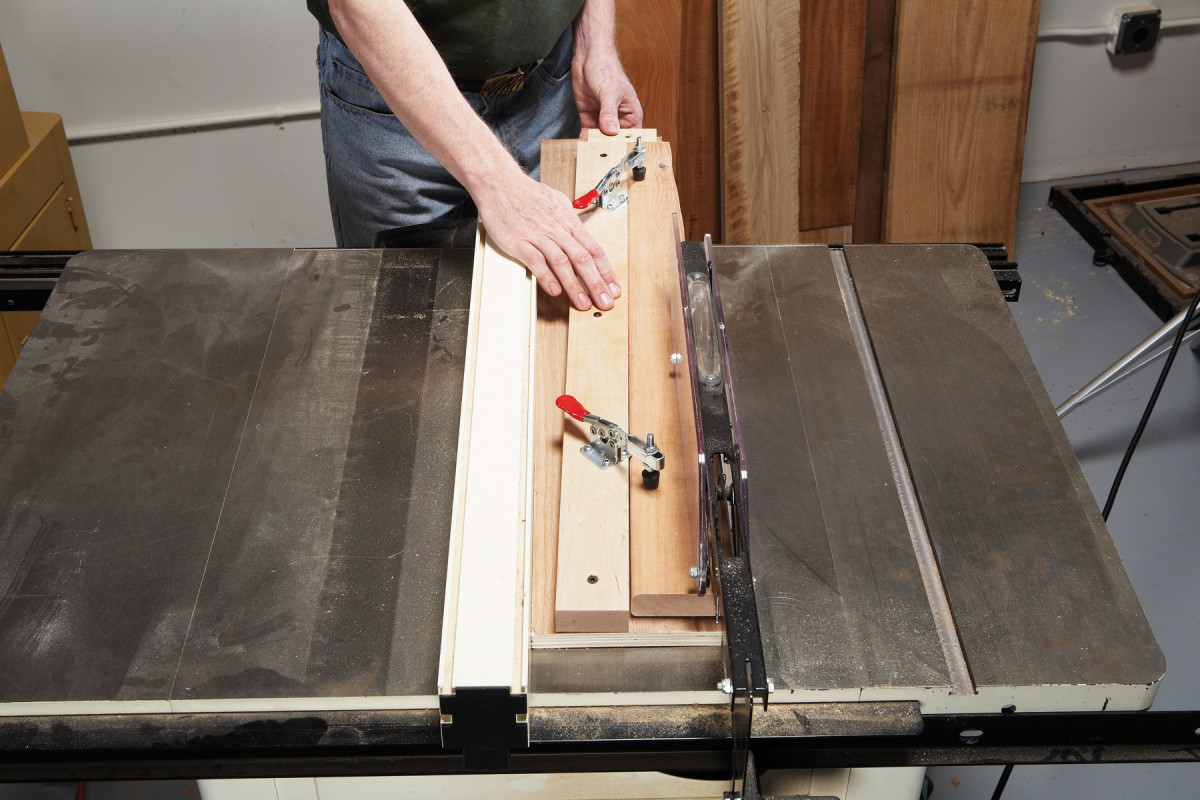
9. Taper the back slats using a jig for your tablesaw. Mount toggle clamps on the jig to keep your fingers away from the blade.
Make a set of back slats (D1 and D2). You can rough-cut two slats from one length of 1×6. Build a tapering jig and cut the rough side of each slat using the tablesaw (Photo 9 and Fig. H). The exact angles on the slat’s ends are not important.
10. Spacing the loveseat’s back slats requires careful measuring and marking. Begin by temporarily installing the four slats that define the two halves of the back.
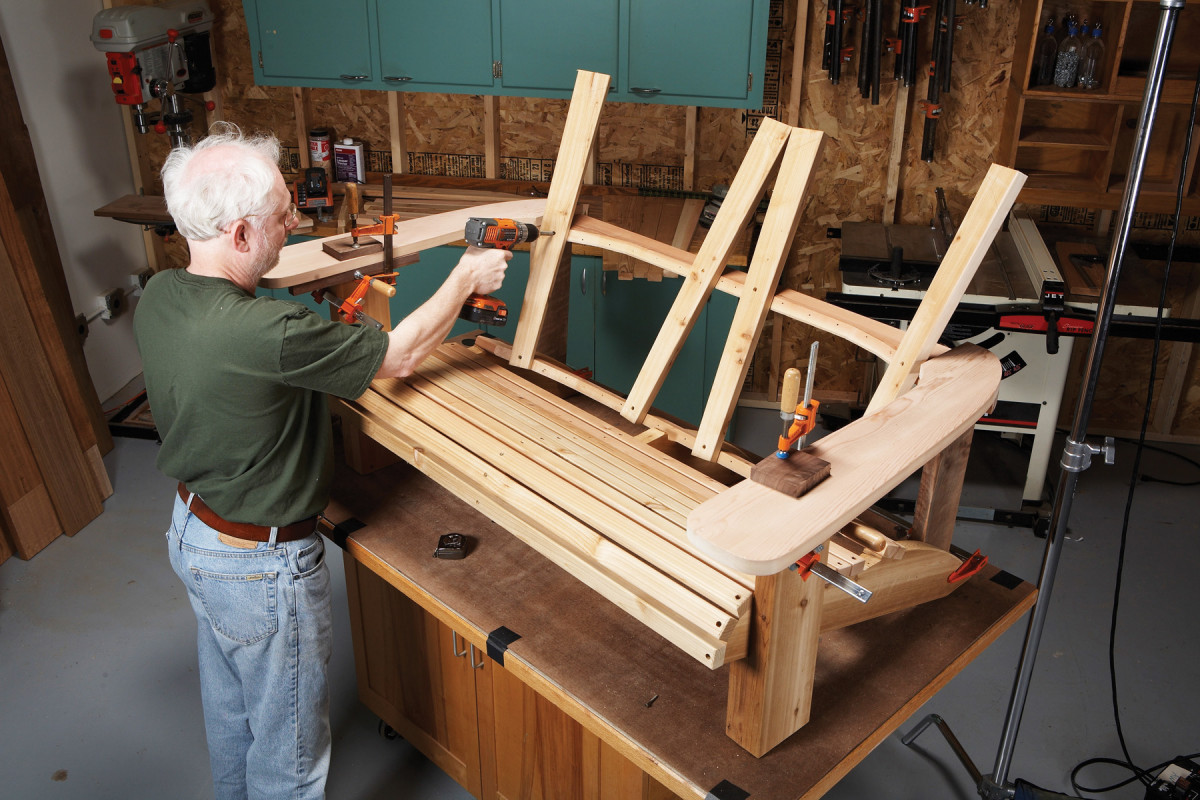
Drill screw-and-plug holes in the lower ends of the outer slats. Mark the positions of these slats on the lower back rail (Fig. A, Detail 2). Clamp the slats in position (the top ends of the centermost slats touch each other) and mark locations for the screws that will go into the upper back rail. Remove the slats, drill the screw-and-plug holes, then attach–but don’t glue–the slats in place (Photo 10).
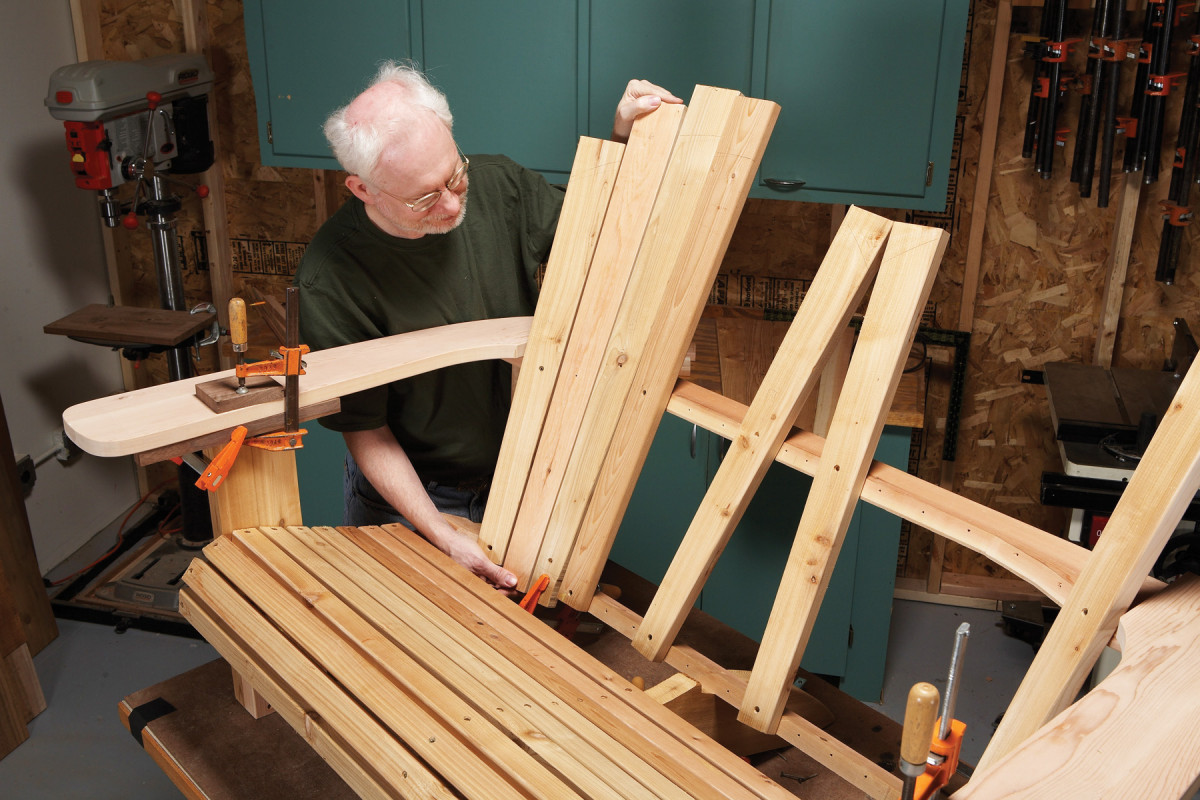
11. Fasten the middle slats next. Then install two slats between the middle and outer slats. Adjust these slats up or down to make the spacing even.
Install one of the inner back slats midway between the outer back slats. It should be vertical. Fit the remaining slats (Photo 11). Make the gap between them about 1/4-in. After these slats are fitted, mark their screw-and-plug holes and cut off any excess length at the bottom. Then install the slats with screws. Repeat this process on the other side of the back.
SHAPE THE BACK
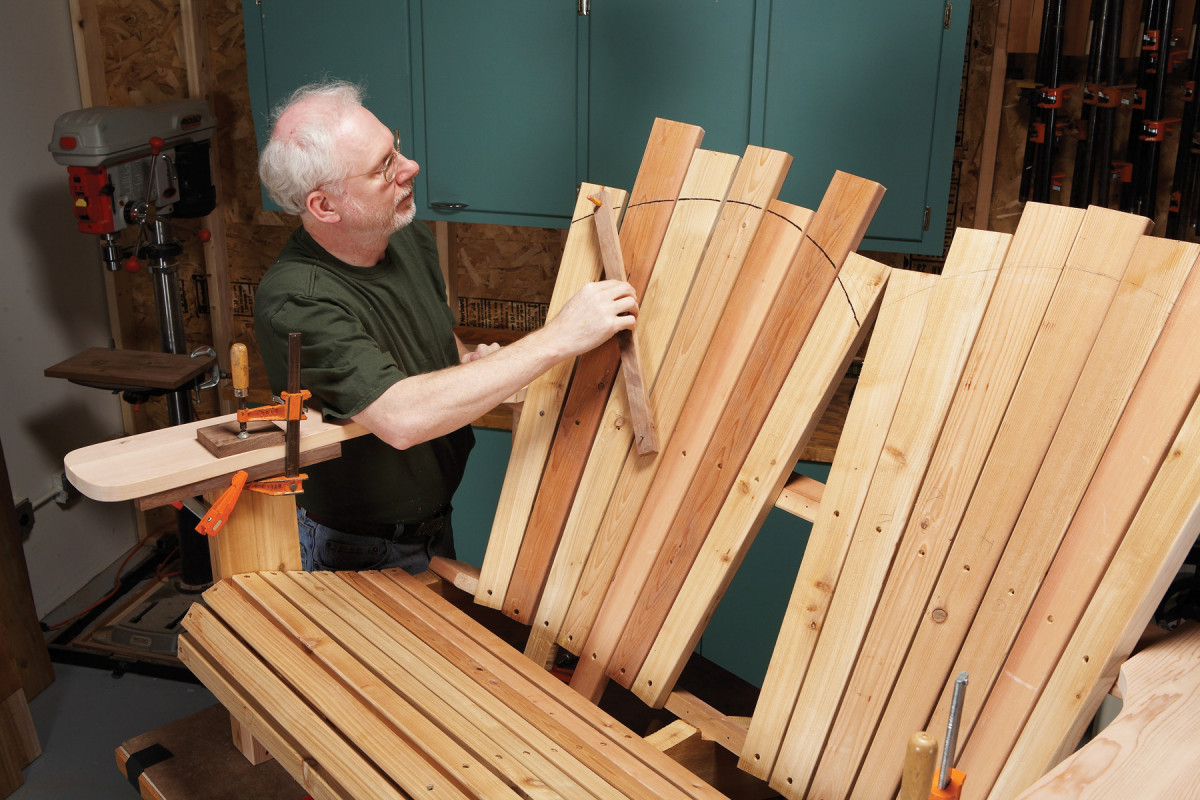
12. Draw a curve across the back using a shopmade trammel. That’s just a stick with a nail at one end and a pencil stuck in a hole on the other end. Remove the slats and cut the curve on each piece.
Make a trammel and find the centerpoint of each set of back slats (Fig. J). Turn the trammel around and draw each curve (Photo 12).
Mark the position of each slat and remove them. Saw their top ends and round over all their edges. Glue and screw the slats to the back rails. Cut a piece of paper to fit the gap between the two back sections. then Fold the paper in half and use it as a pattern to make two pieces (D3) to fill the gap. Install these pieces.
SUPPORT THE ARMS
13. Rout grooves on the ends and inner edges of the corbels, the wing-shaped pieces that support the loveseat’s broad arms. These grooves hide metal brackets under the arms.
Connect the arms and legs with corner braces (Fig. A). Use #10 or #12 pan head screws to install them.
14. Fasten the corbels to the legs with glue and screws. The bracket allows you to safely lift the loveseat by its arms.
Cut two corbel blanks (D4). Rout stopped grooves on the inside edge of each blank to accommodate the corner brace and screw heads (Photo 13). Saw the corbel’s shape (Fig. K) and round over its outside edges. Drill screw-and-plug holes through the front legs and screw and glue the corbels to the front legs (Photo 14). Make sure each corbel’s top fits tight under the arm.
FINISHING STEPS
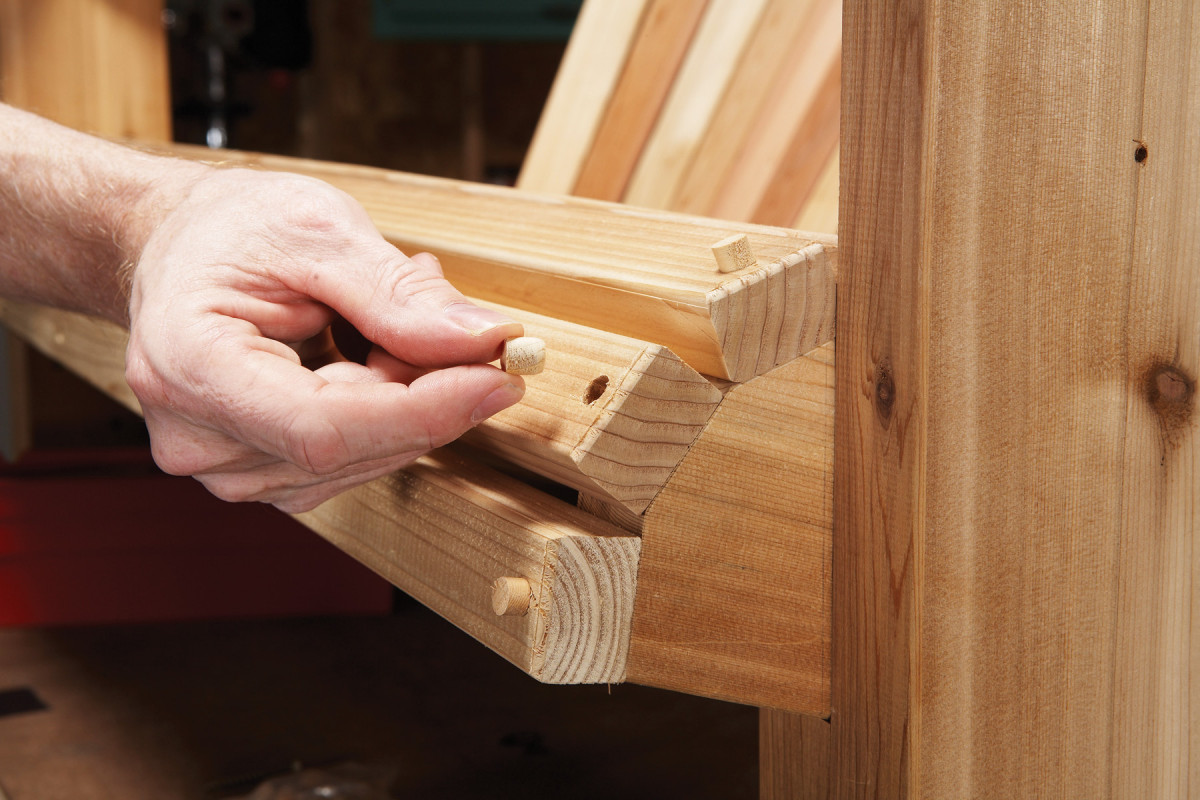
15. Once every part is in place, glue plugs in each screw hole. Cut the excess with a flush-cutting saw.
Glue cedar plugs in all the screw holes. Cut and sand them flush (Photo 15).
Apply two coats of exterior oil finish. It’s best to do this outside, for good ventilation. Sit and enjoy!
 Sources
Hamilton Marine, www.hamiltonmarine.com, (800) 639-2715, 3/8” Dia. Bung Cedar (plugs), #FSW-05-C, $10 per 100.
Rockler, rockler.com, (800) 279-4441, 30-degree Chamfer router bit, #24805, $34.
Adirondack Loveseat Cut List
Overall Dimensions: 58″ W x 37″ D x 34-1/2″ H
Part Name Qty. Material Dimensions
Seat
A1 Outer back leg 2 2×6 1-1/2″ x 5-1/2″ x 31-3/8″
A2 Center back leg 1 2×6 1-1/2″ x 5-1/2″ x 31-3/8″
A3 Seat slat 10 5/4 1″ x 1-1/2″ x 47″
A4 Back seat slat 1 5/4 1″ x 3-3/4″ x 47″
A5 Lower back rail 1 5/4 1″ x 5-1/2″ x 47″
Front legs
B1 Outer leg 2 2×6 1-1/2″ x 5″ x 19-1/2″ (a)
B2 Inner leg 2 2×6 1-1/2″ x 5″ x 7-5/8″
B3 Corbel 2 5/4 1″ x 2-1/2″ x 15″
Arms
C1 Arm 2 5/4 1″ x 8″ x 32-3/8″ (b)
C2 Upper back rail 1 5/4 1″ x 5-1/2″ x 53″
C3 Assembly support 1 5/4 1-1/2″ x 5-1/2″ x 18-1/2″
Back
D1 Outer back slat 4 5/4 1″ x 3″ x 28″ (c)
D2 Inner back slat 10 5/4 1″ x 3-1/4″ x 32″ (d)
D3 Center slat 2 5/4 1″ x 3-1/2″ x 25″
(a) Cut B1 and B2 from 30″ long blank
(b) Glue up from two pieces, 5″ and 3″ wide.
(c) Cut two pieces from one 5-1/2″ x 30″ blank.
(d) Cut two pieces from one 5-1/2″ x 35″ blank.
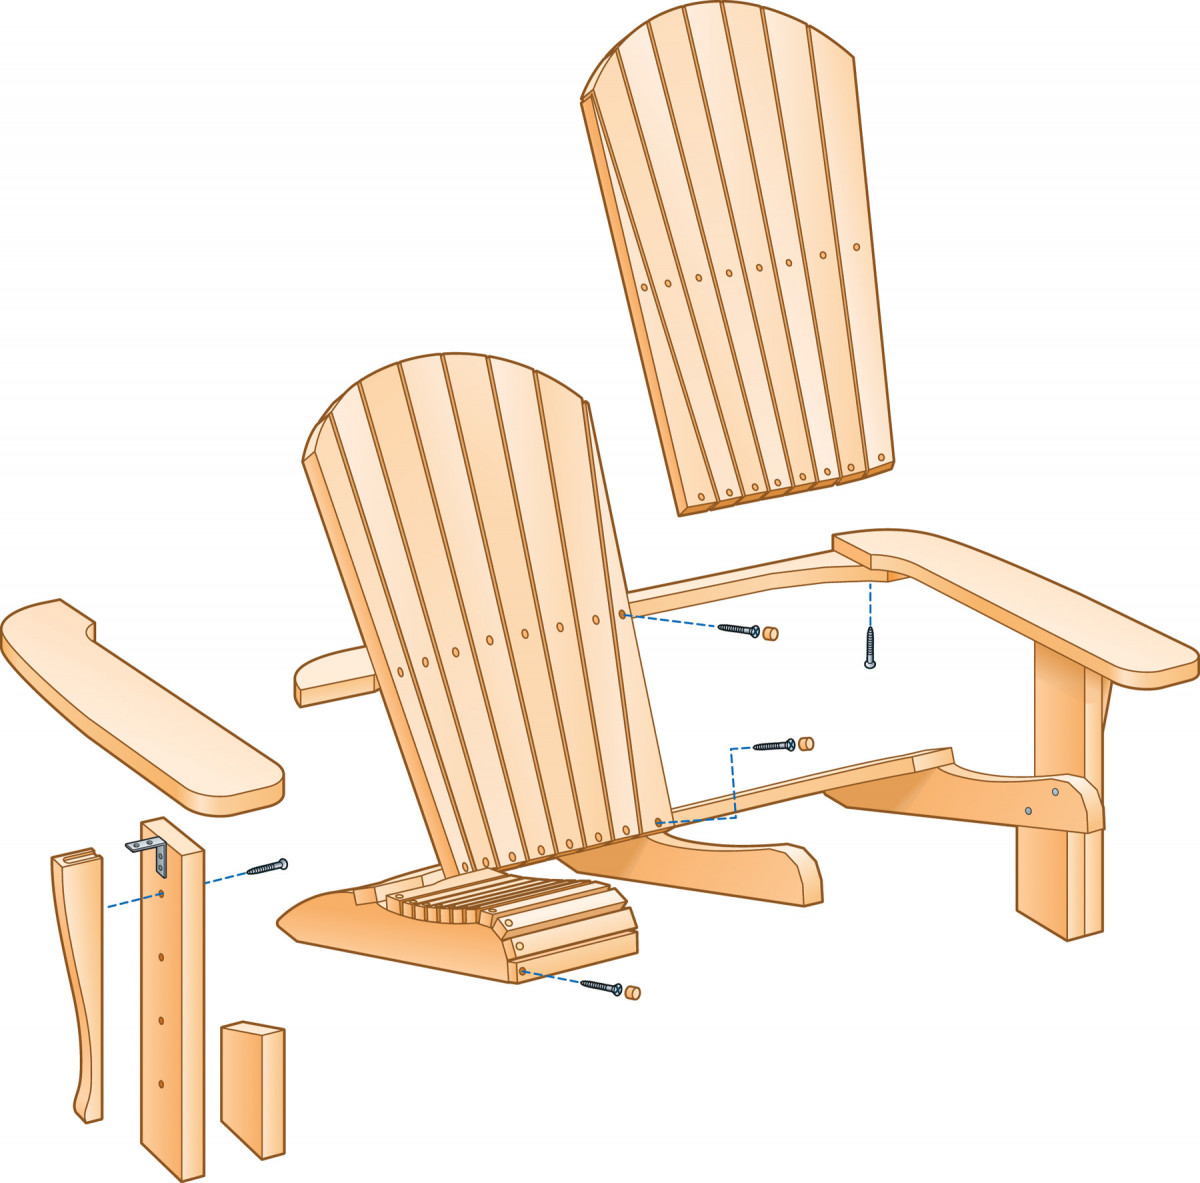
FIGURE A EXPLODED VIEW
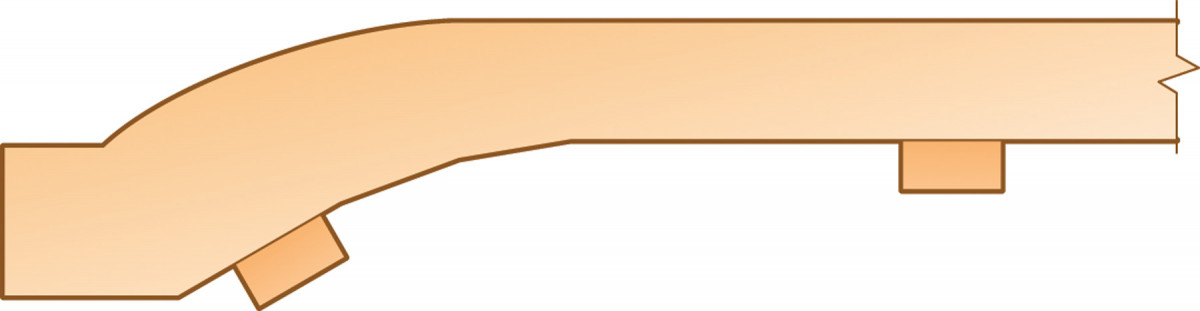
FIGURE B SLAT LOCATION
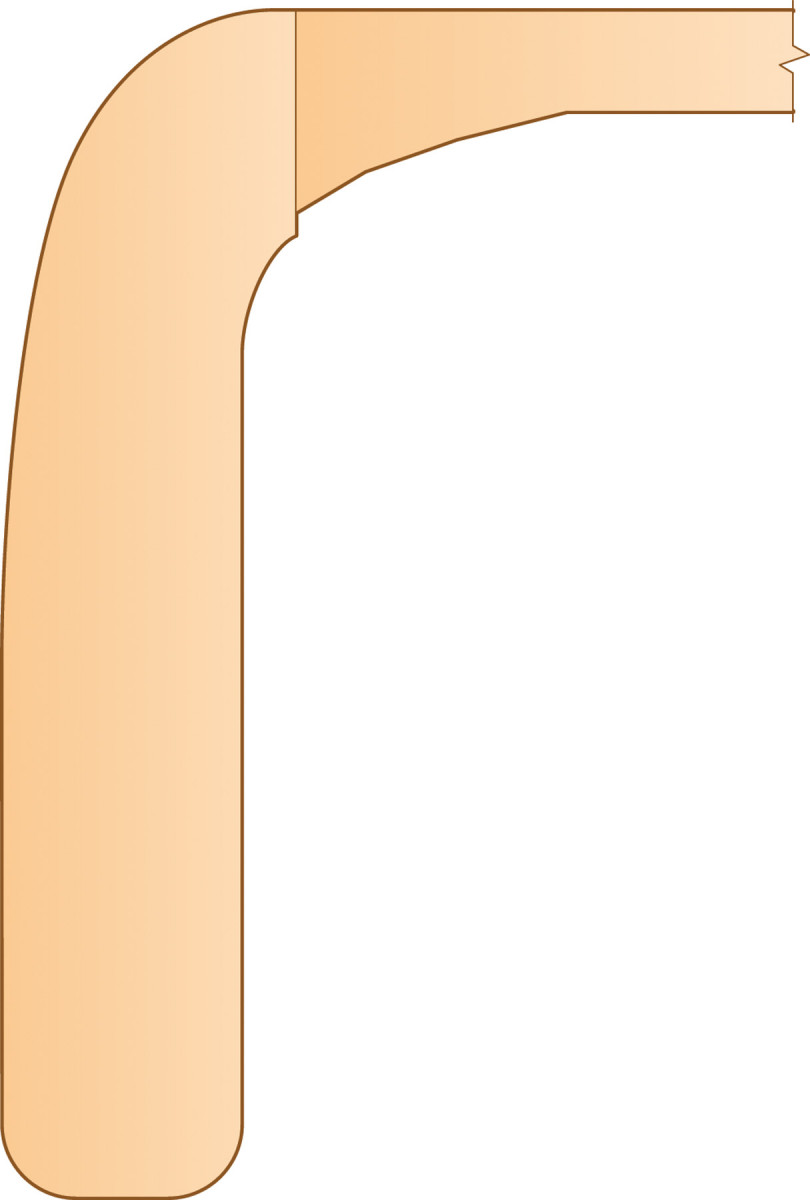
FIGURE C ARM AND BACK RAIL ASSEMBLY
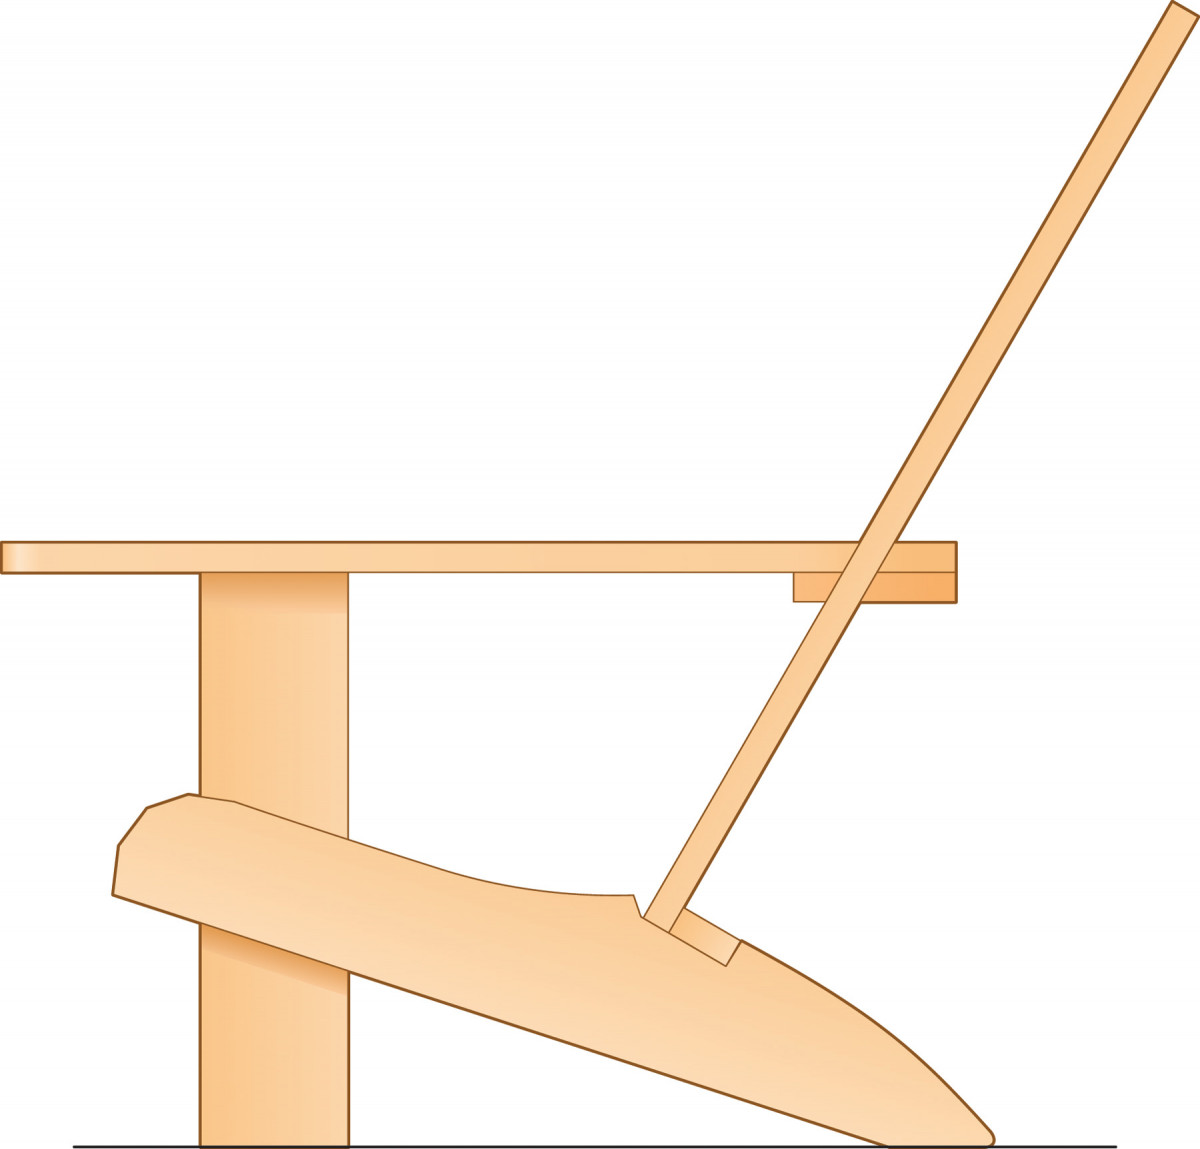
FIGURE D CROSS SECTION
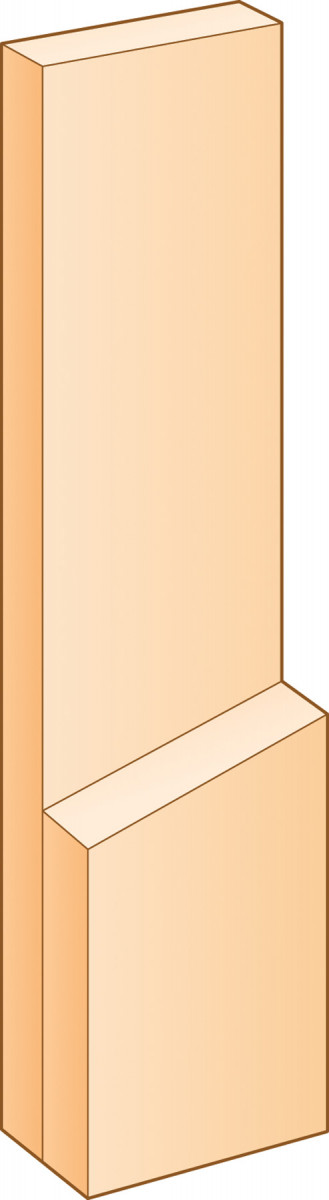
FIGURE E FRONT LEG

FIGURE F BACK SEAT SLAT
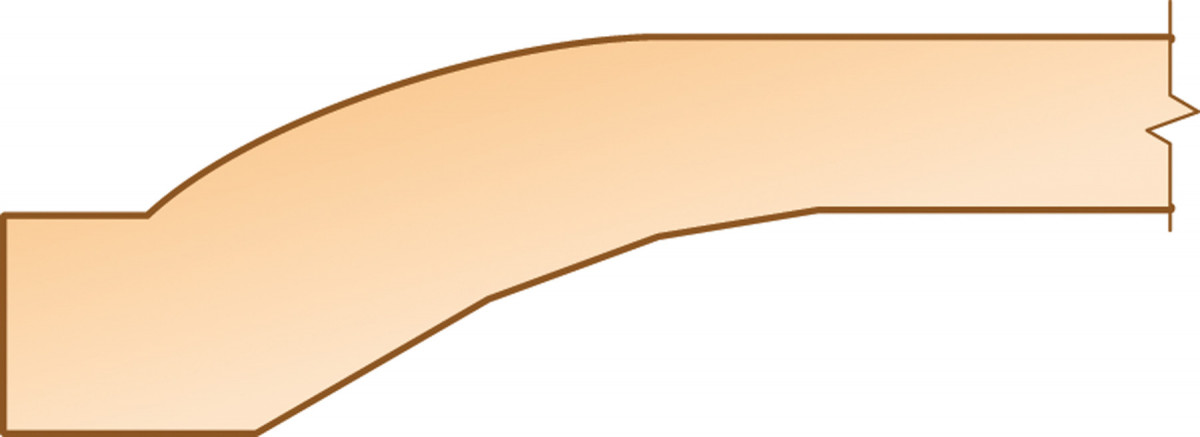
FIGURE G LOWER BACK RAIL

FIGURE H BACK LEGS

FIGURE J ARM
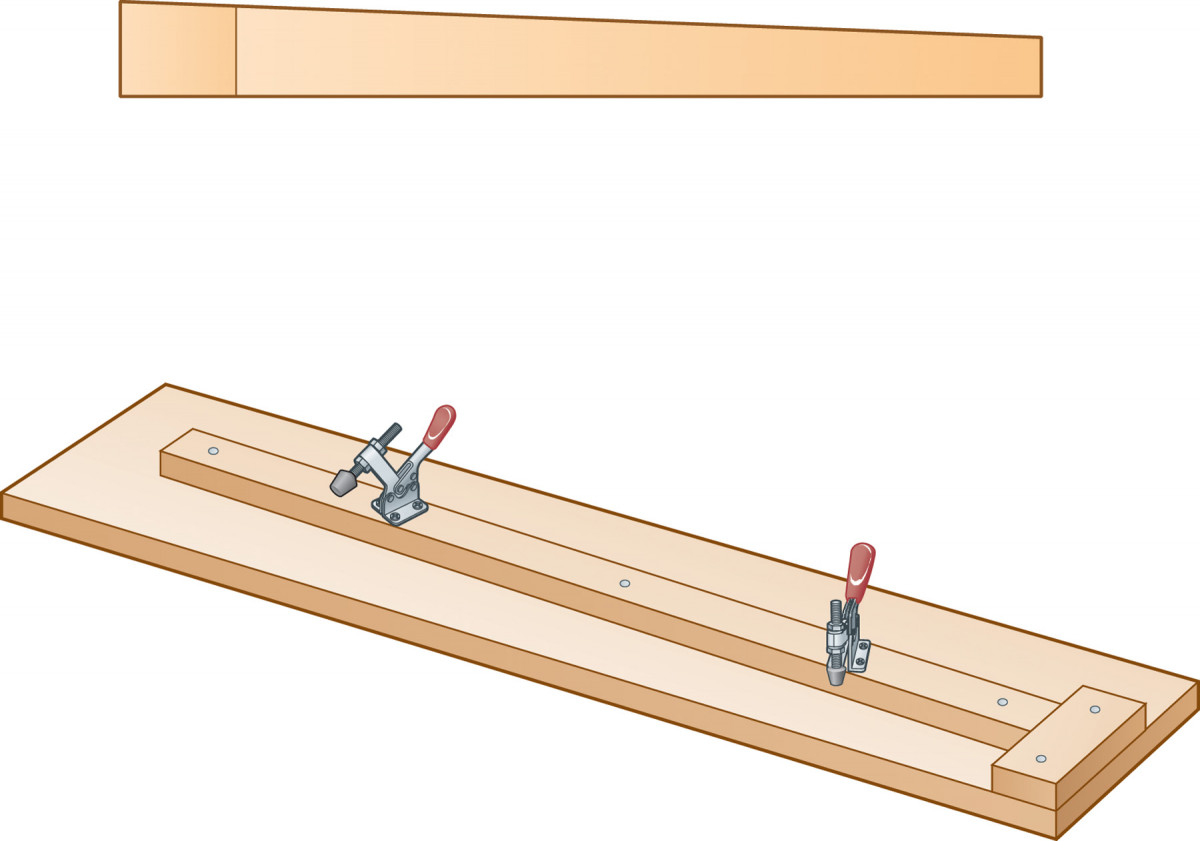
FIGURE K BACK SLATS AND TAPERING SLED
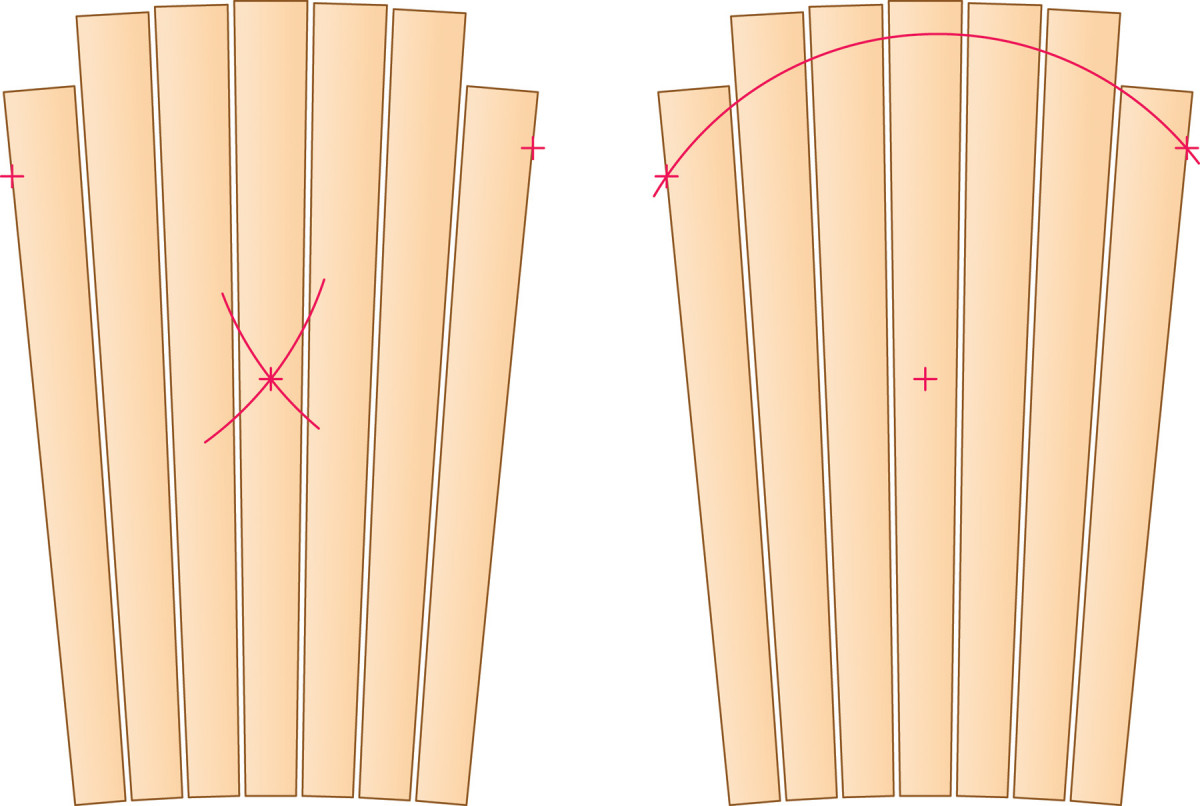
FIGURE L DRAWING THE BACK’S CURVE
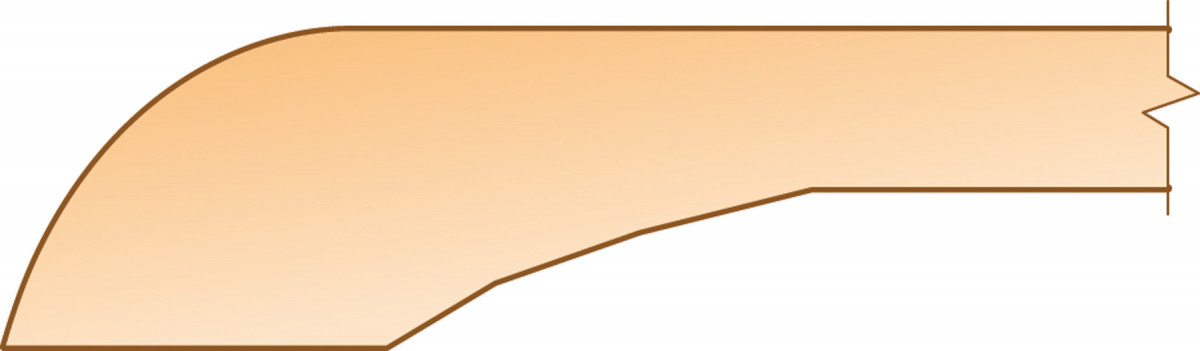
FIGURE M UPPER BACK RAIL
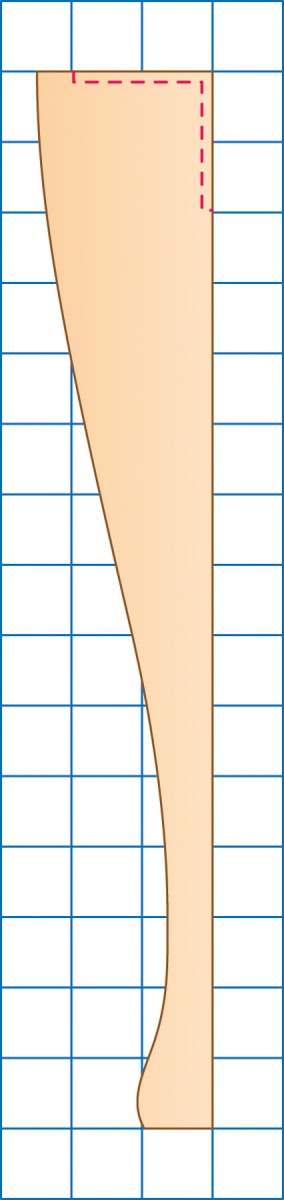
FIGURE N CORBEL
Here are some supplies and tools we find essential in our everyday work around the shop. We may receive a commission from sales referred by our links; however, we have carefully selected these products for their usefulness and quality.


Where can I go to download the printable cut outs?