We may receive a commission when you use our affiliate links. However, this does not impact our recommendations.
Hold and guide your work like never before with this fixture that will (finally) fix your drill press.
There probably isn’t any machine more ignored in my shop than my drill press. Even though I use it constantly for one thing or another, the last significant upgrade it saw was a slab of leftover plywood and a simple, but workable, fence. Even after swearing to myself (and at the machine) on numerous occasions that I would come up with something better, I’d still haul out a clamp and screw gun to hold down some odd setup.
Most times I’m drilling a hole located from an edge and end, or a series of holes along an edge. The hole diameters need to be precise, but usually their relation to an edge doesn’t require extraordinary precision. More and more often, I’m trying to hold down some elaborate fixture positioning an odd-shaped part.
Similar to many woodworkers, I often wondered why drill presses couldn’t be more like mills and less like drills on a stick. What if I could go to my drill press and set hole locations without marking the part? What if it had a slotted top so I could mount fixtures anywhere? Isn’t there a better alternative than a router-table-style fence?
As these ideas fermented in my mind, it wasn’t until a catalog with the prominently featured slot-wall-cutting bit arrived that things took off. In a matter of minutes the T-slot table was born.
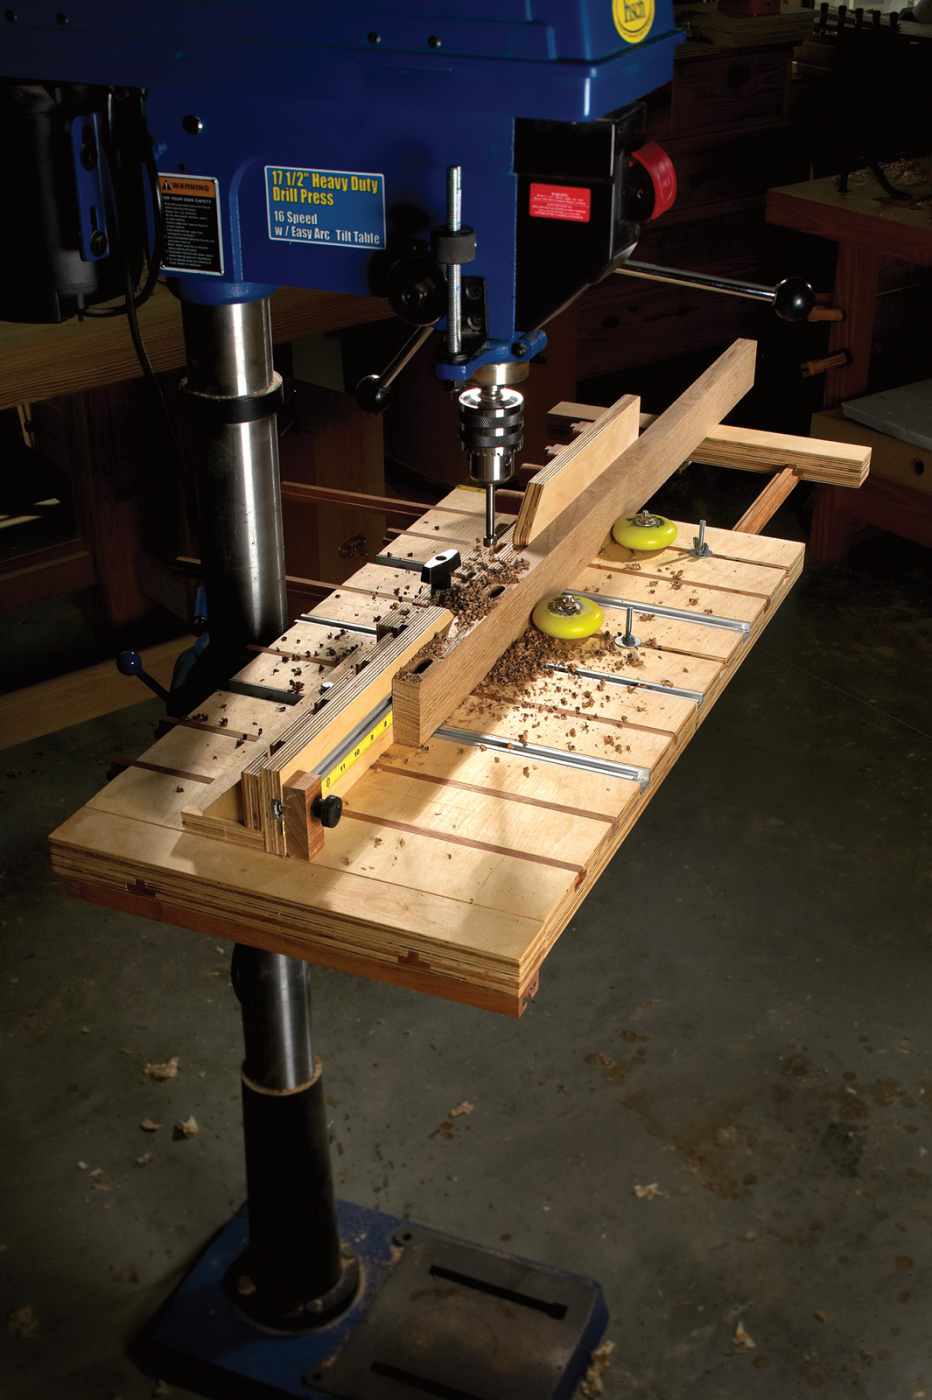
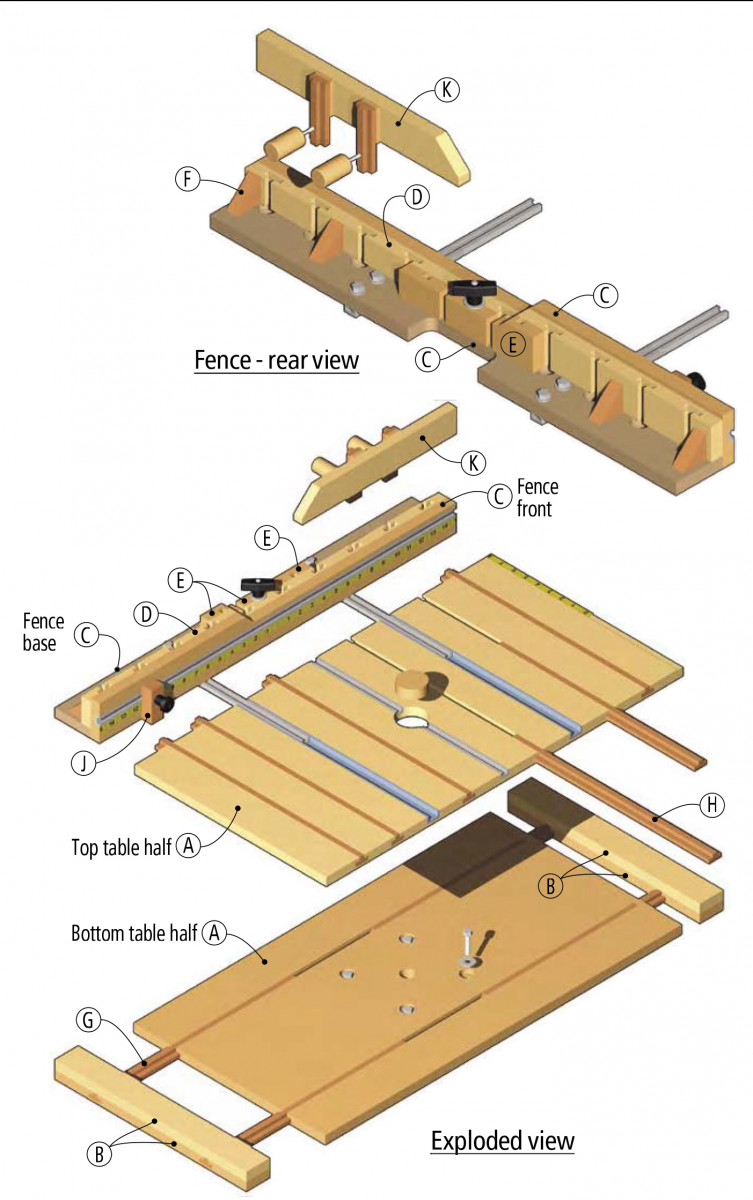
On the T-slot table everything moves on an X/Y axis and all the scales are built into the table. T-track extrusions guide the fence to act as an independent table. Work can be clamped to the fence assembly and moved. Only one conveniently located knob is needed to lock down the fence. A row of slots on the back of the fence holds clamps for one-handed tightening of work. The large T-slots in the table hold a variety of fixtures and stops. Filled with wood strips, they keep out the dust and debris, and are self cleaning. Extensions on either end pull out to nearly double the table width, which is a handy feature.
Despite its somewhat overwhelming appearance, it is easy to build. The brunt of the work requires basic router skills and a couple quick jigs.
Making the Table
After making my centered 3⁄4″ x 3⁄8″-deep dado, I cut both the side 1″ x 1⁄2″-deep dados using two passes with the same bit.
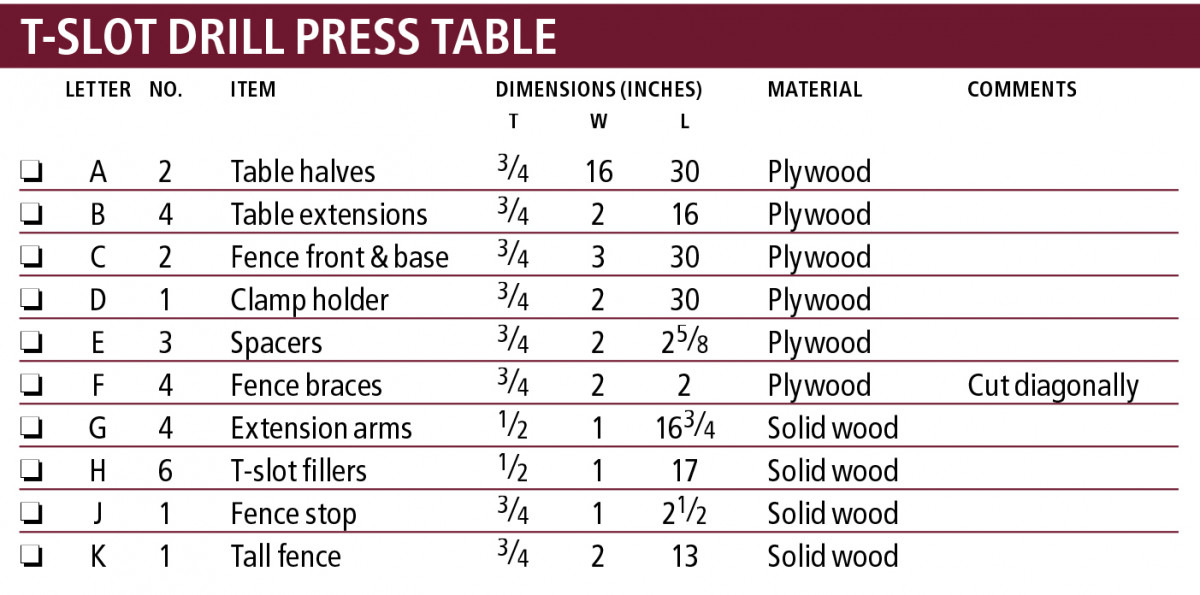
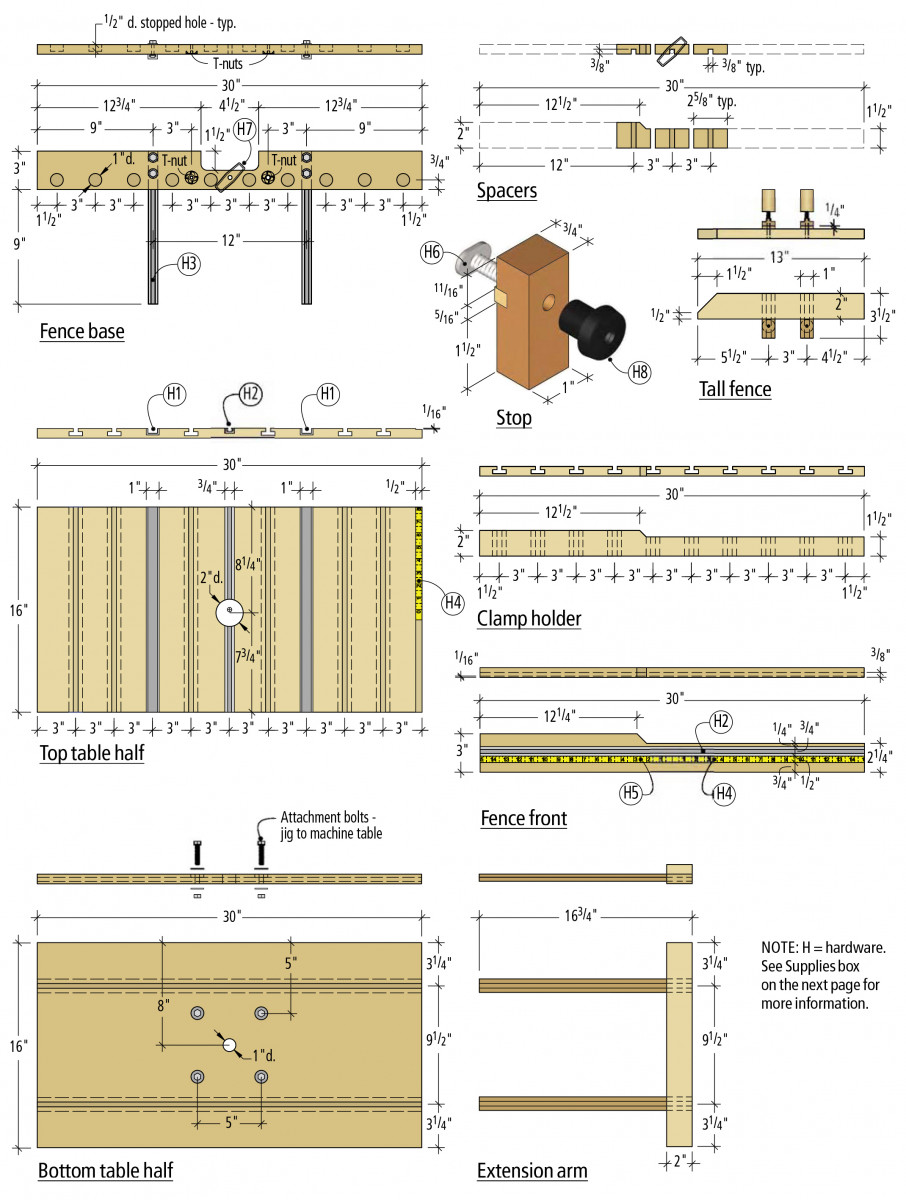
Everything for the T-slot table can be cut out of a 24″ x 60″ piece of birch plywood (or two pieces of 24″ x 30″ birch plywood). Rip and crosscut the plywood to the sizes given in the cutting list, to start.
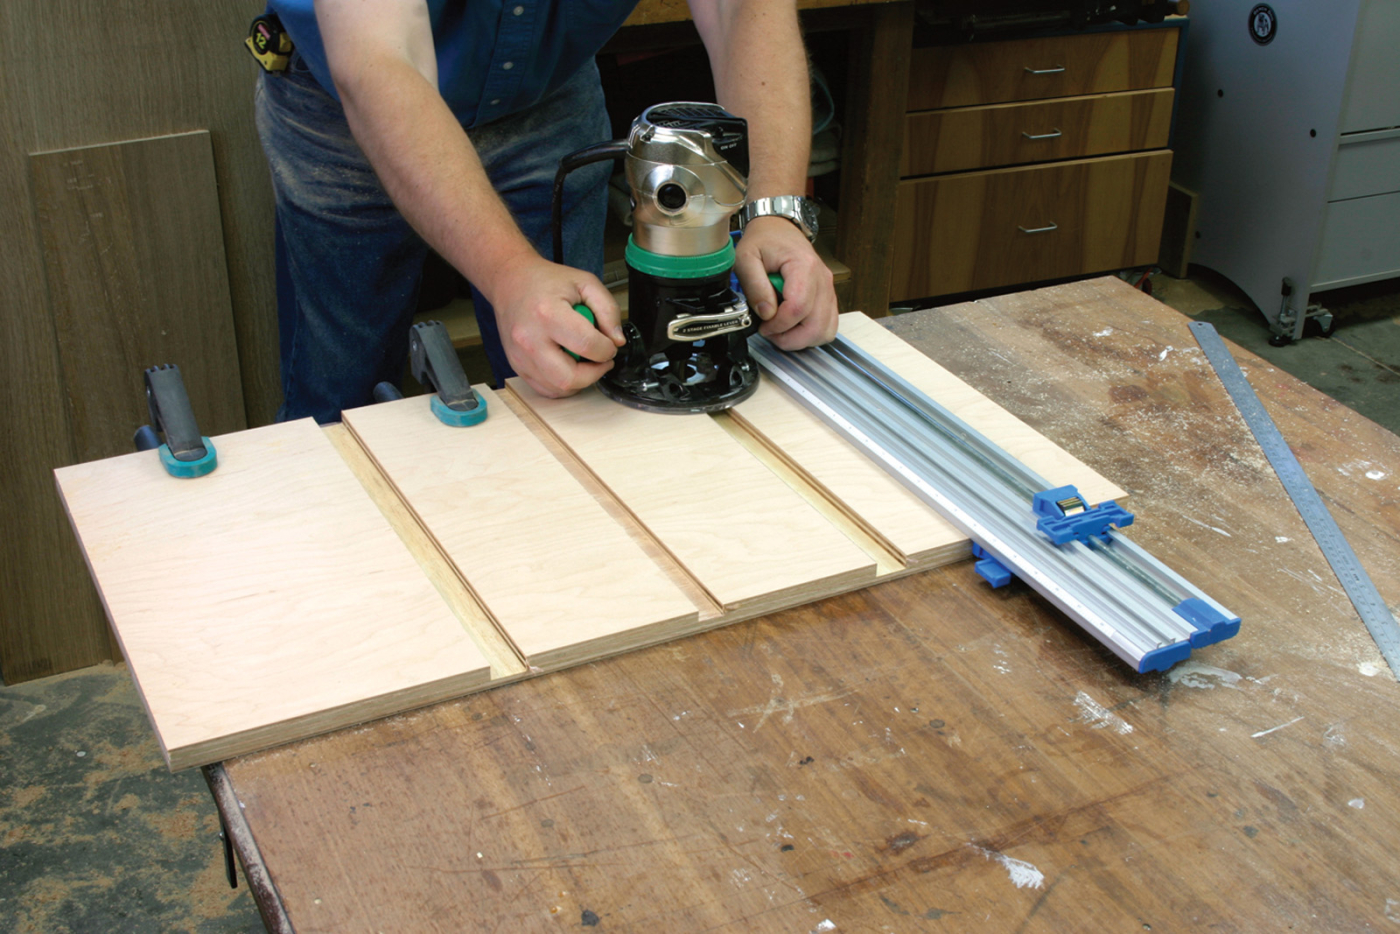
The upper table has three dados that hold the center T-slot extrusion and the two channel extrusions that guide the fence. I used a router to make all the dado and T-slots on the plywood table.
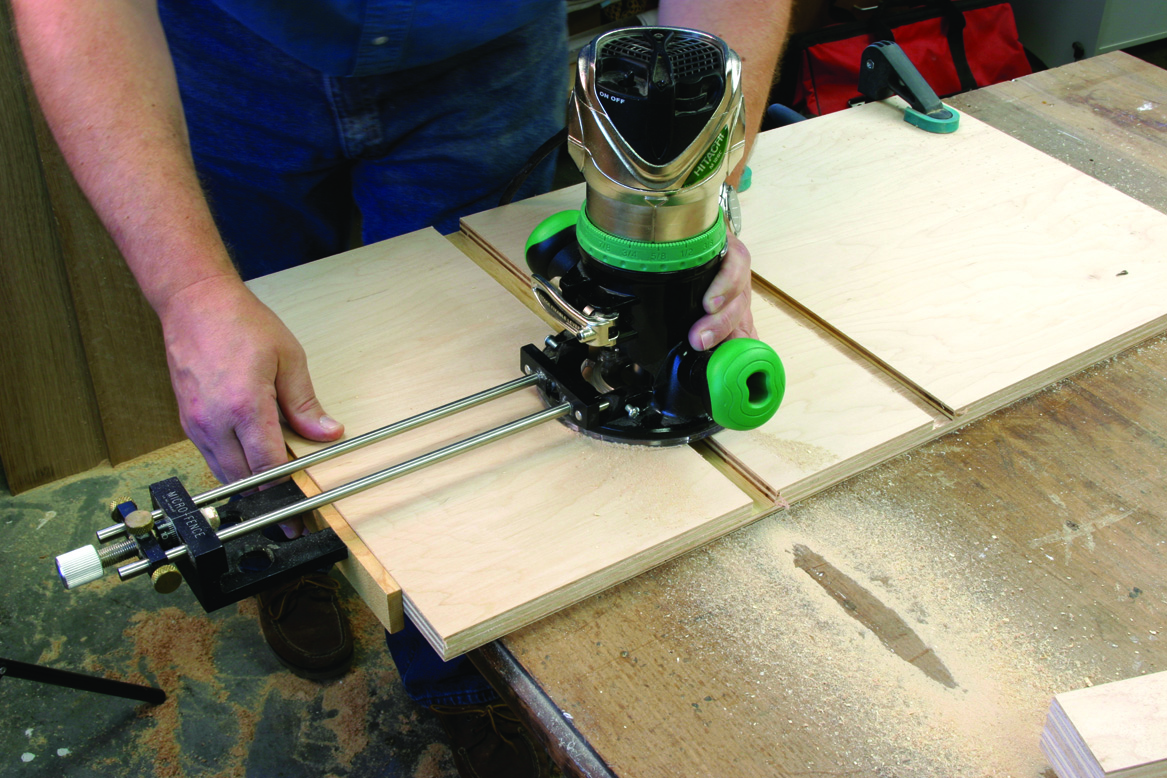
The first dado cut goes directly down the centerline of the table from front to back. Measure and mark 15″ to the center of the table. Using an edge guide, set up your router to cut a 3⁄4“-wide by 3⁄8“-deep dado down the centerline of the table, front to back.
The next two dados hold dado channel extrusions. Measure 9″ in from one end of the table and mark the centerline for the first dado. Using a router guide, make a 1″ x 1⁄2“-deep dado from front to back. I didn’t have a 1” bit so I made the dado in two passes using a 3⁄4” bit, offsetting the cut by 1⁄4” for the second pass.
The other dado holds the second channel extrusion. It must be parallel to the first 1″ dado. The dados are cut 12″ apart, centerline to centerline. Parallelism is more important than the exact 12″ spacing. Measure accurately, but don’t panic if the spacing is a hair off. A guide template that rides in the first 1″ dado is preferable. Using a guide such as this also allows you to flip the guide around and use the dado you just cut as a guide to recut the previous dado. This will make sure your dados are parallel and eliminates future problems with the fence guides binding.
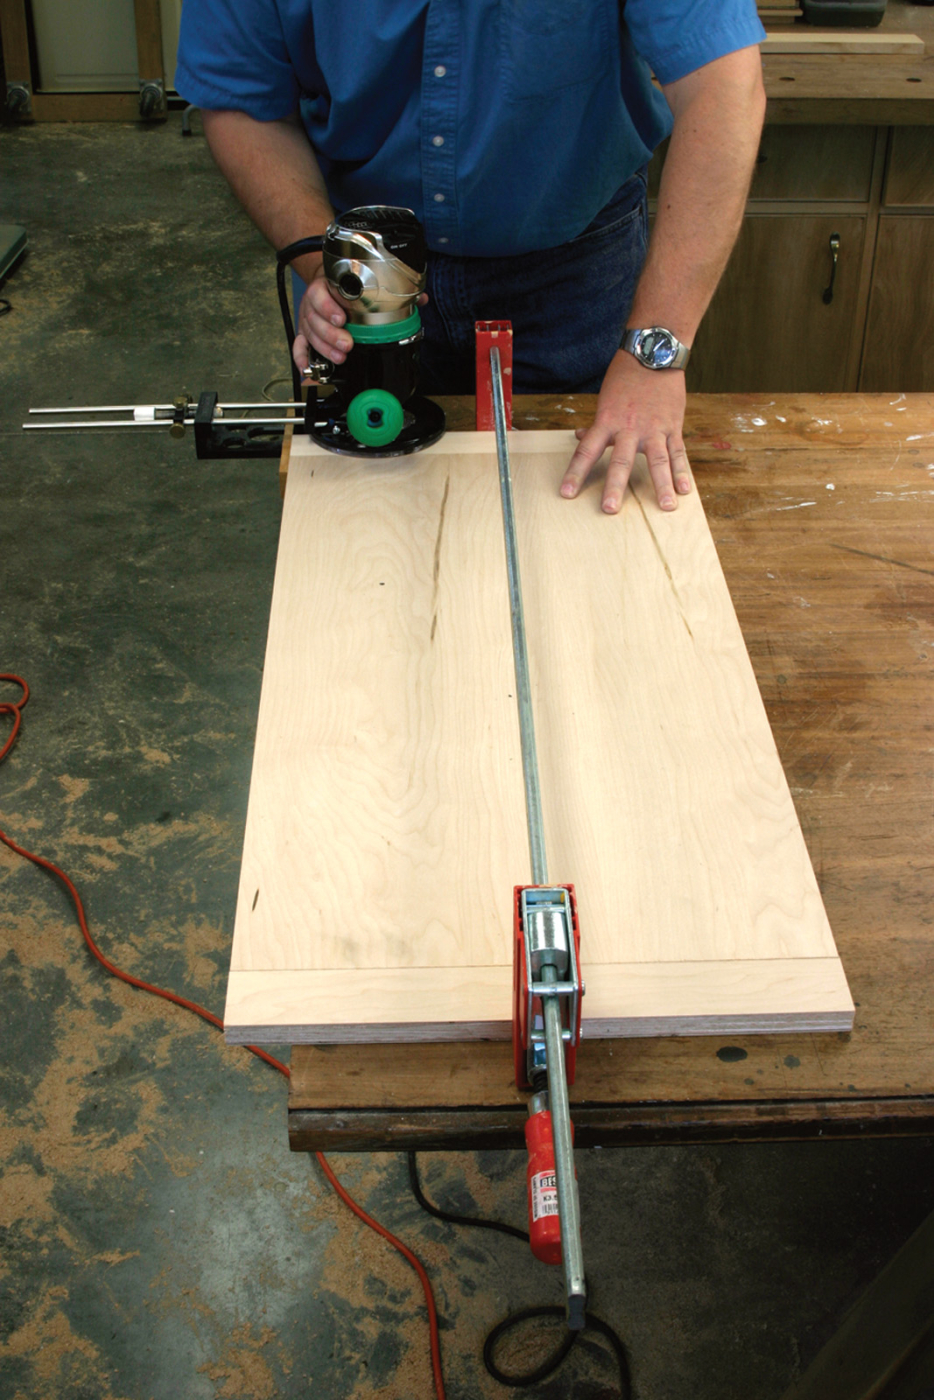
The second 1″ dado must be parallel to the first, so if you use a router guide as shown here, measure carefully from the first dado to align the cut.
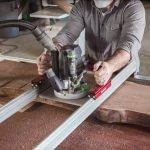
However, if you don’t have such a guide, another option would be to carefully set up a router guide using the first dado as your reference point (again, maintaining the parallelism) as shown below, then cut the second 1″ x 1⁄2“-deep dado front to back.
You’re now ready to cut the 36″ channel extrusion in half and install the channels into the two 1″-wide slots.
While you have the router set for a straight cut, readjust the depth and cut a shallow rabbet on the right edge to inset an adhesive scale flush with the surface. My scale was 1⁄2” wide x 1⁄16” thick; yours may differ.
The T-slots
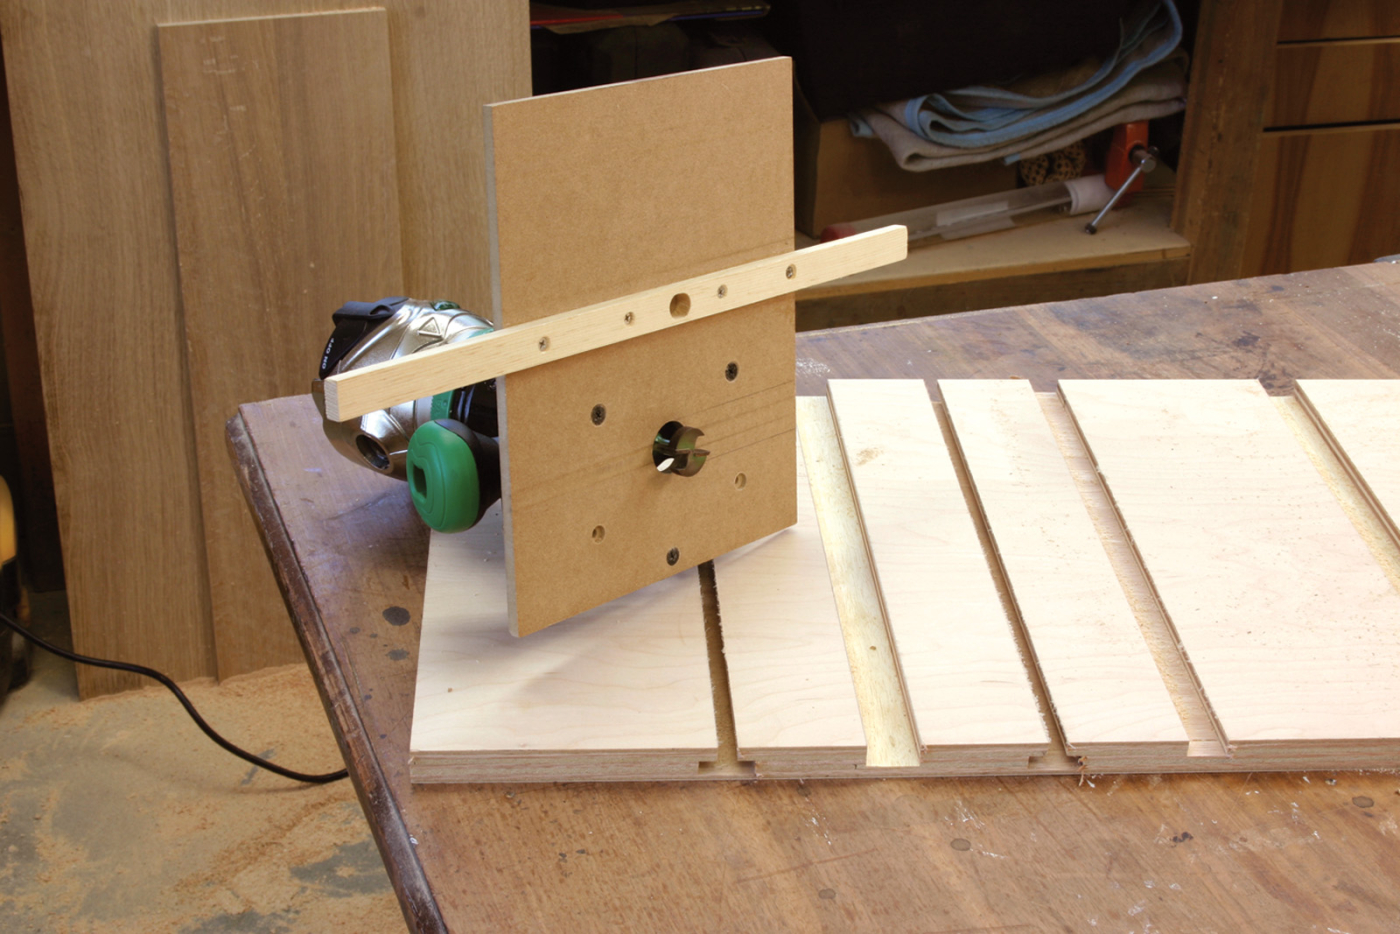
My jig to guide the T-slot cutter is simply an auxiliary base plate for the router and a 3⁄4″ x 3⁄8″ strip to guide in the 1″ slots.
Cut the T-slots using a jig similar to that in the photo below. It cuts the T-slots 3″ on center from the previously cut 1″ channels. Carefully set the depth of the bit to 5⁄8” and then cut T-slots on both sides of the channels. Cut the remaining two T-slots on the ends of the table, 3″ from the adjoining T-slot by modifying your jig or using a router fence. Don’t forget to recheck the bit depth.
T-slots on the Lower Table
Clamp the end extensions to the lower table in the center to run the T-slots for the extension tables. If you have to move the clamp between cuts you might shift the location and mess up the smooth operation of the extensions.
Clamp the lower table extensions to each side of the table. The slots start 3″ in from the long edges. With your router set, rout a T-slot end-to-end, parallel to each long side through the table and extensions.
Slotted Clamp Holder
Because I cut my table out of 60″-wide stock, I was able to make my clamp holder in one piece. If you cut yours out of smaller stock, you may need to put together sections. I cut my slots on my router table using a scrap wood fence and pin to control spacing, just like cutting finger joints on a table saw or router.
T-slot Fillers
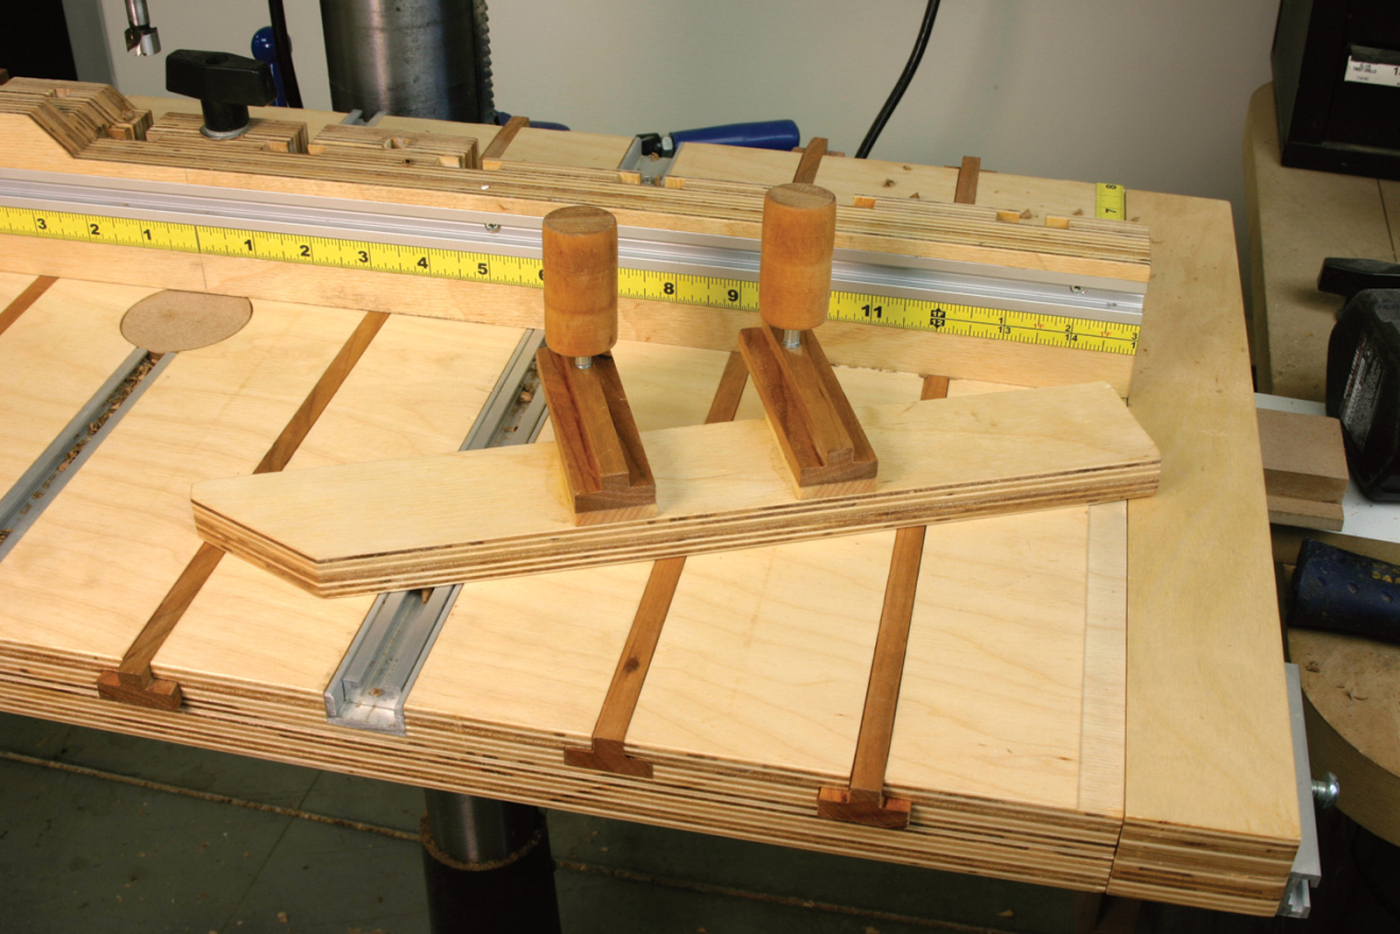
For working with taller objects, a taller fence (part K) is handy. By utilizing the T-slots in the rear fence, I easily adapted an auxiliary fence to slip into place on the right or left side of the table.
T-shaped strips fill the slots not in use and also serve as the supports for the table extensions. Just about any wood will work. I used some cherry leftovers that I had lying around. I cut mine with the same slot-cutting bit I used for the top, mounted in my router table. Any suitable method will work. Make them a nice sliding fit. The same T-fillers will work to add accessories to the drill press table.
Making the Fence
Dado the channels for the T-track and measuring scales. Before cutting the fence profile I used screws to temporarily attach the clamp holder to the fence front. On the fence base, mark the exact center and drill holes as shown in the illustration for the guides, T-nuts and fence lock. Install the T-nuts.
Assemble the fence with the front perpendicular to the base. Add blocking and spacers (see illustration on bottom of article). Cut 30″ from the 48″ T-track and install on the face.
Cut the 24″ piece of T-track in half to make guides for the fence. Securely attach one of the T-track guides to the fence with bolts and sliding T-nuts. The extrusion should protrude about 9″ from the front of the face. Make sure the track is perfectly perpendicular to the fence face.
Mounting the Table
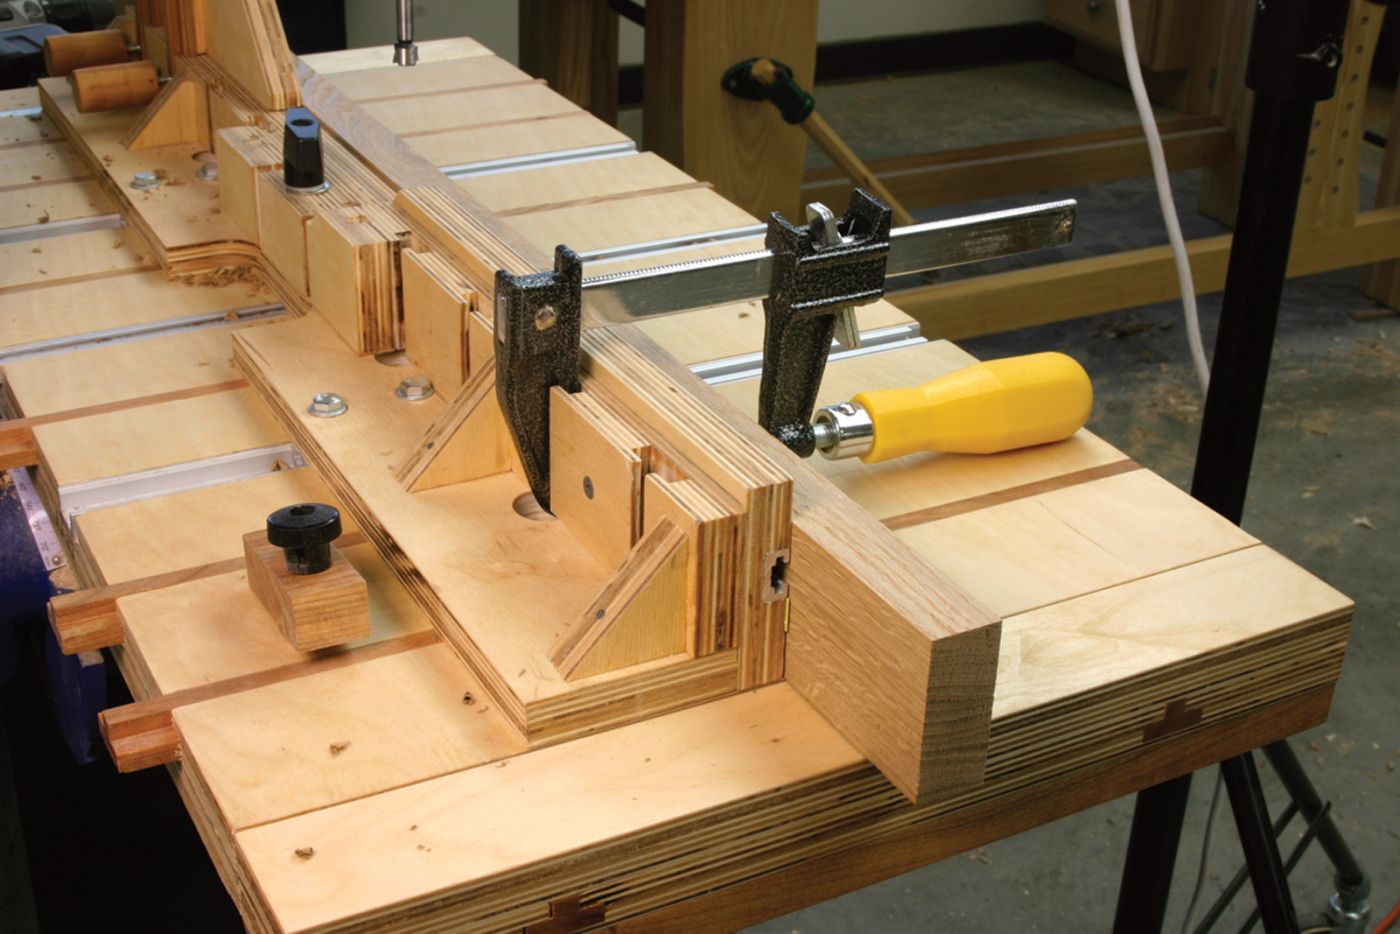
The fence can be simplified to the basic base, front and triangular braces, but I added the T-slotted rear fence to make it easy to attach a clamp to the fence. The T-slot lets the head of the F-style clamp slide into place, and holds it there.
When you use a drill press with an auxiliary table, the area under the bit invariably becomes perforated. So I included a replaceable section under the bit. This isn’t a new idea, but I’ve added tricks that make mine better.
It’s nearly impossible to find 3⁄4” plywood that’s actually 3⁄4“, so I use two discs to match the “thinner” plywood.
Before mounting the table to the drill press, use a 2 1⁄4” hole saw to cut two medium-density fiberboard (MDF) plugs from scrap material. One should be 3⁄16” thick and the other 1⁄2” thick. These two discs, used together, add up to 11⁄16“, which is much more likely to be the thickness of your plywood.
Next, mark diagonals across the lower table to locate the center. Use a brad-point bit in the drill press to center the table and clamp it in position. Mark appropriate locations for bolts. Drill holes and counterbores for the bolts and re-center the table. Affix it with carriage bolts that lie flush or just below the top of the lower table.
The two-plug system brings the insert flush to the table surface. Also notice the offset location (the through hole is where the bit will drill) to keep the discs from spinning.
Now it’s time to attach the two table halves. Remove the extruded channels from the upper table and lay it on top of the lower table. Move it back 1⁄4” from the front edge of the lower table and clamp it into position.
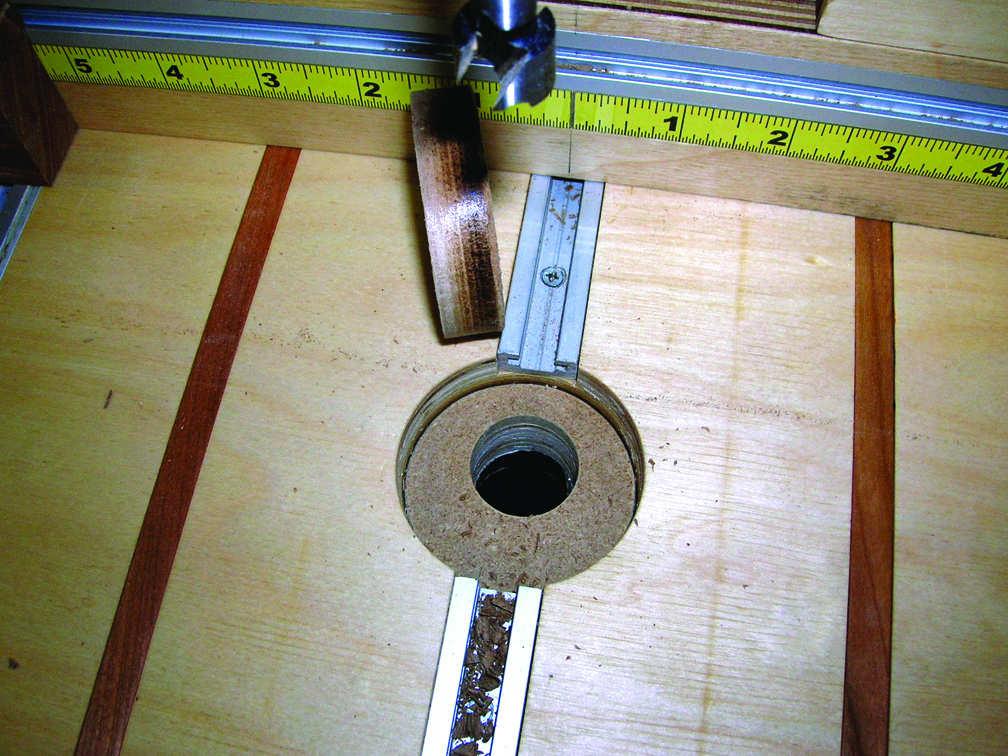
Many drill press tables will use square table inserts, while I prefer a round insert because it collects less dust (no corners!). One concern with a round insert is if it was exactly centered in under the bit, the disc could get caught on the bit and spin. By making the replaceable center eccentric (drill through the disc off center), it cannot spin (an old engineer’s trick).
Install a 21⁄8” hole saw (lock-installing size) and drill through the first table until the saw edge just touches the lower table. Remove the plug. Move the top table to realign it perfectly with the lower table and re-clamp.
I used two 1⁄4” dowels to keep the upper and lower table pieces aligned. They have no structural purpose and I placed them in the dados because the track covers them up. I didn’t permanently glue the table pieces together as I have commitment issues.
From the bottom, use screws to hold the upper and lower table together taking care not to drill through any of the T-slots. Apply a little glue to the bottom of the 3⁄16“-thick plug and drop it into the hole. After it has set, put a 1” bit into the press and drill a hole through the plug and lower table. You will see that the center of the plug does not match the center of the hole.
Putting it all Together
Reinstall the guide channels. Put the fence on the table and install the second T-track, and adjust to ensure smooth operation.
Drop the 1⁄2” MDF plug into the table and cut T-track from the leftover 18″ piece to fit from the back and front up to the edge of the plug. Install the T-track with screws. Next, using the center “groove” on the extrusion, locate the center of the fence and transfer a line to the front and top.
Cut six pieces of T-slot filler stock to length (+ 3⁄4“) to fit the table and slide into position. Next cut the four 16 3⁄4” pieces of T-slot filler stock for the extension guides. Glue the T- shaped stock into the extension pieces and attach the top piece.
Adhere the scales to the fence and table, connect the lock-down knob and bolt on the fence, and you are set to go.
Jigs, Fixtures, etc.
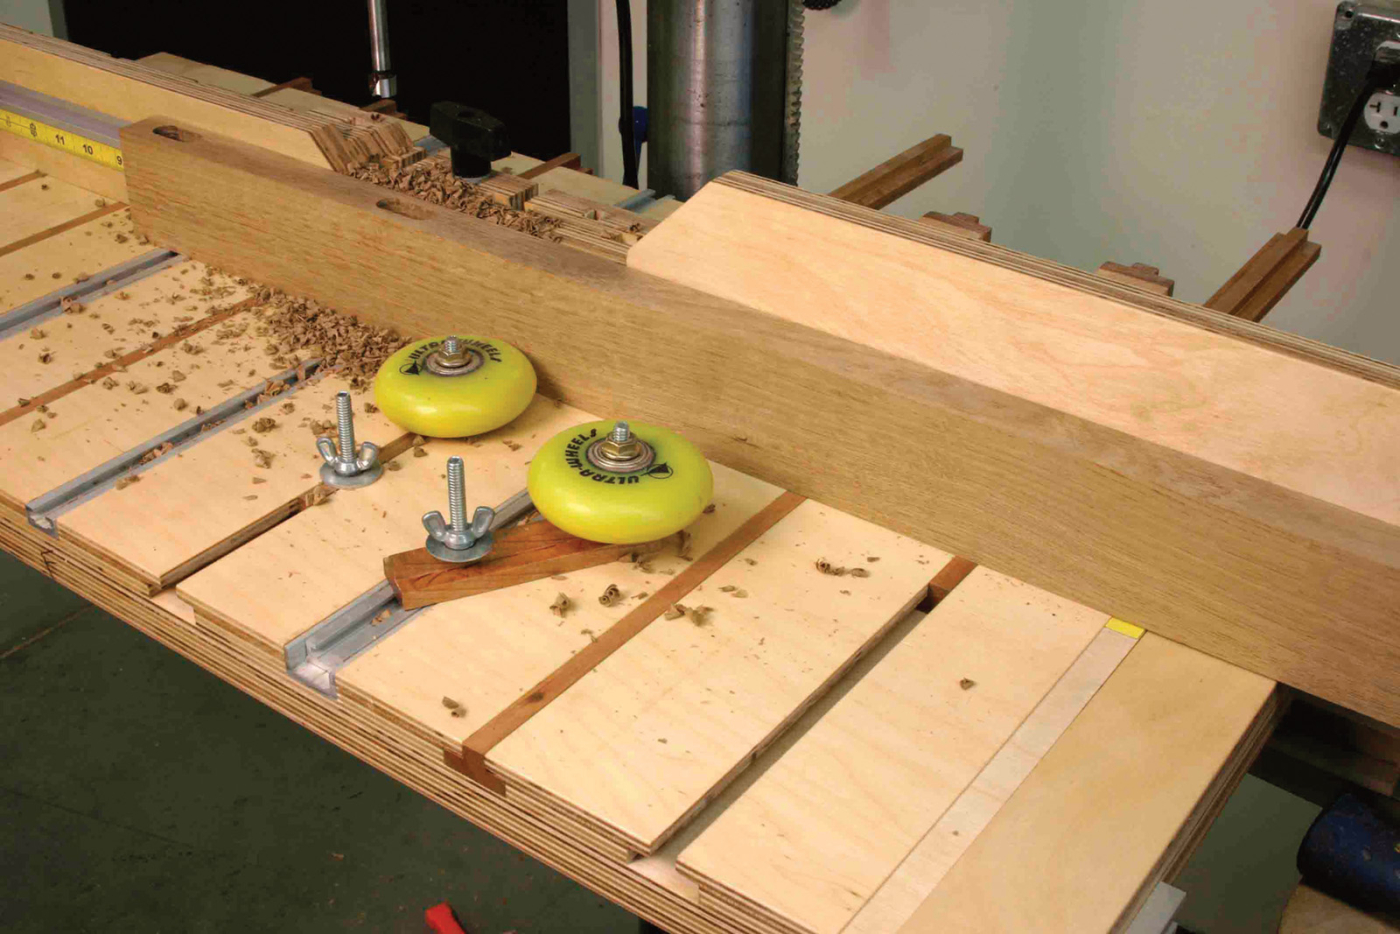
Roller guides are only one of the accessories you can add to your drill press table.
The large T-slots require custom T-bolts. I make mine by using scraps of the T-filler strips. I drill a 3⁄16” hole through the center and then thread with a 1⁄4-20 tap. A countersink on the back lets me thread a 1⁄4-20 flathead stove bolt through to make a rock-solid T-bolt.
Your fixture is ready, but I’m sure you’ll continue to work on it, as I have. I’ve come up with a number of “add-ons” to improve the usefulness of the table, such as a pair of roller blade wheels to serve as a rolling clamp for stock. And with all the T-slots available on the jig, there are lots of places to attach any kind of accessory you can dream up.
Here are some supplies and tools we find essential in our everyday work around the shop. We may receive a commission from sales referred by our links; however, we have carefully selected these products for their usefulness and quality.