We may receive a commission when you use our affiliate links. However, this does not impact our recommendations.

Buy smart to get the best deals and the best wood.
1. Start out thick
Rough lumber thicknesses are measured in 1/4-in. increments. The thinnest rough-cut boards, labeled 4/4, and called four quarter, are 1-in. thick. It’s tough to get surfaced stock thicker than 13/16-in. from 1-in. rough stock.
Plan to lose 3/16-in. (1/4-in.on thicker stock) when you plane a roughsawn board smooth. Hardwood lumberyards commonly stock species in 4/4 and 8/4 thicknesses, with additional sizes available based on supply and demand.

2. Be prepared
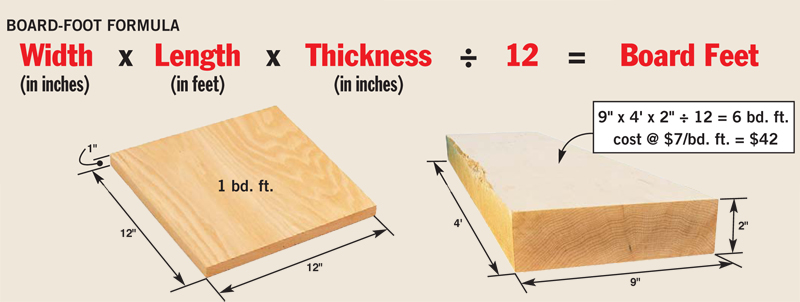
Take a tape measure and calculator with you when you go to the lumberyard so you can measure the boards you choose and figure out how much they’ll cost. Because roughsawn boards come in random widths and lengths (no two are alike) they’re measured by volume, which can be calculated by using a simple formula. The standard unit, a board foot (bd. ft.), measures 12-in. x 12-in. x 1-in.-thick, or 144 cubic inches.
Because bd. ft. is a measure of volume, any combination of thickness (minimum 1 in.), width and length that equals 144 cubic inches also equals one bd. ft.
Rough lumber is sold based on its cost per bd. ft. Some species are more pricey than others, and thicker boards cost more per bd. ft. than thin ones. To determine cost, simply multiply the total number of bd. ft. in the boards you’ve selected by the bd. ft. price.
3. Buy long
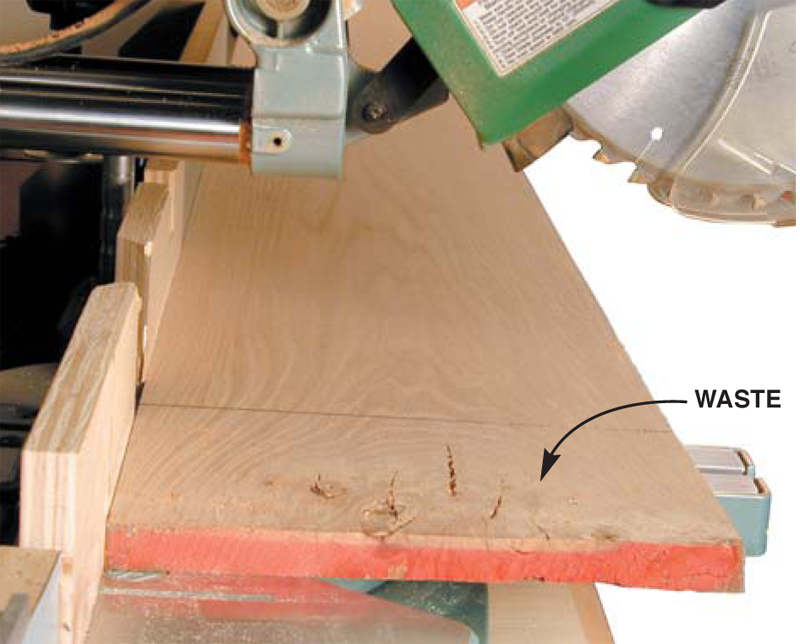
Don’t expect to get an 8-ft. length out of an 8-ft. rough board. Even though roughsawn boards are regularly cut a couple of inches long, they usually contain checks, knots or wild grain that must be cut off. If you need finished 8-ft. lengths, you’ll probably have to buy 9- or even 10-ft.- long boards.
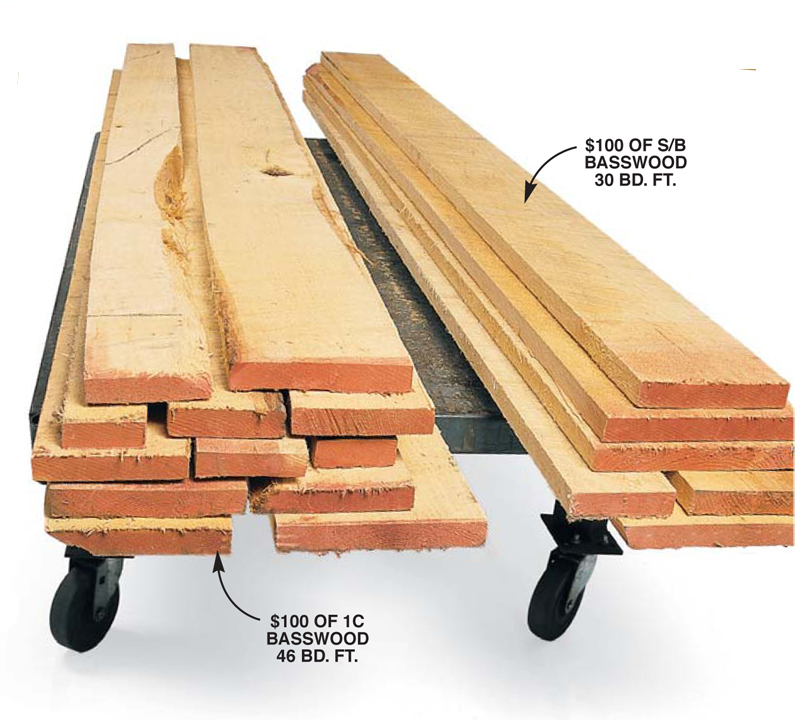
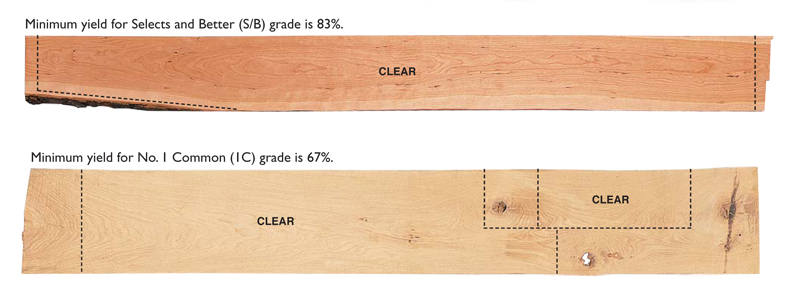
4. Check out No. 1 Common
No. 1 Common (1C) lumber is always worth considering. It sits only one notch below Selects and Better (S/B), the best grade most lumberyards carry, but costs up to 40 percent less.
In general, 1C grade has more defects,and boards usually contain more waste. This reduces its cost advantage somewhat. On the other hand, some 1C boards are perfect, but too narrow or short to make S/B grade. In fact, there’s a large gray area between the low end of S/B lumber and the top end of 1C lumber. It’s not hard to find 1C boards that look just as good, if not better, than S/B boards. Buying 1C lumber is a great way to stretch your woodworking dollars.
5. Top-grade boards aren’t always pretty
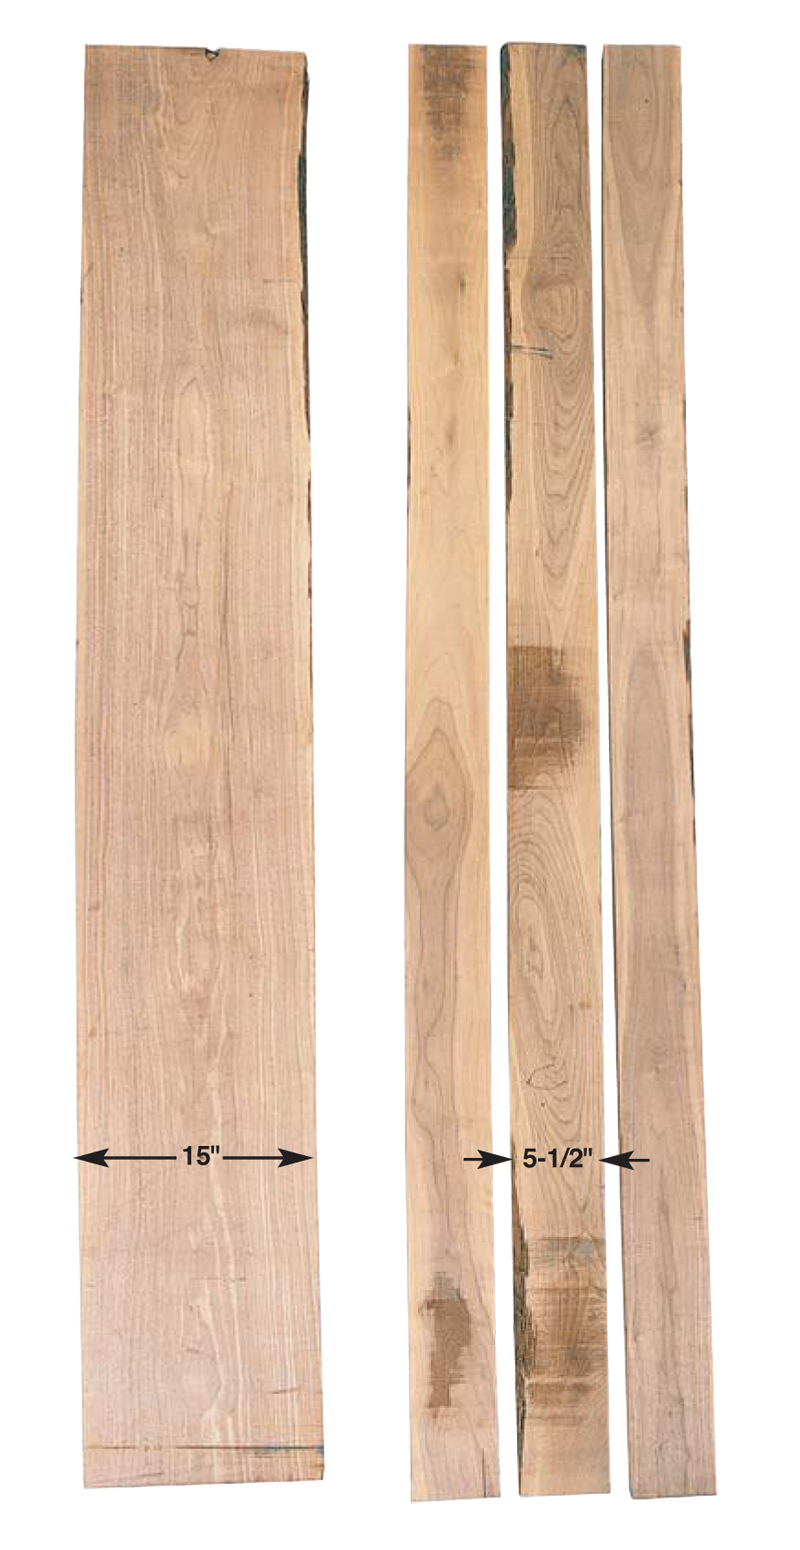
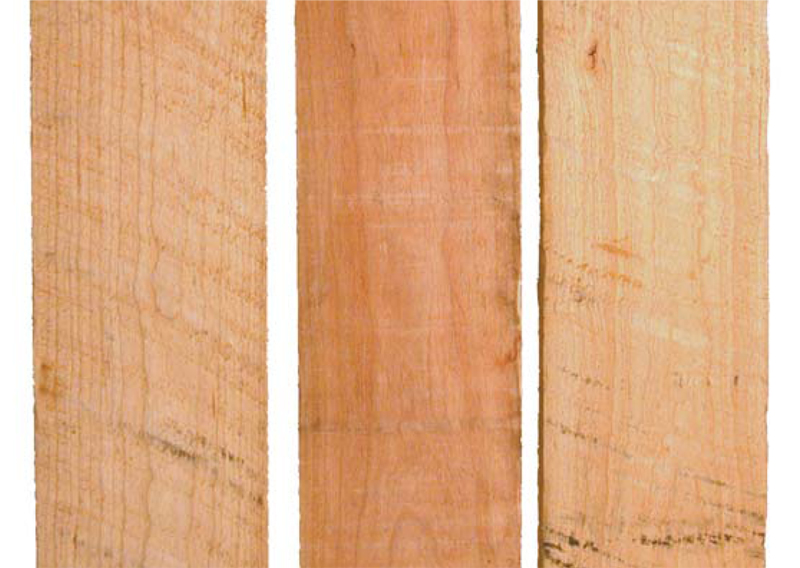
Spectacular boards cost no more than ordinary ones, because lumber grades depend on yield, not aesthetics. The presence of off-color sapwood and funny-looking figure isn’t a factor. The four boards at left all came from the same top-grade stack. In the eyes of the grader, the trio of slender boards is identical to the single wide one, because they contain the same amount of usable material. Three boards or one, they’ll cost the same. How would you spend your money?
6. Buy more than enough
It’s a big mistake to buy the exact amount of wood your project requires. If you do, you’re gonna come up short, because rough lumber isn’t perfect, not even top-grade boards.
A common rule of thumb is to buy 15 to 20 percent more than you need. Some species, like red oak, consistently contain few defects, so you don’t have to over-buy as much. Other species, like black walnut, require more insurance than the average.
I usually don’t bother with percentages, I just buy extra pieces. For example, if I’m going to build a table, I’ll choose enough stock to make an extra leg. If the top requires seven boards, I’ll buy eight.
Watch: Milling Your Own Lumber Series
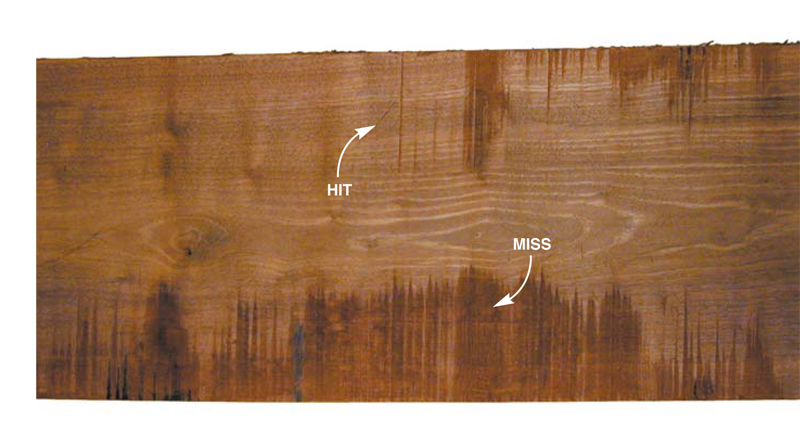
7. Look for hit-and-miss
The landscape at the lumberyard is changing because stock surfaced hit-and-miss (H/M) is becoming common, and may eventually replace rough lumber altogether.
H/M planing skins the board’s rough surfaces.This makes choosing good-looking boards easier because you can see what they look like, without having to guess.
Even though I’ve been buying rough lumber for years, I still get fooled. It’s just plain hard to see the figure pattern and color in a roughsawn board. H/M planing keeps you from buying ugly boards. H/M boards are also easier on your tools, because the rough top layer, which often contains dirt and other junk, has been removed.
Here’s the bad news. First, you’ve got less thickness to work with. H/M-surfaced boards are 1/16-in. thinner than the rough thickness (4/4 H/M stock is 15/16-in. thick). Second, H/M boards still need to be finish-planed. Their surfaces are coarse and usually contain portions that are still rough (hence the name). And third, H/M planing doesn’t flatten warped boards.
8. Tame warped lumber
Common sense tells you to choose flat boards and avoid the pretzels. Unfortunately, flat roughsawn boards are sometimes hard to find. Lots of boards end up warped as a result of the drying process. In lumber lingo, warp is defined as any deflection from a flat, planar surface. Warped boards can be cupped, bowed, crooked or twisted. A single board can contain a combination of warps. Luckily, most warped boards can be flattened, if the deflection isn’t too severe. Knowing how to identify and deal with boards that aren’t perfectly flat will give you many more choices as you look through the stack.
9. Cup
A board that bends across the width of its face is cupped. Cupping, which occurs mainly in plainsawn lumber, affects a board’s finished thickness.
Boards that are slightly cupped are easy to flatten. Joint them with the concave side down. This keeps both outside edges in contact with the jointer’s bed, for stability. To flatten a severely cupped board without sacrificing its thickness, rip it in half and joint both pieces separately. Don’t rip a cupped board on your table saw, however. It’s too likely to cause a kickback. Use a bandsaw, circular saw or jigsaw. Glue the pieces back together, after jointing their mating edges. Then make a final smoothing pass on the glued-up face.

Check for cup by looking at the end of the board.
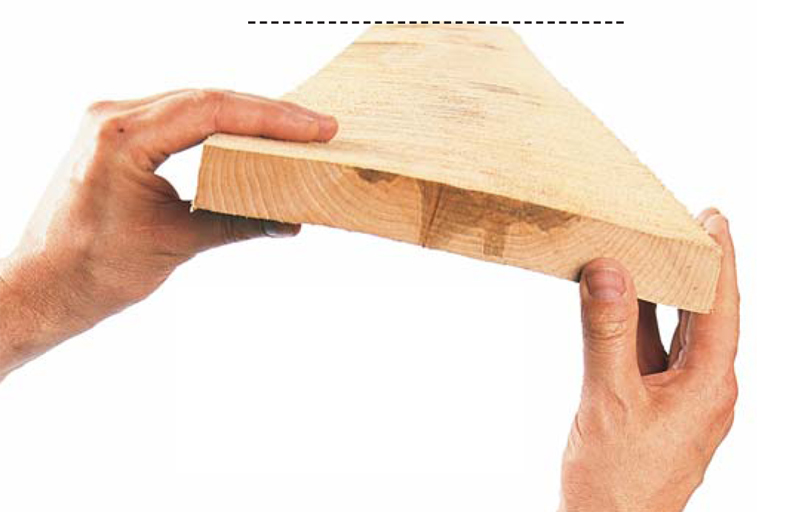
10. Bow
A board that bends across the length of its face is bowed. You’ll lose length when you flatten bowed boards, because you have to remove more from the ends than the middle. Joint with the bowed side down, and don’t press the board flat against the jointer bed. The only way to deal with a board with a pronounced bow is to cut it into shorter lengths. The short pieces will still bow, but not as much, so they’ll be easier to flatten. If the bow is confined to one end of the board, cut it off or make repeated jointing passes on that end only.
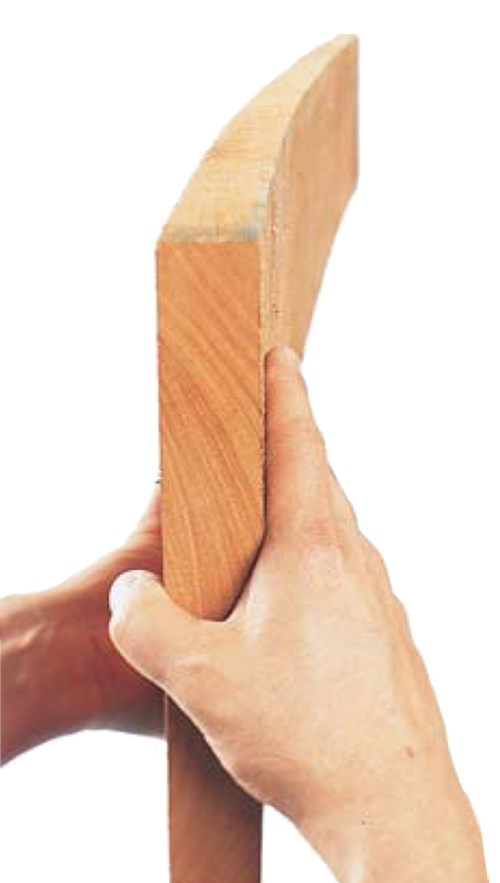
Bow is easy to see when you sight down the edge of the board.

11. Crook
A board that bends along its length is crooked. Straightening a crooked board reduces its width. Boards with a minor crook are common. They can be straightened by jointing and/or ripping. (Again, don’t rip a crooked board on the table saw without a sled to hold it; kickback is too likely.) Jointing or ripping won’t work on a board with a major crook—you’d end up with nothing. Instead, cut the board into short pieces.

12. Twist
A board with one high corner has twist. It’s best to let twisted boards be someone else’s nightmare. They’re difficult to flatten, and even if you’re successful, the twist has a tendency to return. If you must use a twisted board, cut it as short as possible, to minimize the deflection.
Sight down the face of a board. If the opposite ends aren’t parallel, it’s twisted. Put it back.
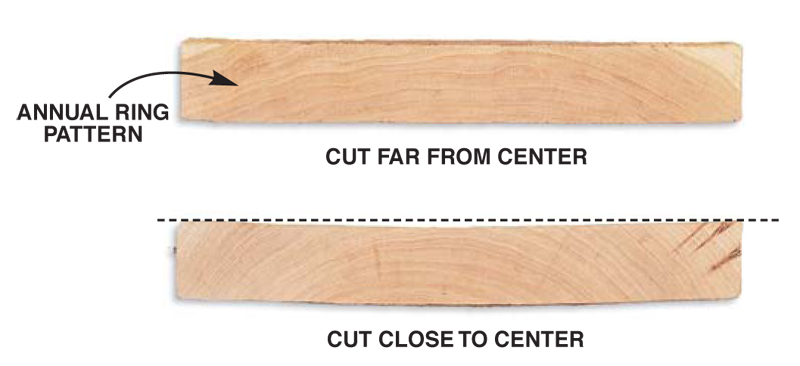
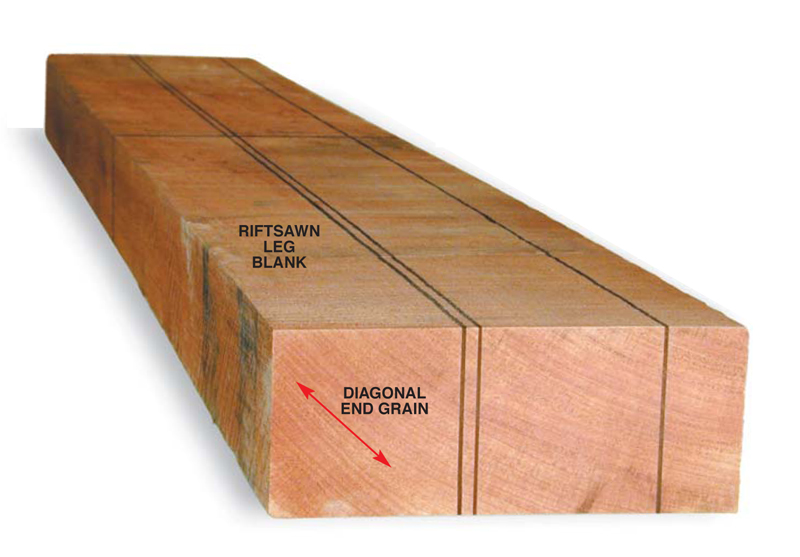
13. Riftsawn blank for legs
For table legs, choose a riftsawn blank; one on which the end grain runs diagonally. Because the blank is riftsawn, all four faces of each leg will exhibit the same straight-grained figure pattern. Look for a blank that’s slightly more than twice as wide and slightly more than twice as long as one leg, so you can get all four legs from the same piece.
14. Take advantage of milling services
Rough lumber is rarely flat or straight. Milling your own is backbreaking work, takes forever and produces gobs of sawdust.
Why not let the lumberyard do it for you? Most yards will rip one edge of a rough board straight (called SL/E, straight-line edge), plane both faces (S2S, surfaced two sides), or mill both faces and edges (S4S, surfaced four sides). In addition to a setup fee of $15 to $45, the cost ranges from about 15 to 30 cents per bd. ft., depending on which type of milling you choose. It’s not worth the expense to have only a few boards milled—for small amounts, it’s usually cheaper to head straight to the yard’s inventory of surfaced lumber. The set-up fee usually gets waived for large milling jobs, over 150 bd.ft., for example. Check with your yard for specific costs and minimum amounts.

A straight-line edge cut (SL/E) made at the lumberyard makes ripping and crosscutting at home safer because it gives you a straight side to work from. It also saves you the frustration of trying to joint a long board on a small jointer.
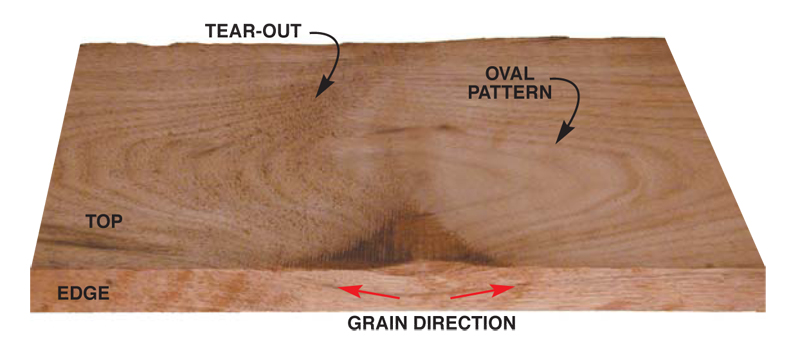
15. Beware of ovals
An oval figure pattern on the board’s surface signals a change in grain direction that may cause significant tear-out. You’ll be planing with the grain on one side of the oval, but going against it on the other, so there’s gonna be trouble.
Instead of sanding like mad to get rid of tear-out, use a scraper or handplane. Check the edge of the board to see how and where the grain changes, then smooth the oval by working from opposite directions, following the grain.
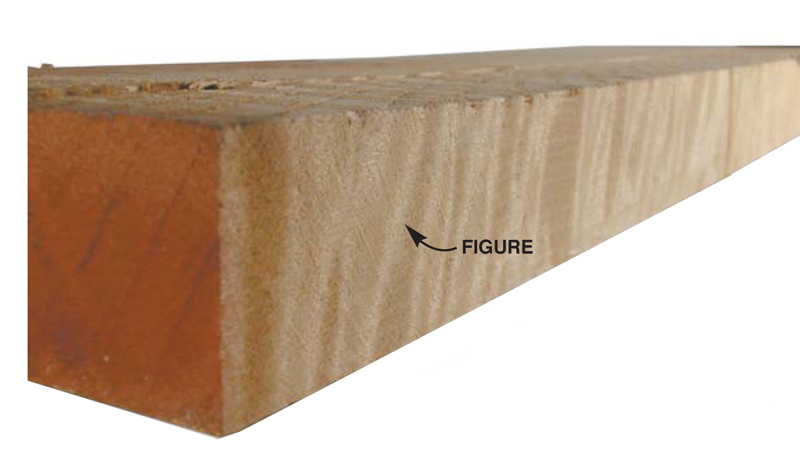
16. Edges reveal the curl
Spectacular figure may be hidden by a board’s roughsawn surface. If you suspect a board contains curly figure, look at its edges for closely spaced light- and dark-colored stripes. Pronounced stripes indicate heavy figure. You can check an entire stack of boards for figured ones just by looking at the stack from the side.
17. Resawing saves money and material
Even though thicker wood costs more, you can save money by using it effectively. Say you need two 1/2-in.-thick panels. Instead of milling two pieces of 4/4 stock, and wasting almost half of each board, resaw a pair of panels from a single piece of 6/4. Besides, resawing produces bookmatched pieces that can make a great-looking pair of doors.

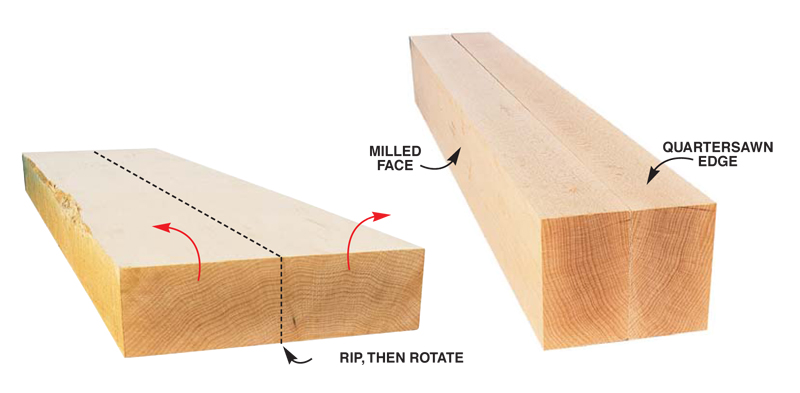
18. Do-it-yourself butcherblock
Butcherblock tops are best made from quartersawn wood, so they don’t expand and contract as much. Instead of buying or searching out quartersawn wood, simply buy plainsawn. After milling your boards smooth on top and bottom, rip them in half and rotate both pieces 90 degrees.
19. Be fussy about color
One off-color board can ruin the appearance of an entire project. Trust me, that dark (or light) board will bug you every time you see it! You can usually tell when boards don’t match, even in the rough. Stand them alongside one another in good natural light, so you can compare.
This story originally appeared in American Woodworker Magazine, October 2001, issue #89.
Here are some supplies and tools we find essential in our everyday work around the shop. We may receive a commission from sales referred by our links; however, we have carefully selected these products for their usefulness and quality.