


We may receive a commission when you use our affiliate links. However, this does not impact our recommendations.
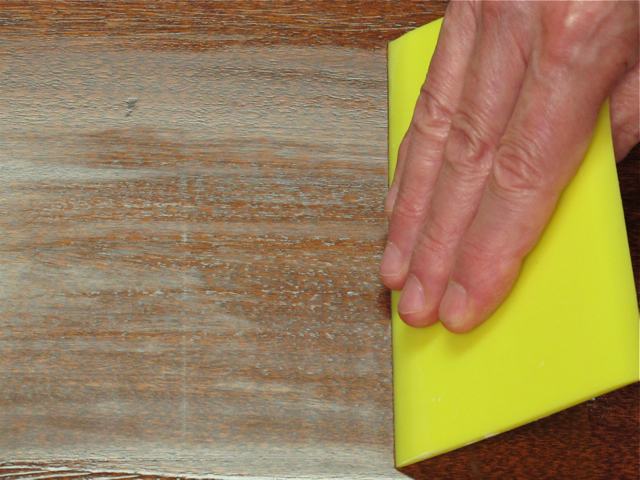
When rubbing out a finish to achieve a perfectly flat surface, it’s faster to check your progress with a plastic spreader than to wash off the sludge.
Rubbing out a finish to achieve a perfectly flat surface on porous woods such as mahogany and walnut is a lot of work, so it’s usually reserved for tabletops. Using a film-building finish (not oil), the first step is to sand the finish back, or level it, to leave the pores filled in. You usually have to do this even if you have used a pore filler because there’s always some shrinkage. Then, when the surface is perfectly flat, use finer and finer grit abrasives to create the sheen you want.
The problem in leveling is that you can’t see how much you have progressed because the sanding sludge you’re creating prevents this. But you need to see the progress so you don’t sand through to the wood.
You can, of course, wash off the sludge, but then you have to let everything dry before you can see the shine in the pores, and this slows you down.
A much quicker way to check your progress, as long as the finish you have applied has a gloss sheen, is to remove the sludge from the area you’re checking with a plastic spreader. The glossy finish in the pores where you haven’t sanded enough shows up well.
I call this “the plastic-spreader trick.”
— Bob Flexner

Here are some supplies and tools we find essential in our everyday work around the shop. We may receive a commission from sales referred by our links; however, we have carefully selected these products for their usefulness and quality.


Nice, but I like my way a bit better. You should try it sometime, if you don’t already know about it:
When finishing a flat surface with pores to be filled, I like to take my film forming finish onto the surface in a thin coat and work it with a 320 or 400 grit sanding disk on a RO sander. The grit is small enough to not dig into the surface if the sander is kept moving slowly but steadily and the RO action generates just enough heat to accelerate curing of the finish while filling the pores with a mix of sanding wood dust and finish. The pores are well filled in one or two coats, the coating binds the wood filling the pores, the filler is a perfect match for the substrate, the surface is quite flattened and smooth and ready for a finish coats.
So far, the only caveat I’ve found is to avoid too much finish on the surface when starting, as it can cause the sanding disk to “float” about the wood surface so that no surface sanding and thus no sanding dust is created. (Of course, that assumes proper handling of the sander, as mentioned above, which we all do faithfully in all cases anyway. None of us would ever allow a sander to dig into the surface of our work.)
Works well with wiping varnish, plain resin varnish, and polyurethane varnish but isn’t a good idea with epoxy coating formulations (which will get much too quickly in most cases for the abrasive to do much good, particularly since the heating accelerates gelling). It works, albeit less well, with curing oil finishes (BLO and tung oil) as even with the gentle heating they still take too long to cure. But the technique will form a mighty fine surface with those as well.