We may receive a commission when you use our affiliate links. However, this does not impact our recommendations.

Make a pad. To make a pad for French polishing, wrap a folded cotton or wool cloth inside a non-stretching (not a T-shirt) cotton or linen cloth that is thin and tightly woven without sewn ridges. Here, I’m using a cotton cloth from a fabric store.
Linen and more.
Three times in recent memory, articles have appeared in major woodworking magazines instructing readers to use linen for the outer cloth in a French polishing pad. No explanation, just the instruction.
This brought back memories from 30 years ago of my running all over town searching unsuccessfully for linen because I had just read the same instruction: Linen is “best.”
Recently, I was able to buy some linen in the Los Angeles fashion district to test whether it actually is superior to cotton (specifically tightly woven worn handkerchiefs, which are my favorite).
I’d long suspected the word “linen” was being used loosely: “linen closet,” “change the bed linen,” “Linens ’n Things.” Indeed, a search through dozens of old books on French polishing, many from England, revealed both linen and cotton being recommended.
Still, linen is a specific fabric, and when the type of picky personality that is capable of pulling off a successful French-polish job is told to use linen, that’s what he or she tries to use!
As you surely suspect, after extensive comparisons, I can’t see or feel any difference between using a thin, tightly woven cotton cloth and a thin, tightly woven linen cloth. Both work great. The key for me is that they are thin and tightly woven.
French Polishing
Though French polishing takes practice to master, it’s easy to describe.
Wrap a folded cotton or wool cloth the size of a golf ball or larger inside a thin, tightly woven, non-stretching cotton or linen cloth and twist the outer cloth tight to remove wrinkles. Pour some one-to-two-pound-cut shellac onto the pad’s bottom, tap it hard against your other hand to disperse the shellac then rub the cloth in straight, circle or figure-eight strokes over the wood surface, to slowly build an evenly thin film.
At an early stage, sand with very fine (#600 or finer) sandpaper to remove roughness and other flaws, then continue building the film.
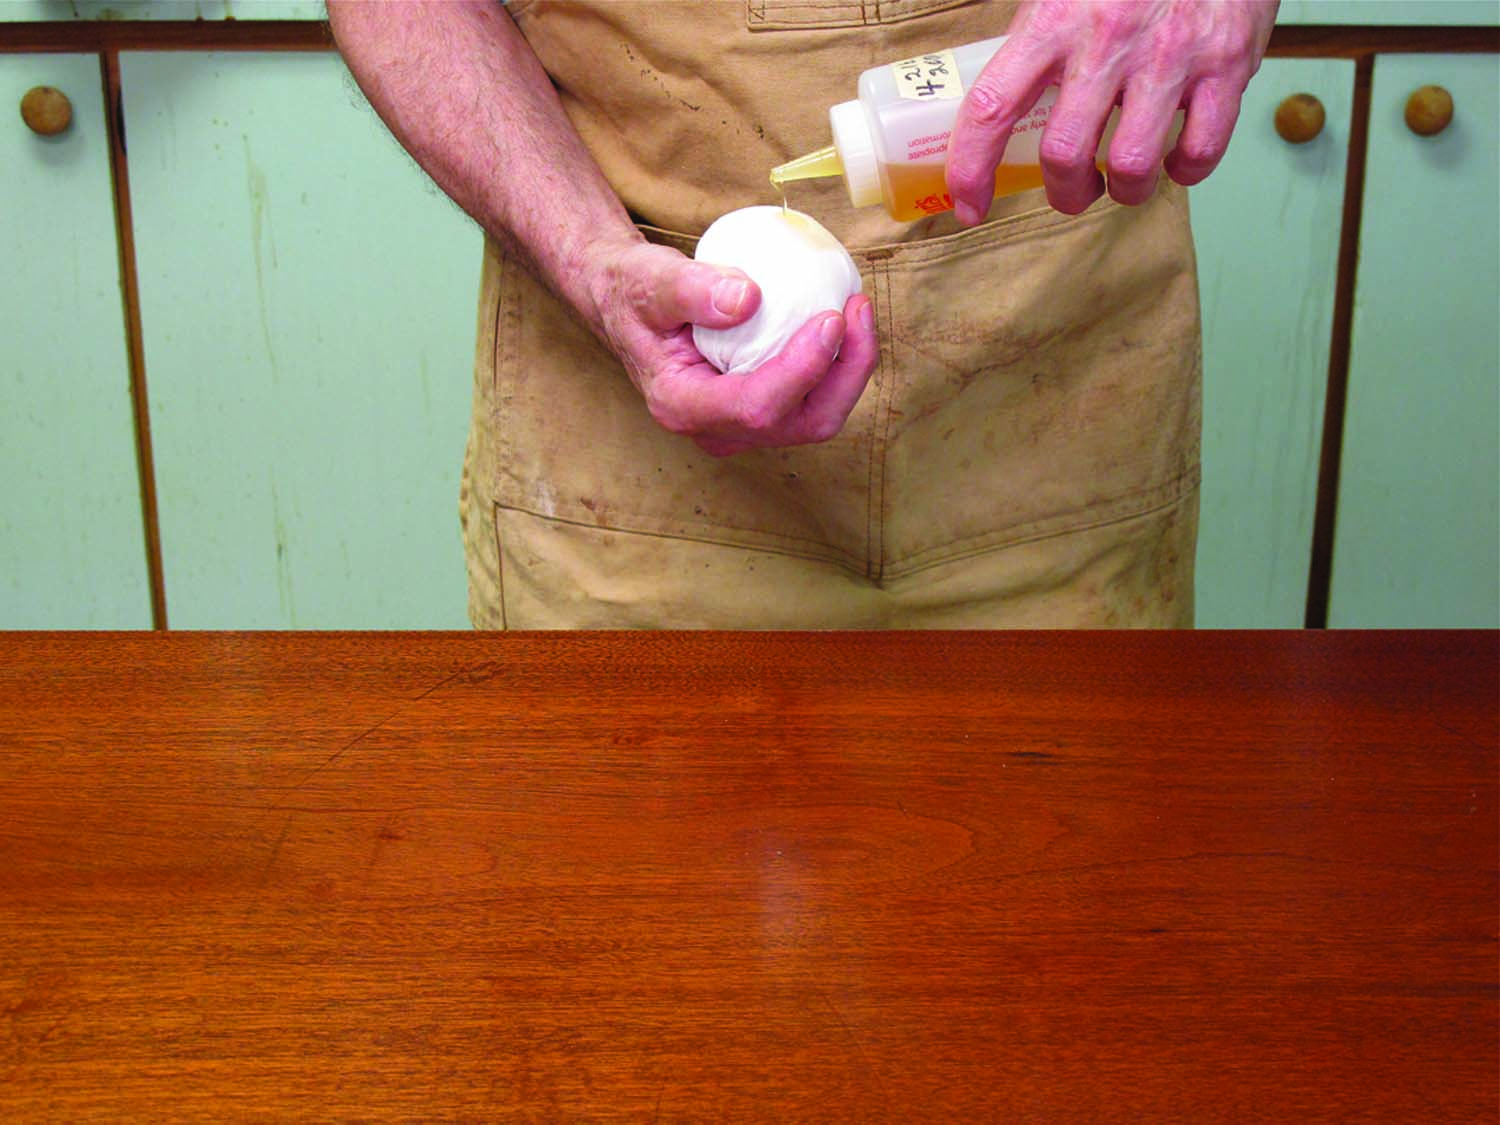
Add shellac. The easy way to add shellac to the pad is to pour it from a squeeze bottle. I’m always amazed at those who go to the trouble of tying up the folds of the outer cloth with a string. The whole purpose of using an outer cloth to wrap a folded inner cloth is so you can remove wrinkles easily by giving the folds a twist. Why would you want to untie and retie the cloth every time?
There are three tricks for getting good results.
The first is to apply a couple finger dabs of mineral oil to the bottom of the pad every time you add more shellac. Then disperse again.

Tap to disperse. Once you’ve added shellac, and maybe some alcohol, to the pad, disperse the liquid throughout by tapping the pad hard against your other hand. The advantage of not wearing gloves is that you can feel the wetness of the pad, and you’ll learn to adjust to what feels right. Gloves prevent this, but many wear them anyway to avoid contact with the alcohol and the stickiness left by the shellac.
As the alcohol in the shellac evaporates through the oil, it leaves a vapor trail across the surface indicating you have a good amount of shellac and alcohol in the pad. If the pad is too wet, the vapor trail will be so long that you can’t see it. If the pad is too dry, there won’t be a vapor trail, just an oily smear.
As you rub, the vapor trail will shorten to only a few inches. This tells you it’s time to replenish the pad.
The second trick is to wipe the oil off the surface now and then with naphtha to see where you are. The oil disguises flaws, making you think you’re closer to the end than you actually are. For this reason, many experienced French polishers don’t use oil at all, but they lose the lubrication and the visual clues provided by the vapor trail.
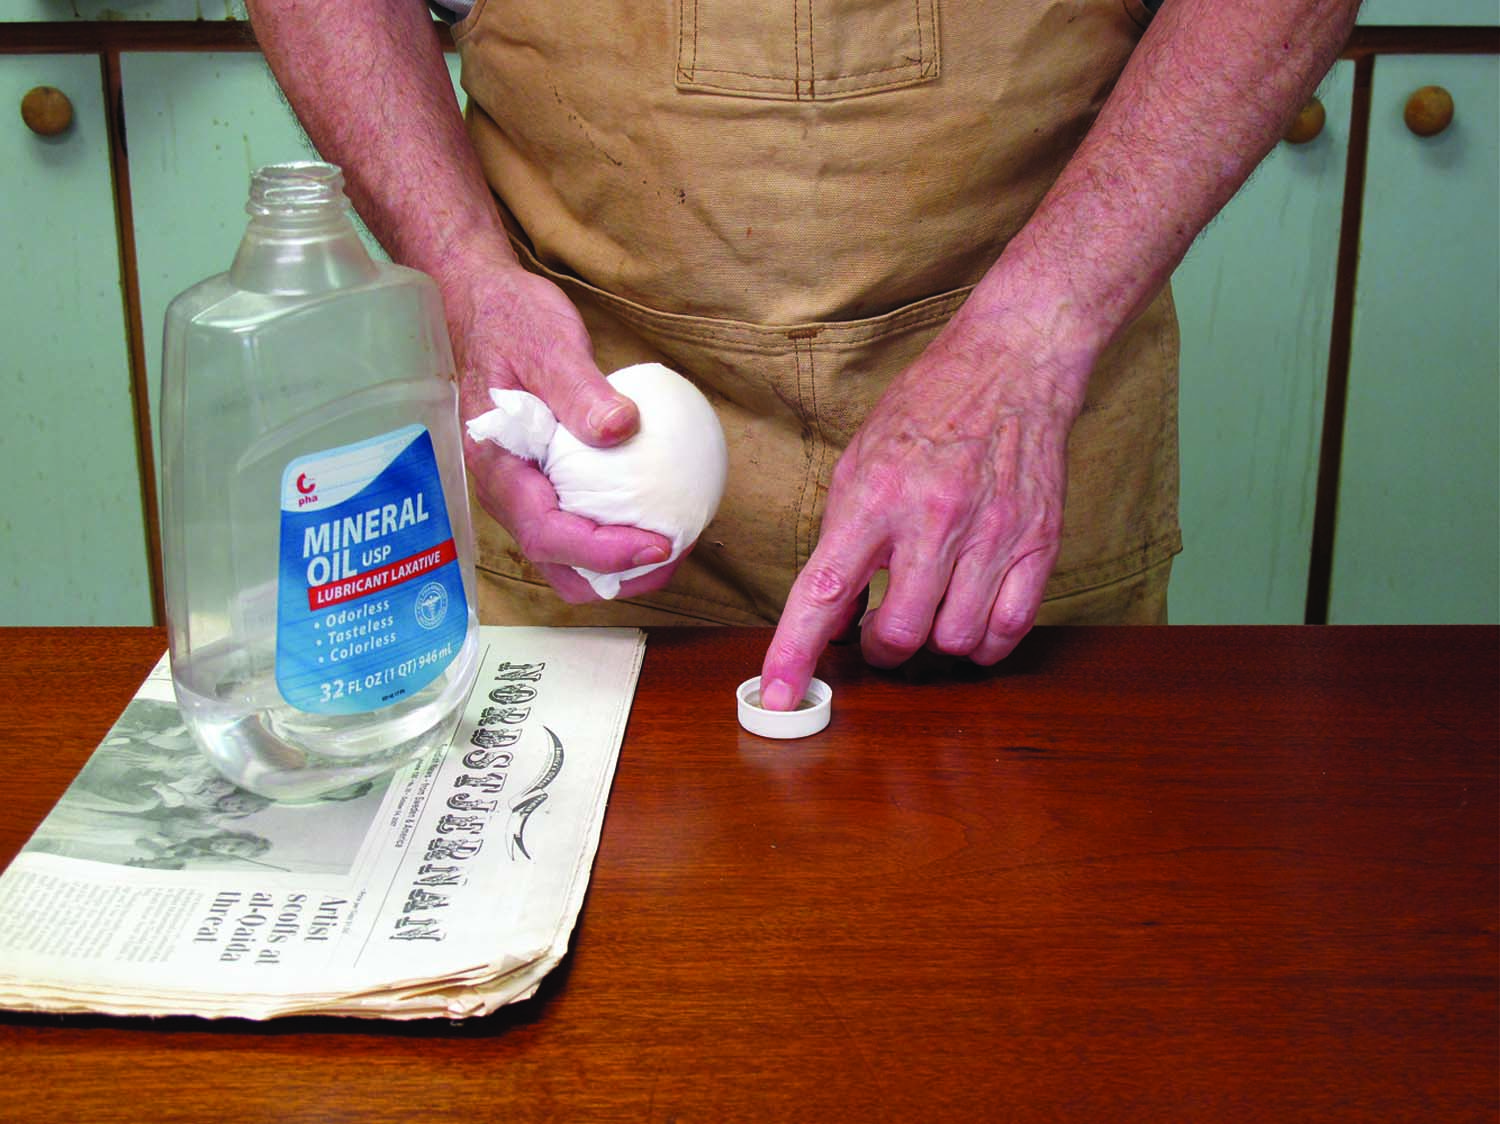
Add oil. Until you become experienced, you’ll find that adding a finger dab or two of oil to the pad each time you add shellac and alcohol gives you more control.
Naphtha is best because it evaporates much faster than mineral spirits. Neither causes any damage to the shellac.
The third trick is to reduce the amount of shellac and increase the amount of alcohol as you near the end of the job – that is, as the film starts looking good with the oil removed. The easy way to do this is to have one squeeze bottle of two-pound-cut shellac and another of alcohol.
For all of the building phase, pour some shellac followed by a little alcohol onto the pad and disperse. As you near the end, slowly reduce the shellac to nothing, finally adding only alcohol.
This is to eliminate rag tracks. Just as with brushing, cloths leave tracks, like tiny brush marks, when the finish is thick. Thinning is key to eliminating the rag tracks (and also brush marks).
Apply Shellac to Inner Cloth?
Another common instruction is to open up the outer cloth and apply shellac to the inner cloth whenever you need to replenish it. It’s claimed the outer cloth then regulates the seepage.
This is nonsense. Once both cloths are wet with shellac, the outer cloth doesn’t know it is separate from the inner cloth. Once you have dispersed the shellac, and so long as you don’t have the pad soaking wet, the depositing will be even across the surface.
Removing the outer cloth every time you need to replenish gets really messy, and there’s no need to do this as long as your outer cloth is thin enough to let the poured shellac penetrate.
Linseed Oil?
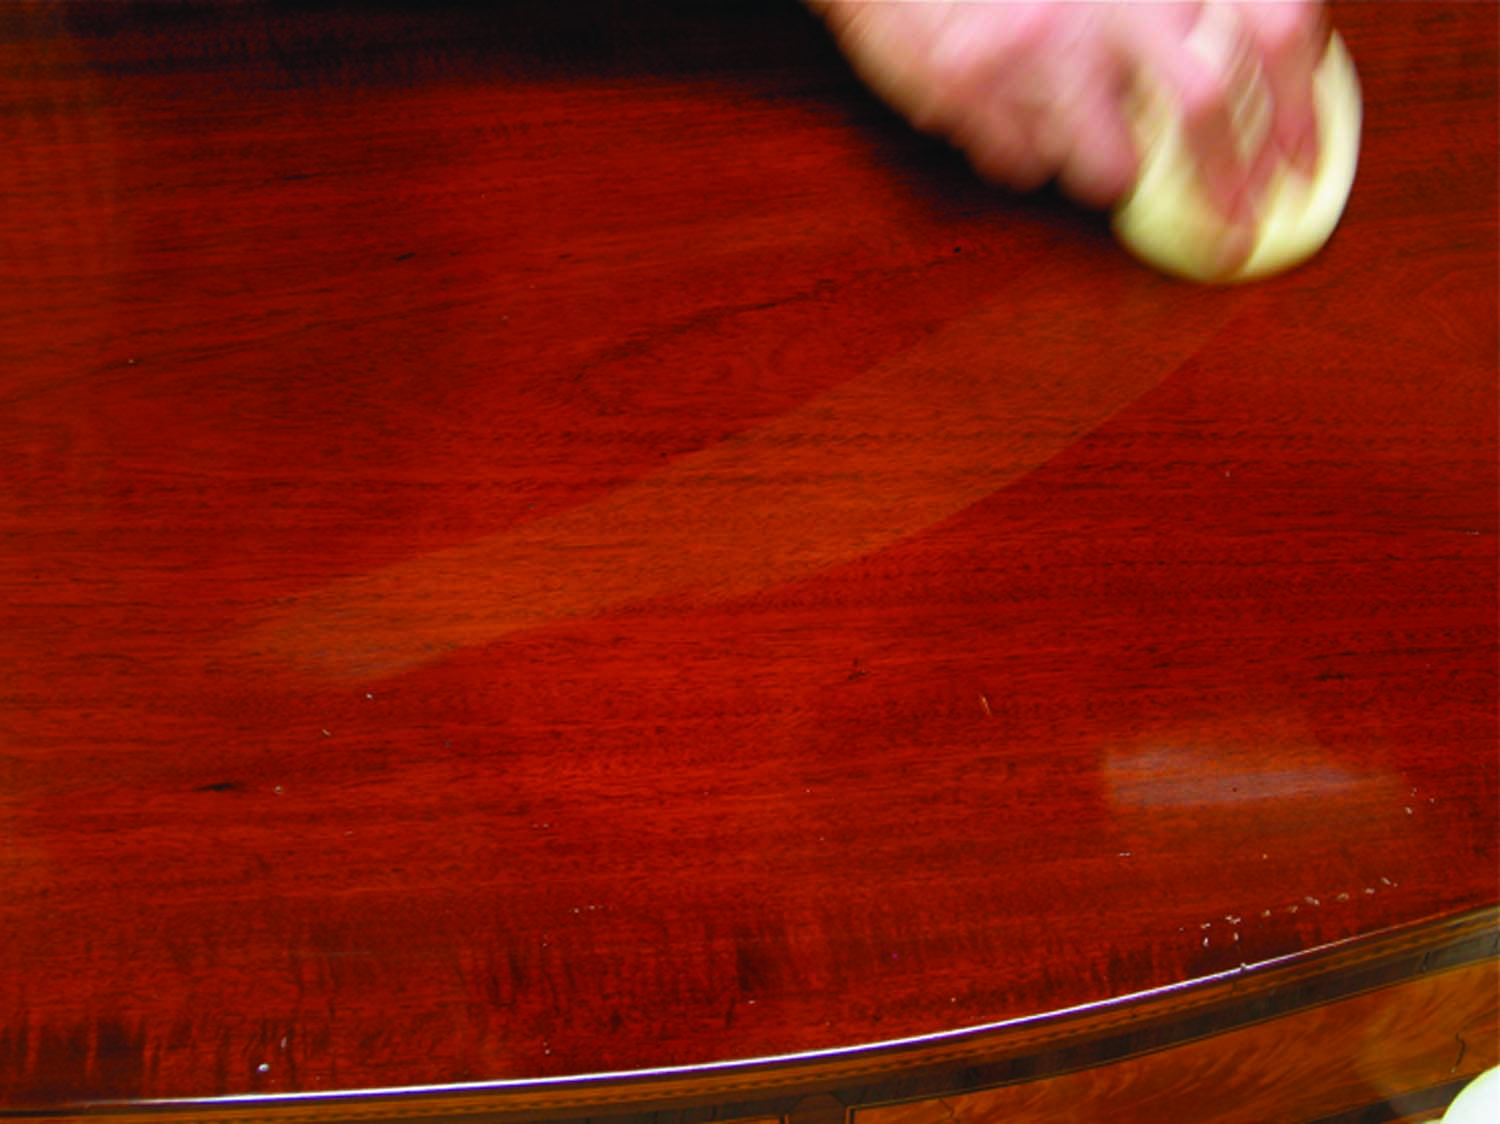
Vapor trail. Adding oil to the pad produces a vapor trail when you are rubbing the pad over the surface. The vapor trail is evidence that you have a good amount of shellac, alcohol and oil in the pad. As you rub the pad, the vapor trail will shorten, which tells you when it’s time to add more shellac and alcohol to the pad.
Sometimes you see instructions to use raw linseed oil instead of mineral oil. This is OK as long as you are especially vigilant to remove all of it after completing the project. Otherwise, the surface will become sticky.
You could use any type of oil, actually. It comes down to what you get used to, and many French polishers trained in England were taught to use raw linseed oil. Personally, I prefer mineral oil because there’s no risk of stickiness.
Spiriting Off?
Traditional instructions say to remove the oil at the end by “spiriting off” with denatured alcohol. This is very difficult to do because the alcohol can easily damage the shellac film.
It’s much safer to use naphtha, with the downside that it leaves the surface looking drier. You can regain the “wet” look with furniture polish or paste wax, which also reduces scratches.
Hand-rubbed French Polish?
Twice in the last year I’ve seen the term “hand-rubbed French polish.”
I guess this term could be used for marketing purposes. “Hand-rubbed” indicates quality to many people. But it is misleading because it is redundant. French polishing is rubbing by hand!
On the other hand, could the phrase refer to rubbing afterward with abrasives? Why then bother with French polishing? Just brush or spray the shellac (much faster), then rub it smooth and perfect to the sheen you want.
French polishing done well produces a perfect finish to begin with.
Here are some supplies and tools we find essential in our everyday work around the shop. We may receive a commission from sales referred by our links; however, we have carefully selected these products for their usefulness and quality.