We may receive a commission when you use our affiliate links. However, this does not impact our recommendations.
Editor’s note: Looking for a great gift? A bottle of wine is nice for almost any occasion, and this wooden wine box designed by woodworker and author A.J. Hamler (author of numerous books including his latest “Build It with Dad”) adds a personal touch as well as a handy box that your lucky gift recipient can use to store almost anything.
*Project excerpted from Hamler’s “Box Builder’s Handbook,” available now in paperback or as a PDF download. The book is included in the Box Making Value Pack – 10 box-building books, articles and videos for just $79!
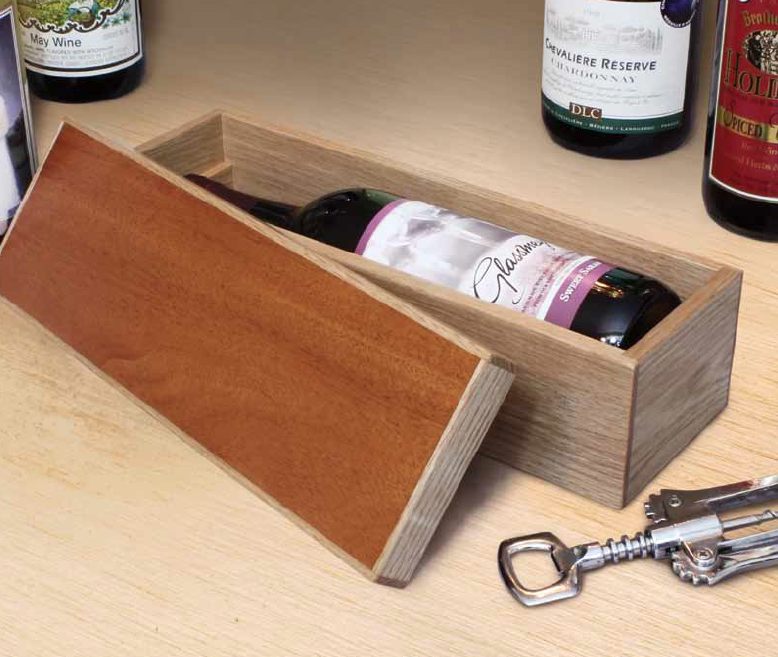
Most true wine aficionados tend to turn their noses up at wine that comes in a box; for them, only the finest bottled wine will do. However, I’m willing to bet that anyone who loves wine will enjoy any vintage that arrives in this box. Containers to carry wine bottles aren’t unique — any Internet search will turn up numerous bags, pouches, boxes and other containers — but the thing I noticed about almost all of these was that they’re intended for just a single purpose: carrying a bottle of wine. This means that should you gift a friend a boxed bottle, after enjoying the wine itself the box will end up on a shelf until needed to carry a bottle once more. I got to thinking, wouldn’t it be nicer if a wine box were designed to have another purpose after fulfilling its original job? Seems to me that would certainly beat tossing it up on a shelf to collect dust. That’s exactly what I’ve done with this project. For its original purpose of carrying a gift of wine to a friend, the bottle fits inside and is held in place by a keeper. The keeper extends about 3∕8″ above the top of the open box, allowing the lid to nestle over the top.
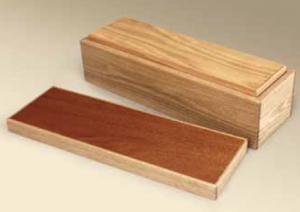
Once the box is empty, however, flip the keeper over and it becomes an inner tray. The lid fits over the tray the same way, but now the box can be used for just about any purpose, with a larger main compartment underneath and a shallow lift-out tray resting above (as shown below).
The Wine Box lid is held on by the internal tray. Turn the tray upside down over the wine bottle to hold it securely.
Later, flip the tray right side up for other uses.

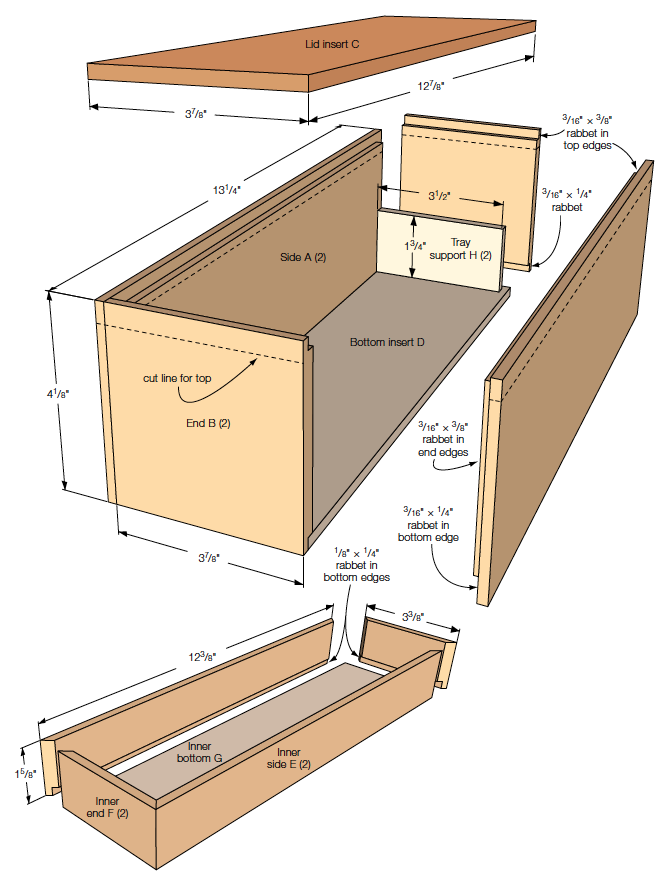
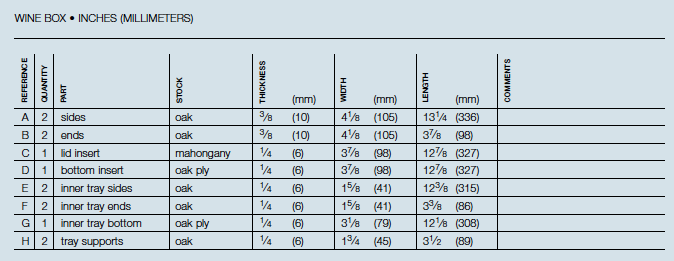
Always start by getting an exact measurement of the wine bottle that you intend to use the box for. The bottle I used measured 12″ high and 3″ in diameter, which is about average for wine bottles. Using that measurement, I added a bit to each dimension for some extra room (just in case someone came along and drank the wine from my intended bottle before I finished the project, there’d be enough room in the box for a bottle of similar size). You’ll notice from the cut list that other than the lid insert, there are no components listed for the lid. That’s because we’ll build the box as a single unit, then cut the lid free from the box. This method of making the lid is not only easier, but it guarantees a perfect fit, as well as continuous grain between the box and lid sides.
Construction
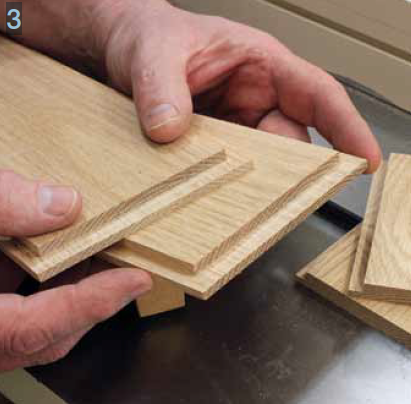
After cutting the parts, it’s a good idea to recheck for size before you start working (Fig. 1). We’ll divide this box into two projects — the main box, and the tray insert. Start construction of the main box by cutting 3∕16″ × 3∕8″ rabbets on each end of both sides, as I’m doing with a dado set in my table saw in Fig. 2. If you prefer, you can cut the rabbets with a straight bit in a table-mounted router. Now, adjust the dado set or router table to cut 3∕16″ × 1∕4″ rabbets on the top and bottom edges of both sides, as well as the top and bottom edges of the end pieces (Fig. 3).


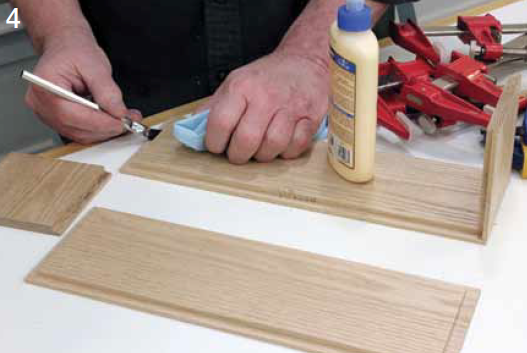
Spread glue into the end rabbets on the box sides, (Fig. 4) and clamp the main box together (Fig. 5). Although I’m not yet gluing it in place, I’m dropping in the mahogany lid insert, which I know is square, to keep things aligned while the glue dries.

Once dry, pop out the insert, add glue to the top rabbets and drop the insert into place. Arrange a few wooden blocks around the edge of the insert to act as cauls to spread the pressure evenly when you clamp the insert, as in Fig. 6, and allow to dry. Unclamp the box and flip it upside down, then glue in the bottom insert the same way you did for the lid. When you’ve got the bottom insert securely clamped, immediately turn the assembly right side up. I’ll explain why in a moment.

First, a few notes on this method of box/lid construction are in order. Since you’re effectively making an elongated sealed cube, you might be wondering how you contain or wipe up any glue squeeze-out on the inside. The answer is, you can’t. That’s why when doing this kind of box I always glue in the lid component first, which allows me to reach through the bottom while the assembly is clamped and get rid of any extra glue that squeezes out. Using glue sparingly helps, too. The inside of a box lid rarely receives additional adornment such as a lining, so cleaning any squeeze-out there is a priority. The bottom, though, is often a different story. You still want to avoid squeeze-out by using glue sparingly, but by doing the bottom insert last you can minimize the effects of any squeeze-out later when you add a liner — any glue you can’t remove once the lid is cut off will be hidden beneath your lining.
Remember earlier when I told you to immediately turn the box right side up while the glue for the bottom insert dried? This keeps any extra glue from dripping down the inside toward the lid.
Now, let’s remove that lid. You can do this on the band saw, but let’s use the table saw here. The box sides are 3∕8″ thick, so set the blade height just a hair shy of that. Now set the fence distance to create a lid of the desired height; in this case, 3∕4″. Be sure to allow for the blade kerf when setting your fence. (Since the completed height of this box is 4″, you’ll note that I’ve allowed an extra 1∕8″ on the cut list for the box sides and ends to account for the blade kerf.)
Start cutting on one of the ends, using a piece of scrap as a push block as in Fig. 7. Because the box is taller in this orientation than it is long, using a push block when cutting the ends allows for more control of the cut. Now just work your way around the box until all four sides are cut (Fig. 8).


Since we set the blade height just shy of the thickness of the sides, the lid is still attached. Again, this was for safety reasons; you don’t want the lid flying free on that last cut. To remove the lid, just cut through the remaining thin portion with a sharp utility knife as I’m doing in Fig. 9, while holding the lid. When the lid is free, use the knife and a sanding block to clean up any remaining material (Fig. 10).


The last thing the main box needs before moving on to the tray is to add the two tray supports on the ends by gluing and clamping them into position (Fig. 11).

The tray goes together quickly using miter joints. After cutting the miters on the ends of each of the tray sides, lay them, miter down, on a flat surface (the top of my table saw works well for this) and use packing tape to temporarily hold the miters together (Fig. 12). Keep the edge of the miters tight while applying the tape.

When all four pieces are taped (remember the proper order), except for the last joint, flip the taped piece over and apply glue to the miter joints (Fig. 13).

With glue on all the miters, fold the pieces together to form the rectangle of the tray, and tape the last miter joint tight (Fig. 14).

Although I’ve used packing tape to assembly the tray, I’ve opted for a bit more clamping strength with a band clamp, as in Fig. 15. Just as with the mahogany lid insert, you can drop the bottom into place to keep the assembly square. Once the tray dries, glue the bottom into place permanently as you did with the bottom of the main box earlier.

Since this box will be toted around and may receive some rough handling, after finish-sanding all the pieces, I opted for a couple coats of polyurethane. When the finish was dry, I added a felt liner in the bottom of the main box that not only cushions the wine bottle that will go inside, but gives the box a nice final appearance. Adding a liner to the bottom of the tray insert is up to you.
À votre santé!
For more box making projects check out A.J. Hamler’s “Box Builder’s Handbook,” which is part of the Box Making Value Pack – 10 box-building books, articles and videos for just $79!
Here are some supplies and tools we find essential in our everyday work around the shop. We may receive a commission from sales referred by our links; however, we have carefully selected these products for their usefulness and quality.