


We may receive a commission when you use our affiliate links. However, this does not impact our recommendations.
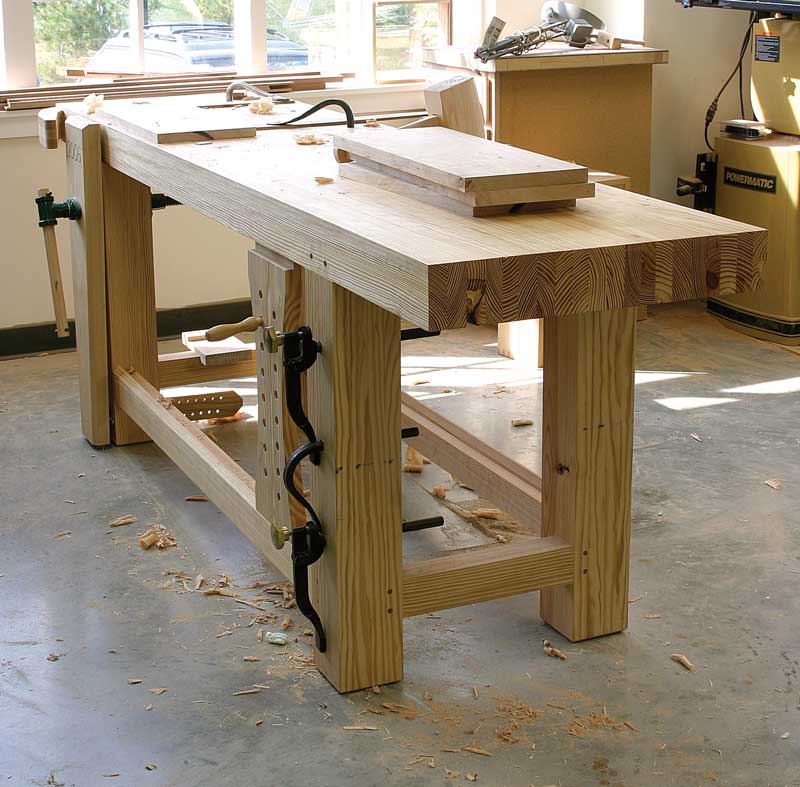
My baby Roubo and tool chest are home!
As many of you know, I recently bought a new (old) house. Though I’m still waiting on my roofer to finish up work on the porch roof (grrrrr), most of the major “must do immediately” stuff is done (read: I now have A/C, and a furnace that was built during my lifetime).
Last night, Christopher Schwarz kindly helped me move my little Roubo bench and tool chest from the PWM shop where I’ve been storing it since early April to the new place; I’ll be transporting home my personal tools this evening.
First on the list is to make the second-floor bathroom bearable. I won’t bore you with the plumbing, wallpaper removal, painting and wiring stuff. There is (in addition to all that), some woodworking involved. This weekend, I’m building an Arts & Crafts-inspired medicine cabinet to replace the circa 1985, faux brass-framed three-panel-mirror cabinet with integrated round vanity lights above.
And I’m also trying to get better at SketchUp.
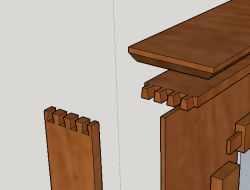 So during lunch today, I finally stopped being a lazy SU user. Instead of just drawing the visible portion of the thing to size, I actually drew the dovetails and mortise-and-tenon joints in the model. (OK…I didn’t add all the m&t joints – just the ones on the door.)
I have SketchUp Pro, so once one half of a joint is done, the “Solid Tools” (which aren’t in the free version) make it pretty simple. Align the pieces as they will be in the actual build. Then click on the “trim” tool, click the part on which you’ve drawn the joinery, click the mating part, and presto – it makes the other half of the joint for you. In this case, I drew the tails and the mortises. So the next time I have a model to build for the magazine, I’ve no excuse to be lazy and pass the model off to our illustrator, Donna Hill, for the joinery. (For personal projects, I really just need to see the overall form – still, I’m happy I took the time to learn.)
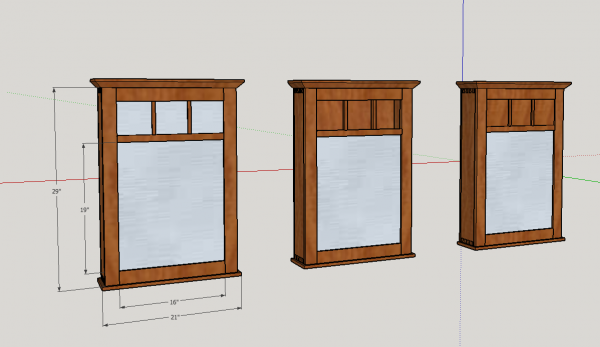
Anyway, below are three iterations with just minor differences. The first has mirrors in all the door openings – note that the top of my head will meet the mirror about two-thirds of the way up; the mirrors at the top will serve no real purpose. The second has nothing in the three small upper openings. I’d put a shelf even with the 1″-wide rail and put a couple decorative items in the space (glass canisters, perhaps). The third has 1/4″ wooden panels in the small openings (which would possibly be out of a contrasting wood). But I’m leaning toward the first one. Of course I am; it will cost more to have the additional mirror pieces cut. Sigh.
Now I just have to find time to get to the lumberyard tomorrow to pick up some maple, so the medicine cabinet matches the chimney cupboard that holds my clean towels. Or, I could use the cherry or walnut that I have on hand, and build new towel storage to match…in between the plumbing, wallpaper removal, painting, wiring…
 p.s. If, like me, you like the Arts & Crafts style, take a look at the new (second) edition of “Popular Woodworking’s Arts & Crafts Furniture Projects,” with step-by-step instruction for 42 projects (at least one of which looks a bit like the above).
Here are some supplies and tools we find essential in our everyday work around the shop. We may receive a commission from sales referred by our links; however, we have carefully selected these products for their usefulness and quality.


The wood selection is very important. After all this is an item that you will “see” often.
We just finished painting and minor re-decorating two bathrooms. The inexpensive mirrors were originally held on the wall with plastic rosettes – not very attractive. I took a board of spalted cherry that I had obtained from the Frank Miller Lumber Company, and captured the mirrors in a grooved half lap frame. I used a satin poly finish.
I could shop for years and not find mirrors this attractive.
I like the third iteration too. It’s closer to the Golden Section, a more pleasing proportion.
Instead of adding a week for BLO dry time to your finishing schedule, just go with orange shellac and forget about the BLO. It’s a misnomer about making the wood glow before actually laying on the finish. Try not to fall for the “romance” of hand rubbing BLO on everything like it’s some sort of magic elixir. For instance, I nearly ruined a gorgeous piece of air-dried black walnut by slathering on BLO. All the subtle colors disappeared in an instant under that yellow oil. It wasn’t till I stripped it back down to bare wood and laid on half a dozen thin coats of blonde shellac that those gorgeous shimmering colors returned. It’s still a thing of beauty and takes nothing more than a buffed coat of paste wax twice per year to keep that way.
With it being a bathroom fixture, I’d go with cat-lac or poly to finish the finish. Less maintenance and more durability. Heck, I’ve even had good luck with spray can Spar poly on small projects.
” a furnace that was built during my lifetime”
I’m beyond arm’s reach (and farther away from Baby New Year than you), so I’m just gonna say it. That ain’t sayin much. 😮
I look just like that taco bell guy in the thread. 😉
Teasing aside, I look forward to more tales from Megan’s Old House.
Paint the walls? I painted the bare, ratty sheetrock in my garage during our last garage/workshop cleanout and it’s much brighter in there now. More of a workshop feel. Less like a forgotten dungeon.
Megan, if you go with iteration 1, why not use a single large mirror and let the upper muntins overlay the mirror to create the illusion of divided lights/separate mini-mirrors? It’d probably be cheaper from the glass shop too.
Megan, the Trim and Keep plugin for SU Pro is what the native Trim function wants to be when it grows up. Give it a try. http://sketchucation.com/forums/viewtopic.php?t=40310
Go with iteration 1.
I see you’ve progressed on the new house since we spoke at the Scottish Rite Temple in Cedar Rapids a few weeks ago. (What did you do for lunch, after rejecting my recommendation of the Taco Bell down the block?) Here’s another recommendation. Use a combination of the cherry and walnut. Once the cherry darkens, you’ll love the result. One coat of BLO, several coats of beige shellac. Maybe try the new Royal-Lac shellac Vijay now has at ShellacFinishes.com. It is a shellac/resin finish. It claims to be more durable and water resistant than plain shellac. I used it on the top of a computer table I built this winter from hickory. Goes on just like straight shellac. And it definitely seems harder than plain shellac. No marring, yet, from my shoe heels or my breakfast cereal milk that periodically gets spilled on it.