We may receive a commission when you use our affiliate links. However, this does not impact our recommendations.
You usually think of scale drawings and models as the starting point for a project. Before you start milling lumber, cutting pieces and assembling parts, you either draw or buy a scaled plan. Some woodworkers also build a scale model so they can better visualize how parts will go together.
But the pre-planning phase is not the only phase of a project when scale drawings and models come in handy. I don’t mean just referring to project plans as you move through each step – all woodworkers do that constantly. What I mean is that there is often an opportunity to pause your work completely and go back to the drawing board. Sometimes a new scaled drawing – or a newly drawn view – can help solve mid-project problems.
Here’s an example. I am at this stage in my Adirondack chair project:
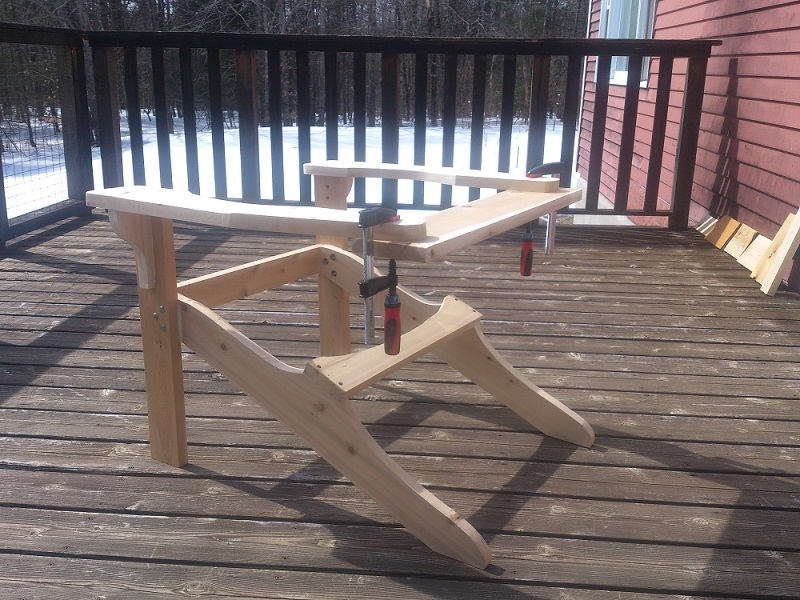
Scale drawings and models can come in handy in mid-project. With snow on the ground, there’s still plenty of time for my Adirondack chair!
The next step is cutting the upper rear crosspiece (the clamped horizontal piece) to the right size and curved shape. Then I will cut and attach the back slats, which slant diagonally along the curved rear crosspieces to form a comfortable reclining position.
I could have gone ahead with cutting the upper rear crosspiece directly from the scale drawings that were provided with the original plan. However, I have made some small adjustments throughout the project build so far. Just a quarter inch here and an eighth inch there, but it adds up.
I paused my work and picked up a pencil, paper, tape measure and ruler. I don’t have a fancy drafting table yet. No need. You can complete an adequate scale drawing on your kitchen table.
I drew a side view of the chair, paying most of my attention to the parts in question. In fact, I left all the other parts out of my drawing. All I really needed was the front legs, the arms, the crosspieces and the distances between them.
Directly below the side view, on the same piece of paper, I drew a top view of the chair. This is standard practice for scale drawing. You want to line up the different views above and below (or laterally adjacent to) each other. That alignment allows you to transfer most of the major points from one view to the other, without measuring each piece twice. It takes some mental gymnastics, but within a few minutes you will suddenly see both views emerging in detail on paper.
I don’t need to go into the specifics of my discoveries here. That would bore everyone who is not building the Adirondack chair project. But within a half hour I was able to figure out exactly how I am going to proceed with the next cuts and attachments. Think how much time – and possibly material – that’s going to save me in the end!
Tell us in the comments how and when you go to the drawing board in your projects.
–Dan Farnbach
p.s. – Are you ready to “scale” your woodworking to a massive level? Well, we finally have the brand new “Super VIP” program ready for you! It took us a while, but we got all the goodies in there. No matter what level of woodworking you are at today, this package is going to take you up 2 or 3 more echelons. Join now! (I’m told the product goes live in the store tomorrow, March 26th.)
Here are some supplies and tools we find essential in our everyday work around the shop. We may receive a commission from sales referred by our links; however, we have carefully selected these products for their usefulness and quality.