


We may receive a commission when you use our affiliate links. However, this does not impact our recommendations.
The only downside to using cut nails is they can split the work, especially when used near the ends of boards. While a properly sized pilot hole will usually prevent splits, there are times when the gnarly grain of the wood wants to split anyway.
Cut nails also will split your work if you use a nail size that is just too big for the boards at hand. And that was my problem today.
I’m building a nailed-together tool chest to create a manual for my students in two upcoming classes. The joints at the corners called for a 4d or 5d nail, but all I had on hand was 6d or 7d. Plus, one section of the pine boards had some crystallized sap, which tends to deflect nails and create splits.
The solution? Bar clamps.
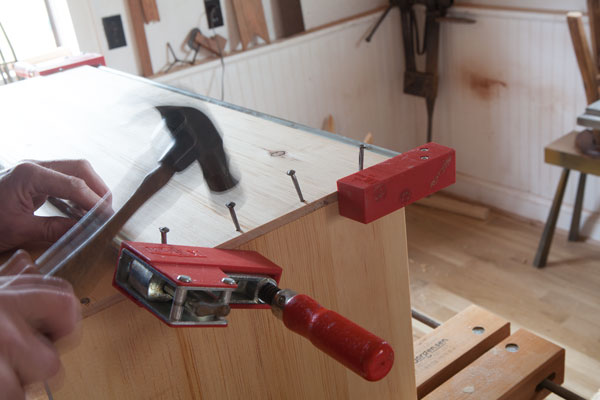
By clamping across the joint you greatly reduce the chance of the boards splitting when you nail them in. If you look at the photo above you will see two different clamping strategies at work.
To prevent splitting in the top board, concentrate the clamp pressure on the end grain of the top board. This is the strategy I use when I have big nails and little boards. I used this strategy with the clamp closest to me,
To prevent splitting in the bottom board (this was because of the sap), shift the pads down to press on the bottom boards. You still might get a split on the interior of the case, but that is preferable to a split on the outside. I used that strategy for the nail I’m driving in the photo.
The clamp simply reinforces the wood so it can endure the shock of the penetrating nail. You are fooling the board into thinking it is longer than it really is.
Try it. I think you’ll find it works quite well.
I’m a sure this is an old trick, but I don’t remember seeing it in any of my old books. I think I grabbed a clamp in desperation one day many years ago. And that’s probably how most tricks are discovered.
— Christopher Schwarz
Here are some supplies and tools we find essential in our everyday work around the shop. We may receive a commission from sales referred by our links; however, we have carefully selected these products for their usefulness and quality.


Chris, forgive my ignorance, but I’m trying to wrap my noggin around this. The clamping pressure goes with the grain? I would have thought across the grain to hold it together, but obviously I’m missing something. What are the mechanics involved here?
Thanks
Kevin
What is the guide line for the pilot holes for cut nails. Considering how much wider they get towards the head, where on the nail is your size gauge for the pilot hole?
When you say cut nails, are you talking about cutting the wedged point off of it?
Back in the early 80’s, I took part in an apprenticeship program for carpet installation; and we were instructed to do that when installing molding. The reason being that the wedged point of the nail could cause the wood to split, whereas the nail with a plat tip would simply punch a hole in the wood when it was driven in.
I’ve always had nail splitting wood issues due to the nail being to close to the edge and those were standard nails. Thanks for the tip on how to prevent this.
I use that joint on many of my boxes/chests. In some cases i’ll glue the joint first and then drill and set my nails. The glue tends to hole everything in place while the nail is set. This was particularly helpful when I made a box out of 1/4 Cherry. One out of 8 nails started to split the wood. Not bad on thin, hard stock.
Yepper, found out that tidbit for myself couple of decades ago on the dry white pine I was using to build small boxes. I used hand-screws on the thin material and itty-bitty cut nails. Even used a push drill for the pilot holes. Boxes are still in use today.
Pre-drilling has always helped w/this
The best way to stop nails spliting work is to use screws. Rechargeable drill/drivers no longer for me as I will buy no more replacement batterys. My wrists are getting stronger – otherwise do not miss the nasty plastic junk. If I built decking it might be a different story.
I continually read about predrilling for cut nails. How about someone presenting a hole size table for cut nails?
I too have made a few chests using these steel cut nails and I love the look. I found that by making the right size prebored hole you can pretty much eliminate the splitting. And since the steel cut nails are tapered from the larger head to the point, I used different sized pre bored holes for the top of the nail verses the head. Maybe even a step drill would work well for this. And of course I also drive the longer side of the nail shaft with the grain, which I’ve been taught, helps to prevent splitting. I guess the point is you want to make enough of a prebore to prevent splitting ,but no so much that you lose the effective grab of the nail. At any rate thanks for sharing these additional tricks ! And if you haven’t read about this in any of the many old books you’ve read then may we be able to safely say that it’s new. Perhaps we could call it the “Schwarz Factor” ! Really bummed out that I missed your trip to San Diego last year. I just completely spaced on it ! Hopefully you’ll ramble out to these parts again in the near future.
Another 1 to try is reaching in with hand-screw clamp. This supports wood on both inside and outside…. if your hand-screw is deep enough.