


We may receive a commission when you use our affiliate links. However, this does not impact our recommendations.
When I made my tool chest I opted for an-off-the-shelf powdered milk paint that you mix yourself. I was pleased with the finish once it was sealed with a couple coats of linseed oil. However one thing nagged at me. Due to the nature of powdered milk paint, it was not good fun trying to cut in and get a crisp edge. I reflected also that perhaps it was a bit of a dead end for me as I was aiming to find an authentic and easier-to-use paint finish for the projects I like making, and I could not imagine milk paint being appropriate for me in most of those cases.
So it was back to the drawing board. In our workshops we have used linseed oil paint for some of the external joinery we make, so that became my next line of enquiry and it was much more fruitful in terms of authenticity. Linseed oil paint works much more readily than the milk paint I used. To reassure me further I took to reading up – and two sources were very helpful, one new and one old. The new is Stephen Shepherd’s book “Shellac, Linseed Oil & Paint” and the old is Peter Nicholson’s “The Mechanic’s Companion.”
Shepard’s book is excellent and a very worthy purchase for those who are interested in traditional finishes of the19th century (and extra uses for garlic) and Peter Nicholson’s work is an informative period reference which shows there is more to offer in his work beyond the tools and the bench. A word of warning though: If you do undertake researching and making your own paints, be very cautious of the older text and interacting with old paint. Older text is not your “How-To Guide.” It should be treated as historical practice. One of the constituent parts of nearly all old paint finishes is lead, and that is something you must not use just because it says so in an old book. Paints containing lead have been outlawed for some time due to their heath hazards so avoid lead with good reason. Thankfully lead is not essential to linseed oil paint but even then if you do choose to make your own paint, make sure you follow all the manufacturer’s guidance and warnings to protect your health.
If that’s enough to give you the heebie-jeebies don’t revert back to milk paint just yet; simply buy some ready-made linseed oil paint and give it a try.
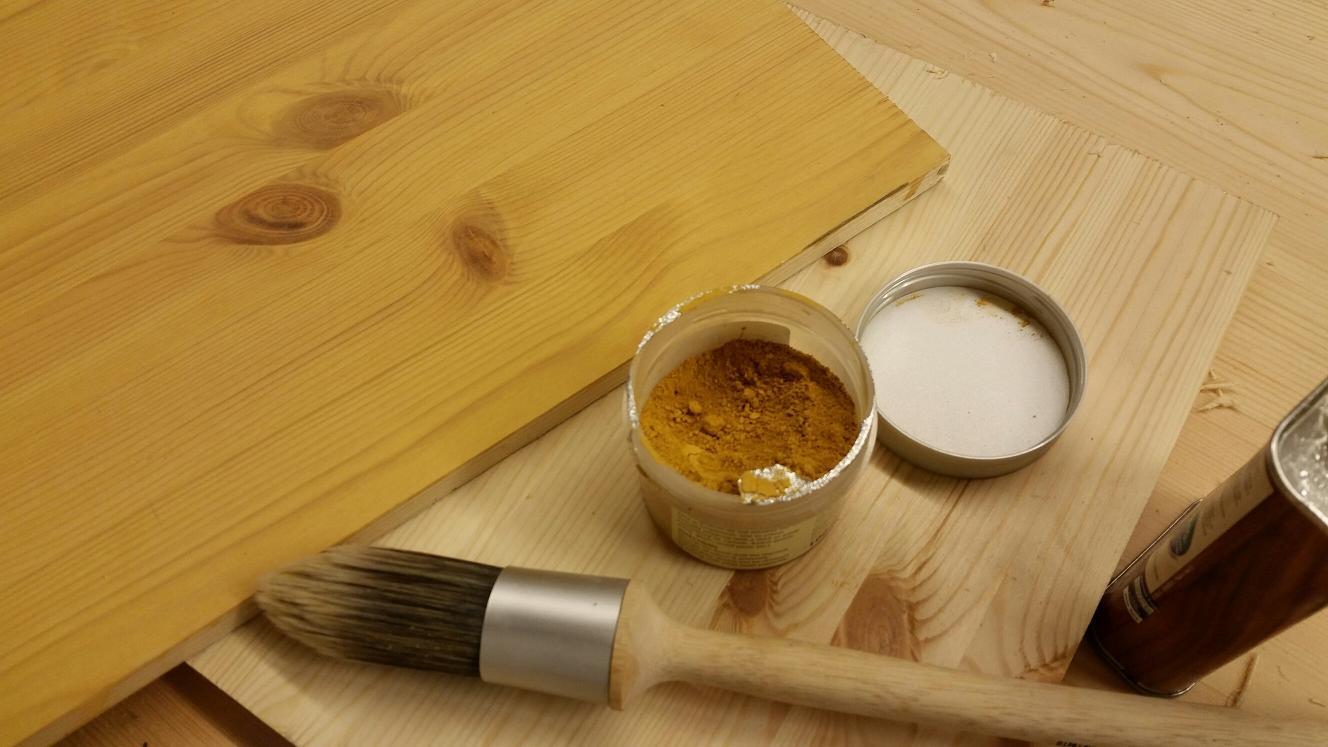
So after consulting the texts, one thing I seemed to miss was a basic recipe for paint so I just got stuck in. Liberon* had all the bits required. I bought small tubs of Liberon pigment, some boiled linseed oil and some turpentine.
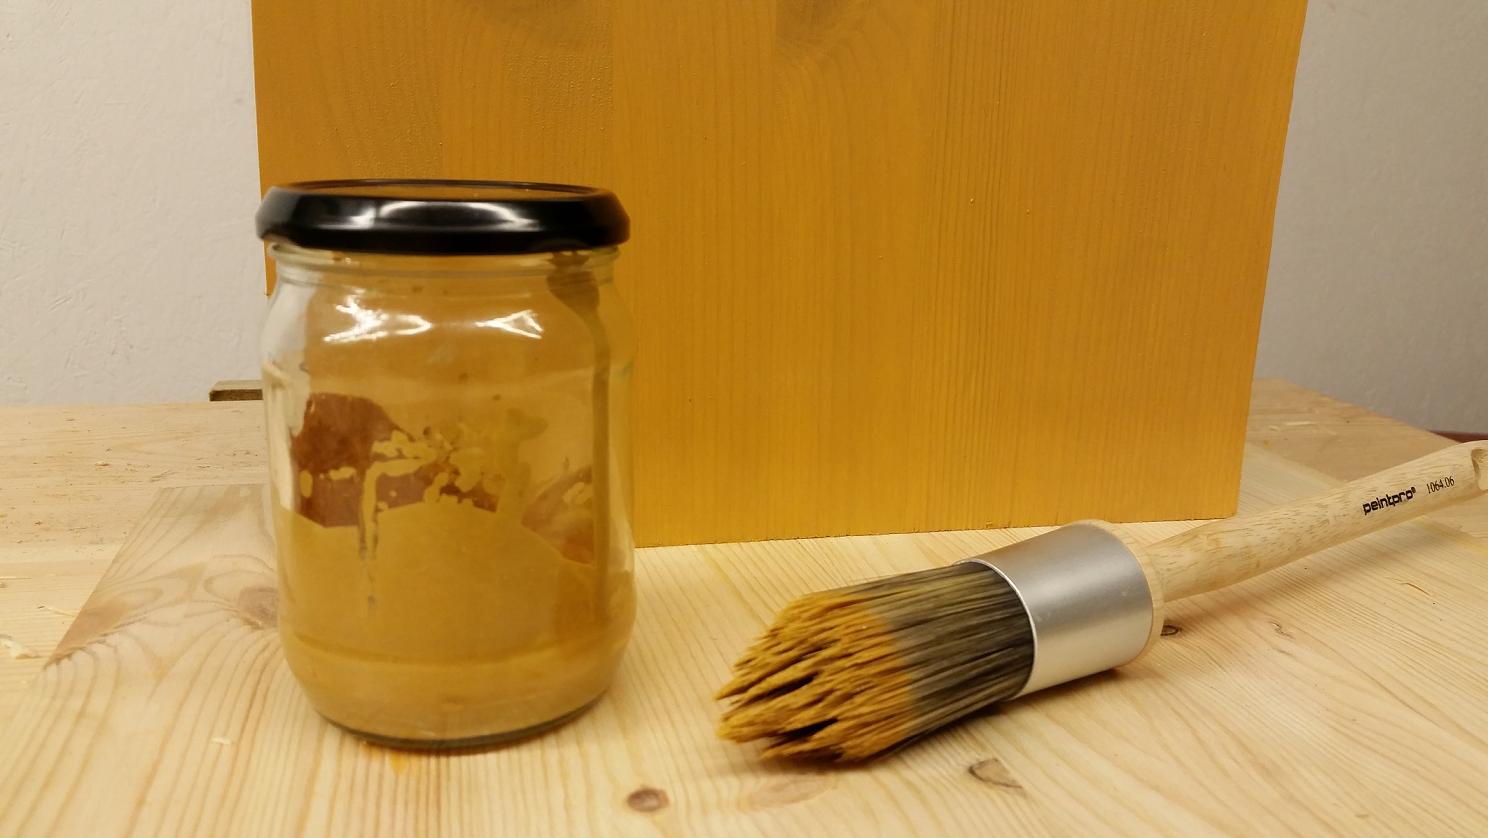
The first coat is the primer coat and this needs to be thinned more than the following coats. I made this with a 50 percent linseed oil and 50 percent turpentine mix and enough pigment to give the colour I wanted. As this is new territory for me, I tried the primer on a scrap board; the last thing I want to do is ruin a project at the last moment. This primer I made created a colour wash of sorts that leads me to think I could have used a touch more pigment (see the above) – but not too much, as the primer needs to be thin to key nicely .
The following full coats I’m applying will be a ratio of two parts boiled linseed oil, one part pigment and a small dash of turpentine. You can see the first coat over the primer in the first photo. This will be applied in thin coats and allowed to dry. With the off-the-shelf linseed oil paints I have found drying is best done in natural but not direct sun light, because UV helps cure the paint. However, this is not a fast-drying acrylic so you will potentially need to wait two to four days before applying the next coat (I’ll confirm my drying times for you once I’m done).
If that all sounds a lot of faffing about I understand that and the modern off-the-shelf paints and ready-made linseed oil paints are very good options. But what gets my juices flowing is an element of discovery in my work. And on the basis I hope my projects will potentially last for many decades (if not longer) waiting a while to get the finish how I want it is OK by me. This paint finish is being applied to my boarded chest project. Once dried and finished I’ll share some photos so you can judge the finish for yourselves.
— Graham Haydon
* Liberon is available online and in most woodworking stores in the United States.
Here are some supplies and tools we find essential in our everyday work around the shop. We may receive a commission from sales referred by our links; however, we have carefully selected these products for their usefulness and quality.


Check out this commercial linseed oil paint: Alback Linseed Oil Paint. This is a linseed oil paint with natural earth pigments. It is made in Sweden from a recipe that is more than 200 years old and thus is truly a traditional finish. The composition is very close to what Peter Follansbee describes in his book. The paint is available from a US distributor (Viking Sales, Inc., 1-585-924-8070). Check out the color chart at http://www.solventfreepaint.com/linseed_paint.htm. The paint has no VOCs, and is all pigment. The coverage is phenomenal. Apply the paint as thin as possible (I warm the paint up in a pan of hot water to thin it out). The paint goes on very opaque. Generally only a second coat is needed, with no intermediate sanding. The finish is satin. The drying time is temperature dependent and is better with thinner coats. You can purchase a vial of siccative (part number 50484) which is a natural drying agent to speed the drying time. The paint is expensive but you can purchase a 7 oz sample of any of the paints for $18.95. This is enough to paint about 5 benchtop tool boxes with multiple coats.
Nice article, Graham. For a slightly updated version of period finishing advice, take a look at The Painter, Gilder’s And Varnishers Companion, H.C. Baird, editor, 1850. In particular, p.45 on oils and p.97, Painting In Milk at http://www.shopwoodworking.com/the-painter-gilder-and-varnishers-companion-w1469
I haven’t tried making paint yet, when I painted my tool box the premixed paint cost less than if I’d made it myself. I am making my own putty now with whiting and oil, and added chalk line chalk to it, red in my case, for a better color match for the red cedar I was using. It’s easy, and you can mix what you need, to the consistency you want. I’ve used chalk line chalk for milk paint pigment in the past. I’ve also used pottery glaze, you can get it in a wider variety of colors than chalk line chalk. Both cost a hell of a lot less than those little containers of pigment. You don’t feel you have to be stingy with the pigment.
The red chalk used to have more intense color than what you can buy today. I’m guessing it had lead in it back then.
This is an interesting experiment, if for no other reason that mixing my own paint would likely upset my wife somehow. I’m wondering, are the pigments used limited to a lighter tone? I know that at one time nearly all paint had a linseed oil base, I’m just wondering if it limits the tones that can be achieved.
Ancient memory from art school days reminds me alumina hydrates is a better filler for paint than chalk. While I’m at these memories if one colour bleeds through another a bit of french polish will block it.
I too have been experimenting with making my own oil based paint. It’s a worthwhile exercise. Might I add to anyone interested in trying it for themselves:
1. Adding very finely ground chalk increases the opacity and thickens the paint. This gives you better coverage in fewer coats without having to add more pigment (which can sometimes be very expensive). Also, with dry times being long, this is helpful. Experimention is needed to know not to add too much chalk as that will weaken adhesion. Nevertheless, I have found a certain amount of filler is actually beneficial to the paint. Even though chalk appears white and you’d think it would affect the color of your paint, it does not.
2. Straight oil with pigment creates a totally flat (non-shiny) paint. Most of the time this is what I prefer. However, degrees of glossiness can be achieved by adding certain oil soluble resins. Damar, for example dissolves readily into turps and can be added to the oil. The resin also acts as a binder and increases adhesion. Experimentation with the addition of resins can also affect moisture resistance and durability.
3. I have samples of painted wood with linseed oil paint I have made that have been sitting outside in direct, harsh sun and rain for about 7 years. It still looks really good with no flaking or color fading.
4. I have found it is not always necessary to add thinner to the paint. In this case, linseed oil paint is very environmentally friendly.
5. As an aside, while it is harmful for people to inhale turpentine, turpentine in non-photochemically reactive and completely biodegradable. In my opinion, it is less harmful to the environment than mineral spirits.
6. Adding a little Japan dryer can shorten the dry time to 24 hours. When the weather is warm and dry, I’ve painted coats that were dry to the touch (dust free) within a couple of hours and ready for next coat by the next day.
7. Finally, if you live in the Los Angeles area like me, you literally can not find oil based paint commercially available and therefore you must make your own. So give it a try!
Jack Ipekjian
I really like to see how the old techniques can be adapted to today’s work, so I really like this article. I have a quick question; when you wrote “The following full coats I’m applying will be a ratio of two parts boiled linseed oil, one part pigment…”, I assume you mean parts-by-weight. Is this correct?
Thanks,
Eric
Thanks Ken, it seems to be working well at the moment. I’ll update with drying times and the finished article as soon as I can.
Cheers
G
Well done Graham, some great info their buddy. It will be Interesting to see how the chest turns out. Good job