We may receive a commission when you use our affiliate links. However, this does not impact our recommendations.
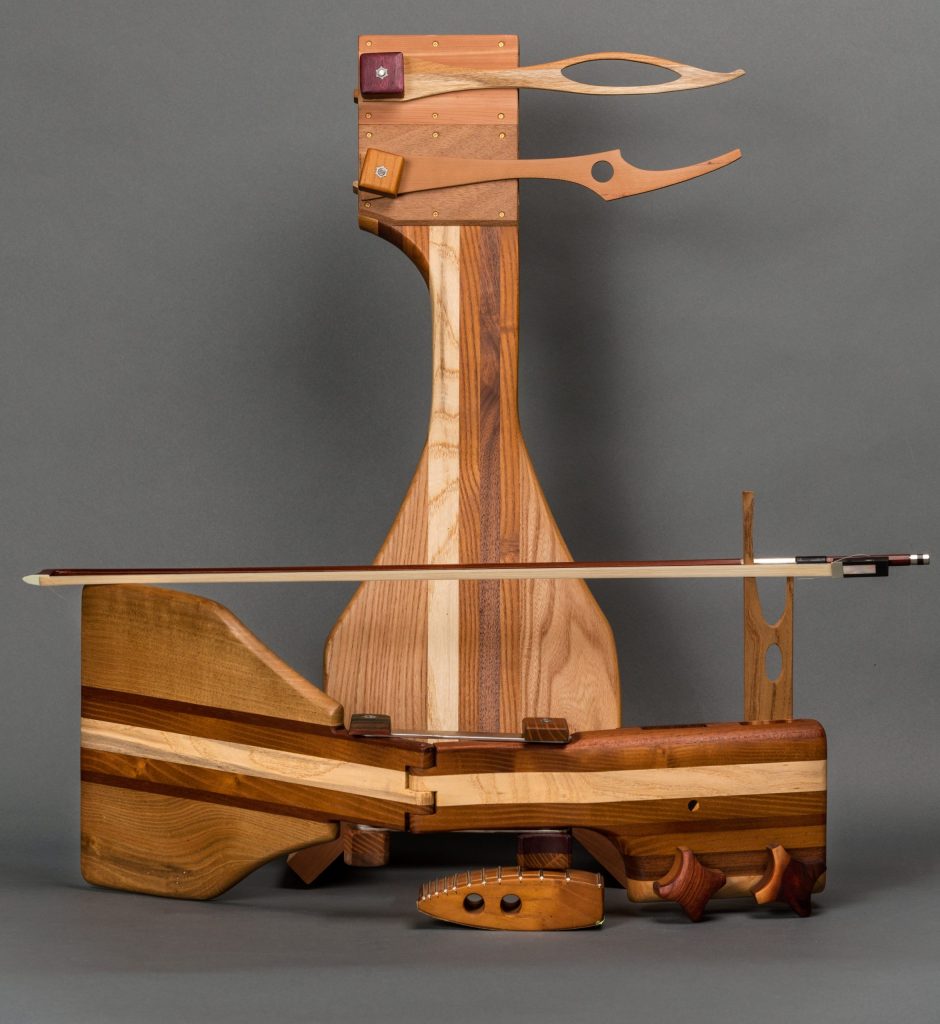
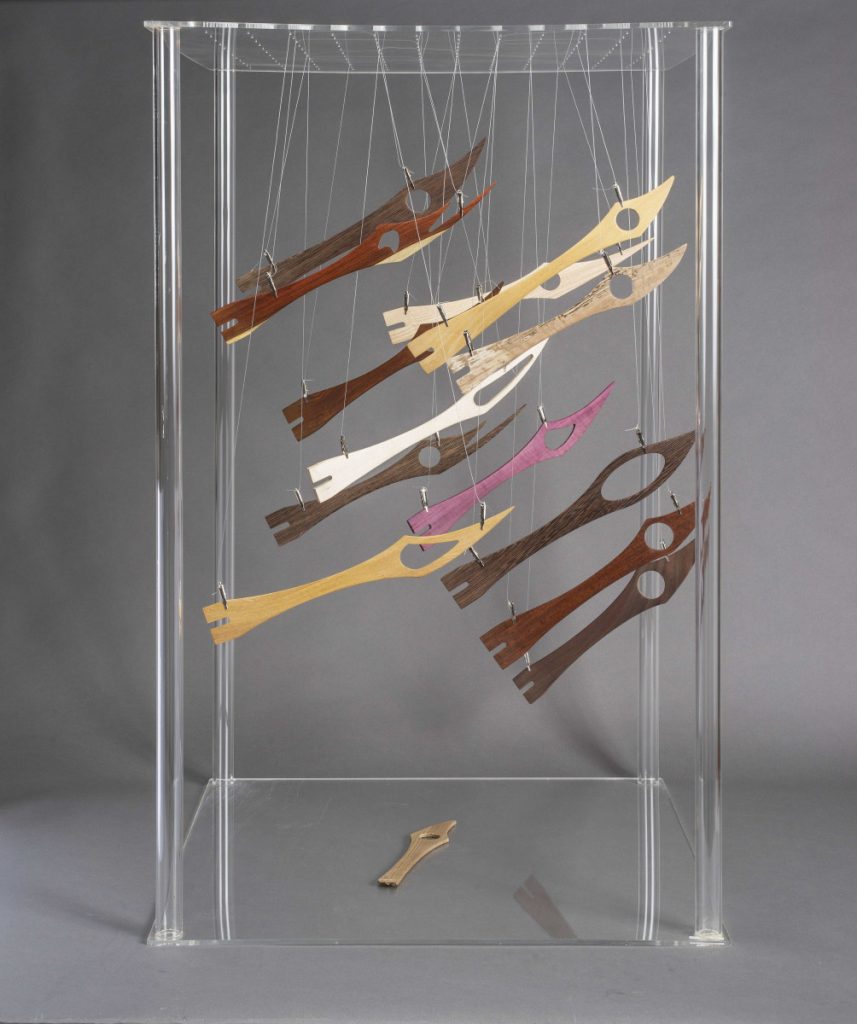
A recent daxophone by Daniel Fishkin, 2017, photo by Ben Tran.
Hey! My name is Daniel, and this is the first of three posts about the daxophone, a very special and strange musical instrument that not many people know about outside communities of experimental music. The daxophone is a thin hardwood strip, which when set into vibration by a bow, can sound like the human voice, a violin, or a frisky woodland mammal. The daxophone is a rather new musical instrument, invented in 1987 by German font designer and musician Hans Reichel. There is no specific or “classical” way to make it—its form could vary widely between different luthiers. I have been building daxophones since 2005, and in this guide I will detail some things I’ve learned along the way. This will not be a how-to-do guide, but rather, how-I-do. Creative tinkerers can easily build their own daxophone with a little effort. I hope that you, dear reader of Popular Woodworking, will be inspired, and give it a try.
But since this is a musical instrument, let’s start off with a video, so you can hear how it sounds, and see how it is played.
Now, how does it work?
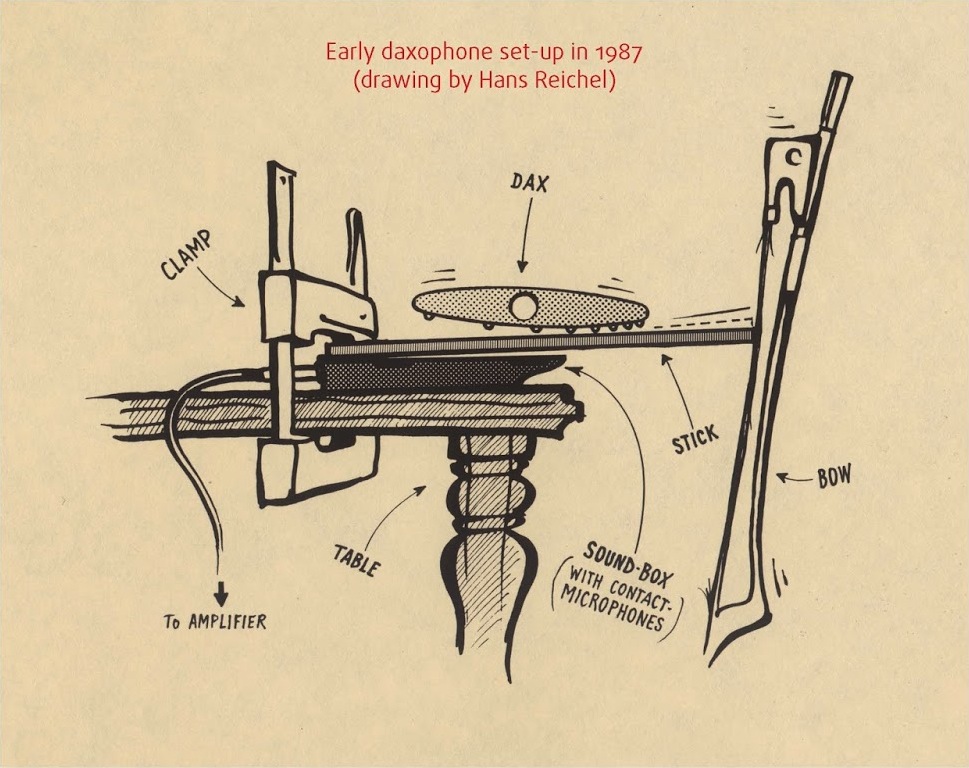
Reichel’s first daxophone set up.
As Hans Reichel wrote in the liner notes to Shanghaied on Tor Road: the World’s First Operetta Performed on Nothing But the Daxophone, the daxophone “is essentially made up of four parts, two of which are joined together mechanically, and two of which are not.” These parts are:
- The Tongue (the thing that vibrates)
- The Bow (the thing you use to make the sound –pencil is okay, too. Really, anything can be used as a percussive or semi-percussive tool to get the thing to sing.)
- The Dax (the curved thing you use to change the pitch)
- The Soundbox (the way you anchor the tongue and subsequently amplify its vibrations)
These components can be developed to various degrees of sophistication. You can shave away to perfection on any of these parts, or you can make a crude-yet-functional daxophone in two minutes using only a C-clamp, a ruler, a bow, and a table. In this blog series, I will deal with these different parts separately.
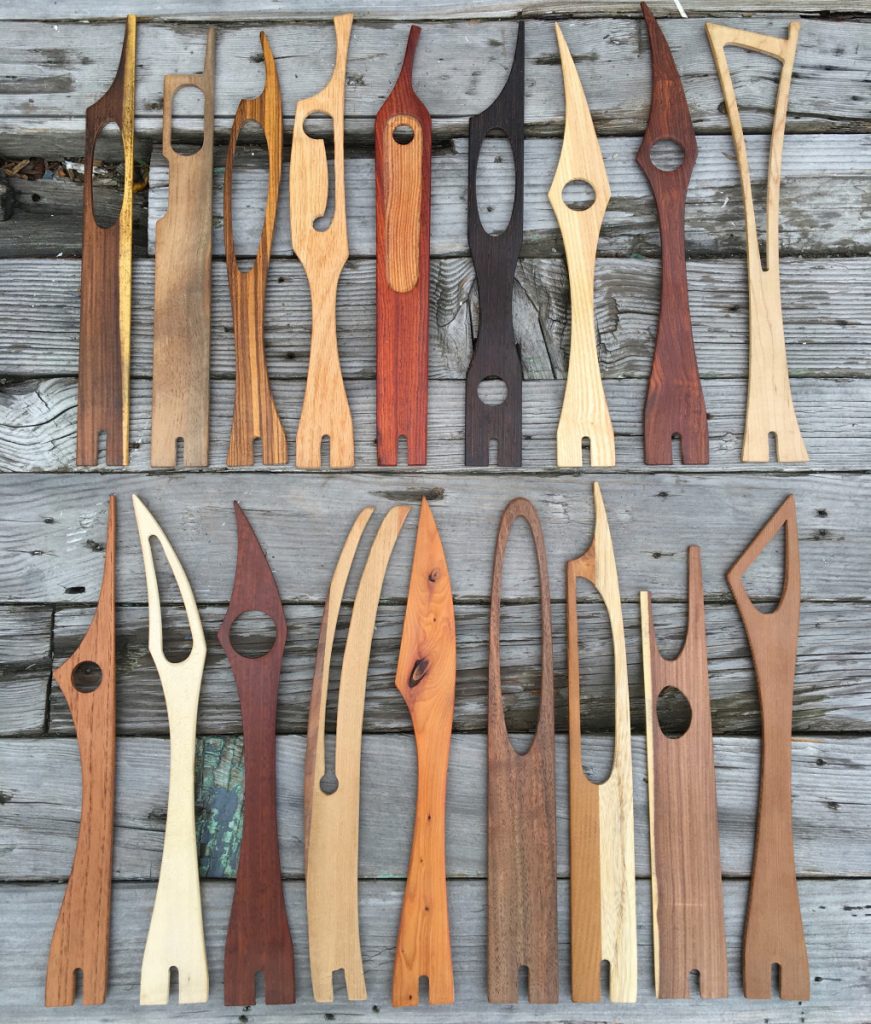
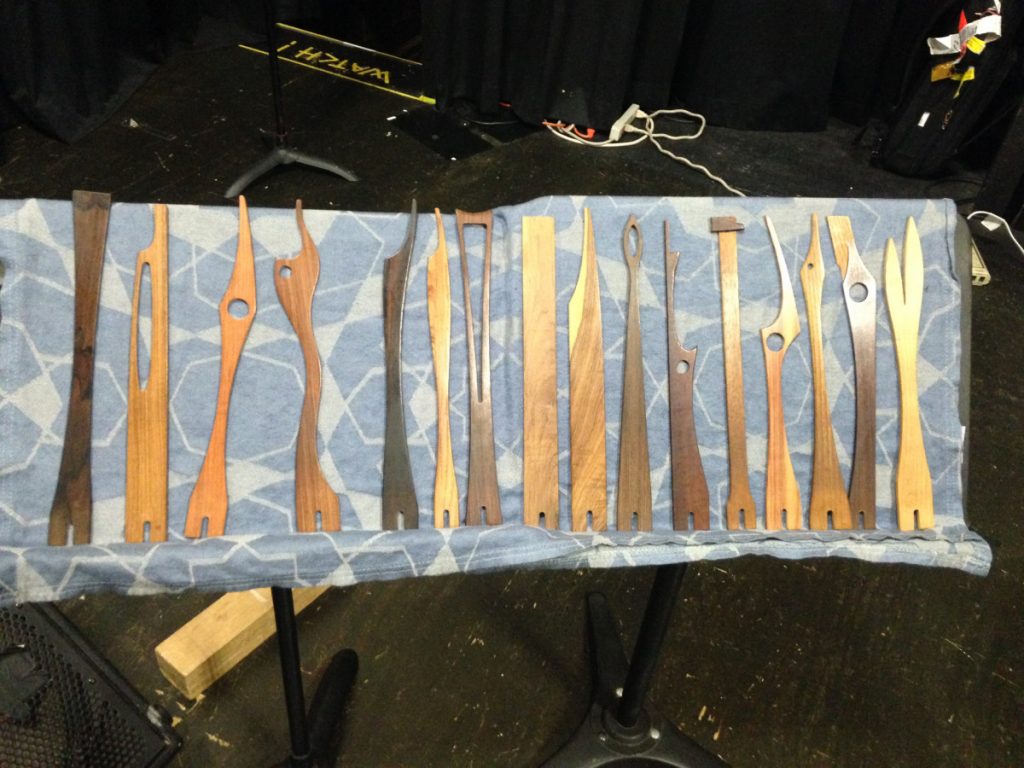
My current favorite daxophone tongues, tried and true in countless performances. Top row L to R, rosewood (this one is from 2005!), black walnut, zebrawood, red oak, cocobolo/pine, wenge, ash, cocobolo, maple, Spanish cedar, box elder, snakewood, walnut/sassafras/cherry, yew, claro walnut, mulberry/hackberry, rosewood, redwood.
The Tongue
The tongue is the soul of the daxophone. The concept is simple—it’s just a strip anchored at one end. The lamellaphone, or acoustic cantilever, has been developed in many other instruments, such as the mbira, the mechanical music box, and the toy piano. But in the daxophone, some significant changes distinguish it from these other designs. Instead of many sounding elements, only one tongue is played at a time. The tongue is much larger, and shaped like a flat strip rather than a cylindrical rod. The dimensions of this strip are variable, but I usually explore between 12″-15″ long, 1″-2.5″ wide, and 3-6mm thick. The entire strip can be bowed, and by playing different regions of the strip, you can access different musical ranges, from bass to sopranino.
Because the daxophone is literally only wood—no strings or air column—every change you make to the wood therefore changes the sound. Starting with the shape of the ruler, different relief cuts open up new ranges in the instrument. Hans Reichel was also a font designer, and he created an entire font of daxophone shapes, which he called Daxoph, so people could print out templates of his designs. But a careful look into Reichel’s work suggests that this font is just a jumping off point, rather than a taxonomy—as many as 409 tongues are documented in a group photo of sorts, detailing a stylistic evolution over 25 years of instrument building. To some degree, the particularities and subtleties of these shapes are mysterious and/or arbitrary. Even after building hundreds of daxophones, while I have an intuitive feeling about what a certain shape might sound like, I am often surprised. Each tongue ends up unique.
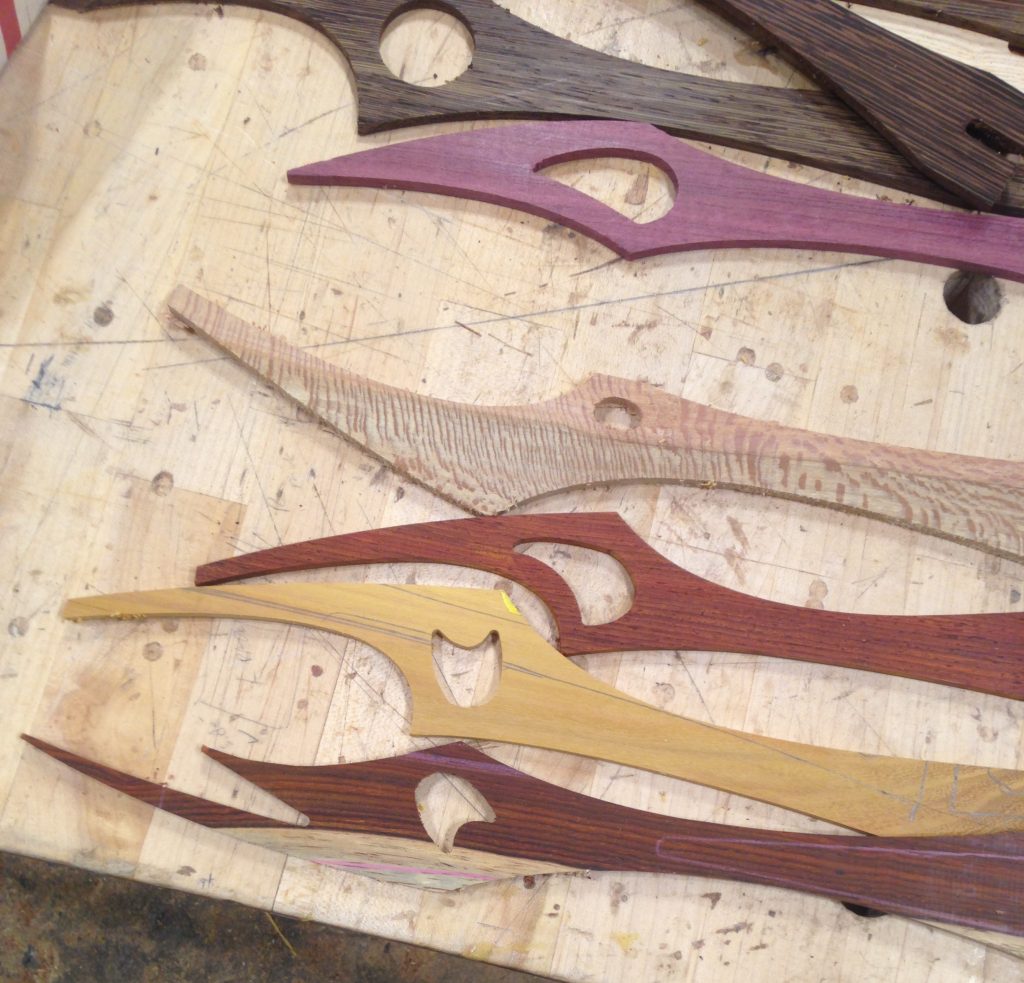
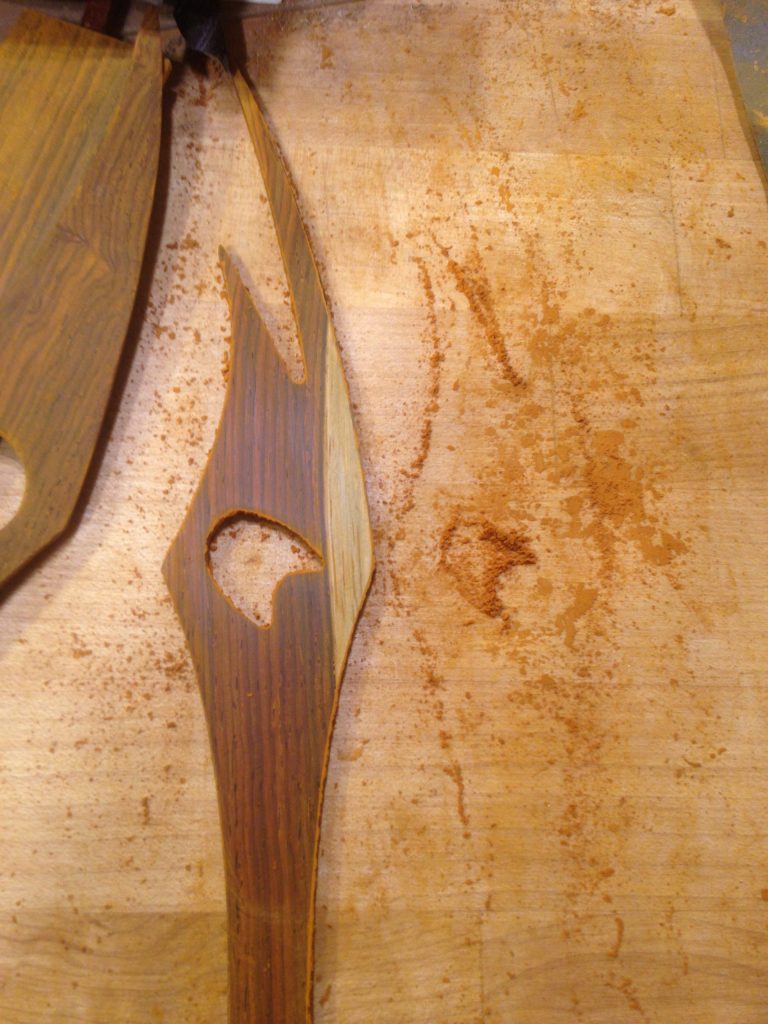
Some unfinished tongues on the sanding bench.
Some answer to this mystery must lie in the wood itself. All species of wood sound different—wenge sounds like a scratchy blues singer, African Blackwood has a piggish chortle, and cedar can wail like a cat in heat. But these are generalizations—I could go on and on about the particular tonal qualities of different wood species. Reichel seemed to favor the exotics, such as the rosewoods, bubinga, zebrawood, amaranth. Though I can’t deny my reverence for these majestic tropical woods, I am a native of Pennsylvania, and I have made a great effort to celebrate the large diversity of local trees here. Mulberry and ash, for example, are favorites, as are walnut, osage orange, sycamore, maple—the list goes on. The many types of maple remind one that there is so much variation even between one particular species. On this, Robin Wood, the master bowl turner says: “I always get asked what my favourite wood is. But that’s like saying what’s your favourite race of people, as if every beech or sycamore tree is the same. I don’t think in those terms at all. I think in terms of individual trees.” Hans Reichel wrote, “Even two pieces of wood cut side by side from the same block, do not sound identical.”
The daxophone is a musical instrument, and you can play lots of different types of music on it. Here’s an old recording from my now-deceased punk band, Dandelion Fiction, which showcases the daxophone in a song-form context.
So, how to build tongues?
Building Daxophone Tongues
I usually prepare daxophone stock by resawing larger blocks into strips, and then follow up with the thickness planer until the stock is about 4-6mm thick. Depending on the wood I’m using, I might be very picky about “pre-finishing”—sanding or scraping to a finished surface before I even begin to cut my shape. There are two main tools that I like to use for cutting tongues: the scroll saw, and the CNC router. After cutting out the shapes, depending on how things have gone, they may be near complete or quite rough. I finish them up with files, rifflers, or a little spokeshave that can really perfect a tricky curve.
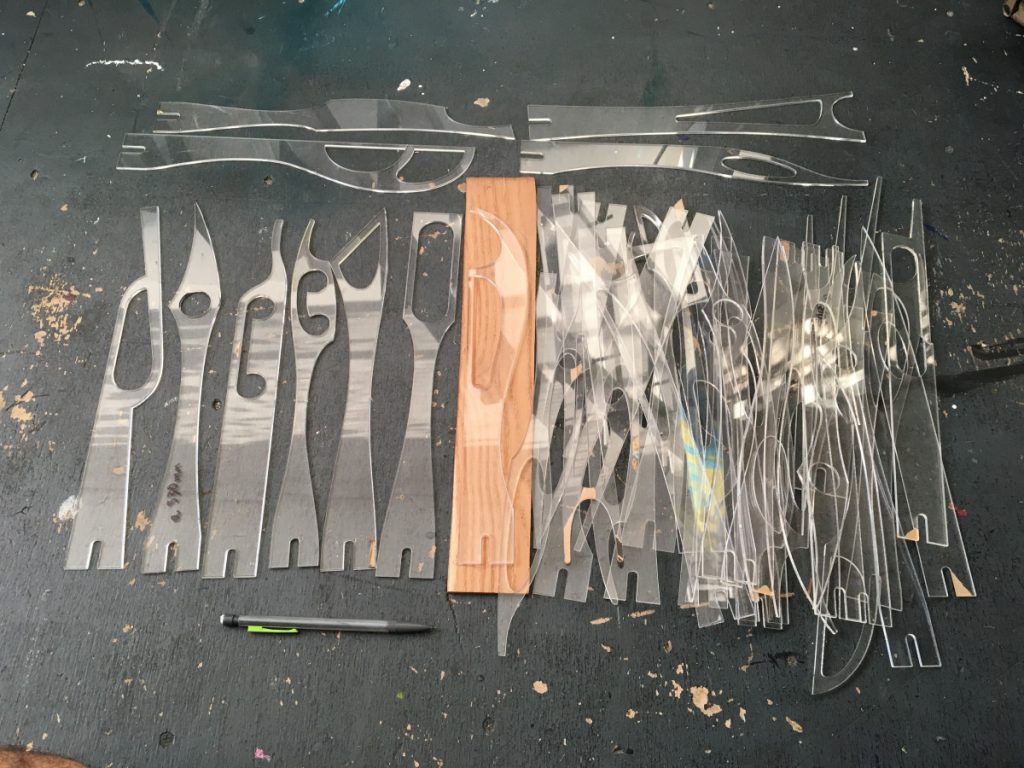
Here’s a slew of daxophone tongue templates. I use these for tracing patterns onto daxophone blanks, before approaching the scroll saw. The great thing about the clear plexiglass is that you can see the grain. I sometimes move these around to change the shape while tracing, if I’m trying to include a particularly interesting pattern.
The scroll saw has been my main jam since 2005. Before I knew anything about woodworking, I was using the scroll saw to cut thin scraps into primitive daxophones. The process is simple—I use templates or draw my shape freehand on a thin piece of wood. Then I cut out the tongue. I would not advise using a bandsaw for daxophone tongues. The set on bandsaw teeth is a little rough, and leaves pronounced marks in the wood. Whereas, the extremely small kerf and fine precision of most scroll saw blades offer a finished cut that is very smooth, almost burnished. If I’ve done a good job on the sawing, I hardly need to use hand tools or sandpaper to perfect the shape. Also, the tiny scroll blades can pivot along the most nuanced daxophone curves, and you can do interior curves too. Lately, I have been using Flying Dutchman saw blades, which leave a wonderfully polished surface, and can handle even the densest hardwoods with no problem. I am not sponsored by Flying Dutchman at all—I just really like their product!
15 daxophone tongues cut on the CNC machine in the fabulous Makerspace at NextFab.
I’ve only recently begun to work with the CNC machine, which I first had access to through The Center for Art in Wood’s Windgate ITE International Residency Program, of which I was a Fellow in 2017. This residency was housed at NextFab, a fabulous Makerspace in Philadelphia, where most of these pictures were taken. I wanted to use my time during the Windgate Ite Residency to make a very thorough study of all aspects of daxophone building. It was also the first time I ever had access to a CNC machine, so during the residency I decided to learn the technique and craft of the CNC, even designing my own shapes on the computer. The CNC will cut very complex shapes exactly, and repeatedly. This makes it possible to conduct a very systematic study of the sounds of different wood types, keeping the shapes consistent between cuts.
The furniture maker and craft writer David Pye has this wonderful terminology, “worksmanship of certainty” and “worksmanship of risk”—that he uses to describe the gamut of activity between the handmade and the mass produced. He writes, “the most typical example of worksmanship of risk is writing with a pen, and of the worksmanship of certainty, modern printing.” So much of woodworking is about certainty—jointing and planing stock so its faces are parallel, maintaining proper fit for joinery, cutting to precise dimensions as they are marked, etc. You line everything up, before cutting, and if you’ve measured correctly, it works out. In some ways, the furniture is already designed before it is cut, and skill in craft is about proper execution. But in woodturning, even if you have a design you’re trying to produce, each time you approach the material with the gouge, you are taking a risk—you don’t know what is going to happen, what’s inside the wood, or whether your body will do what you intend it to. (I am indebted to the great wood artist Mark Sfirri for delivering this lovely comparison verbatim, in the summer of 2016.)
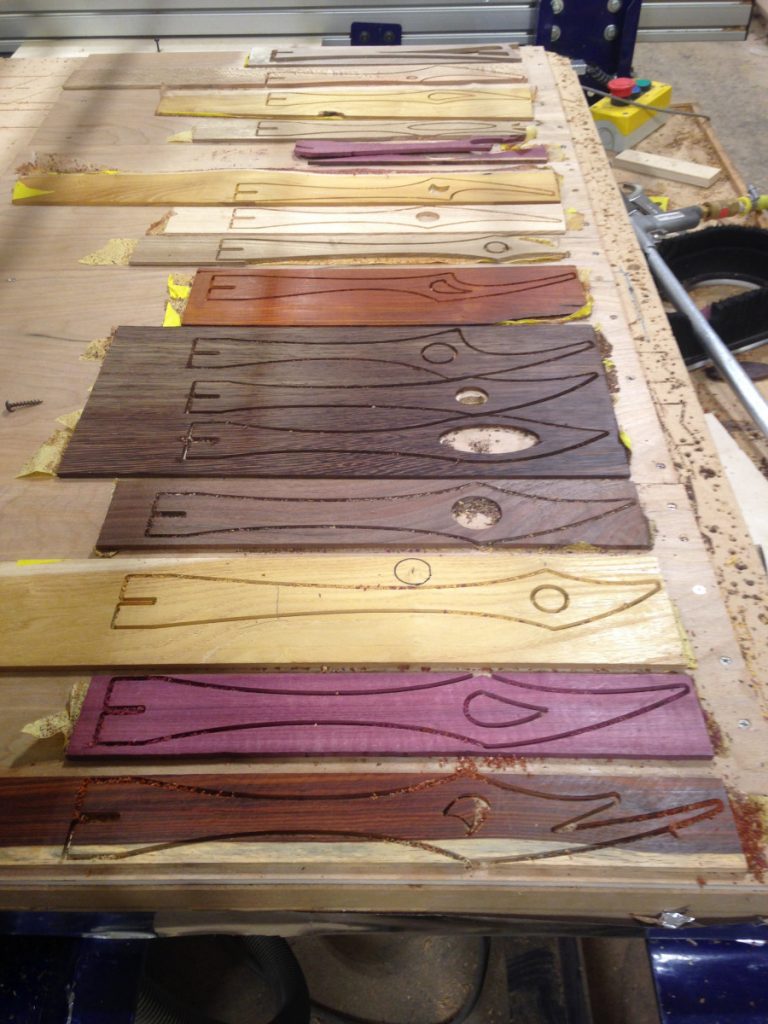
This group of tongues were cut on both the scroll saw and the CNC. All tongues are a variation of the letter “A” in Reichel’s Daxoph font.
The scroll saw is a woodworking tool that is full of risk. You can improvise with it. You can doodle with it. Sometimes, I notice that I may have gone outside of my marked line, but if just keep the movement of my fingers fluid, I will retain a smooth curve despite my deviation from the template. I’d rather have a perfect cut that swerves slightly away from my intention than fix it later with the file or spokeshave. In this way I never end up making the same tongue twice, and I delight in the variations of this handwork. Conversely, the CNC machine is a tool for certainty. You design the daxophone tongue on the computer, affix the wood to the table, and it will be cut just the way you designed it. Working with the CNC allows you to become a more deliberate designer. I have made numerous studies of particular “letters” in the Daxoph alphabet by Reichel, pushing the curves in every direction in order to see what happens to the sound.
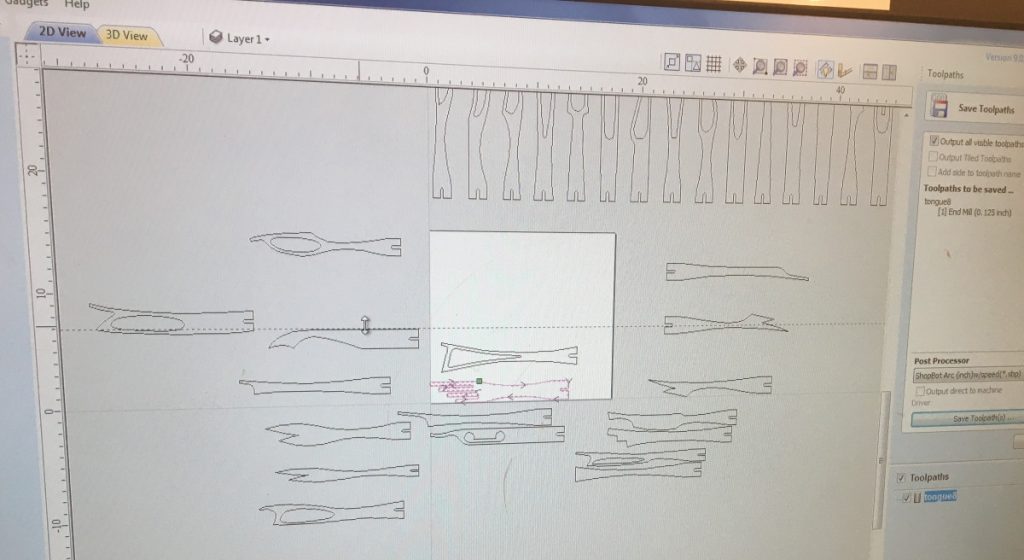
Translating the Daxoph font to VCarvePro, and modifying tongues for new instruments.

If you look carefully at this picture, you can see that I’ve gone inside and outside the traced line. But this isn’t a problem for the daxophone, and since I’ve kept the curves pretty smooth, I won’t have to do much sanding to perfect the tongue.
The only thing left to discuss is finishing. Of course the face of all daxophone tongues can be sanded, planed, or polished to a beautiful degree, to show off the wonderful grain therein. But you, as a woodworker, know this already, and you surely know that some woods don’t sand as easily as others, and that the smoothing plane or card scraper might be a better friend to these woods than 1000 grit sandpaper. However, it is absolutely important to mention that I never apply a liquid coat of finish on the daxophone tongues—no oil, wax, varnish, whatever, nothing! I might be a ruthless purist in this regard, but remember, the bow is making contact directly with the wood—oil might interfere with the friction of the bow-rosin. (I’ll look forward to new daxophone innovators discovering magical varnishes that improve the tone of the instrument or whatever.) So, without the luxury of using oil finishes, you have to be really serious about sanding, and I enjoy putting on a beautiful polish with ultrafine steel wool, sometimes brass wool, or scotch-brite.
Sanding a cocobolo tongue.
Lastly, the unseen bit of daxophone finishing is its edges. A sanded edge of course sounds totally different from a planed edge, or one that has been worked with a newly sharpened spokeshave. This part is all about listening to the wood. It is possible to sand the edges too much, making it squeak too much while playing. You can always change the polish on the bow contact point by scuffing it with a heavier sandpaper, or using a blade. You can also improve the intonation of the instrument by breaking the perpendicular edge of the tongue with a bevel or chamfer, or even a taper that resembles a knife’s edge.
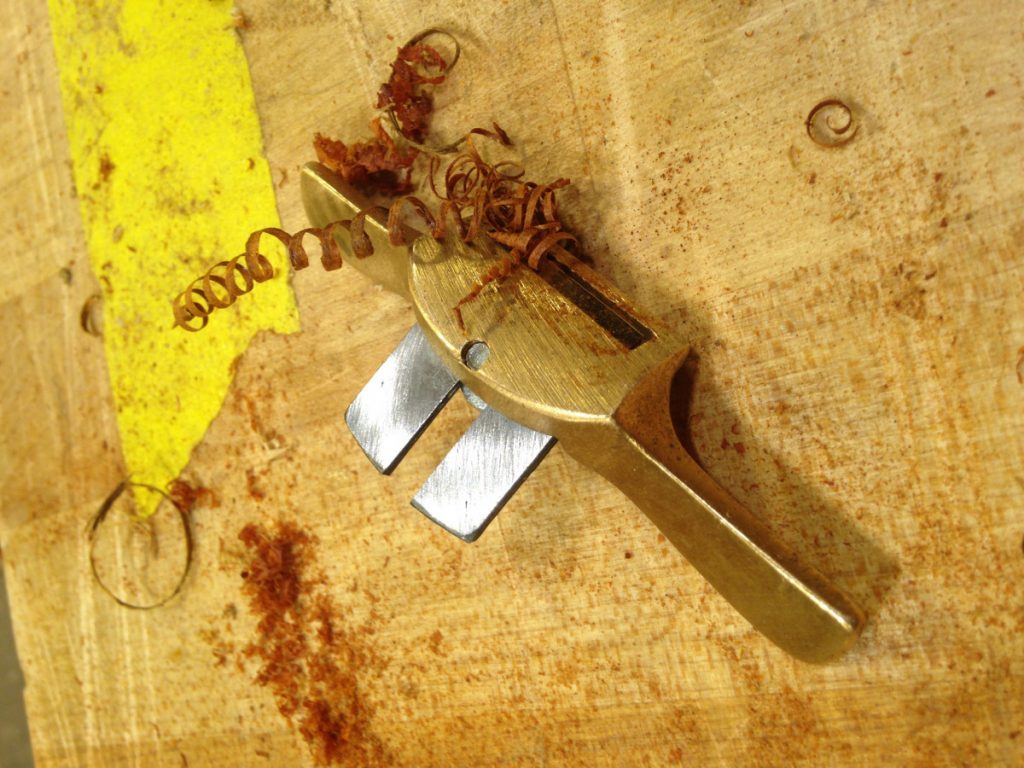
I love this little finger spokeshave for detailing the curves of a daxophone tongue.
My last bit of advice to you is to just give it a spin. Start with the “ruler” and go from there. I have gotten a lot better at woodworking since 2005, but a good daxophone tongue will sound good even if it looks simple, or even a little weird. Some of my first daxophone tongues are still in regular playing rotation! They don’t look as fancy as what I’m capable of nowadays, but they still sound amazing.
Kazuhisa Uchihashi’s daxophone quiver, Philadelphia, 2017. All tongues by the master, Hans Reichel.
In 2017, I hosted the great Japanese daxophonist, Kazuhiza Uchihashi, in Philadelphia for a daxophone workshop and duo concert. Kazu plays daxophones made by the master himself, Hans Reichel. At the show, I was surprised to see Kazu’s preferred quiver of Reichel tongues were actually mostly simple shapes. Sometimes, a complex shape will sound boring, but a simple-looking tongue might have a world of music inside it. In my quest to improve my craft, I try to remember this truth—the sound is already in the wood, and it is up to the daxophone maker to bring it out.
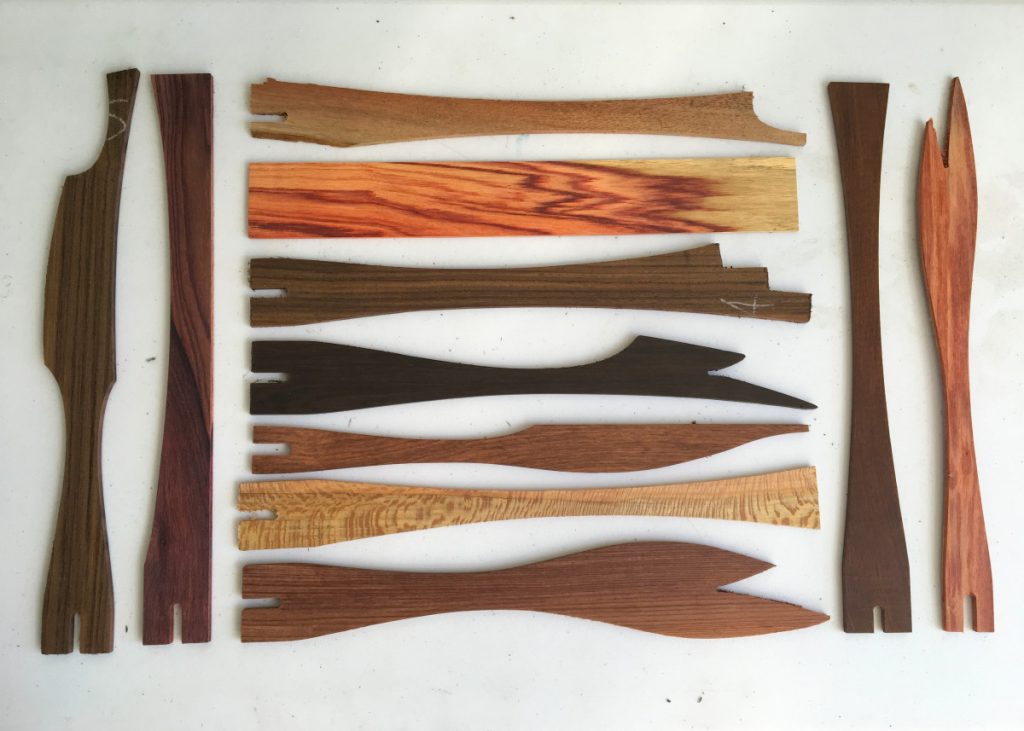
Some in-process tongues with more modest shapes, before sanding.
Thanks again to The Center for Art in Wood, and to NextFab for the support and inspiration. Stay tuned for part two, when we will cover how to build a soundbox, to amplify your instrument!
Daniel is the type of composer that is more likely to reach for a soldering iron than a pencil. He has performed as a soloist on modular synthesizer with the American Symphony Orchestra, developed sound installations in abandoned concert halls, and played innumerable basement punk shows. To see more of his work, please check out his website here.
Here are some supplies and tools we find essential in our everyday work around the shop. We may receive a commission from sales referred by our links; however, we have carefully selected these products for their usefulness and quality.