We may receive a commission when you use our affiliate links. However, this does not impact our recommendations.
You can now get both Dutch tool chest plans – both the big one and the little one – in the October 2013 issue of Popular Woodworking Magazine, which recently shipped to subscribers.
If you don’t have this issue, check it out in the store here.
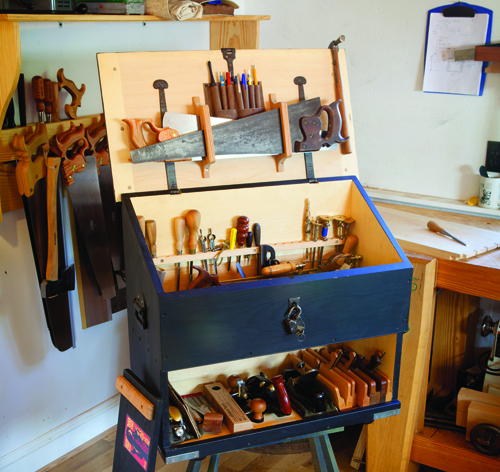
I’ve been traveling with these chests all year and can vouch for them as a fantastic way to carry your tools to a woodworking class and protect them in the shop. Despite the chests’ small size and simple construction, they are remarkably efficient. The big Dutch chest can hold as many tools as a full-size English floor chest and requires less space and fewer materials.
The other nice feature about the chests is that they are nice to work from. They hold all your tools in a way that you don’t have to dig around or move trays to get to the tool you want.
What’s the disadvantage? Well I don’t think they look as nice as the traditional English floor chest, and the joinery on the Dutch chests is more “rough and ready.”
If you are contemplating building one of these chests, here are some resources for you and some thoughts from readers who have already built theirs.
DIY Tool Chest Tours
For a closer look at each chest, take a look at these two short videos I shot in January. You can see how the interiors are set up and then loaded with tools.
Hardware
There are lots of options for hardware for these chests. For the large chest, I used strap hinges from Lee Valley Tools and made my own lifts.
The Lee Valley hinges can be found here. I used the 7-1/2” x 3-1/2” ones. (Don’t forget that you’ll need to buy screws.) The hinges come pre-rusted; I stripped off the rust to get to the raw iron. Nice.
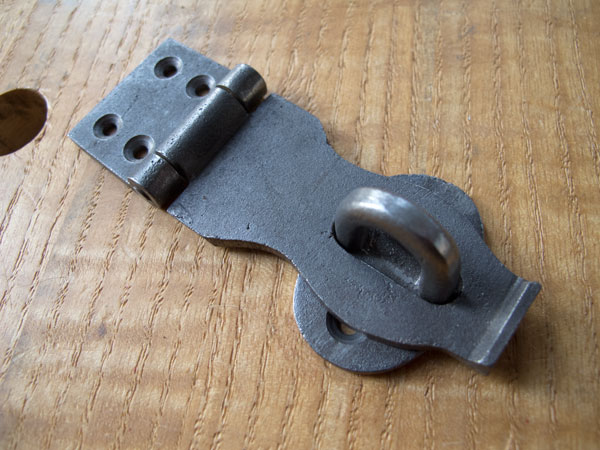
For the small Dutch chest, I went overboard and bought blacksmith-made straps and a hasp from John Switzer of Black Bear Forge. They are excellent, and I recommend them.
One of my students had built the Dutch chest using strap hinges from Nathan’s Forge. I ordered some a couple weeks ago, but I haven’t received them yet.
The lifts on my small chest were – at first – iron ones that I bought off eBay. Similar iron ones can be purchased from Lee Valley here. Since then, I replaced them with cast brass ones.
Since I wrote the article, I found a good (and inexpensive) source for the hasp and iron padlock. VanDyke’s Restorers now carries these items. Check out the iron hasp here. The padlocks are here.
Construction Variations
During the last eight months I have fielded a lot of questions about these chests, both from students and blog readers. Here are some common ones:
1. Do I have to use pine?
Nope. Just use the cheapest, lightest wood that is available to you. As with all tool chests, weight is a primary concern. If you are ever going to move the chest, choose a lightweight species.
2. Can I use a frame-and-panel back instead of the tongue-and-groove or shiplap back?
Absolutely. However, I would make the panel as thick as the frame members. The back of this chest takes a lot of abuse.
3. Do I have to use screws?
No. You can use nails (I recommend cut nails) or even wooden pegs. I used screws because I found them commonly used on these chests.
Finish
I finished both of my chests with General Finishes black “milk” paint. I put “milk” in quotes because I don’t think it has any casein in the mix. The stuff looks nice and is easy to apply – plus, no mixing.
If you want a chalkier finish, consider using a milk paint from Old Fashioned Milk Paint or Real Milk Paint. As to color, the most common color of these chests is blue, historically. I chose black, which is more of an English color.
After applying one of the chalkier finishes, consider adding a coat of boiled linseed oil, wax or varnish over the paint to add some sheen.
— Christopher Schwarz
Here are some supplies and tools we find essential in our everyday work around the shop. We may receive a commission from sales referred by our links; however, we have carefully selected these products for their usefulness and quality.


Do you see any problems with lengthening the chest to hold a full-size handsaw?
For more antique and old model Hasp, here you could check. Hasps Black Wrought Iron Hasp 1 1/2” H x 14 3/4” Wide. I am sure you will like this.
http://www.rensup.com/Hasp/15778.htm
Someone please help. I know that I have seen a video where Chris gives his formula for the tool holder. I believe ti goes something like – 1/2 ” holes on 1 1/8″ centers. Can someone please direct me to the video or at least let me know if my memory is correct? I know it should be easy enough to come up with something that works for the tools I have today. However, I don’t have near the experience adding tools over the years as Mr. Schwartz, so why not try to benefit from experience? Thanks for your help.
Just finished my version of this chest. The smaller one, using old pine and some pine-ish boards from the BORG. Now all I need to do is trick out the insides. My first dovetails on the bottom worked pretty well – practicing first helps! Also, first time using milk paint. Then two coats of satin General Finishes finish. I did paint the inside – simple off-white from a spray can because the pine was old and stained. I wanted a clean look, and the off-white is perfect – not too bright, but hides the blemished.
Thanks for the idea! The English chest I’ve wanted to build, but my hand tool shop is only 12 x 12, so there’s not a lot of room. This chest is perfect for my space!
They are one of the best looking and yet functional tool chests that I’ve seen. But shouldn’t the strap hinge’s short end be screw on the inside? Outside, it would defeat the hasp and lock completely, Chris.
Chris,
Can you please elaborate on the hardware you used to attach the handles to the side of the small chest?
Speaking of chests, I’m really happy to have my grandfathers’, a massive thing in cypress and walnut for protecting tools in bad weather in south Florida. It looks similar to this one I saw on craigs this morning:
http://boston.craigslist.org/sob/tls/4028162556.html
While it’s got handles for carrying, it’s not nearly as portable as the one you’ve made.
Chris,
Just a thought from a complete novice. I note the chest is used above floor level, usually on a stand or chair. How about attaching the top of a French cleat to the back. The schools you visit could mount the bottom, a “courtesy cleat,” at a convenient location & height for your use. Just a thought.
a few questions…
Did you paint the back? Did you add BLO over the paint? A BLO/MS/varnish blend over the paint?
Also, did you add any finish to the inside? Same as the top coat mix over the paint?
I’m making a traitor version from plywood (A chest in hand is better than a chest in mind). I’m wondering if you painted your ATC traitor’s version with milk paint and how well plywood and milk paint play together. The exposed edges especially. And again, did you add any finish to the inside of the traitor ATC? Do you think a finish on the inside plywood is required? I’m thinking of applying a BLO/MS/poly mix over the entire thing. Maybe just a BLO would be better?
Thank you in advance
It seems to me that you could build the small dutch chest to use when you need portability, then build a matching base on wheels for in the shop that would hold the less frequently used tools. By stacking the two together you could have the best of both worlds. Does that seem feasible?
Chris,
This will be my first attempt at using my new tongue-in-groove LN plane. When you join the back boards it looks like you space them with a ruler in the photo. Do you recommend such spacing on all tng panels? It makes sense to do so, I just have never made one. And thanks for the project, it’s great for a novice like me.
Thanks,
Brian
What would be the alternative joinery options for the front board rather than nailing? The back seems to be able to move due to the T&G but I am concerned with wood movement on that front piece… (in central Texas, so huge variations in humidity throughout the year)
tom
Chris
A couple of questions regarding the dutch chests, specifically the smaller traveling version:
In your ATC book you go to great lengths identifying how the floor chest’s design keeps dust out. What can be done with the dutch chest to keep dust out?
The front is identified as being 7″ high in the cut list, but 7-1/2″ in the 3D view.
The sliding lock notches are identified as being 1/4″ deep in the text (on page 44) and in the cut list, and proportionally (in the picture on page 46 labeled “That’s catchy”); however a 1/2″ notch for the locks is called out (in the text on page 46). What is the purpose for the larger 1/2″ notch called out here?
The fall-front’s edge in the picture captioned “That’s catchy” appears to have a thicker rabbetted lower edge. What is the purpose here?
This smaller version will fit my available space well. Thanks.
Jay
When will the digital version of the October issue be available to purchase?
Hi Chris,
I am just building a ‘traitors’ version of the dutch toolchest using 3/4″ plywood. The building went quite fast, now i am ready to mount the hinges. Question: can you post a picture from the back of the chest? Is the fixed side of the hinge just screwed onto the back board?
Br, Wolfram
Thanks for the update on hardware. While I have a copy of the Anarchist’s Tool Chest, I think the Dutch chest is a better fit for my space.
Lee Valley sells iron screws with slot heads, as does Blacksmithbolt.com. You also can buy them at teh hardware store and strip the zinc off with citric acid.
where do you get the screws for the lee valley hinges?