We may receive a commission when you use our affiliate links. However, this does not impact our recommendations.
If you don’t have a mitering sled you can clamp down the live edge slab onto a rectangular sheet of plywood or MDF and tuck it against the fence of the miter gauges (see explanation on how to use two miter gauges and a fence in my previous post).
When both edges of your slab are “live edge” you can’t rely on them for crosscutting or sawing off accurate miters. This is because tucking a live edge against the fence of a crosscut sled will not provide you with a stable support, nor will it ensure a miter that is perpendicular to the slab’s center line (the line that spans along the length of the slab).
So what should you do? Your best strategy is to clamp down the slab to your mitering sled in the appropriate configuration to ensure a miter that is at a right angle to the center line.
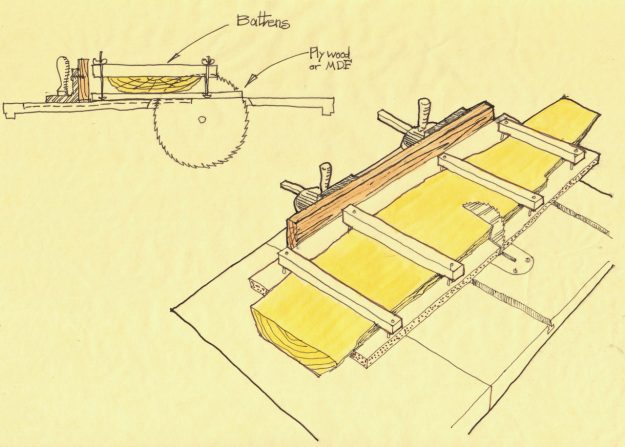
One way to do this is to install a few makeshift brackets that conform to the contour of the live edge (at the location to which they are being clamped down). The brackets should be screwed to the bed of the mitering sled in order to prevent the slab from shifting during the cut. If you have some toggle clamps at hand, use them instead of the makeshift brackets. They are easy to use, plus they allow you to clamp slabs of different thicknesses.


If you have some toggle clamps at hand, use them instead of the makeshift brackets. They are easy to use, plus they allow you to clamp slabs of different thicknesses.
Another option is to make a few battens and use them to clamp down the slab onto the sled. The battens act like clamps and will keep the live edge slab from moving. You can use carriage bolts with wings or regular nuts, or you can use wood screws to anchor the battens to the sled.
To increase friction between the slab and the sled’s bed, place a few pressure sensitive adhesive (PSA) sand paper patches (glued back to back) under the slab in key points. When you glue two pieces of PSA sand paper together you create a very effective friction enhancer that, once placed under workpieces, can prevent them from moving while you drill, cut or saw. I often use sandpaper patches to prevent jerky behavior of workpieces on the drill press when clamping them down is not practical or possible. By the way, there are also some ready made friction enhancers for purchase, as recently reviewed by Chris Schwarz.
When you Don’t Have a Miter Sled
If you don’t have a mitering sled you can clamp down the live edge slab onto a rectangular sheet of plywood or MDF and tuck it against the fence of the miter gauges (see explanation on how to use two miter gauges and a fence in my previous post).
Lastly, if you intend to make many live edge pieces with a waterfall joint, you might want to invest in building a souped-up miter sled equipped with four metal t-tracks and complementary clamps. These jigs, made by a few companies, will provide versatility in situating the clamps over the slabs to provide the most convenient position to ensure a stable and safe cut. Embed two tracks on the right banks and two on the left banks of the miter sled to address all the mitering scenarios that I mentioned in this post and in previous postings.
Next time I will show how to clandestinely reinforce the miter.
Here are some supplies and tools we find essential in our everyday work around the shop. We may receive a commission from sales referred by our links; however, we have carefully selected these products for their usefulness and quality.