


We may receive a commission when you use our affiliate links. However, this does not impact our recommendations.
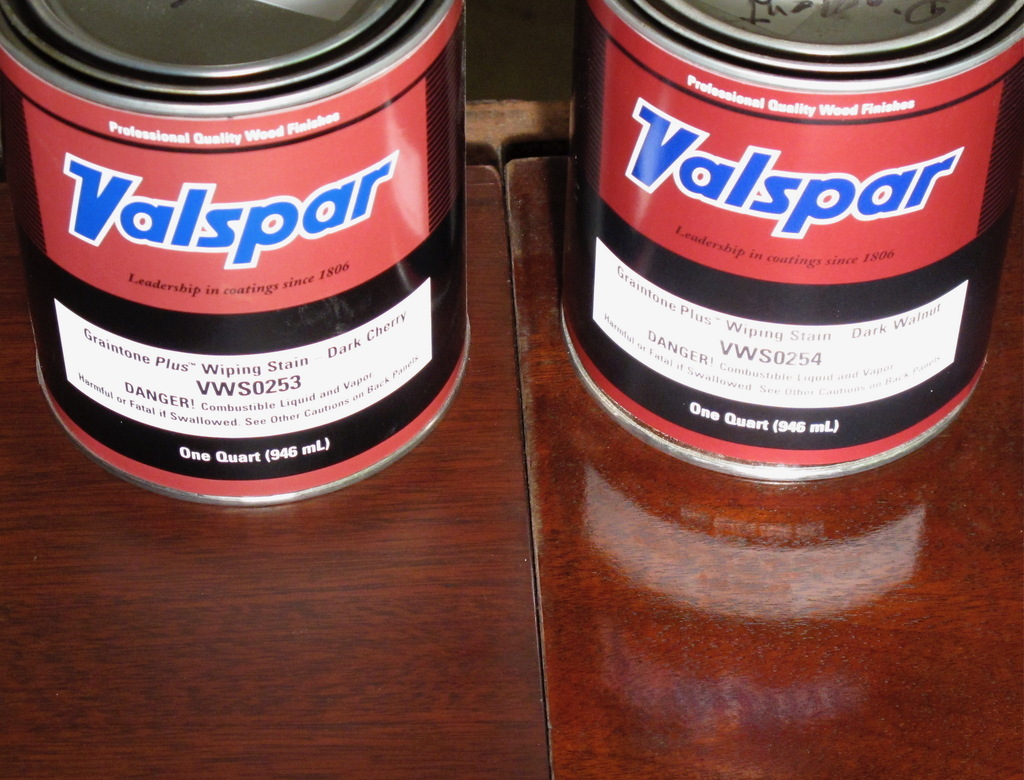
The lack of reflection on the left shows flat; the reflection on the right shows gloss.
A woodworker friend called me with a problem. He had just built a bookcase and was trying to match the approximate sheen of a factory-finished piece of furniture he had and couldn’t find a polyurethane that was flat enough. What should he do? He had tried rubbing it with coarse abrasives to match the sheen but the scratches showed too much.
His problem was that most stores that sell to amateur woodworkers just carry gloss and satin finishes. Few sell flat finishes. But creating one himself is not hard.
First, I explained to him how satin, semi-gloss and flat finishes are made and work. A flatting agent, usually silica, which is similar to fine sand, is added to a gloss finish by the manufacturer. You have to stir this flatting agent into suspension before use because it settles to the bottom.
When you brush or spray the finish, some of the flatting agent is, of course, near or at the top of the layer. It creates very fine bumps, too fine to see, that reflect light randomly. The more flatting agent in the finish the more light is reflected randomly and the flatter the effect when the finish dries.
You can see the flattening happening if you watch a satin or flat finish dry. For a while after application the finish is glossy. Then very quickly, as the solvent is evaporating, the sheen develops. Thinking about this, it should be obvious that it’s the last, or topcoat, that determines the final sheen. The sheen doesn’t get flatter when you apply several satin coats, as is often said.

On the left half I applied two coats of satin finish, then a coat of gloss to the left one-quarter. On the right half I applied two coats of gloss, then a coat of satin to the right one-quarter.
It should also be obvious that you aren’t limited to the sheens of finishes available. You can make any sheen you want from just one can of satin finish.
First, let the flatting agent settle to the bottom of the can. The easy way to do this is to tell the store clerk not to shake the can. Otherwise, let the can sit undisturbed on a shelf for a week or two.
Then pour off or decant some of the gloss finish at the top of the can. Leave the finish with the flatting agent at the bottom of the can.
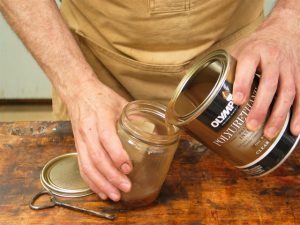
The first step in creating whatever sheen you want is to pore off some of the gloss finish at the top of the can after the flatting agent has settled.
Now you have two parts: one gloss and one very flat. You can mix these to get any sheen you want. You’ll have to experiment a little, because you don’t know the sheen of the mix until the finish has dried.
Remembering that it’s the last coat of finish you apply that is responsible for determining the sheen means that it’s possible to change the sheen with the next coat if you don’t get it right.
There’s one caveat, however. Creating your own sheen works easily with solvent-based finishes, but not with water-based finishes because the flatting agent doesn’t settle nearly so quickly.
Here are some supplies and tools we find essential in our everyday work around the shop. We may receive a commission from sales referred by our links; however, we have carefully selected these products for their usefulness and quality.


Hi Bob, I have looked on Amazon and Woodworker’s Supply, but I can’t find a flattening agent that can be used for more than one finish. Do I really need to buy gloss and flat varieties for every finish I use so I can extract the flattening agent from the one can to adjust the sheen for a project? Isn’t there a supplier of a general, multi finish flattening agent?
I don’t think a universal flatting agent exists. But you don’t need to have both gloss and flat. Buy a satin and don’t let the store clerk shake it. Handle it gently and you should have gloss on top and very flat underneath. Decant most of the gloss into another container and you have gloss and very flat.
Bob,
So could I put several coats of gloss polyurethane for maximum protection on a project, then top coat with a satin to reduce the sheen? I’ve always thought it might work because like you said the final coat determines the sheen.
Patrick
You could do that, but I don’t see the advantage of doing it. For as long as I’ve been doing finishing I’ve heard that gloss is more durable than satin, so it’s better to apply several coats of gloss followed by a single coat of satin to get a satin final result. Protection means resistance to moisture. How is gloss more resistant than satin? Protection is improved by increasing the thickness of the “plastic” barrier. Three coats of equal thickness should be more protective than two (though it might not look as nice, so you may choose not to do it). Concerning scratch resistance, I can’t see how two coats of gloss under a satin coat would be better. It’s the top coat that gets scratched. Finally, my picture above shows pretty definitively that sheen is established entirely by the final coat.
I could see some logic behind gloss being more durable.
If flatter finishes have (effectively) sand in them to dull the shine, as the plastic wears away these bits of sand will be exposed and removed getting you deeper into the finish more quickly.
It’d be interesting to see your two gloss finishes side-by-side. It’s probably a trick of lighting; however, the left gloss appears less glossy than the right and there’s some logic behind that since the underlaying surface isn’t quite as smooth as the initial coat of gloss. Granted, it’s probably not enough to change the appearance, just that there is some logic behind it.
Great work though, your books are my go-to when finishing.