


We may receive a commission when you use our affiliate links. However, this does not impact our recommendations.
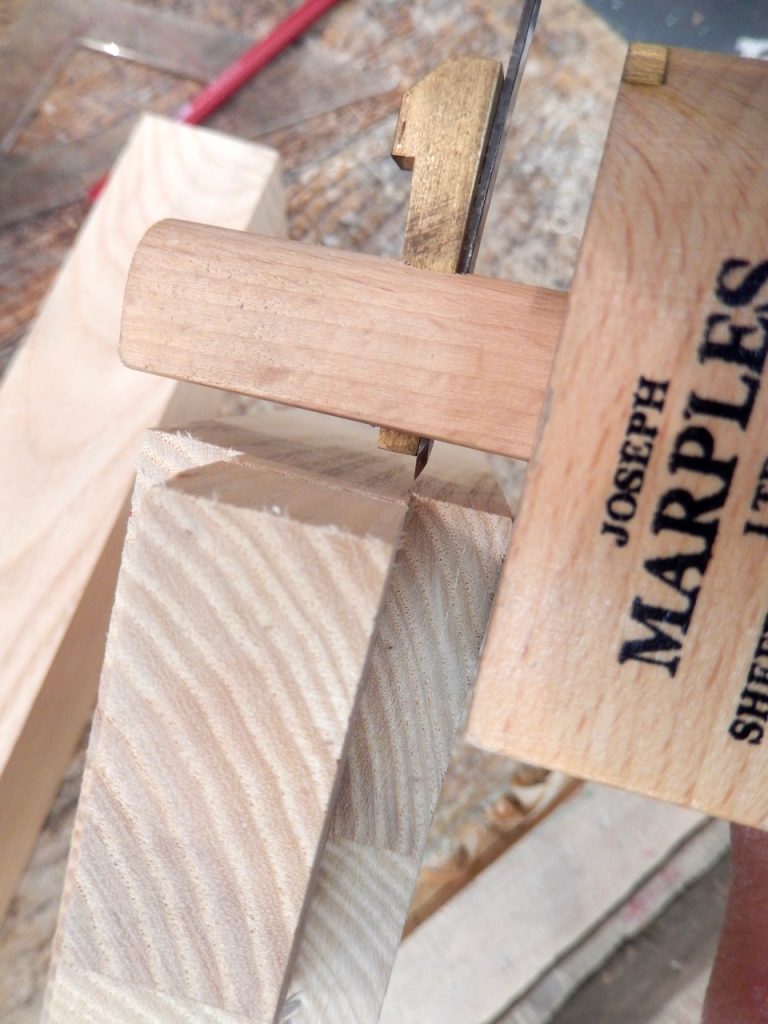
Last August I attend Nancy Hiller’s book signing party at Tools For Working Wood in Brooklyn New York. After the party ended, Joel Moskowitz showed me the most recent edition to their tool and jig offerings – The BT&C Planing Stop. The BT&C Planing Stop is a small toothed plate, intended to serve as a buffer stop when planing a board on the bench.
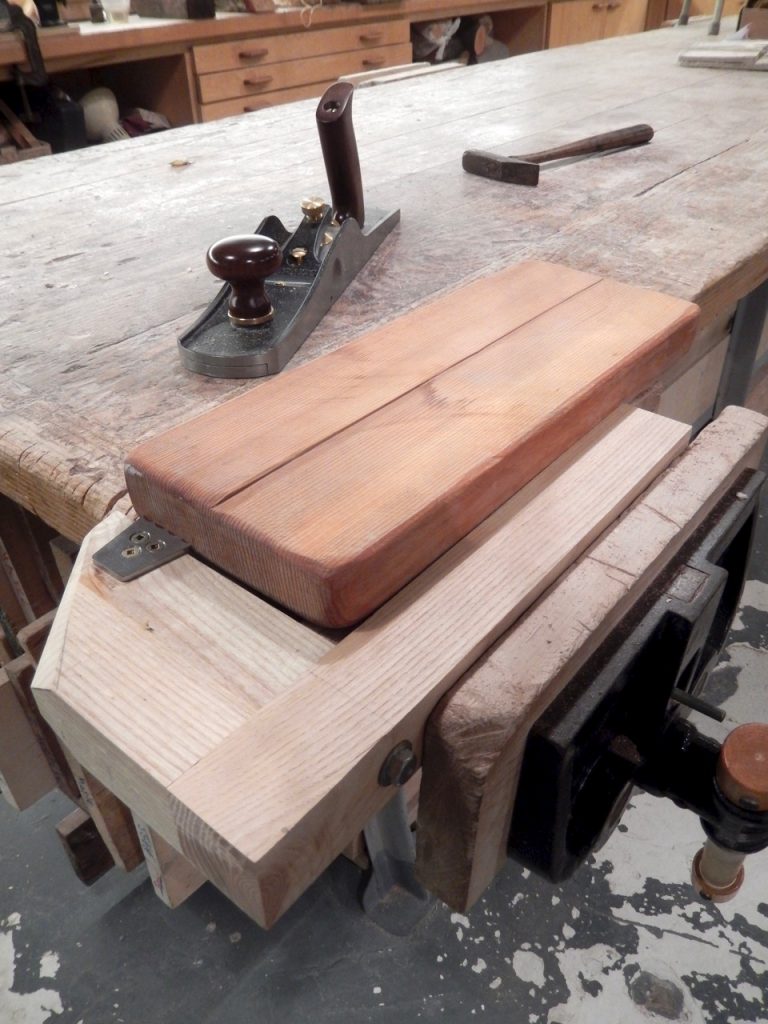
This idea is old and has numerous versions. The novelty with Joel’s planing stop is its versatility. While other planing stops, such as bench dogs, need to be situated into holes excavated in the bench top, the BT&C Planing Stop can be screwed to the top of your old, or new, wooden bench dogs (both round and square), mounted on a special bench stud that can be screwed to the end of the bench, or (as I discovered after playing with the little trapezoid plate for some time) be mounted over a new and handy planing stop jig which I call the Bench Arm. The Bench Arm, whose alternative names can also be: Planing Arm or Bench Rex (look at the picture and you’ll probably see the resemblance to a T-rex) is meant to be held in the vise and is made in the shape of the letter “L”.
After building the arm (building details will follow bellow) I mounted the BT&C Planing Stop on the short leg of the “L”. Then I clamped the long leg in the vise.
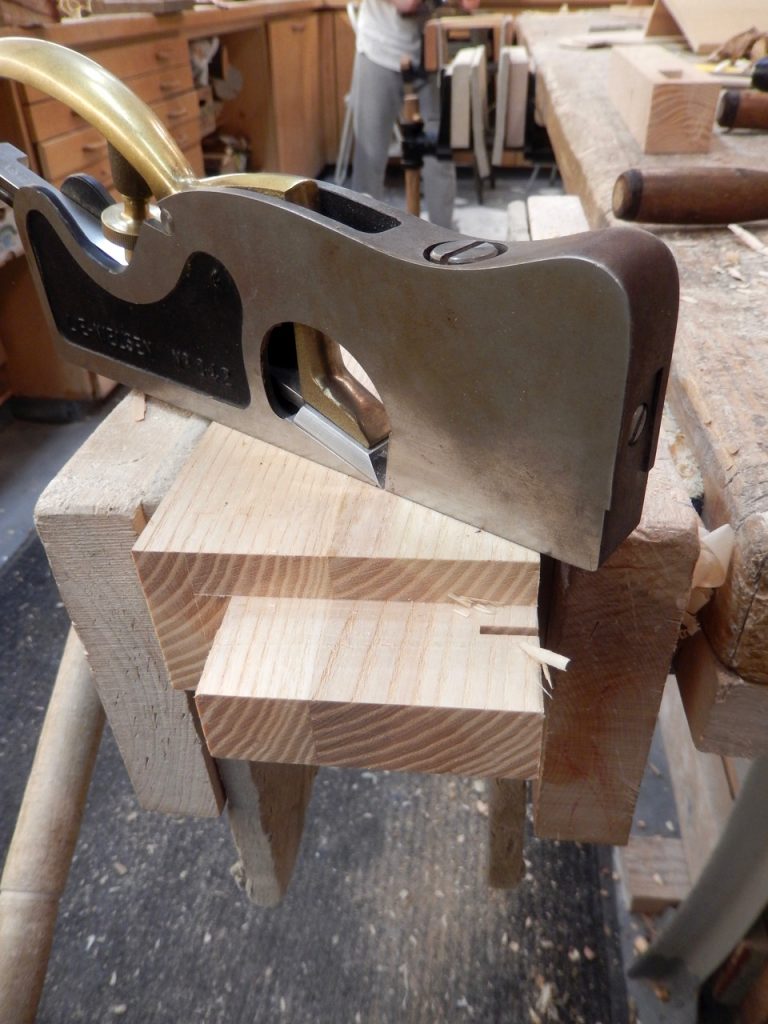
To plane thick stock, hold the Bench Arm high in the vise. And if your stock or workpieces are thin, vise the Bench Arm lower – to allow only the BT&C Planing Stop to protrude above the surface of the bench. The Bench Arm will allow every bench owner to hand plane with ease. So if you don’t like holes in your bench, and prefer to utilize your installed vise, just build yourself a Bench Arm.


Bench Arm Design
Structure: There are a few ways to build and join the Bench Arm. I decided to build it using a traditional mortise and tenon joint reinforced with a leg bolt. The leg bolt should be installed through the base of the tenon, closer to the inner corner of the “L” in order to negate the strong moments that the joint has to withstand at that area. But of course, you don’t have to build the Bench Arm using a mortise and tenon joint. Using strong screws, dowels and screws combined or even a dovetail construction will do the job quite nicely.

Coplanar or not? My Bench Arm’s parts are coplanar, but that is not necessary the best design for all applications. If you want to allow the planed workpiece to rest on the vise’s jaws while planing, you might want to step up the short arm of the “L”. Otherwise, whenever you’ll plane a piece of wood that is thicker than the BT&C Planing Stop you will have to contend with the long arm of the “L” flanking your workpiece. This is not such a bad idea, since that flanking affect will help contain the workpiece while planing.
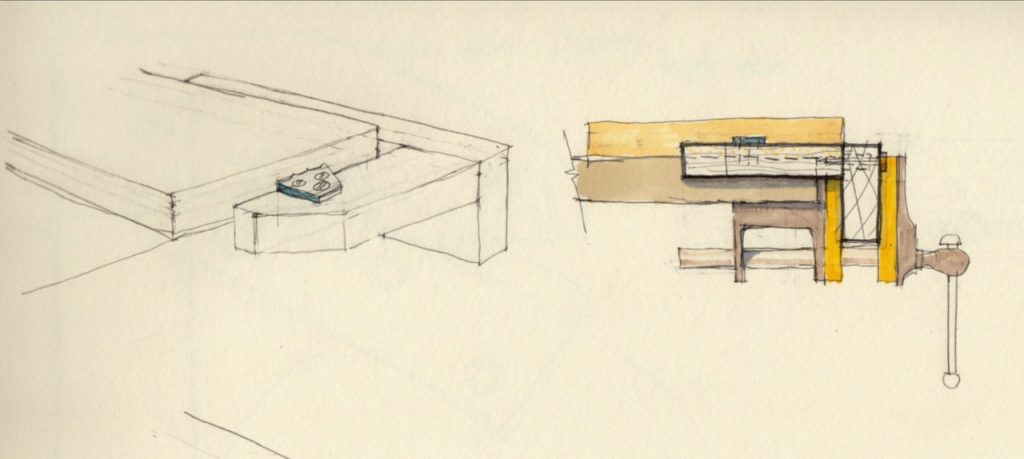
A Coplanar Bench Arm can flank the long edge of your workpiece. This is an advantage when planing narrow pieces.

A Bench Arm whose long leg is stepped down will allow you to plane a wide board up to the very edge of your work bench and beyond.
One or more BT&C Planing Stop? If I had a second planing stop plate, I would have installed it closer to the corner of the “L” , a configuration that could be instrumental in planing wide boards.
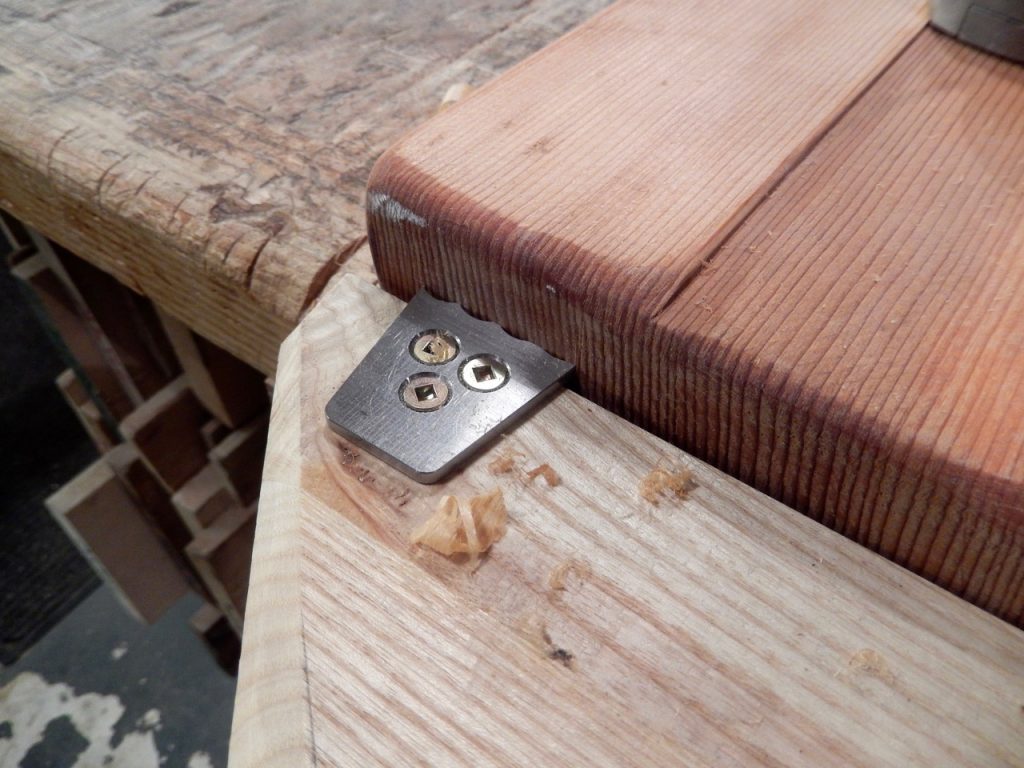
Can you make the toothed plate yourself? Yes you can. You can use half of a door hinge for instance. After sawing off the hinge’s housing, proceed to form the teeth using a round or a triangular file. Any metal stock that is 1/8″ thick will do. And if you feel uncomfortable riding your plane with its keen edge and smooth sole against a toothed steel plate, try to find (or buy) a brass, aluminum or copper plate to be form as mentioned above as your homemade stop.
![]()
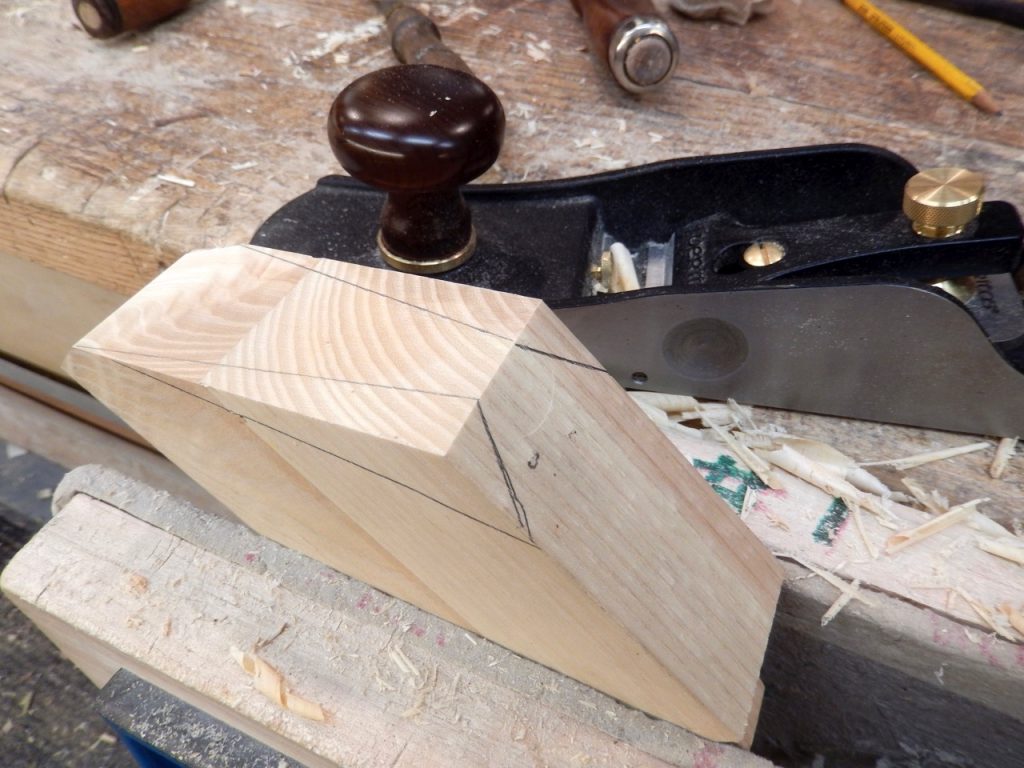
How I Made My Ash Bench Arm
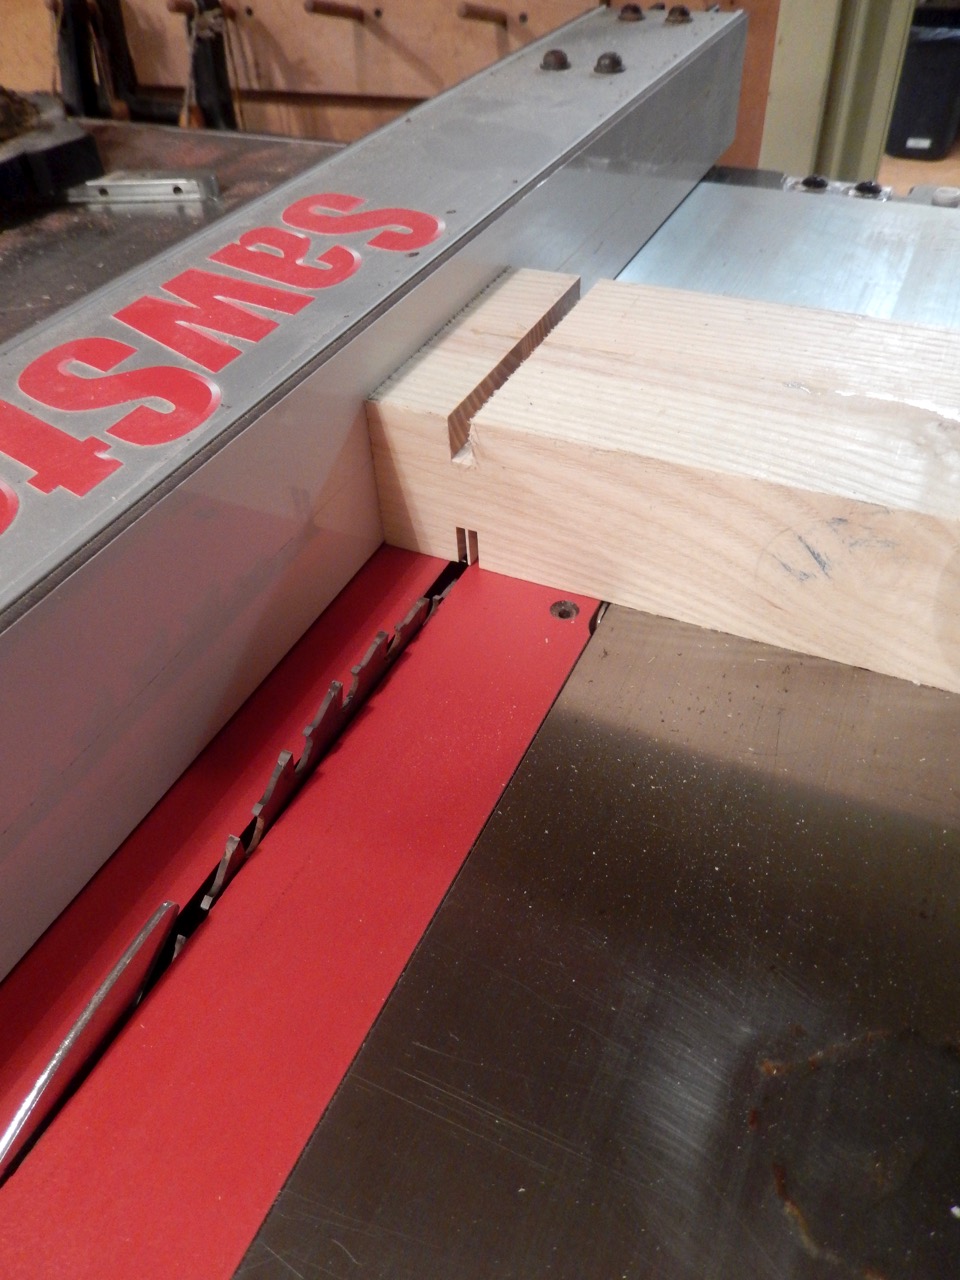
I formed the tenon on the table saw incrementally, moving the the fence to help me mill away the wood.

Nobody’s perfect. The tenon’s under kerf is an error.
After the tenon was done I registered a cutting gage to its shoulder and transferred the marking/scoring to the long ash blank in preparation for excavating the mortise.


I used a shoulder plane to shave and tweak the thickness of the tenon, until I achieved a nice tight fit with the newly excavated mortise.
Easing out the harsh corners of the Bench Arm.


Installing the Planing Stop
Popularwoodworking.com is a participant in the Amazon Services LLC Associates Program, an affiliate advertising program designed to provide a means for sites to earn advertising fees by advertising and linking to Amazon.com and affiliated websites.
Here are some supplies and tools we find essential in our everyday work around the shop. We may receive a commission from sales referred by our links; however, we have carefully selected these products for their usefulness and quality.


Hi Yoav
I used annealed O1 steel. I believe it was 1/8″ thick and 1″ wide. Try McMaster-Carr. This comes in 24″ lengths. Simply cut off a piece, file the teeth, and drill the holes for the bolts. Too simple to take photos. 🙂
Here’s the photo I tried to post above (and made a mess of) ..
https://i.postimg.cc/xj3p2NTZ/N-zpswzq6p89s.jpg
Regards from Perth
Derek
Thanks for this helpful info.
I am going to try and build one from a rusty hinge that currently lays outside with other scrap metal parts that I have. The holes in it are already predrilled and countersinked so I will only need to file the teeth and saw off the proud parts.
Cheers,
Yoav
Hi Yoav
The BT&C bench stop looks the part and is good value if you cannot make your own. This stop is actually really easy if you are comfortable with a file, and even easier if you sharpen your own saws.
I made my own early this year, inspired somewhat by the one by BenchCrafted.
http://www.inthewoodshop.com/ShopMadeTools/PlaningStop.html
The difference is that I built this onto a bench dog, which involves minimum intrusion, and offers height adjustment. Importantly, being built into a bench dog enables it to be used in any of the identical bench dogs along the front of my bench.
Used together with a Doe’s Foot, popularised by Chris Schwartz and Richard McGuire, the combination is a dream come true for work holding on a bench without a vise.
I have now even added one to my BenchCrafted tail vise (where there is the option of using it or not). The grip of two (one at the front and one at the rear) is tremendous! You can just glimpse the combination here …
[img]https://i.postimg.cc/xj3p2NTZ/N-zpswzq6p89s.jpg[/img]
Regards from Perth
Derek
Hi Derek,
Thanks so much for the info and link. I am sure that many who which to build a planing stop by themselves will appreciate this. Do you have any images of the making of your plate? And what kind of steel stock did you use?
Best,
Yoav