


We may receive a commission when you use our affiliate links. However, this does not impact our recommendations.
Every November my school throws a fantastic Fall Fair fundraising event which (among other things) showcases our school and its programs. The Saturday extravaganza allow families, guests, and practically anyone who walks by to have a glimpse of what Waldorf education is. The school is transformed for one day with new colors, smells and textures as hallways, staircases and classrooms are decorated with seasonal themes. Logs and branches are brought in and get suspended over our main hallway, fabrics of all sorts drapes over our walls, and fresh scents of pine, cedar and other trees are ushered in as a celebration of the holiday season.
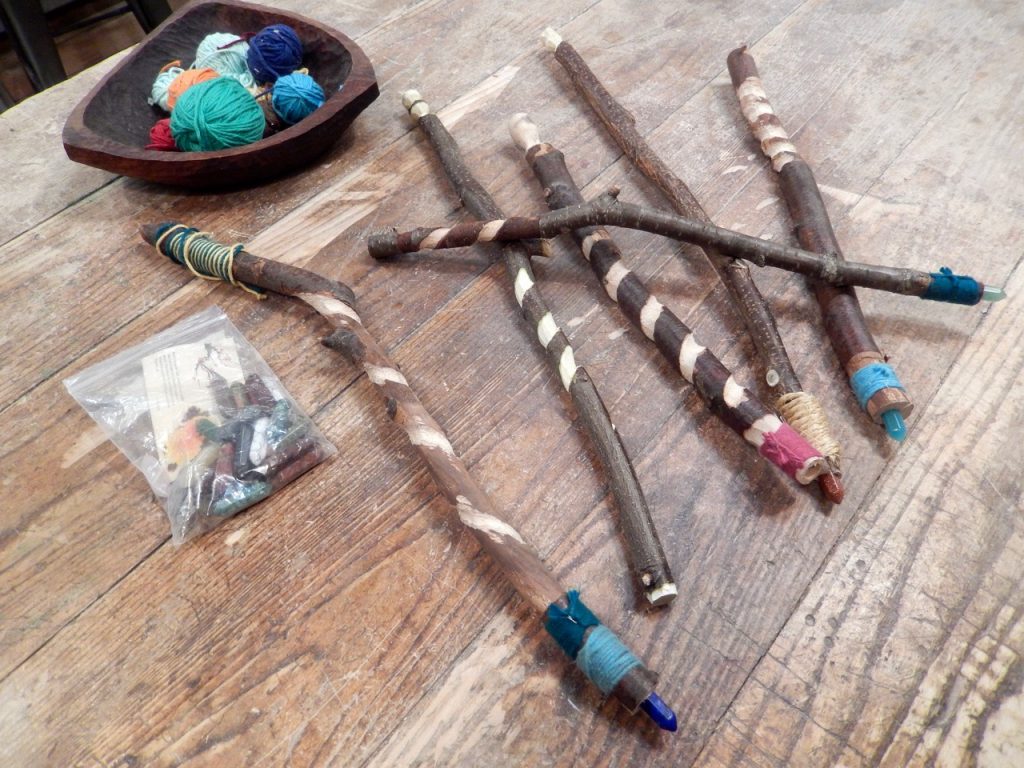
We at the wood shop take part in this event too. This year I taught a parent-child workshop in magic wand making. You see, the craft of transforming twigs and gems into wands can be very enticing to anybody who is young at heart (and, of course, has read a one or more of the Harry Potter books).
Take a stick, whittle it a bit, rasp it, then drill a hole in its tip, proceed to stick a crystal into it, secure it with a string and voila: a tool for transforming princes into frogs and dragons into squeaky little mice is born.

The craft of magic is secret and its details are hidden from the general public – for good reasons. Yet I will risk my life, and my good name, to let you into this Privy Council of Sorcerers and Witches, and confide in you some of the ways in which we crafted the wand.
First, choose a twig, stick or branch of the appropriate size. It can be straight, twisted or curved. It might have a bark or be bark-naked. It could be spalted wood, greenwood or dry wood. In short, draw upon your own preferred aesthetics.


Second, if you want to create a spiral, then the easiest way to do it is to tape a strip of masking tape in a helix form around a portion of the branch. Then trace the path of the masking tape with a pencil and peel it off. Now, following the pencil track, use a rasp or whittling knife to form the spiral. If you prefer a finial or any other roundish form, you can easily shape it at the end of the stick. I used a simple carving knife for this job, but a pocket knife can fulfill the same task.

Now comes the embedding of the magical crystal. For this we purchased a few bags of prismatic, or polygonal, crystals on Amazon. I found out that 21/64th drill bit works well to allows these gems to nest in the wand. Drill the hole at the tip of the wand to approximately 2/3 of crystal length. Then using a handsaw or bandsaw make a kerf from the tip of the wand to about ½” below the bottom of the hole.


Next tuck the crystal into the hole and secure it by forming a Common Whipping knot around the wand’s tip. Try to create a long whipping knot to hide the kerf completely. If you can, form the whipping first, nearly close the kerf, and only then tuck in the gem. This technique ensures the crystal will stay inside the wand.


Some of the parent-child teams decided to decorate the wands with strings and paint. But perhaps our most talented duo decided to incorporate a feather, paint and strings to create one of the most powerful and magical wands made that day.


A project of this sort transcend the ages. It can be used as a toy by a young child, placed proudly on the family’s mental and even be framed and hung on the wall, only to be used in time of dire need (to command the children to be quiet, eat their food and generally be nice, or else…..)
Check out this video to be enchanted by our workshop.
Popularwoodworking.com is a participant in the Amazon Services LLC Associates Program, an affiliate advertising program designed to provide a means for sites to earn advertising fees by advertising and linking to Amazon.com and affiliated websites.
Here are some supplies and tools we find essential in our everyday work around the shop. We may receive a commission from sales referred by our links; however, we have carefully selected these products for their usefulness and quality.


