


We may receive a commission when you use our affiliate links. However, this does not impact our recommendations.
The first project I give to my students in the Intro to Woodworking class at 3rdWard NYC is building a wooden mallet. The mallet is perfect because it requires less then two meetings to make and it covers fundamental techniques and theories of woodworking. It is also a tool that will be useful and practical for students later on in woodworking. The mallet project is also very predictable. Its construction sequence is clear and almost always error-free. That means that even the most novice student will be able to complete it successfully and will feel happy with the results, something that I believe is crucial for generating confidence and motivation to pursue interest in future woodworking projects.
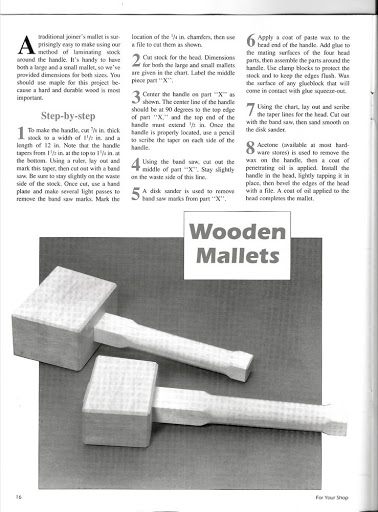
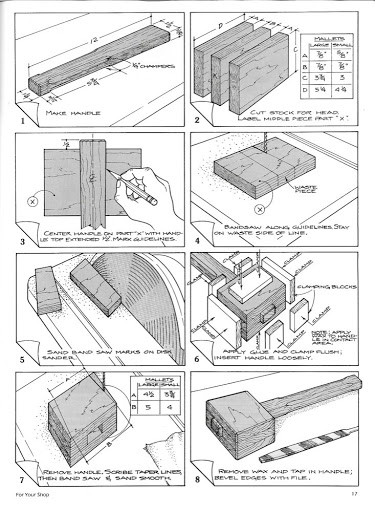
The idea of assigning the mallet project came to me a few years ago. I have, in my collection, an instruction sheet for how to build one. This plan was originally published in a woodworking magazine and calls for a 3/4″ hardwood stock. The mallet’s head is made out of a four-part “sandwich”. The fifth part is the handle. The tapered handle is flanked inside the head by two short cheeks and the wedge effect makes it possible to disconnect the handle at will. It will further ensure that the handle will always be tight in its mortise without any glue or hardware.
The first group of students who built this mallet with me were my Eliot House students at Harvard. According to the original plan, the band saw and the disc sander are the only power tools we need to use.
Here it is:
As more and more of my students were following this plan I started to realize that the plan has some shortcomings, mainly: aiming for accuracy during the building and gluing process. Don’t get me wrong, I think that the overall mallet design is genius, my quarrel is with some recommended aspects of the building process.
So, after a few classes where we used the original plans I decided to tweak them and alter the building process so instead of solely using the band saw we incorporated the miter saw. This gave us better and more smooth cross cuts – a paramount feature to ensure that the handle will be held tight in the head’s sandwich.
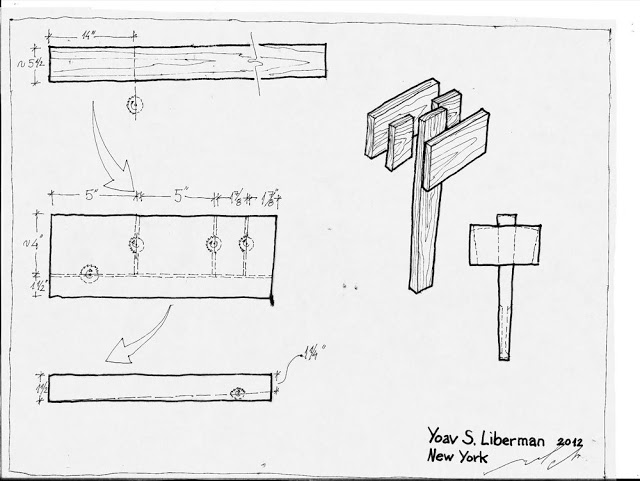
Here is my modified plan that I give my students these days:
 :
:
We start by learning how to use the miter saw. We then go on and cross cut a section of 14″ long from a 10′ board (We use an oak board of 3/4″ thick by 5 1/2″ wide). The remnants of the board can be used later for our Shaker Step Stool project that I have blogged about here before. Maple, ash, beech, and birch are great domestic wood that will make strong mallets too. After we cut the 14″ piece we continue to dissect it into the five parts which constitute the mallet. First we rip the handle blank on the band saw.

We cut the short cheeks (1-7/8″ wide) with the miter saw and lastly we cross cut the remaining piece in half to make the sandwich’s 5″ parts.
In my drawings you will notice an Icon of a circular saw that is located where the cuts are made. Although most cuts at this point are made with the miter saw, the ripping of the long handle is obviously done with the band saw — for practical and safety reasons. In the future I will create an icon for bandsaw cutting as well which will look cool and will be more coherent to beginners.
Next time I will show how my students are building the mallet.
Here are some supplies and tools we find essential in our everyday work around the shop. We may receive a commission from sales referred by our links; however, we have carefully selected these products for their usefulness and quality.


