


We may receive a commission when you use our affiliate links. However, this does not impact our recommendations.
Build these easy-to-make plywood show panels to display your woodwork.
Woodworkers love to make things out of wood. Naturally, we like to share what we make. And, if you’re at it long enough, many of us start to think about showing and maybe even selling your creations. Along with that big decision comes a long list of challenges. One of the practical ones is figuring out a way to display your work. Large pieces, like furniture, can stand on their own. Smaller pieces, like boxes or spoons, are best displayed on tables. But, if you make things that need to be hung vertically, there’s no way around it: you’re going to need a wall.
If your woodwork needs to be displayed, consider making a set of modular show panels.
Unfortunately, wall space is often limited or unavailable. Sometimes the best solution is to bring your own walls. In my case, I frequently exhibit wall-mounted, carved wooden sculpture at galleries and sometimes at art shows. Galleries certainly have plenty of wall space, but portable, free-standing walls are hard to come by. Art shows usually have limited wall space. Plus, in either situation, there’s always concern about the viability of the walls to hold woodwork?
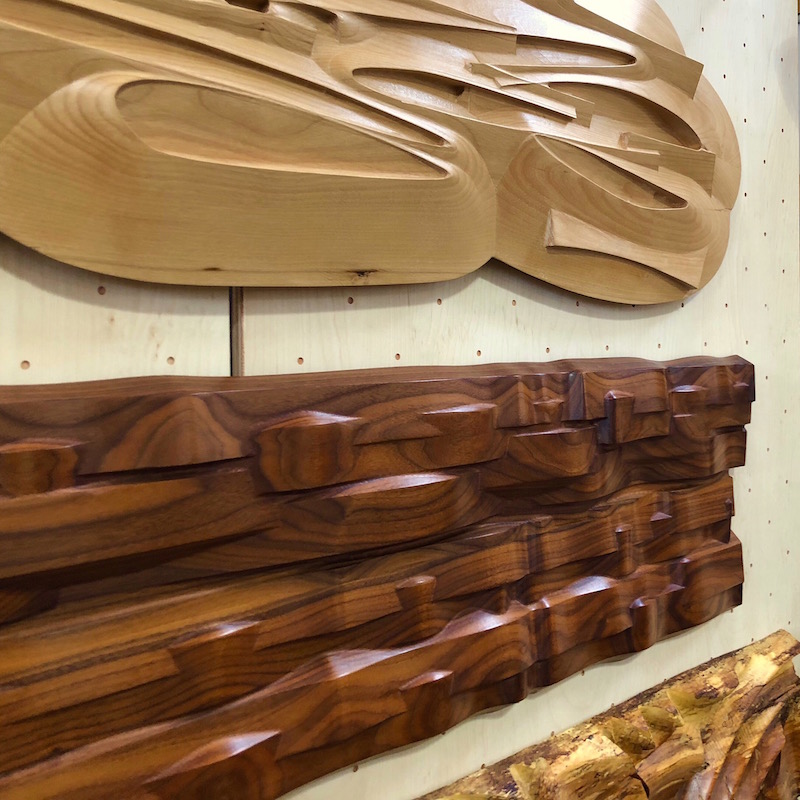
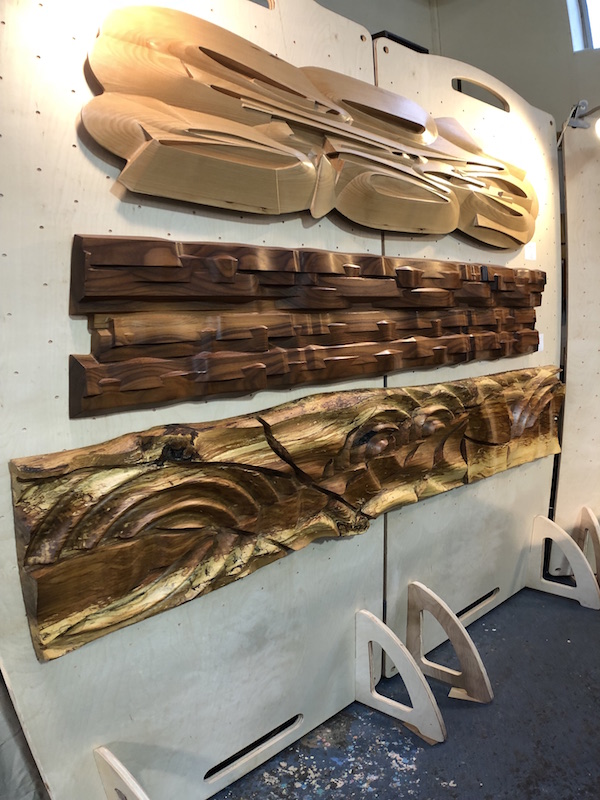
Unlike flat art — such as paintings, prints, or photographs, artwork made out of wood is heavy and requires strong support. To deal with these problems, I’ve designed a simple to build, portable, knock-down, modular panel system. The panels work great, handle the weight of reasonable-size wooden artwork and are easy to build.
These show panels aren’t just for woodworkers. They work just as well for any artist that creates framed or flat art. Beyond using them for display, the panels have other potential uses. In an upcoming Popular Woodworking workbench article, I’m writing for fall publication, I’ll show you how the panel design can function as moveable tool walls you can position around your woodworking shop.
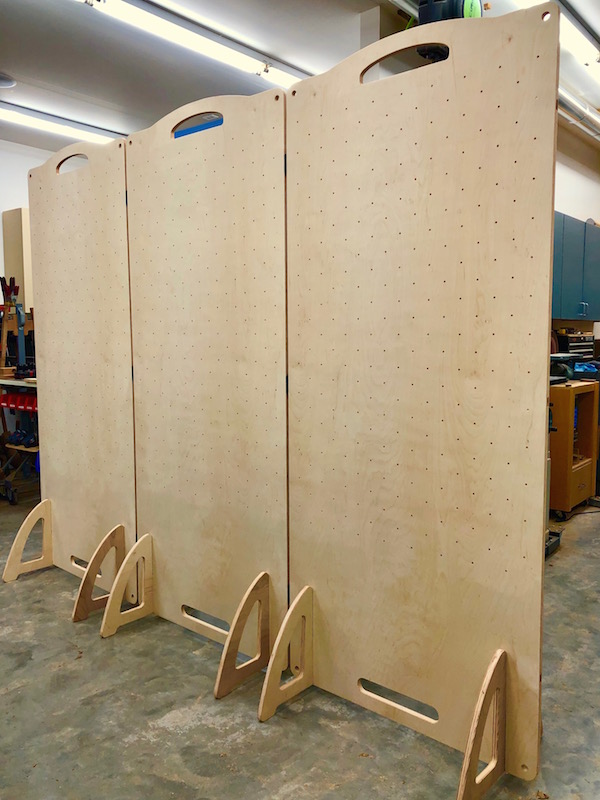
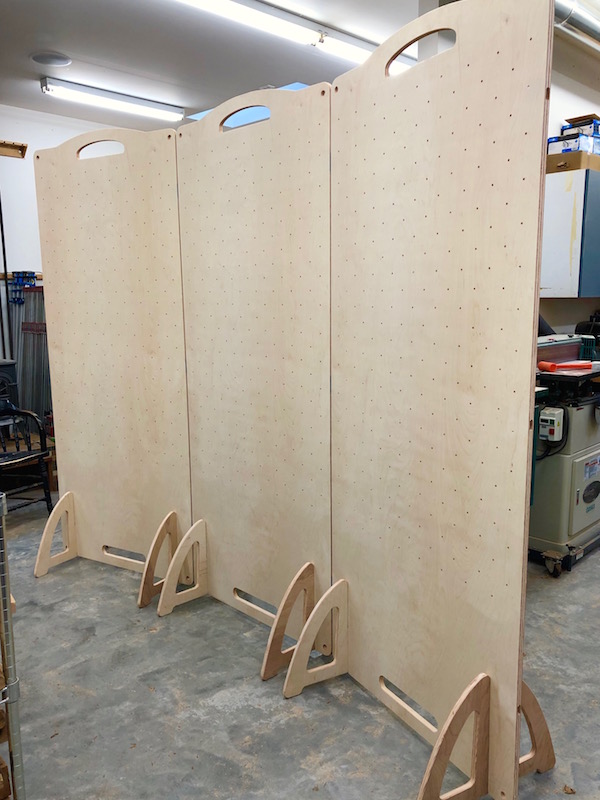
Two, three or more panels can be set up inline to make longer walls.
Alternatively, with 15 degree angled connectors, the panels can be set up to curve inward.
Panel Systems
Panels and panel systems for displaying flat art (paintings, photographs, etc.) are commonly used to exhibit work at craft fairs, art shows, and galleries. Commercially available panels are often made out of carpet-covered ceiling material and designed to hang relatively lightweight, framed artwork via hooks or pins. Usually, they can be configured to work in groups. But, if you work in wood, the panels are not ideal. Woodwork is far too heavy for a light duty panel system.
A few years ago, I made a set of display panels out of plywood to hold the wooden artwork that I exhibit. The panels have worked out well. Recently, I revisited the project, improved several details, made the design modular, and re-designed the new panels to be free-standing. Plus, like many woodworkers, I lack available wall space in my shop. So, I also use them to arrange and test large assembled sculpture work as I’m creating it.
The Details
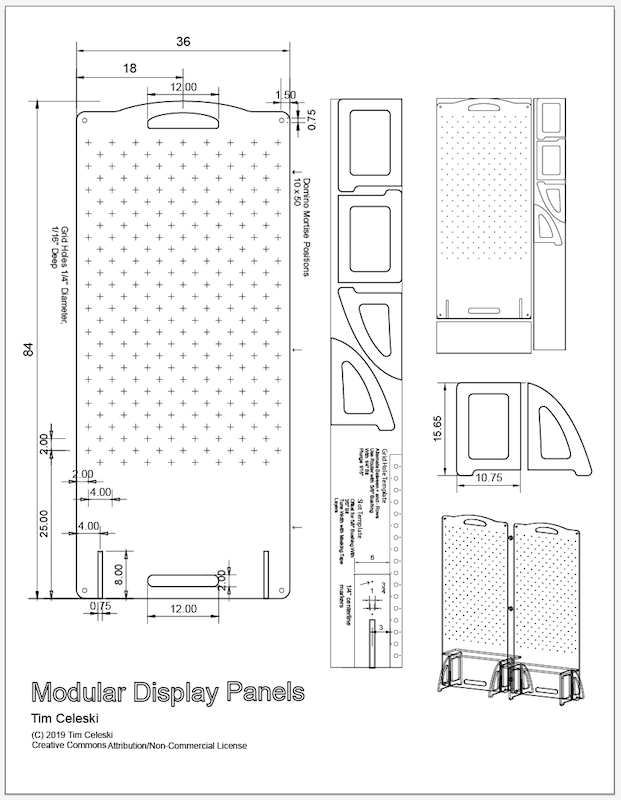
The panels are 36” wide and 84” tall. I chose not to use heavier and more difficult to handle full-size, 4’ x 8’ plywood sheets. Besides using panels for indoor displays, they’re sized to fit nicely inside 10’ x 10’ tents or common pipe-and-drape booth spaces that are standard at art shows and craft fairs. You can certainly scale the panels to any size you need —I have a 24” wide set for example, but if you go bigger, keep in mind the added weight and handling challenges.
Like a lot of furniture makers, I use a full-size van, but if you have a smaller vehicle, there’s no reason the panels couldn’t be redesigned to work around your transportation limitations. However, keep in mind that as you shrink the design down, you’ll have to come up with a solution to raise smaller panels up to eye height. Hint: make the feet freestanding, sturdier and taller.
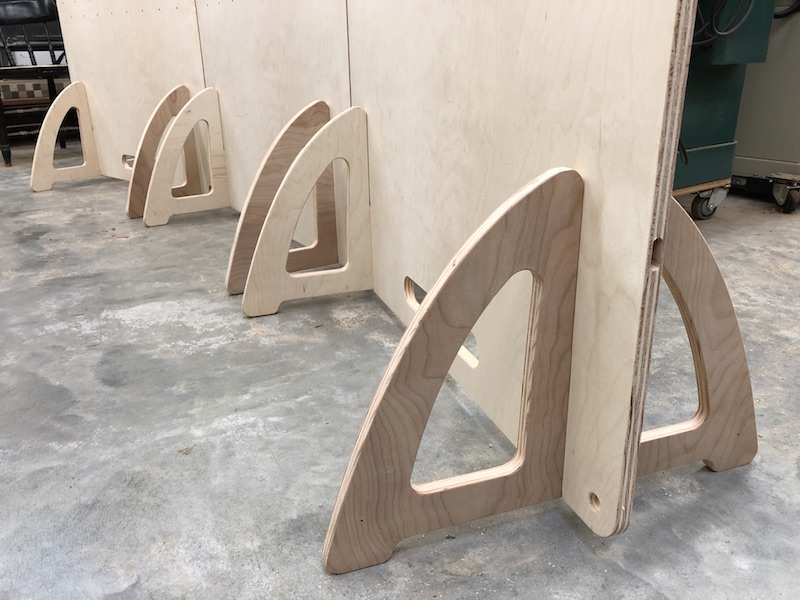
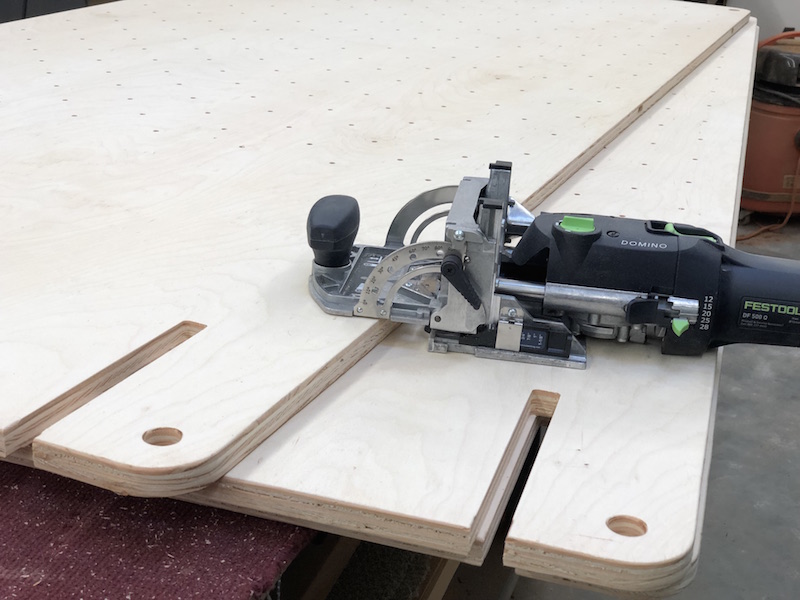
The panel design features feet with slip joints to slide onto the panel. Though this photo shows sloping feet, the plan offers an alternate flat and square design so you can add a shelf at the bottom of your display. Note the oversized Domino slot on the side of the panel. There are three in each panel that is connected with 3D printed connectors or 10mm x 50mm Dominos.
Why a Grid?
One of the main features of the panels is a grid. Why a grid? Two answers: The grid made up of shallow 1/4” holes on the front surface of the panels is there to help you position and place your hangers, panel clips, nails or screws so you can hang your artwork in an organized way. Being precisely laid out, the grid gives you everything you need to space, align, level and mount your artwork. Plus, rather than a blank plywood panel with a growing collection of ugly holes drilled everywhere, these shallow grid holes hide the mounting holes you drill in them. At the same time, the grid is quietly attractive and doesn’t distract from the artwork being displayed. With reasonable care, your panels will look fresh for a long time.
The grid of shallow holes helps you align and level your artwork and hid mounting holes. The Domino is used on the sides of the panels to make connection points between them.
Other Features
To ease handling, loading, and transporting, the panels have cut-outs on both ends for your hands. Also, the panels are free-standing, have removable bases and designed to work together in multiples of two, three or more. With Dominos or special connectors between them, you can set them up in series for wall lengths of 6’, 9’, 12’, etc. They can be arranged as one long flat wall or angled-in at 15 degrees. Another detail is each corner has a hole so the panels can be attached to a tent frame or pipe and drape display system with bungee cords.
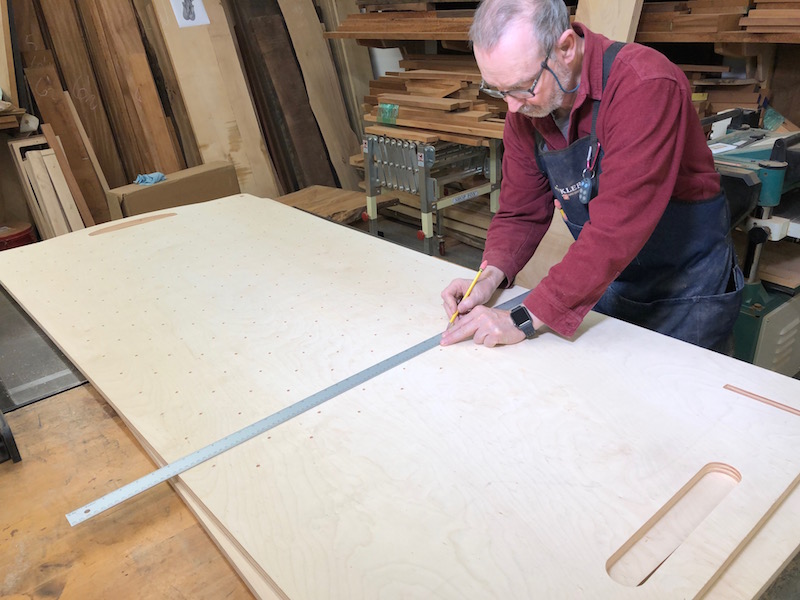
Layout is everything — particularly if you are making a set of large panels. Use a sharp pencil, accurate rulers and squares and check everything twice. Here I am l laying out the Domino mortise positions along the panel sides.
Panel Design and Construction
The panels are made from 3/4” or 18-millimeter plywood. Since I prefer my panels to be unpainted and natural, I use cabinet grade or better, hardwood-faced plywood. But, there’s no reason they couldn’t be clear finished or painted if that’s your choice.
The first thing to do is to cut the panels down to size. I start by cutting the 4’ x 8’ plywood down to 3’ x 7’ on my table saw. A track saw works just as well. Make your first cut lengthwise for leftover 12” x 96” strip. That material will be used for the support legs and a template if you’re building more panels. Your second cut should result in a 12” x 36” strip, which we have another use for.
Detail view of the slip joint at the bottom of the panels. Note that everything is rounded over with a 1/8″ round over bit.
Building the Panels
To make my panels, I used a CNC. That made it possible to design and build a set of three in a few hours. A CNC’s forte is accuracy and repeatability which makes it perfect for drilling the perfect grid of shallow holes and the shaped details and the various slots. I’ll show you how to machine the panels with a CNC in my next post. And, I’ll add a third method of making the panels using a router, a simple pattern, and a little CNC thinking. You can make the panels faster and more accurately.
Working from a Plan
I’ve included a downloadable plan for the entire panel. First, it’s time to cut the 4’ x 8’ plywood down to a workable size. We need to end up with 84” x 36” panels. Start by making cutting the sheet down to 36” wide with a table saw or a track saw. We’ll use the 12” x 96” strip to make the legs and two patterns for the rest of the project. From the remaining 36” x 96” piece, cut a strip 12” x 36” off one end that we’ll make use of like a shelf.
After cutting out 84” x 36” blanks, it’s time to cut the curved top detail, the hand holds at the top and bottom and the corner holes that are used as tie up points.
Use the drawing as a guide for the layout of the arch on the plywood blanks. If you plan on making more than one panel, think consistency and accuracy. It’s worth the little extra time needed to lay out the arch on plywood or other scrap and shape all your panels to it. Plus, use the slot template for cutting the slip joint slots out of the leftover 12” x 96” strips. The joint template is oversized to allow for a 5/8” router bushing and 3/8” spiral router bit.
Because plywood varies greatly, it’s impossible to plan for all thicknesses. Test fit on plywood scrap and fine-tune the fit by applying layers of masking tape on one side of the slot template. Once tuned, the joints should be slightly snug but not loose or too tight.
Drilling the 3/4” corner holes for tie downs are obvious, but the handholds can be made in different ways. If you make more than one panel, I’d suggest making either a full-scale drawing of the top and bottom slots to trace onto your panel blanks or consider making a template for routing. For routing templates, the included drawings use the offset for cutting the slots with a 3/8” bit and 5/8” router bushing. To align the slot template on the panels and glued up legs, use the center position marked with 1/4” holes to align with the slot position on the panels.
Rough cut close to the line with a jigsaw and clean up the edges with a rasp. Line up the templates on your panels and the slots will be correctly positioned. Rough cut with a jigsaw and shape to the template.
Panel Legs
Two legs are connected with three Dominos and glued together at the bottom 8″ to make a pair. To make them, cut one leg out, refine the shape and details and use it as the shaping template for the other legs so that they all match. There are two design options with the legs: A sloping design and a flat top design so that the remaining 12″ x 36″ can be used a shelf. Gluing one of each together gives you the best of both worlds. Just rotate as needed.
Slot Template
Included on the plan is a slot template. An offset has been designed in to allow for use of a 5/8″ router bushing and a 3/8″ bit. The final opening is 3/4″ wide, which is slightly oversized for the plywood used in the project. To tune the opening, build up layers of masking tape along the sides of the template slot for a final, slightly tight fit on scrap plywood before using it on the legs and panels.
The Grid
For the grid, a simple template is included. The template is 2” wide and 36” long and centered on the width are a row of 5/8” holes to be cut out with a Forstner bit. Once you install a 5/8” bushing and a 1/4” bit on your plunge router, align the template to the panel and cut the grid holes 1/16” deep. Note the “+” and “-“ marks. Start with the “+” holes for one row, move the template 2” then use the “-“ holes. The result will be an alternating grid pattern.
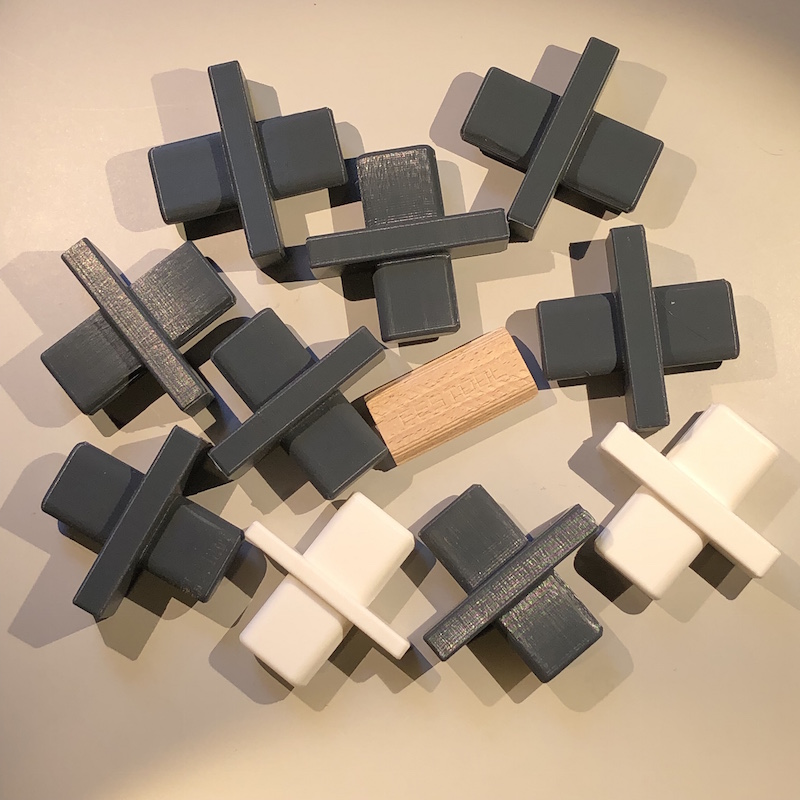
Domino size panel connectors made on a 3D printer. I thought that a little space between the panels would look better, so I designed a spacer between the two Domino sized tenons. I also made a set tilted in at 15 degrees so the panels can be set up angled inward.
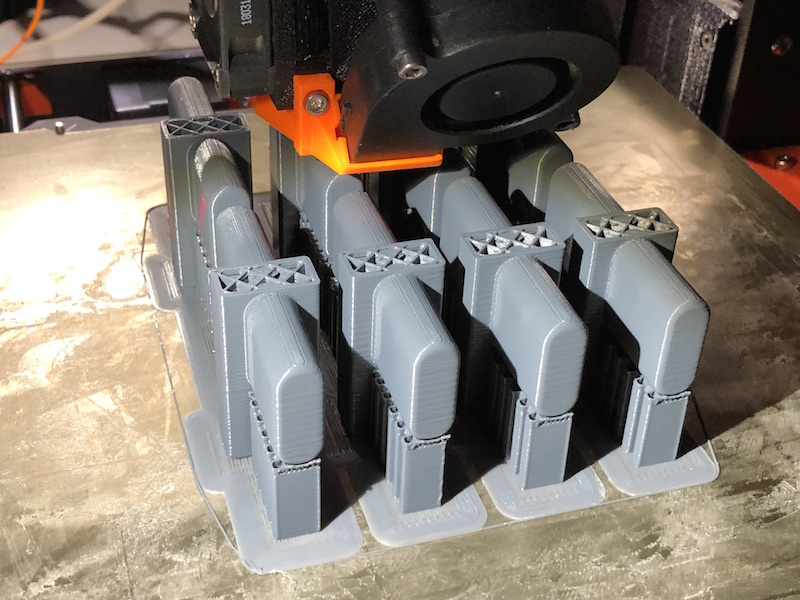
3D printers can be very handy when you need a special part. Here’s a set of panel connectors being printed.
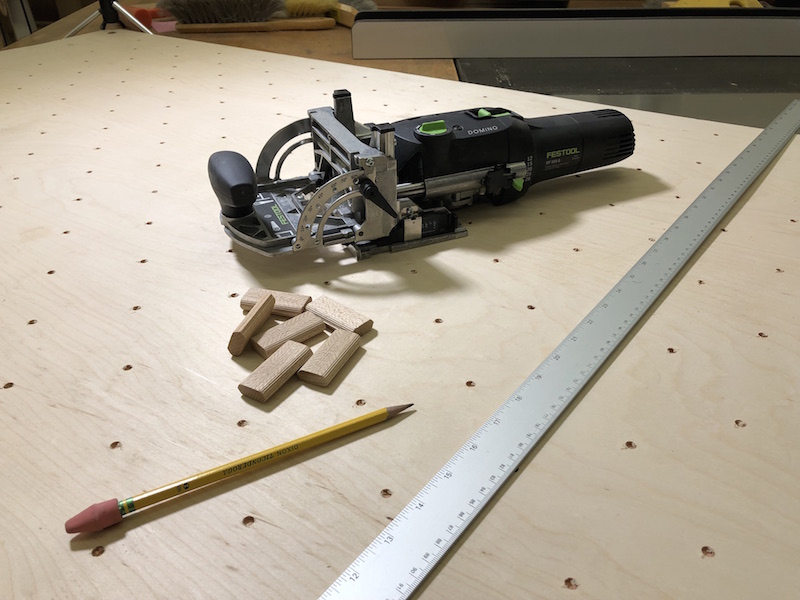
The final step to complete the panels is to cut Domino mortises along the sides. Three spaced-out slots are plenty. I suggest using 10mm x 50mm Dominos with 25mm deep slots and wide setting for a loose fit. Floors are rarely level and you’ll be glad you allowed for some adjustment when putting panels together in groups. On my set, I designed 3D printed Domino sized spacers for a more finished look. If you have a printer, files for printing your own set are free and shared at Thingiverse.com
Other ways to build the panels
In my next post, I’ll offer two alternate methods for making the panels. If you have a CNC, a plan and a few instructions are all you need to make these panels. The second method involves a new template designed for accuracy and repeatability plus with a quick lesson in CNC thinking using traditional woodworking tools. Armed with the template and a plunge router, you can quickly and accurately make as many show panels as you need.
Additional Resources
- Downloadable PDF Display Panel Plan
- Link to Thingiverse files for 3D printed connectors
- Digital Woodworking on Instagram
- Personal Work on Instagram
- Digital Woodworking YouTube Channel
Here are some supplies and tools we find essential in our everyday work around the shop. We may receive a commission from sales referred by our links; however, we have carefully selected these products for their usefulness and quality.


Great project. Those looks great. I like the inclusion of more digital manufacturing. The 3D printed pegs were a nice surprise.
Sorry to be pedantic, but you said it’s made of 3/4″ or 9mm ply, but I think it’s either 18mm or 19mm ply.
Oh yeah. I guess I’m been too much small millimeter math lately. You are right 9mm is roughly 3/8″ and 18mm will be corrected.