


We may receive a commission when you use our affiliate links. However, this does not impact our recommendations.
Three Different Ways to Build Show Panels
My last post introduced the show panel project. These are vertical, free-standing panels designed to show off wall-mounted art work or sculpture. Besides being useful for woodworkers or any artist who needs to display their work, the project is also a great exercise in CNC thinking.
In the first post, the building technique included a plan geared around using conventional woodworker’s tools: a table or track saw and a router. In this post, I’ve got three alternate methods for building the panels. The first is to use the method that I employed to built my own set: a CNC. A medium to large CNC and the included DXF file are all you need. The second method is a separate DXF file designed to make a smart project pattern with a smaller CNC. Then, you can use a router to make your panels. The final method is to make the pattern with a careful layout and conventional tools. All three methods work great.
Building with a CNC
If you’re building the panels with a CNC, I’ve included a full-size DXF show panel file with this post. Click here to download it.
To build my panels, I used a 3’ x 6’ CNC and made a set of three in a few hours. A CNC’s accuracy and repeatability are perfect for drilling the perfect grid of shallow holes, cutting the shaped details in the panels and legs and the slots.
The panels are made from 3/4” or 18 millimeter plywood and the first step is to cut the 4’ x 8’ plywood down to the final panel size of 3’ x 7’. I used a table saw but a track saw works just as well. Make your first cut lengthwise for a left over 12” x 96” strip that will be used for the support legs and patterns. Your second cut at the bottom of the 3’ x 8’ piece should result in a 12” x 36” strip that we’ll use for a shelf at the bottom of the final display panels.
CNC milling details
When cutting plywood on a CNC, I use a spiral compression bit .250” in diameter. These are bits where the direction of the top 1/4” cuts in a up-cut direction and the remainder of the bit is a downcut. The benefit is if you set your first pass to .260 or deeper, you get no tear out because the cutters are pushing down on the delicate top plywood veneers. Once you work your way down through the cut all the way through to the bottom of the plywood, the top of the bit pulls up the bottom veneers. The result is a clean cut on both sides of the plywood.
If you’re using a CNC and have cut your blank panels to size (unless your machine is 4’ x 8’ or so) it doesn’t make sense to repeat the parallel cuts already done with a table saw or track saw. So, I use the CNC to cut the curved corners, the crest rail area at the top, the corner holes and the handle cut outs. For the grid, cut .250” holes just .0625” deep. Remember, these are just markers for where you put your screws and nails for hanging the artwork. Shallow holes keep the grid the subtle pattern it’s intended to be.
The only variable for cutting on a CNC is the width of the slots for the stands. Note that the drawing shows these slots as a separate layer (read in the screen capture below). Because plywood varies from batch to batch, it’s important to make test cuts on pieces of scrap before proceeding on to cutting a full panel or leg pair. Expand or contract the width of the slot in the drawing to get a fit that’s just right for the plywood you’re using. Loose is not good and neither is too tight. Slightly snug is just right. It should be just snug enough that a few light taps of a dead blow hammer is all you need to take the legs off.
A Show Panel Pattern for a Small CNC
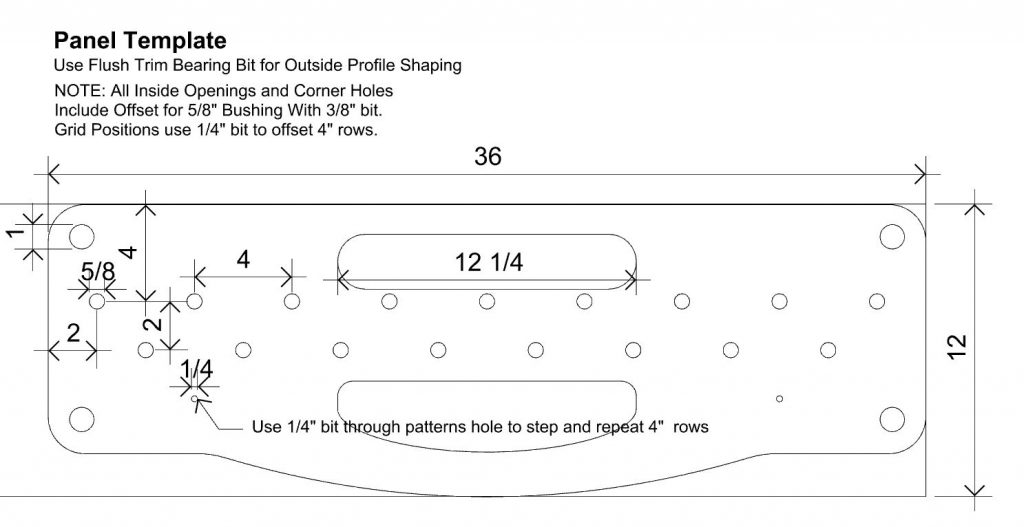
If you have a small CNC in the 2’ x 3’ range you can mill a small pattern that includes the critical features of the full-size CNC file. These are the top and bottom shapes, cut outs for hand holds, corner holes and a new setup for cutting the shallow grid. To make the show panel pattern, use a .250” compression or up-cut bit. All cuts for the pattern are through cuts. Cut the pattern out of 3/4” plywood or MDF.
Note that there are now two rows of 5/8” openings where the .250” grid was in the full size plan, plus two .250” holes in the row below the openings. The two holes are for aligning the grid rows. The other inside cuts: the hand holds, corner holes use the same bushing but a 3/8” bit. The outside shapes on the panels are do be done with a flush cut bit.
For the legs, either use a small CNC to make a single leg as a pattern for shaping the others or cut out all the legs on your CNC. To use the patterns and complete the project follow the shared instructions for non-CNC users below.
A lesson in CNC thinking
If you don’t have access to a CNC, no worries. With a little CNC thinking you can make the pattern with conventional tools and gain many of the benefits. What is CNC thinking?
CNC’s primary benefits to a woodworker are it’s accuracy and repeatability. To get those gains with regular woodworking tools, you need to combine precision layout with smart pattern making. The idea is to make the same pattern included for a small CNC except we’ll make it by hand.
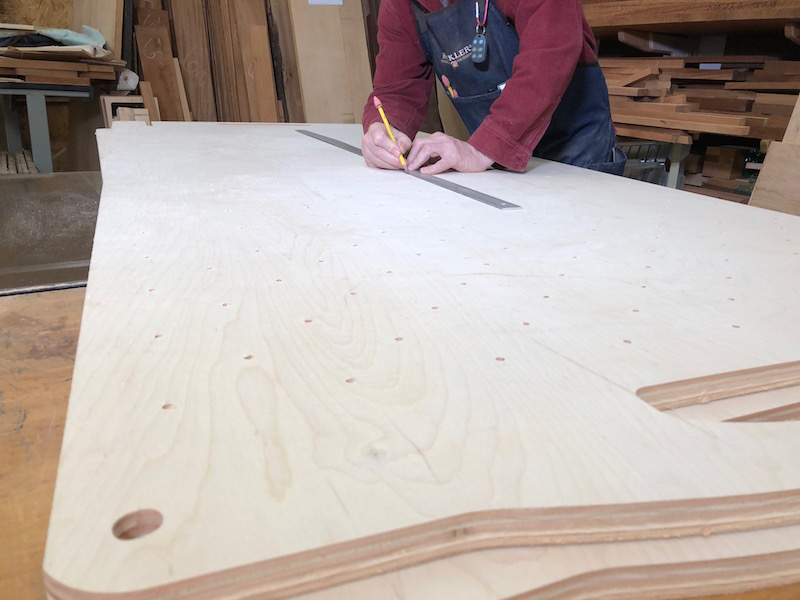
Here’s a link to a PDF plan with the details and measurements you need to make pattern using conventional woodworking techniques. The critical detail in this pattern is precision layout of the grid. Use long rulers, good quality squares and a sharp pencil to locate the center points of the two rows of 5/8” grid holes and the two 1/4” holes on the row below. The 5/8” holes should be cut with a Forstner bit on a drill press. To insure perfect drill position, first tap a small center point of each hole with an awl. If you hold your pattern loosely under the drill press at the start, the Forstner bit will follow the center point and nudge the pattern into place.
When it comes to the shape at the top and bottom of the panel, I suggest you use an inkjet or laser printer and print out the top of the panel plan using the tiling features common to all printers. Use Spray Mount to glue the paper pattern to the blank, band saw close to the line and use a rasp to refine the curves.
Using the pattern
The small pattern made by hand or on a small CNC makes an important assumption: Because the panels are too large to handle on a router table, you need place the pattern on top of the rough cut panels in order to to use it. Outside shapes are cut with a flush trim bit — the kind where the router bearing is at the bottom, closest to the router and the pattern is double-stick taped to the blank. Inside cuts (the handle cut outs, corner holes) are made with a 3/8” bit and a 5/8” router bushing.
The grid
For the grid, we’ve replaced the 1/4” holes of the CNC version of the project with 5/8” holes for a router bushing. This time use your router with a 1/4” bit and the same 5/8” bushing and set your depth to 1/16”. To start, draw a line at the bottom of the panel 29” up from the bottom of the panel. Align the flat part of the pattern to it. Clamp and hold the pattern to the panel and with your router setup, route the two rows of holes. Move the panel up 4”. Now, locate the your next two rows, by using use the shafts of two spare 1/4” bits in the two 1/4” holes in the pattern in the shallow holes on the row you just cut. Once locked in place, clamp, cut and repeat. You’ve just built a CNC caterpillar to move your cuts along the length of the panel. This is a great trick that I use all the time for moving, positioning and cutting oversized pieces on my CNCs.
Legs
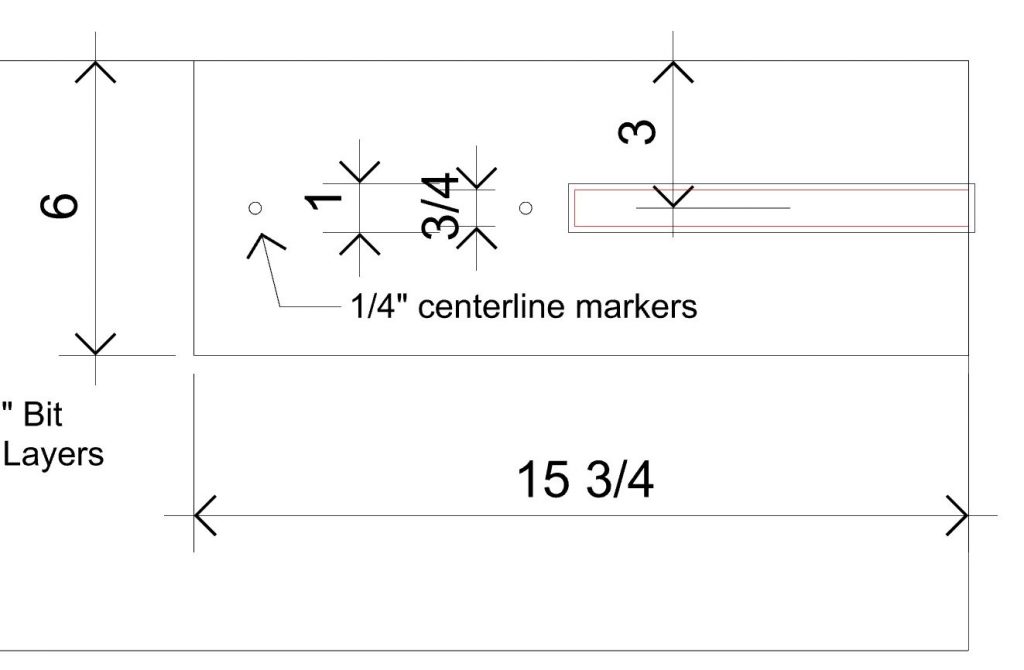
For the legs, use the same concept as the panel patterns. Carefully layout one leg, rough cut on a band saw, refine with a rasp and use it as a pattern to shape the other legs with a flush cut bit.
Two leg are glued together into a front/back pair. Two pairs are needed to support each panel. To make a set, the legs needs three 10mm x 50mm Dominos or other loose tenon or biscuit joint connections on the bottom half of the legs. Don’t glue the top half that will have a slot cut later. The pairs should be glued, clamped and cured before cutting the 8” long slot for the panels at the top. On the CNC, I recommend setting your origin point at the top of leg set and center your bit on the glued-up seam. If the earlier test cuts fit, then the cuts in the legs will fit perfectly, too.
There is an optional leg design. The legs shown in the photos are designed to be soft and leg friendly But, if you make one of the leg sides square to support that 12” x 36” piece of plywood you saved earlier, you get a very useful shelf at the bottom of your display. Choose whatever leg design you need when you set up your panels.
Fitting the slip joint
Just like in the first post, you need to run tests to refine the fit of the slip joint slots on the panel and glued up leg pairs before you commit to the final cuts. Run out samples on scrap and test until the joint is just snug. Once ready, then cut slots on the legs and the show panels.
Completion
If you’re making a set of panels, three oversized Domino slots need to be cut on the sides of each panel to connect them together in a series. For connectors, use 10mm x 50mm Dominos or better yet, make the 3D-printed plastic panel connectors I designed for this project shown in the previous post.
Once everything is tested and fits, all you need to do is slightly round over all the edges, lightly sand and apply finish — if that’s your choice.
Lessons learned
Like most things in woodworking, there are several methods you can use to get to the final result. These two posts show three different ways to build this project. CNC, small CNC or making an accurate, smart pattern using conventional tools and a little CNC thinking. In future posts, I will try to offer smart patterns and CNC thinking alternatives whenever possible.
Additional Resources
- Downloadable PDF Display Panel Plan
- Downloadable CNC Plan for larger CNCs
- Downloadable CNC Plan for small CNCs
- Downloadable PDF Plan to make the project small pattern
- Link to Thingiverse files for 3D printed connectors
- Digital Woodworking on Instagram
- Personal Work on Instagram
- Digital Woodworking YouTube Channel
Popularwoodworking.com is a participant in the Amazon Services LLC Associates Program, an affiliate advertising program designed to provide a means for sites to earn advertising fees by advertising and linking to Amazon.com and affiliated websites.
Here are some supplies and tools we find essential in our everyday work around the shop. We may receive a commission from sales referred by our links; however, we have carefully selected these products for their usefulness and quality.


unbiased reviews for best router tables 2019
https://routertablesreviews.com/