We may receive a commission when you use our affiliate links. However, this does not impact our recommendations.
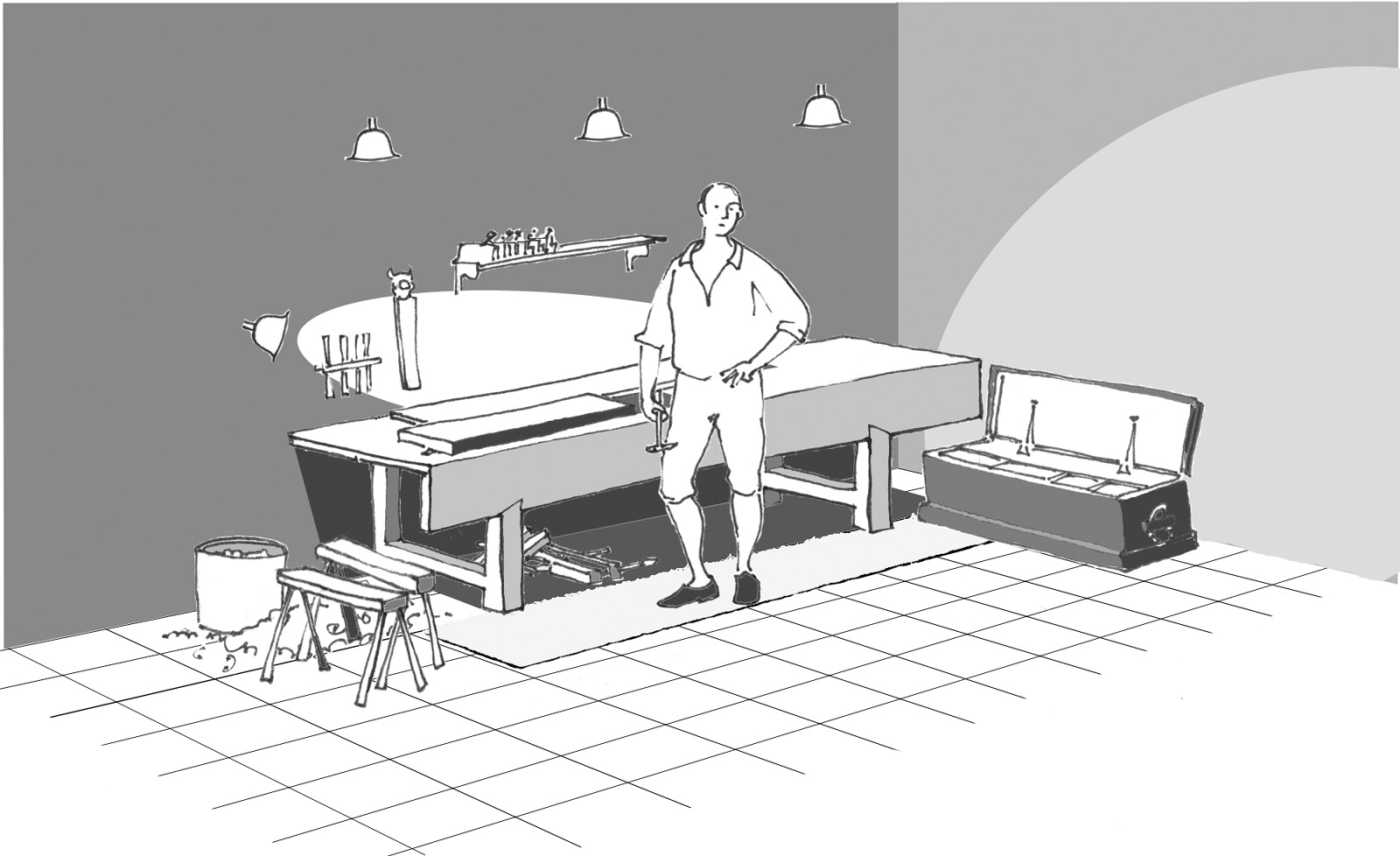
I’m using cartoons to illustrate most of this column for two important reasons. Not only does it allow me to show the “ultimate” shop without actually having the ultimate shop, it also helps to reinforce the notion that the “ultimate hand-tool shop” exists only in our imaginations, and is totally devoid of the real-life compromises and practicalities that shape real-world workshops.
Perfection doesn’t exist. But you can come close.
One of the first things any beginning woodworker must do is set up a workshop. Like so many other things a novice woodworker must do, the preparation of a workshop shapes the capabilities and enjoyment of the craft long after the novice has become an intermediate or advanced woodworker.
Fortunately, many books and articles have been published on the subject. Unfortunately, few – if any – address the unique needs of hand tool usage. All too often, I see benches that are much too short, free standing, or shoved into some filthy corner. Provisions for sharpening appear to be haphazard afterthoughts. Tool storage solutions are typically completely inadequate for the unique needs of hand tools and their convenient usage. The general lack of consideration for the unique needs of hand tool usage conspires to limit the potential of any would-be hand tool craftsman.
Unlike modern shops where each new tool purchase requires a corresponding additional allotment of floor space, once a few basic hand tool work areas are established, there’s rarely a need for any additional growth. The trick is getting these areas laid out in such a way that they don’t prevent your future success.
Space to Plane
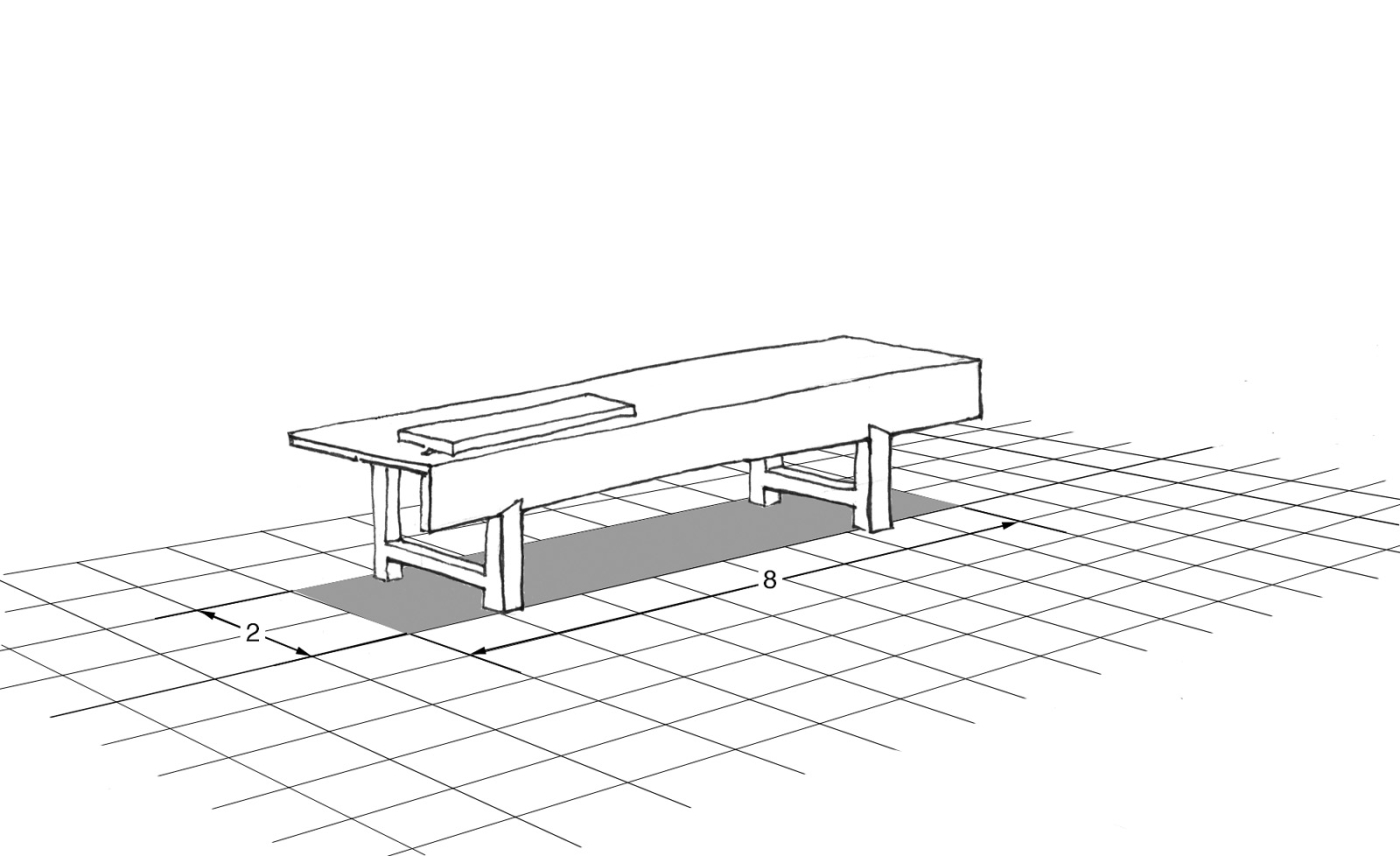
First, place your bench against a wall. A 2′ x 8′ bench is, in my opinion, the minumum amount of space necessary for the bench.
A workbench is used for hand planing and a host of joinery operations. When I built my 6′-long workbench, I thought carefully about the size of furniture I wanted to make. Nothing on that list was more than 4′ long, so I thought a 6′ bench would be plenty long enough. But there were two things I missed: First, a 40″-wide by 20″-deep chest of drawers needs approximately 8′ of base moulding. You can’t make 8′-long passes over stock resting on a 6′ bench. Crosscutting the stock before moulding has disadvantages. Second, I find it best to plane my stock before I saw it. That way, I know where the knots are, where the sapwood or difficult grain is, etc. This helps me avoid those areas when I cut mouldings or saw joints. Consequently, I prefer to plane my stock in the lengths in which I purchase it. Because I buy mostly 8′ stock and rarely need more than 8′ of moulding, I recommend setting aside space for a roughly 2′ x 8′ workbench.
Eight feet of shop space isn’t enough room for an 8′ bench. All planes need “run-off” room. Because the shavings tend to fly off this end of the bench anyway, I find this a convenient location for a trash barrel.
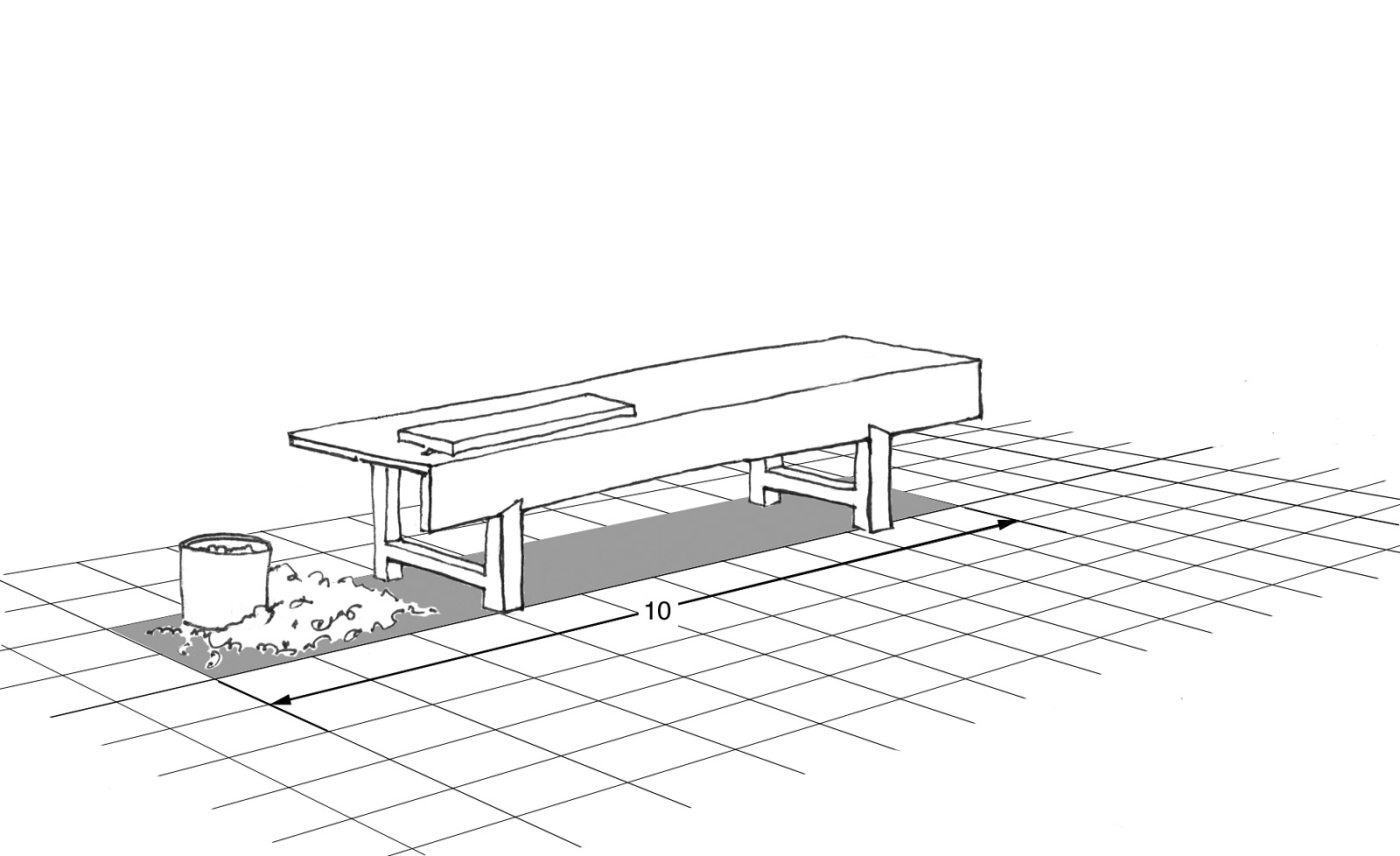
You don’t want to strike the wall with your jointer plane. Put the end of your bench 2′ from the wall – and it’s a good place for a trash can.
Don’t put the end of your bench too close to a wall. Someday you may take my advice and get yourself a 30″-long plane. Make sure you have room to use it. I think it wise to allow a couple feet for run-off room.
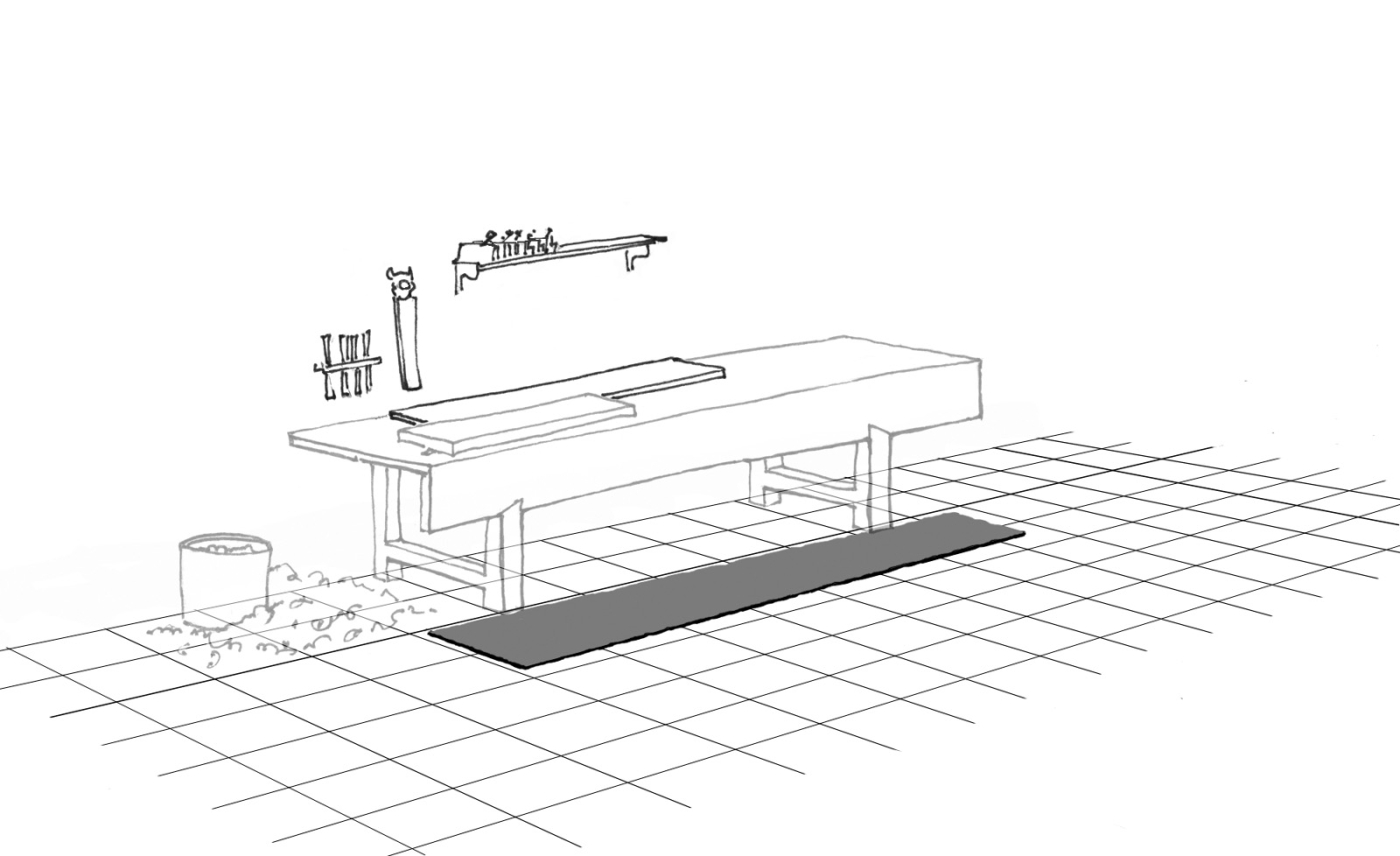
Locating your bench with the back against a wall provides it with stability for sawing or other work perpendicular to the long front edge of the bench. A piece of scrap placed between your stock and the wall provides a convenient backstop for material being planed. The wall also prevents tools from being knocked off the back and provides a convenient location for a chisel rack and other tool storage.
An anti-fatigue mat in front of your bench is an essential part of your shop. It gives you sure footing and is good for your back, too.
An anti-fatigue mat in front of your bench is more than a luxury. Plane shavings can make finished wood or concrete floors quite slippery, even after they’ve been swept away. Planing long stock requires quite a bit of foot work, so I recommend considering a sweep-able non-slip work mat of some sort.
Room to Saw
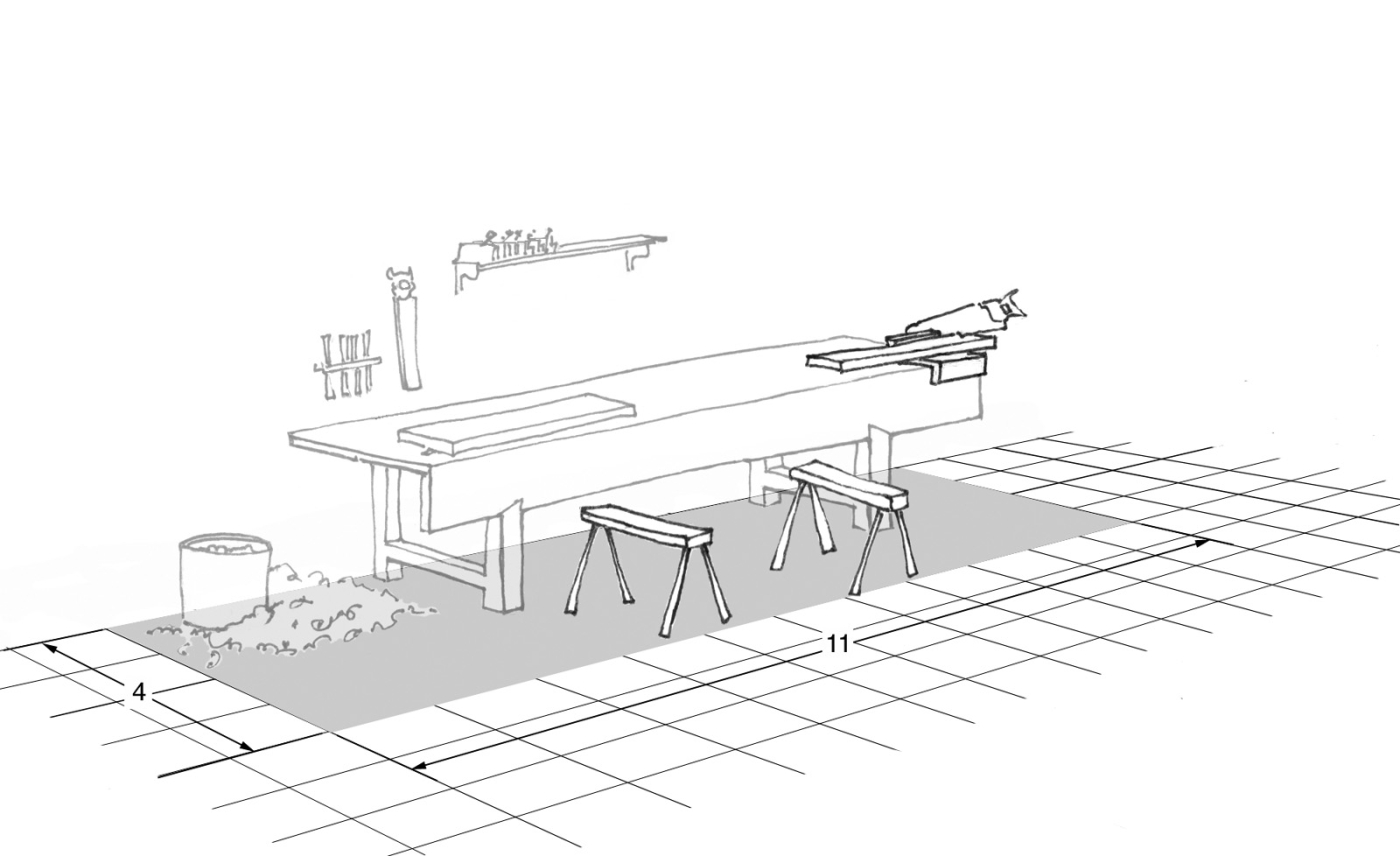
Set aside 2′ of space in front of your bench for ripping at the sawhorses. Add 1′ to the right of the bench for crosscutting.
Learning to saw by hand offers woodworkers the opportunity to explore traditional joinery. Like anything else one attempts to learn, it’s easier to saw with good tools and the right space. In Anglo-American shops, ripping is performed on sawhorses using a wide-bladed “western” saw.
The size and shape required for ripping fits well directly adjacent to the bench. I think this resulting 4′ x 11′ rectangle is the absolute minimum size for the ultimate hand tool shop.
One advantage of working wood with hand tools is that you have the ability to work very wide stock that would be too heavy or unwieldy to muscle across machines. Having space to rip directly in front of your workbench saves you from having to carry some big boards through your shop. That said, if space is tight you can rip almost anywhere. It’s quite easy to take your sawhorses outside and rip on the patio or in the garden.
Many woodworkers enjoy the convenience of a tail vise. Not me. Its limited usefulness is overshadowed by the difficulties it creates for essential crosscut sawing.
The right end of the bench is the perfect place for cutting joints and accurate crosscuts. Anglo-American woodworkers got away without tail vises for at least 100 years and so can you. You needn’t leave much space to the right of your bench for the offcut. A long offcut is difficult to support here anyway.
Tool Storage Space
Hand tools aren’t like hand-held power tools. Dropping them is generally disastrous. Metal tools are sensitive to rust, which can cause pits in polished metal blades. Wooden tools are sensitive to changes in humidity. Finding efficient ways of storing hand tools has been the effort of craftsmen for centuries. Rather than propose a revolutionary solution made from Medium-Density Fiberboard, a quick look back at what has been done might be wise.
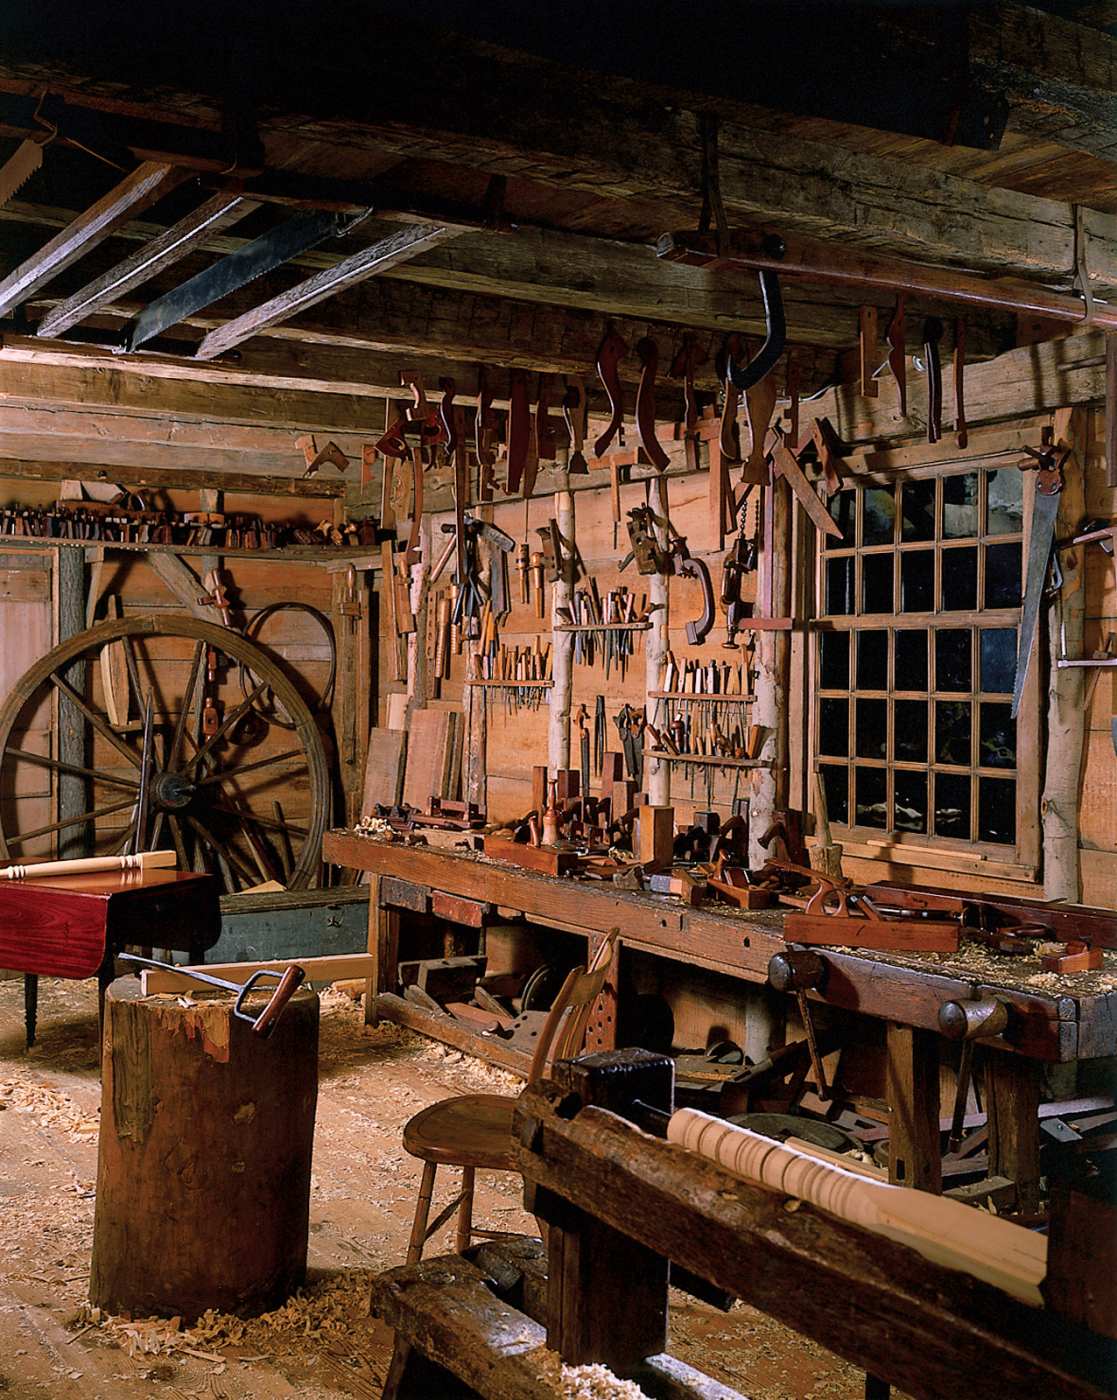
Images of pre-industrial shops clearly reveal a two-pronged approach to storing tools. Oft-used tools, generically referred to as “bench tools” because of their ever-present location on the bench, are shown stored on open shelves, or hung from hooks on the walls.
Tool chests, frequently painted a blue green color (perhaps because the copper-based pigment was inexpensive), are shown in several images of pre-industrial shops. For many years I believed these chests were merely a convenient means of transporting a journeyman’s tools as he “journeyed” from shop to shop. I was wrong. These chests are deceptively large and insanely heavy. And the term “journeyman” is an English corruption of the French word for “work day” (journée) referring not to the traveling nature of the worker but rather the way in which he is compensated for his work (for a day’s work). These chests are a surprisingly efficient way to store hand tools. Tools are easily accessed, safe from the hazards of the workshop, movable (with some difficulty) and the chest is unobtrusive. Made correctly, the chest’s tight-fitting lids seem to protect the contents from rust. Popular Woodworking has offered a variety of plans for tool chests and wall-hung cabinets. One advantage of a traditional tool chest is that it can be relocated seasonally if necessary.
If we define the “bench tools” properly and narrowly as those tools used almost continuously, rust should not be a problem. But great changes in humidity or temperature require us to reconsider the whole concept of bench tools. A fine tool chest may make an excellent window seat or coffee table. Tool chests from the 18th century are often indistinguishable from blanket chests. So why not put one in your bedroom? Tools required for a day’s work could be unpacked and hung on walls or laid on open shelves only to be returned at the end of a day’s work with no great loss in efficiency and some significant gain in peace of mind.
Lumber Storage Space
Planing and sawing by hand forces you to read the grain, and feel its movement, variations in density, etc. I’m not one of those people who falls in love with wood or its grain. But a thorough familiarity with the material is inescapable. Before too long, every hand tool user develops preferences for certain lumber species, air-dried stock as opposed to kiln dried or steamed, and even specific cuts of wood such as quartersawn, plainsawn heart wood, flitches, etc. Consequently, and without exception, the hand tool users I know purchase wood that meets their preferences regardless of whether they have an immediate use for it or not. So I think it is wise, if at all possible, to prepare for the long-term storage of a great quantity of lumber for future projects.
However, your lumber rack needn’t necessarily share your workspace. You may find your garage, woodshed, or even a shady portion of your lawn or garden a convenient location for your lumber rack.
When designing your lumber rack, consider such things as providing sufficient airflow through the racks, accessibility and shading the lumber from sunlight. If children are a part of your life, please take every precaution to make your lumber rack safe for someone who may mistake it for a jungle gym.
Sharpening Space
It has been said that the key to working with hand tools is first learning how to sharpen them. No ultimate hand tool shop is complete without some provisions for sharpening. Although Jacques-Andre Roubo’s 18th-century text clearly shows a dedicated sharpening area, this isn’t an absolute necessity. The workbench can be a convenient place to sharpen because it is sturdy and just the right height for such an activity. But there are several reasons why many prefer a dedicated area as Roubo illustrated. Most sharpening equipment requires some sort of lubrication, which can make a mess of your bench and any future projects. Grinders used by many woodworkers spew nasty abrasive particle dust. Let’s face it. Sharpening is messy business.
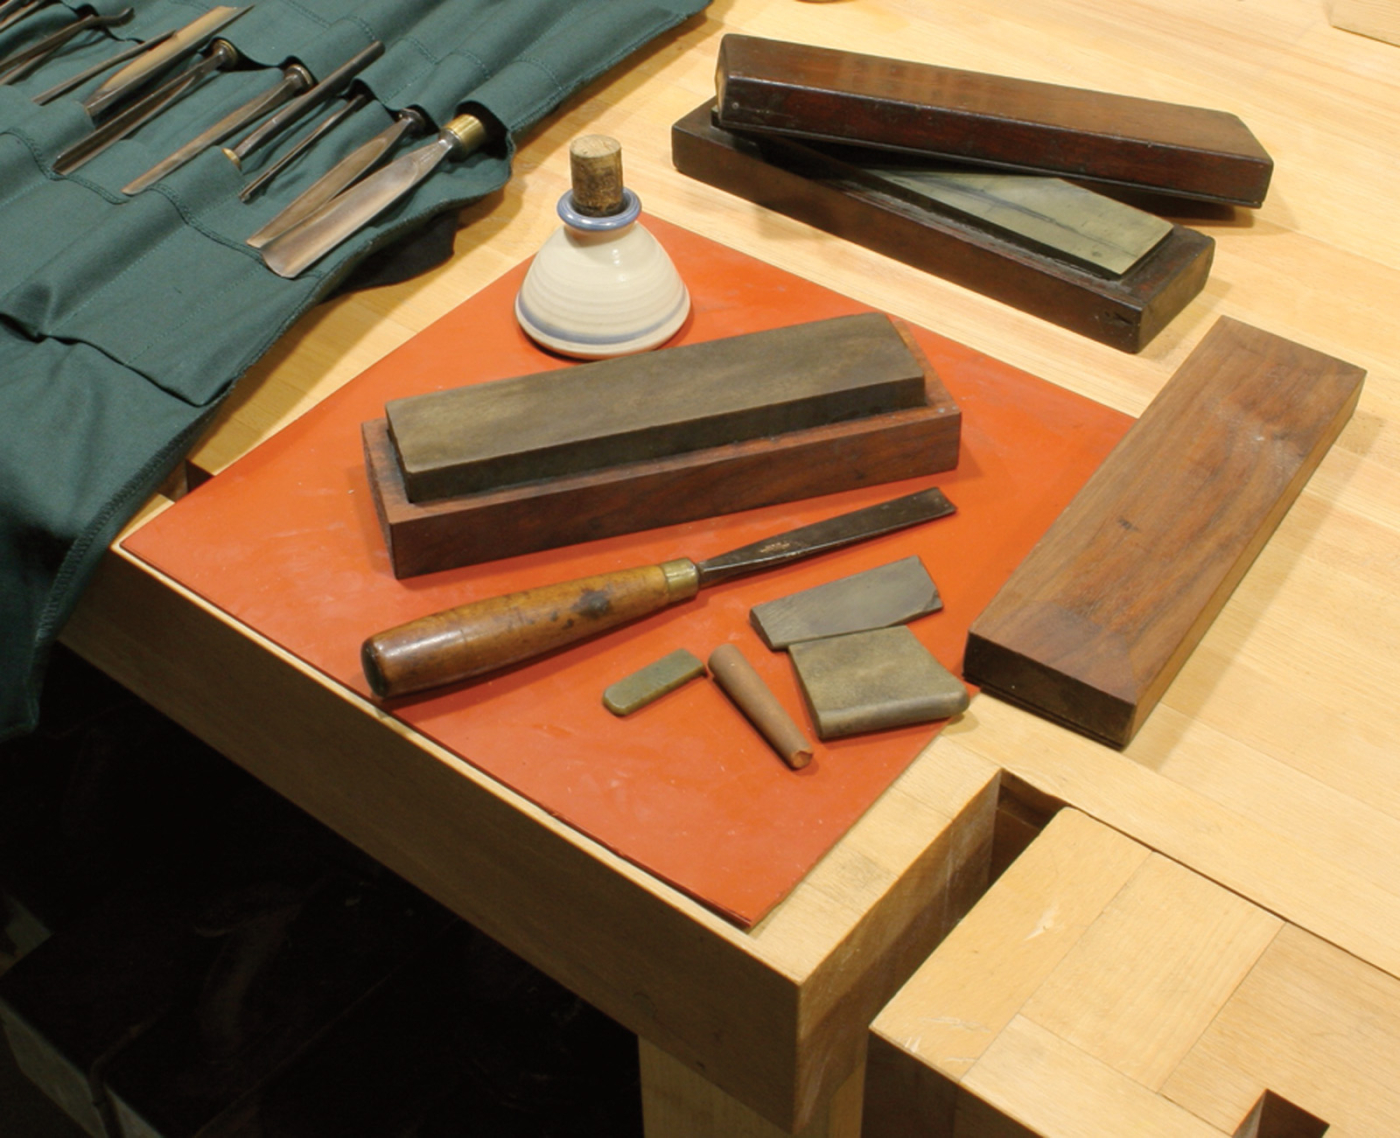
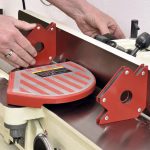
While a dedicated sharpening station is preferred, if tight space requires that you sharpen on your bench, consider some sort of mat to protect it from oil or water – and to keep the stone from slipping around.
If space is short, consider some sort of mat to protect your bench from oil or water that will fly off the end of your stones. This rubber mat serves double duty. It protects the bench and keeps the stone from slipping around.
For light honing, your bench may indeed suffice, but when more serious work is needed, it’s nice to have a dedicated sharpening area. A grinder and a small shop-built table of a convenient height will fit the bill. Now the sharpening station needn’t necessarily be in the workshop. This could be in an unheated or otherwise undesirable location. But an inconvenient sharpening area may discourage you from sharpening. Nothing will discourage a woodworker faster or more completely than working with dull tools. In the “ultimate” workshop, there would be some well-equipped sharpening area. The rest of us just need to find a space we can make a mess in.
Lighting your Workspace
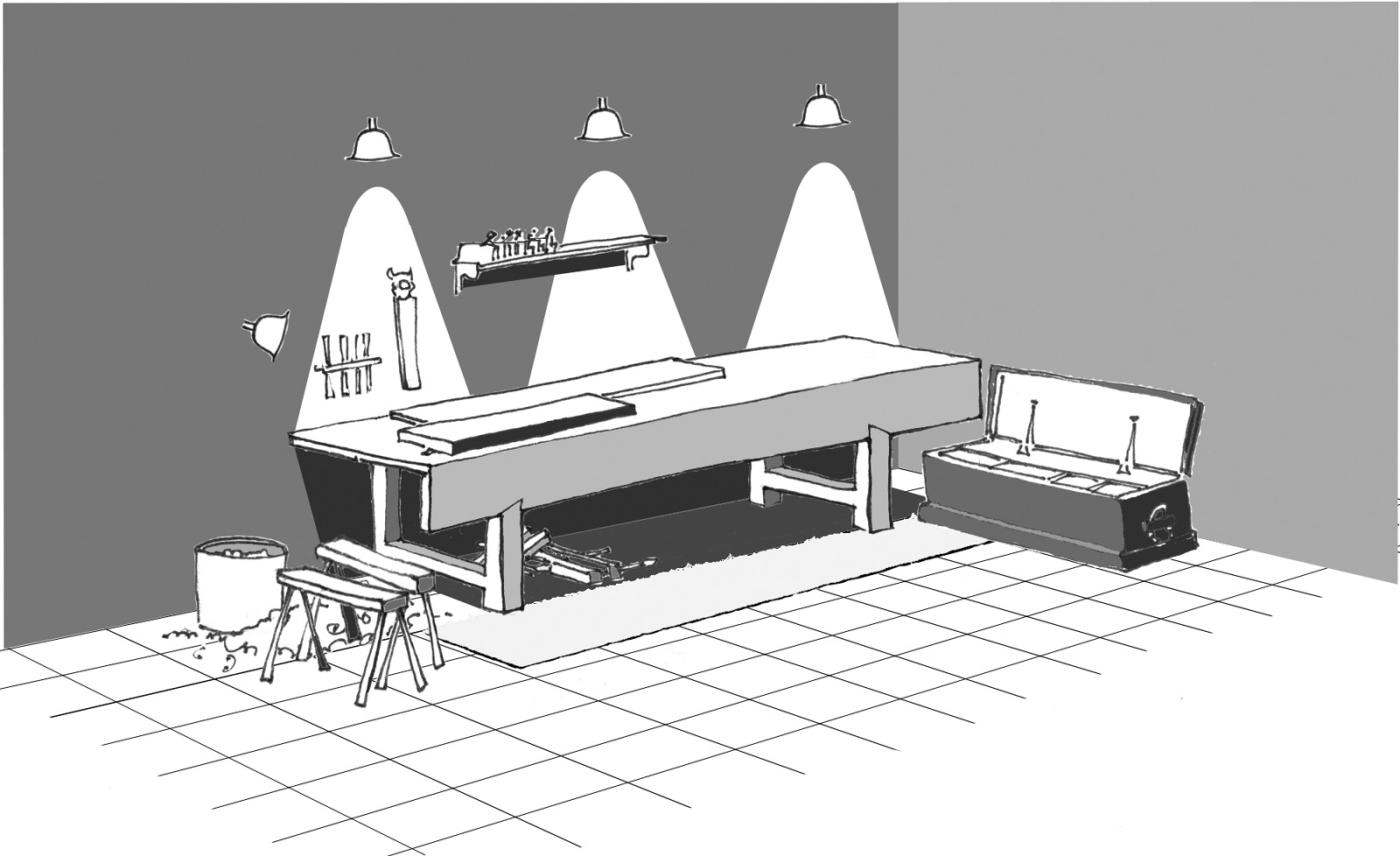
Creating shadows on your bench is important. Shadows allow you to see a profile develop on your work. Create light sources by having lamps you can switch off individually.
In my article about the Anthony Hay cabinetshop in Colonial Williamsburg (November 2005), Mack Headley described some of the benefits of working in “raking” light. The natural light from a nearby window casts shadows, allowing him to read a surface when planing or carving. I have found knife lines to be all but invisible under the shadow-less flood of light from 4′-fluorescent shop lights. Soon after that visit to Colonial Williamsburg, I removed the 4′ shop lights over my bench and began experimenting with different sorts of lights. Lighting is a complicated subject that I hope to read about in some future issue of Popular Woodworking. Until then, here’s what I ended up with.
Lighting the ends of the bench is important. Although it’s counter-intuitive, the ability to turn off lights individually can help you better see what you need to see.
Over my bench I’m using an array of 13-watt, compact fluorescent bulbs in clamp work light fixtures (they have a color temperature of 3500K). These bulbs shed a nice white light, are inexpensive, and, most important, can be turned off individually or quickly repositioned, giving me shadows when and where I need them. I made sure to position lights over the ends of the bench where the finest work is done. You could substitute standard incandescent bulbs in similar fixtures or choose the much hotter and even brighter halogens, but these would need special fixtures. I found higher-color temperature compact fluorescent (CF) bulbs provided better illumination than lower-color CF bulbs with twice the wattage.
With the raking light switched on and the over-bench lights switched off, I can easily see when I need to sharpen my smooth plane.
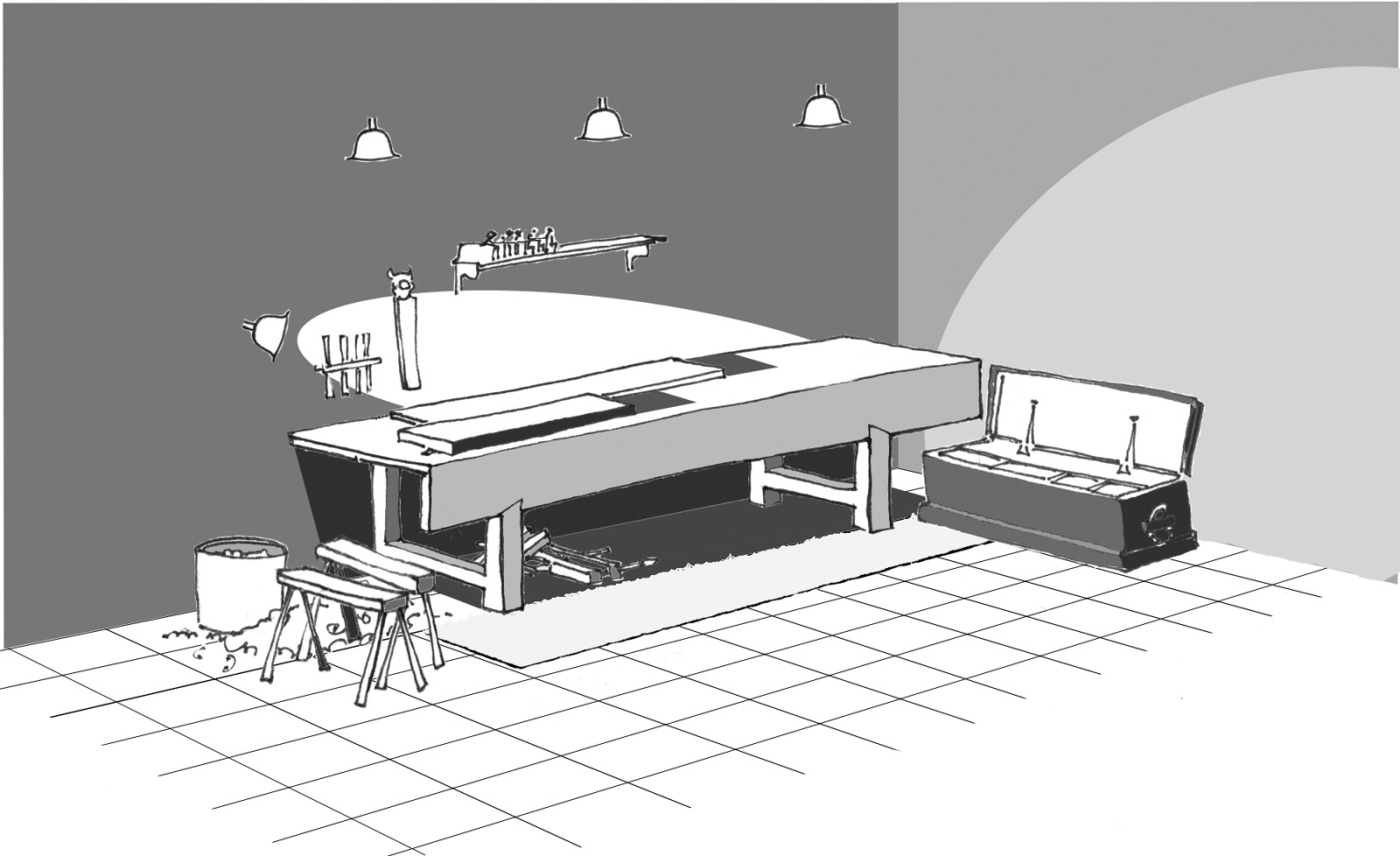
A raking light, as shown above, will quickly point out imperfections in your work, from tear-out to plane tracks.
I prefer the flexibility of multiple low wattage lights. I can’t think of a better application for this approach than these “raking” lights. A strong light would blind you.
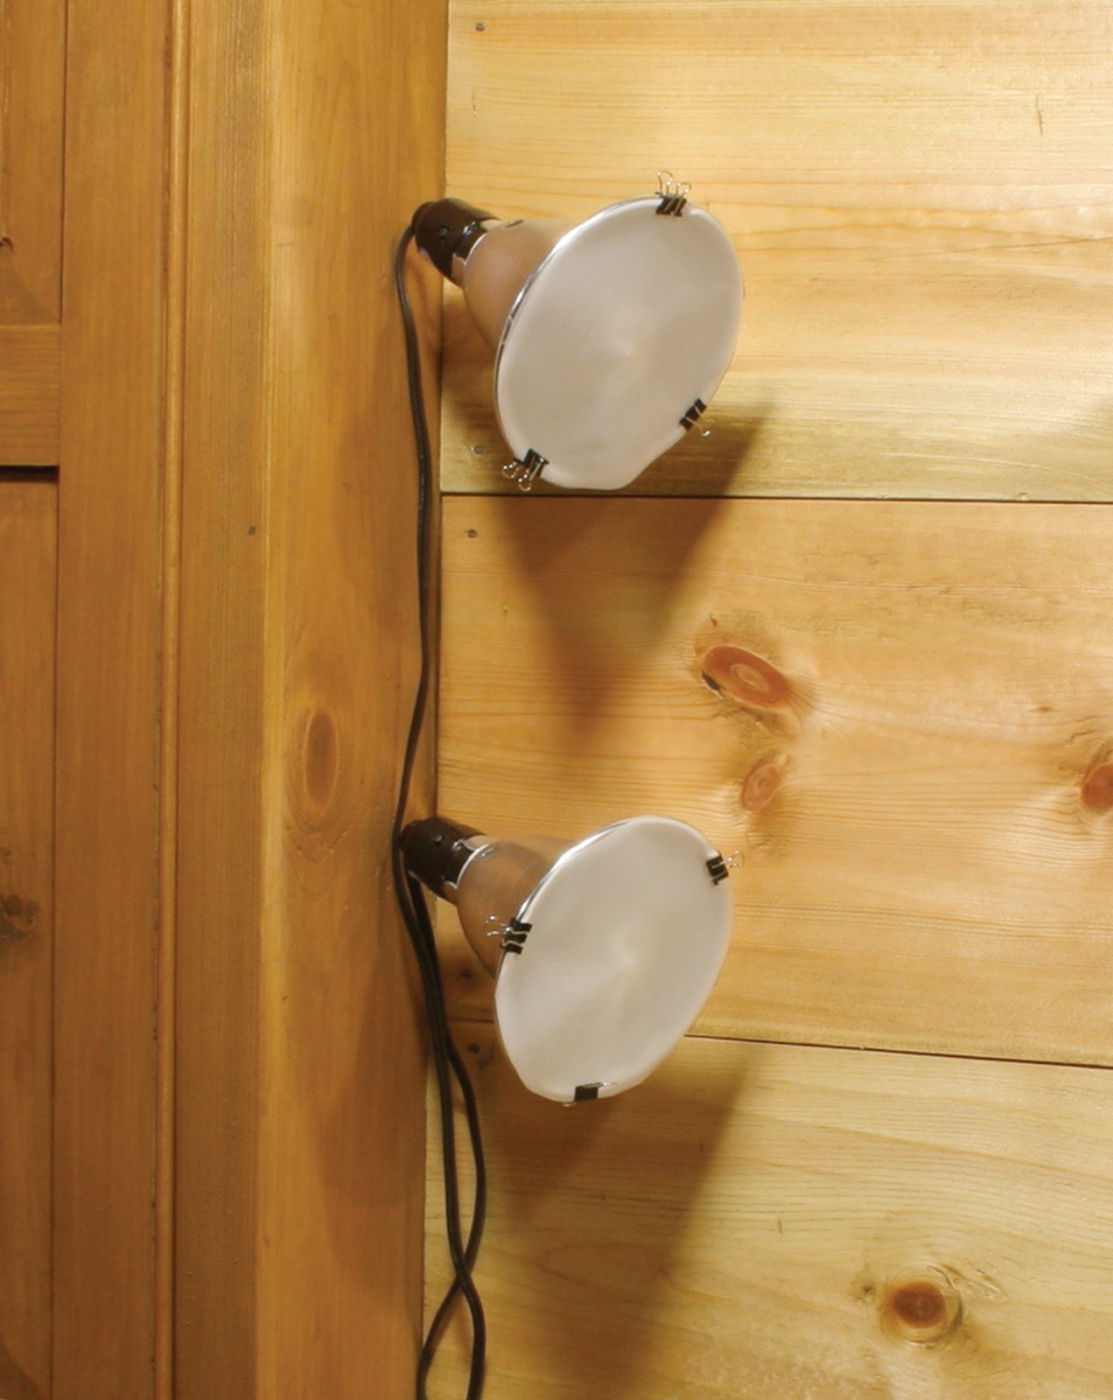
Multiple low-wattage lights such as these offer great flexibility. The diffusers are a great help in reducing glare.
To produce a raking light, I’m using the same 13w, 3500K CF bulbs attached to the wall behind the left end of my bench. To keep from being blinded, I attached a photographic filter material (Cinegel #3000) called a “gel” (it looks like tracing paper) to the front of each fixture with binder clips to act as a diffuser. This material won’t catch fire even in direct contact with the fluorescent bulb and is inexpensive.
An Inviting Shop
By far one of the coolest things about an ultimate hand tool shop is that with a few precautions, it can be made safe enough for a baby. Woodworking is such a solitary hobby, but it needn’t be so. Without the noise and the dust of machinery, the shop can be a pleasant place to be. My shop has toys for my children (although they prefer tenon cheeks and plane shavings) and a comfortable place to sit down. The warm wood paneling didn’t take long to install, but it really took away the harshness of the cinderblock walls. The ultimate shop is a shop you want to be in. The ultimate shop is a shop where a child or grandchild, neighbor or spouse feels welcome. The ultimate shop is a shop in which woodworking can be shared.
Conclusion
I hope I haven’t misled you though. There is no actual “ultimate” hand tool shop. Every shop is the result of several, often unfortunate, compromises. Nor should you consider the hand tool shop as necessarily separate from a modern shop. Instead, you can incorporate “ultimate” hand tool shop features in the space created by pushing aside your 12″ planer and 6″ jointer.
But the one aspect of the ultimate hand tool shop that really earns its title is that it can fit into the end of a garage without moving your car, or just as easily into a spare bedroom, or garden shed, or patio. It’s the ultimate workshop because it can allow someone in a big city to make something wonderful in a very small space.
The truly ultimate hand tool shop offers craftsmen not just a different way to work, but an opportunity to work.
The Dominy Shop
The reconstructed Dominy Shop at Winterthur offers a peek into a rural pre-industrial woodshop. The Dominy family produced a wide variety of items including furniture and clocks in their East Hampton, N.Y., home from the 1760s to the 1840s.
Although the “ultimate” hand tool shop I’ve described in this article was not based on this reconstruction, we can see many of the elements I discussed including the position of the workbenches, tool storage and even the color of the chest in the back corner.
This unique reconstruction, (which was based on 1940s sketches of the original shop and eyewitness accounts) validates our notions of period shops. The Dominy-made furniture and clocks included with the exhibit earn the shop its inclusion in any “ultimate” hand tool shop article.
Winterthur, formerly the estate of H.F. DuPont, is located in Delaware’s Brandywine Valley. The museum, which includes a celebrated collection of American art and antique, is a great place to visit.
Here are some supplies and tools we find essential in our everyday work around the shop. We may receive a commission from sales referred by our links; however, we have carefully selected these products for their usefulness and quality.