We may receive a commission when you use our affiliate links. However, this does not impact our recommendations.

For the cost of one quality piece of large machinery, you can set up a complete shop.
Setting up a hand-tool-oriented shop is a fraction of the investment of setting up a power tool shop. For the price of one large quality piece of power machinery, you can buy all of the hand tools you need to build things – from rough lumber all the way to assembly and final surface finishing. And that is if you are buying the best-quality new tools available.
To do the same work with power tools, you’d need three to four machines, a bunch of small powered hand tools, plus good dust collection to deal with all the small particles. On top of that, you need the space to put everything.
And for the home woodworker, hand tools can be just as fast as power tools. Woodworking as a craft was fully formed long before the advent of machinery and electricity, and people did not work slowly or inefficiently.
It may take some time to develop the skills to be proficient with hand tools, but it is actually easier to get started with them than it is with machines. As long as your tools are sharp they will give you results, and the more you use them the better you will become at controlling them.
One reason people have turned so readily to power tools is that they’ve been convinced it’s much easier to learn how to set up a machine to do a task that it can then repeat over and over than it is to learn the hand skills to be proficient at that same task. Nothing could be further from the truth – even your earliest attempts with a hand tool will give you better results than the first attempts to do the same thing with machines. And it comes at a much lower initial cost.
Tools for Layout & Fastening
The list of hand tools you need for efficient work is nowhere near as daunting as you might think. As you build your kit, it is important to understand that the individual tools do not matter as much – the key is that you have the right group of tools.
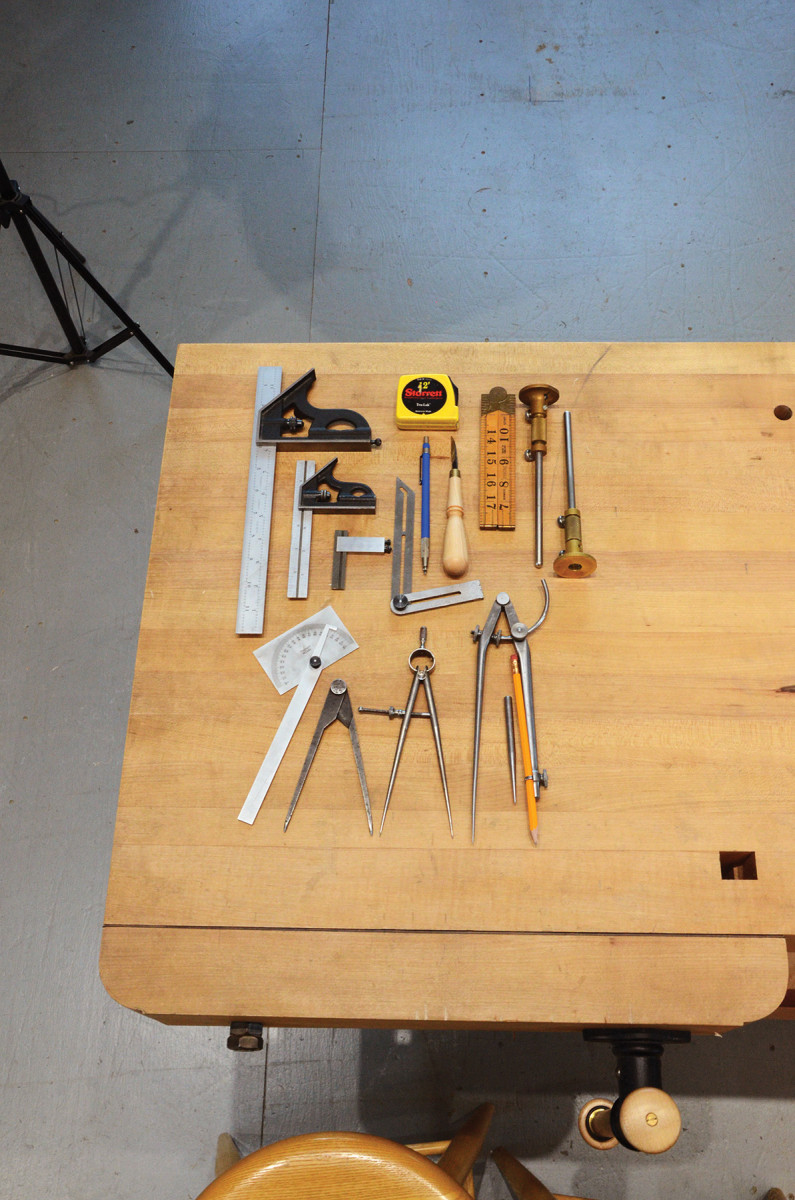
Layout tools. For marking and measuring, core tools include combination squares (12″, 6″ and 2″ are shown here, upper left), a tape measure and folding rule, a marking gauge (or two), a bevel gauge, protractor and dividers/compasses – and a pencil, of course.
The tools you get to fill out this group are completely dependent on which ones work best for you, and there may be specialty tools such as scrapers, rasps or moulding planes that you’ll want to acquire as the need arises.
Plus, you’ll need some measuring and marking tools for layout. I recommend a couple of combination squares – at least a 12″ and 6″ (it’s also nice to have a 2″ or 4″ one), and an awl. A bevel gauge and protractor will let you work with angles.
Two sets of dividers, and a compass allow for curves, and also let you lay out proportions and transfer points onto your stock. Two marking gauges allow you to transfer multiple dimensions without needing to measure. With a folding rule and tape measure, you can take specific measurements. The blade from your 12″ combo square can be a straightedge when needed.
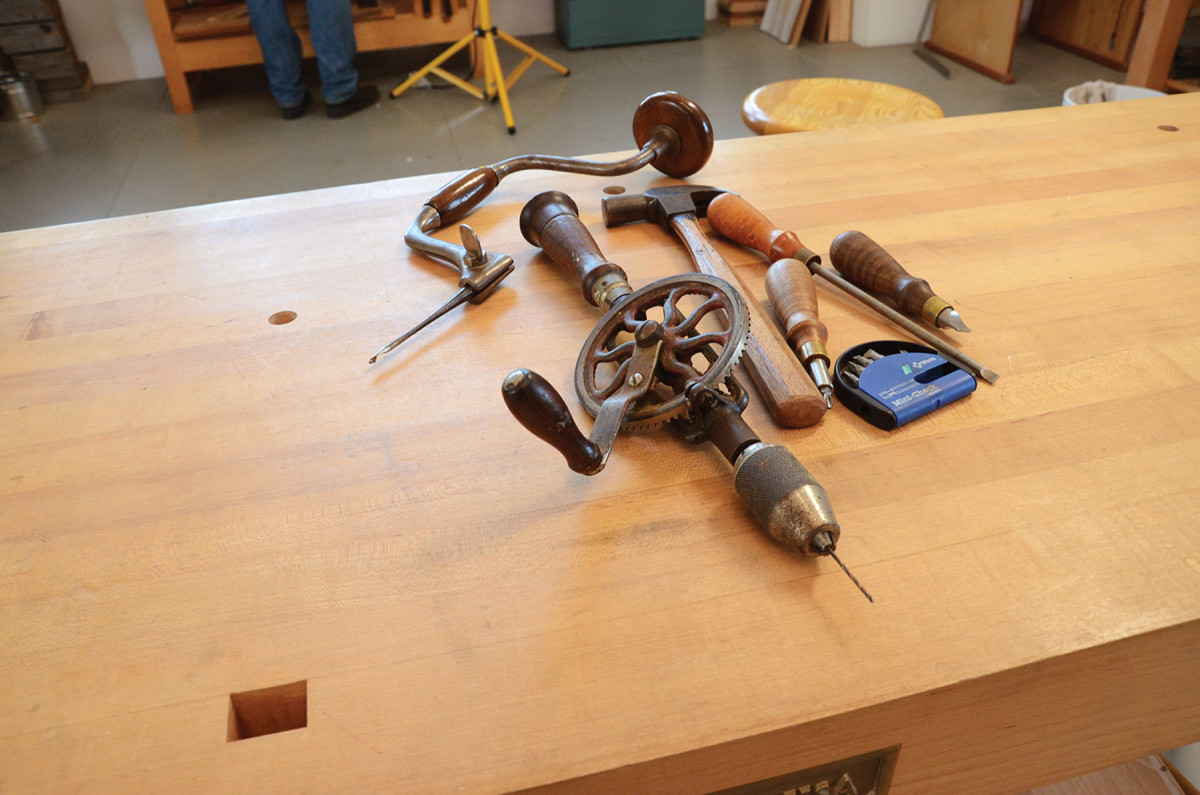
Fasten(ating). If you plan to use any mechanical fasteners, you’ll need a brace or hand drill (and bits), a drill, a hammer and a couple of screwdrivers (or a driver with changeable tips).
And unless you only use all-wood joinery such as mortise and tenons or dovetails, you’ll also need a drill (eggbeater style or a brace) and a hammer, as well as some screwdrivers.
The basic tools for stock preparation, shaping and joinery can be broken into five groups: bench planes, detail and joinery tools, saws, tools for curved work and sharpening tools.
Read: Precision Instruments for Woodworkers
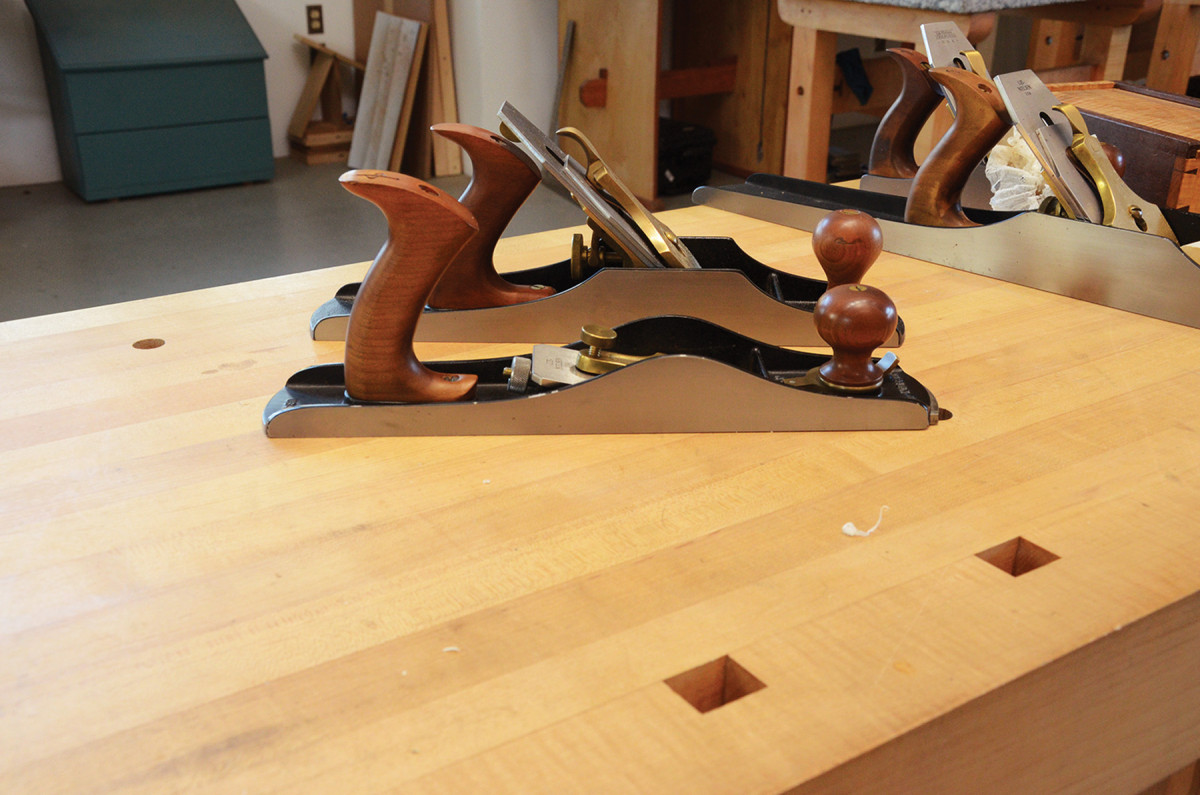
Bench Planes
Bench planes – the jack, jointer and smoother – allow you to handle dimensioning and finishing of stock.
The jack plane is between 14″-15″ long, making it ideal for rough surfacing. As a medium-size tool, it is large enough to get things reasonably flat and short enough to get there quickly.
A roughing cut is the thickest, heaviest shaving, and is typically between .004″-.010″ thick, depending on how cooperative the piece of wood is. (As a reference, a piece of printer paper is typically about .004″ thick.) To use this plane for heavy roughing, sharpen the blade with an 8″-10″ radius; this will make it perform more like a scrub plane.
A jointer plane has the large bearing surface (22″-24″) required for flattening. It does not matter if the board you are working on is large or small; if you want it fl at, grab your jointer.
A flattening cut is a medium thickness, between .002″-.004″.
A smoothing plane is 10″ or less in length. It doesn’t cut more smoothly than the other planes; it’s simply a much shorter plane than a jack or jointer, so it allows you to take a thin finishing pass more quickly than the larger planes.
Finishing cuts should be as thin as you can get, usually less than .002″.
None of these numbers are set in stone, just know that your roughing cut will be the thickest shaving, the flattening cut will be about half of that and the finishing cut will be about half that again.
I like to set my planes up for the cut before I go to work, so I take test cuts on a small piece of scrap to get them set to what I want them to be. The type of cut you need to take will tell you which planes to use for which task.
Read: Understanding Bench Planes
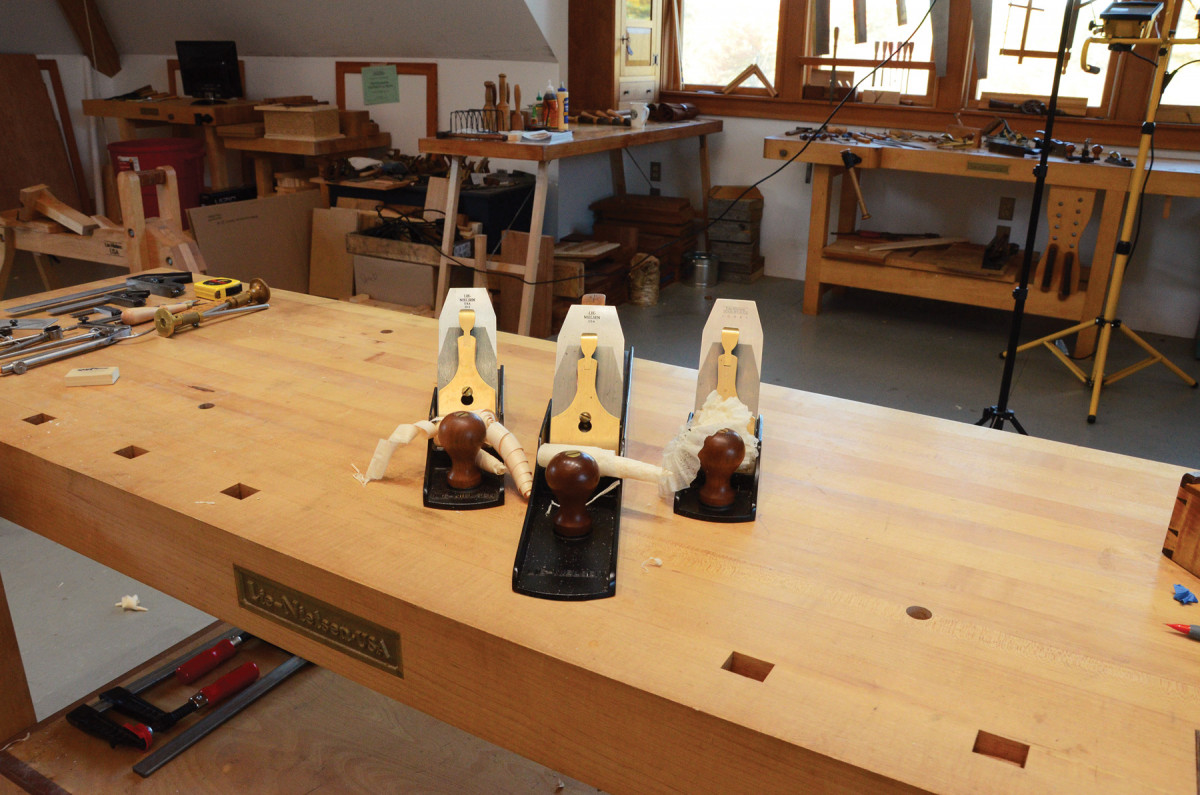
Remove, flatten, smooth. These three tools – the jack, jointer and smooth planes – allow you tackle just about any stock-prep job, start to finish.
Scrap test. Run a small block of wood over the blade as you set up a plane. That will tell you how far the blade extends, and its position relative to the mouth.
Detail & Joinery Tools
These are tools for putting things together, trimming and fitting. A block plane, shoulder plane, rabbet plane, router plane, plow plane and some chisels make up this group. Though there is less choice in the more specialized joinery and detail tools, the same principles apply as to the bench planes: Let the work dictate the tool you reach for. (Again, if there are options, I reach for the larger tool.)
A low-angle block plane, about 6″ long (or shorter), allows you to trim and fit efficiently. It can even be used as a small smoothing plane if needed.
A large shoulder plane is about 10″ long and has a blade that goes out to each edge of the plane’s body to allow cuts into corners – a necessity when you are creating or cleaning up rabbets, or cutting tenon shoulders. The mass and size of a large plane, such as the No. 073, gives you more control than you get with its smaller cousins.
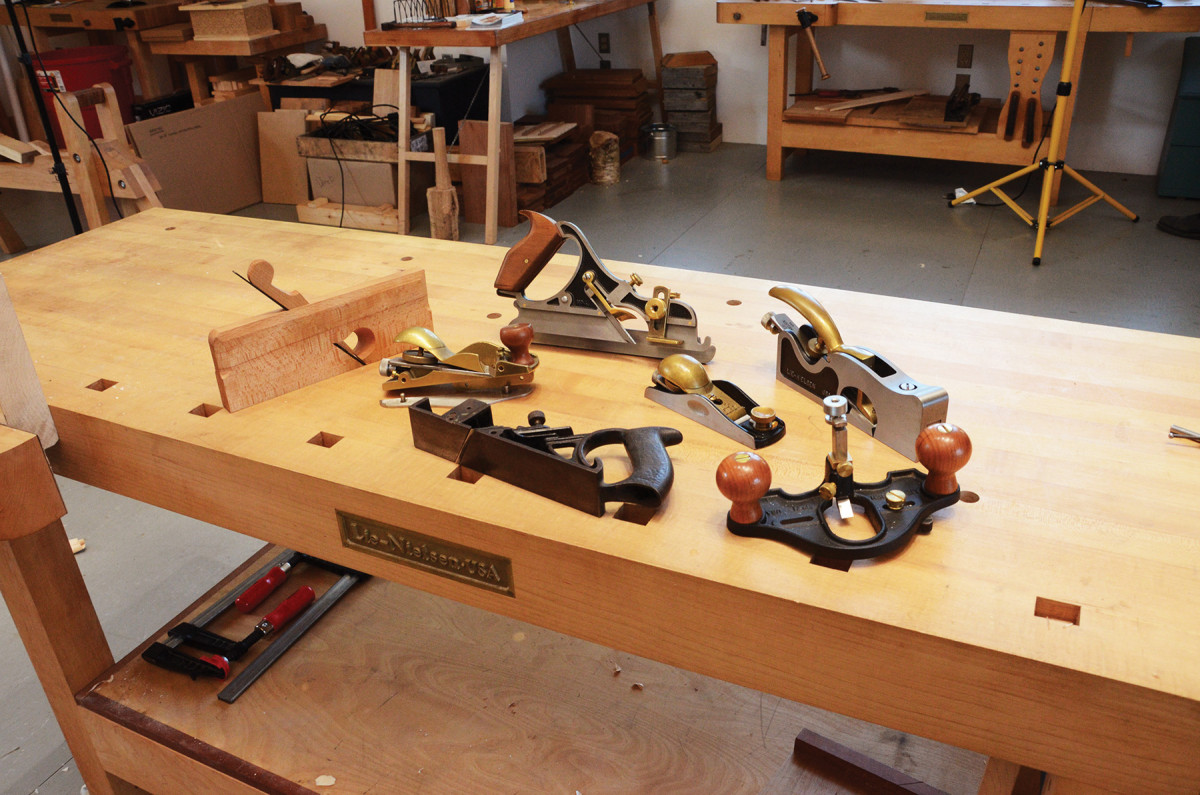
Joinery planes. These tools are for cutting various joints and fitting. Clockwise from the top are a plow plane, low-angle block plane, shoulder plane, router plane, skewed rabbet plane, skewed block plane and wooden rabbet plane.
The rabbet plane’s blade, like the shoulder plane, extends to the edges of the sole; it is an essential tool for casework because you’ll often cut rabbets for joinery. Frequently, these run across the grain, so a skewed blade is preferable. The best vintage option for a skewed rabbet is the No. 289 – but because it’s not easy to find, a skewed wooden rabbet plane or a No. 140 skewed block plane would be good options.
A large router plane (such as the No. 71) can be fitted with a variety of sizes of blades to handle different tasks. It is ideal for creating an even depth for a dado, or trimming the cheek of a tenon.
A plow plane allows you to set a groove in the face or edge of a piece (for a drawer bottom or a panel, for example). You’ll want several widths of blades for a variety of grooves. Tools such as the No. 45 and No. 55 combination planes can serve, but a dedicated plow plane is a better choice for this application.
Plane Selection
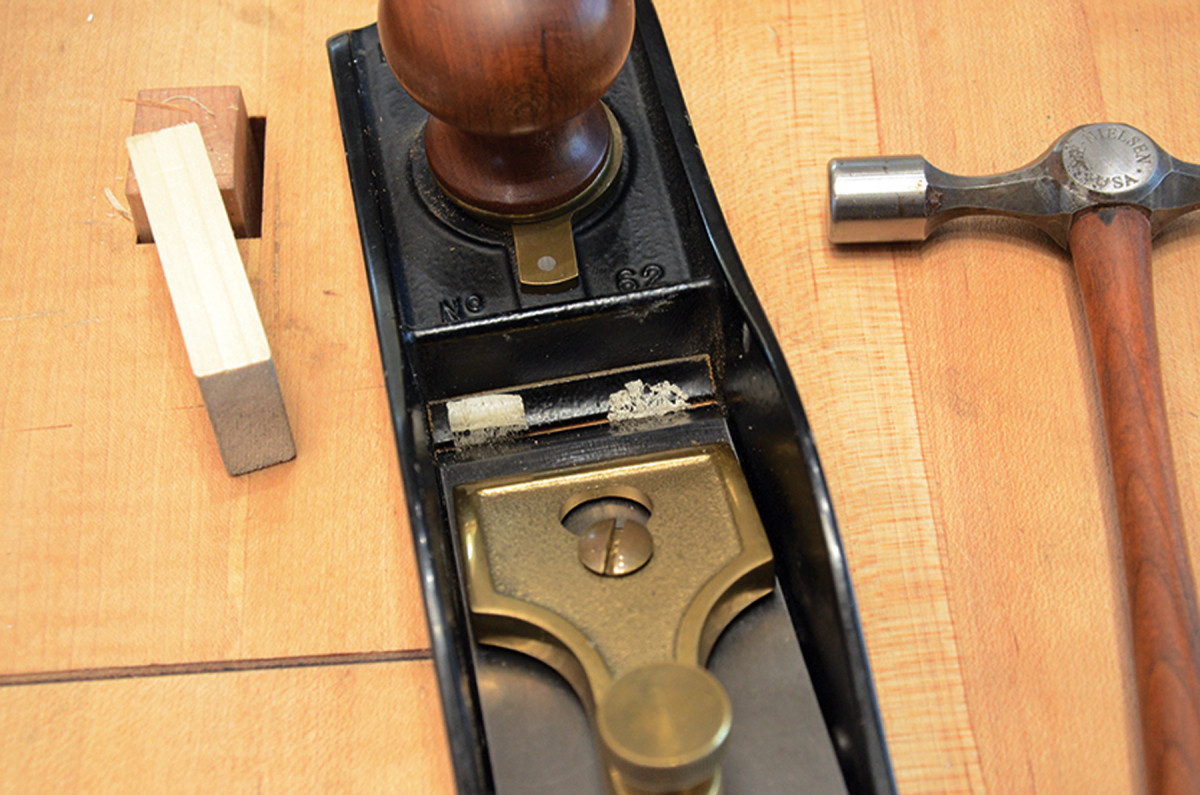
High or low. If you’re looking for versatility, consider a low-angle bevel-up plane (front).
While the section on bench planes explains which type of plane to use for each type of cut, it doesn’t explain which plane is best in each category. This is where personal preference starts to come into play.
I reach for the heaviest plane in any category, because I find the heavier a plane is, the easier it is to use. I would grab a No. 51⁄2 jack, a No. 8 jointer and a No. 41⁄2 smoother – but you must also consider low-angle planes and high-angle frogs.
In very hard or highly figured woods, higher effective cutting angles (the combination of the bedding angle of the tool to the sharpened bevel on the blade) work better than lower angles. You can manipulate that angle on a bevel-up or low-angle plane by sharpening at different angles.
On a low-angle plane that bedding angle is typically about 12°, while the effective cutting angle can range from 37° all the way to a 102° scraping angle, depending on the bevel angle.
With high-angle frogs in traditional style (bevel-down) planes, you can get higher angles by changing the frog or adding a back bevel to the blade, which changes the blade’s bedding angle. The higher angle of presentation means more resistance. Therefore, the more mass the tool has, the easier it is to use. These high-angle cuts are important, because you get much more control over tear-out in difficult-to-plane woods with a higher-angle cut.
As a general rule, it is far more important that you have a jack, jointer and smoother than to have specific tools such as a No. 62, No. 8 and a No. 41⁄2 with a high-angle frog. Your preference might be a No. 5, No. 7 and a No. 4, or any other combination of tools. You might also need task-specific tools, such as the smaller No. 3 smoother to handle surfaces that need to be smooth but not perfectly flat.
Or, the versatility of the low-angle or bevel-up planes means that you might choose one (or more) of them over traditional-style bench planes. Let the type of work you do determine the exact tools that you get. —DP
Chisels
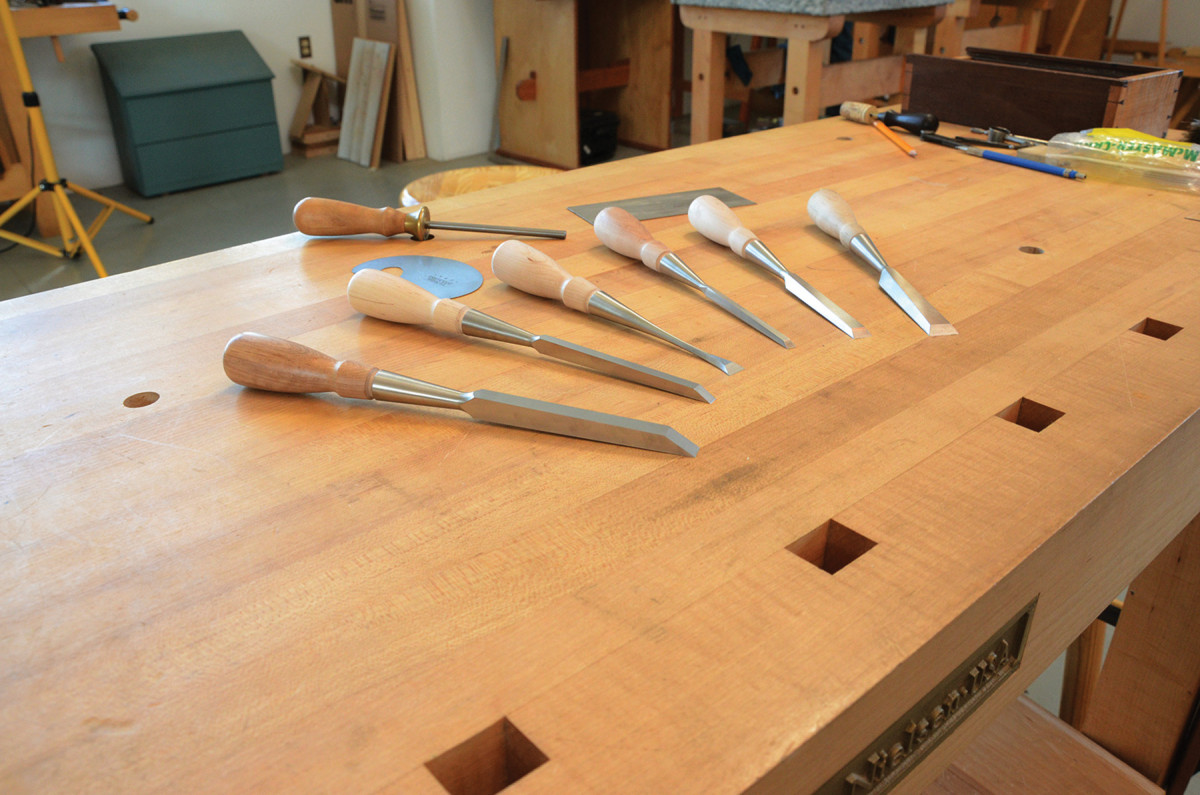
Chisel array. You’ll need various chisels based on the work you wish to do, such as a 1⁄2″ and 1⁄4″ mortising chisel, a fishtail chisel for cleaning out half-blind dovetail corners, and 1⁄4″, 1⁄2″ and 3⁄4″ bevel-edge (bench) chisels.
Chisels are relatively easy to figure out: Get the sizes and types that you need.
Bevel-edge chisels are very versatile; you can use them for striking or paring. Get a range of sizes so you can handle a range of tasks (3⁄4″, 1⁄2″ and 1⁄4″ tools would be a good start). If you plan to chop mortises, get appropriately sized mortise chisels.
Skewed or fishtail chisels are useful if you need to get inside angled areas, such as a half-blind dovetail socket, but are not strictly necessary.
Saws
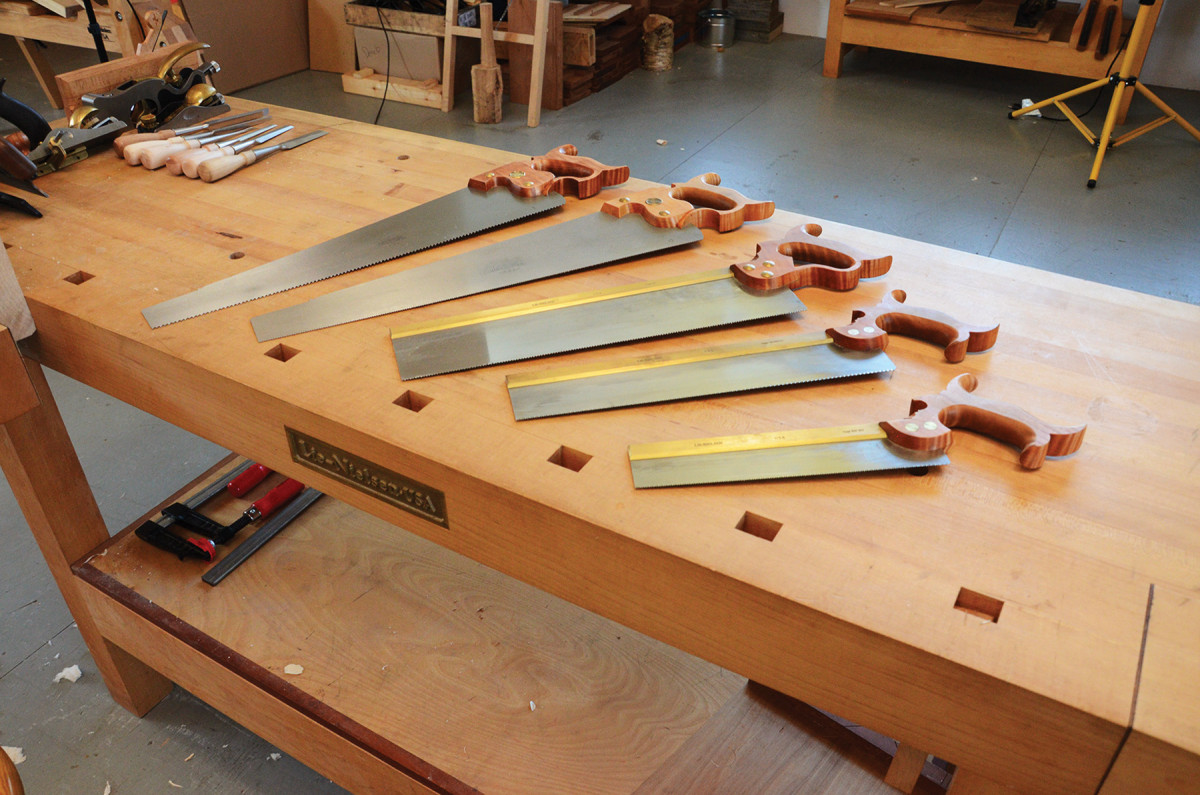
Five saws. While you can get away with fewer, these five saws will make your life easier. From left is shown a 12 ppi crosscut panel saw, 7 ppi rip panel saw, tenon saw, carcase saw and dovetail saw.
Perhaps obviously, you need saws to cut boards to size and to cut joinery. A saw should be comfortable in your hand – and while you might want to try to get by with just one or two, having three types of backsaws and at least one panel saw will make your work easier when you need to size panels or cut boards down.

At left is a close-up of a crosscut saw (left), with teeth optimized for cutting across grain. The ripsaw (right) has teeth shaped for cutting with the grain.
Here are the three backsaws I recommend:
- Dovetail saw. 9″-11″ long, 15-18 points per inch (ppi). This is a fine-toothed small saw, typically filed with a rip tooth, for dovetailing and other small joinery.
- Carcase saw. 11″-14″ long, 14-16 ppi. This fine-toothed crosscut saw is useful for cutting miters and small boards to length, and such work as cutting the shoulders on a dado or tenon.
- Tenon saw. 14″-16″ long, 10-12 ppi. This large coarse-toothed rip-filed saw is useful for cutting the cheeks of tenons and for cutting large dovetails.
Panel saws are available in both rip and crosscut filings, and are about 20″ long, toothed from 7-12 ppi depending on the application. If you can only have one panel saw, make it a ripsaw; a rip-tooth saw will crosscut better than a crosscut saw will rip.
If you plan on cutting any curves, you’ll also want a coping saw or bowsaw; for detail work, a fretsaw or jeweler’s saw is nice to have.
Build: Handmade Saw Cabinet Project
Curved Work
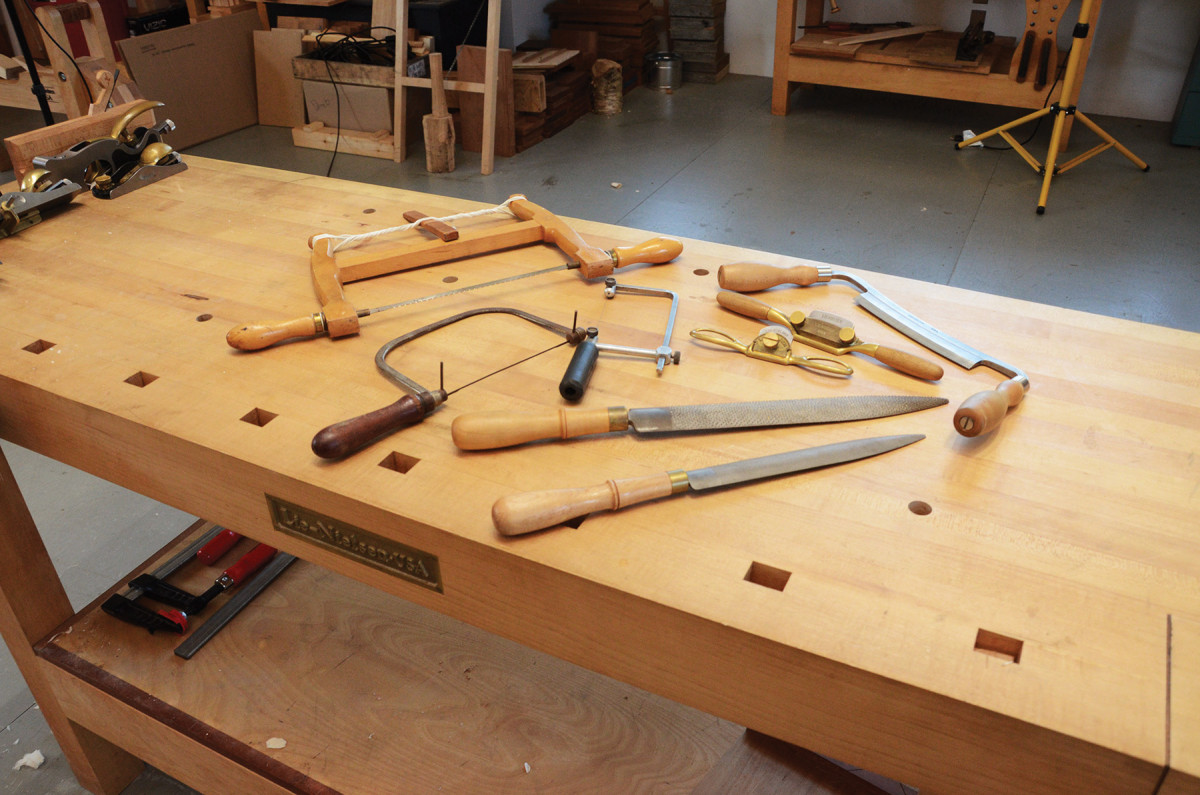
Cutting curves. If you plan on working with other than straight lines, you’ll need a way to cut arcs. In saws, that’s a bowsaw, coping saw and fret saw. You might also want a drawknife and a spokeshave or two, and one or more rasps.
The tools for curved work are more specialized. Not only do you need the saws I just mentioned, you’ll also find use for a combination of spokeshaves, drawknives, scrapers and rasps. Rasps and drawknives allow you to create rough curves (when a bowsaw or coping saw is unsuitable). And for the best finish results, I would turn to a spokeshave or scrapers whenever possible.
Sharpening
Good sharpening equipment – and the ability to use it to create a good edge – is essential to hand-tool woodworking. It does not matter what medium or method you use; what is important is that your tools are as sharp as possible.
To get the most out of your tools, you must know what sharp actually is.
A sharp edge is simply the intersection of two evenly polished surfaces. The bevel should be sharpened on your roughing stone to the point where a burr is raised on the back of the blade, then honed on both the bevel and the back on your finishing stone. There are many ways to do this. What is important is that you go to as high a polish as you can, and that both the back and the bevel have the same level of polish. If you achieve this, then you will have a sharp edge.
Keep your system simple. I recommend using a honing guide (more on that in a minute) with a #1,000-grit roughing stone and either an #8,000- or #10,000-grit finishing stone.
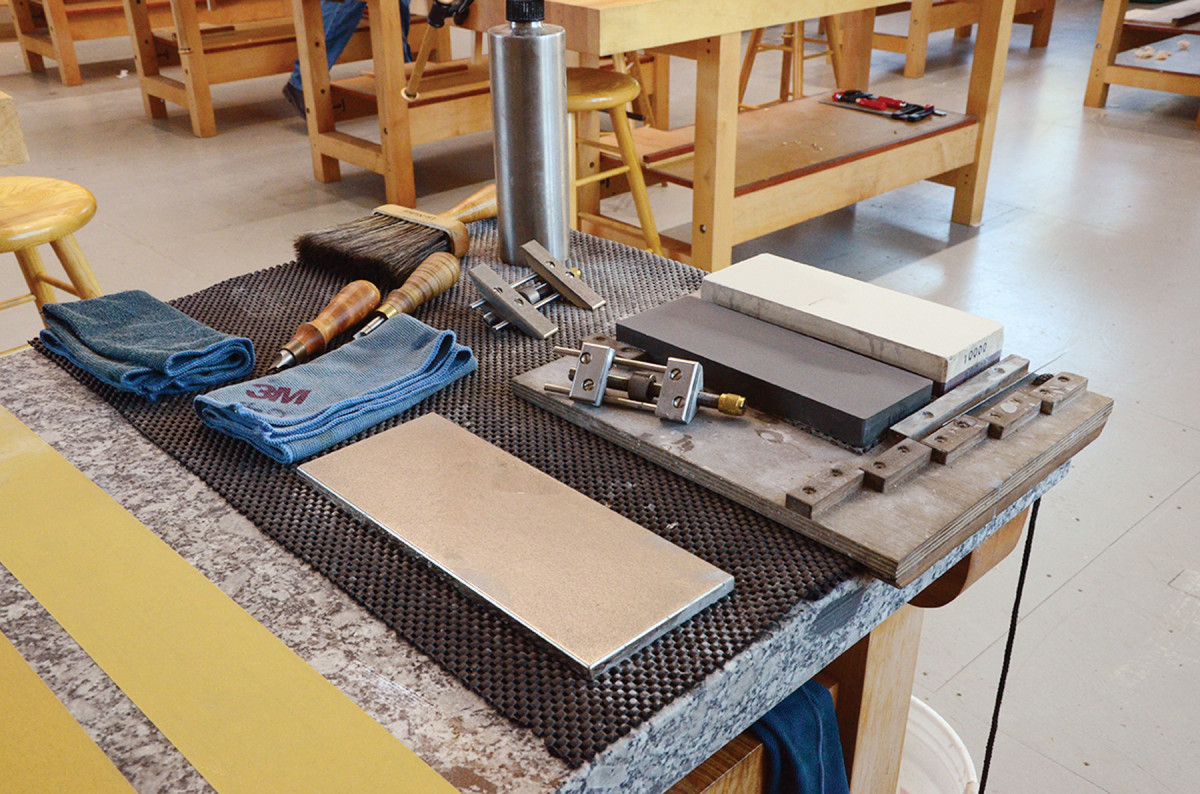
Simple system. Two waterstones and a honing guide (or some sharpening system) should be the most-used tools in your shop.
I prefer waterstones, but you can use any medium or method; simply remember that you need to keep your stones flat and bring both the back and the bevel to the same level of final polish.
So why a honing guide? It makes for a sharpening process that is system-based rather than skill-based. If you follow a system, you get consistent, repeatable results as you build your sharpening skills. If you count on the skill of freehand sharpening (that is, sharpening without a jig), you may become frustrated with less-than-acceptable results and give up long before you develop that skill.
Meaningful Connection
With some practice and the right group of tools, you can build amazing things. You may choose a blended approach to woodworking, using power tools in some cases and hand tools in others.
Or you may choose to work with only hand tools. In either case, you will find that you get more accurate results, your finished surfaces are cleaner and you are able to work faster than you ever thought possible.
I think one of the most valuable things in all of this is that for a relatively minimal kit, you can get started and be building things in whatever space you have available to you, and you are connected to your work in a more meaningful way.
Power tools allow you to bend wood to your will, even though it will only stay there if it wants to.
Hand tools help you learn what the wood wants to be, and enable you to help it become that.
Here are some supplies and tools we find essential in our everyday work around the shop. We may receive a commission from sales referred by our links; however, we have carefully selected these products for their usefulness and quality.