We may receive a commission when you use our affiliate links. However, this does not impact our recommendations.
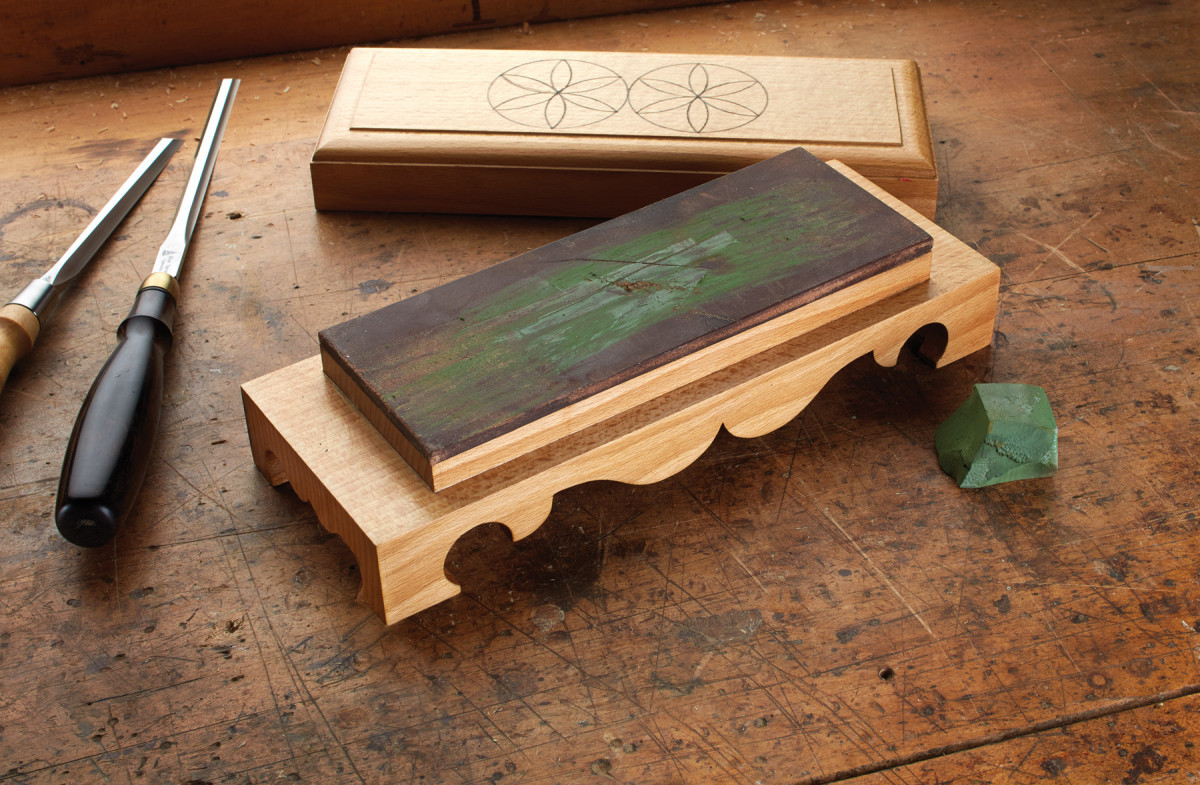
Sharpen your hand-tool skills with this useful project.
I recently obtained a nice piece of leather about 1⁄4” thick that I wanted to use as a strop for plane irons and chisels. And, I was looking for a simple hand-tool project. So I decided to make a “strop box” in the Queen Anne style.
The examples I studied all have cavities to hold sharpening stones. I needed a platform to which to glue the leather, so I adjusted my design to accommodate that – but the techniques shown here can be used for either type of box.
Most of the boxes I studied are mahogany, though a few are walnut and pine. They all appear to be made from a single piece of wood, or two pieces cut from the same section of stock.
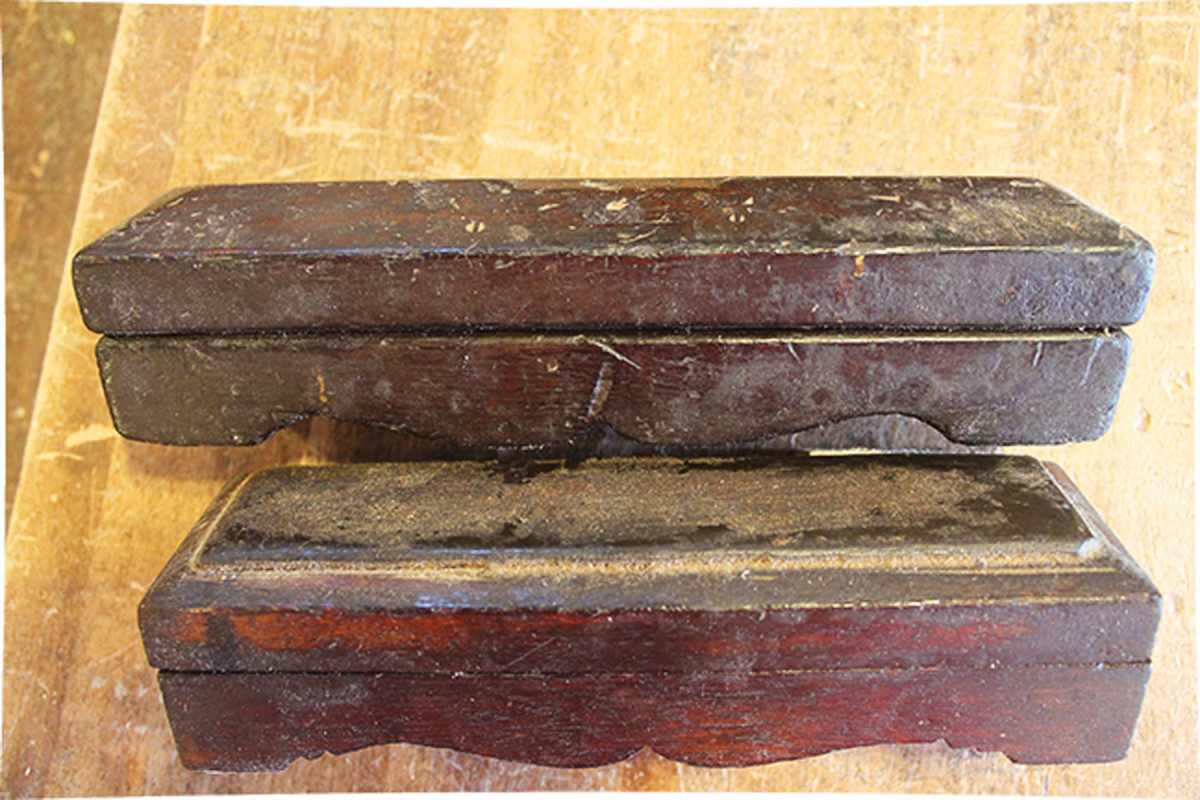
The recesses in the box bottoms and tops are typically drilled out with a brace and bit, and usually to the same depth in both pieces. You can see the remnants of the bit spur and the center point in most of my examples.
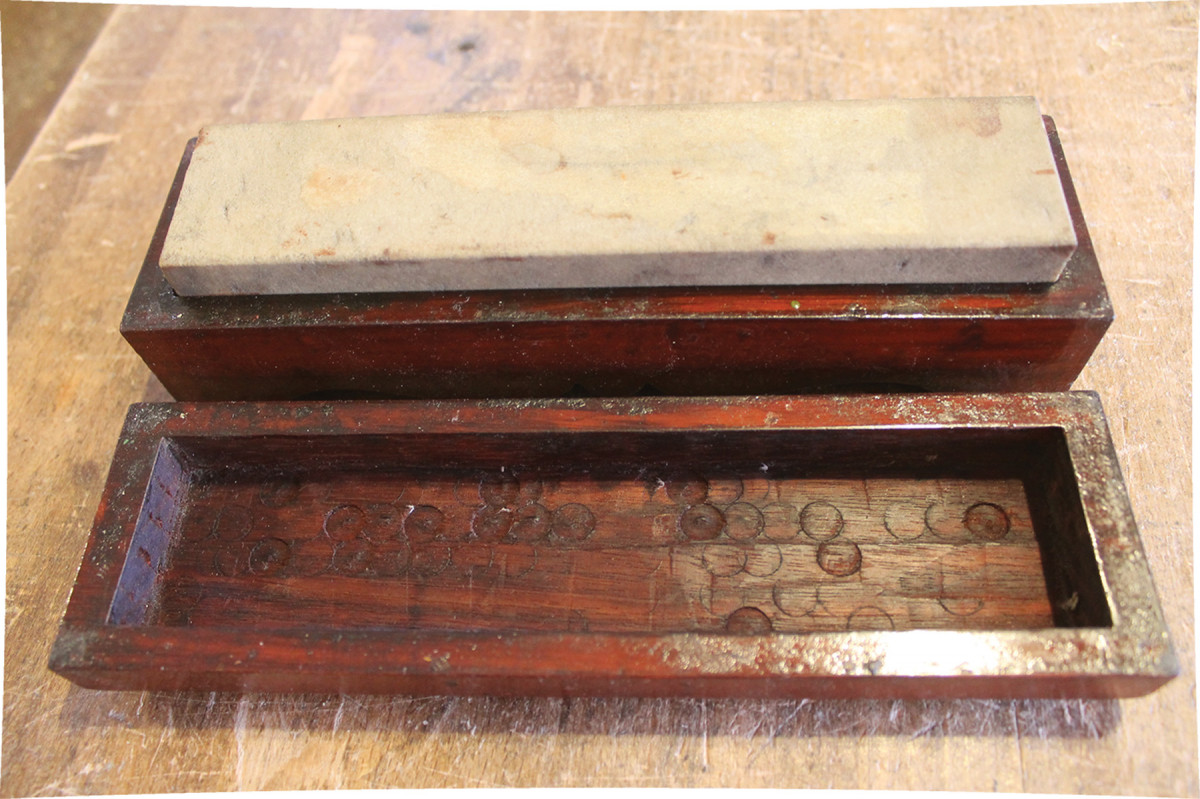
A bit of evidence. You can still see the marks from the bit spurs in this box lid.
Many of these boxes are squared off, but when they do have feet, they are often shaped as a mirror image ogee curve, cut with a band saw or bowsaw, or kerfed then pared out.
For my box, I decided on feet in the Queen Anne style, based on circles and ogee shapes. The strop is mounted on a wooden platform on the base, and the top fits tightly to the base over the strop platform. The top has moulded edges and features some traditional decoration scribed on the surface.
I had a block of quartersawn beech, so that’s what I used for the box shown here. It’s a tough wood; that’s great for wear resistance, but not so easy to drill. I recommend mahogany as perhaps a better choice for yours; it’s easy to work and is historically correct.
Stock Preparation
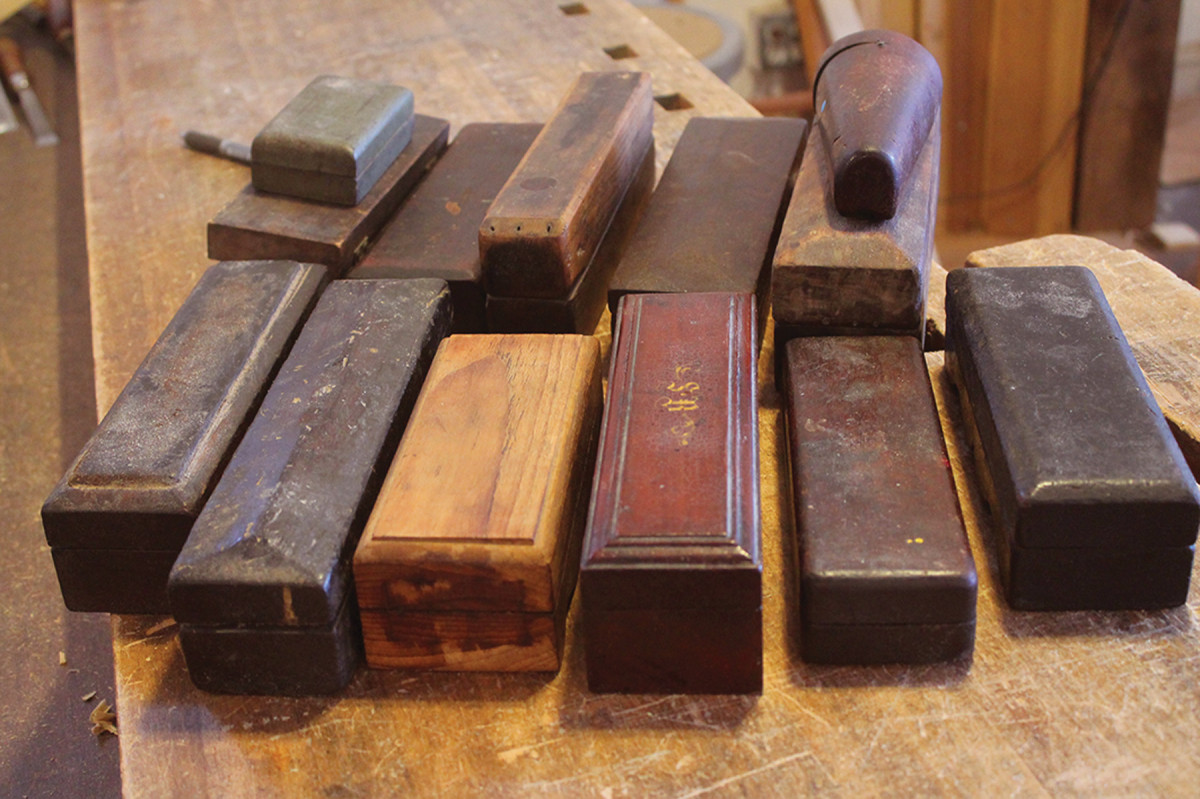
Bases. Of the vintage stone boxes I studied, most have a squared bottom, though a few have some nice curves.
In antique boxes where the recess walls are the same thickness all around, the end-grain walls are often split out or cracked, so I decided to make my end-grain walls at least 1″ thick, in hopes of avoiding a split.
 The bottom half needs to be about 11⁄2” thick (1″ for the foot recess, plus 1⁄2” or so for thickness above the feet. The top half needs to be about 11⁄4” thick (3⁄4” to accommodate the leather and the base it rests on, plus 3⁄8” for the top of the top). I cut the base for the leather from the top half of my beech.
So, with the above in mind, I cut my box parts from a piece of 8/4 stock, about 9″ wide x 10″ long. But your exact measurements depend on the size of the leather strop (or stone) you wish to put in your box.
I planed a surface and side of each box half to create a reference face and a reference edge, then marked them as such. The final thickness and width of each was scribed off these.

Reference surfaces. With one edge and one faced planed flat and at 90° to each other, you have references surfaces from which to scribe the final dimensions.
For the bottom piece, I then used a side axe for gross stock removal, followed by scrub, jack and smoothing planes. Bevel the long edge opposite the reference edge to your scribe line before planing to prevent spelching.
On the top piece, I four-squared it with planes, then marked and sawed off the waste; it will become the platform for the leather, and is sized to match.
For perfect crosscuts to get to my final lengths, I used a miter box and saw.
The top face of the bottom is the reference face of that piece, and the bottom face of the top piece is its reference surface. In the end, the two reference surfaces will mate.
Recesses & Leg Layout
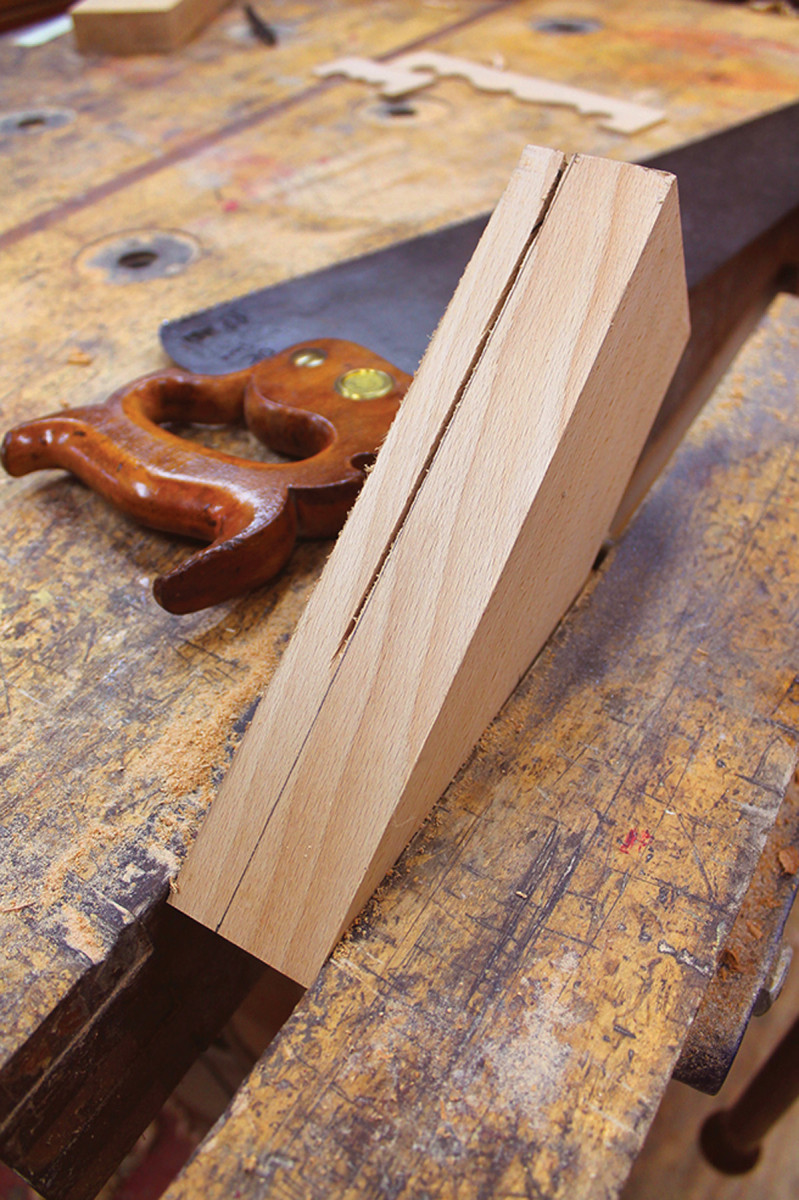
Platform. The waste from the top piece is sawn off; I’ll size it to match my piece of leather, and use it as the platform.
Lay out the recesses with a marking gauge and square, registering your tools off the reference edges of each piece. In my case, the layout accommodates the leather platform; keep in mind that your layout should be based on your platform (or stone sizes). The long walls on mine are 3⁄8” and 33⁄8” from the reference edge; the end walls are 1″ and 9″ from the same end of each piece.
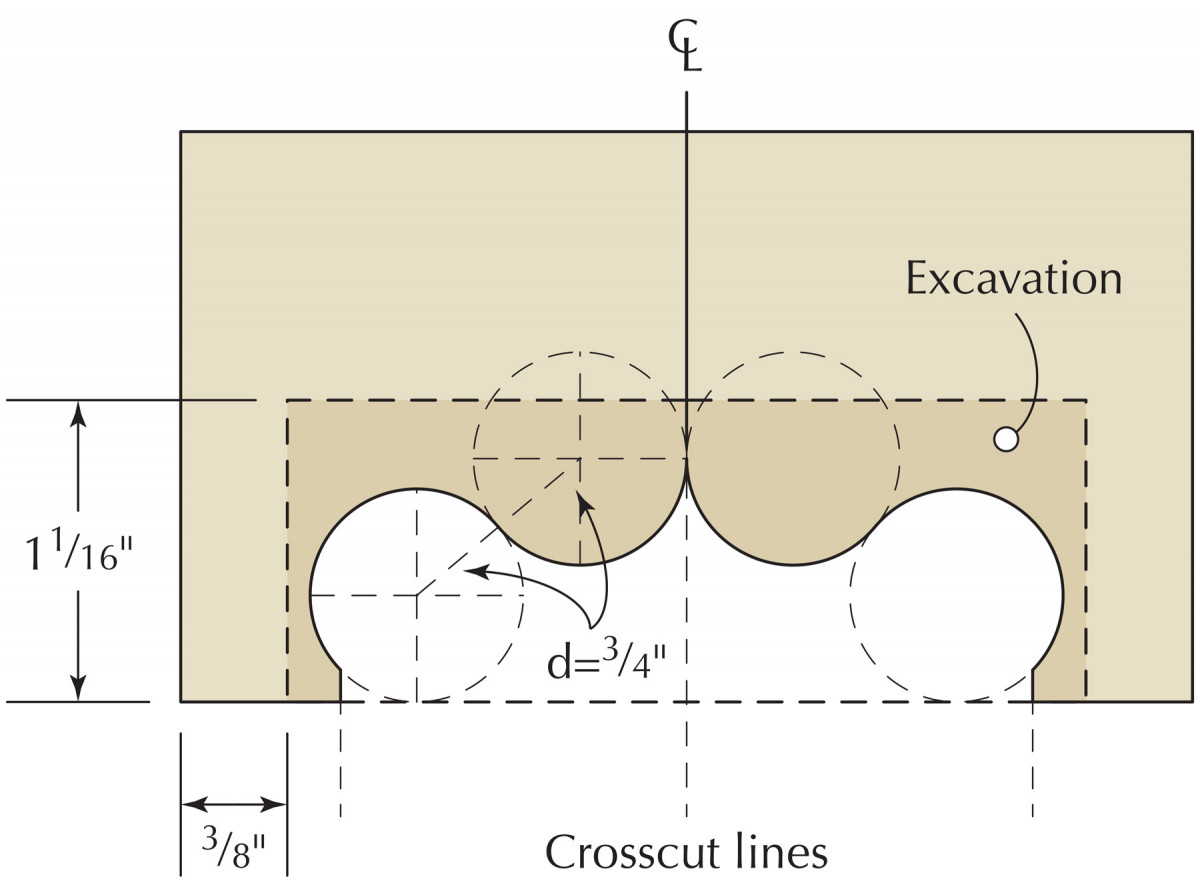 I made two full templates for the feet – one for the long-grain edge, the other for the ends.
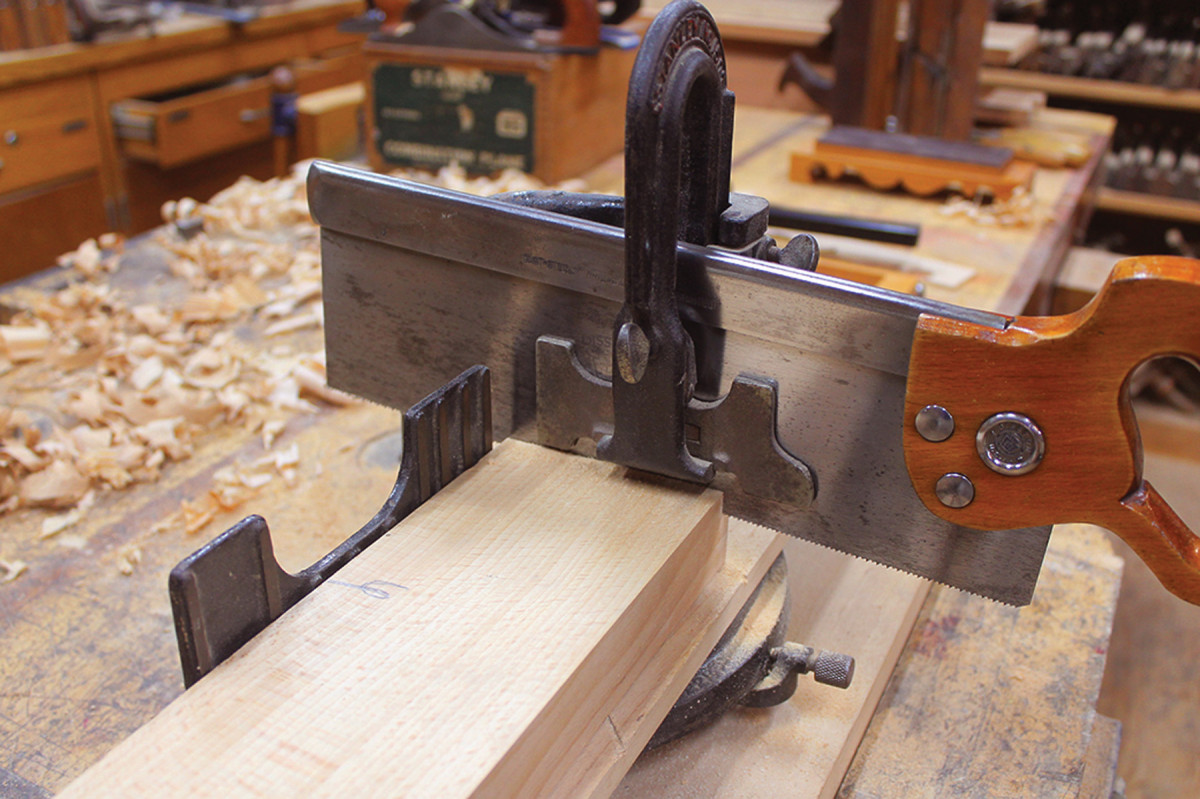
Miter box. Note that the reference edge is against the fence as I crosscut this workpiece to length.
The long-grain template is derived from a circle, a bird’s beak transition and long, shallow quasi-ogee curve. The bird’s beak transition is a quarter arc of the same circle as the leg circle. The ogee-type profile was derived from a circle that looked good to my eye, then I faired it out to end at the bird’s beak.

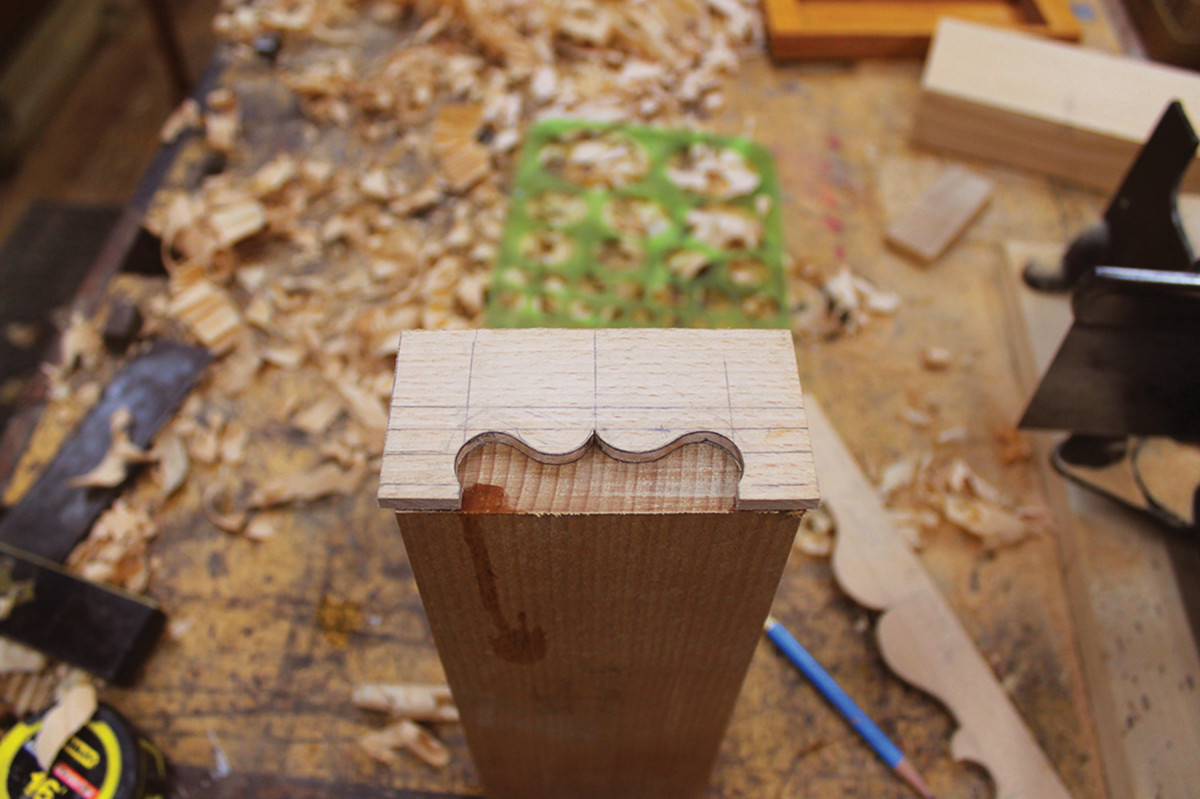
Curve work. Half templates ensure symmetrical layouts, however sometimes I like to make a full template so that I can get a complete idea of the profile.
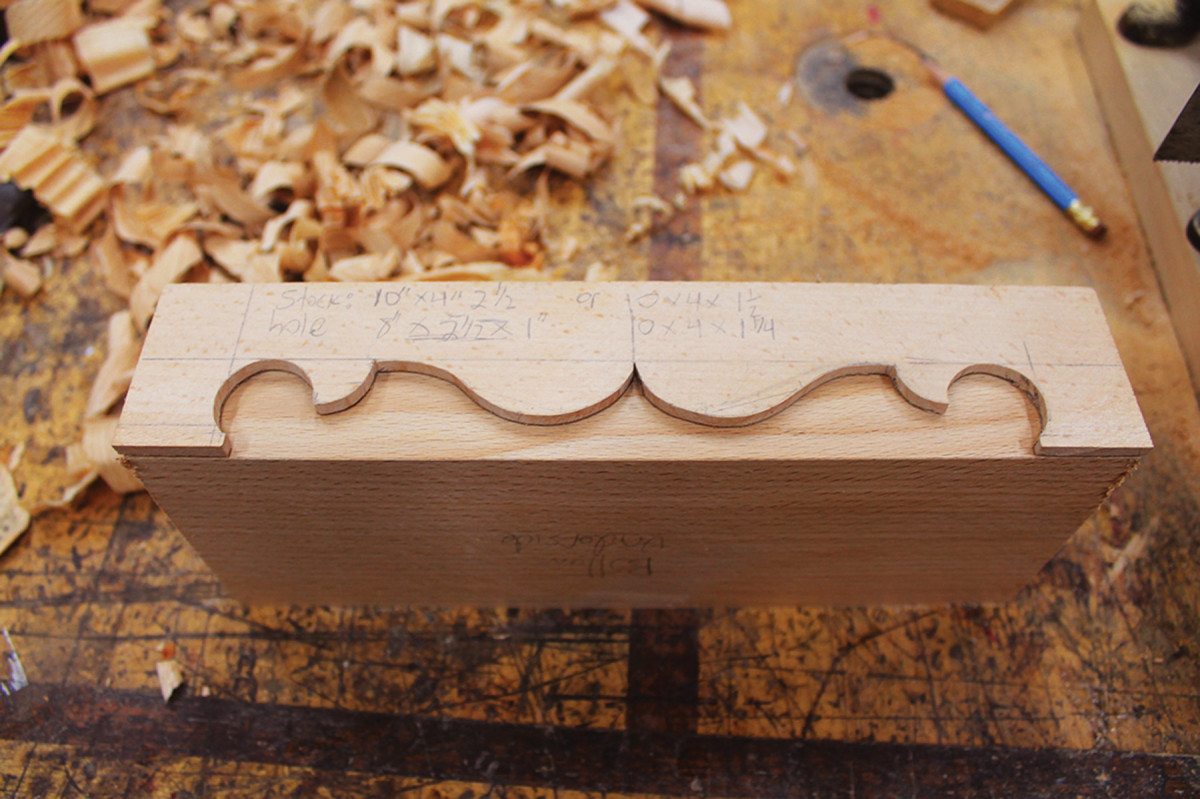 Because the end-grain template is so much shorter, I modified the shape slightly by reducing the profile depth from 7⁄8” to 3⁄4“, and eliminated the bird’s beak.
Here’s the Drill
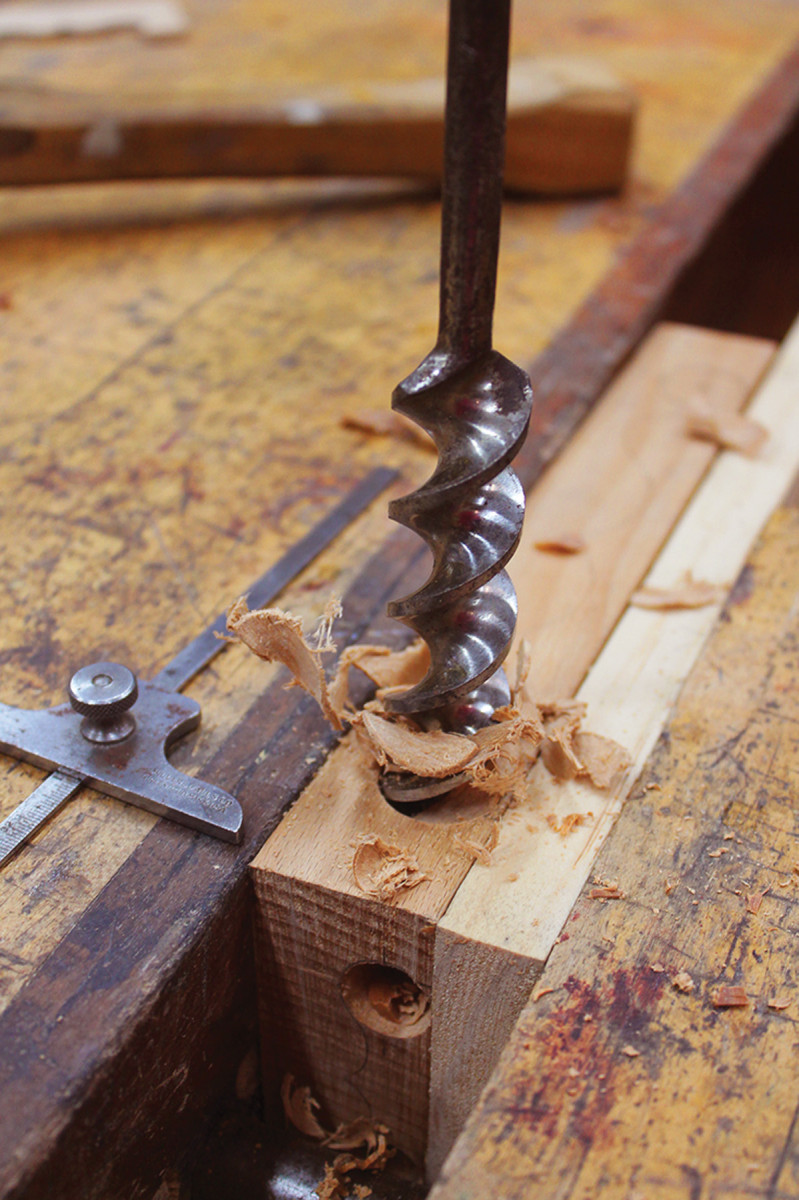
Bit selection. A No. 100 Jennings-pattern bit works for the long-grain holes, but for end-grain drilling, a centerpoint is the better choice.
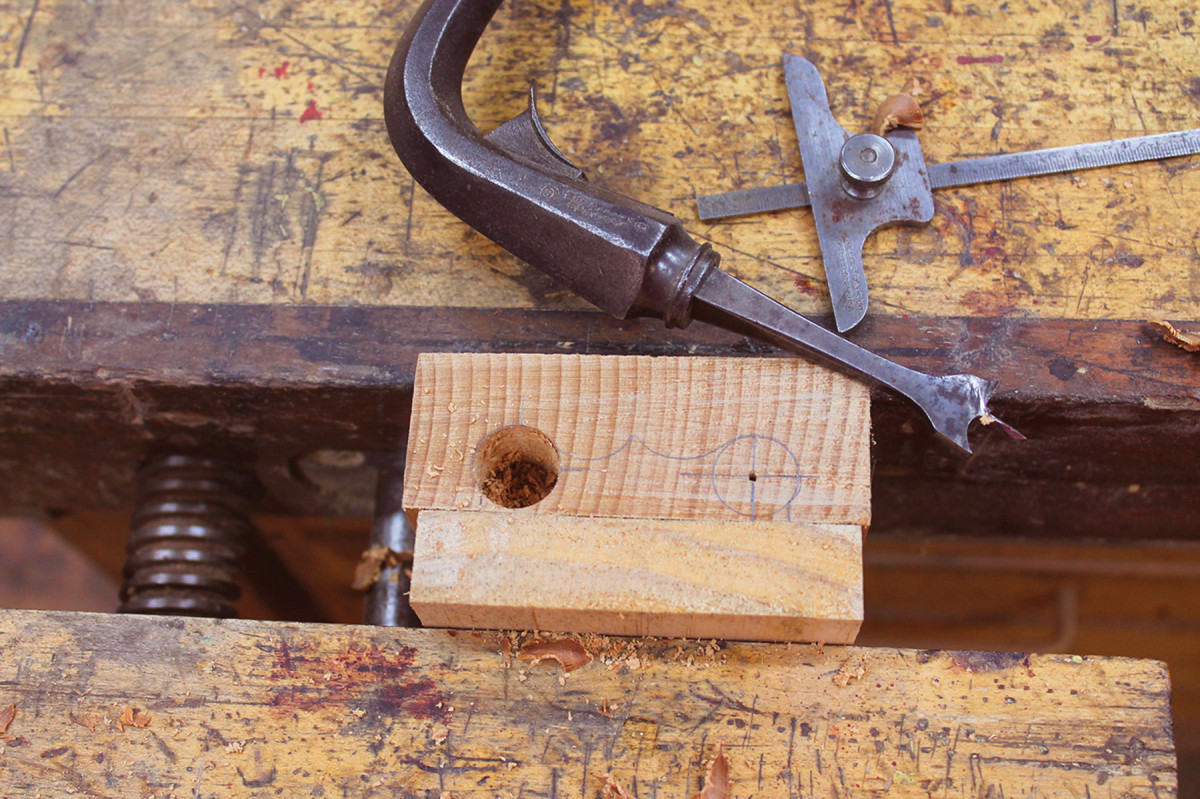 Before drilling out the recesses, drill holes to define the eight outside circles of the profiles for the legs. I drilled these circles to a depth greater than the planned wall thickness of the recesses (to about 11⁄2” for the ends and about 1⁄2” for the sides). The four long-grain holes can be easily drilled with a brace and the appropriate auger bit. In all cases, use a bit diameter smaller than the actual diameter of the circles (by 1⁄8“) so there is no possibility of breaking out the bottom edge of the profile – you need this surface to rest your router plane on.
The end-grain holes need to be drilled with a centerpoint bit. The auger bits that most of us own have a double-cut lead screw; this style will easily clog in an end-grain cut. Some bits have a single-cut lead screw that results in a more aggressive advance to the cut, which is less likely to clog. Unfortunately, I have not been able snag bits of this style. Centerpoint bits are a good alternative, but because they do not feed, a little more effort is needed. Also, these bits are better designed for shallow cuts. In a deeper end-grain cut, they tend to follow the grain. So for these, I first drilled a pilot hole for the centerpoints to help the bit track better.
For all of the drilling, I clamped a scrap piece on the bottom to give the bottom surface of the box support to prevent breakout.
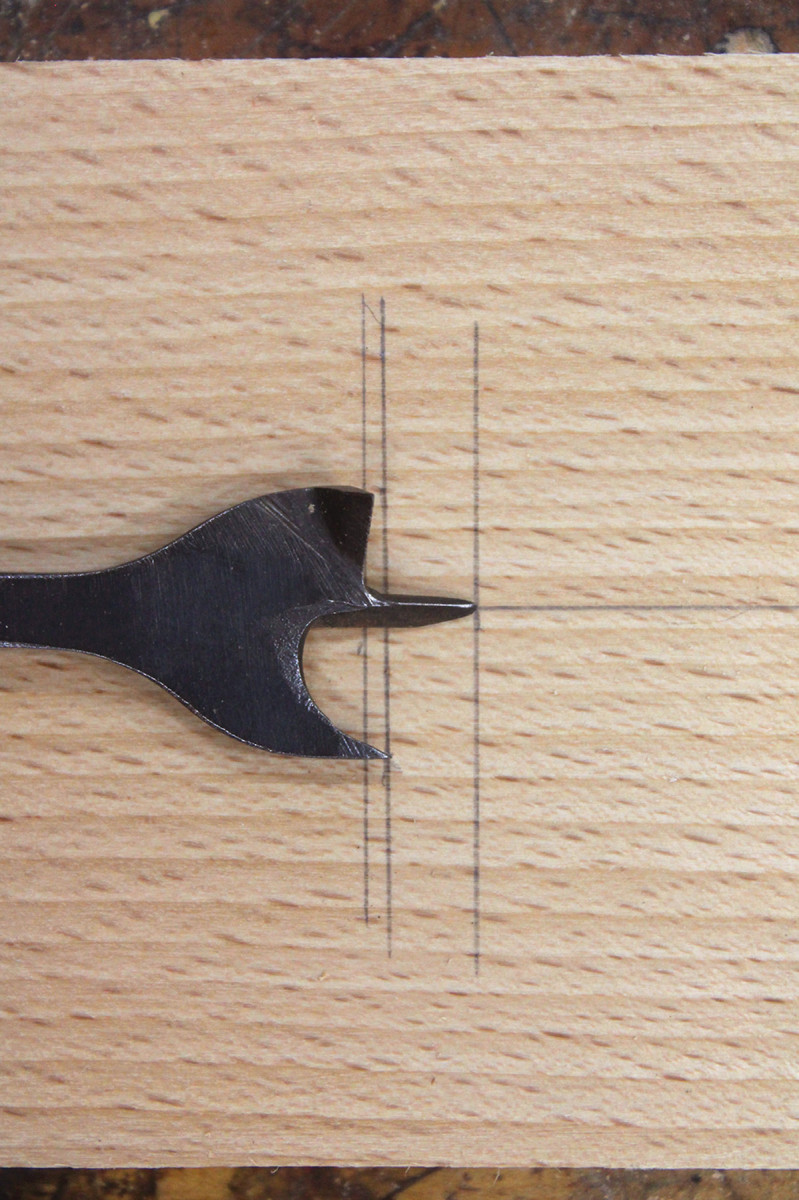
Modified. “Safe” files (which have one or more smooth edges) make quick work of modifying a centerpoint bit. Above is the bit before I shortened the point; below I filed the point so it’s about 1⁄8″ longer than the spur.
 I wanted to keep the thickness of the box halves to a minimum, plus I wanted to rout a clean surface after drilling. Deep lead screw (or centerpoint) holes would present a problem for the strop box (though less so for a honing stone box). But fortunately the centerpoint bits can easily be modified to overcome this.
I filed a centerpoint to about 1⁄8” longer than the outside spur, then recreated the three-sided point to get it back to the axis of the bit shaft. (It must be perfectly centered to keep the bit from levering out of the circle it is cutting.) Also, the cutter may need to be reshaped in the region next to the centerpoint; it needs to be square to the axis of the bit. I used various “safe” files for this. This is basically a trial and error process, but takes just a few minutes.
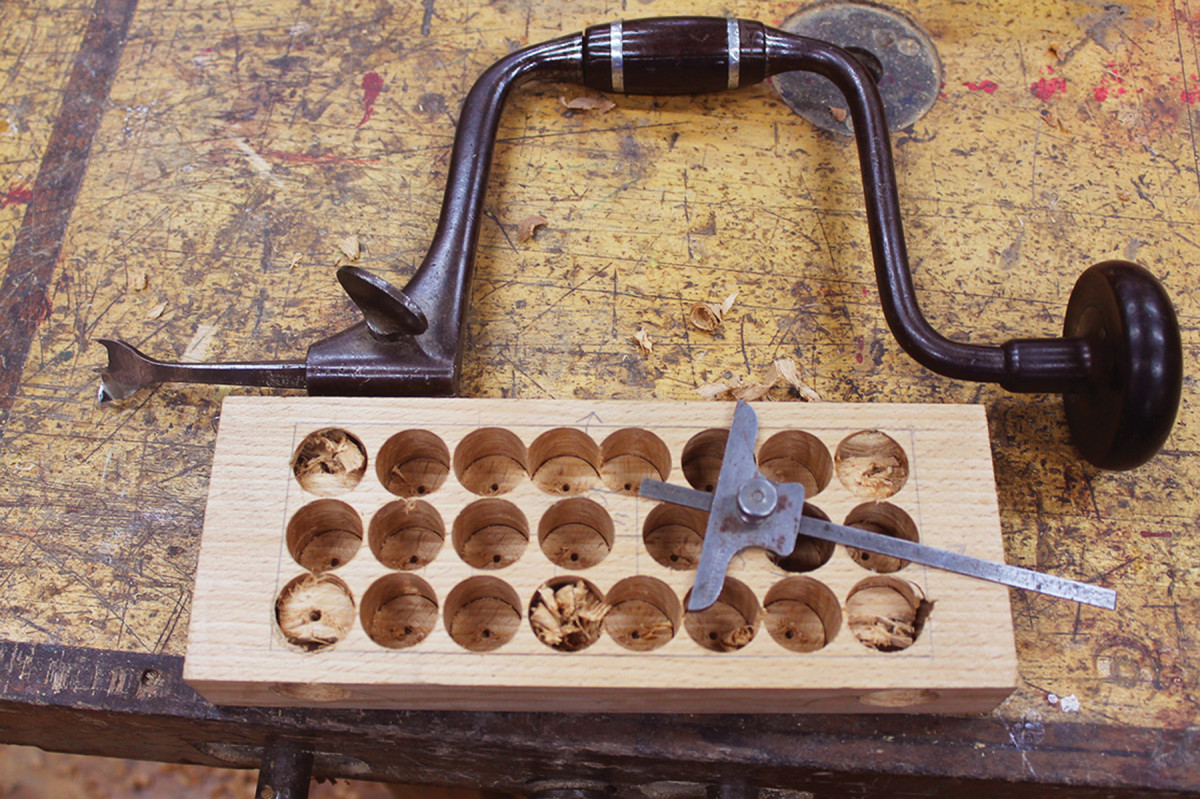
Hog it out. It’s a lot easier and faster to drill out the bulk of the waste than to remove it with a chisel alone.
After making the holes for the decorative profile, remove the waste in the center of the base.
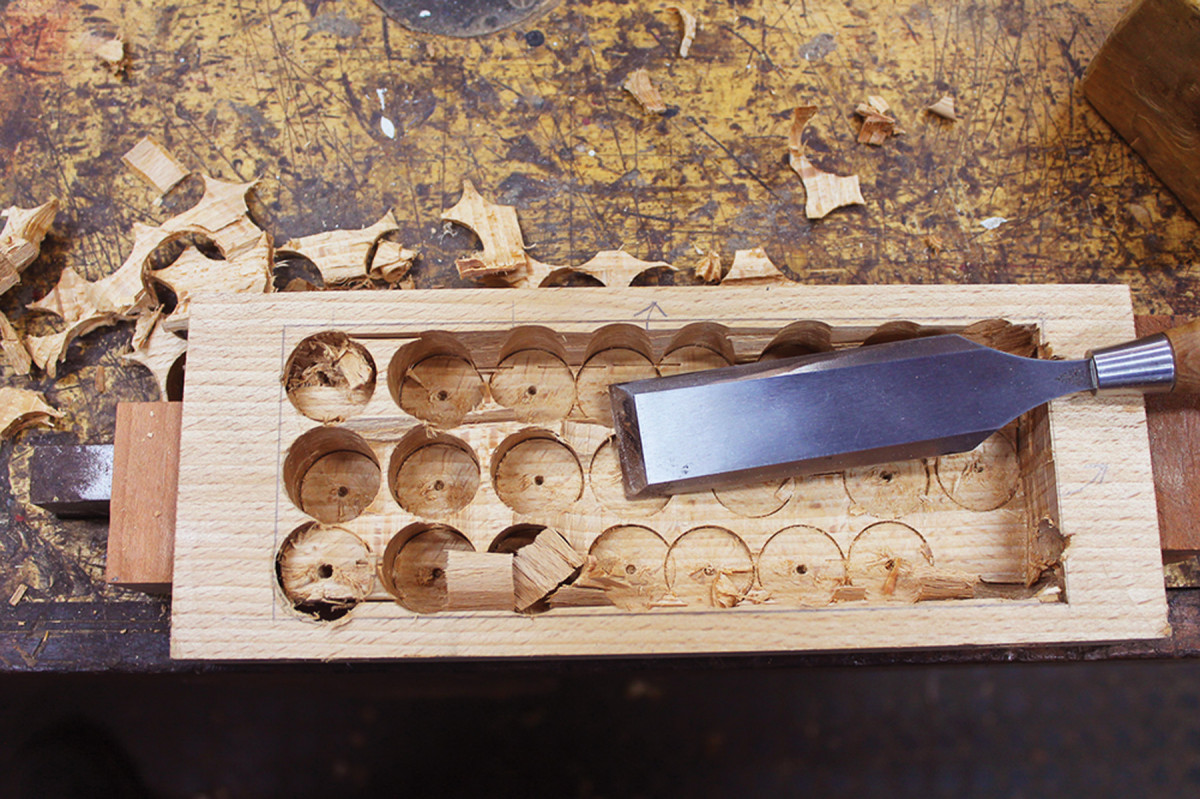
Rough removal. Work with the grain with a chisel to remove the waste between the holes
For this box, I laid out and drilled 24 holes to hog out the waste. Why “laid out?” You have to identify the centerpoints and leave plenty of leeway between the box sides and the holes themselves. Generally, I needed about 100 turns of the brace to drill a hole 7⁄8” or so deep. I kept the holes shallow enough so that I could bring them to final depth (11⁄16“) with a router plane.
I used a relatively narrow chisel to knock out the bulk of the waste between holes, then a wider chisel to roughly flatten the revealed surface. Here is where straight, flat grain in the stock really pays off. The ends of the recesses and the long edges were defined with V cuts with a wide chisel, then pared straight down.
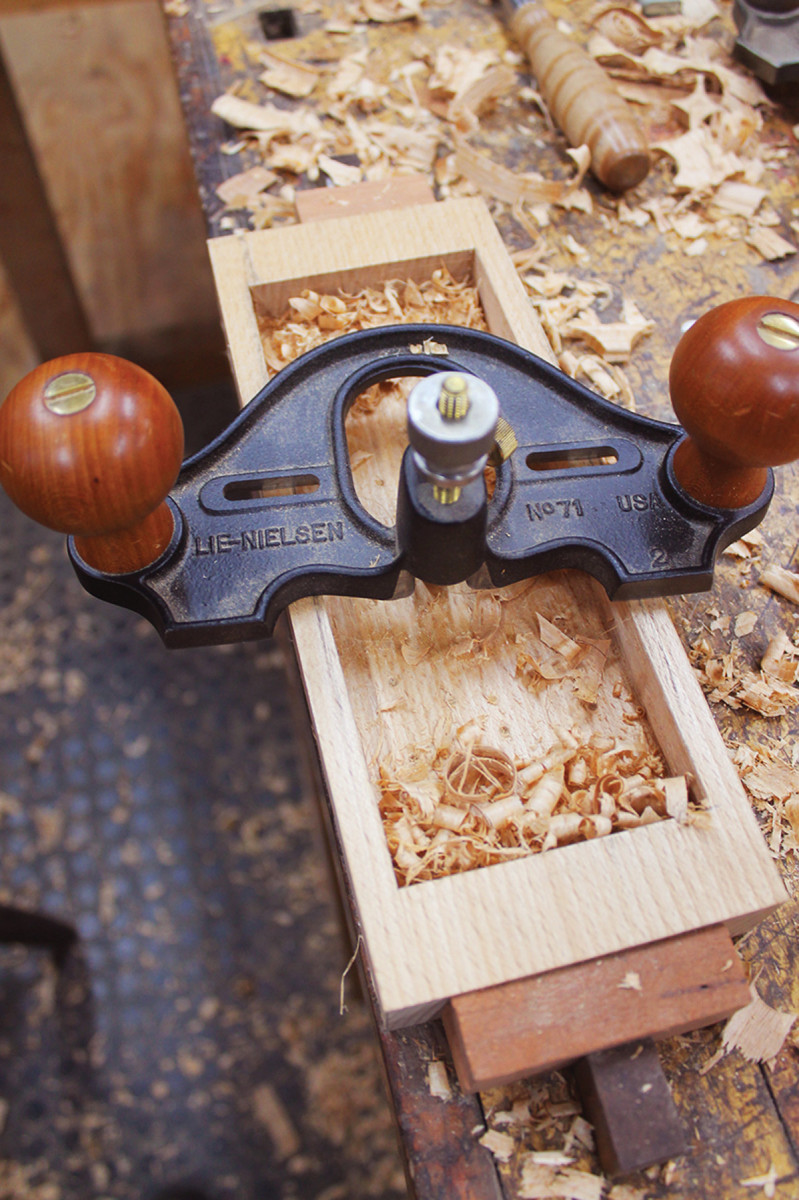
Rout it out. Use a router plane to reach the final depth and remove bit tool marks.
Note: If you’re making a stone box, excavate the cavity on the top side of the bottom using the same method, and make sure your stock is thick enough to accommodate both cavities, with at least 1⁄4” of material remaining between.
Now mount the stock between dogs, and use a router plane with a wide, square bit to refine the recesses. I used a depth gauge to check my progress as I planed to a final depth of 11⁄16” and all of the tool marks from the bits were gone. I made vertical cuts with a wide chisel to clean up the walls, so that the interface between the surface and the walls was sharp and crisp.
Now excavate the waste in the same manner for the underside of the lid.
Shape the Feet
Once the recesses are finished, it’s time to shape the feet.
First, rasp out the circles that defined the feet at all four corners. I used a fine modeler’s rasp and a rat tail rasp.
Next, I made a series of vertical saw cuts to the profile lines at every transition of the profile, followed by cuts with a coping saw to rough out the curves.
Then I pared with a chisel bevel up, following the grain downhill to give the curves a finished surface.
In hindsight, I recommend skipping the coping saw and just using a chisel – you’ll get a finished surface off the tool.
It’s a good idea to set the box aside at this point for a week or so. A lot of material has been excavated from the stock, and the box will continue to dry out and move, depending on the grain and moisture content. You might have to make some adjustments for fit after the wood has settled.
Alternative Feet
 The most common foot pattern is a mirror-image ogee curve centered on the midpoint of the box bottom, as shown on the period stone boxes at left. These feet are easy to lay out, but if you are making a honing stone box, just make sure that your profile at the midpoint leaves enough material to excavate the recess.
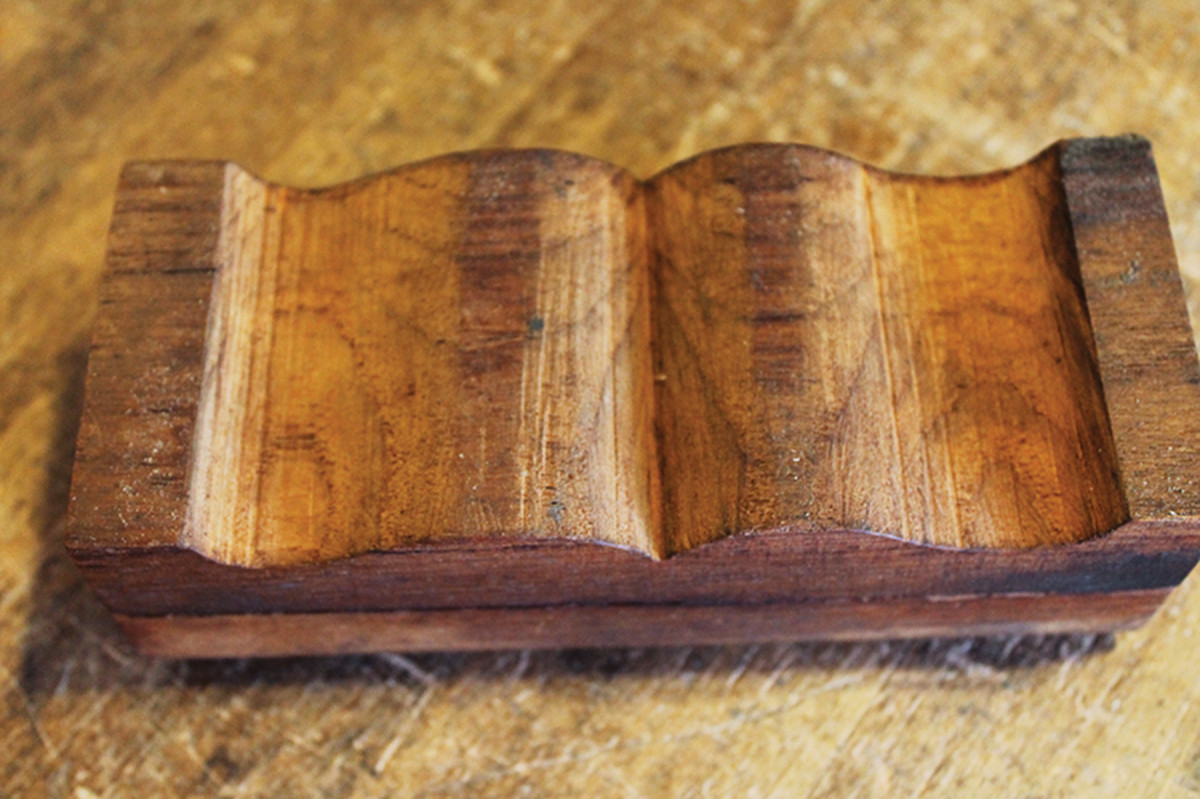
A peek underneath. Note on the underside of this example that the curves are cut into a solid piece of stock.
The profile can be cut on a band saw or with a bowsaw. Alternatively, you can define the curves with a series of crosscuts to the profile line, then pare across the grain with a chisel and clean up the cuts with a fine rasp. Make the saw cuts shy of the midpoint junction, so that you can make that junction very sharp with some bevel-up paring. — WA
Assemble the Platform
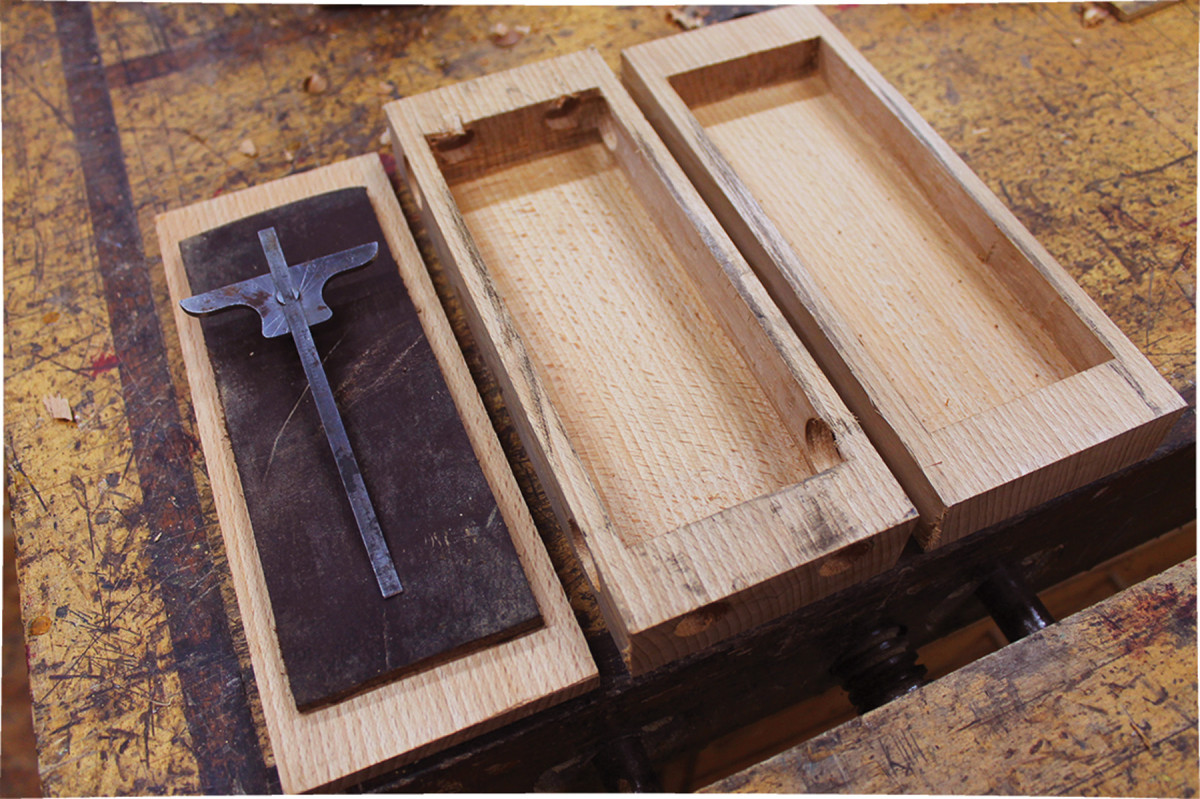
Piecework. Here’s the rough-sized platform (with leather atop), the underside of the bottom with the cavity drilled and smoothed and holes drilled for the corner curves, and the hollowed-out top.
The dimensions of the platform need to match the lid recess. First pencil reference marks on the platform and one end of each recess so that you can fit the parts together the same way each time. Then carefully plane and file the platform so that it fits snugly inside the lid. Don’t push the platform all the way in or you might not get it back out again.
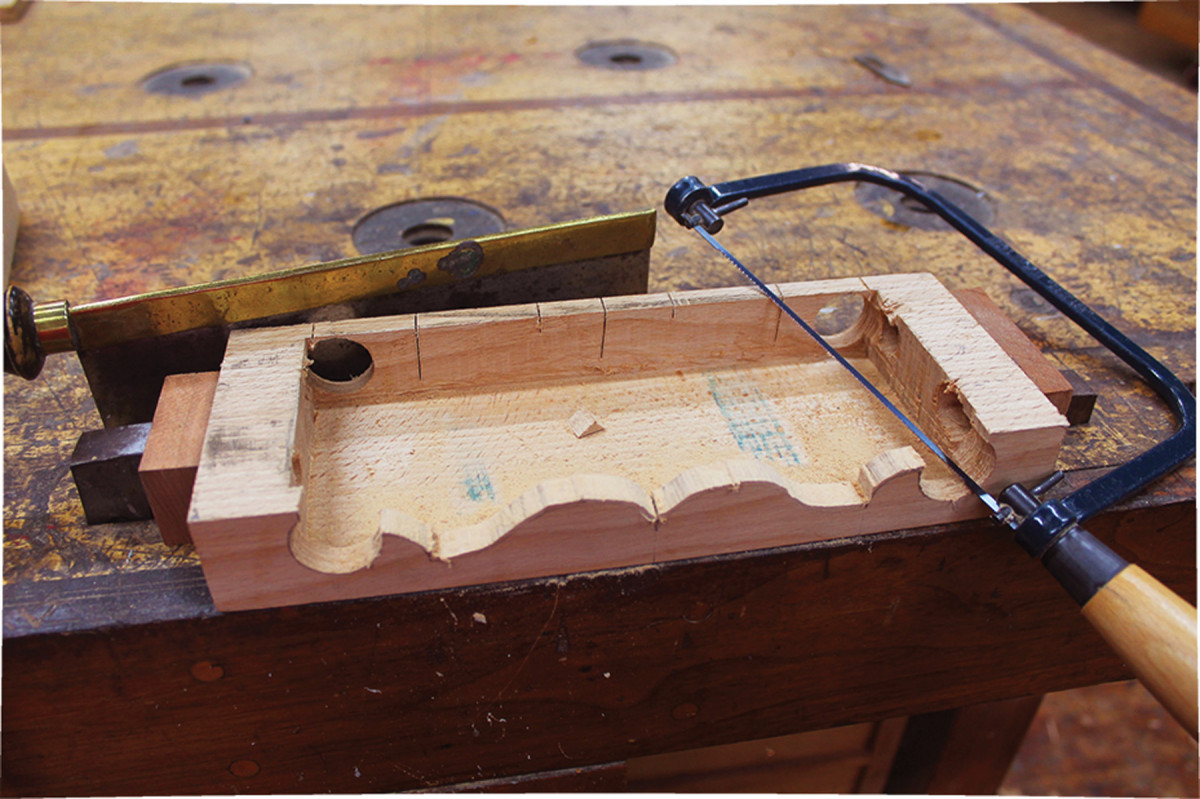
Curve appeal. After rasping the drilled holes clean, make relief cuts straight down to all profile transition points, then rough out the curves with a coping saw. Follow that with chisel cuts to fair the curves. Or, skip the coping saw and just use a chisel.
Once the platform is sized, verify that the leather strop has the same dimensions, then glue it to the platform with hide glue.
 After the glue is dry, re-scribe the top of the bottom with a marking gauge, making just one end-grain mark and one long-grain mark. Apply hide glue, carefully align the platform to these two lines and clamp it to dry.
Now assemble the two halves, and make alignment marks (I use chisel nicks). If the halves don’t fit easily, first check that the inside of the walls on the top are vertical; second, consider using a shoulder plane to tweak the edges of the platform until the parts slide together.
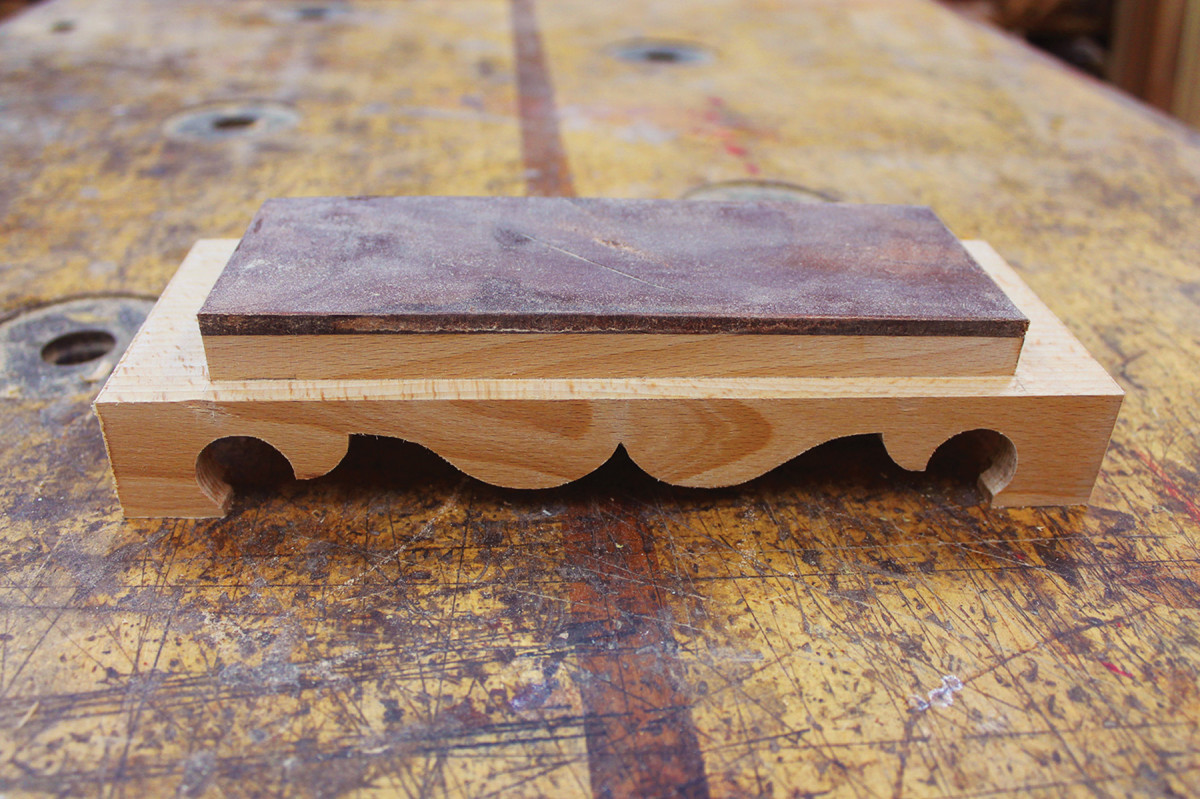
Leatherwork. Glue the leather on the platform, then glue the platform to the base.
When the top and bottom half fit snugly, assemble the box, clamp it in a face vise, and plane the long edges with a finely set plane until they are flush. The end grain can be planed with a low angle block plane or filed until they are flush. Reestablish your alignment marks, if need be.
Mould the Top
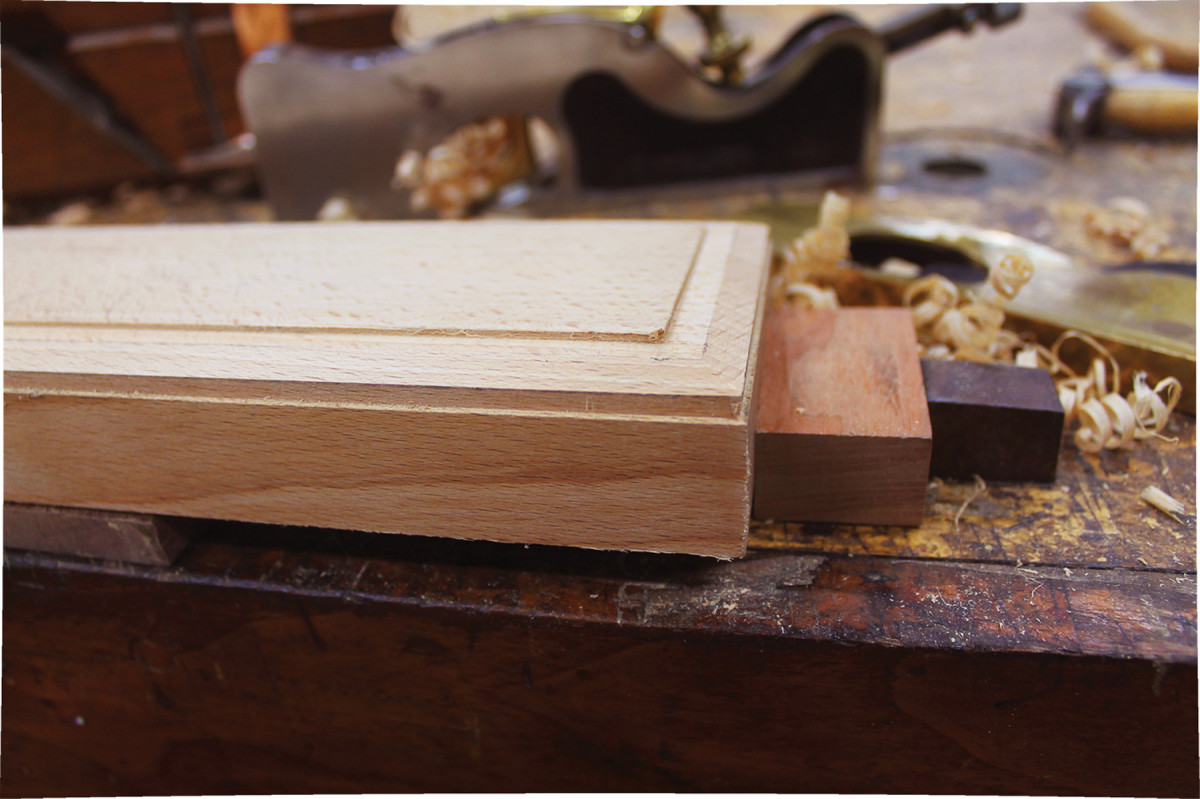
Shoulder work. I used a small shoulder plane, held slightly off vertical, to first cut flats, then to fair the curve on the box top.
 For the lid, I decided on a wide ovolo profile (really an ellipse), that is relatively shallow, with fillets at the top and bottom. This profile can be made with a shoulder plane only, which is an advantage on the end grain. If you use a dedicated moulding plane, it will need to be very sharp, and well profiled to work on the end grain.
I blocked out the ovolo shape by eye, with a small shoulder plane held just off vertical.
Make a bevel completely around the top, starting with the two end grain ends first. Set the shoulder plane very fine and fair out the bevel to a gentle curve on top and a sharper curve at the bottom, again working on the end grain first. Finally, carefully remove the facets with sandpaper (I used #150 grit).
Scratch Decoration
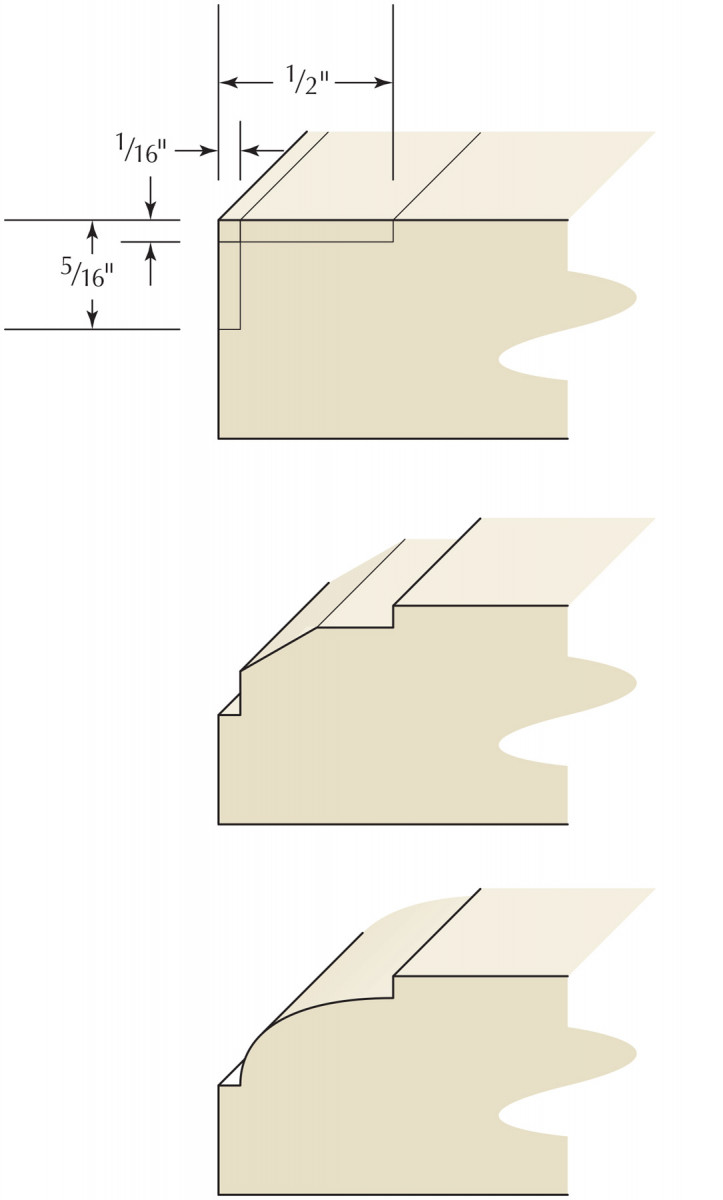
Lid Moulding
The scratch decorations on my box top are laid out with a compass. Here I wanted to make two circles touching at a single point, with a hex symbol inside each circle.
To copy this design, start by laying out two pencil lines – a vertical line and a horizontal line that divide the field into four quadrants. Set one compass point at the intersection of the two pencil lines, and the other to within 1⁄8” or so from the top or bottom of the field.
Once the spread is set, swing the compass to the right and to the left along the horizontal pencil line to find the centerpoints of the two circles.
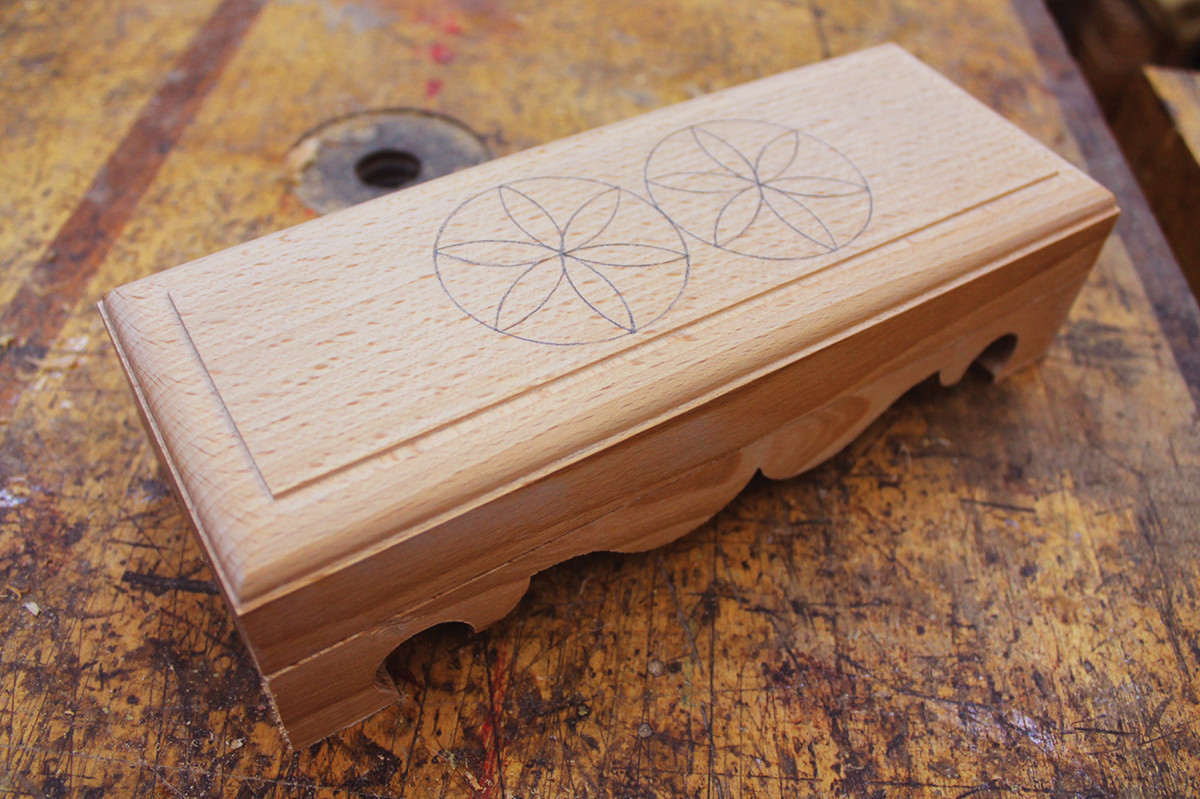
Penciled in. After scratching the design with compass points, use a fine pencil to trace the shallow recesses; this will help the design stand out.
Lightly pencil in a vertical line at each of these points. Reposition the compass to the respective centerpoints and swing circles. Scribe lightly and repetitively to get a good mark. To make the traditional pattern in the center, position the compass point at the intersection of the scribe line and the vertical pencil line for each circle and step out six points around the circle. Reposition the compass progressively at each point on the circumference and scribe arcs across the circle. If you are careful with the compass, these arcs will each pass through the circle center point and drop into a corresponding circumferential point around the circle.
To make the pattern stand out, I traced the series of circles and arcs with a pencil, then sanded the surface lightly with #220-grit paper to remove fuzz and the surface pencil marks.
Generally I needed to repeat the scribing and penciling-in process at least once or twice more to get a well-defined penciled-in shape. As you do this, always check your compass settings to verify that they will drop into the circumferential points accurately, otherwise you will muddy the design.
To top things off, I simply I used my favorite oil finish: Minwax Antique Oil. It is quick drying (less than one day) and builds relatively quickly. I ragged on three coats (buffing in between) then polished things up to a nice shine with a clean soft cotton cloth.
Here are some supplies and tools we find essential in our everyday work around the shop. We may receive a commission from sales referred by our links; however, we have carefully selected these products for their usefulness and quality.


