We may receive a commission when you use our affiliate links. However, this does not impact our recommendations.
 After years of having only poorly made tools to choose from, woodworkers now have some excellent new spokeshaves at their disposal.
By Christopher Schwarz
Pages: 84-89
From the April 2004 issue #140
Buy this issue now
Most woodworkers I know consider spokeshaves to be little more than wretched pieces of painted iron and steel. That’s too bad, because these miniature planes are wondrous tools – in the right hands.
Armed with a pair of spokeshaves, you can shape or smooth almost any inside or outside curve (think cabriole legs). You can refine virtually every part of a traditional chair: the outside of the seat, the curved arms, the spindles and the stretchers.
But for the majority of modern woodworkers, the spokeshave is an extraordinary substitute for an oscillating spindle sander. You can shape any part on your band saw and then remove the marks left by the saw blade with your spokeshave. The surface left behind by a properly tuned shave is ready for finishing; you don’t even need to sand it.
So why are spokeshaves so reviled? Until recently, there were only three types of shaves on the market: vintage wooden-bodied shaves that were used up or needed restoration, old metal-bodied shaves that needed restoration, or brand new metal-bodied shaves that needed major surgery before you could even learn to use them.
In the last decade, the rise of chairmaking classes has created a healthy demand for high-quality spokeshaves that work perfectly after only honing the cutter. Like all quality tools, these spokeshaves are considerably more expensive than the garden-variety tools. Are they worth it? To find out, we bought the current crop of metal-bodied shaves – both the inexpensive ones (Stanley, Kunz and Anant) and the premium brands (Veritas and Lie-Nielsen) – to compare them side-by-side.
Bevel Up or Bevel Down?
To understand how these shaves differ from one another, you first need to know a bit about the mechanics of this type of tool. There essentially are two major types of spokeshaves: those where the cutting bevel faces up toward the user and those where the cutting bevel faces down against the work.
Historically, wooden-bodied spokeshaves have always had the bevel facing up, much like a block plane. This created a low cutting angle (usually about 25°, depending on a variety of factors) that allowed the tool to move easily through the work and shave end grain with ease. The problem is that the low cutting angle isn’t ideal for situations where the grain switches back on you – tear-out can be a real problem. But if you pay close attention to the grain or you frequently shape end grain, these tools are great. (For more on these wooden shaves, see “From the Bench” in the November 2003 issue.)
The other type of shave has the bevel facing down against the work, much like a bench plane. These tools have a much higher cutting angle (45°). This makes the tool a little harder to push during the cut and makes it mostly useless for end-grain shaping. But the higher cutting angle makes the tool less likely to tear-out in tricky grain situations (though it’s not perfect, either).
Until a couple of years ago, all the bevel-down spokeshaves had metal bodies. But then Veritas, the manufacturing arm of Lee Valley Tools, created a hybrid shave with a cast aluminum body and a cutter with the bevel facing up. (This tool is in our test, so you can see below how it performed compared to its metal-bodied half-brothers.)
The metal-bodied shaves also come with two types of soles: curved and flat. The curved soles are bellied from front to back and are useful for shaving inside curves. The flat-soled tools are ideal for outside curves. A well-equipped shop will have both. The flat-soled shaves are easier to learn to use. So if you’re buying your first shave, I recommend you begin with a flat-soled one.

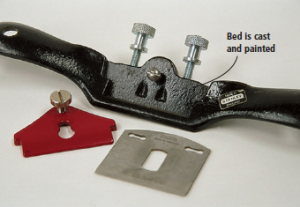
Machining makes the difference. Look at the bed of the Stanley 151 spokeshave. It is just cast gray iron that has been painted. This creates a poor fit between the iron and the body of the tool. The result: chatter, screeching and cursing.
Do You Need an Adjuster?
With the metal-bodied shaves, there are two major types: those that have blade adjusters and those that don’t.
The adjustment mechanism on a spokeshave is a bit different than on a hand plane. With a hand plane, you generally have one knob that you turn to control the depth of your cut. With most of the spokeshaves in this test, the adjusters have two knobs. One controls the depth of cut on the right side of the tool; the other controls the cut on the left.
This handy feature allows you to fine-tune the tool in some surprising ways. You can correct an edge that is out of square by increasing the depth of cut on only one side. Or you can set the tool to take a fine shaving on one side and a thick shaving on the other.
But I suspect that the adjustment mechanism works this way to keep the tool simple to manufacture – the two-knob system is mechanically simpler than anything you’ll find on a bench plane.
It’s worth noting that some vintage spokeshaves (especially those from the now-vanished Preston company) had a single adjustment knob for the iron. In my limited experience with these tools, I found them difficult to set for an even cut on both sides of the tool. So in my book, the two adjustment knobs are a real plus.
The best adjustment knobs have a tight fit between the shave’s iron and knobs, which gives you precise and immediate control of the iron. A knob that spins freely before engaging the iron can result in serious backlash, which is when the iron gets pushed up into the body of the tool as you work.
But do you even need the adjustment knobs? The two Lie-Nielsen tools in our test don’t have adjusters. Instead you set the depth of cut by applying slight pressure to the back of the iron while tightening the cap iron. The more pressure you apply to the iron, the deeper the cut. Apply pressure in the middle and the cutter will take a consistent cut all the way across. Apply pressure to the right or left side and the cut will be deeper there.
I’ve seen beginning spokeshave users struggle with this technique. However, after learning an important trick (it helps to adjust the tool while it’s resting on a completely flat surface) and an hour of working with the shave, adjusting it becomes easier.
The bottom line is that the adjustment knobs do not improve the tool’s performance, but they are an immense convenience for beginners. With these two knobs you can set the tools much like you do a hand plane. Simply look down the sole of the tool with a light-colored surface in the background (many people use a sheet of paper). Increase the iron’s projection on both sides until you see it appear as a thin black line emerging from the sole. Then retract the iron back into the tool’s body by turning the knobs counterclockwise the same amount. Start making cuts on a scrap piece and advancing the iron on both sides in small, identical increments. When your tool cuts beautiful wispy shavings, you’re done.

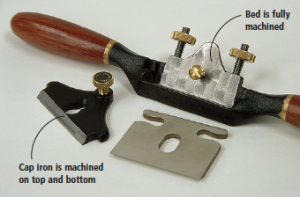
Now this is more like it. Note that the bed of the tool is fully machined. This is what you pay for with a premium tool such as the Veritas. The excellent fit between the body and iron translate into excellent cutting action. Also note the machining on the front edge of the cap iron. This helps the shavings escape.
Sharpening a Big Hurdle
Of course, if your iron isn’t sharp you’re not going to make anything that resembles wispy. And sharpening a spokeshave beguiles many first-time users.
In general, spokeshave blades are shorter than plane blades and chisels, so they don’t fit in most honing guides you can buy. You can sharpen these irons without a honing guide, but freehand sharpening is a skill that some woodworkers have yet to acquire.
If you use a honing guide to sharpen, I highly recommend the Veritas Small-Blade Holder. This ingenious little jig clamps into your honing guide and holds any spokeshave blade in place with a couple of strong magnets. It’s available from Lee Valley Tools (item #05P32.03, $14.50) and is well worth the price.
Choosing a Tool
Ultimately, the differences between the inexpensive tools and the premium ones came down to the raw materials used and the amount of precision machining on the tool. The better tools are generally made from bronze or ductile iron, which is tough enough to withstand a fall from the bench without breaking. The less expensive tools are made using gray iron, which is more brittle and can crack if dropped onto a concrete floor from your bench.
The more expensive tools had thicker irons that were made using A2 steel, an alloy that stays sharper longer. Less expensive tools have thinner irons made from high-carbon steel or other alloys that aren’t as durable as A2.
The biggest difference between the expensive and inexpensive tools was the machining – well-milled surfaces allow the tool’s parts to fit together snugly. A precise fit between the tool, the iron and the cap iron results in a tool that will not chatter and is capable of taking a heavy cut with ease. If any of those parts doesn’t mate with its neighbors, the tool will screech, skip over the wood and leave a rippled surface.
The three less-expensive tools have little – if any – machining between these parts. They were simply cast, stamped and painted. The expensive tools have a fully machined bed, precisely milled irons and cap irons that are milled on the underside and where the shavings escape. This extra effort makes all the difference in the world.
And while it’s possible to soup up the inexpensive tools by altering the bed and replacing the iron and the cap iron, I consider that time and expense to be excessive. Buy a tool that works right out of the box.
Our Picks
I can’t recommend the three less-expensive tools: the Anant, Kunz and Stanley. They require too much work to become usable.
If money is the most important factor in your decision, I recommend you hunt the flea markets for a vintage Stanley 151 spokeshave or similar model. (You’ll need to do some research first. Go to “Magazine Extras” on our web site for a couple of links that will get you started). These vintage tools were better made than the modern ones and generally require less tuning. You likely will want to upgrade the iron, and Hock Tools sells good replacement irons (hocktools.com).

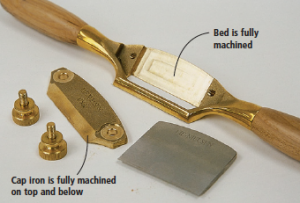
More praiseworthy machining on the Lie-Nielsen Boggs Spokeshave. This tool is a bit different in that the cap iron contacts the iron at more points than other tools. This adds stability to the iron, which allows for fine and coarse cuts.
The Veritas Low-Angle Spokeshave is ideal for chairmaking and work that requires shaping end grain. The smaller Lie-Nielsen shave excels at fine small-scale work. It’s not designed for hogging off material so it makes an ideal second shave.
When it comes to all-around performance, the Veritas and the Lie-Nielsen Boggs Spokeshaves are the best. Both tools are well-manufactured, durable and excel at fine and coarse work.
The Veritas’s adjustment knobs make it easier for beginners to learn, but as I said earlier, the adjusters don’t ultimately improve performance. These two toolmakers have done everything right, so they both earn our Editor’s Choice awards.
Download a PDF of a side-by-side spokeshave comparison:
Spokeshaves Side By Side
From the April 2004 issue #140
Buy this issue now
Here are some supplies and tools we find essential in our everyday work around the shop. We may receive a commission from sales referred by our links; however, we have carefully selected these products for their usefulness and quality.


