We may receive a commission when you use our affiliate links. However, this does not impact our recommendations.
Learning to work with veneers and curves enables you to design and build almost anything. This bow-front entry table serves as a good introduction to both – without costing a small fortune or requiring you to attempt an overly intimidating project. Veneer introduces to you to a world of beautiful grain patterns and species that are prohibitively expensive to buy in solid hardwoods. Having the confidence to add curved and veneered surfaces to your work also allows you to tackle a wide range of period, contemporary and original designs that were previously off limits.
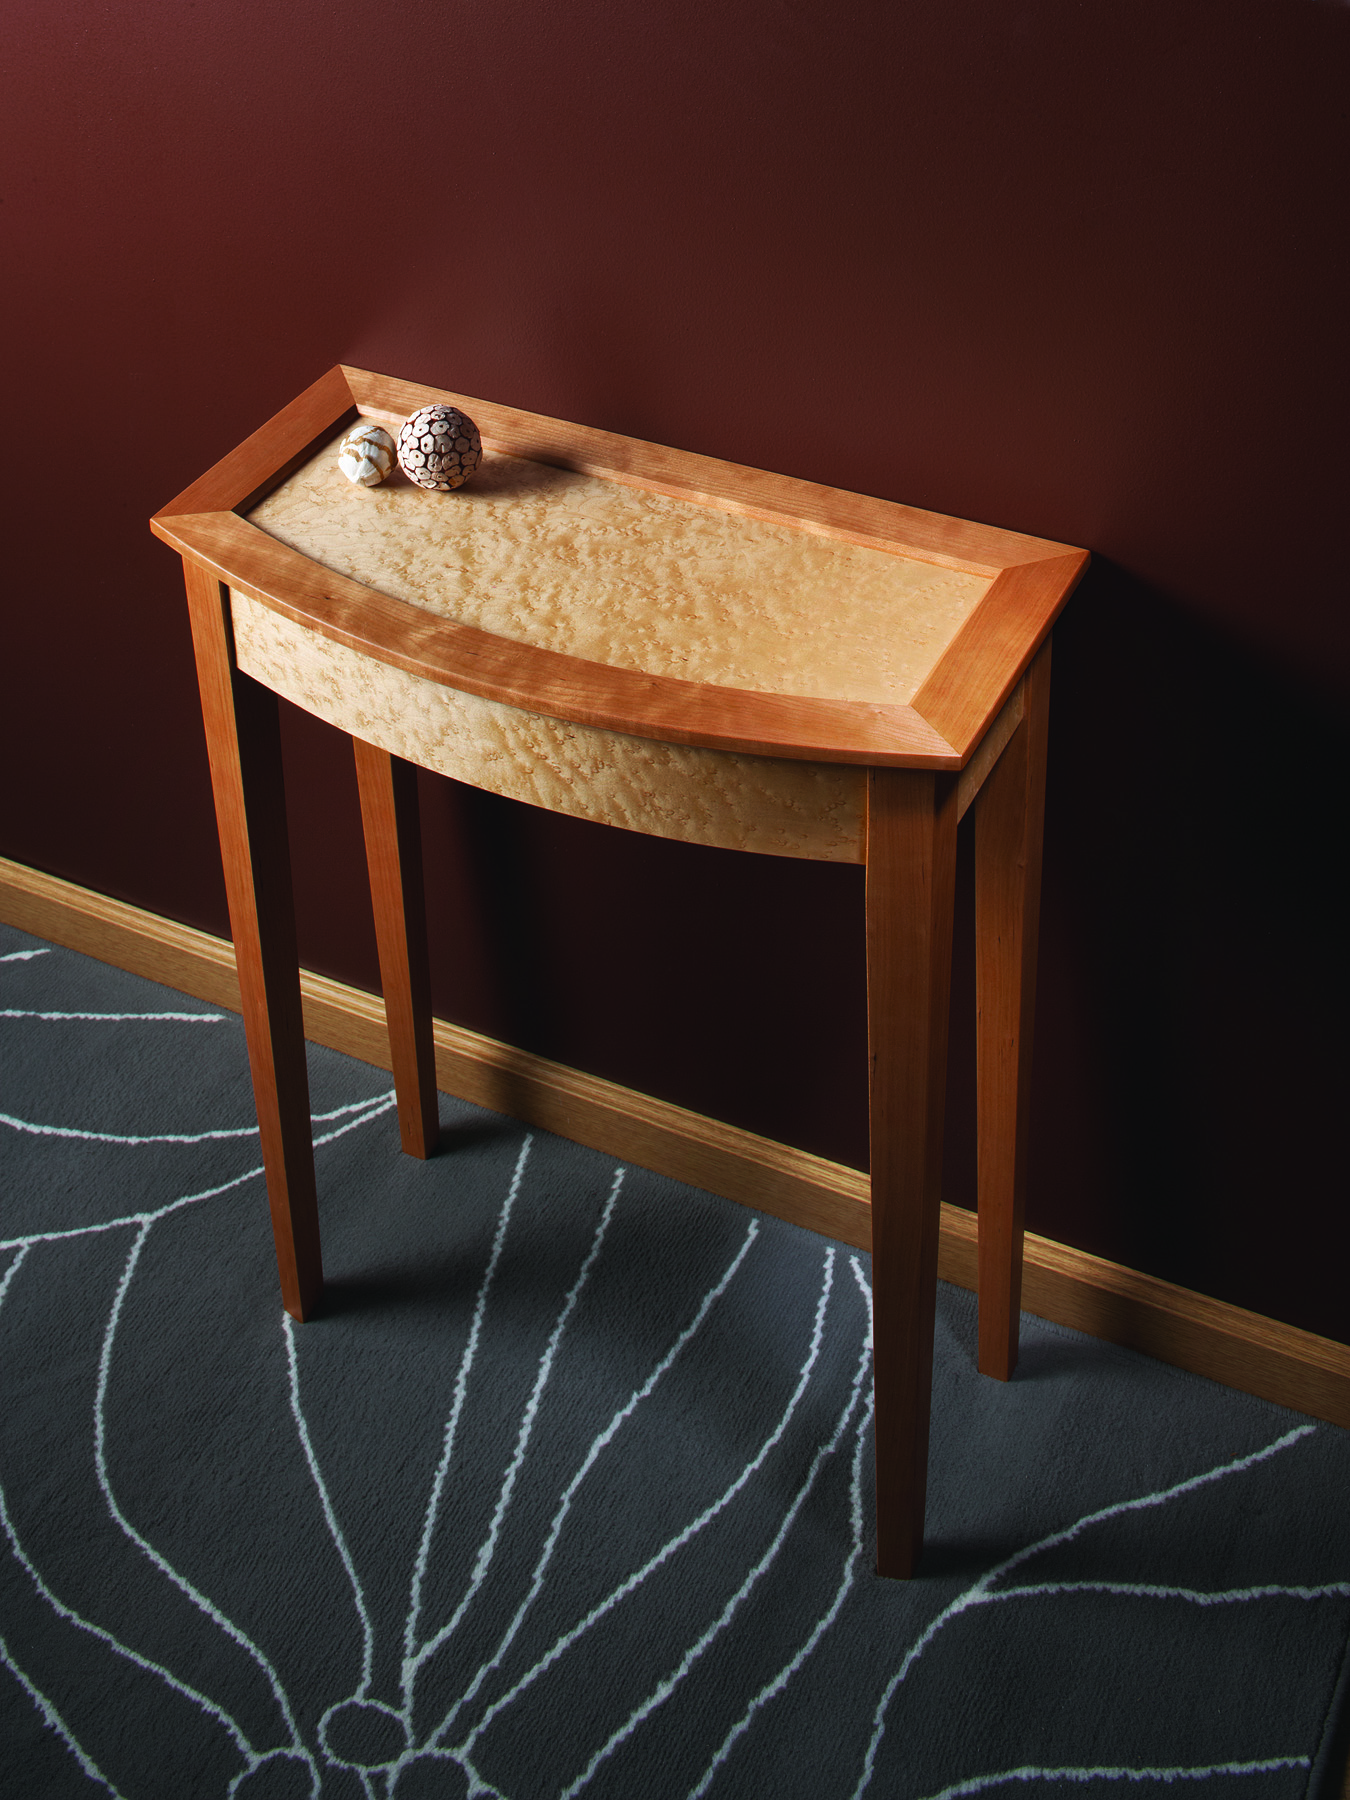
This petite design teeters somewhere between a traditional bow-front table and a sleeker modern piece. The veneered bird’s-eye maple top panel and aprons are framed and highlighted by the darker, contrasting solid cherry used for the legs and top frame. A subtle but graceful detail is that the front faces of the front legs are angled to visually extend the curve of the front apron. Like this little detail, which you may not notice at first, I think all furniture should have a few secrets to be discovered only on closer inspection. The hidden drawer on this table qualifies as well; its non-traditional placement on the side of the table is completely disguised by a drawer front that is piston-fit between the legs. Unless someone points it out, you’d never know it was there.
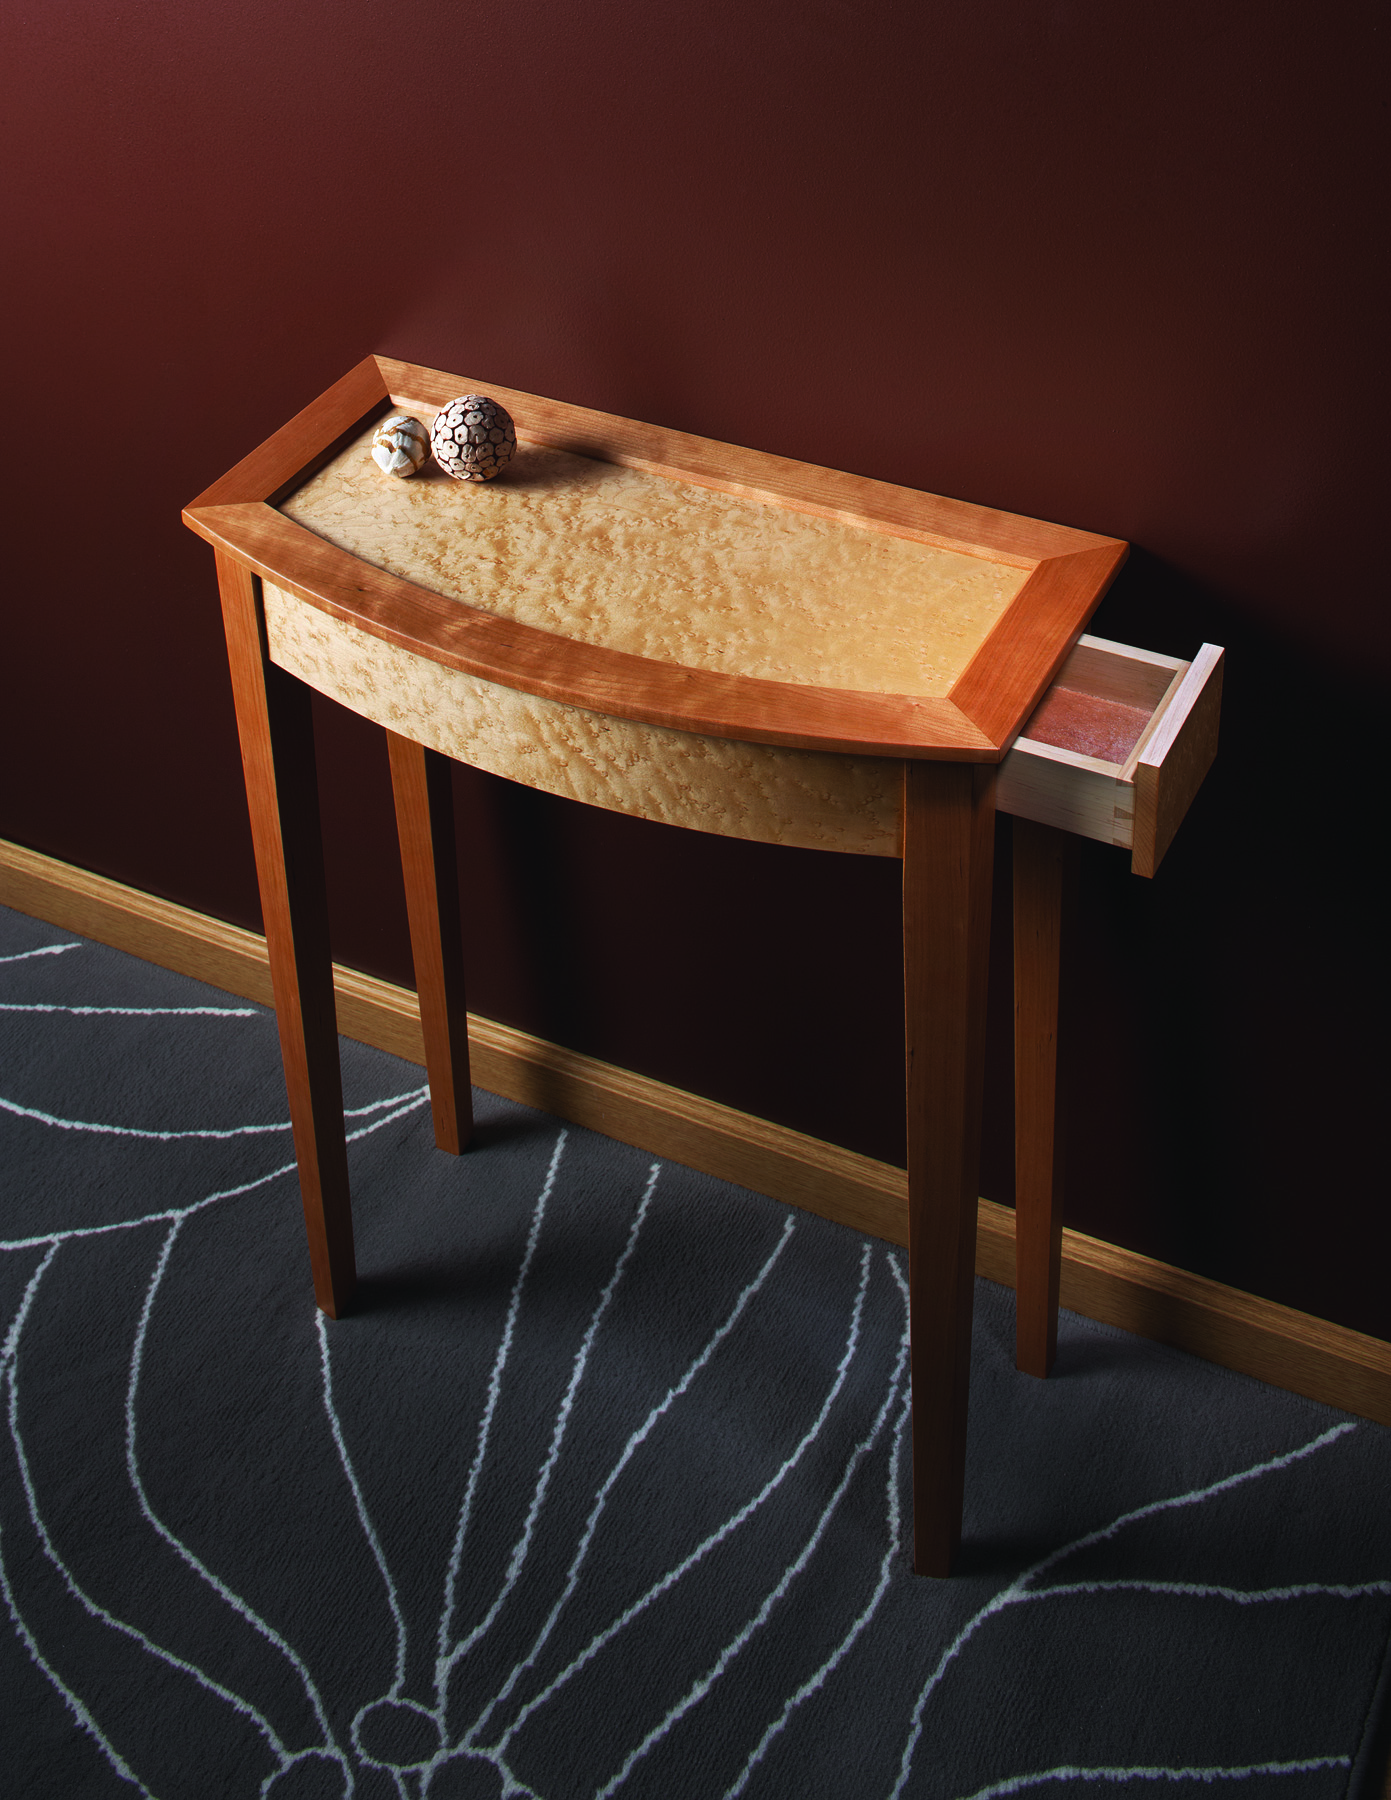
A hidden drawer. A false drawer front fits snugly between the legs so that when the drawer is closed you can’t even tell it’s there. A small cove routed on the underside of the drawer front allows you to pull it out from below.
If you’re new to veneering a curved surface or veneering altogether, this is a perfect project for expanding your skills. Thanks to a hand-pumped vacuum veneer press that costs only $60 for the complete setup, the veneering is easy, requiring no additional veneering tools. You could, of course, skip the veneer work completely and cut the curved apron from 10/4 stock. For that matter, you could even skip building and installing the drawer. But where would be the glory in that?
Start With the Curve
I stayed away from veneer work for years; I have a small shop and didn’t want to spend hundreds of dollars on a vacuum veneer press that I don’t have room for. When I needed to veneer the occasional panel, I borrowed a press. But lately I’ve admitted that it’s difficult to regularly find solid stock that looks as good as fine veneers. And even if I could, I’d get better yield by sawing it into thick veneers. So I started looking around for an affordable solution.
There are many ways to veneer curved surfaces, any of which would work for this project: You could use a vacuum veneer press to attach veneer to an MDF substrate; hammer veneer over a brick-laid curve; or clamp up laminates or bending plywood between male and female forms. But I’ve been curious about the hand-pumped Roarockit veneer press system, originally designed to make skateboards, since it came out in 2002 (perhaps because much of my youth was well misspent on a skateboard). So I placed an order. For more on the process, which worked seamlessly for me, see “Hand-pumped Veneer Press” on page 29.
Whatever method you use to execute the curve, be sure to make the front apron first. Begin by drawing a full-sized version of the table base from above, as shown on page 28, but be prepared to alter the curve on the drawing if necessary. Laminates have a tendency to spring back after they are bent. Once the apron comes off the form and has a chance to acclimate, check to see if there was spring-back. If so, adjust your full-sized drawing. Otherwise, the curve of the top may not run coplanar to the curve of the apron.
Build the Form First
The first step in making the curved apron is to make a bending form with a curve matching the drawing. My form is made of 3⁄4” MDF, but plywood would work, too. On a scrap 5″ wide x 28″ long, draw out the arc as shown on page 28, bowing from 91⁄2” to 12″ over 24″ in length. Be sure to draw the arch an additional 2″ long on either end. This extra length allows you to square and tenon the ends of the front apron. Once you’ve band sawn the arch, refine and fair the curve with a rasp or belt sander.
Making the form takes five layers of 3⁄4” material. Once you’re happy with the fairness of the first, simply template-rout subsequent layers using a flush-trim bit on your router table. Then screw all the layers together.
It’s easiest to add only one layer at a time, clamping it in place and getting the edges flush before you drive the screws. Once the form has reached full thickness, use a flexible sanding block (sandpaper glued to 1⁄4” plywood works well) to make sure the whole surface is smooth and fair. Laminate the apron as shown in “Hand-pumped Veneer Press.”
While the glue sets on the curved apron, mill the rest of the table parts to rough size and then focus on the legs. Because tenoning is the next step for the curved front apron, go ahead and cut all of the leg mortises before you taper the legs. I cut 5⁄16” mortises using my hollow-chisel mortiser and then cleaned up the walls with a chisel.
Make the Form
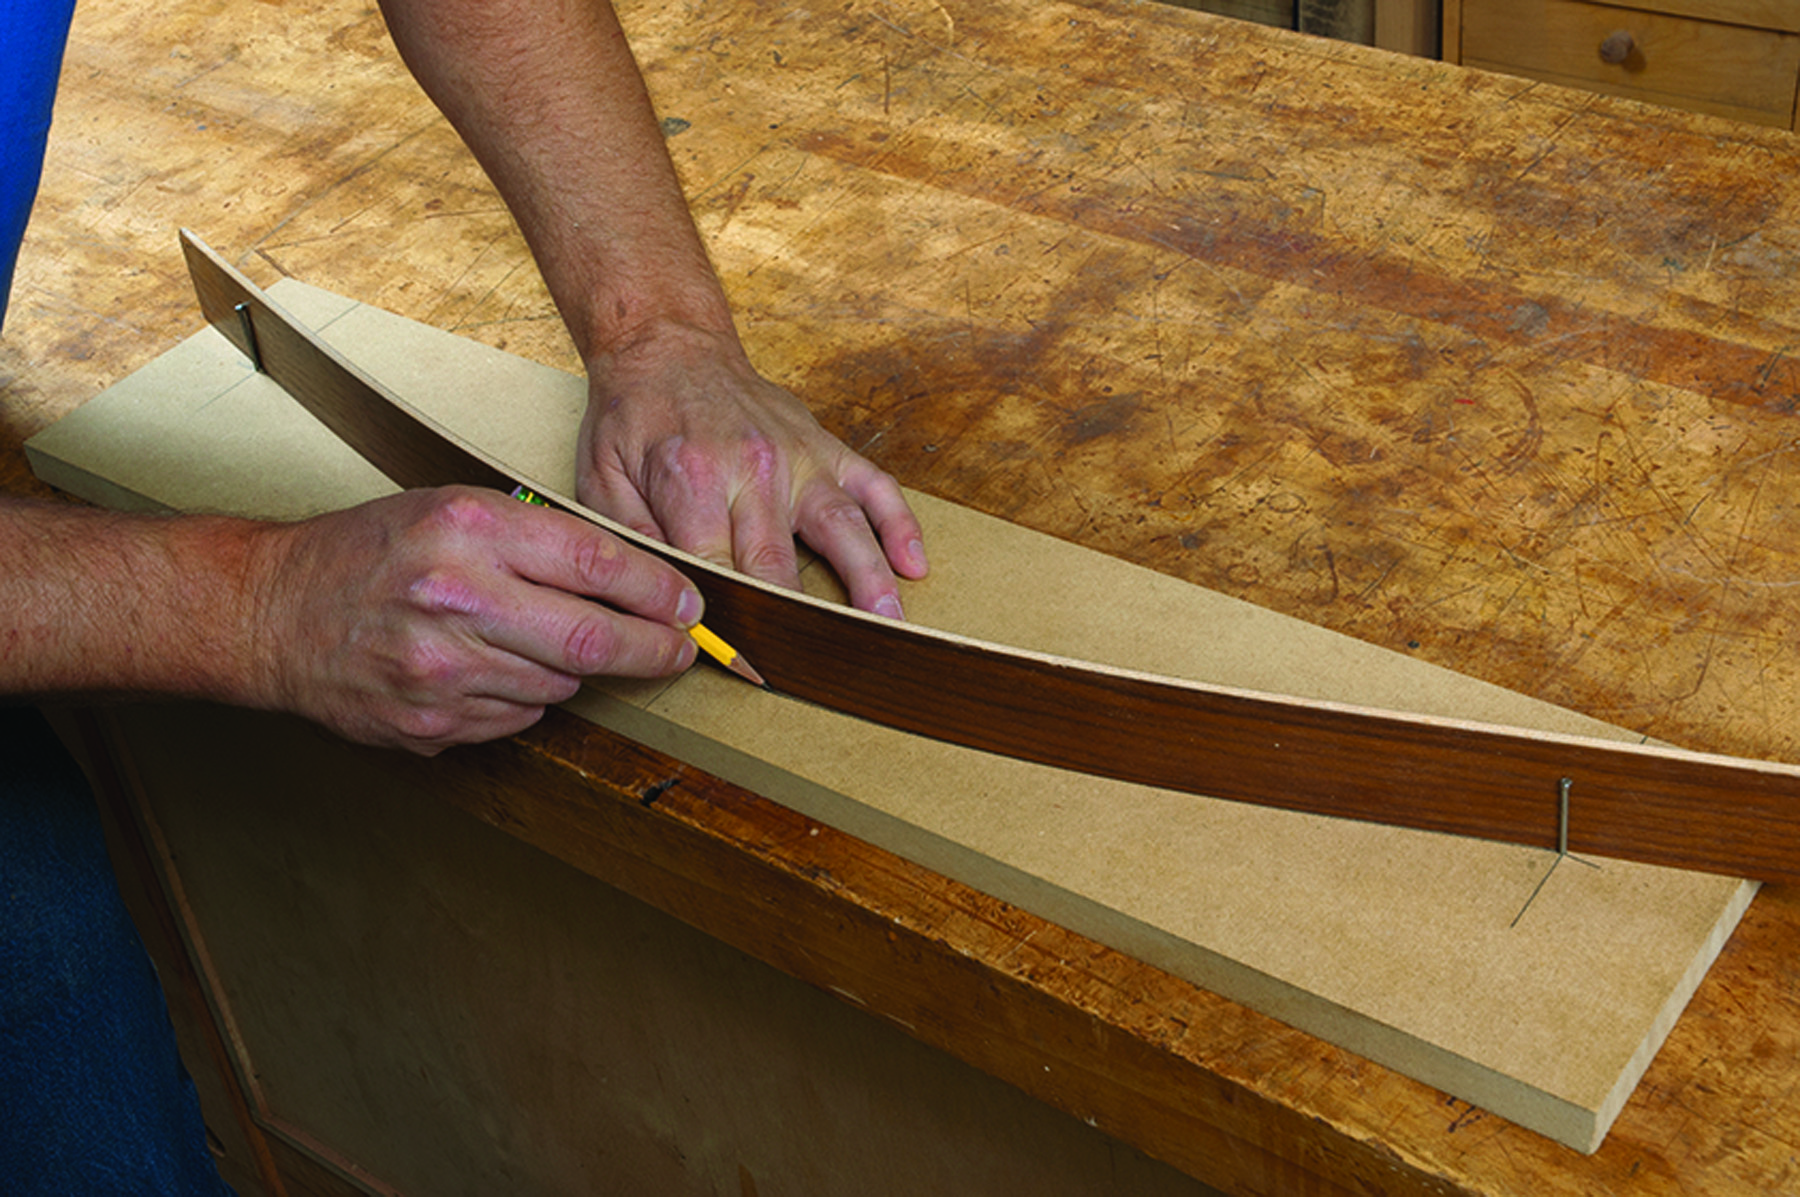
Draw the apron curve. Bow a batten between finish nails driven into MDF and mark the curve. Remember to add length beyond the nails to allow for trimming and tenons.
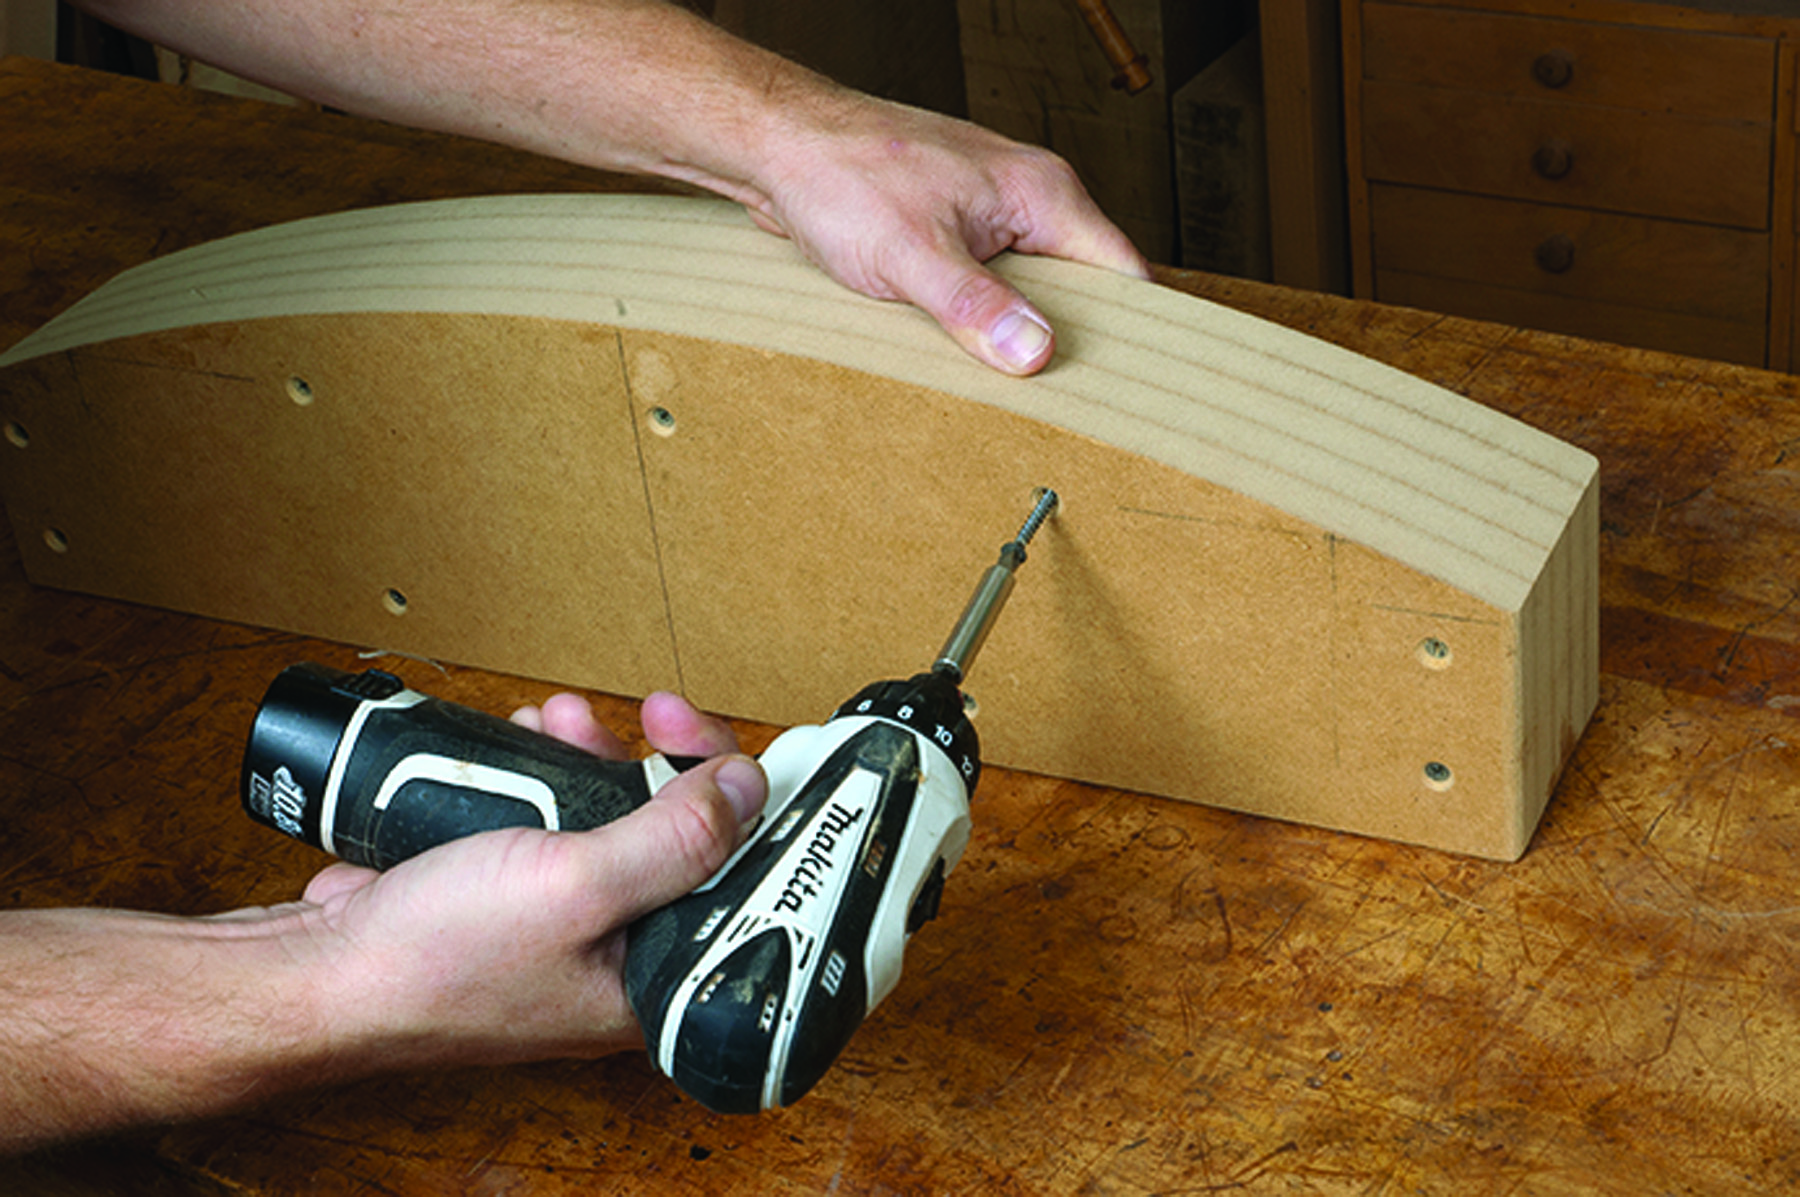
Build the form. After band sawing the curves, template-rout multiple layers of MDF and screw them together. Once the form is assembled, make sure the face is smooth and fair.
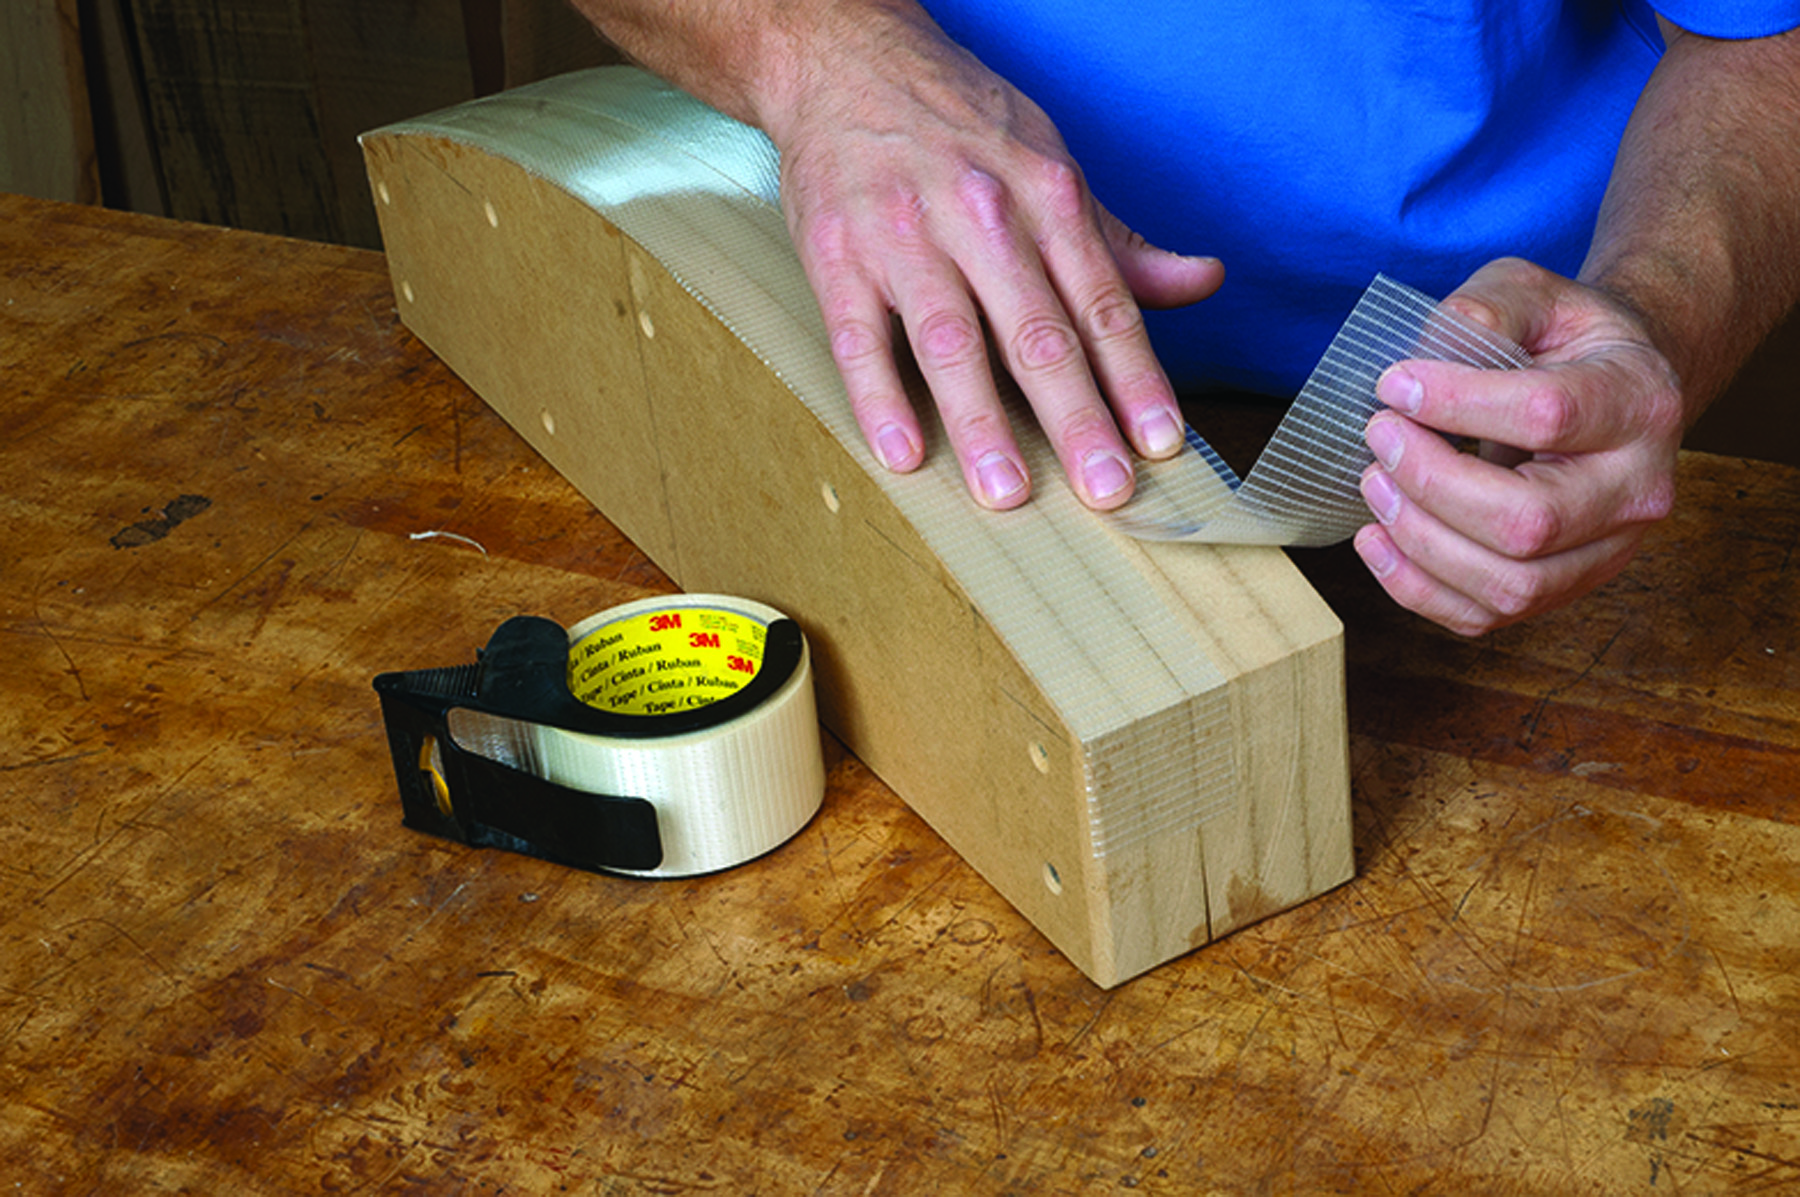
Seal it off. Skip the finish or wax altogether – a layer of slick packing tape is all you need to make sure glue squeeze-out won’t stick to the form.
Hand-Pumped Veneer Press
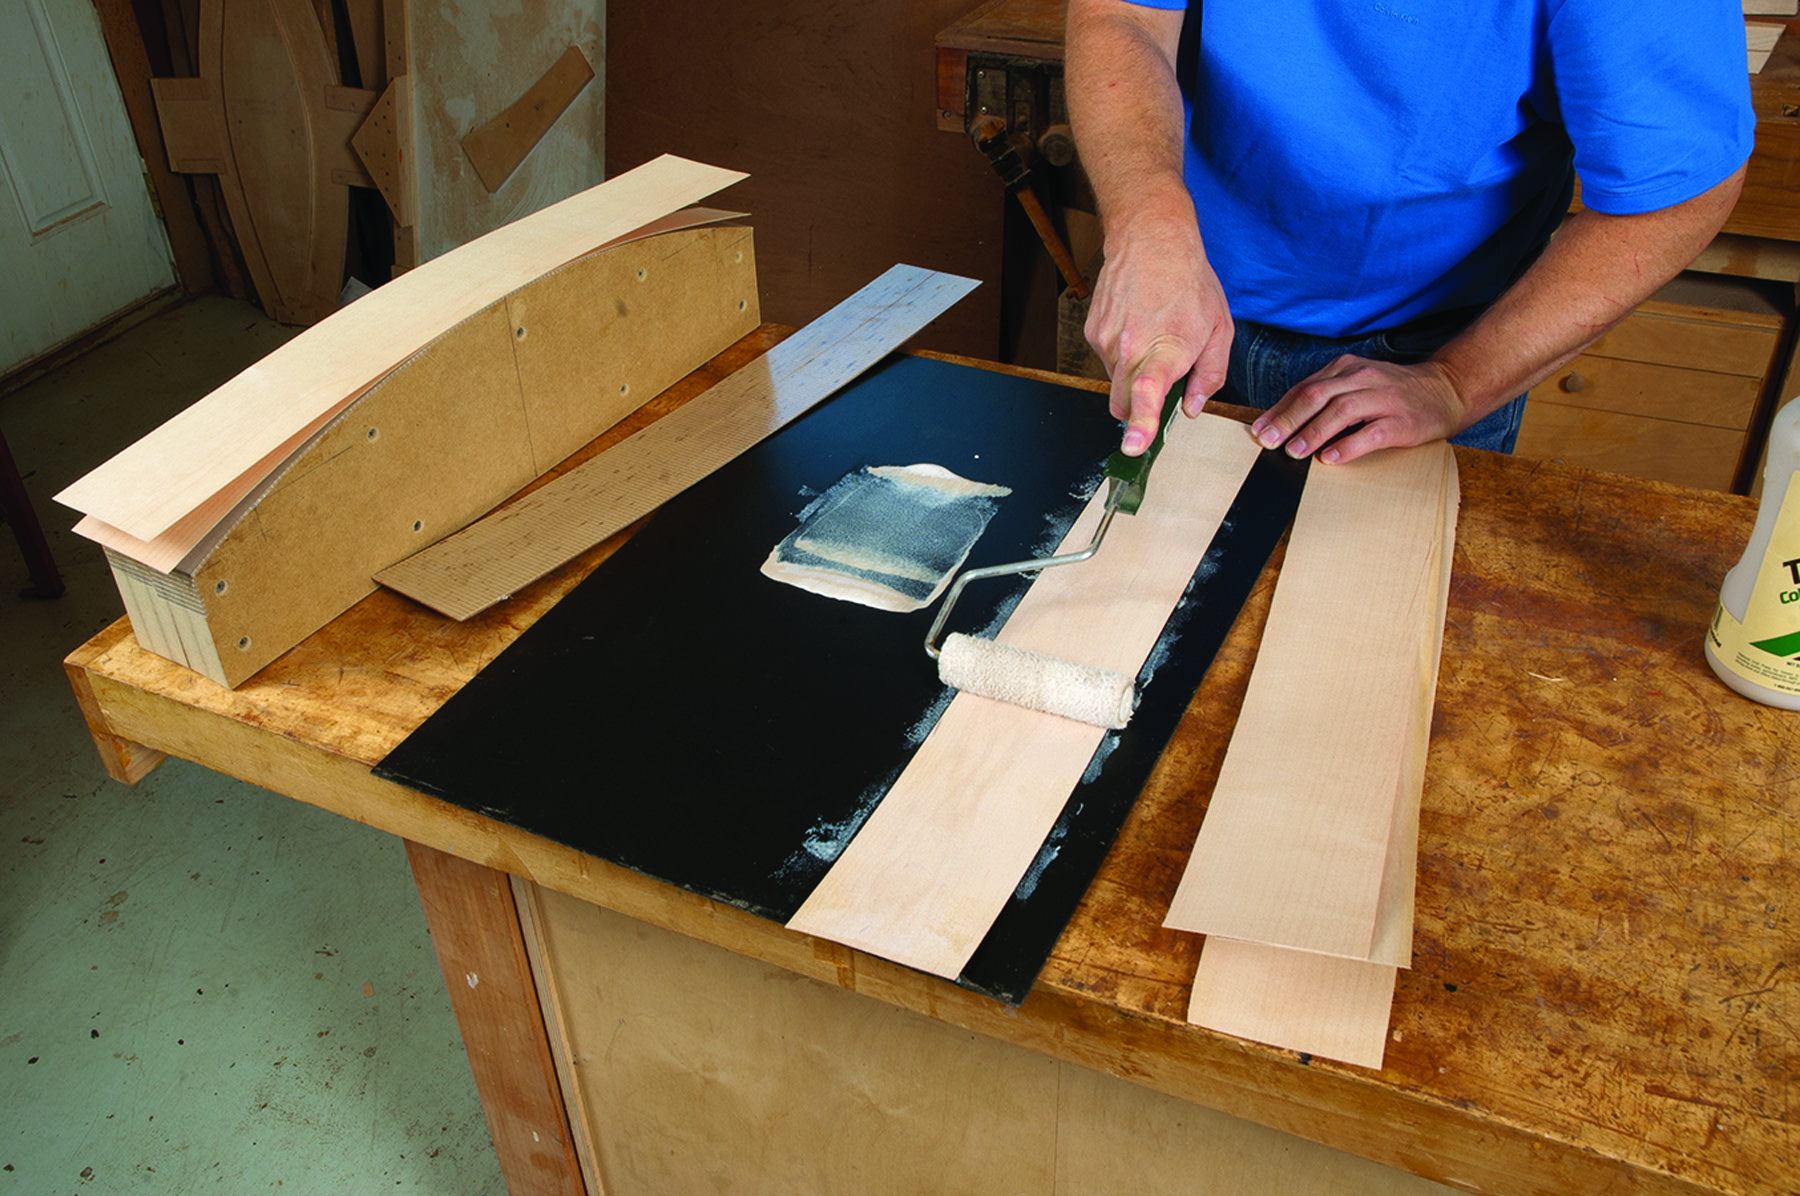
1. Roll on the glue. Spread a thin, even layer of glue on one face of the veneer. A 4″ paint roller makes this work easy.
Originally designed to enable non-woodworking skateboarders to build their own boards, the Roarockit veneer press works almost exactly like a vacuum veneer press, but it’s small enough to stow away in a drawer when not in use – a boon for those who have small shops. Also, if you’re not sure veneering is something you’ll do often, the setup costs only $60 – a fraction of the price of a traditional vacuum press. If you find it’s not your thing (you won’t), you haven’t risked hundreds of dollars. The price covers everything you need, including a 26“ x 28“ vacuum bag. Roarockit offers bags of various sizes or will make whatever size you request.
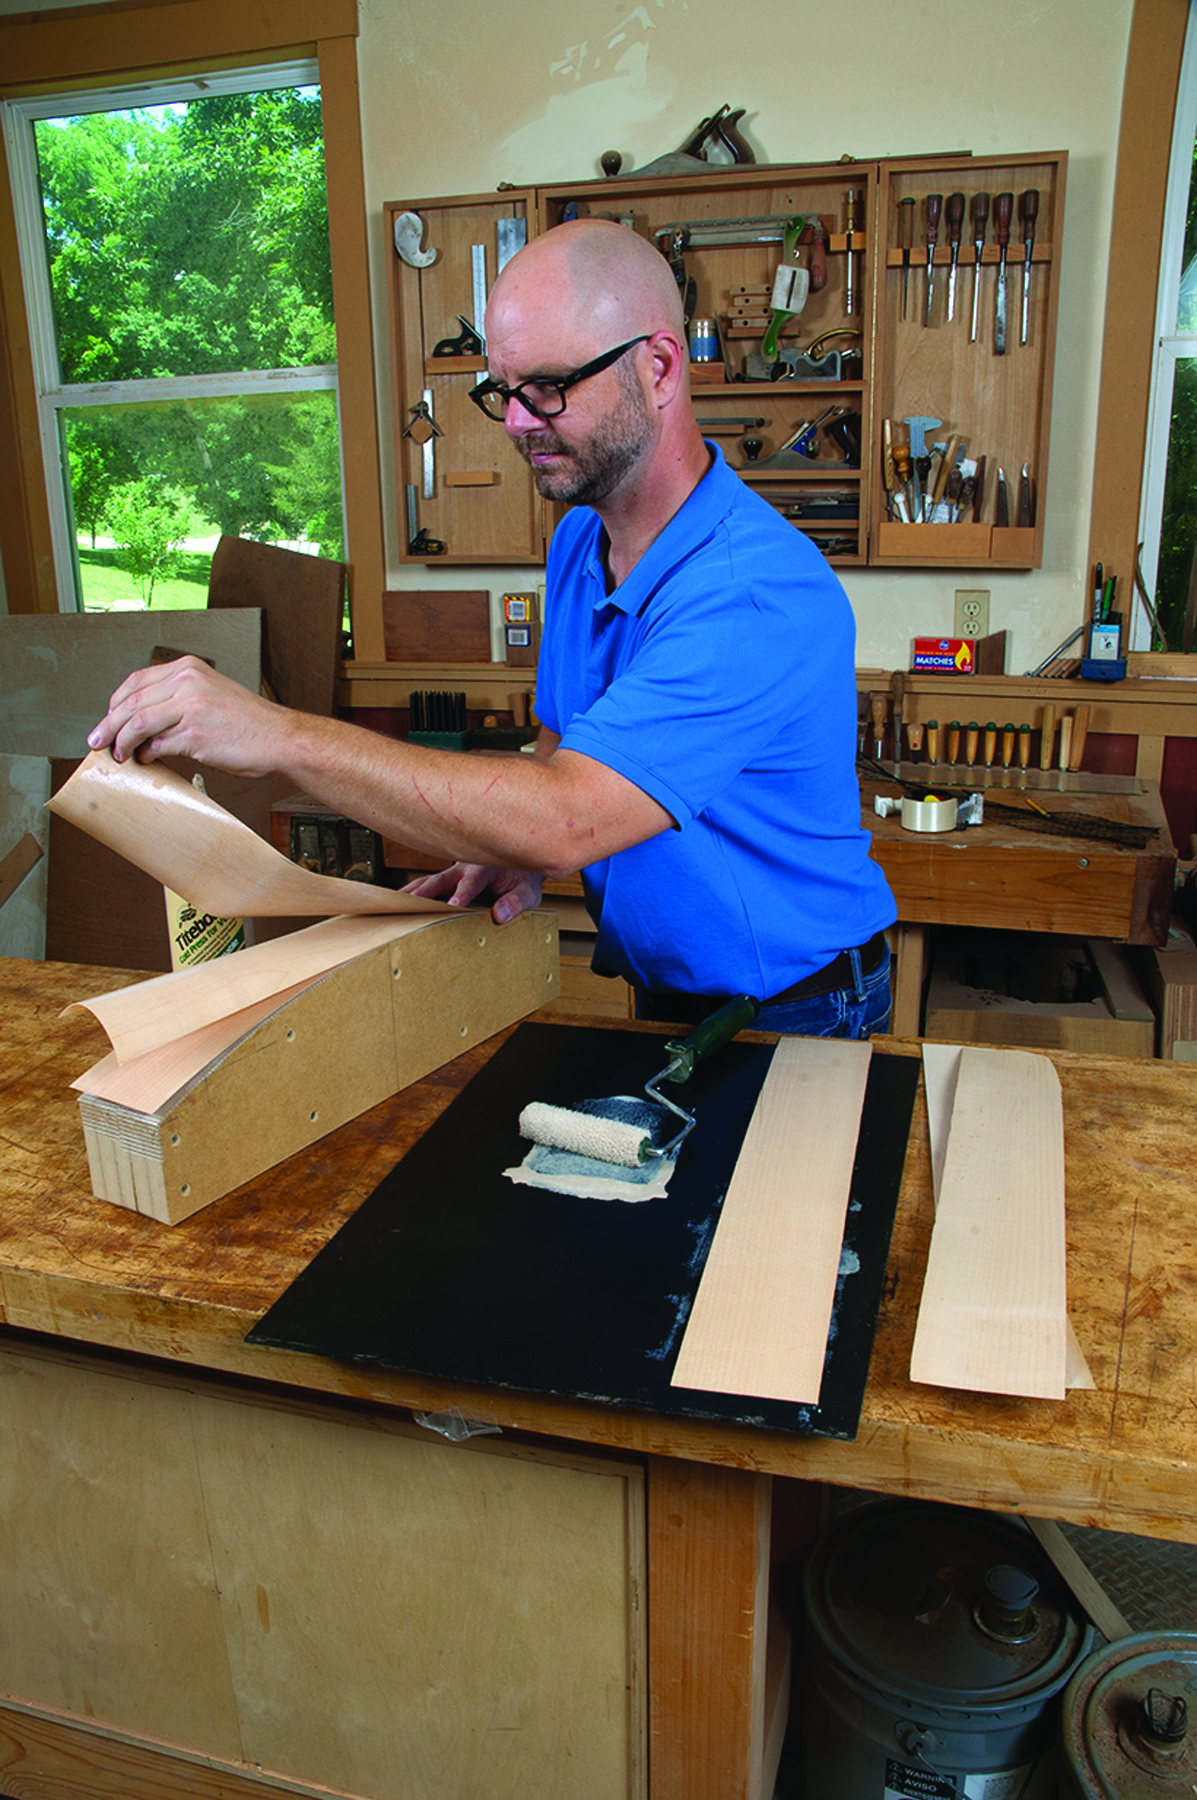
2. Stack it up. After your first unglued face is on the form, stack subsequent veneer layers in place with the glued face down.
Using the Roarockit is almost identical to using a traditional vacuum press. To make the table’s front apron, simply follow the steps outlined in the photos here. As you work through the process, keep a few things in mind:
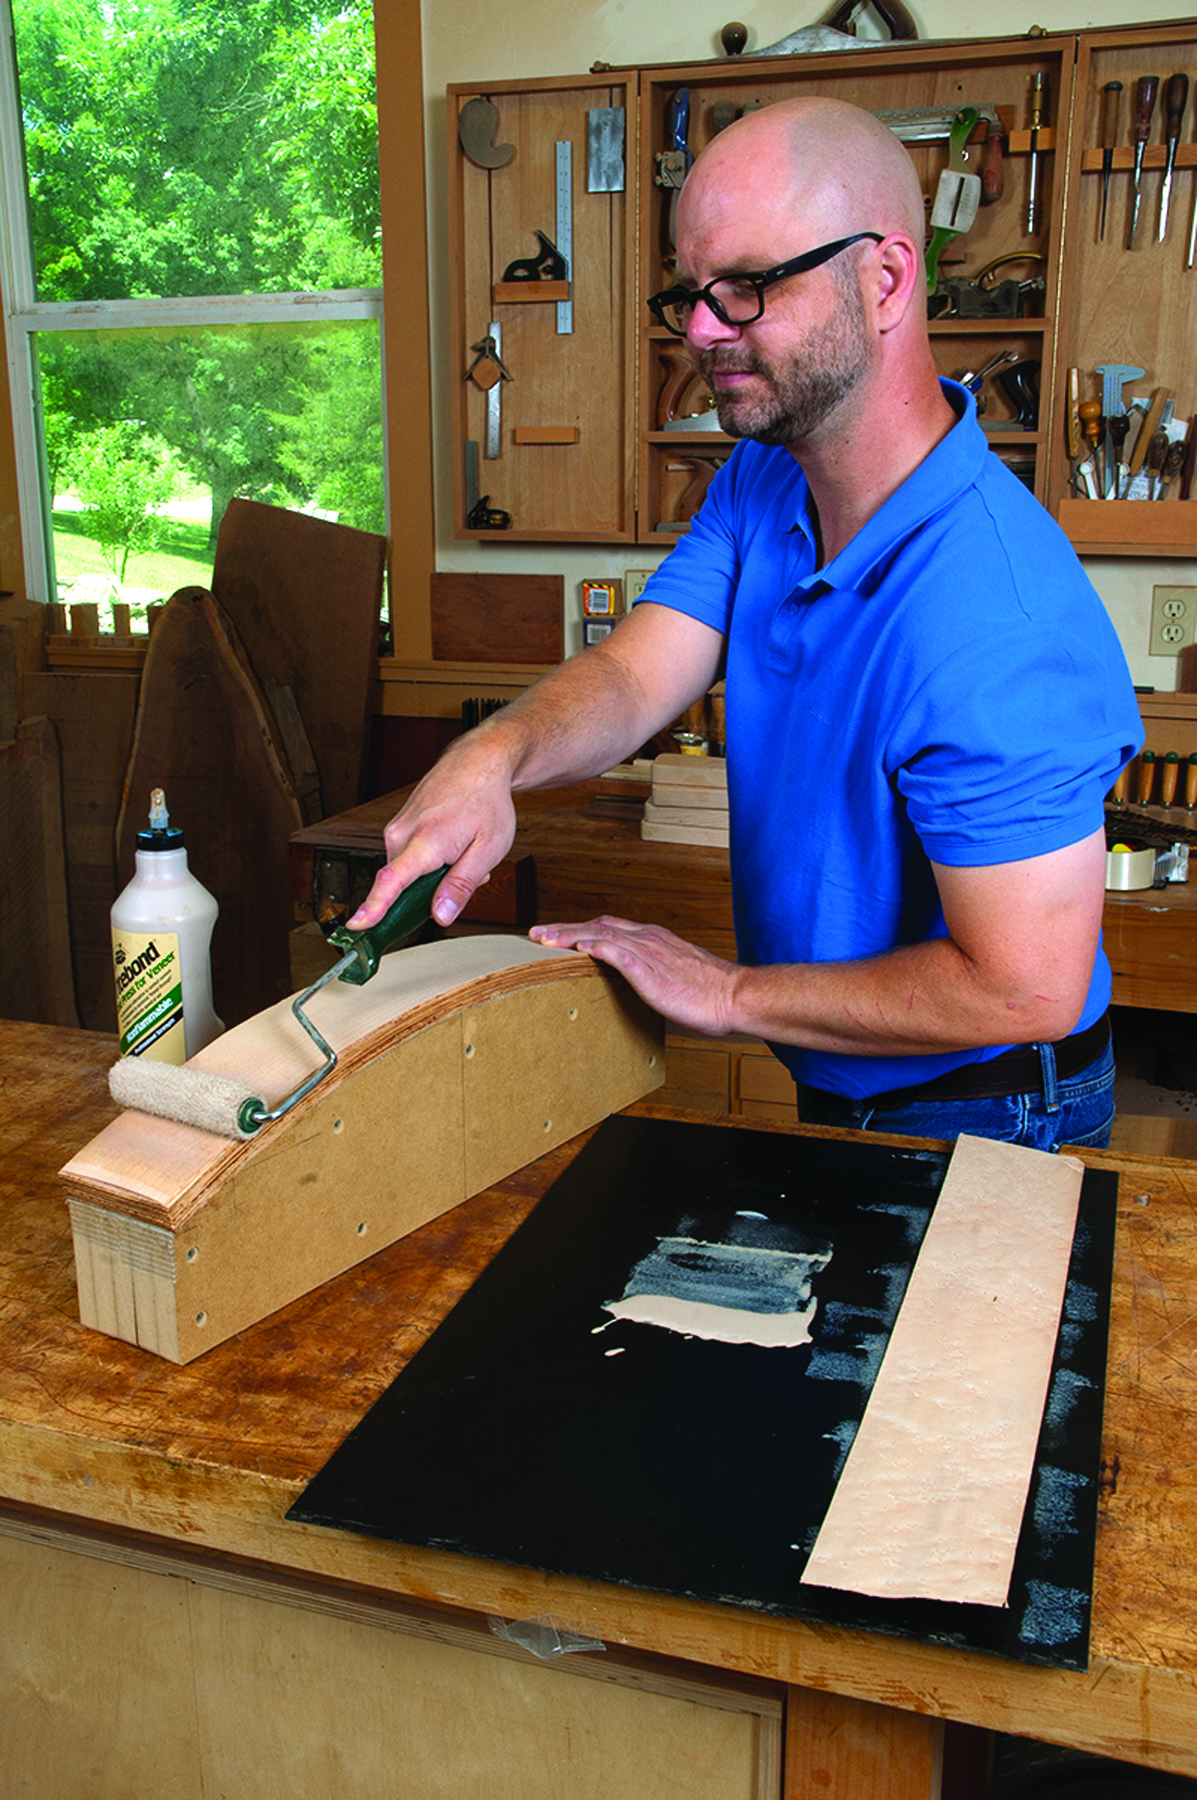
3. Roll again. Spread glue on the opposing face (that way, if you miss a spot on one face the glue-up will still be OK).
Though you could veneer over an MDF or brick-laid form using this press, I glued up the apron similar to the way a skateboard is glued up. I simply laid up multiple layers of 1⁄16” veneers until I reached the 13⁄16“ thickness I was after. This process is similar to laminate bending where you cut multiple layers from a single board and then glue them back together over a form. Another option would be to put the face veneer over bending plywood and a bending form. Any of these methods would work, but because the system was designed for skateboards, I borrowed as much as I could from their methods.
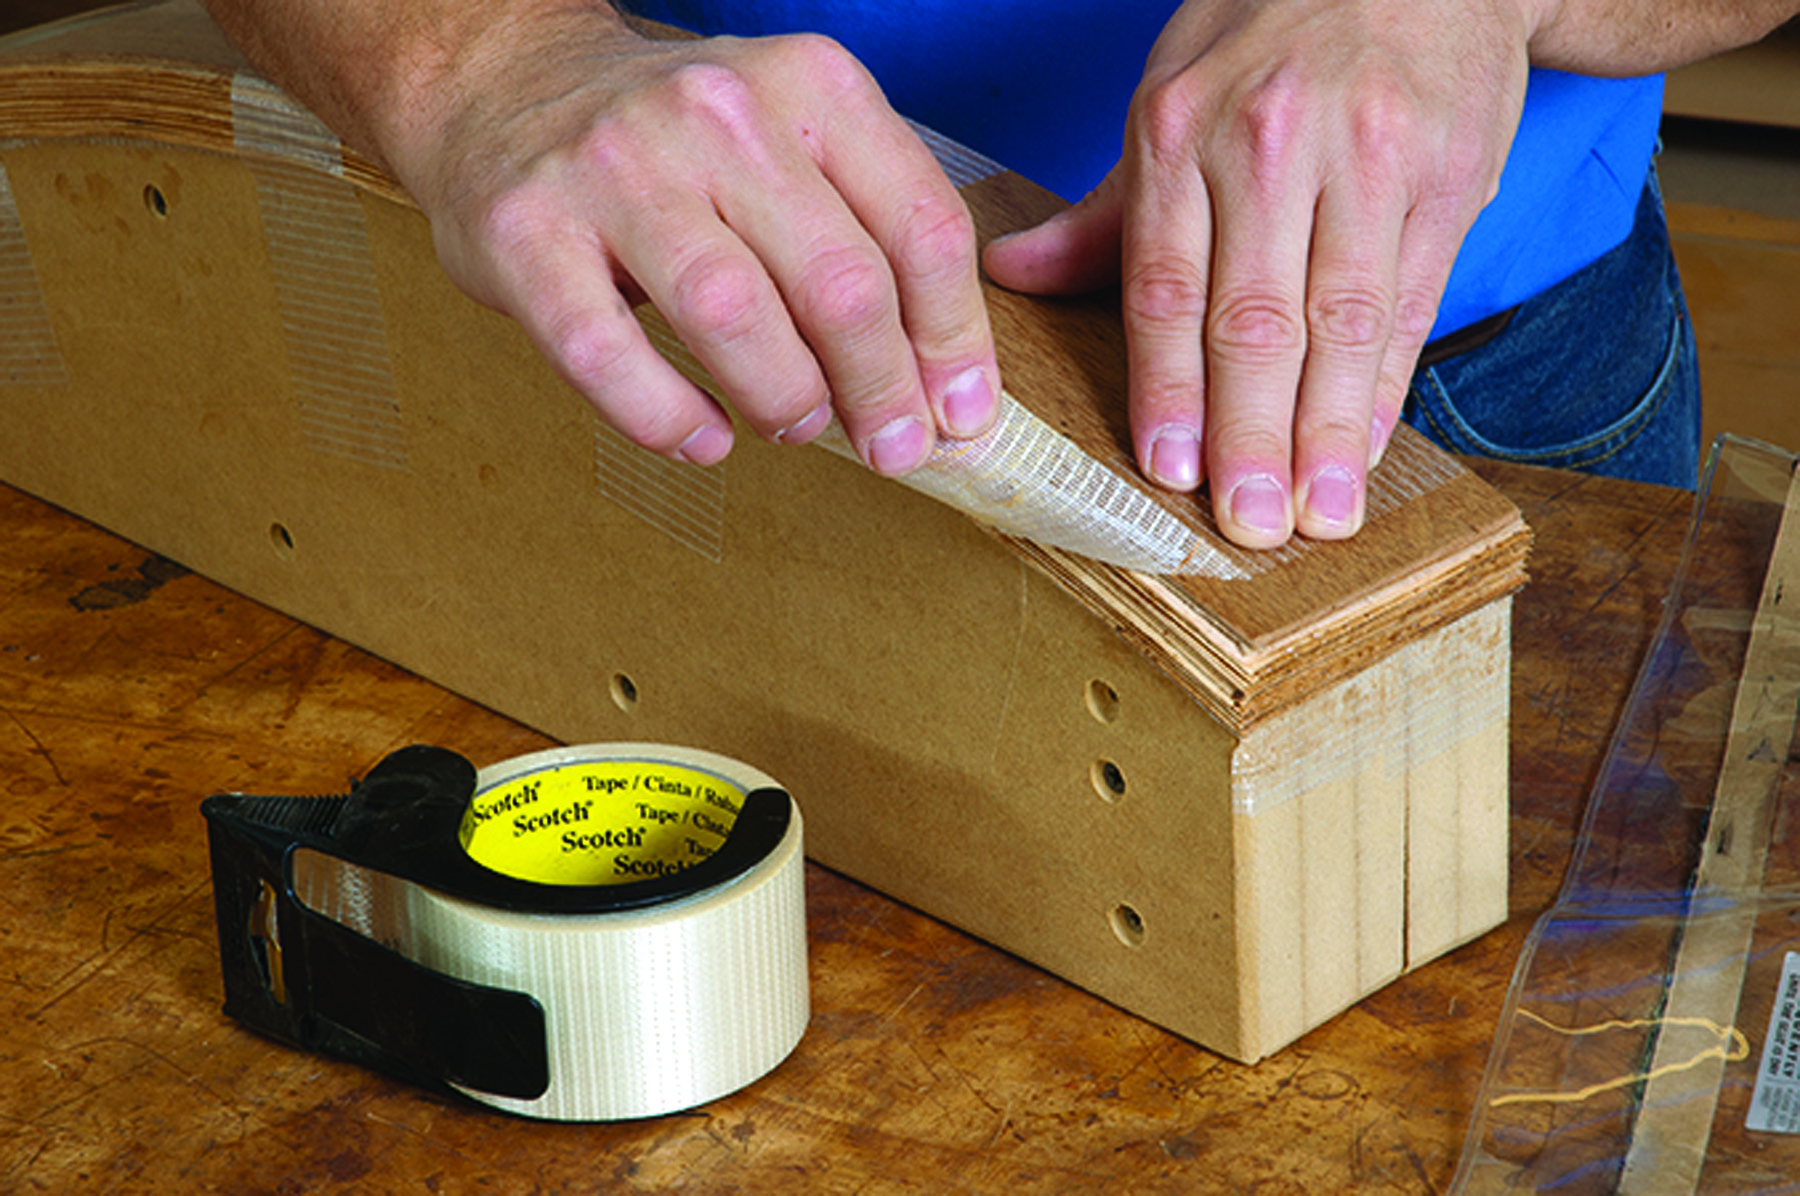
4. Line everything up. Apply a flexible 1⁄8″ Masonite or plywood platen over the top and tape the entire stack to the form.
The only downside to simply stacking up veneer is that you have to spread a lot of glue quickly. Using thicker laminates or bending plywood – either of which would work seamlessly with the Roarockit – speeds the process. That said, I had an extra set of hands in the shop on glue-up day. With my helper and I both spreading glue we had no trouble managing the clock. Another strategy would be to use a slow-setting glue, such as urea formaldehyde or epoxy.
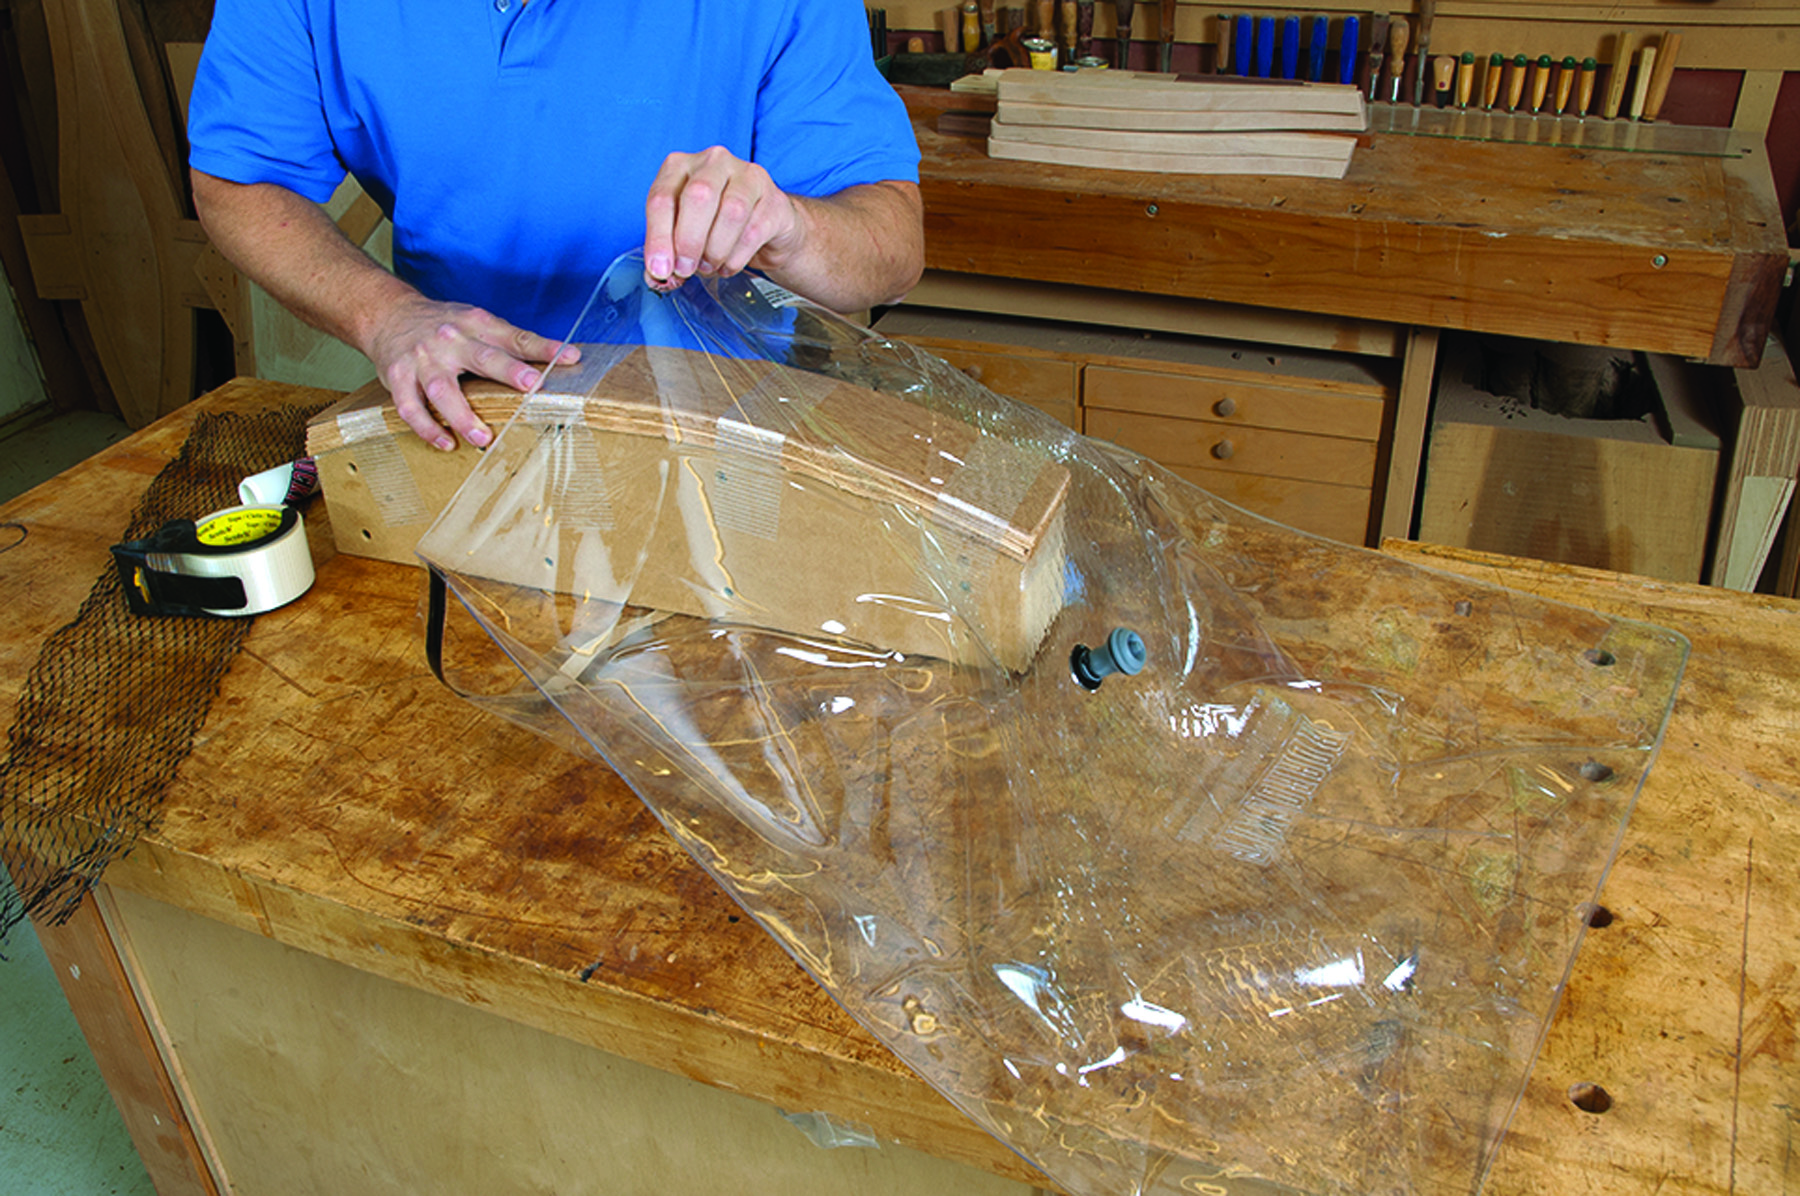
5. Slip it in. With the glued bundle of veneer taped in place on the form, slide the assembly into the vacuum bag.
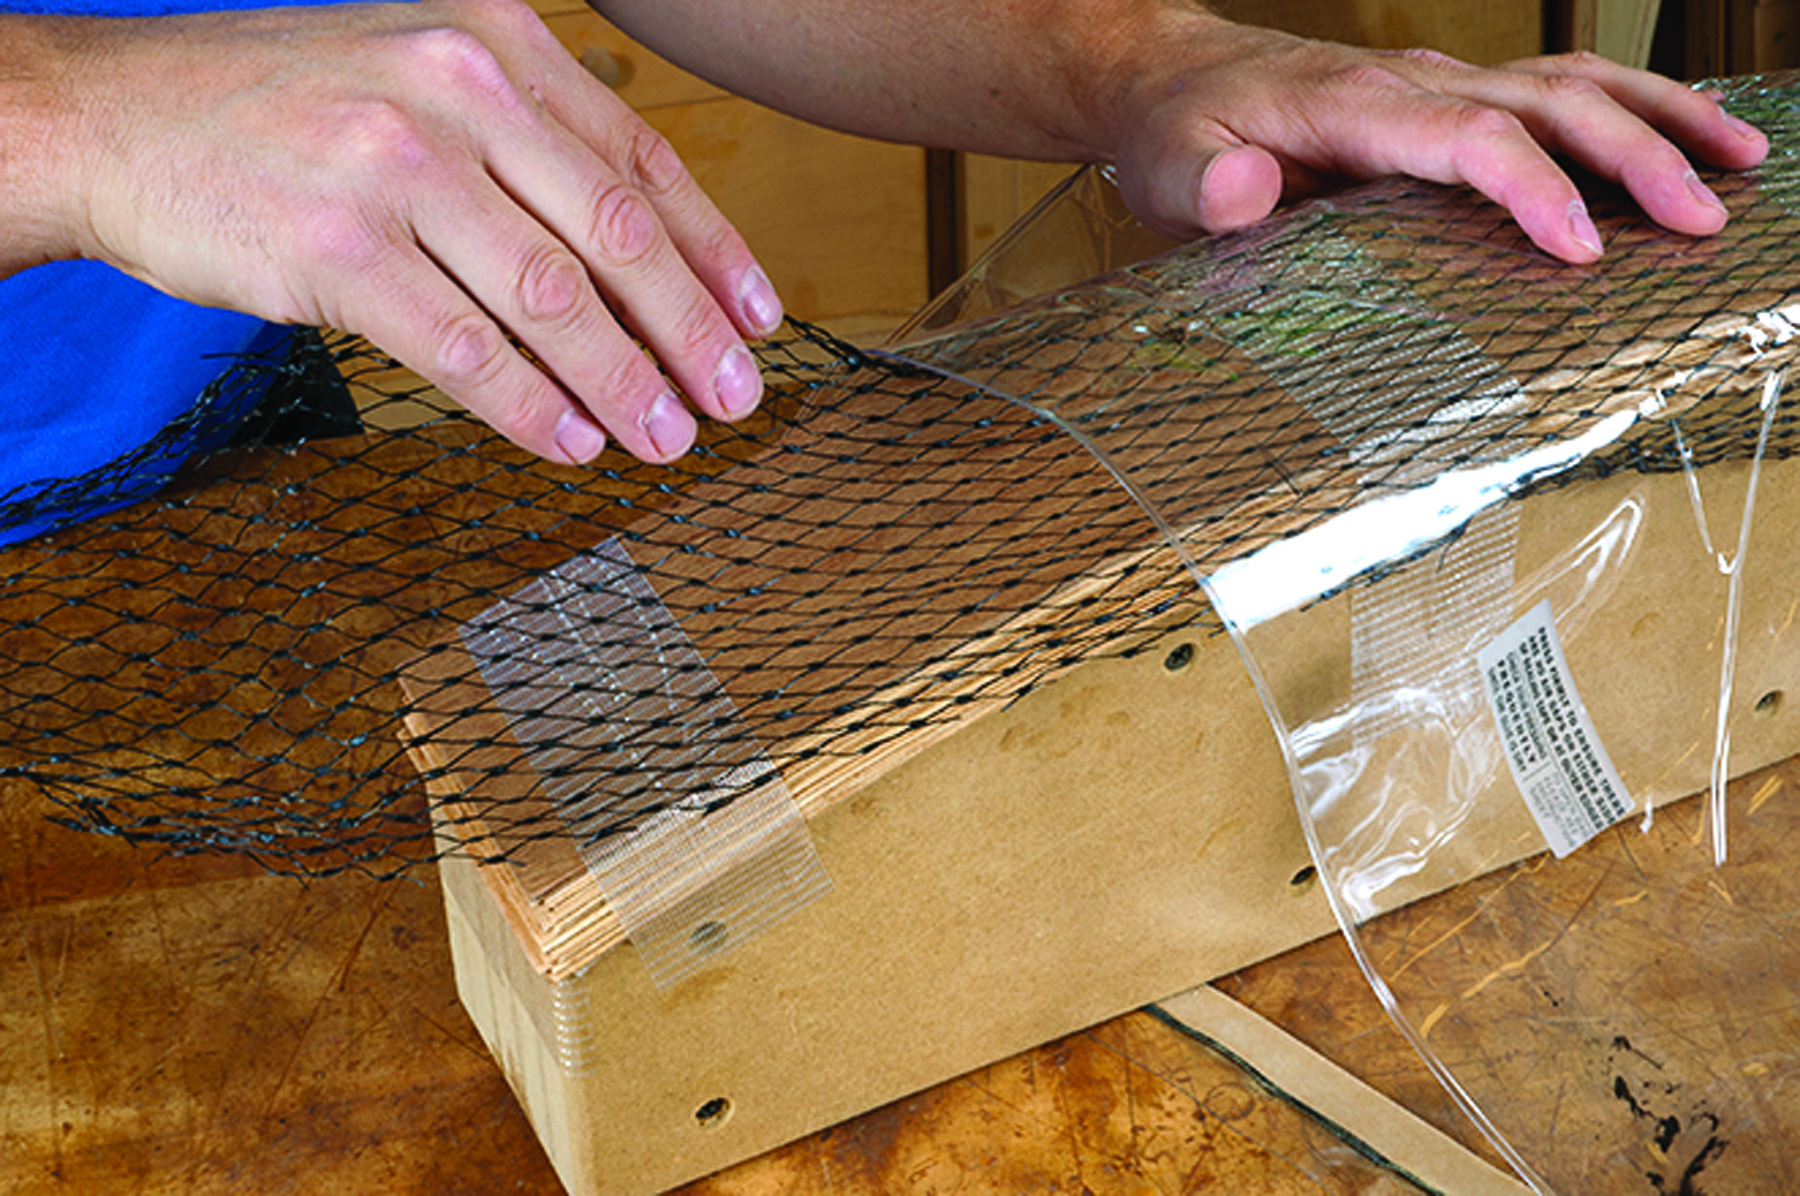
6. Give air an escape route. Netting over the top of the veneered stack provides a pathway for excess air to be sucked out of the bag once it’s sealed.
While skateboards are typically glued up using PVA glues (Roarockit recommends Titebond II), I took the advice of Franklin International, maker of Titebond, and used its Cold Press Glue for Veneer. In brief, regular PVAs are less brittle, which is great for, say, a skateboard that gets banged around as a matter of course. But Cold Press Glue for Veneer is a little more rigid, a bonus for furniture. It’s more prone to spring-back than urea formaldehyde resin glues or epoxies (both of which are common choices for veneering and laminate bending) but it is easy to use straight out of the bottle and spring-back has never been an issue for me, especially on mild bends such as this one.
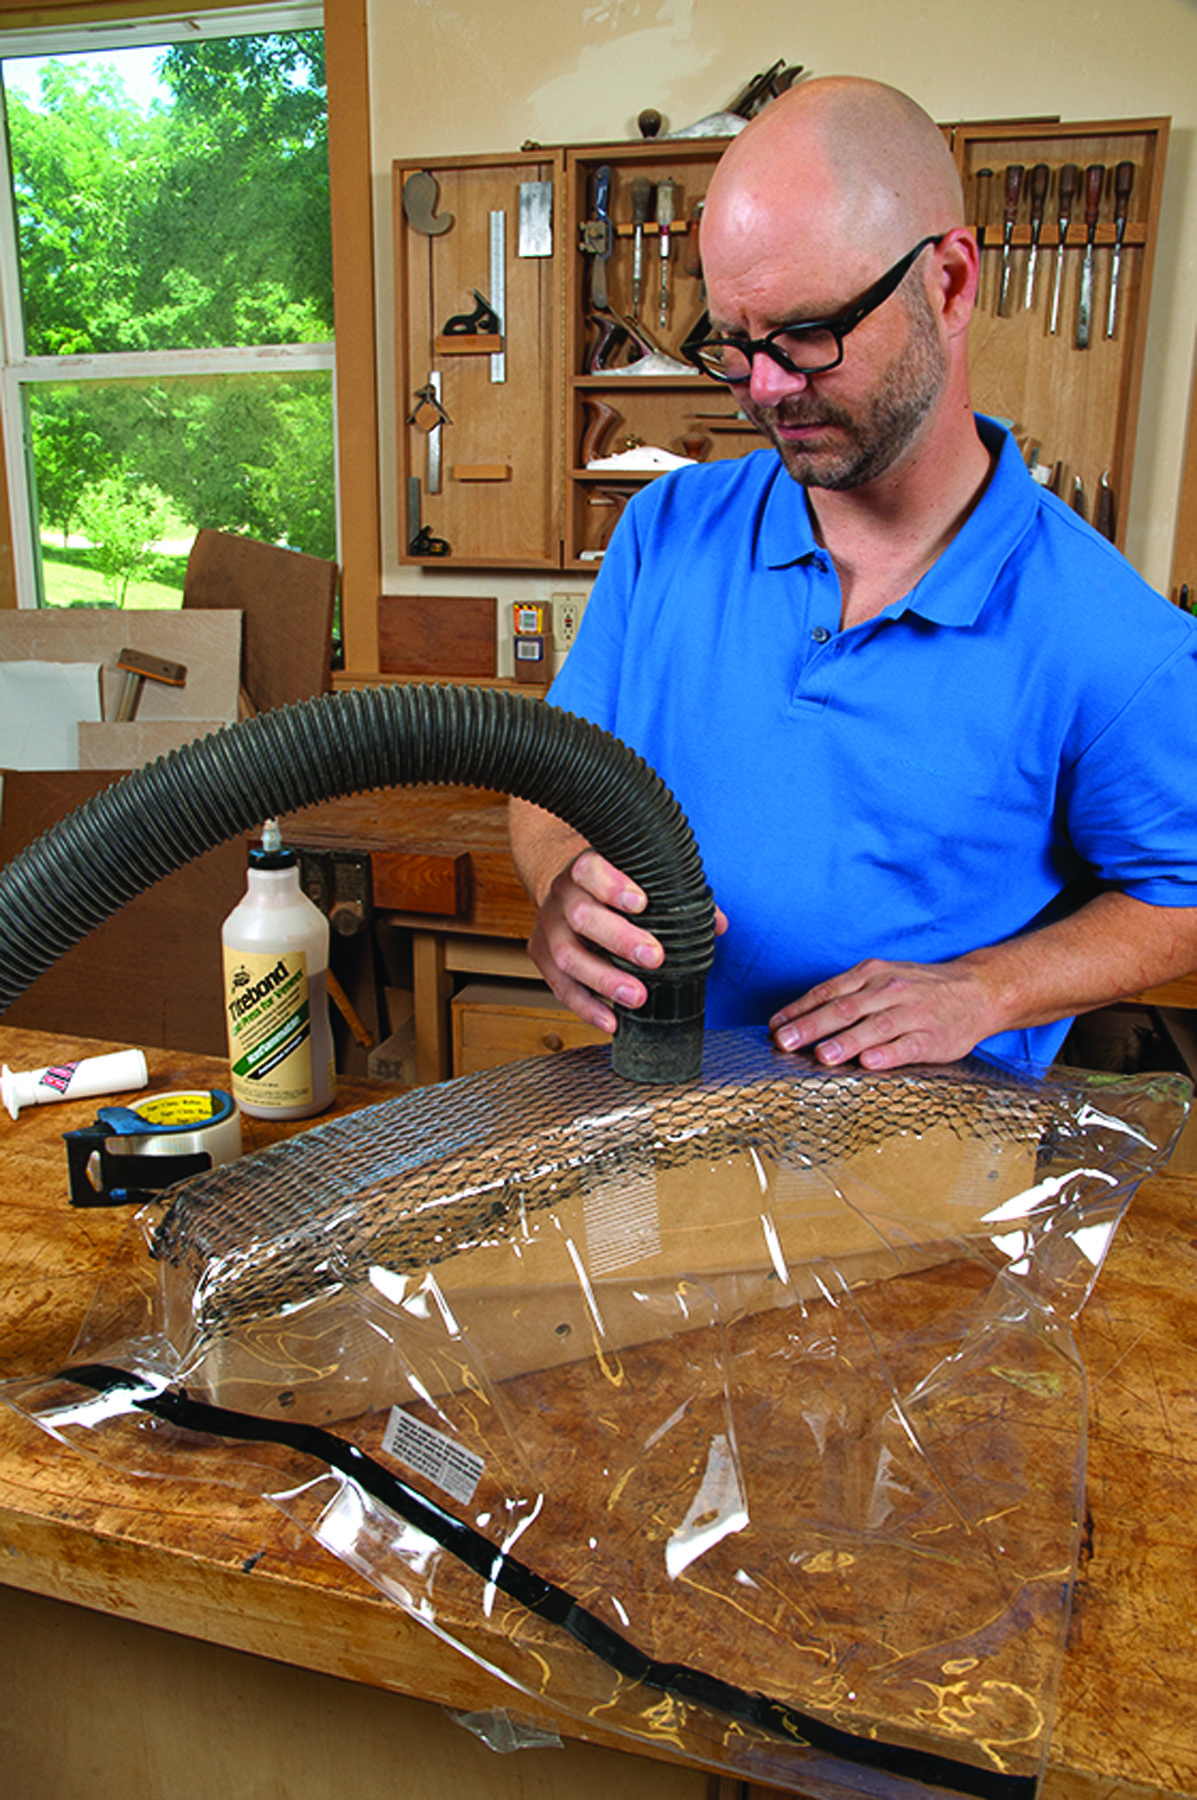
7. Take the easy way out. Once the bag is sealed, a shop vacuum sucks the bulk of the air out of the bag.
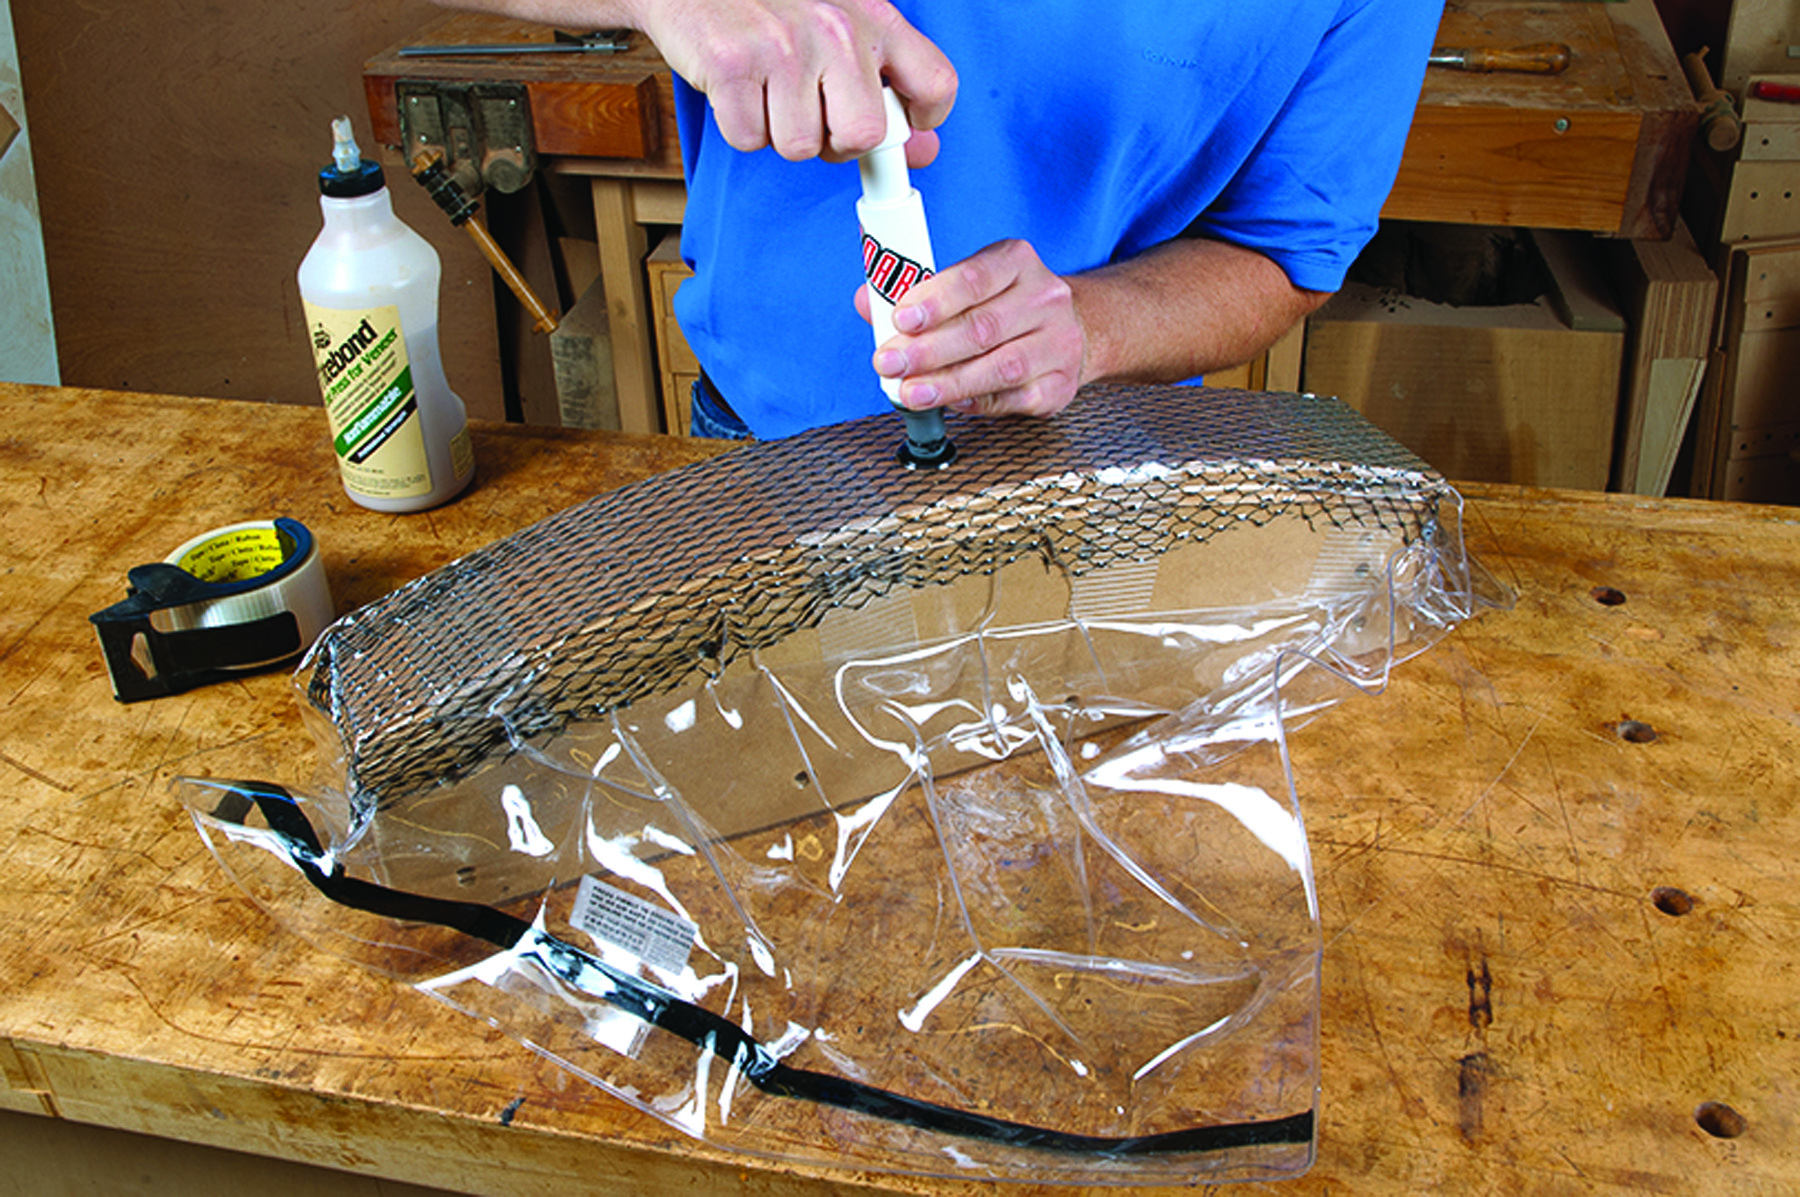
8. Pump out the balance. Use the hand pump that comes with the veneer kit to remove the last of the air from the bag.
Once your form is made, the glue-up process is pretty straightforward; mine went off without a hitch. Just remember to make your veneers and form a little oversized so that you can square the apron’s edges and ends after it comes out of the form. This project was my first experience with the Roarockit veneer press, but I suspect it’s the beginning of a long and fruitful relationship. — MT
Tenon the Front Apron
Once the front apron comes off the form (you should let it sit overnight), check the curve against your initial full-sized drawing to make sure there isn’t excessive spring-back. Using relatively thin veneers, I wound up with so little spring-back that I didn’t need to adjust my drawing at all. (Spring-back may be an issue if you use thicker laminates and on more extreme curves.) If necessary, adjust the curve on your drawing and mark out the location, length and thickness of the front apron tenons on the drawing. Then mark the length, including the tenons, on the actual front apron using your drawing as a guide.
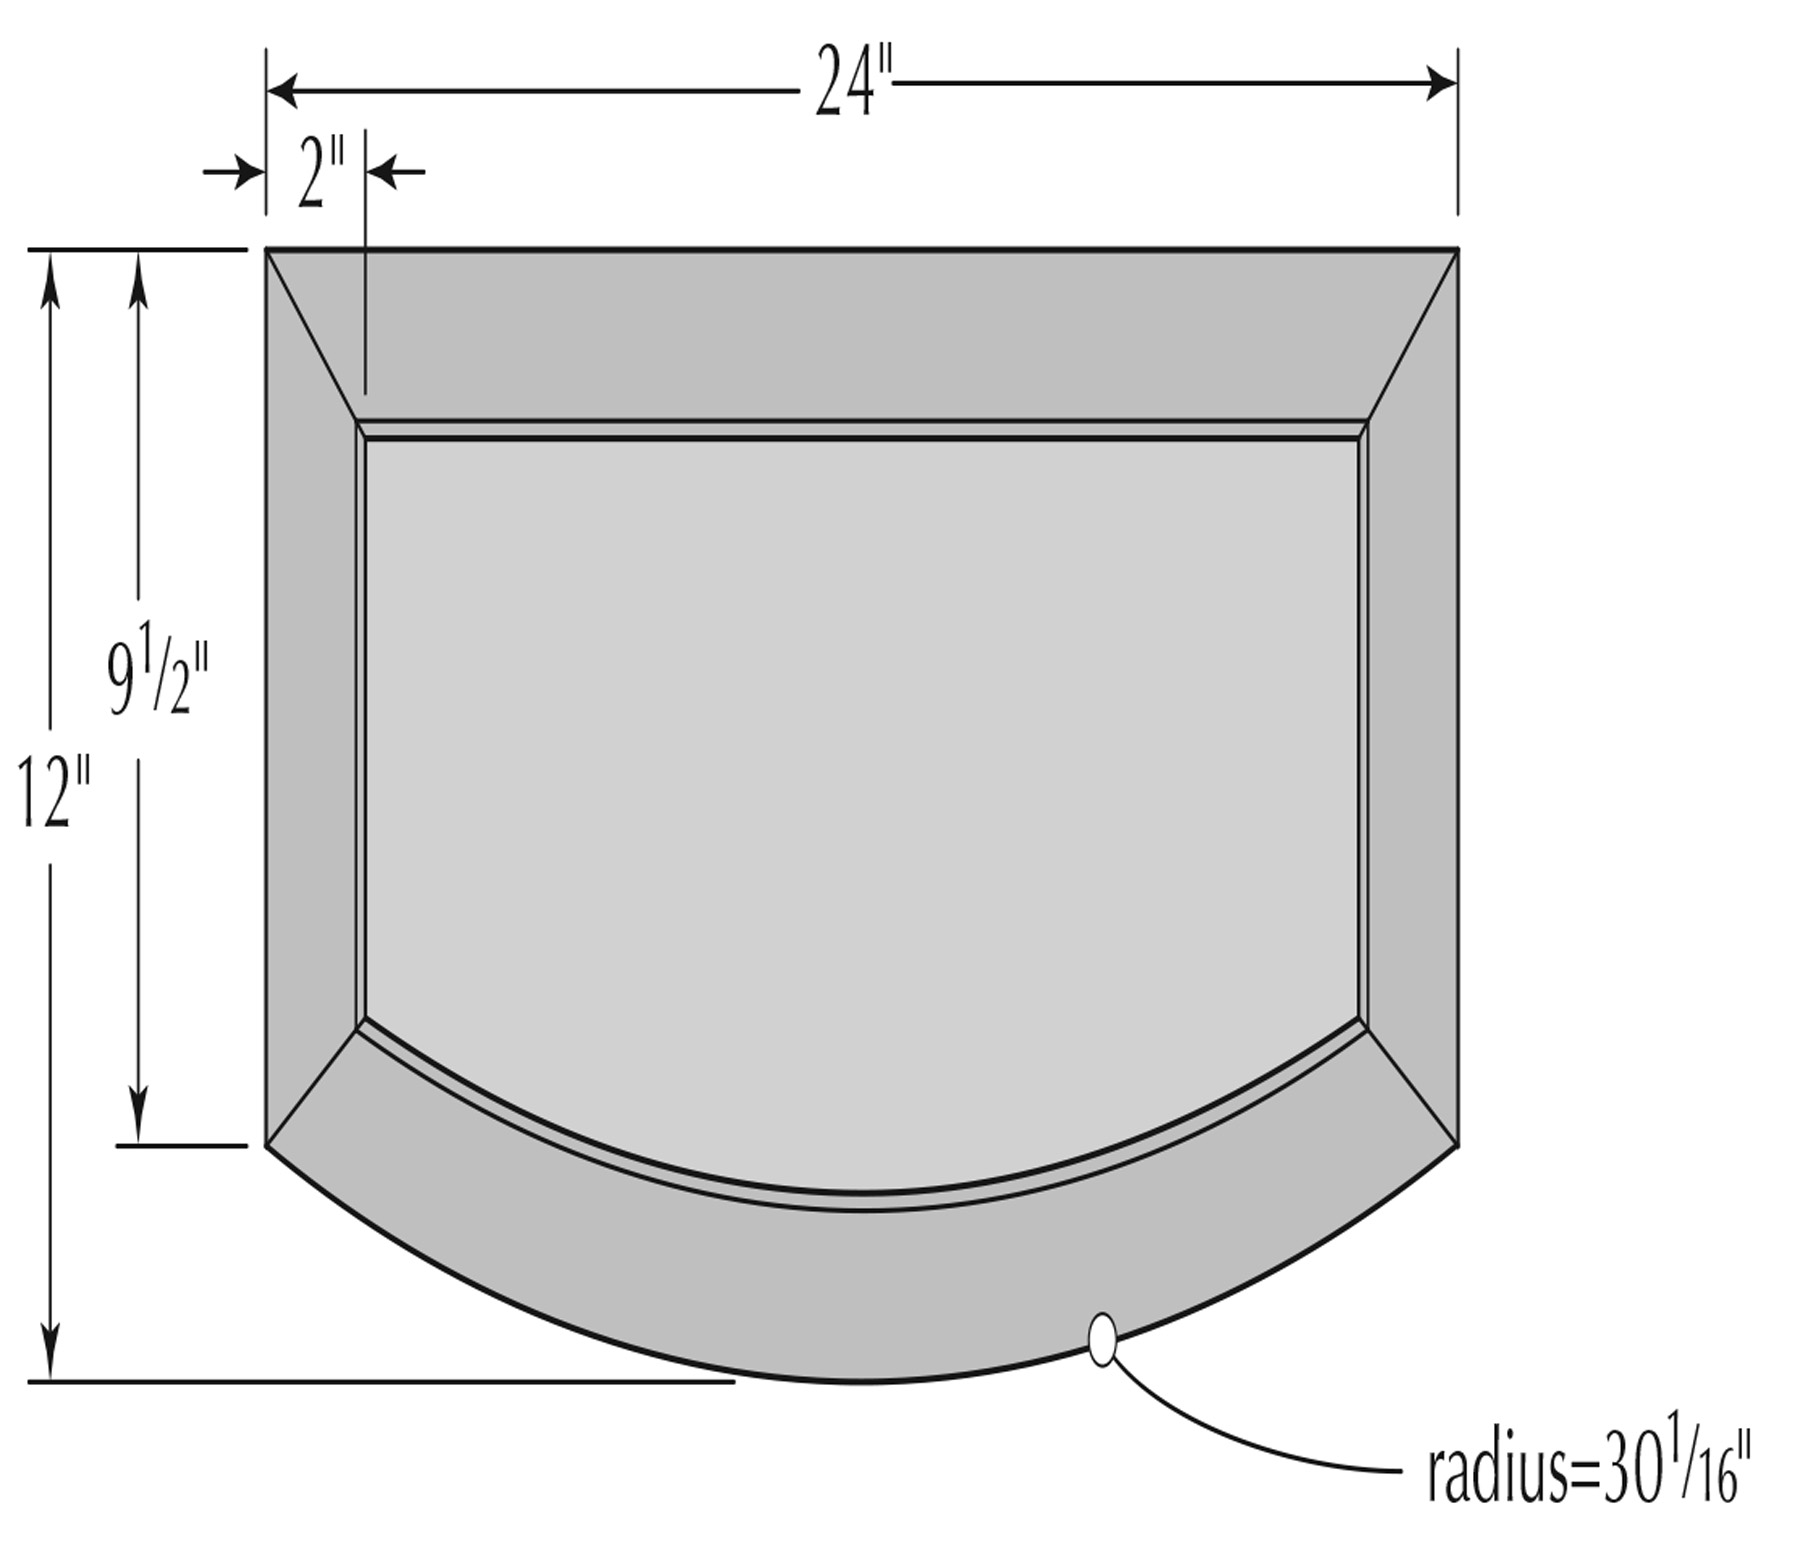
Top Plan
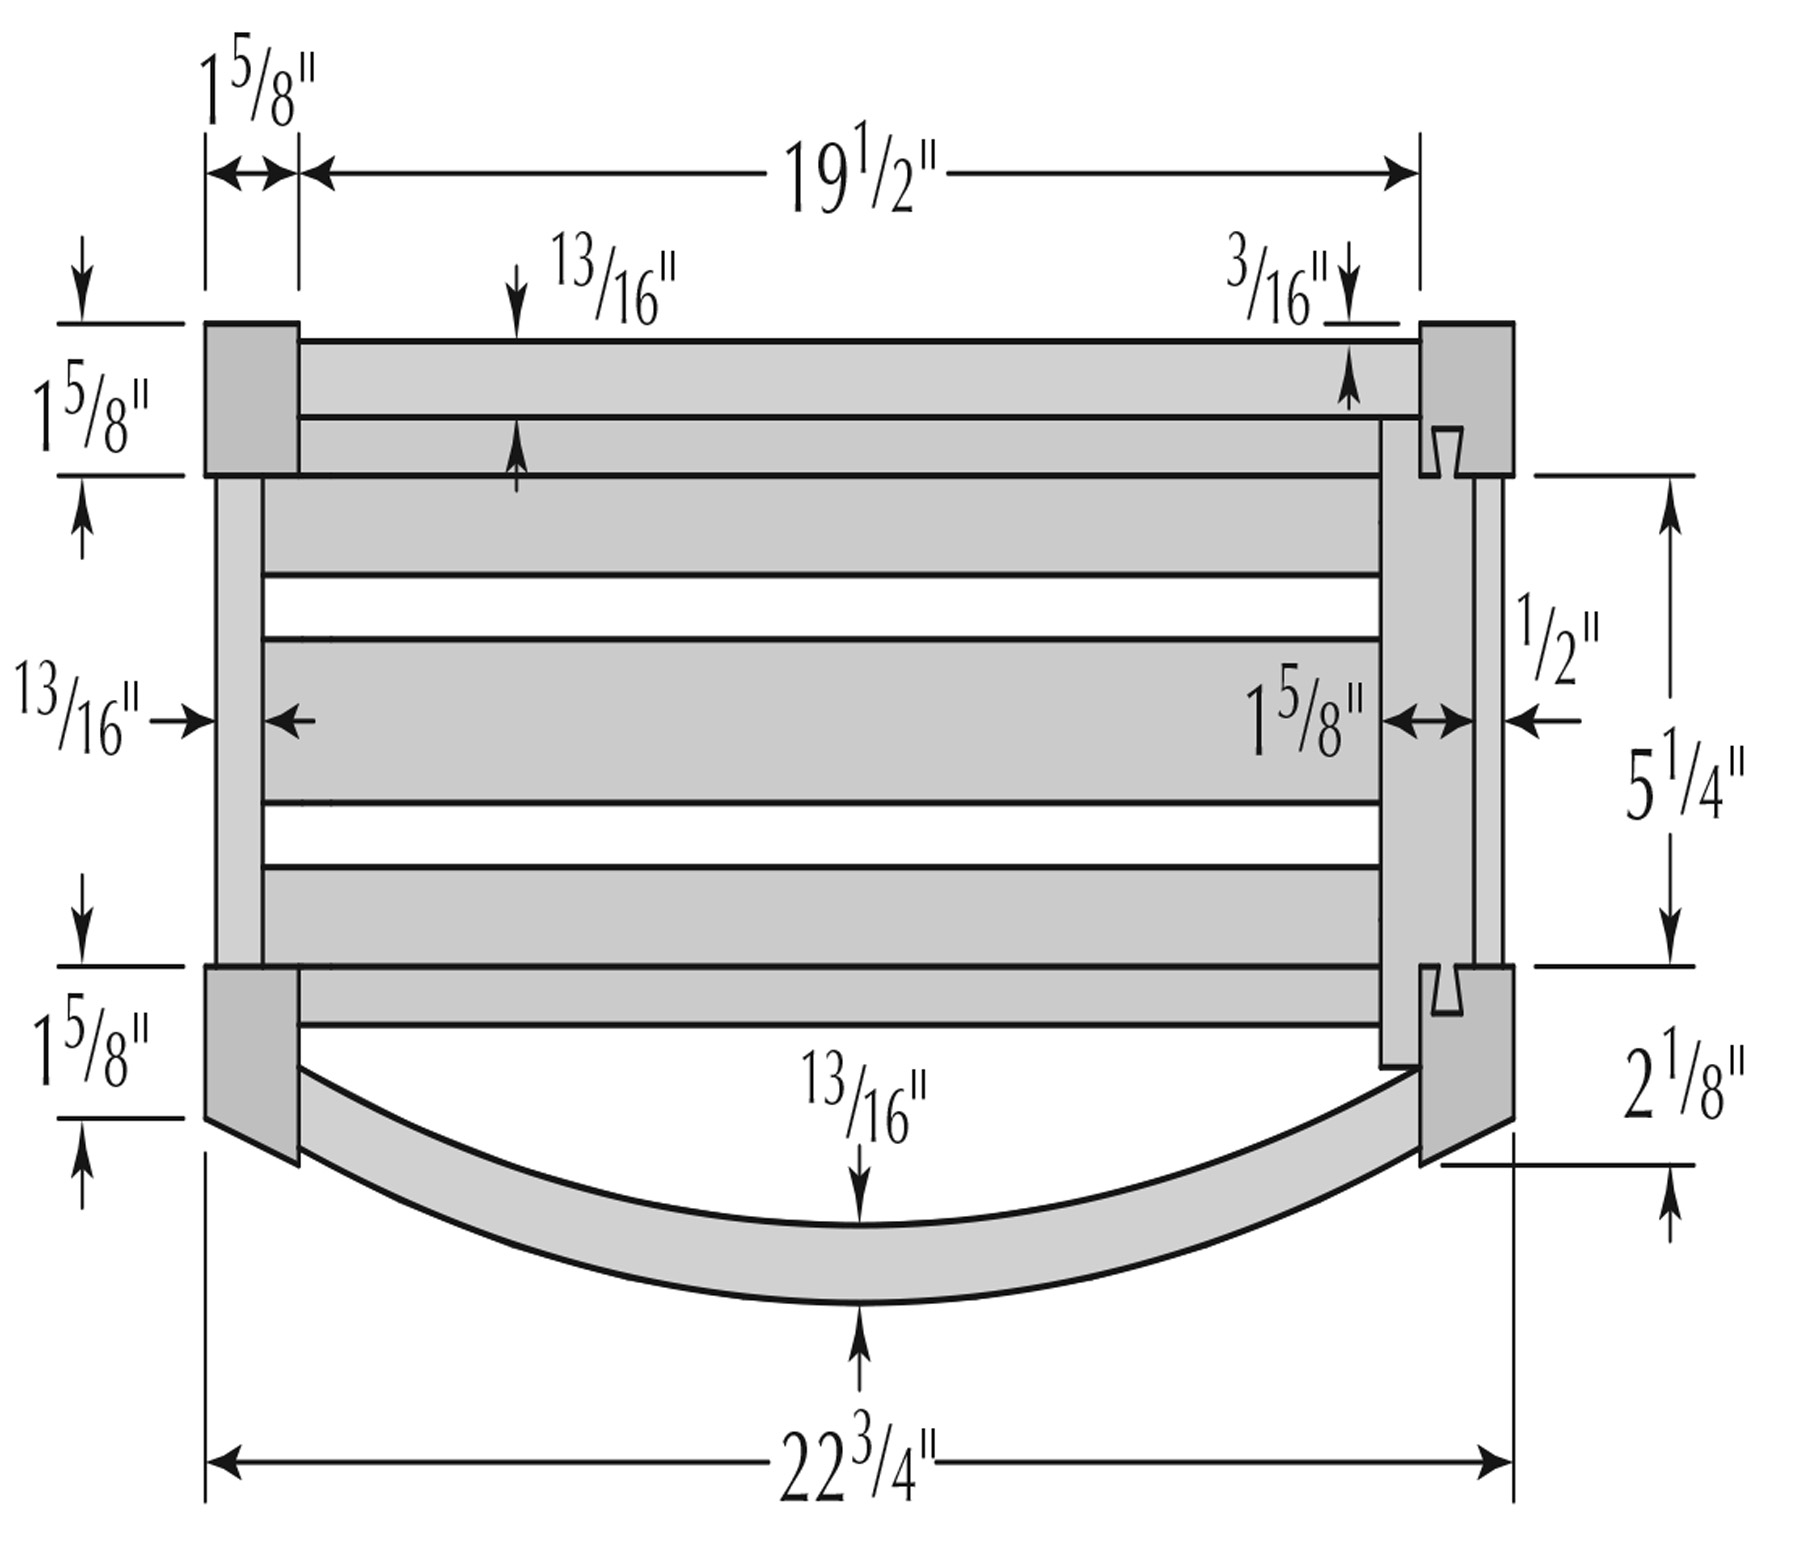
Table Base Plan
Before tenoning, square one edge of the apron at the jointer, as shown in the photo below. Then trim the opposite edge to final width by running it through the planer.
To help square and tenon the front apron, make a quick holding jig by screwing together a few pieces of scrap and band saw them to match the curve on the inside of the apron. At the table saw, position the jig against your miter gauge with your workpiece on top of the jig. Holding the assembly firmly together (with double-sided tape if necessary), align the cut and crosscut the ends of the apron square to the edges. Because you’ll use this jig again, trim the jig at the same time you trim the apron, as show in “Square & Tenon the Curved Apron.”
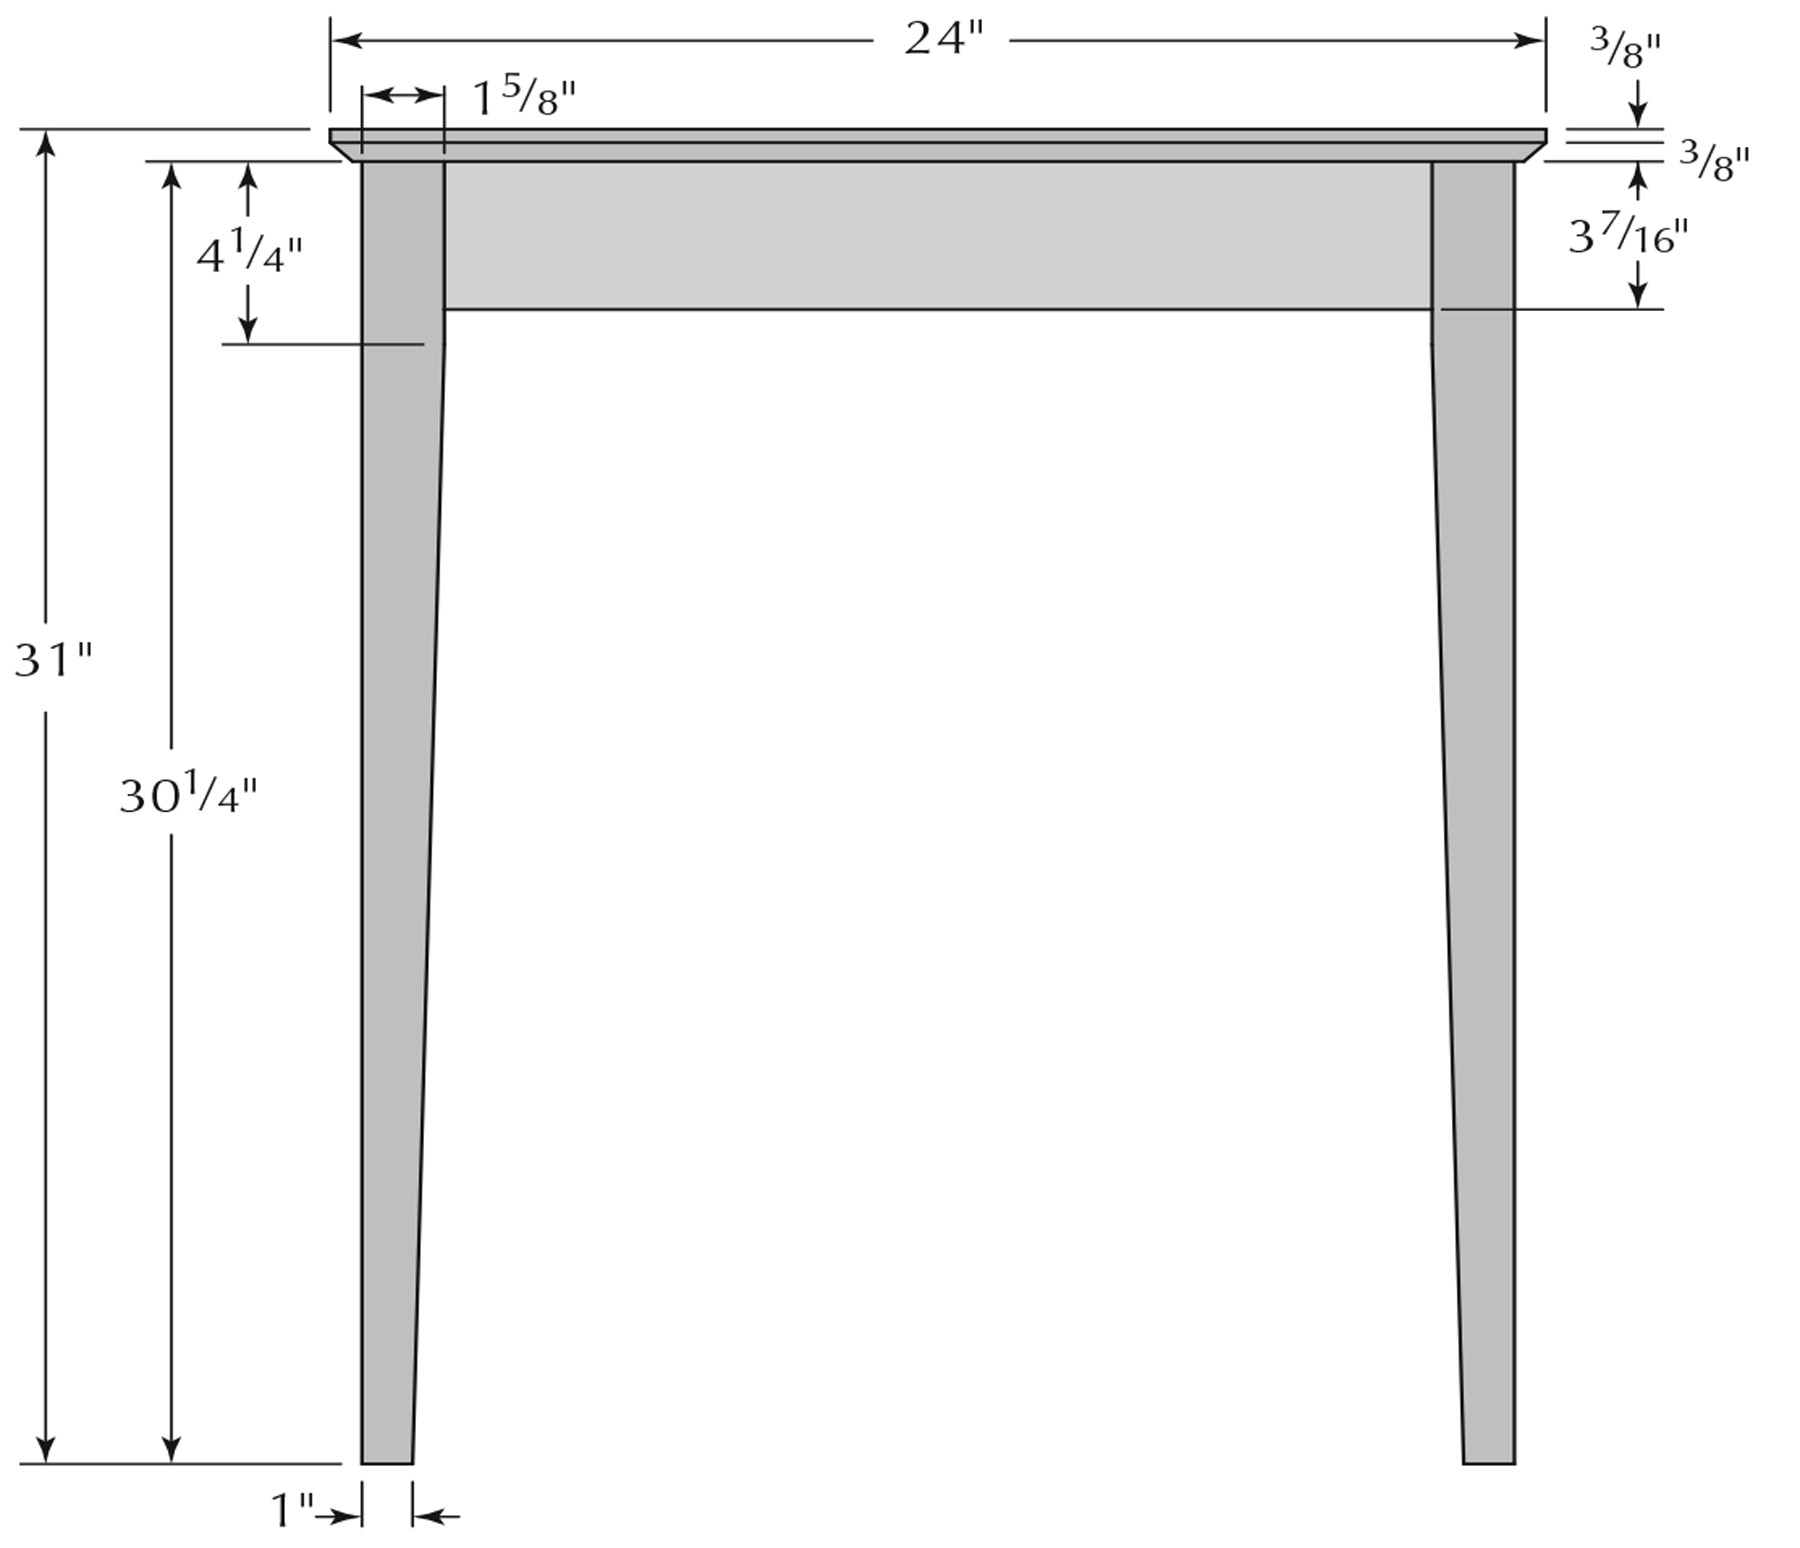
Front View
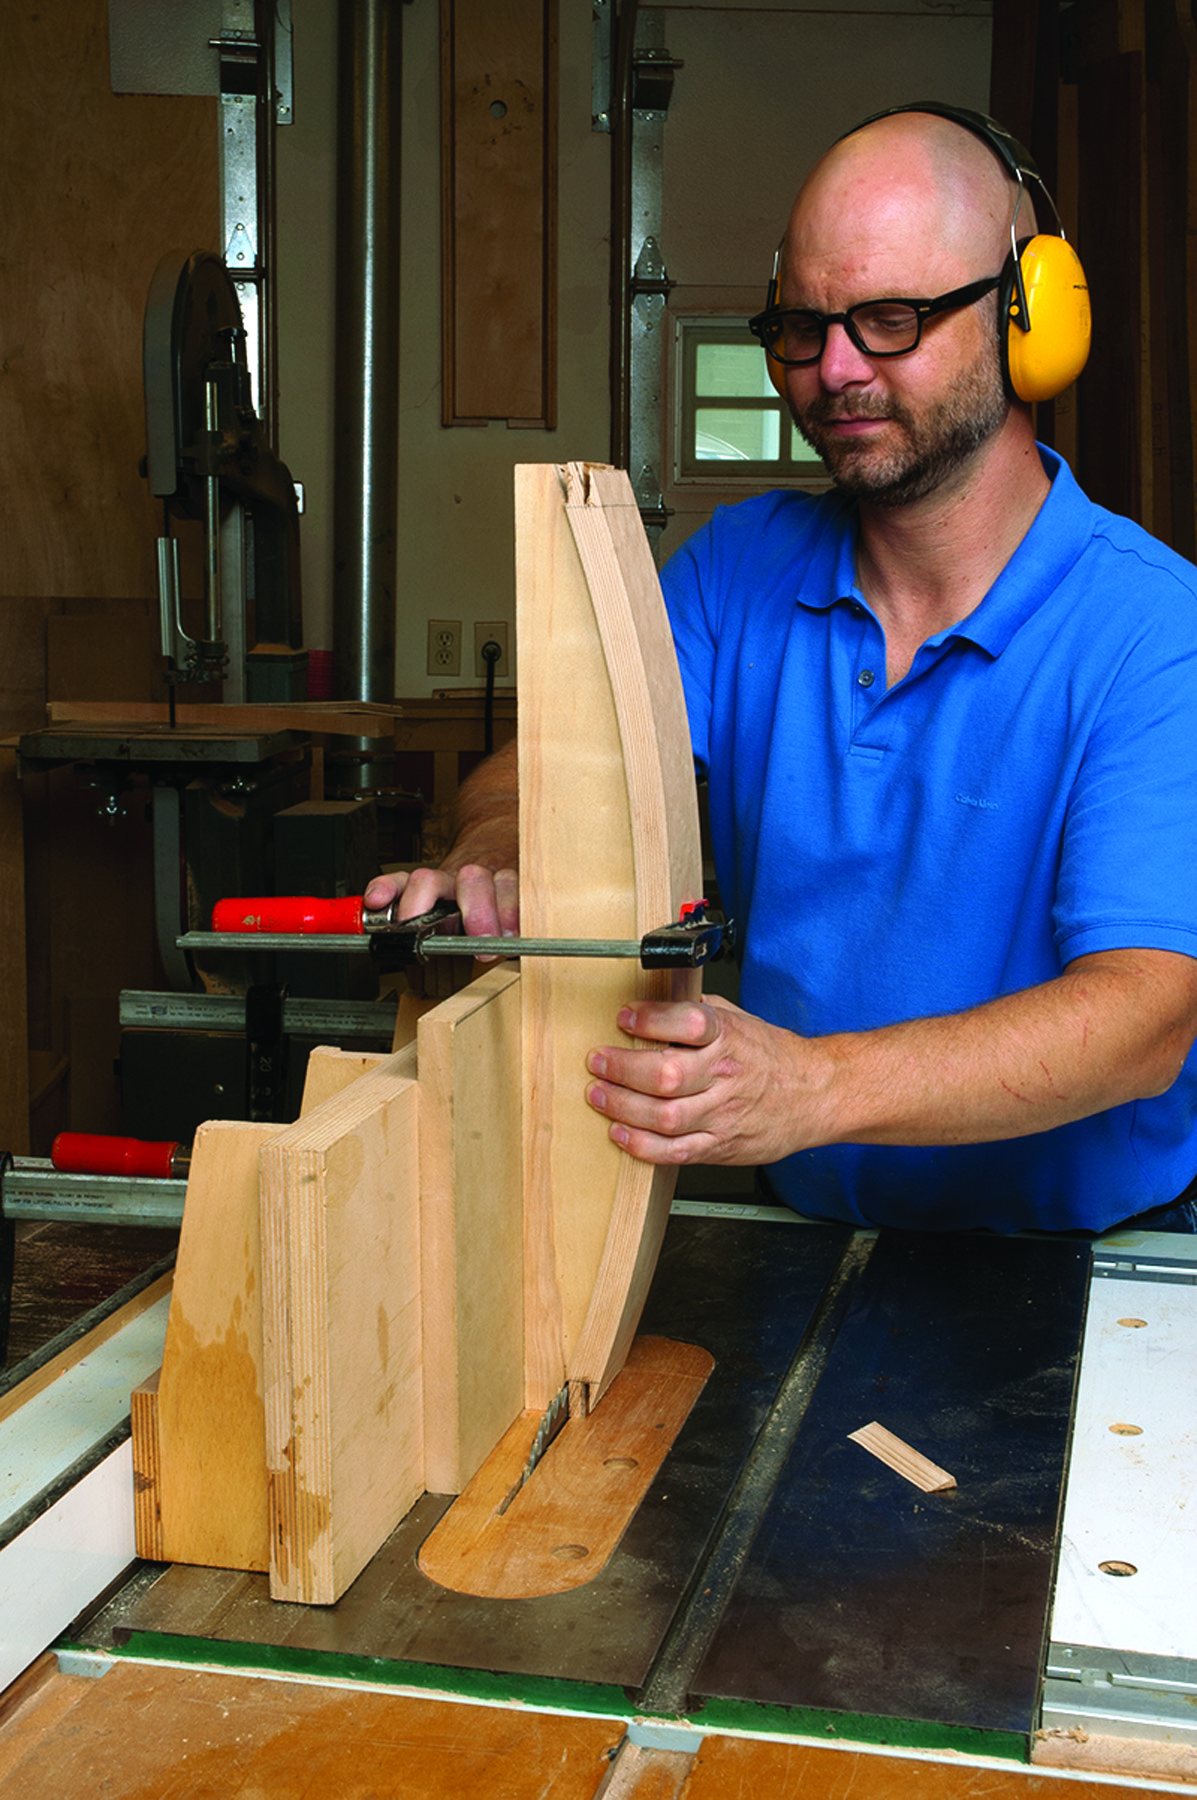
With the apron cut to length, mark out the location of the tenons, which you can transfer from the full-sized drawing. Attach a tall auxiliary fence to your stock table saw fence. Make a right-angle guide by attaching a guide fence flush to one edge of a 10″ x 10″ square of MDF or plywood. Orient the right-angle guide against the tall fence so that the guide fence allows you to hold the stock upright. Then position the curved jig you just used to cut the ends to length against the right-angle guide, and the workpiece against the jig and guide. Set the height of the table saw blade to match the length of your tenon and align the blade with the tenon location. Then make the cuts and test the fit of the tenon thickness in the leg mortises.
You could trim up the shoulders of the tenon at the table saw as well, but because it would take more extensive jigging up and there are only two of them, I used a backsaw to make the initial cuts and then fine-tuned the fit using a shoulder plane and a chisel.
Square & Tenon The Curved Apron
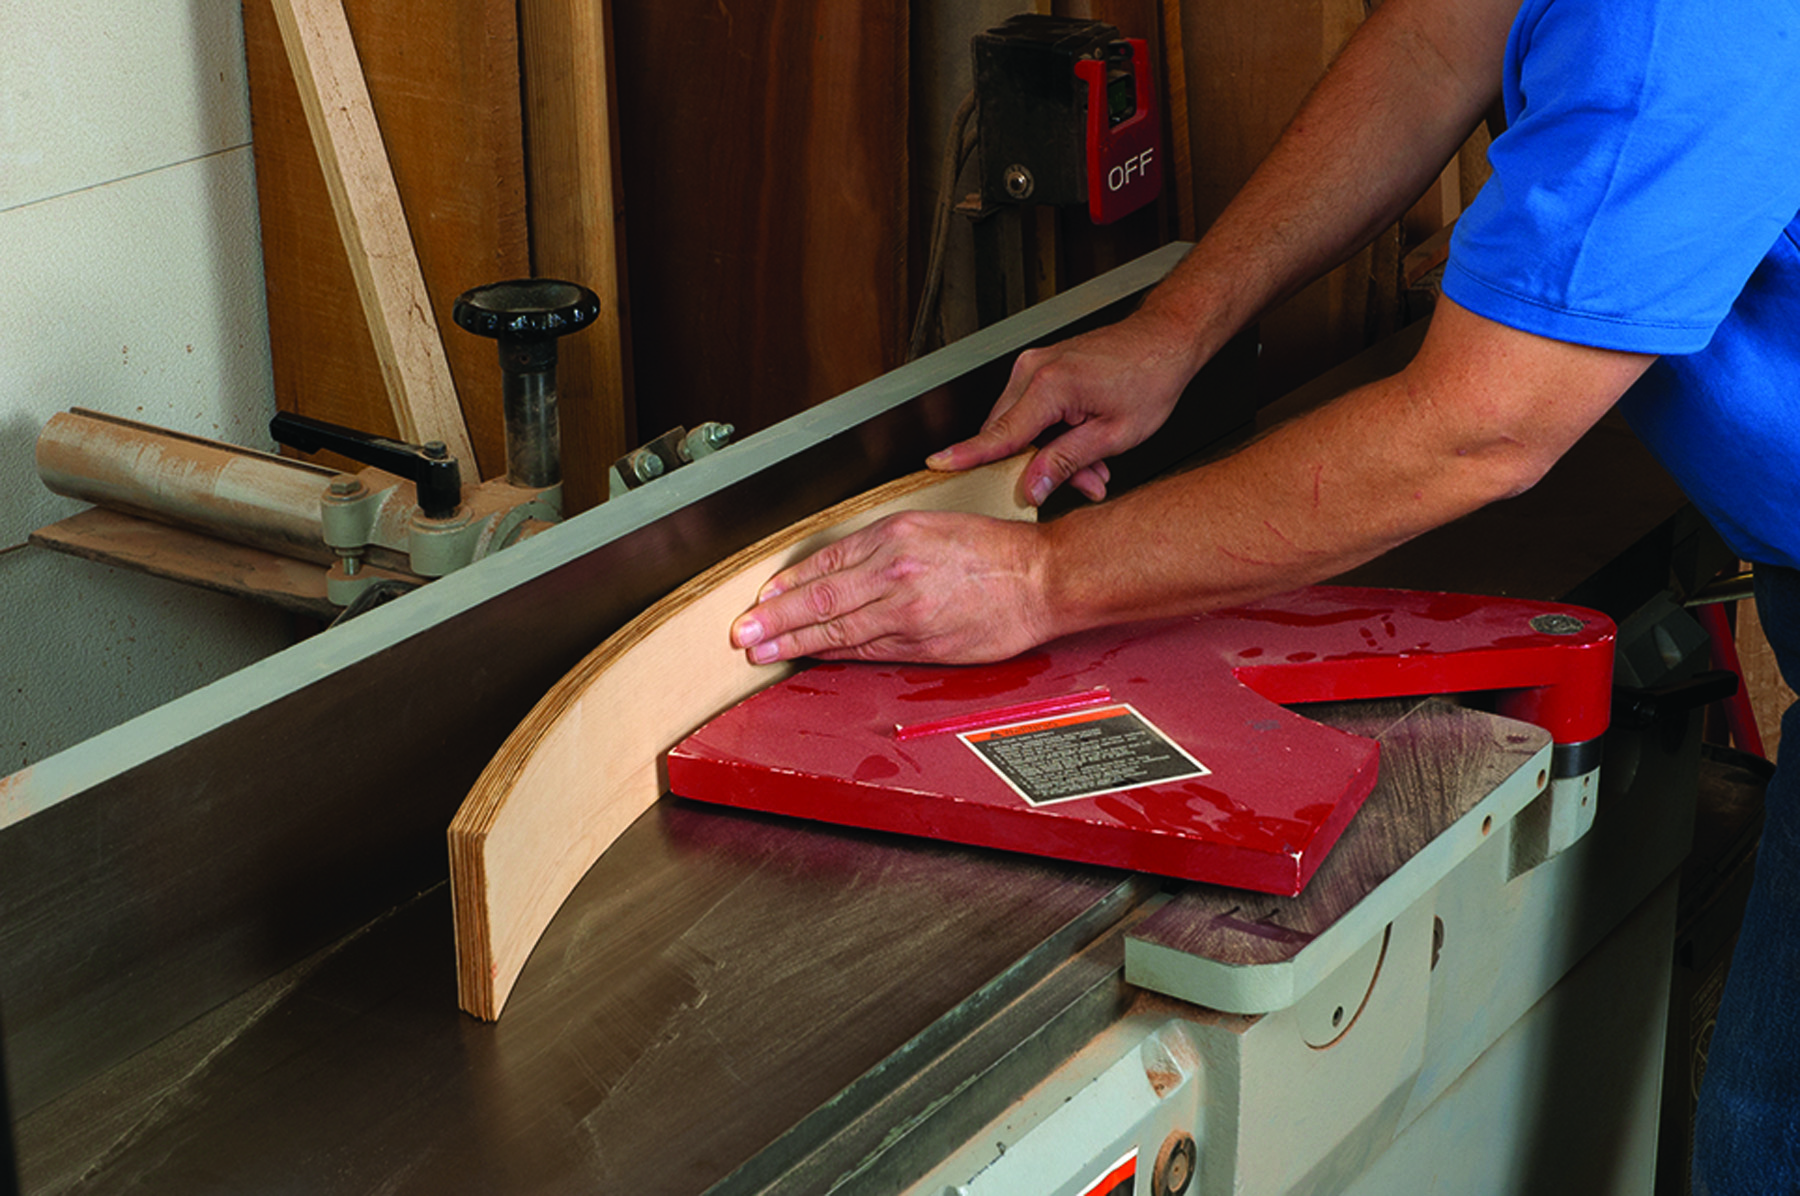
Square an edge. Joint one edge of the assembled front apron. Be sure one hand holds the apron flush to the fence as you square the edge to the face.
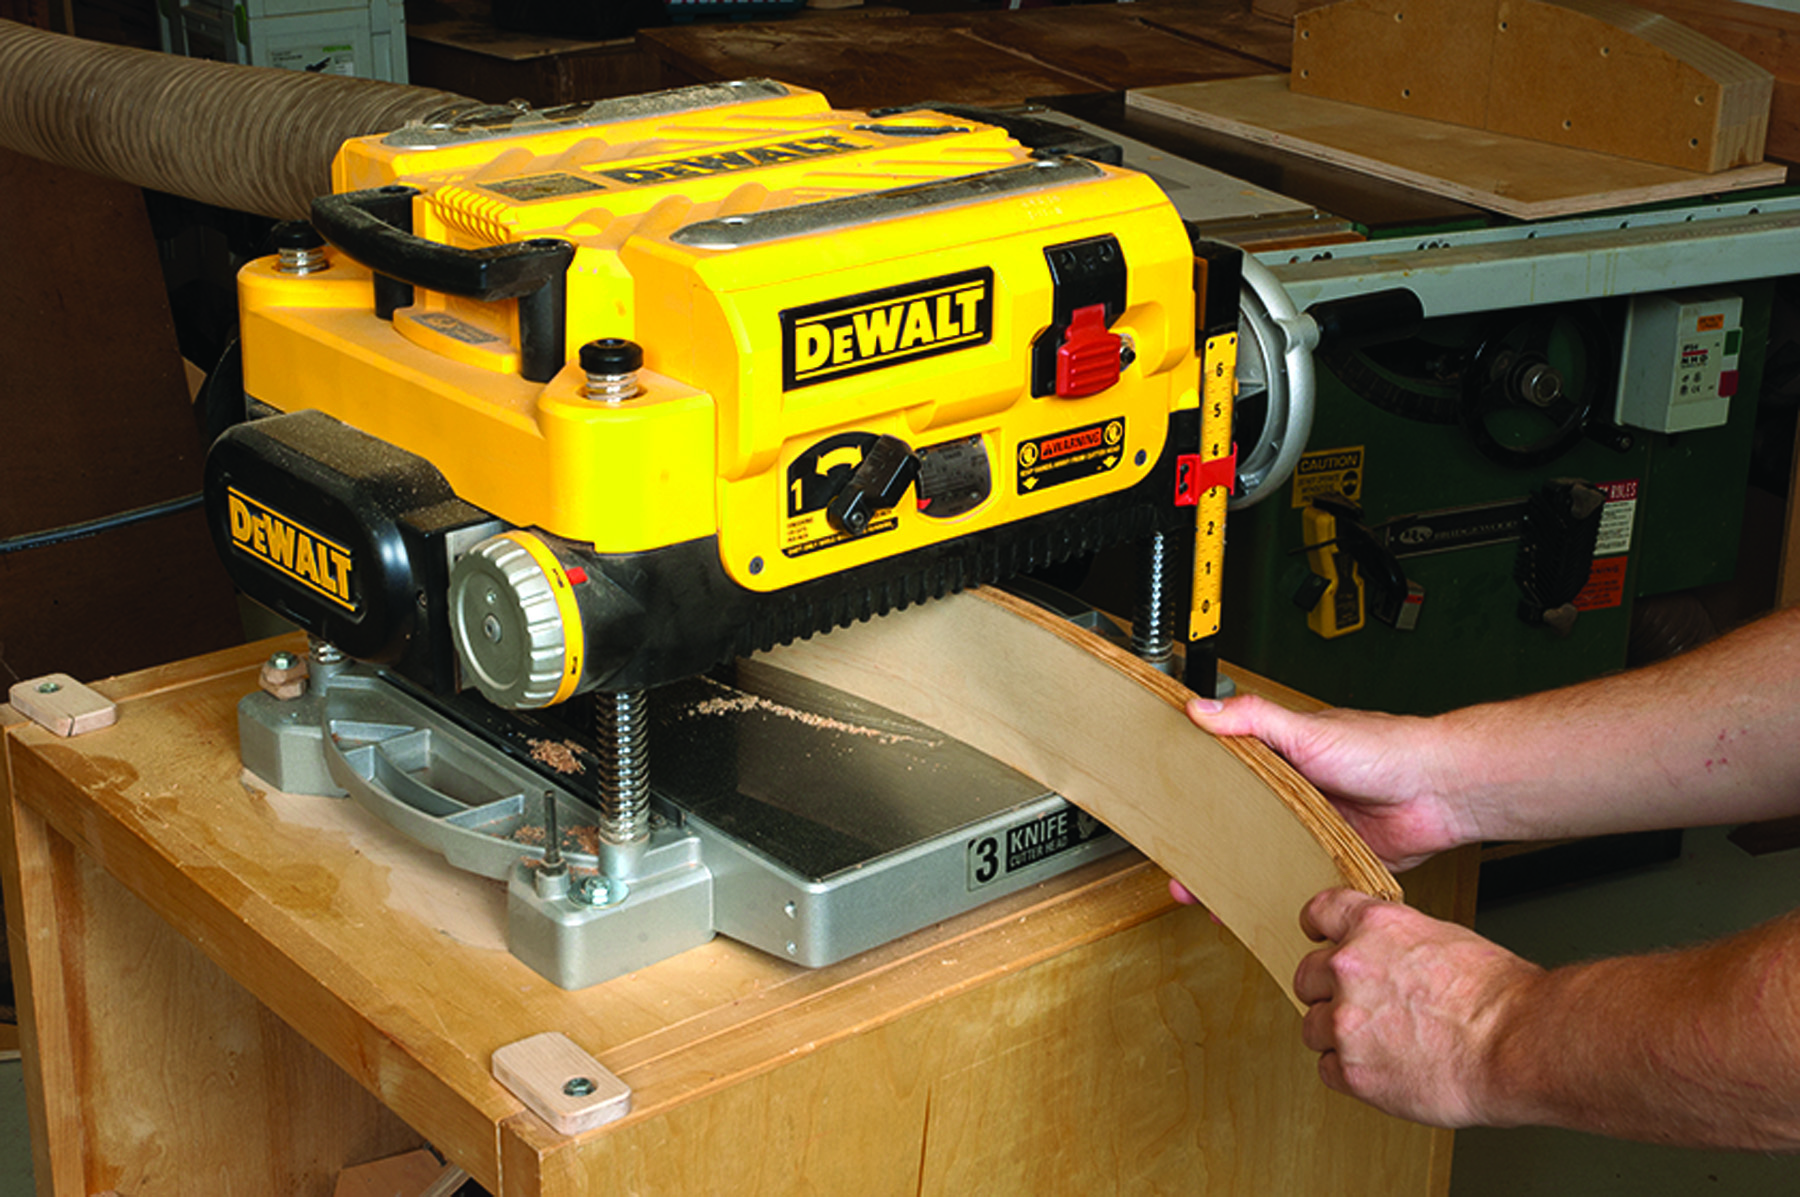
Plane the opposite edge. With the flattened edge facing down, guide the curved apron through the planer to square and bring the other edge parallel to the first.
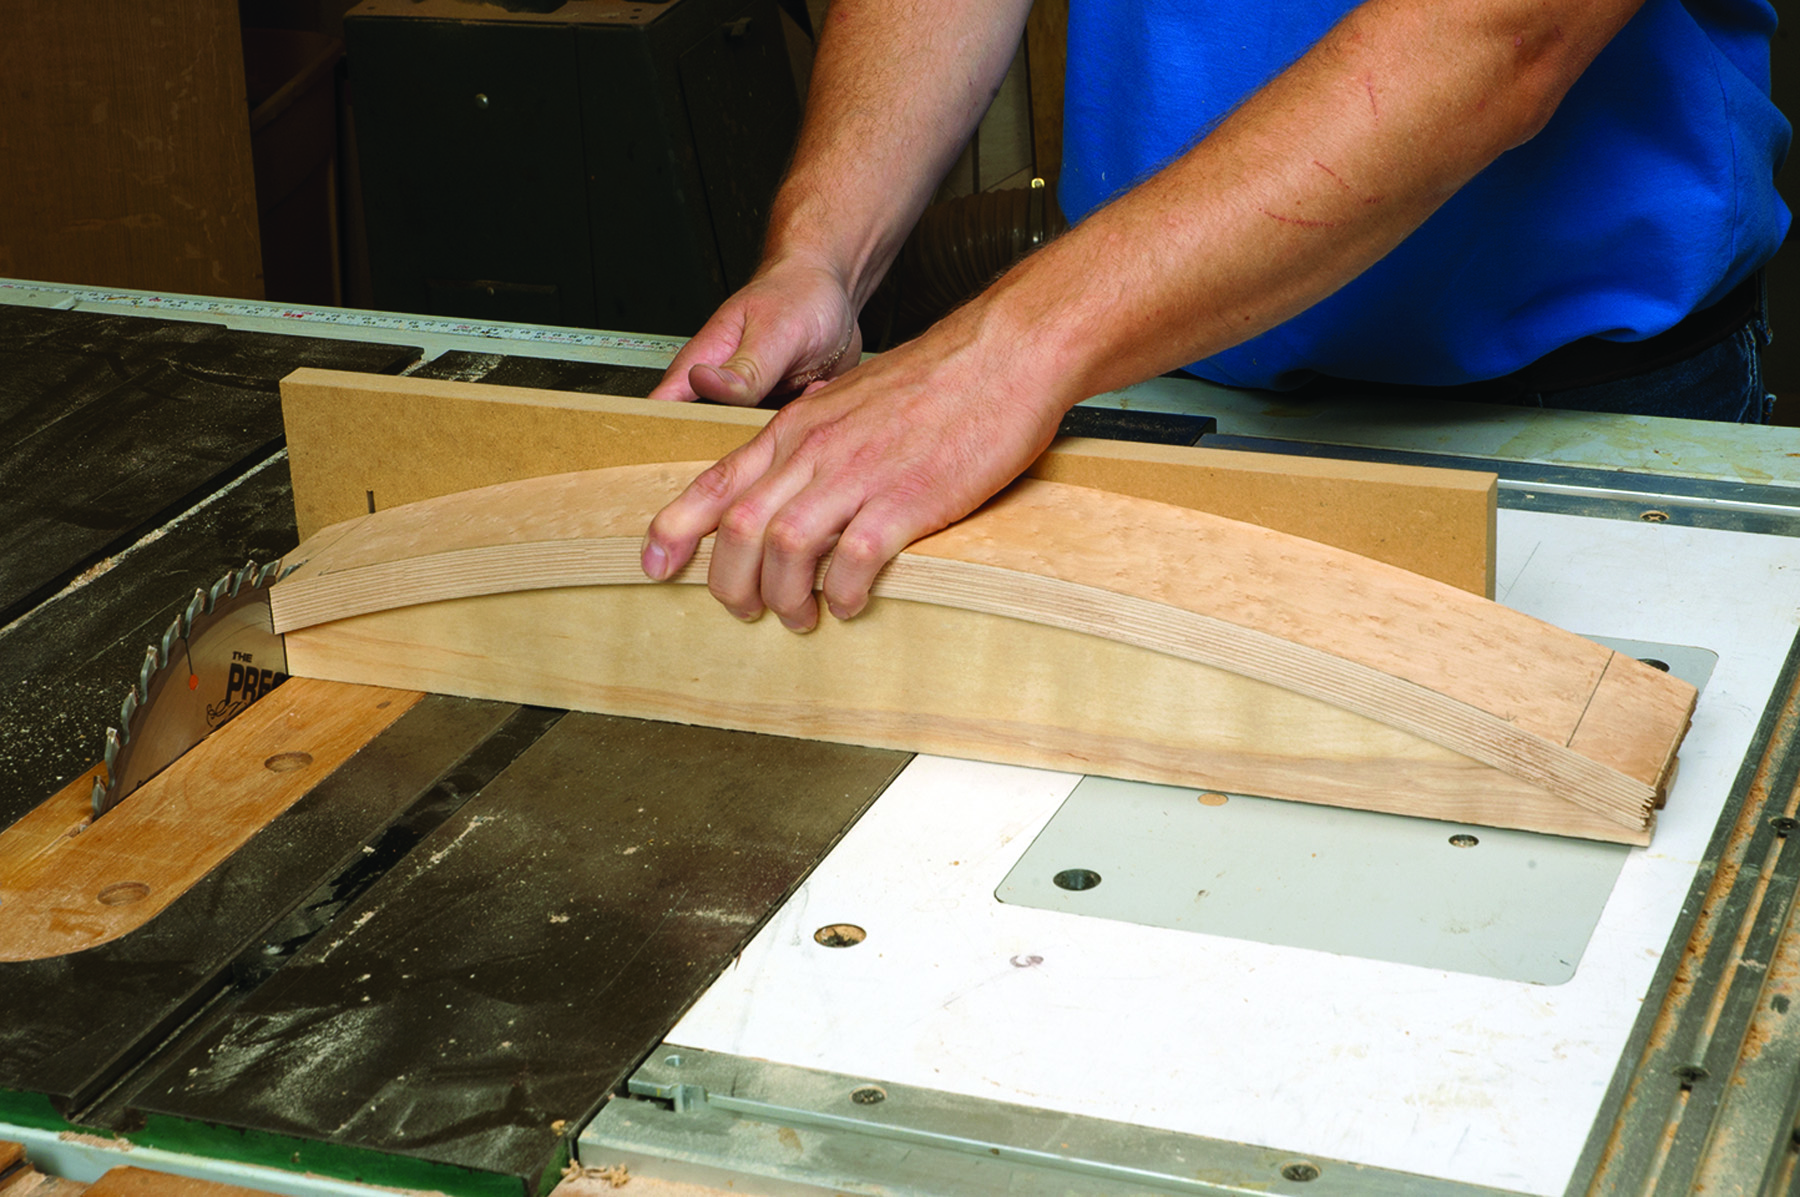
Square the apron with a jig. Made of scrap band sawn to the shape of the inner curve and screwed in position, this simple jig positions the workpiece against a miter gauge to trim the ends square at the table saw.
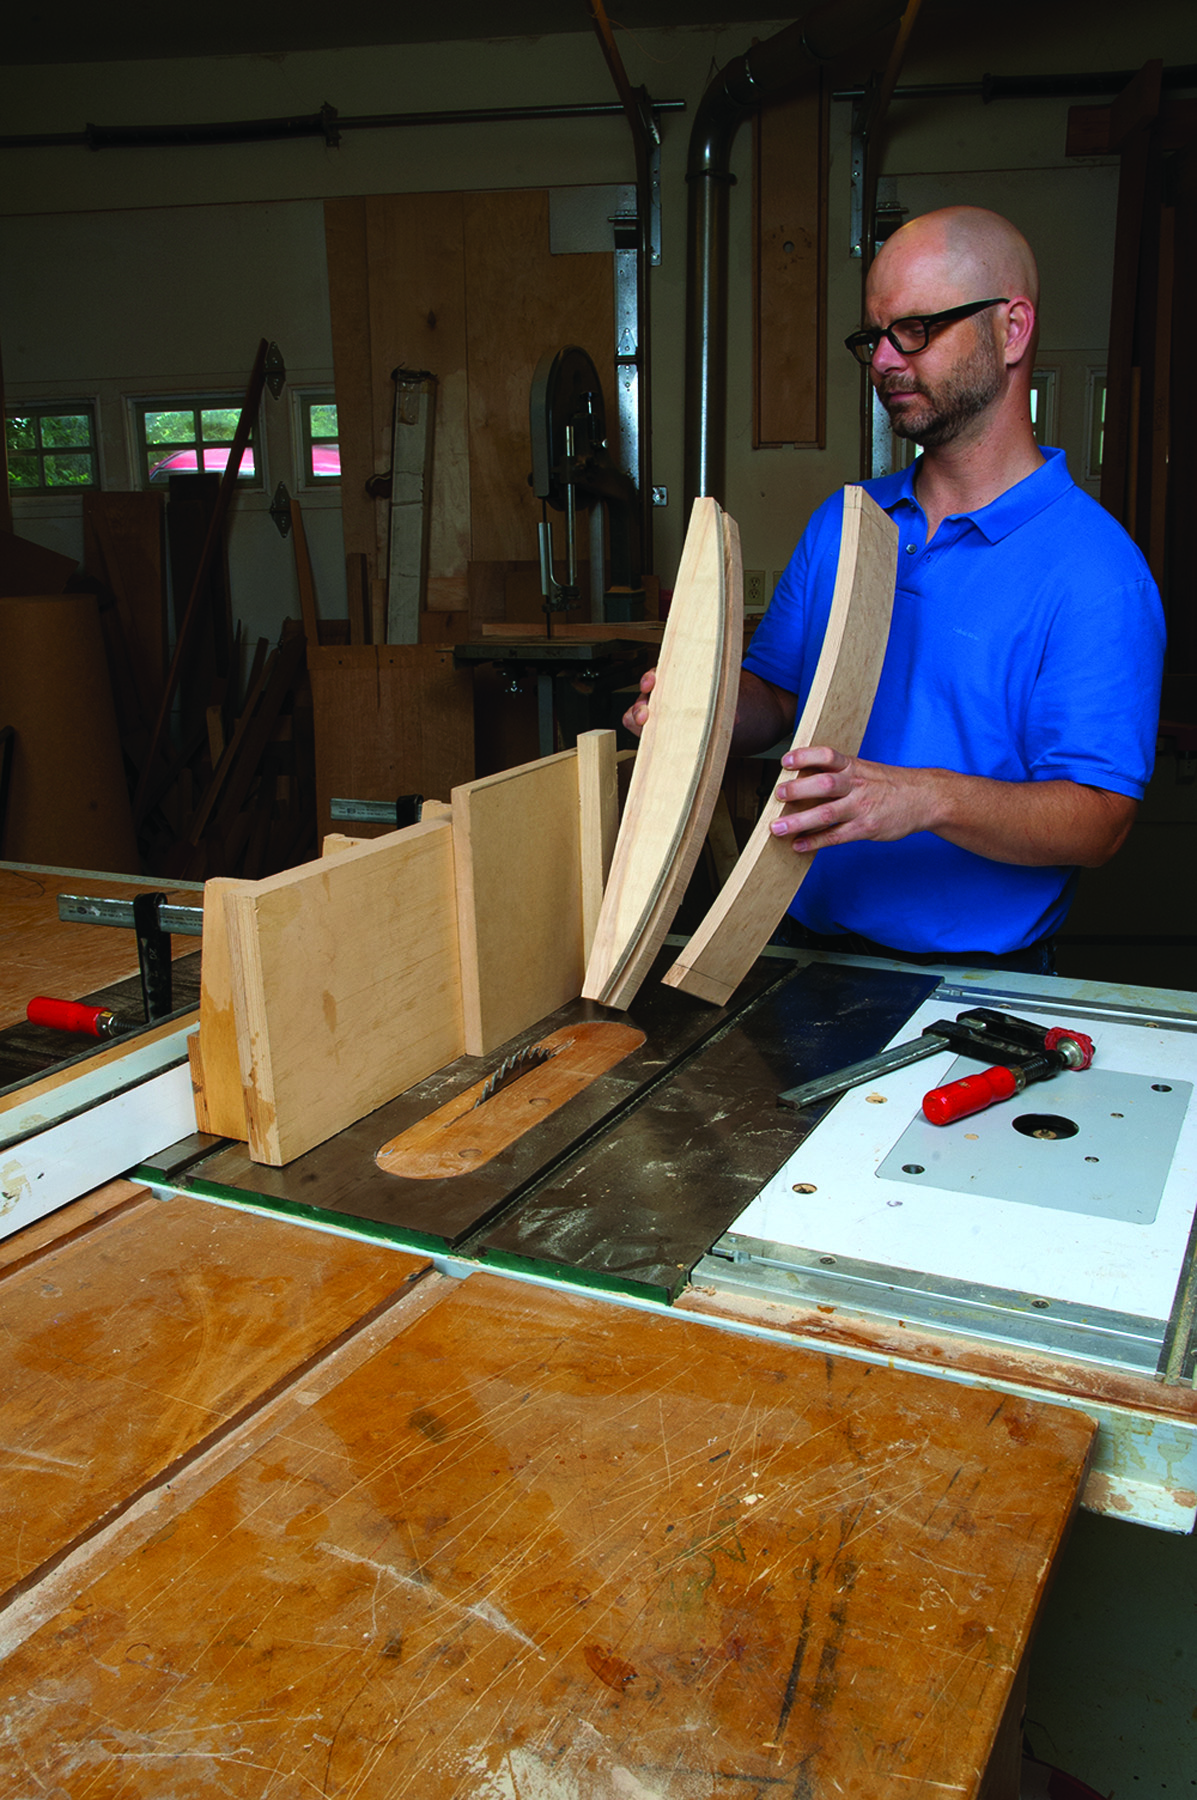
Use a stack of jigs. With both the jig and apron cut to length, turn the jig upright against a right-angle guide and a tall fence to cut the tenon. Clamp the workpiece to the jig and the right-angle guide, align the blade to the tenon location and then cut the cheeks. The tenon shoulders are best sawn by hand.
Prepare the Legs
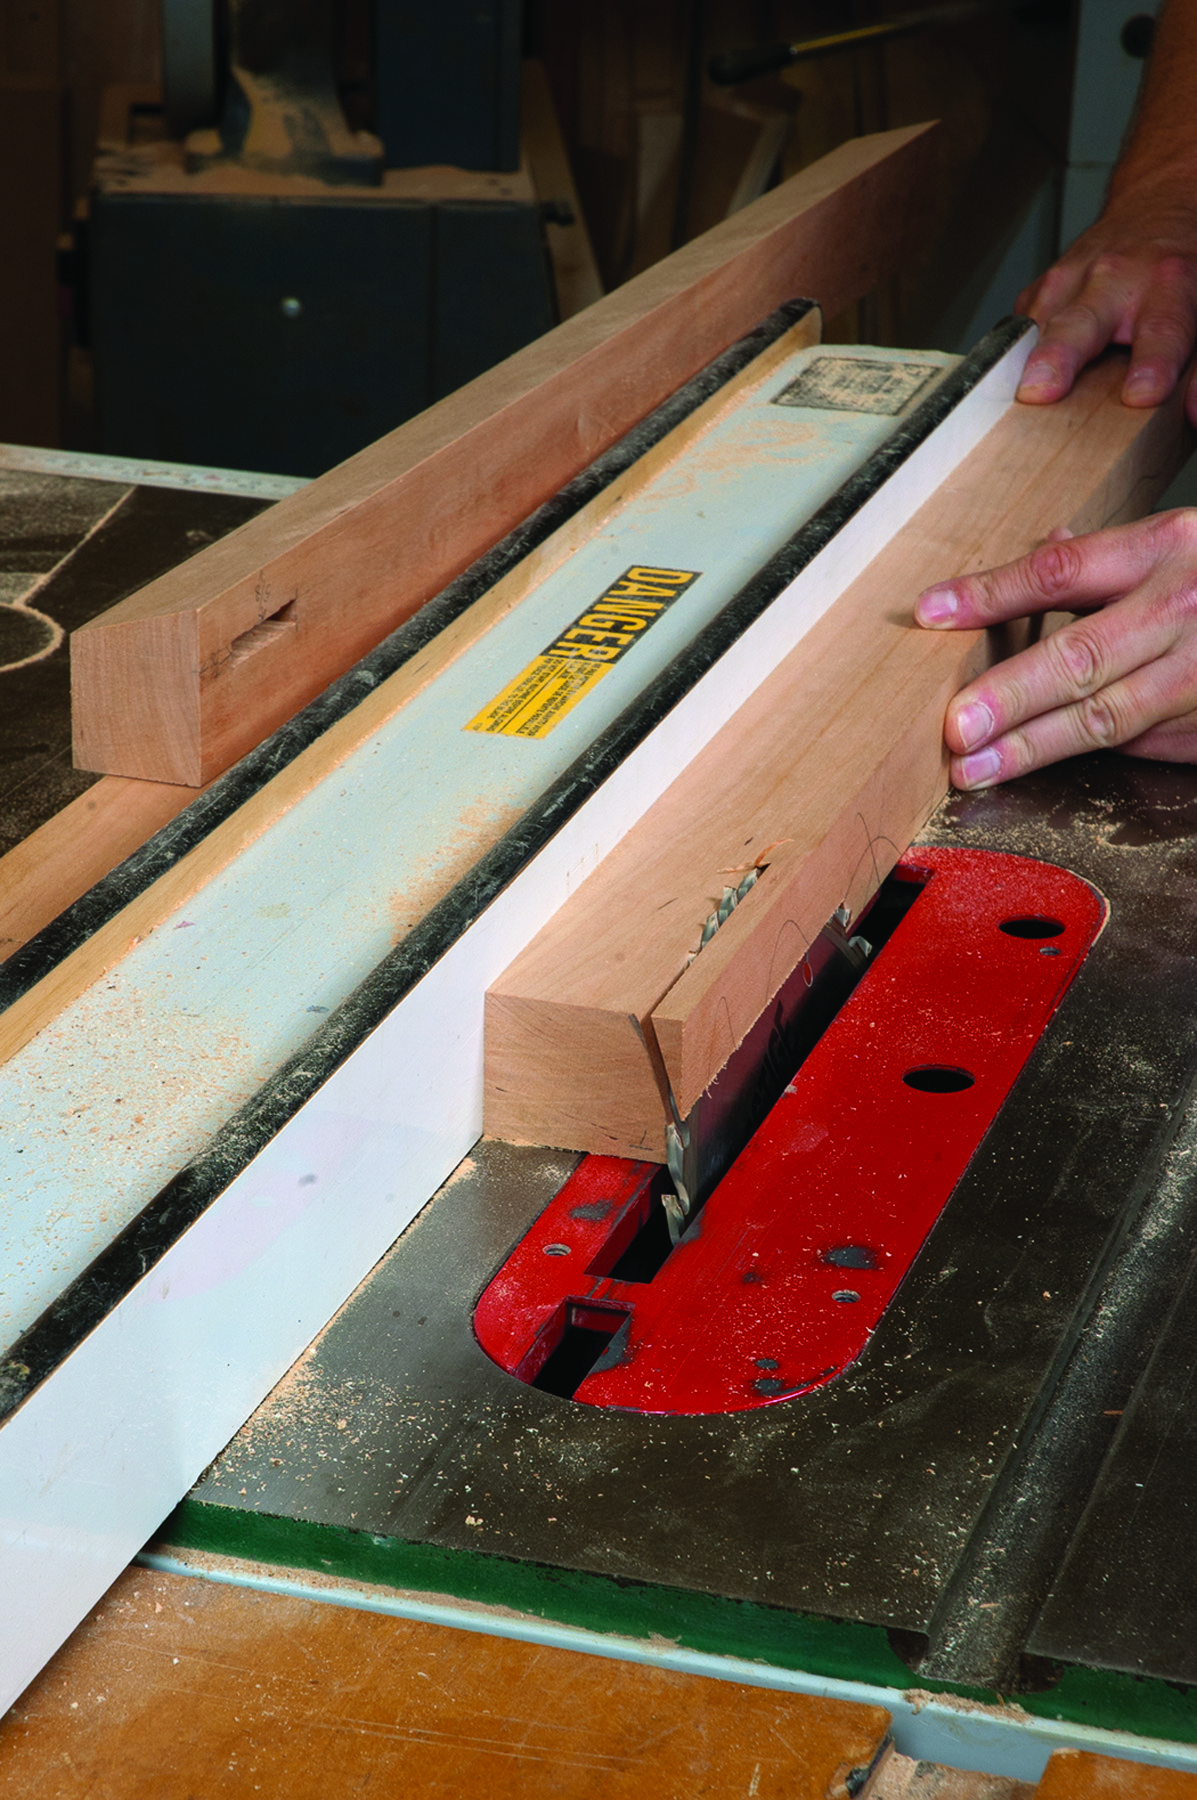
Rip an angle on the legs. Set your table saw blade to match the curve of the front apron and then rip the faces along their full length.
Note that the front legs of this table are cut from blanks that are wider front to back than side to side. Cutting an angle on the front of the front legs (shown on page 31) visually continues the curve of both the front apron and the tabletop. The process is simple but it lends refinement to the design. I then tapered the legs at the band saw and cleaned up the faces with a handplane.
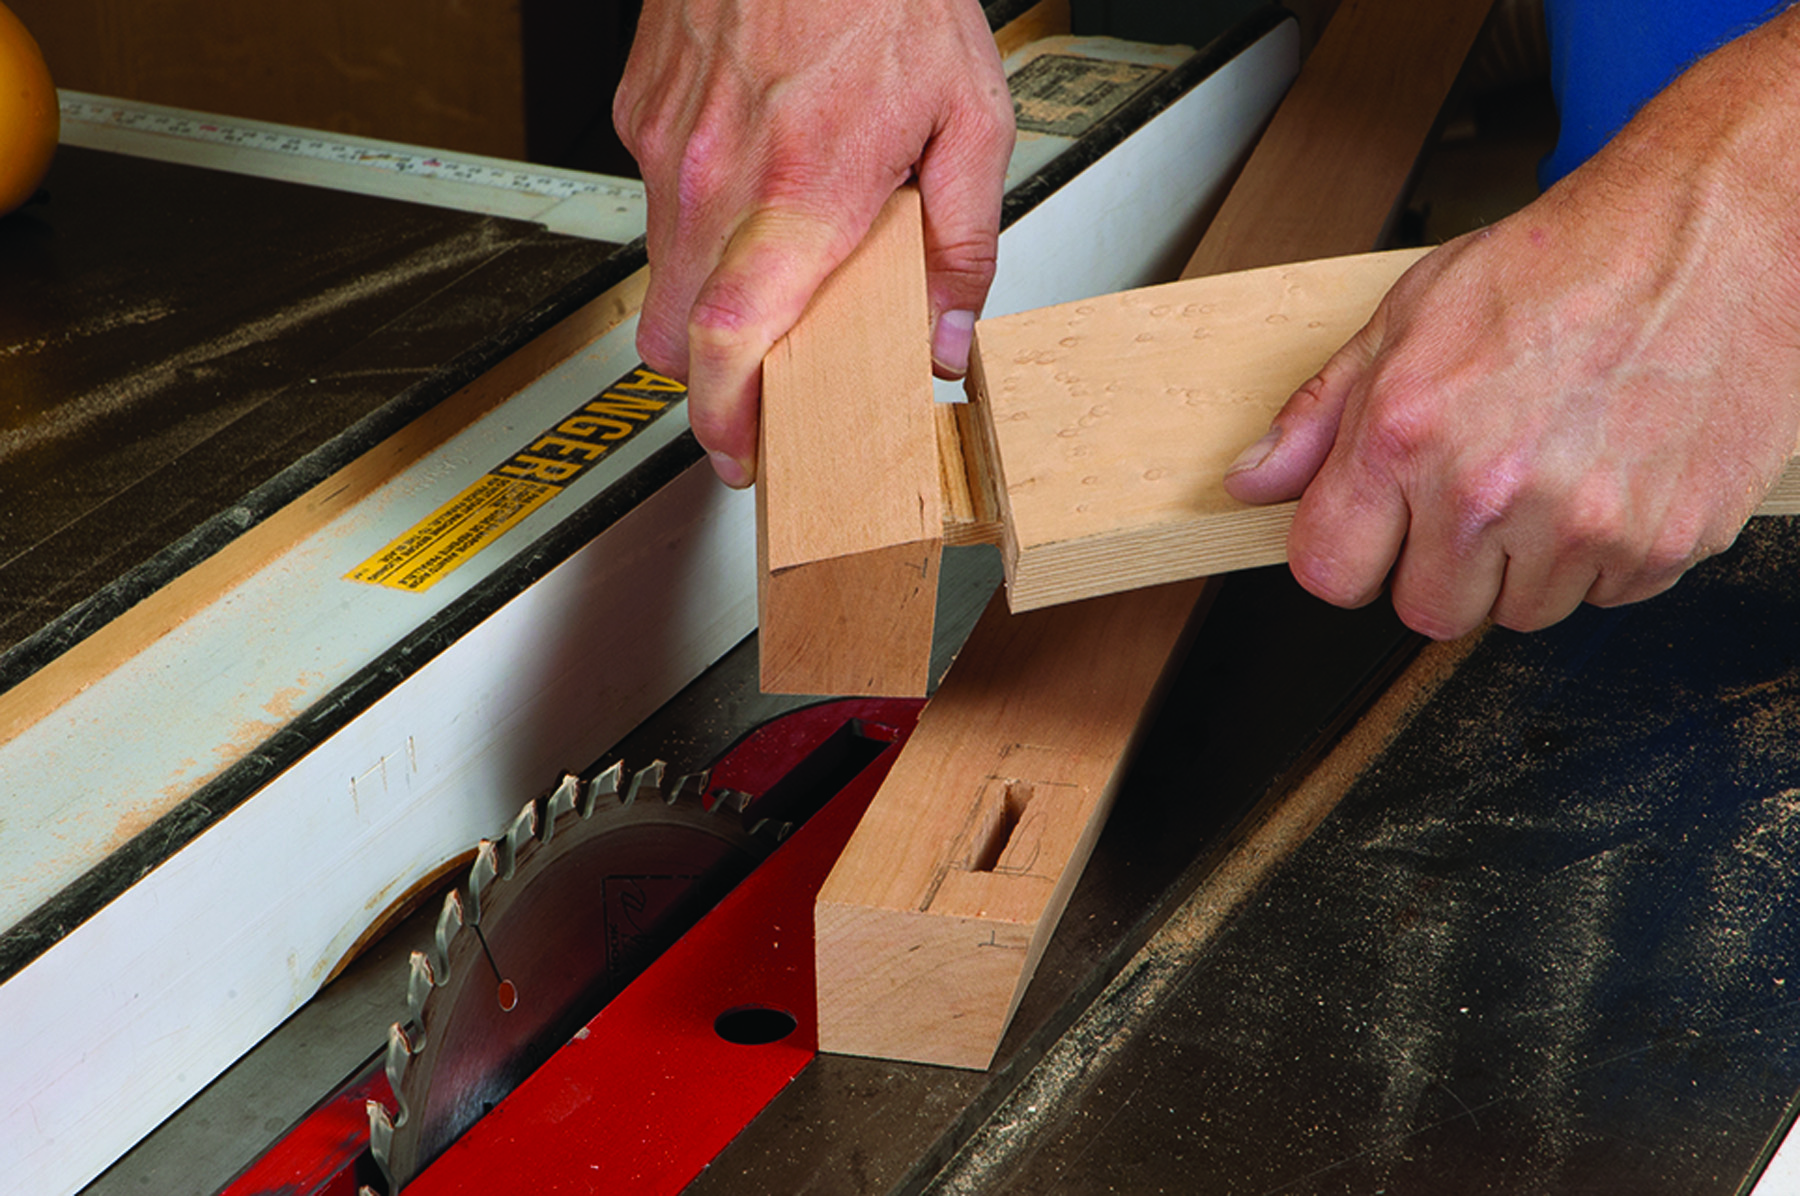
All in one plane. After the tenons are fitted and the legs are ripped at an angle, the front faces of the front legs match the curve of the front apron.
Building the balance of the base is pretty straightforward. I veneered the side apron and the false drawer front (both to solid maple) at the same time using the same vacuum set-up I used to make the curved front apron. The side and rear apron were tenoned at the table saw, but you can use whatever method you prefer.
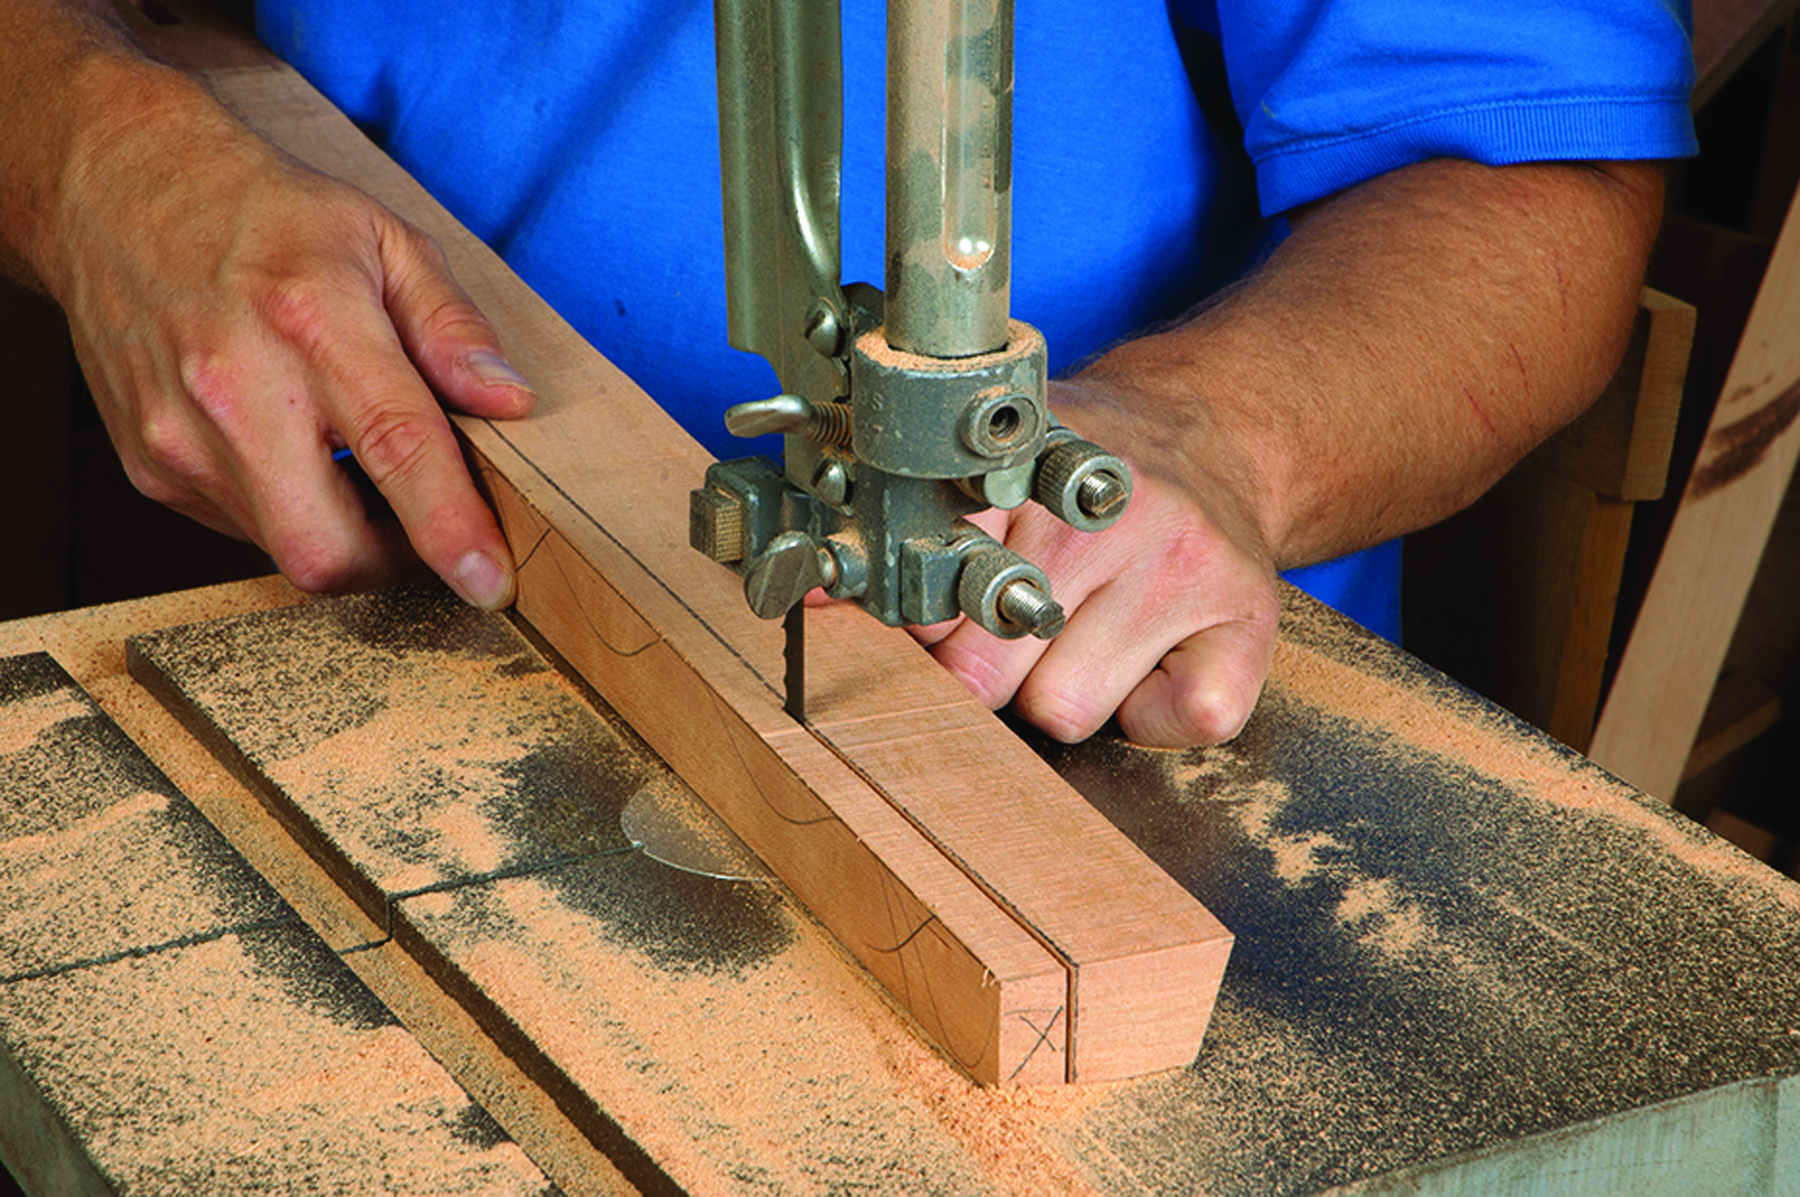
Taper the leg. Use the band saw to rip tapers on the two inside faces of the legs. Then clean up the faces using a handplane. Make sure your tapers stop at least 1⁄4″ below the aprons.
Ready the Table for the Drawer
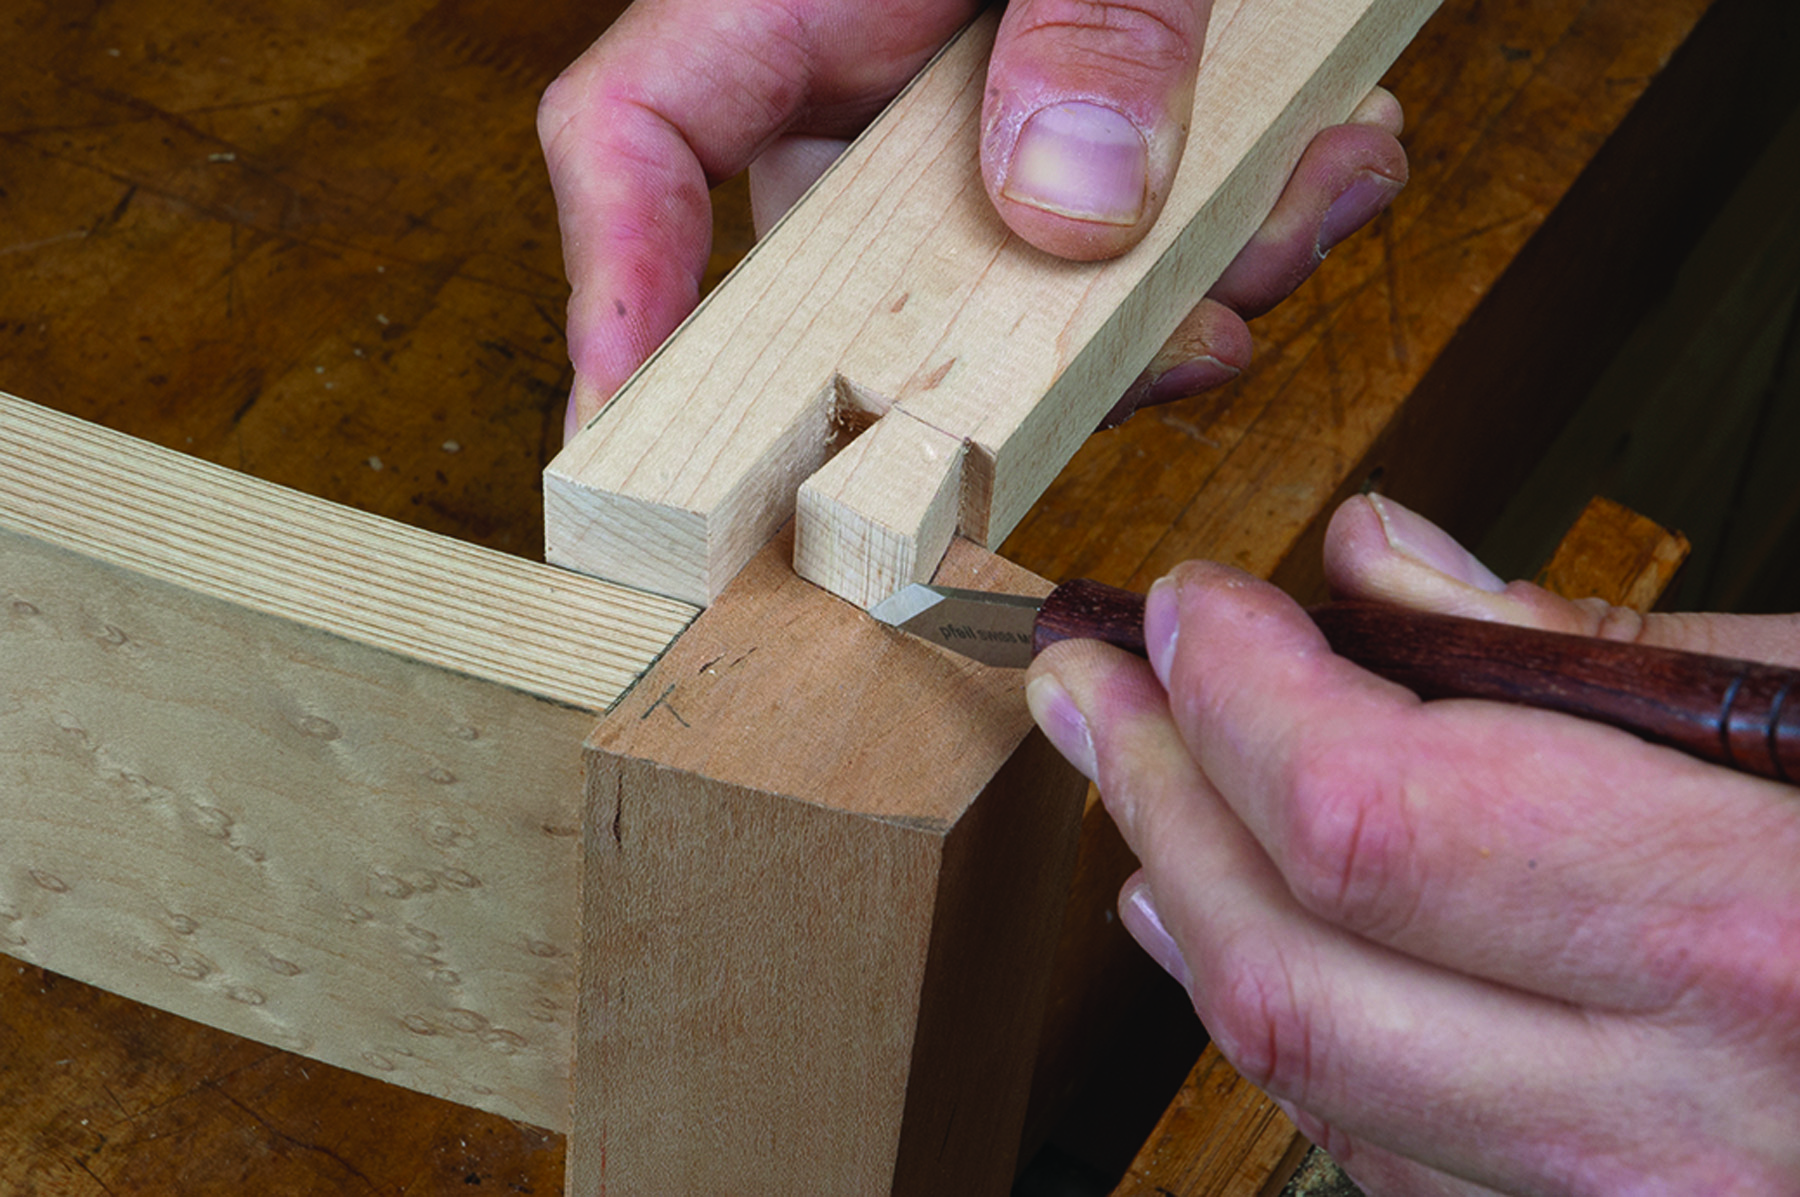
Mark the stretcher. The stretcher above the drawer is marked to length, notched and dovetailed. The dovetail is then transferred to the top of the leg. The bulk of the dovetail slot is routed out, then chiseled to fit.
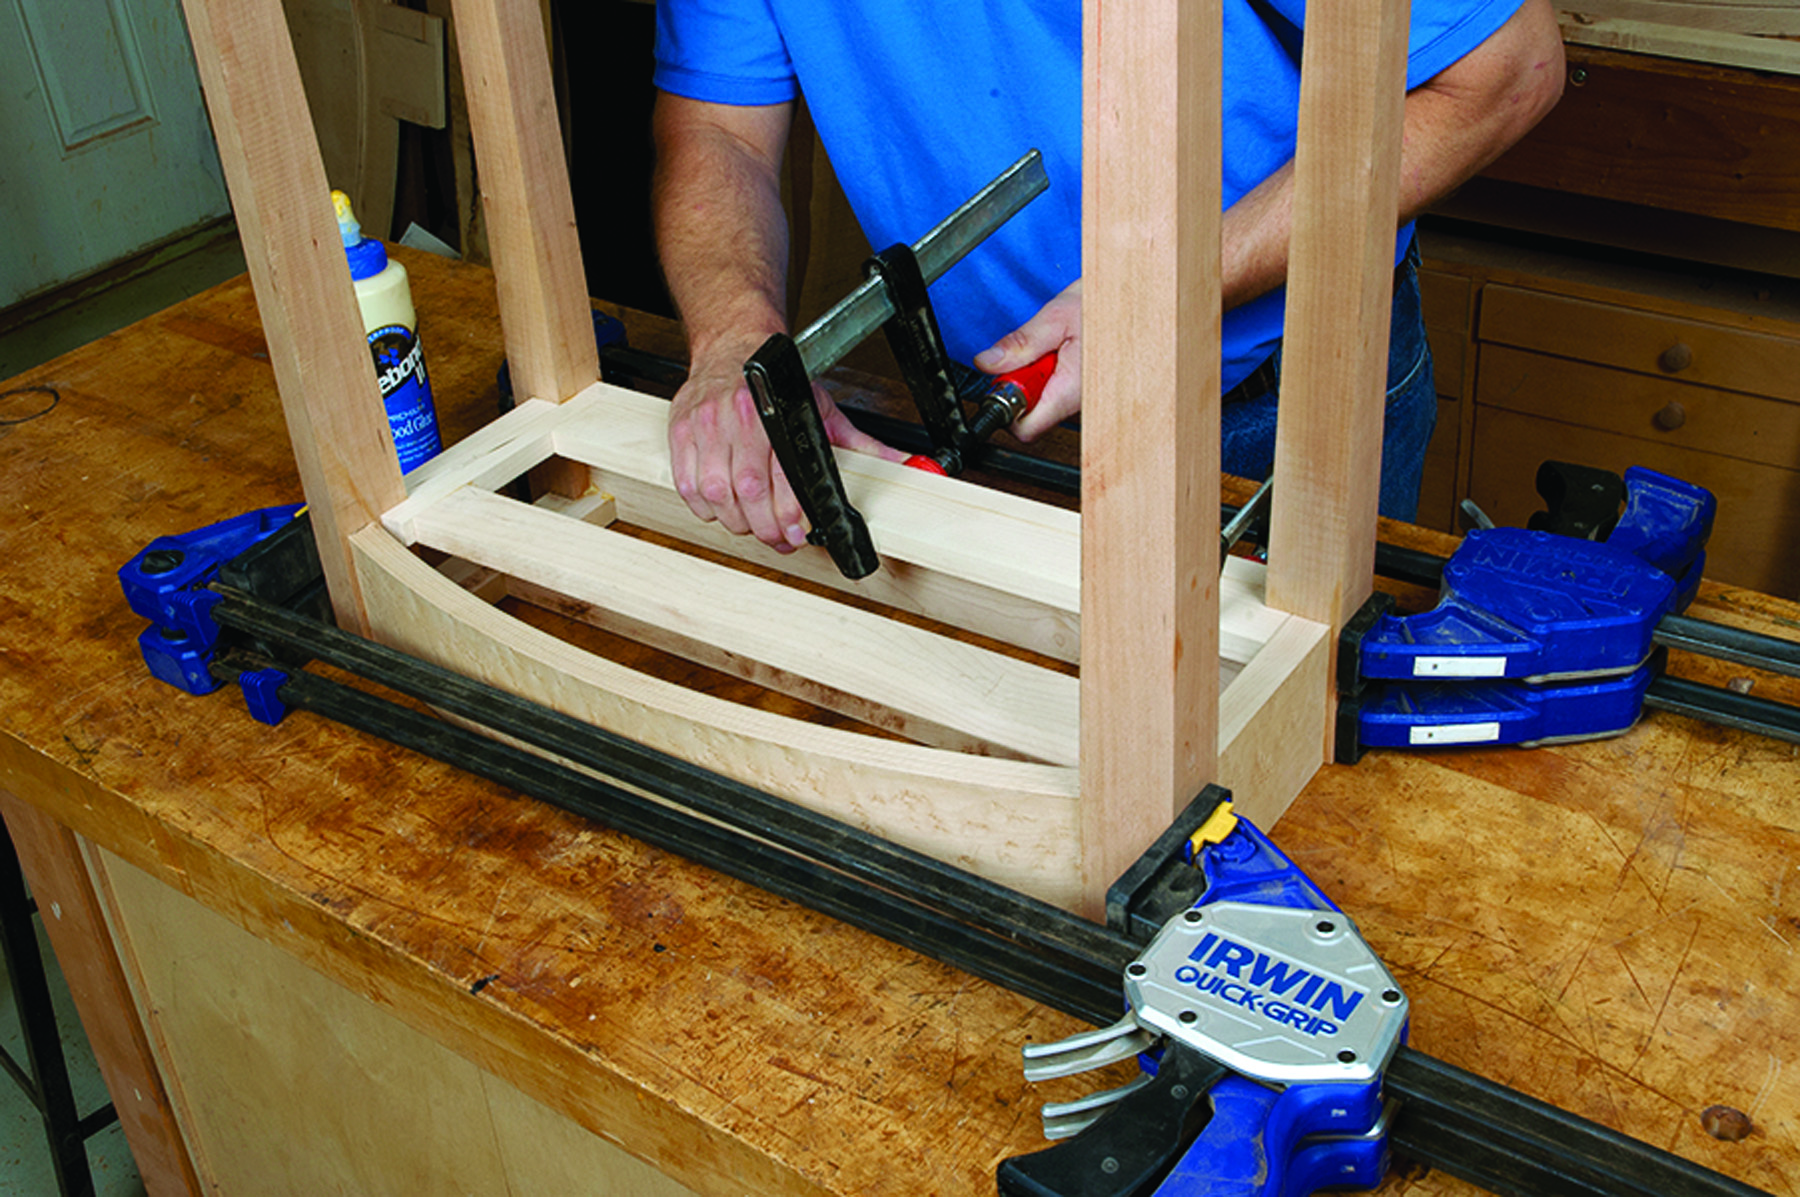
Glue it up. Clamp up the long aprons and add the drawer runners and kicker. Runners and the kicker are tenoned at both ends. The rear runner is also glued to the rear apron.
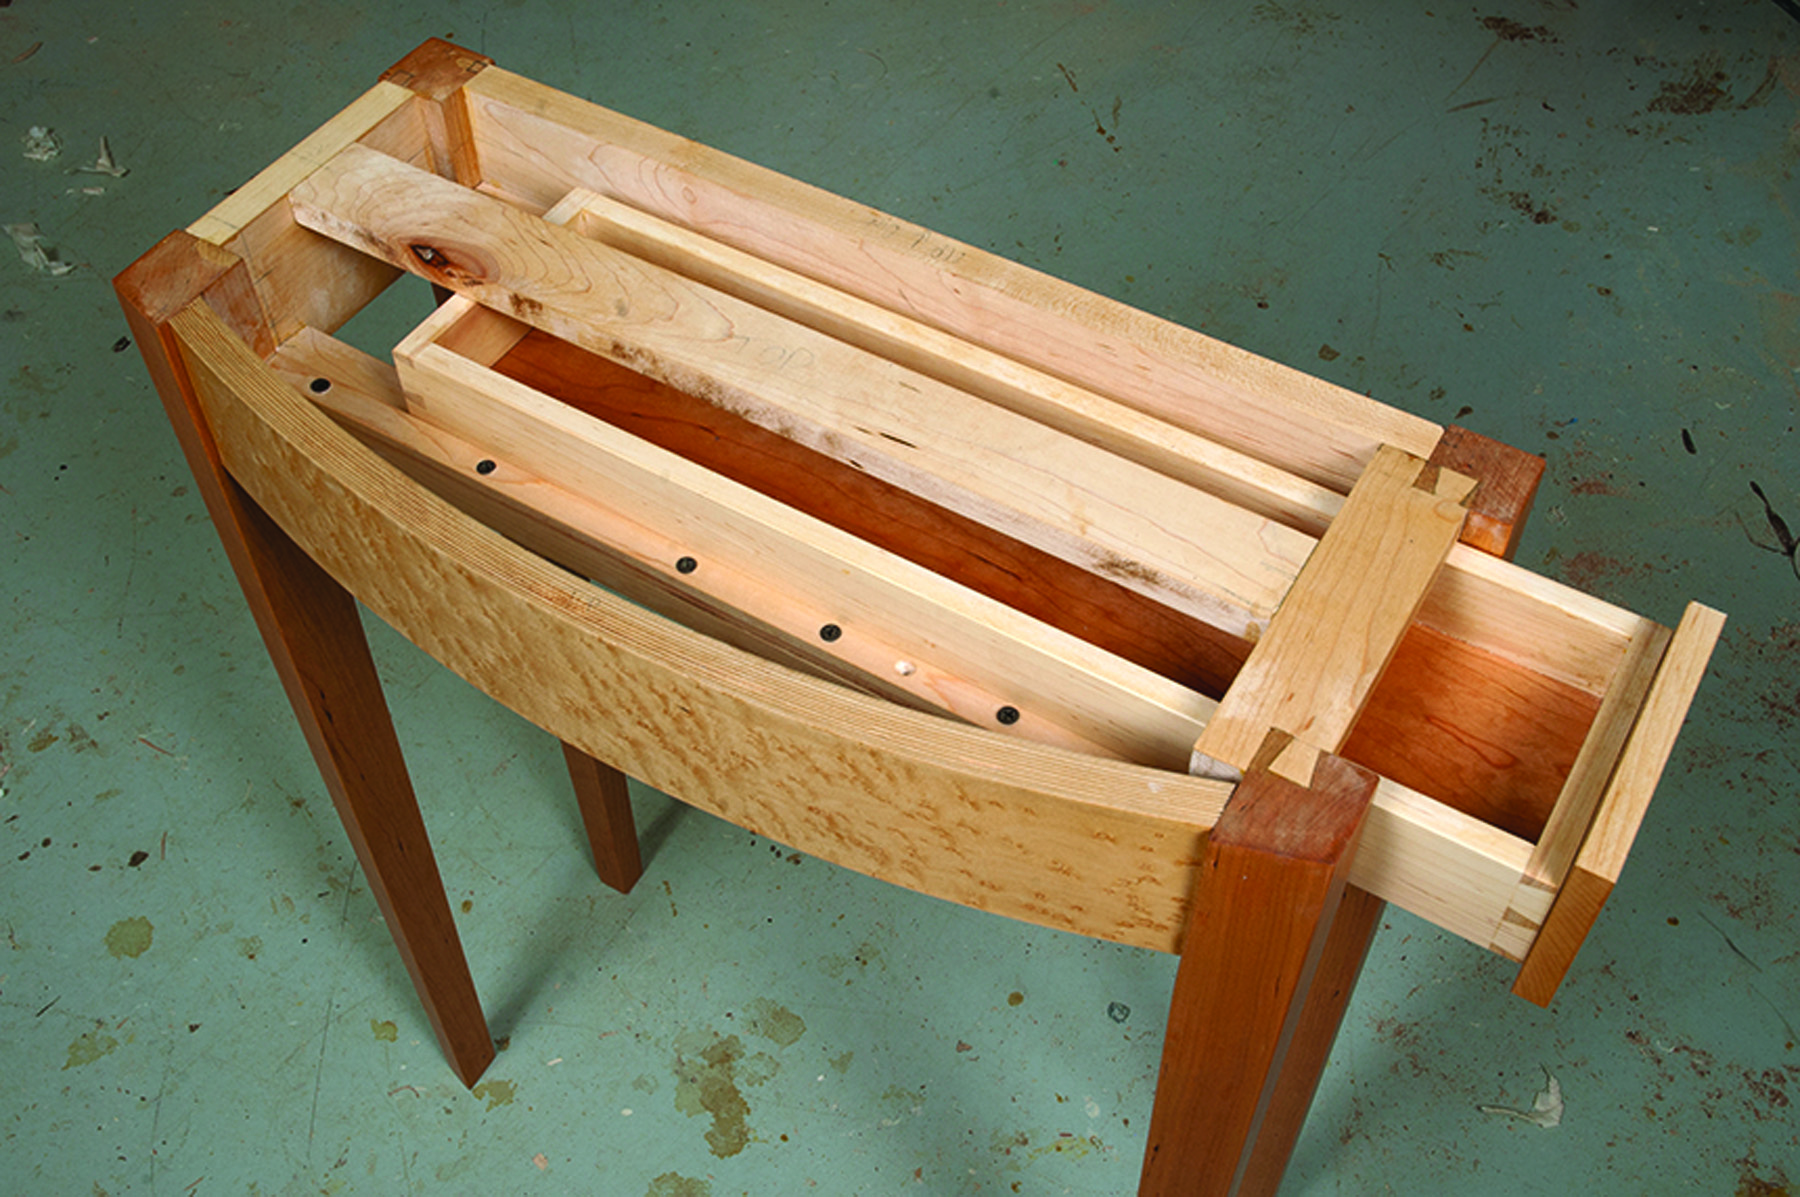
How the drawer works. The assembled base is outfitted with drawer runners, a kicker and guides. The false drawer front looks like an apron when the drawer is closed – you can’t even tell it’s there.
Assemble the Base
I’ve always thought that a table without a drawer, even if it has to be a small one, is a lost opportunity. Though drawers are traditionally placed at the front of a table, a drawer on the front of this table would be prone to racking and too short to find much use. That, plus the fact that I simply like the idea of a hidden drawer, led me to put a drawer on the end of this table. The drawer on my table is on the right end, but you could switch it to the left end if that makes more sense for the spot where your table will live.
The drawer itself is set in a fairly traditional drawer opening – it’s just sideways. A stretcher below the drawer is tenoned into the table legs and wraps around the legs. The stretcher above the drawer also wraps around the legs but is secured to the legs from above with a single dovetail. If you’ve never used this technique, it’s much easier than you might imagine. Just cut the tails on the stretcher and then knife the outline of the dovetail directly onto the table leg. To get a flat bottom on the dovetailed slot in the legs I use a 1⁄8” straight bit to rout out the bulk of the waste. Then I fine-tune the dovetail slot with chisels.
Before assembling the base, cut small mortises (mine are 3⁄16” thick) on the upper and lower drawer stretchers, as well as on the side apron, to accept tenons cut on the ends of the drawer runners and kicker.
After a quick dry-fit, you’re ready to glue up the sides. When the glue has had time to cure, do another thorough dry-fit to make sure that the joints on the front and back apron close up completely. Once you’re satisfied with the fit, glue the front and rear apron, as well as the runners and kicker, to the assembled sides.
Bow-front Entry Table Cut List
No. Item Dimensions (inches) Material t w l
❏ 1 Front apron face 1⁄16 37⁄16 195⁄8 Bird’s-eye maple veneer*
❏ 12 Front apron cores 1⁄16 37⁄16 213⁄8 Veneer*, 3⁄4” TBE**
❏ 1 Side apron core 3⁄4 37⁄16 63⁄4 Maple, VBS†, 3⁄4“ TBE**
❏ 1 Rear apron 3⁄4 37⁄16 21 Maple, 3⁄4” TBE**
❏ 1 False drawer front 1⁄2 37⁄16 51⁄4 Maple, VBS†
❏ 2 Front legs 15⁄8 21⁄8 301⁄4 Cherry
❏ 2 Rear legs 15⁄8 15⁄8 301⁄4 Cherry
❏ 1 Upper drawer stretcher 5⁄8 15⁄8 65⁄8 Maple
❏ 1 Lower drawer stretcher 5⁄8 15⁄8 65⁄8 Maple
❏ 1 Tabletop panel 3⁄8 87⁄8 207⁄8 MDF*, VBS†, RBE‡
❏ 1 Tabletop frame rear 3⁄4 2 24 Cherry
❏ 2 Tabletop frame sides 3⁄4 2 91⁄2 Cherry
❏ 1 Tabletop frame front 3⁄4 4+ 24 Cherry*
❏ 2 Drawer runners 5⁄8 11⁄2 205⁄8 Maple, TBE**
❏ 2 Drawer guides 5⁄8 5⁄8 191⁄2 Maple
❏ 1 Drawer kicker 5⁄8 11⁄2 205⁄8 Maple, TBE**
❏ 2 Drawer side 1⁄2 23⁄16 201⁄2 Maple
❏ 1 Drawer back 1⁄2 23⁄16 51⁄4 Maple
❏ 1 Drawer front 1⁄2 23⁄16 51⁄4 Maple
❏ 1 Drawer bottom 3⁄8 45⁄8 197⁄8 Cherry
* Cut oversize to match layout, trim to final dimensions ** TBE=Tenon both ends
† VBS=Veneer both sides ‡ RBE=Rabbet bottom edge to fit groove in frame
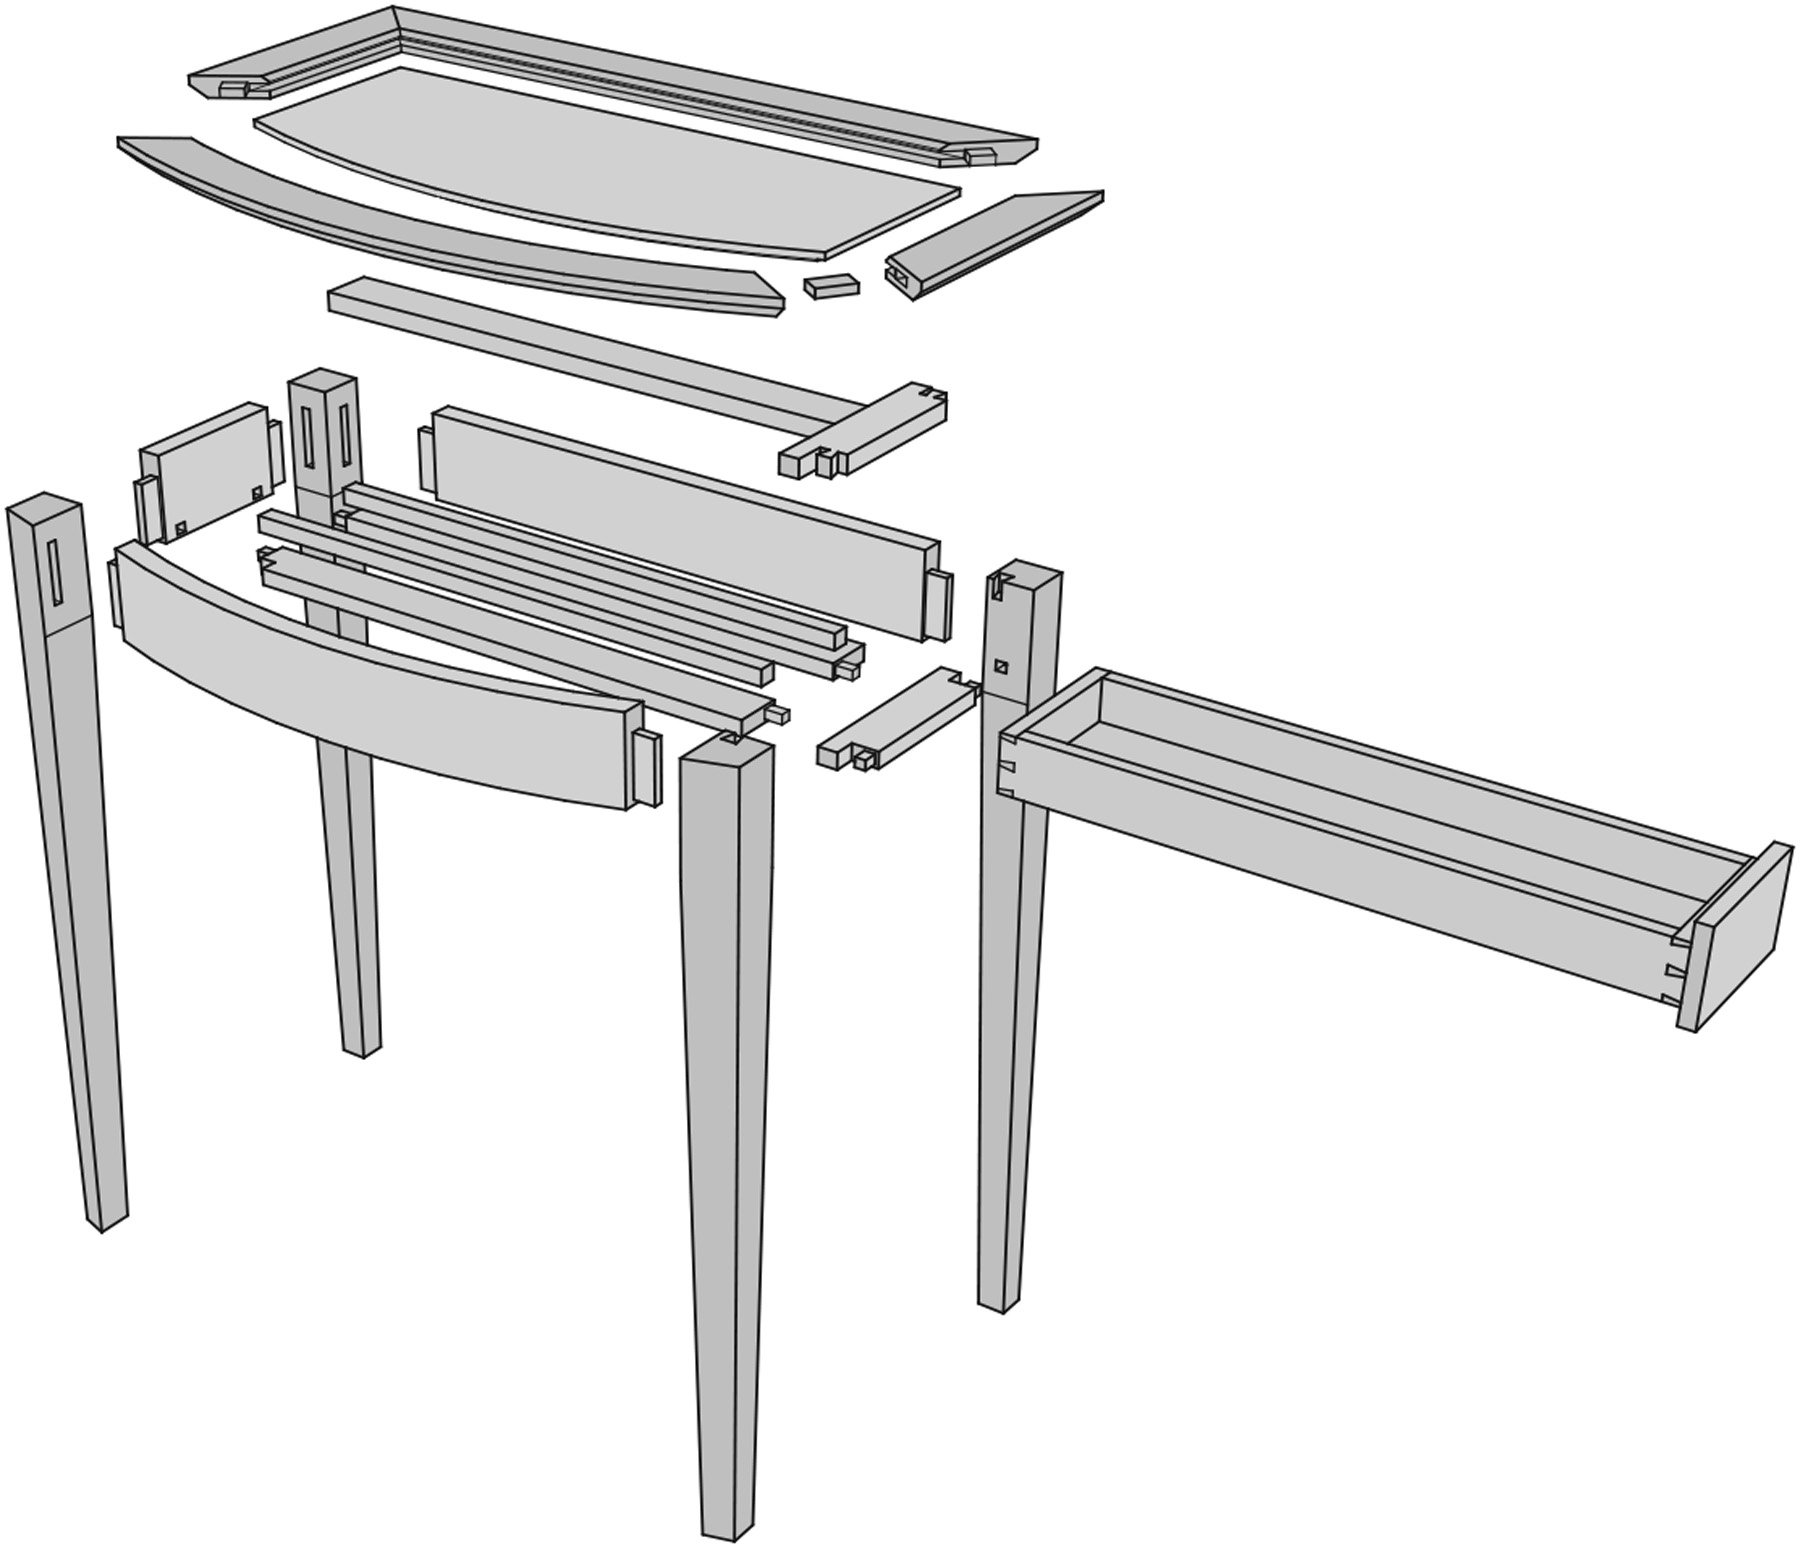
Exploded View
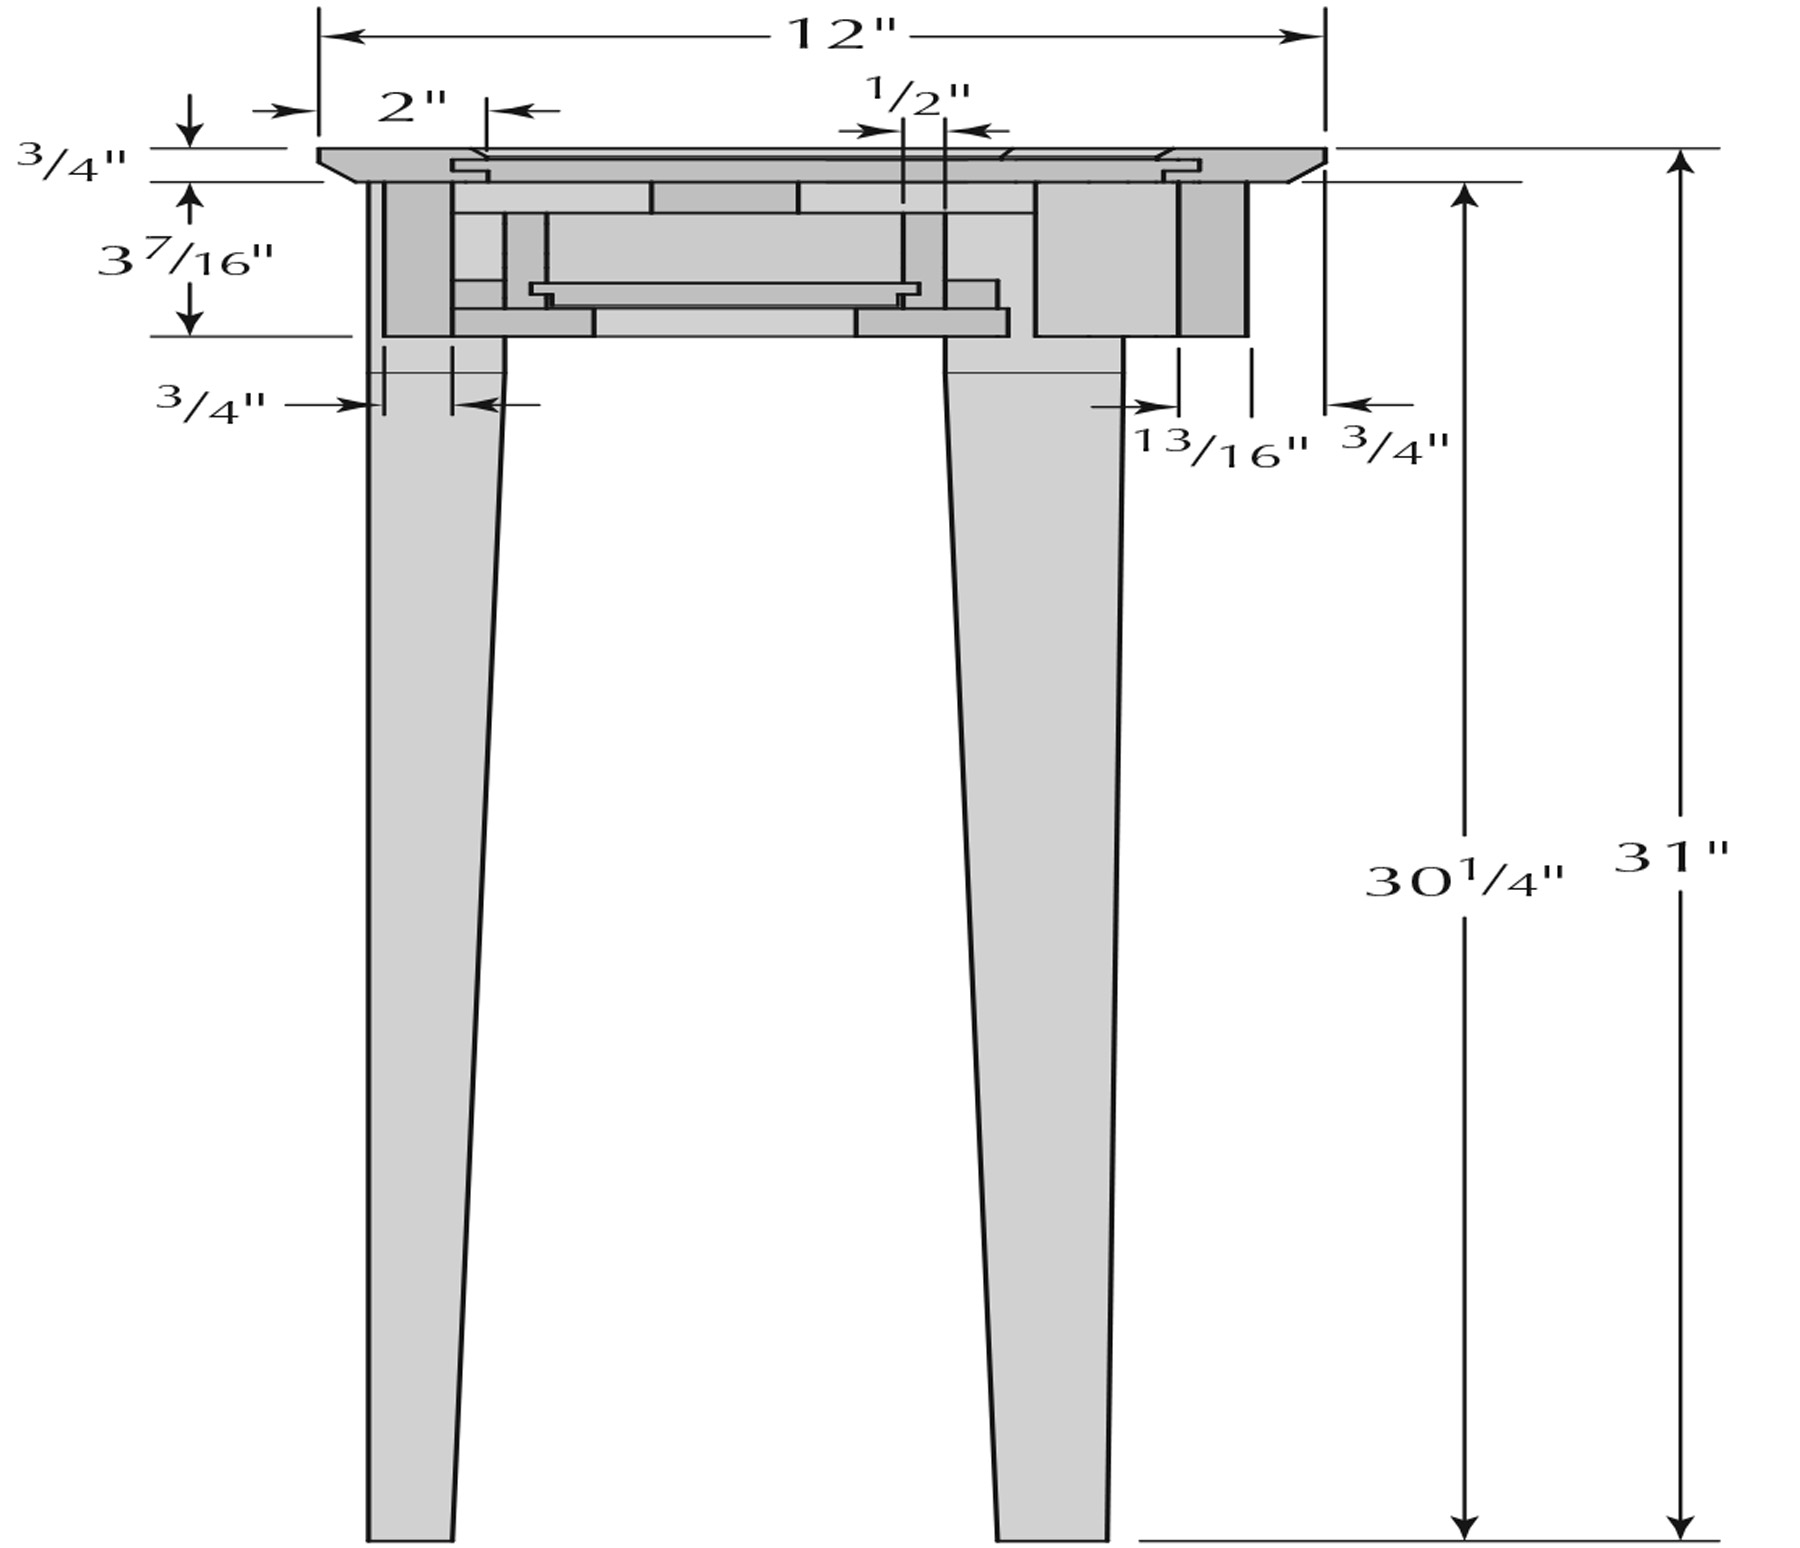
Section View
Build the Tabletop
I used a mitered frame on the perimeter of the tabletop because the look fits the contemporary feel of this design. I typically reinforce my miters with splines or keys, but for a sleeker, cleaner look I used loose tenons to join this frame. When choosing stock for the cherry frame, look for straight grain for the straight pieces and use a piece with arched grain to match the curve on the front piece of the frame. Start by cutting the three straight parts of the frame to size. Leave the front piece of the frame oversized and square at this point – it makes cutting the angle on the end much easier.
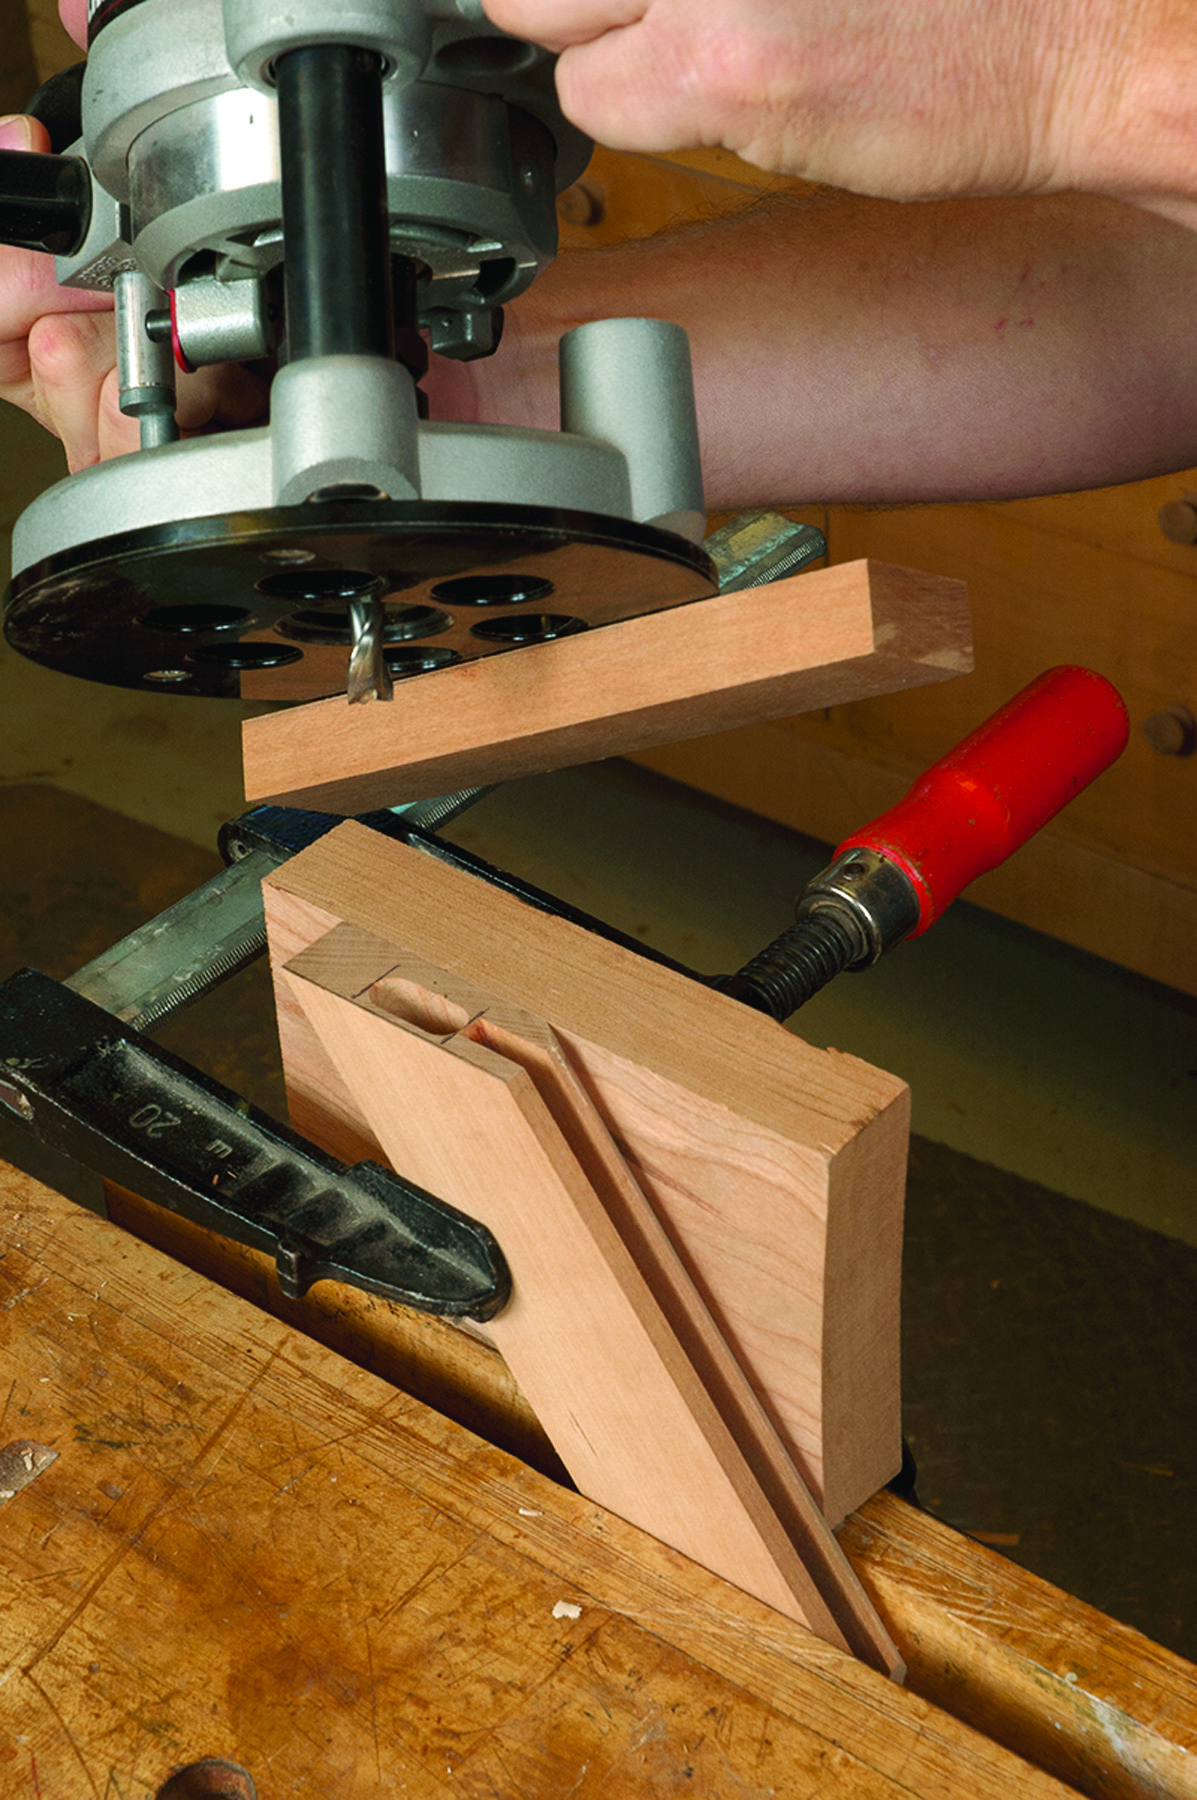
Mortised frame. Clamp scrap stock flush to the ends of the frame members to steady the router and use double-sided tape to a guide fence on your router base. Then take plunge cuts until you reach full mortise depth.
The joints at the back of the tabletop are mitered at 45°, which can be done at the table saw or on your miter saw. The angle on the front joints can be pulled off the full-sized drawing using a bevel gauge and transferring the angle to your table saw or miter saw.
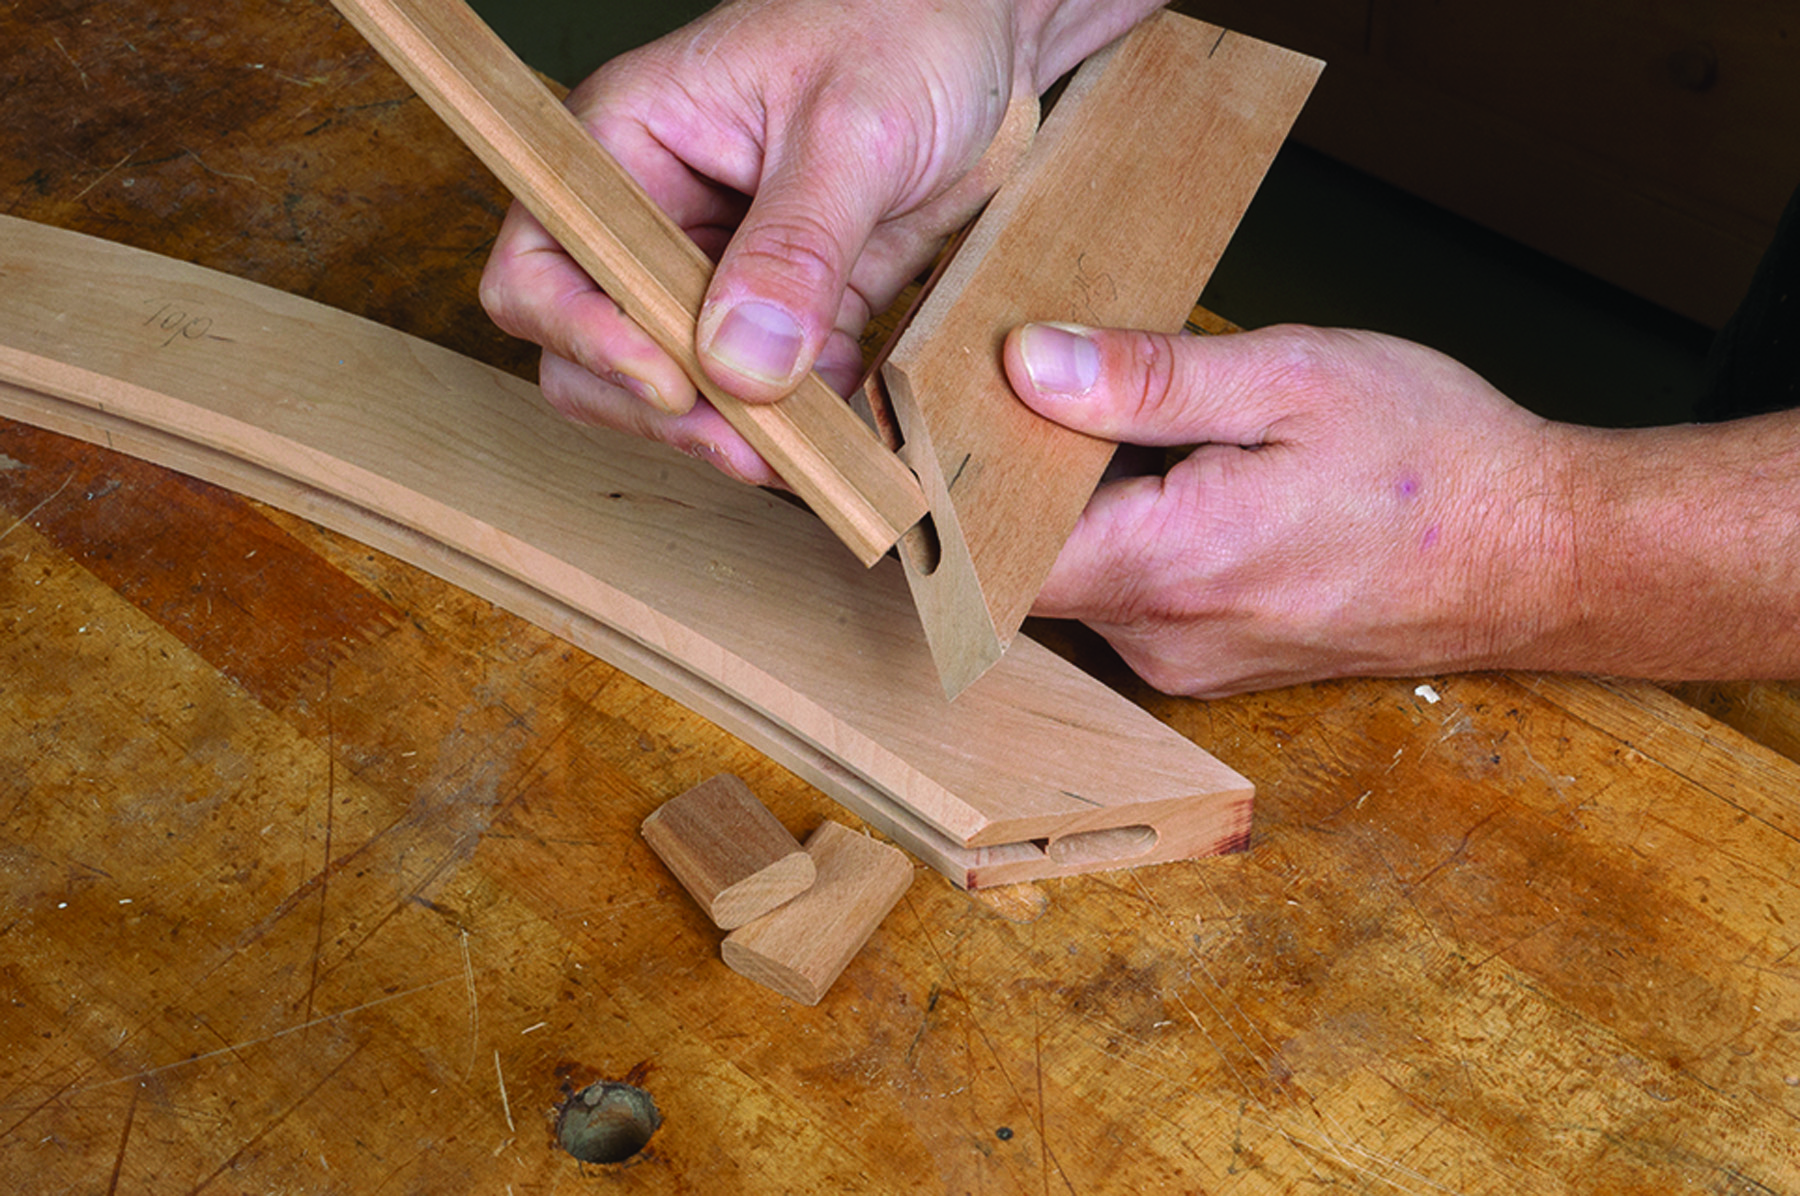
Loose tenons. Plane and rip stock to fit the mortises in the frame members of the tabletop. Then round over the edges at the router table and trim the tenons to length.
Before moving on, take time to test the fit of all the joints and make sure they close completely. To tweak them for a perfect fit I use a piece of sandpaper glued to a flat scrap of wood. Once you’re satisfied with the fit, band saw and fair the curve on the front piece.
To mortise for the loose tenons I used a plunge router outfitted with a straight bit and guide fence, as shown above. Place the mortises so that the joints won’t poke through the edges of the frame or panel groove. Once the mortises are done, cut the loose tenons to thickness and width at the table saw. Then round over the edges and cut them to length. To house the bird’s-eye maple panel in the tabletop, use the router table to mill a 1⁄4“-wide x 1⁄2“-deep groove centered on the inside edges of all four frame members. On the inner top edges of the frame pieces, mill a 3⁄16” x 3⁄16” chamfer.
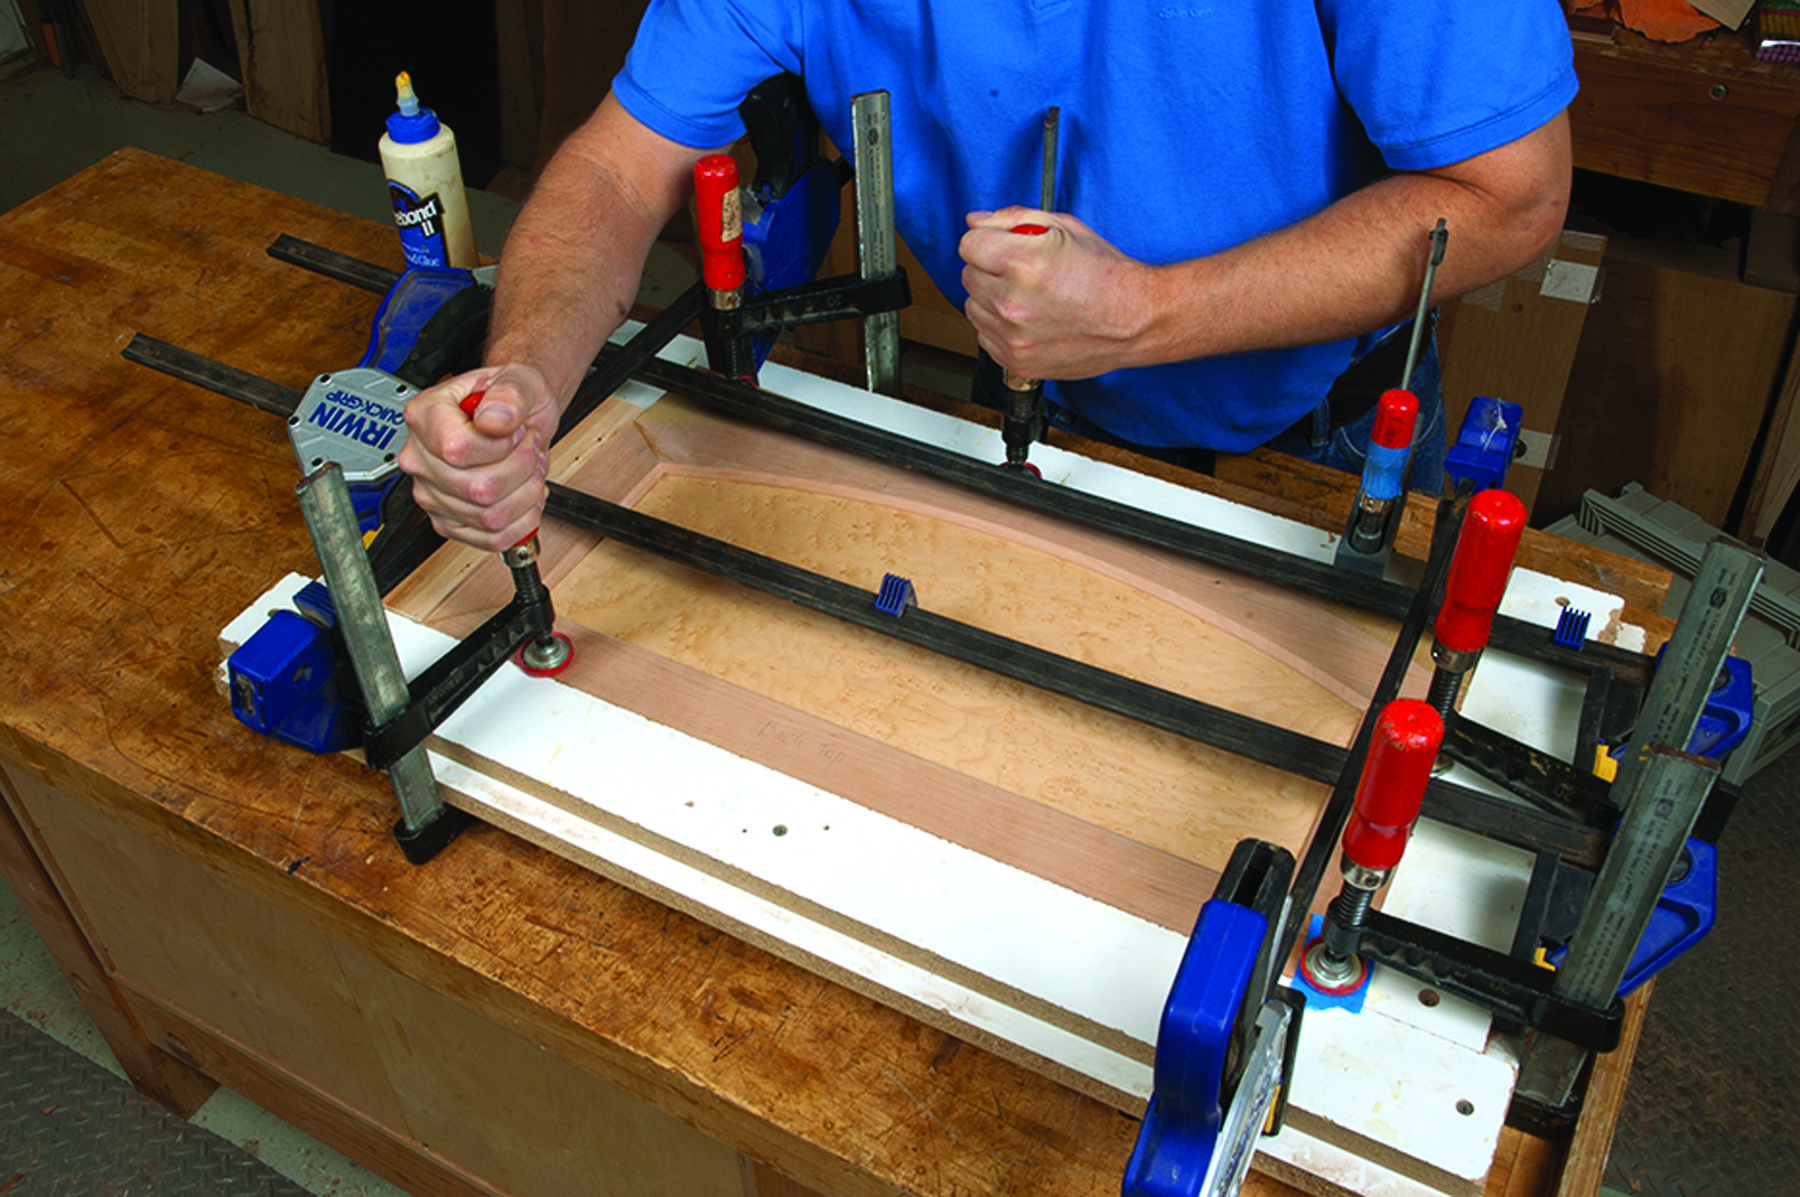
Tabletop glue-up. To make sure the tabletop goes together square and flat, use a quickly made and self-squaring assembly jig that allows you to register two adjacent sides off of right-angle guides.
Having glued up the curved front apron, veneering the flat panel is easy. I used the same vacuum bag set-up and used bird’s-eye maple veneer on the top and plain maple veneer on the bottom. For the core of my panel, I used 3⁄8” MDF because I had it on hand, but a quality plywood would work, too.
Rabbet the bottom edge of the panel. Before you glue up the top, apply a few coats of finish to the panel. I like to glue up tabletops or any flat assembly on an assembly jig made from a piece of 3⁄4“-thick melamine to which I’ve screwed two guide boards at a right angle. After applying glue, I butt adjacent flat frame parts against the guide boards. For the curved front piece of the frame I cut a few scraps to match the curve. Once clamps are applied to close up the joint, make sure the tabletop is flat to the melamine. If it’s not, add a few clamps to hold it down.
To give the table a lighter feel and a sense of lift. I routed a 3⁄8” x 3⁄8” chamfer on the bottom edge of the top.
Add a Drawer & Finish
The drawer can be made in whatever fashion you prefer. I dovetailed a simple maple box and installed a cherry drawer bottom just to add a little contrast. Once the drawer is built and fitted, using a false drawer front allows you to size it for a piston-tight fit between the legs.
I routed a cove on the inside edge at the bottom of the false drawer front so I can reach underneath and open it easily. A nice touch for the hidden drawer would be a hidden locking mechanism, such as one of those that Charles Bender wrote about in his article “It’s a Secret” (Popular Woodworking Magazine, Nov. 2009, issue #179; you’ll find a link to that article in Online Extras).
Though I finished the panel on the tabletop prior to assembly, I still sand the frame and lay on a few more coats of Waterlox before attaching it to the base. Additional coats simply build the sheen and lend a little more protection. The base of this table got three coats of finish, and the top got about six. Before the final coat, I wet-sand the entire piece with #600-grit wet-dry sandpaper, apply a thick coat and then wipe it nearly dry after a few minutes.
To attach the top to the base, I screwed directly through the drawer kicker and into both the top panel and the sides of the tabletop frame. To allow the front and back of the tabletop to expand and contract just a little, I used figure-8 tabletop fasteners to secure it in place and prevent warping.
It’s a satisfying build and a handsome little table. The contrast of the cherry surrounding the bird’s-eye maple panel and aprons serves to highlight the beauty of the veneer. And the drawer is a nice surprise – one you can keep to yourself or show off to your friends.
Further Reading: Learn a quick method for dovetailing the upper drawer stretcher.
Here are some supplies and tools we find essential in our everyday work around the shop. We may receive a commission from sales referred by our links; however, we have carefully selected these products for their usefulness and quality.


